Quote:
Originally Posted by _Ogre

i'm still not sure what your trying to accomplish with the drywall/plaster
if you do get the plaster poured and pull the plug; what then?
if you fiberglass over the plaster plug the fiberglass will be too big to fit in the roof...<snip>
|
I want to blend the outer roof panel into the inner "perimeter" panel so the inside of the roof becomes a continuous mold. Then:
1) tape over the mold.
2) apply 'glass and build to thickness.
3) take 'glass panel out, then rip out the plaster and the rest of the tape.
You're right that there will be a gap between the inside of the roof and the new panel. I plan to install little "top hats" (standoffs) to the roof after the plaster is removed, and hold the new panel to them using velcro. I may use j-mold on the outside of the new panel, or not, depending on how well the velcro works. Of course, the new panel will be held in bu the sunvisor brackets and dome light to prevent catastrophic failure during the driving experience! The use of the standoffs will position the top at exactly the same location in which it was formed (he said).
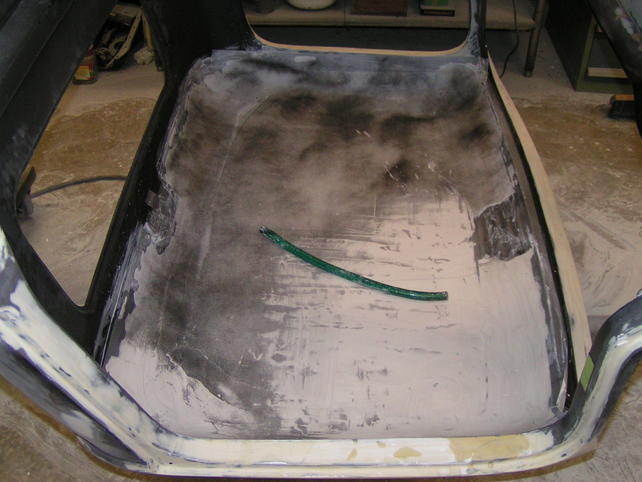
Here's a picture of the progress. I'm in the process of erasing the black guide coat. It took about 5 minutes to sand the white portion shown in the pic. Note the piece of garden hose. It's kind of tricky block sanding a concave panel, so I'm using the piece of hose and 220 grit wet-or-dry. For rough sanding I'm using an 80-grit drywall "sponge. No dust!
It appears to have worked. I've just applied the final (3rd) coat and will wet sand it in about 2 hours. I'll let it dry overnight, then tape it and 'glass it tomorrow.
Quote:
Originally Posted by _Ogre
<snip>...it helps to embed some reinforcement in the plaster
some wire mesh and a few handles will allow you to pull the plaster off...<snip>
|
Hmmm...too late for that. My plan is to just yank on the duct tape and off it comes. The plaster thickness is no more than 1/2" anywhere, and less than 1/4" in most places. I'll report back on how well that goes.
Quote:
Originally Posted by _Ogre
<snip>...using duct tape vs masking: masking tape comes off easier
sometimes even with proper waxing the tape comes off with the glass
you will probably destroy the glass before pulling the duct tape off...<snip>
|
Oh, that's good news! I tried a small 'glass test piece last night. It released well and the tape appeared almost unaffected. My mileage may vary on getting a big piece to release.
Quote:
Originally Posted by _Ogre
<snip>...i used a roller, once.
that was enough it took me longer to clean than the job, plus it pulled up the glass
i buy 2'' chip brushes from harbor fright, i cut half the bristle length off and stipple with these...<snip>
|
The trick to cleaning the roller is to keep it wet with acetone. I put the acetone in a small pan, roll the roller in it, then roll some resin, then acetone, etc. I've built 3 mid-year Corvettes that way with good results.
I will use the HF chip brush, especially in/near the corners. Cutting it off to stiffen it is a great idea!
Thanks again for all the help, Ogre! Your tips have contributed a lot to how I did other 'glass parts on the truck.