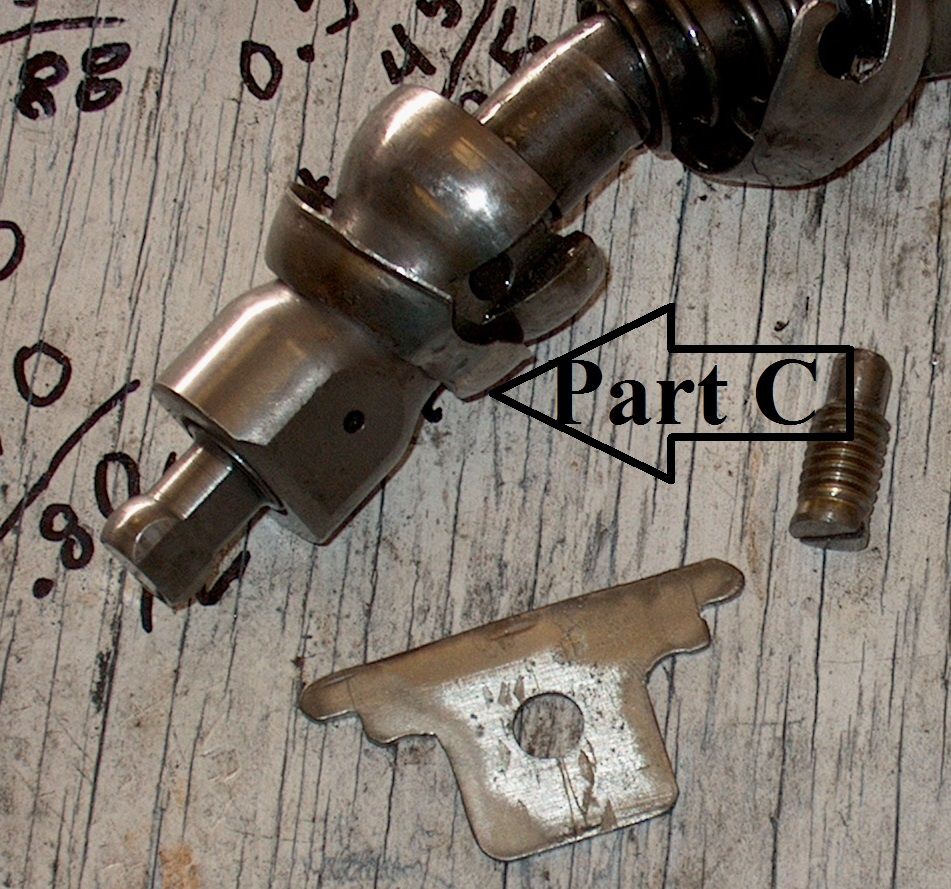
Now we can focus our attention on part C, the "cup". Granted the one I show you is in a rough stage of finish but I've since buffed it up and it looks good and performs well.
To make this part you'll have to find something made of stainless steel that is small and hemispherical. This is the only trick part of this project. After that, making the part isn't difficult. Don't bother to look in any automotive catalogs because it wont be in there.
However, If you go into the kitchen, you know that drawer where the wife keeps all the miscellaneous utensils like the apple corer, the potato peeler, etc... Yeah, that one. Open it and take a good look. Stainless steel everywhere. Now take a close look at her set of measuring spoons and ask yourself these questions: #1-are they stainless steel, #2-are they half-round and #3-does one of them look like a good match for the diameter of the shifter stub? If all three answers are yes then you have struck gold and won't have to make a trip to Walmart.
That's right, the stainless steel shim (cup) that's about to save you 400 dollars once lived its sedentary life as a 2 dollar measuring spoon. Haha! Now snag the spoon and take it to the garage, take your calipers and measure the inner diameter of the spoon and the outer diameter of the shifter stub where it meets the seat. Close? If not you might still have to make that trip. Once you have the appropriate size (and shape) stainless steel device, turn it in to something useful. Cut or grind the little handle off and file the area so it is smooth. Put it aside and go get your shifter stub. Stare at it. Anything happen? Ok so were going to have to cut a passage into the stainless steel hemisphere (sounds a lot better than "measuring spoon") which is the same shape as the bottom of the shifter stub.
Our only difficulty here is the bottom of the shifter stub is flat, and the "cup" is round. No worries. Find some masking tape at least as wide as the shifter stub. Take two or three pieces (a couple inches long) and laminate them together so you have one thick piece of tape (three layers).
Clean the shifter stub with acetone or alcohol so the tape will stick. Cut a hole in the center (close counts) of the tape strip you made so the end of the stub will just pass through.
Slide the tape over the end of the shift stub and carefully press the tape over the bottom of the stub so it sticks everywhere. Don't worry about the excess just apply it so it doesn't move then trim the shape of the shifter bottom.
Carefully remove the template you just made, being cautious that it doesn't stretch too much. carefully center this template on your stainless steel hemisphere. There are many ways to do this and at this point it just has to be close.
Mark the shape onto the hemisphere with a sharp tool (scribe) and cut it out with the abrasive tool of your choice, file, bench grinder, band saw... Then smooth the cut edges with a small file.
Try to slide your part over the shifter stub. If you have done you work accurately, it wont fit. But that's ok. Examine your part. Chances are it needs some "tuning" to bring the passage onto its actual center but it shouldn't be far off.
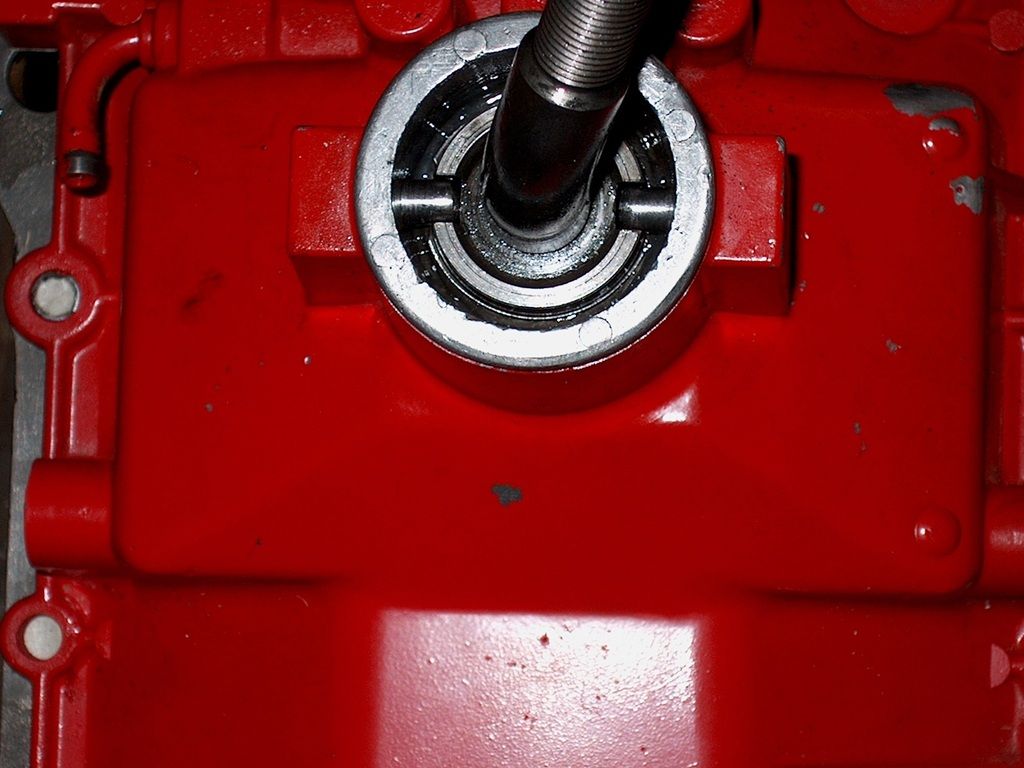
Grind or file the points of contact on the part so that the interference with the shifter stub is minimal and it tends to bring the passage closer to center. Keep working in this manner until the part slides smoothly over the shifter stub and cup rests against the matching surface of the stub. Again, it just needs to be a close fit but the closer it fits, the better it will work. Now look at this picture ...
Notice there is a small half-round relief in the edge of the cup for the pivot pins. There's nothing special about them except that they need to be roughly in line with the pivot pin channel cut into the shifter stub. This will help to limit the movement of the shim cup once the shifter is installed but still allow freedom of movement with the shifter.
Use a grinder or file and cut the two half round areas. Just gotta be close. A good estimate works but for greater accuracy just scribe their locations while holding the cup against the shifter stub seat area. You may note that the diameters of the cup and the shifter stub seat area differ slightly. If you used the right sized measuring spoon, this difference will be negligible but we're going to use that difference anyway. As long as its close (and it should be pretty close) then the slight difference is to our advantage.
At this point you should be able to try to install the shifter stub with the shim cup. It could be a real struggle and it may not even be possible to get it installed. That's because of the difference in radii between the seat in the top cover, the seat area on the shifter stub and the cup.
To install the cup correctly we're going to have to "seat" it.
Seating the shim cup will force it to conform to its new environment. Place the shifter stub and shim cup into their respective positions in the shift tower. Put the two pivot pins in and tighten them.
Don't try to depress the spring and lock the shifter stub. In fact, it's best if the spring and the upper parts aren't there at this time. They'll just be in the way so go ahead and remove them if you haven't already.
Now there is a nut that threads over the top of the shifter stub. Bring this nut to the top of the stub and make sure the nut is flush with the top of the stub. Place the top cover in your empty tans case.
We are preparing to strike this with a heavy hammer and do not want to ruin the threads. A small three pound sledge works great for this but it doesn't require much force. So with the stub in place between the pins and our cup in place where it will go and the nut protecting the stub threads, give the nut a fair blow. One should be all it takes.
Now try to lift the stub out of its hole. You may find that it gets caught on the cup and the cup gets caught on the pivot pins. This is a good thing. Just use a screw driver and back out the pivot pins. It means that the shim has flexed (seated). Your stub might just pull out easily and that is ok too. The shim cup probably seated but the passage you cut in the hemisphere may have been slightly larger than mine. That's fine as long as the shim cup seated.
How can we tell if the shim cup seated when the shifter stub slides out easily? Well, look again at the picture of the cup and your cup. In the picture, there are now two small dents in the cup, one on each side, just below the half-round relief you cut for the pivot pins. Those two indentations should be in you cup after seating.
They are made by the two small protrusions that are in the seat of the shift tower. Those two small protrusions are what prevented you from being able to install the shifter completely. Believe me when I tell you, it is a serious pain to try to install the shifter without seating the shim cup.
Now, if you had to back out the pivot pins to remove the shifter stub then the shim cup is sorta stuck on your stub. That's ok but who knows, that cup may have to be replaced some day. So though it might take a little force to remove your stainless steel shim cup, it'll come off and with a little filing it will fit like a custom made part. After all, that's what it is.
I would recommend a final filing/fitting so it works nicely. It isn't hard and you've gone this far. It's a nice touch. Put some trans fluid on your parts as lubricant and assemble/install your shifter. It will roll through the gear pattern smooth as silk, perhaps better than new. Don't forget to put some thread locker on the pivot pin threads. otherwise the shifting action will loosen them.