Okay, sure enough, I did the upgrade today and all worked perfectly. It makes it somewhat nice when both front and rear use mostly the same equipment.
I didn't take step by step pictures on this hub, but I decided I would write it up, and add pictures later.
Parts List
O'reilly part numbers:
H2508 - Left Drum Brake Self Adjuster Repair Kit $9.99 each (2 needed)
H2509 - Right Drum Brake Self Adjuster Repair Kit $8.49 each (2 needed)
H7017 - Front Drum Brake Hardware Kit $4.49 (1 needed)
H7018 - Rear Drum Brake Hardware Kit $4.29 (1 needed)
If you have a 3/8" hole on the rear shoe already, where the hold down spring goes, you don't need to change the brake shoes. If you don't have the 3/8" hole, you will want to change over to the newer '63-'72 brakes. Since I was changing shoes anyway, and although the 228 brakes that O'reilly sells are the same in every other way as the newer style 280 brakes, including the 3/8" hole, they had less friction surface, so I went with the newer style.
280 - Brake shoes $29.99 a pair (2 needed)
Total cost before tax: $105.72
Procedure
The reason you need the hardware kit isn't because your old hardware is worn out. It is because the old hardware uses two identical springs as tensioner springs at the top, where the self adjuster setup needs a bit shorter spring for the rear shoe. The old setup also has a shorter pin for the rear shoe hold down, and with the added hardware, you need a little longer pin.
1. Put the green spring with hooks on it from the hardware kit in the holes at the base of the shoes. (The one that holds the shoes together.) Make sure the long end goes toward the rear shoe. The rear shoe is the one with the longer friction surface. Make sure that the spring will not interfere with the adjuster wheel.
2. Insert the adjuster wheel mechanism where the old one went with the wheel toward the rear shoe and place the brakes around the hub.
3. Assemble the actuating lever and pivot plate so they will look as shown in the picture. (Picture is of the left side. Right side will be reversed.)
4. Put the lever and plate against the rear shoe and line up the hole with the hole in the shoe.
5. Insert the sleeve through the adjuster and brake shoe and insert the long pin through the backing plate, brake shoe, and adjuster.
6. Place the green spring without hooks narrow end first over the pin and secure it with the deep dish washer.
7. Find a short pin in the hardware kit, along with the yellow spring. The yellow spring and short pin are used to hold down the front shoe.
8. With a pair of vise grips, hold down the adjusting lever against the brake near the bottom of the shoe and install the heavy override spring from the adjuster kit.
9. Insert the little red return spring underneath the adjusting lever. This can be done before the adjuster is put in, but it can be inserted afterwards as well with only your fingers.
9. Connect the heavy wire link from the adjuster kit to the actuating lever and connect the black spring from the hardware kit from the rear shoe to the wire link, then connect the link to the top anchor pin.
10. Connect the gray spring between the front shoe and the top anchor pin.
When finished, your brakes should look like this:
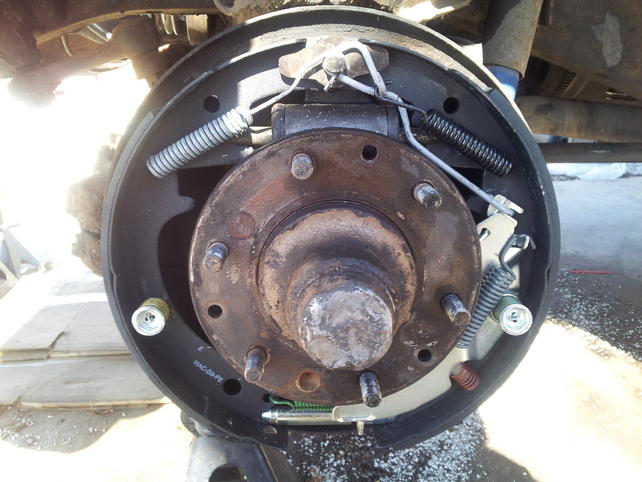
If you are doing a rear brake, there is the emergency brake hardware that is different, and the right brakes will look reverse of this.
11. Adjust the adjuster mechanism so that you have slight friction on the drum when you install it and turn it.
12. From the rear access hole, use a screwdriver to adjust the adjuster to just put tension on the drum to the point where it is difficult to spin by hand. Then back off the adjuster 6-8 clicks, or until you are just able to spin the drum again.
Do all four wheels, then you will want to drive in reverse up to maybe 10 mph, and step hard on the brakes. Do this several times, and all brakes should be adjusted properly and should stay adjusted as long as you drive in reverse once in a while.
All said, the job was really no more difficult than changing brakes.