I flushed the brakes for the 6th time on my Impala and the first time on my 2005 Silverado this weekend. I've tried to stay on a schedule of every 24 months or so since she was built on August 1st 2008 with the Impala. The first change was the swap over ATE SL.6 DOT4 in December of 2009.
My guess is the Pickup has the same Brake fluid the GM line workers installed in September of 2004. I didn't take a picture of the black Iron crud that settled on the bottom of the catch bottles nor did I take pictures of the operation. Sorry.
Why flush the brake fluid through? Two reasons and either one is a good reason to change the stuff on a regular basis. Both together is double that.
- Brake fluid attracts moisture from the air... 3% H20 will reduce the boiling point of your brake fluid by 100°F.
- Brake fluid has an anti-corrosion add pack as well that gets depleted over time. Brake lines over the last two decades were Ni-Copp or copper brazed steel tube. When the corrosion inhibitors break down the oxidized copper from the corroding brake lines can screw up the ABS motors.
The black crud granules in the bottom of the catch bottles I used to catch the flushed fluid on my recently acquired 2005 Silverado and the lack of the same from my 2009 Impala tells me I must be doing something right.
I NEVER bleed by pushing the pedal on a used master cylinder. The cup seals can get damaged by moving past a ridge in the bore into an area not traveled in normal operation. Not always but why tempt fate.
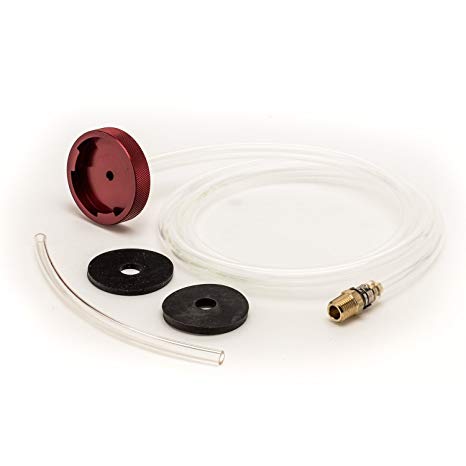
I bleed with a pressure pot. This is Eric O in Central New York State using a Brannick... Real nice simple easy to use tool but there's no way I'm spending $350 on one of those for my occasional use.
I built a weed sprayer pressure pot for under $20 when the parts were cheaper and the Motive pot was priced over $75;
You can find build instructions if you google it.
- 2 gallon weed sprayer.
- 0-30PSI 1/4"NPT pressure gauge.
- 1/4" NPT Male-Female 1/4turn pressure relief valve.
- Four large drinking straws.
- Small plastic bag that reaches more than 3/4 of the way up the sprayer pump.
- Rubber band.
- Isopropyl Alcohol for cleanup.
I just drilled through the plastic near the top of the sprayer with a 3/8" bit where I wanted the gauge and the valve. NPT threads are quite sharp. I pushed down and turned to thread the relief valve and gauge right into the plastic without a tap.
To avoid aerating the brake fluid I put a plastic bag over the end of the pump and slip the straws between the pump and the bag in several places with a rubber band to hold em in place. I throw out the plastic bag, straws and rubber band after one use.
I'm not the only one that decided to use a plastic bag and straws to avoid aeration and I don't feel like taking my cleaned up old sprayer back out of it's garbage bag home for pictures. Here's a post with pics of the other guys...
https://www.corvetteforum.com/forums...post1578587678
I prefer hoses and catch bottles but his method works.
I wouldn't build your own now with the Motive base priced as cheap as they are. You can get the Motive pressure pot from Summit now for about the same price as the parts to build a sprayer base now. It has a gauge, pressure relief valve, and non-aerating pump for $35.
https://www.summitracing.com/parts/m...8aAtWXEALw_wcB
Caps:
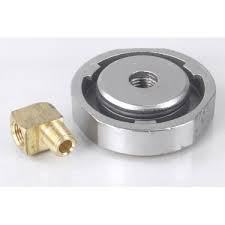
The Motive 1108 Nylon & 1118 Metal pressure caps seal to the top of the Master Cylinder neck. I have the 1118 cap and it leaks. I don't see how the 1108 wouldn't.
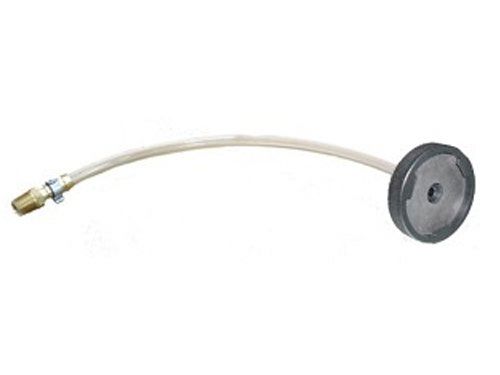
I have an SPX J-35589 that has an o-ring seal inside the filler neck. The J tool is metal but an injection molded reinforced nylon cap would likely work quite well as long as it had the provision for the O-ring seal slug inside the MC neck.
Stock SPX photo of bottom. You can see the O-ring seal slug that makes this cap much better.
My own well loved 35589 cap.

You can find em on Evilbay for around $30-$40. Be mindful of the Shysters that are selling the elbow.
https://www.ebay.com/sch/i.html?_fro...35589&_sacat=0
If you have a small lathe you could probably machine a slug to fit the MC neck with an o-ring groove to seal it. Drill and thread the centre 1/4NPT and keep it from blowing out by drilling a hole in a sacrificial GM Master Cylinder cap for the hose barb to poke through. Not as neat as the GM tool but pretty close and I bet it wouldn't leak.
The Brannick plug cap in Erics' video is a neat idea as well but I don't have one of those and I bet they ain't cheap.
With that in mind here is the rest of the list.
- SPX Kent Moore J-35589 master cylinder cap
- 1/4" NPT hose barb for the SPX cap
- 1/4" Clear fish tank hose for the master cylinder cap
- Clear fish tank hose to fit the bleeders
- four catch bottles. (1L or 2L soda bottles with two holes in the caps will work... one hole for the bleeder hose and one to vent)
Flush the old stuff out with the new stuff.
I usually suck out the Master with a turkey baster or big fluid swap syringe. Make sure the fluid suckers have been cleaned with Isopropyl alcohol and they're completely dry before you stick em in the Master Cylinder.
Then I re-fill the master with fresh fluid and hook up the pressure pot.
The GM service manual says 25PSI but I usually only run 20PSI.
Use a SIX POINT socket or box wrench on the bleeders.
I start opening the bleeders at the end of the longest run at the LR corner then the RR then the RF then the shortest line at the LF corner. You can go the other direction from short to long as well. Your choice. I like long to short. Just have a plan and stick to it. If your fluid is as dark as most folks you won't have any difficulty seeing the change from crap to fresh fluid.
The pedal feel and height is not good if you don't exercise the ABS motors. You have to run an ABS "Bleed" with a diagnostic tool after each bleed cycle to get your pedal feel and height back.
If the old fluid is exceptionally nasty, like mine was, I'd flush it a second time after exercising the ABS motors. You should exercise the ABS motors after each bleed cycle to re-set the pedal height and feel.
I changed my fluid to DOT4. Cue the guys telling me the world will now end...

With the possibility of towing I like to keep the boiling point of the brake fluid as high as possible.
I chose the DOT4 fluids that I use for that reason. Yes some DOT3 fluids have higher than minimum spec. They are not what I choose to use.
Minimum specs on Glycol based DOT brake fluids.
- DOT3 dry boiling point is 401°F. Wet is 284°F.
- DOT4 dry boiling point is 446°F. Wet is 311°F.
DOT4 is downward compatible with DOT3 systems but it's inadvisable to use DOT3 in DOT4 systems.
DO NOT USE DOT5 or DOT5.1 in DOT3 or DOT4 braking systems. DOT5.1 is glycol based but
supposedly it's not backward compatible. Not easy to find either.
ATE and Pentosin brake fluid comes in metal cans. It may not be a big deal but the brake fluid in metal cans always tests to 0% H20 contamination and that gives me warm fuzzies.
I run Pentosin LV DOT4 or ATE SL.6 DOT4 in my vehicles. It has boiling points much higher than the bare minimums. Closer to DOT5.1 specs without being difficult to purchase while remaining compatible with the bits in my system that were designed for DOT3.
The SL.6 & LV variants have a lower viscosity index for the frozen North country too.
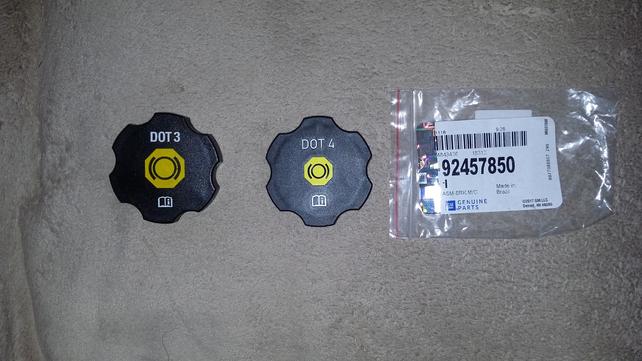
You can get a GM cap that correctly reflects the system contents.
April 16, 2019 GM price on the 92457850 DOT4 cap was $4.98 at my local Chevy dealer.
Old cap on the Left New on the Right with GM # for new.
Installed on my Master Cylinder.

Last and not least. Bleeders... Two things that will save a lot of grief the next time you have to service these.
- Remove the bleed screws completely and coat the threads with NeverSieze.
- Install or re-install the rubber bleeder caps or condoms or whatever you would like to call em. Keeping the water, salt, and general road crud out of the core will keep them from seizing. They're worth the $2-$3 it costs to buy four.
The difference #2 makes.
With a cap... Notice the corrosion free tip and the fact that there's no corrosion inside the bleeder.

Without a cap. Dumb blind luck if this one threads out.

In the 80's when I was young and poor I'd grab bleeder caps off the German cars in the salvage yards for my American Iron. I never saw them on US made rigs at the time. I'm not sure if they were used.