
 |
Register or Log In To remove these advertisements. |
|
|
|
|||||||
 |
|
|
Thread Tools | Display Modes |
|
|
#1 |
|
Registered User
Join Date: Sep 2016
Location: Redington Beach
Posts: 1,317
|
Industrial Chassis Dakota IFS build
Has been a little while since I updated. Took some time off to teach myself some welding and then had my niece and nephew in town for a month so truck took a side stop.
The next couple of posts and pics will be mostly about the Industrial Chassis Dodge Dakota IFS kit I put in. Bit of a repeat from some earlier posts. I am going to put an honest review (good parts/bad parts at end and some tips of what I found). Kit can be found here. http://www.industrialchassisinc.com/?page_id=281 The rough overall steps are #1 Remove all Front end Sheetmetal and brackets including radiator and front support. #2 Remove engine (and transmission and wiring if your doing this) 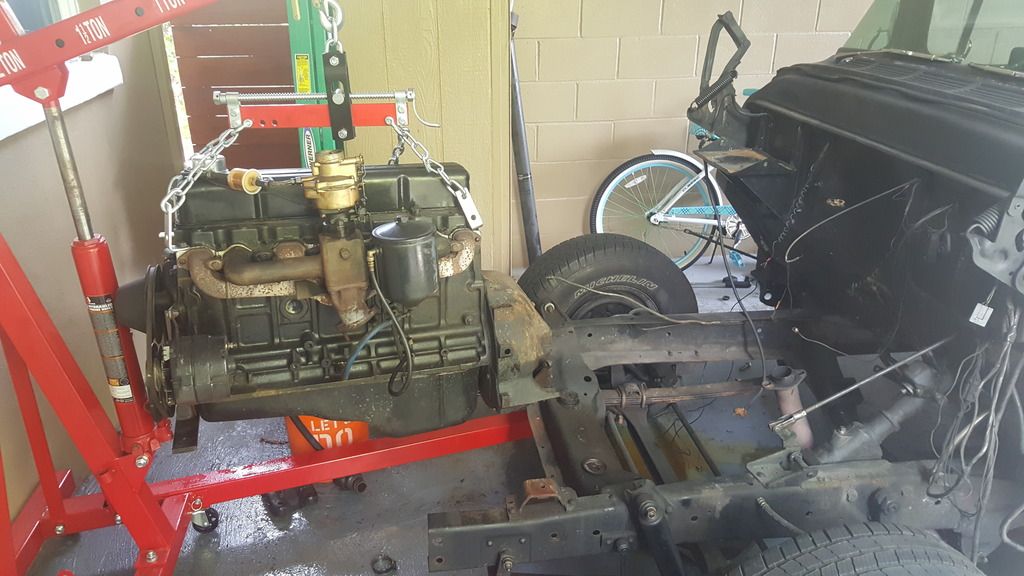 #3 Remove Front Axle and leaf springs. 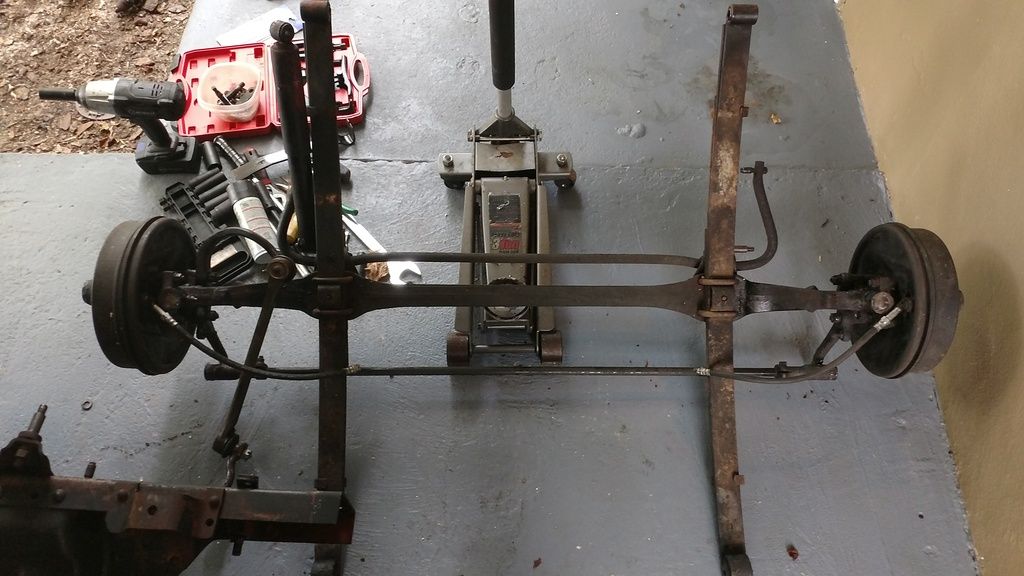 #4 Put in supplied crossmember support up front - but don't tighten down. 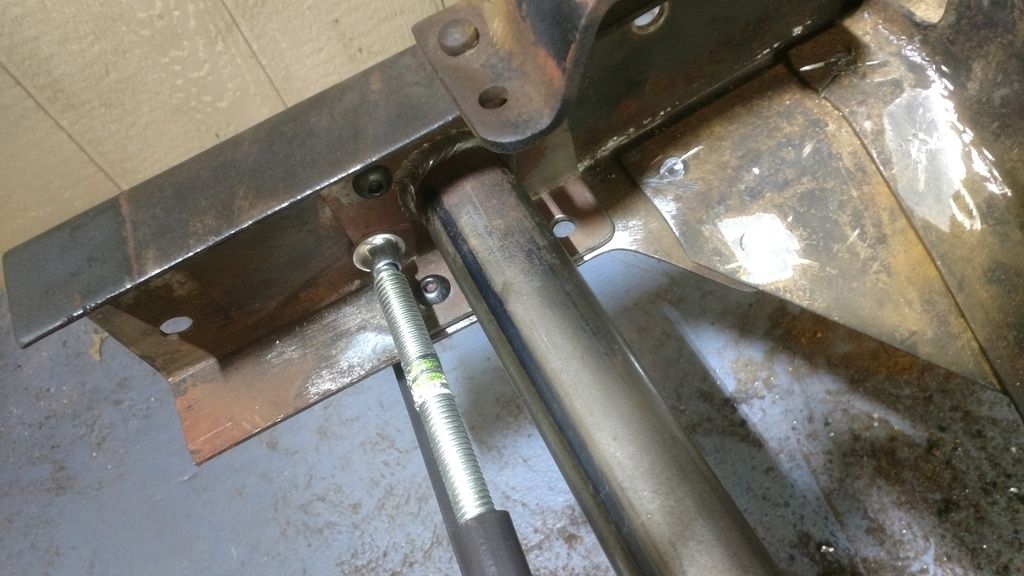 #5 Jackstands and Ensure dead level across frame 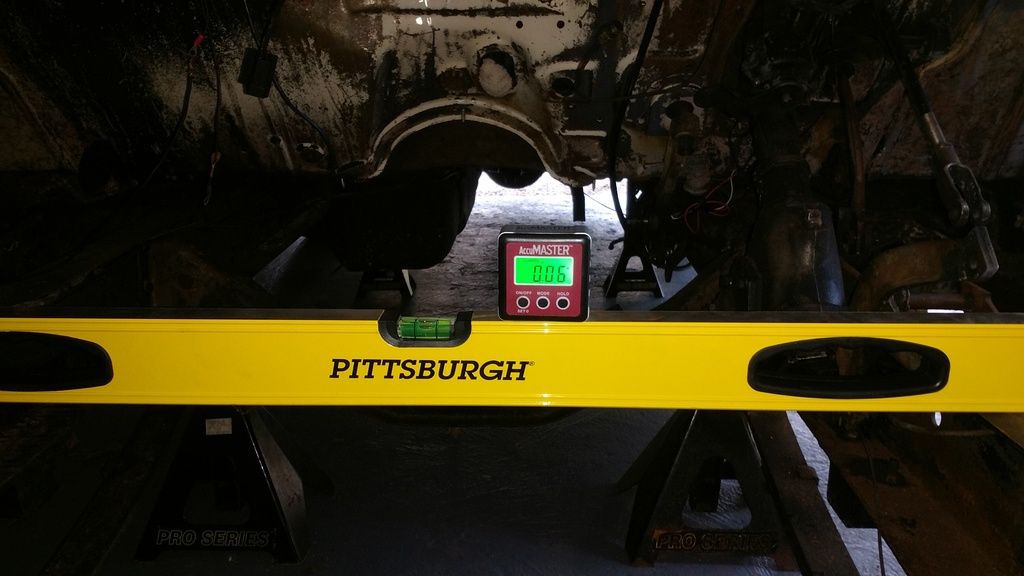 #6 Remove all the rivets and take off the stock front engine crossmember - I used a electrical hammer drill with chisel and grinder. Needed a prybar even after that. Remove CM. 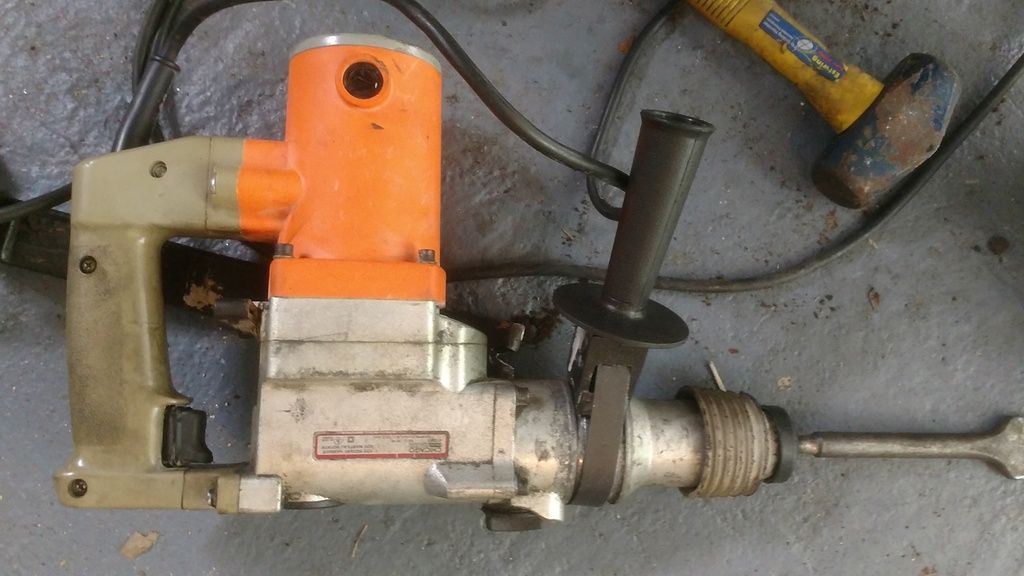 #7 Cut out the excess support flange to make sure the frame is straight. Basically I used a sawzall and a grinder to make the lower edge of the C frame straight - remove the excess "flaps" seen on lower frame edge here below . 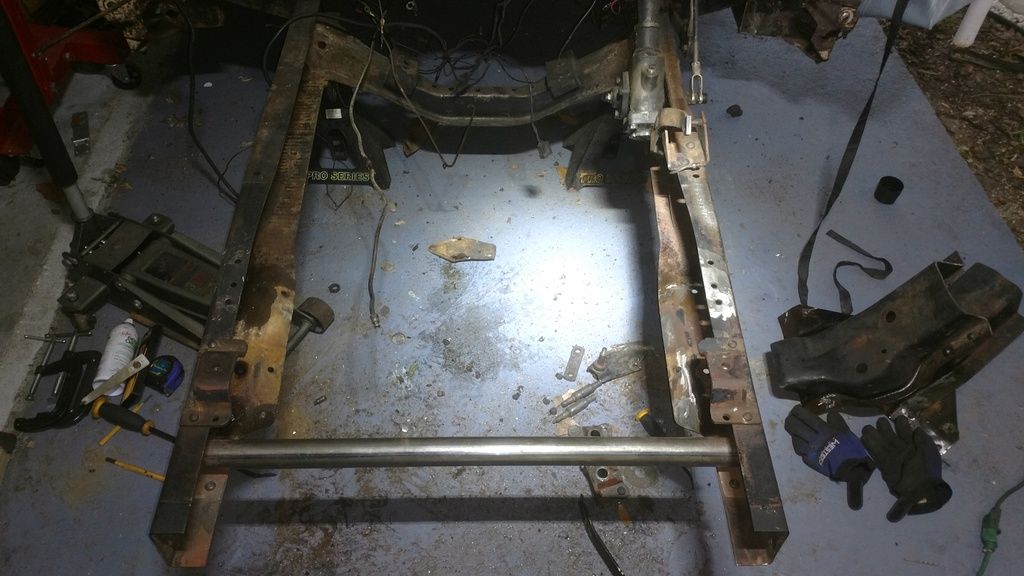 #8 put in the boxing plates and make sure they align to holes as per instruction sheet. Use C clamps to tighten and hold everything in place and make sure no large gaps for welding. 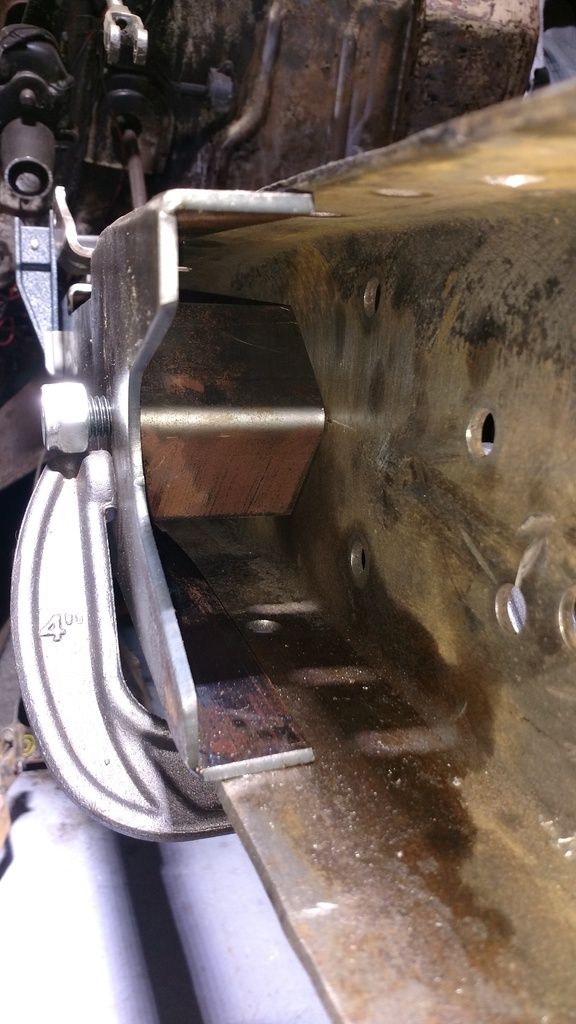 #9 Put in the supplied crossmember. This is why I suggest not tightening up the front "tubed" support as I found with it tightend I couldnt get the main cross member in. Having 1/4" of play when backing off those bolts allowed me to get the main cross member into the alignment grooves .... and then I tightened back down. There are still 2-3 more other cross members rearward that keep the frame straight. But double check after. 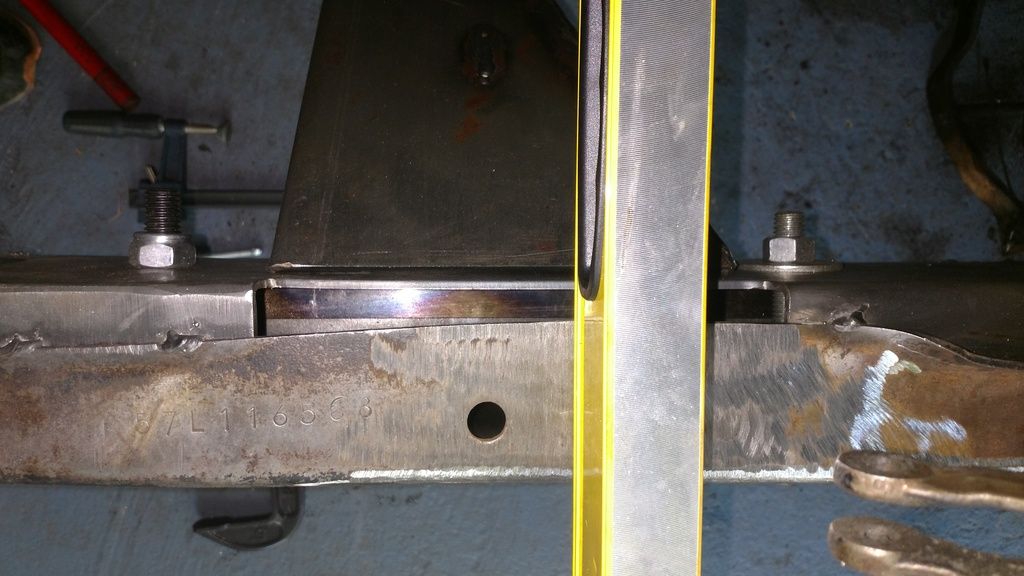 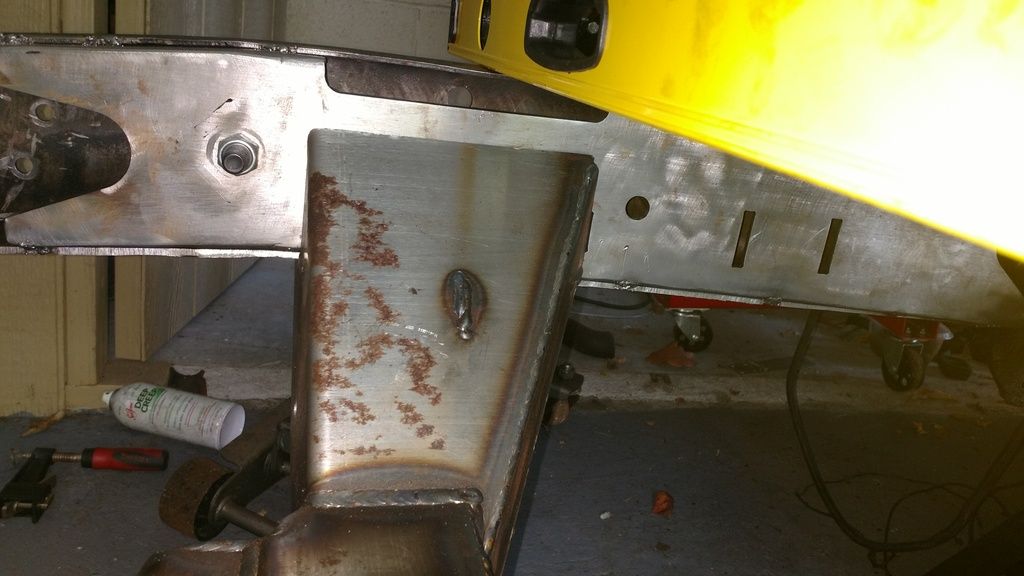
Last edited by FAKKY; 05-30-2017 at 10:47 AM. |
|
|

|
|
|
#2 |
|
Registered User
Join Date: Sep 2016
Location: Redington Beach
Posts: 1,317
|
Re: Industrial Chassis Dakota IFS build
Position on the spring perches. They are meant to SNAP into place by kinda of hooking the back tab on inside then pulling down into the alignment slots. This didnt happen on once side we had to bend the alignment tab to make it fit. It did sort of work for the other side.
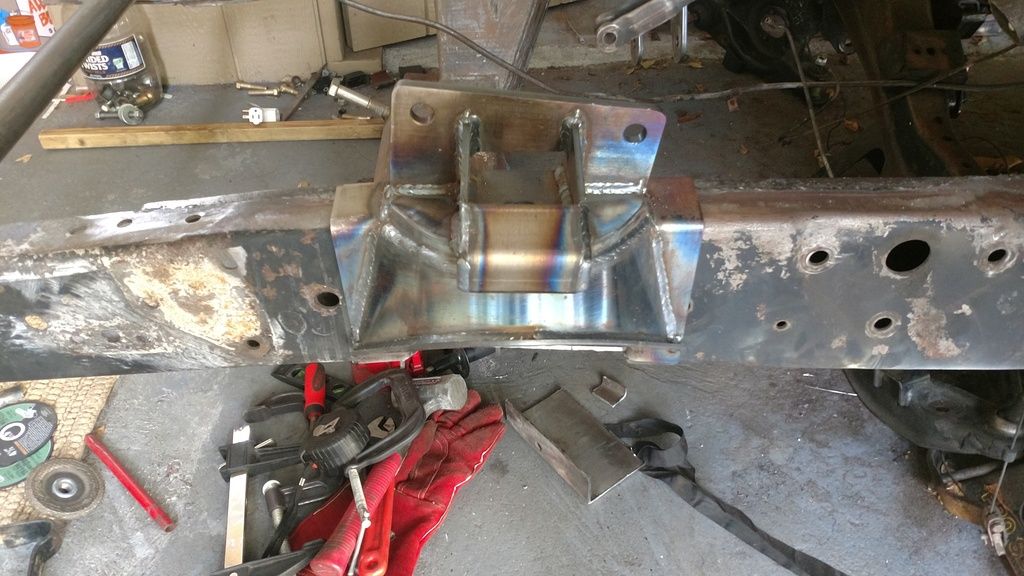 There were some large gaps to deal with welding. Compressing with clamps helped a little but not much. Flush on backside. 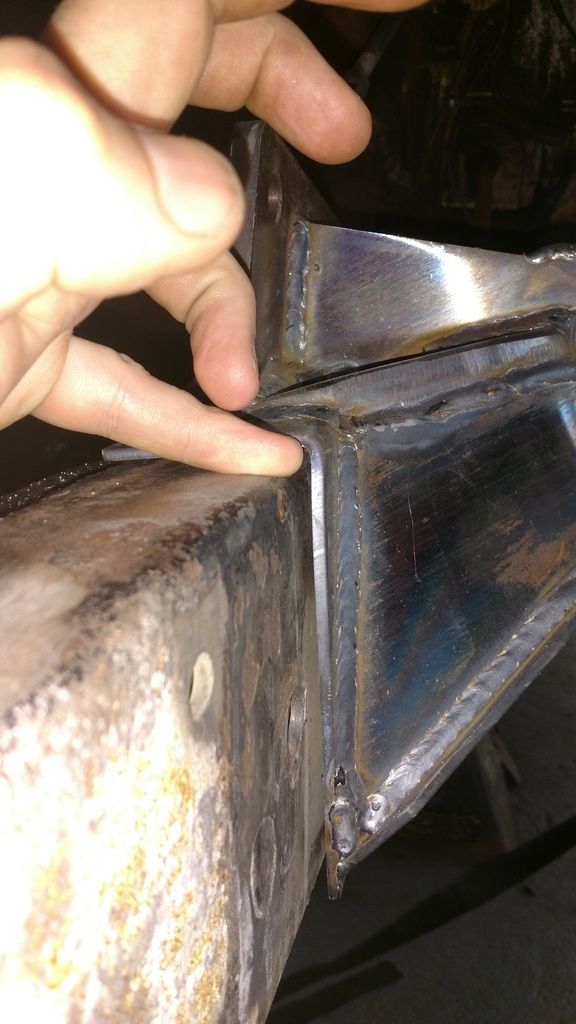 Shows the alignmnet holes cut for the spring perches "key" to fit into. 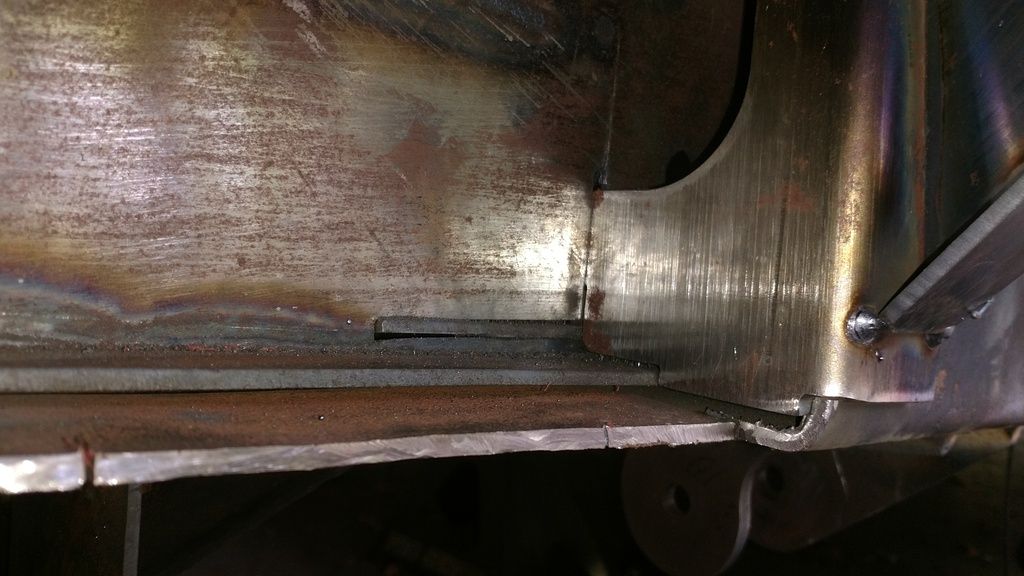
|
|
|

|
|
|
#3 |
|
Registered User
Join Date: Sep 2016
Location: Redington Beach
Posts: 1,317
|
Re: Industrial Chassis Dakota IFS build
From here ..... go practice welds. I bought a Tweco 211i MP machine and practiced over a number of weekends including cross cutting and acid etching for penetration. I dont think I would want to weld this with a 110V machine unless you were an experienced welder - yes it could be done if you were.
After that its really onto assembly as far as spindles/wheels/controlarms. This is where I hit my biggest issues. 1st big issue - controlarm bushings. Mine were shot so I felt better putting in new ones. Not too bad to get out ....... but the final bushing needs the rod in the middle so there is no good way to press it back in. I even had myself and wife standing on some pipe connected to a bottle jack against the wall but it just pushed us and damaged the wall. Long story short - if you havent done this before you really need some sort of custom press which you will probably have to fabricate. I had no access to a press. The front end BJ/TRE service kit is what I used and was lucky it worked eventually. This was a FULL weekend for me. 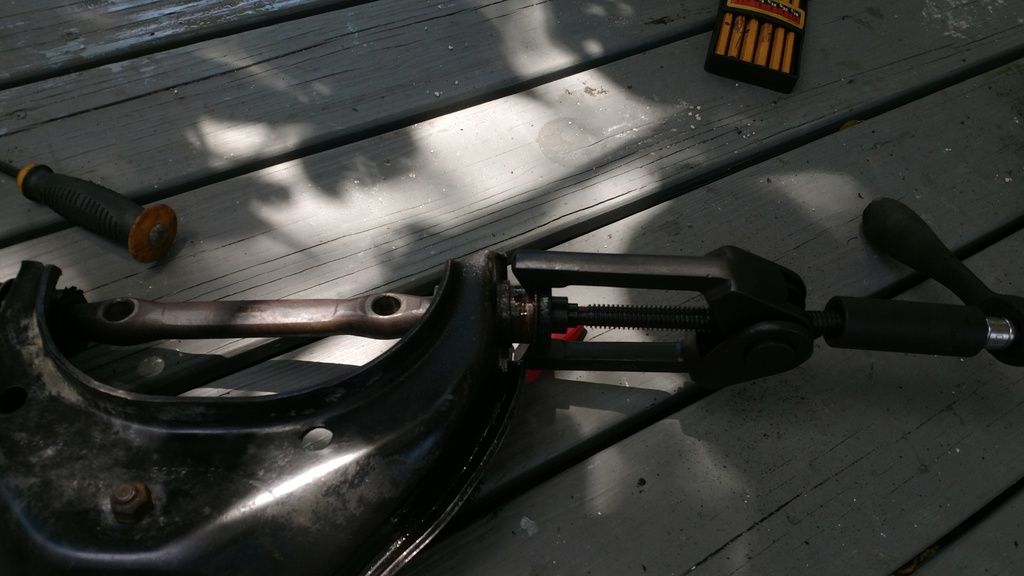 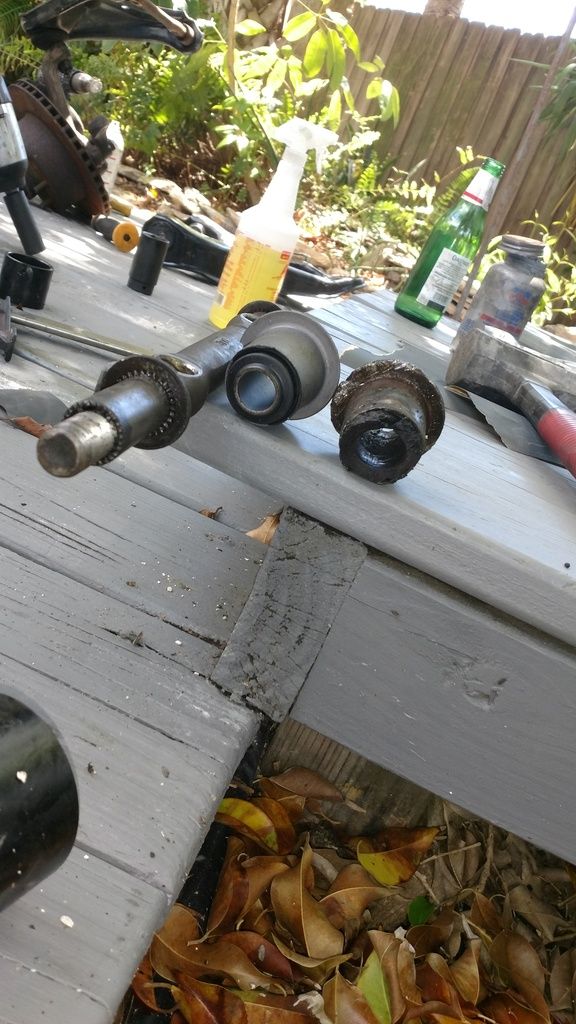 Then go ahead and get new inner/outer bearings for wheel hub/rotor. 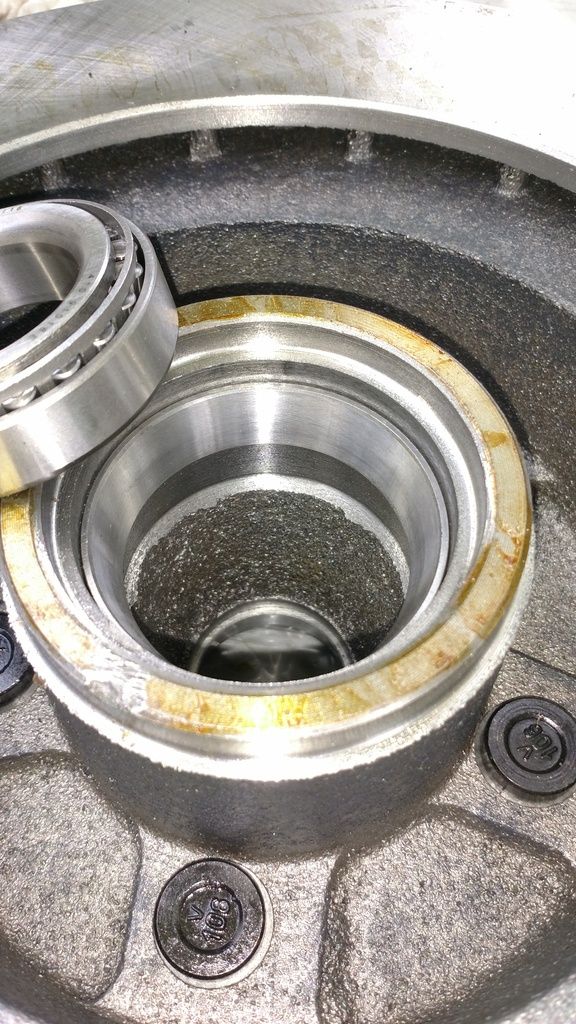 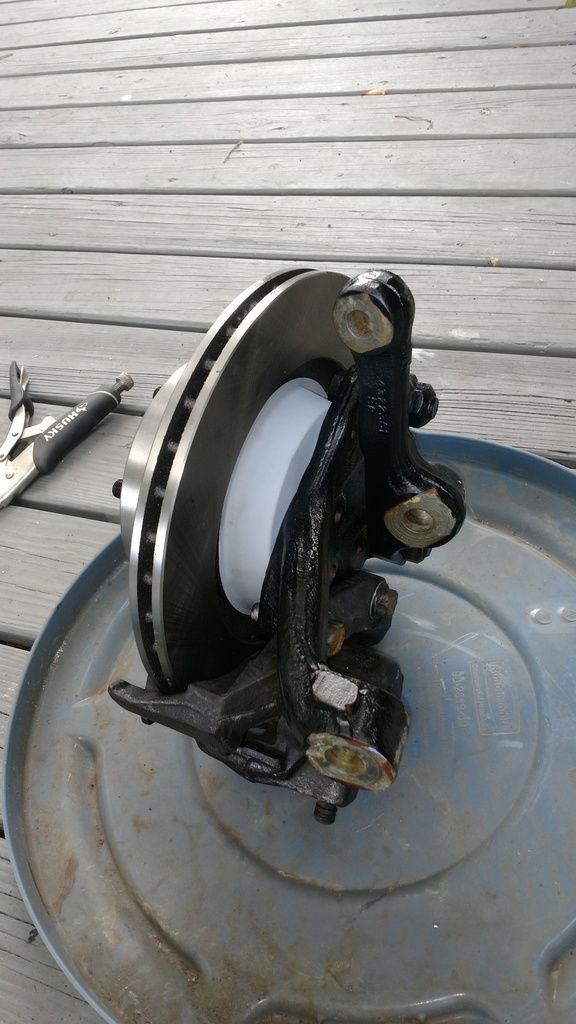 as well as balljoints. ***FYI*** The upper balljoint is a threaded balljoint .... not a press balljoint. In case you gad never heard of this like I had never heard. It takes a special $30 adaptor and is a BEAR to get out if rusted. Broker 2 breaker bars. Heat and Wax eventually got it out. 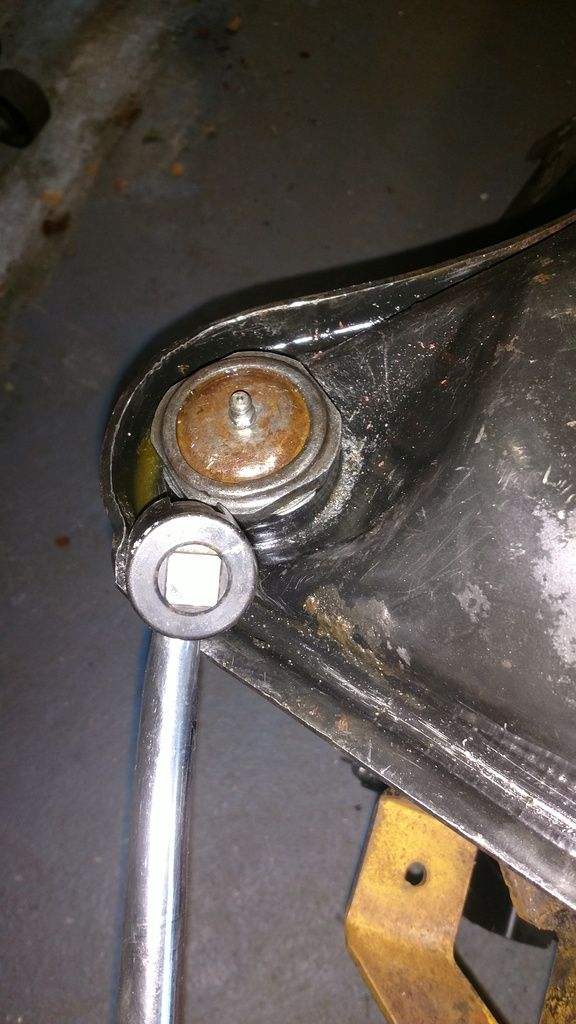
|
|
|

|
|
|
#4 |
|
Registered User
Join Date: Sep 2016
Location: Redington Beach
Posts: 1,317
|
Re: Industrial Chassis Dakota IFS build
Now the final big issue #2 of 2. Coil spring back into truck.
Outer compressor wont work as you keep hitting the controlarms - think these only work for solid axles where you dont have those in the way. I then moved to using the floor jack method. I could only get them in either upside down .... or not fully indexed (Flat end on top, round end indexed into the dip of the lower controlarm). The shock mount tabs that sit on the bottom were enough of a clearance issue that even after four hours of dangerous work with prybar ...... fail. Here's what it took. 1 - Inner threaded rod coil compressor ... going in from topside. As you tighten however it pulls the coils AWAY from the controlarm bucket. No beuno. 2 - 2x ratchet/tiedowns ...... pull the coil using the other frame back into alignment. you want the heavy duty ones here. 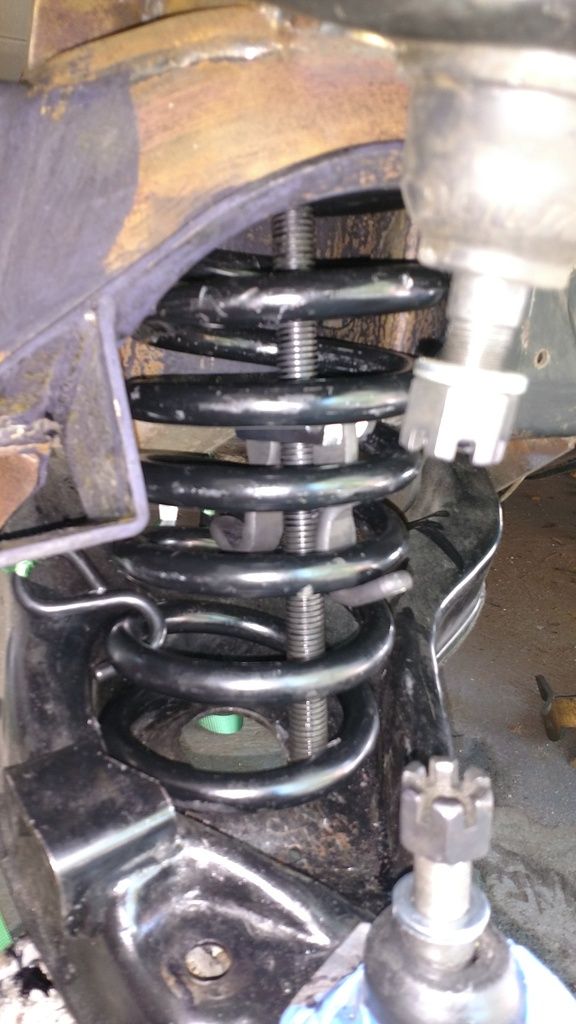 3- Now that they are in alignmnet ...... use the floor jack to bring the lower controlarm up to the slightly compressed spring. This gives you the right indexing and you can get them in. 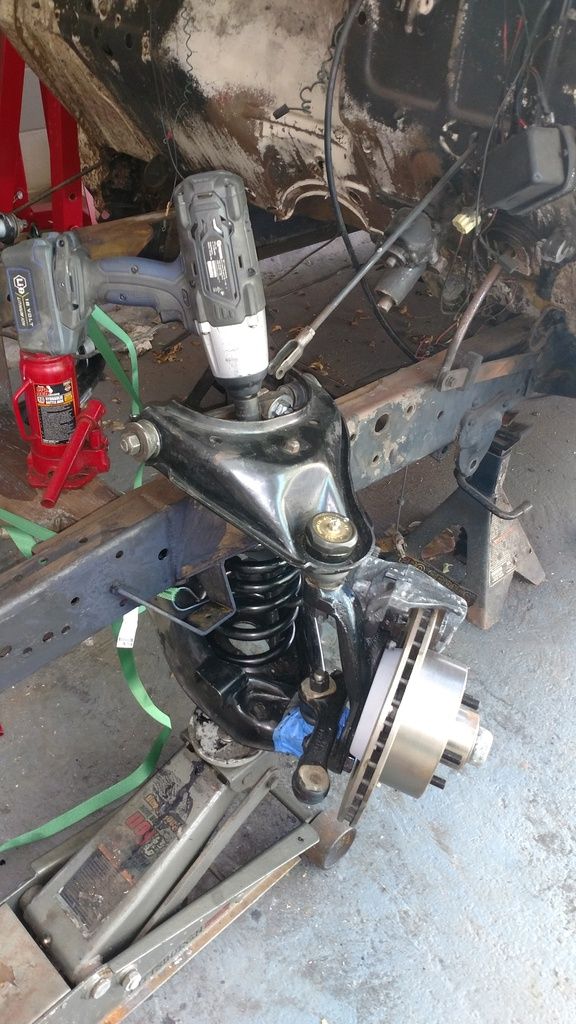 4 - Bolt up the spindles/wheels to the balljoints. 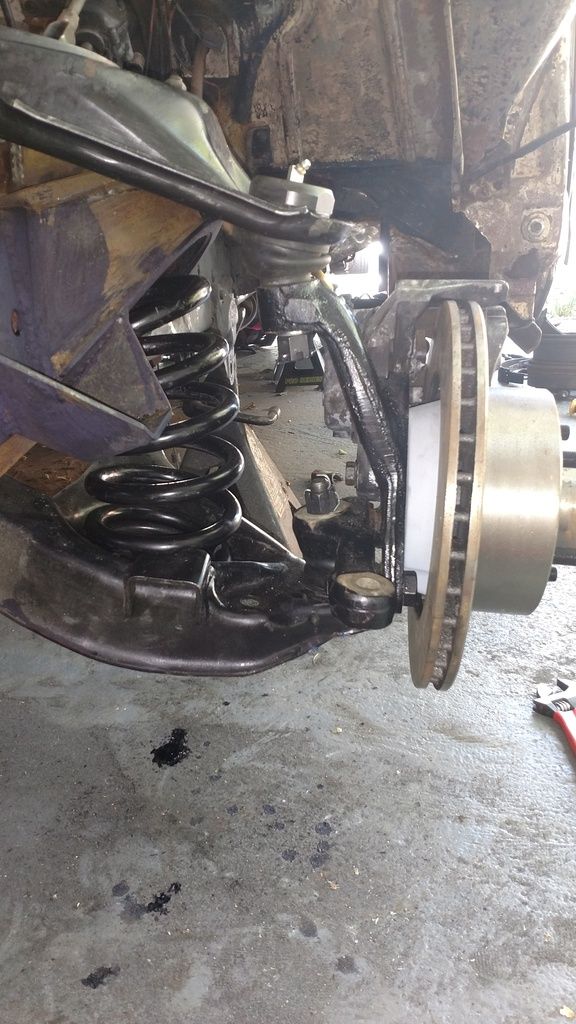 5 - Connect the front Steering rack and pinion and TRE. 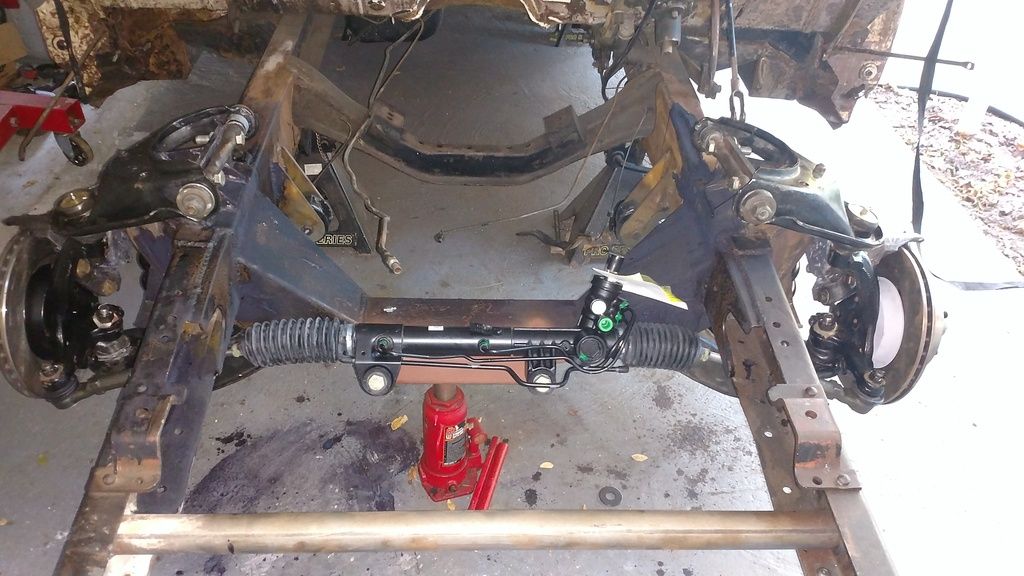 Done. |
|
|

|
|
|
#5 |
|
Registered User
Join Date: Sep 2016
Location: Redington Beach
Posts: 1,317
|
Re: Industrial Chassis Dakota IFS build
ok ...... so so for the review/notes on process.
This is going to be both the good points and bad points as I saw it. I understand some of the things I struggled with were my own lack of knowledge/tools/approach - and whilst I am basically a beginner on this type of stuff - I have turned a wrench on my diesel truck prior to this as a DIYer. The Kit. Its very well made. The safety tabs built in, the fact that the alignment and measurements and fitment generally were very close on a truck built in the 50's is really a testament to the fabricator. The amount of metal, thickness, time and quality is defiantly worth the $750. The Support from Vendor (Steve and IC) and Instructions. The instructions were pretty poor. If you have done this before then I guess they would be satisfactory - but for someone that has never worked on anything but a solid axle - they were hard to follow and understand and not enough detail (hence this thread). There were a couple of rookie mistakes I made like not aligning the rear lower controlarm hooks/support tabs correctly ...... but there was a lot of missing information including parts that were included that weren't mentioned in instructions at all. What this led to ultimately is about 15 emails back and forth with Steve trying to work out what he meant - which really didnt need to happen. That then meant when I had a problem that was more of an issue (like the gap you see in the upper spring perch to frame - felt like I had worn out my welcome with Steve. He would take multiple days to get back to me so when I eventually called him it was very brief and lacking detail. I think Steve is a nice guy from what I can tell - just think the instructions are lacking for someone that hasn't done this before. Understand its a lot more hand holding than he probably wants to be in for for $750 - but fixing the instructions would help. stuff like # Cant get the cross member in - then loosen the front support until you can. #The gaps in fitmnet...... not often but they are there (clamp down /bend/ deal with it ?) #The "ninja stars" in teh kit. Turned out to be spacers for the upper controlarm. I didnt use them - how would I know when I do need to use them - what measurement would show this ? #The proper rotation/fitment of the rear CA mounts .He had a diagram - he sent it to me - just wasn't included in original instructions. # The fact you cant buy some of this gear anymore. Controlarms and spindles. You HAVE to source from a junkyard. So getting replacement parts is not as easy. HE told me they (aftermarket) are coming out with new stuff shortly ....... and he offers tubular but very $$. # The Coil installation - damn. Kind of feels like the coils are a little long to me ....... but not sure - see how they "bow" slightly. No engine in yet - not sure if worse or better when it goes in. These coils are however are on Steves site as an option to use. # Threaded upper balljoints - would be nice to have known. Didn't know they even existed and you need a special $30 adapter. # Bolt spacing and rotor/caliper cross over capability. His site does describe it here ... http://www.industrialchassisinc.com/?page_id=281 But for example I'm running the 1993 gear (caliper/brackets) but on a 1989 rotor. Still not 100% sure that thats ok as I cant decipher it and what he means exactly - neither could my mates who read it. In the end I would summarize as ..... Very well made kit with limited customer support that requires a bit of thinking outside of the box. If you experienced in dealing with IFS and fabrication you will probably have no major issues. If your "new" to this game ..... you might want to look for a fully aftermaket kit where everything is new ....as once you add up all the replacement parts (bearings/balljoints/R&P) and the time to collect everything from junkyards ..... you are ahead but not as much as you may have thought especially considering the time.  Anyway - hope that helps someone else. John Last edited by FAKKY; 05-30-2017 at 10:51 AM. |
|
|

|
|
|
#6 |
|
Registered User
Join Date: Sep 2011
Location: Nevada City, CA
Posts: 908
|
Re: Industrial Chassis Dakota IFS build
Thanks for the update!
Be sure to post driving impressions when you get there  I think I'm sold on the Dakota IFS but it's good to know that it isn't a "done in a day" sort of setup and what some of the snags are likely to be
__________________
"Over my head" 1957 Chevy 3200, big rear window & 6 lug. Front disc, power steering, Vortec 4.8 / 4L60E swap, hydro boost brakes & patina. |
|
|

|
|
|
#7 | |
|
Registered User
Join Date: Sep 2016
Location: Redington Beach
Posts: 1,317
|
Re: Industrial Chassis Dakota IFS build
Quote:
 I would think someone thats done more of this sort of work and used to having to think on feet a little could get it done for most part in 2 full weekends rather than the time it took me. 1 weekend for teardown and welding base kit . 1 weekend for paint and assembly of front end (new bushings/bearings/TRE/R&P/steering linkage). I'm just used to a kit being a kit - i.e fully everything and following instructions .... slowly getting used to idea that doesn't work here  Guys like you and others on forum make it easier though. Guys like you and others on forum make it easier though.
|
|
|
|

|
|
|
#8 |
|
Registered User
Join Date: Mar 2017
Location: Etowah, TN
Posts: 210
|
Re: Industrial Chassis Dakota IFS build
Actually having someone ( New ) that's a Good Communicator and does the Pictures is a Huge Help with a _ Company's Product - Instructions !
As a Company may have thought about the Production - 14 times and Layout and Production another 5 times .. so By the Time they get around to doing Instructions . Details are always - Forgotten ! ~ They take all of Your Input and then _ Redo Their Instructions , also Adding Photo's to the Original Instructions _ is a Huge Benefit to All - Customers & Sellers . . |
|
|

|
|
|
#9 |
|
Registered User
Join Date: Sep 2011
Location: Nevada City, CA
Posts: 908
|
Re: Industrial Chassis Dakota IFS build
Hmm. I'm at least 60% literate. I wonder if an arrangement could be made, a pics-heavy set of written instructions in a .PDF file for a discounted crossmember?
__________________
"Over my head" 1957 Chevy 3200, big rear window & 6 lug. Front disc, power steering, Vortec 4.8 / 4L60E swap, hydro boost brakes & patina. |
|
|

|
|
|
#10 | |
|
Registered User
Join Date: Sep 2016
Location: Redington Beach
Posts: 1,317
|
Re: Industrial Chassis Dakota IFS build
Quote:
I think if there were more/better instructions published/available more people would look to take it on also. |
|
|
|

|
|
|
#11 | |
|
Registered User
Join Date: Sep 2016
Location: Redington Beach
Posts: 1,317
|
Re: Industrial Chassis Dakota IFS build
Quote:

|
|
|
|

|
|
|
#12 |
|
Registered User
Join Date: Nov 2010
Location: calgary alberta
Posts: 7,903
|
Re: Industrial Chassis Dakota IFS build
since you probably have a whack of pics of the dissassembly, clean up, grinding to a predetermined width etc and also a step by step of the assembly procedure after, maybe you should contact him and make a deal for a rebate on your kit in trade for the pictogram instructions that you have previously set up in order for the customer. include a q&a section as well as a pictogram section of what is in the kit and where it is supposed to fit. this is definately where a pic is worth a thousand words and NO EMAILS or PHONE CALLS from irate customers coming back to him, except for thank you stuff. also good reviews on his site and obviously anybody reading up on a planned swap would be more likely to go with his product if he has rave reviews in this and other hotrodding sites. he's gotta sell it and this would be a great way for him to do that.
|
|
|

|
|
|
#13 |
|
Registered User
Join Date: May 2017
Location: Phoenix
Posts: 1
|
Re: Industrial Chassis Dakota IFS build
John, I'm sorry you were disappointed with the customer service.
"The Support from Vendor (Steve and IC) and Instructions. The instructions were pretty poor. If you have done this before then I guess they would be satisfactory - but for someone that has never worked on anything but a solid axle - they were hard to follow and understand and not enough detail (hence this thread)." Here is a link to the said instructions CLICK HERE "I had a problem that was more of an issue (like the gap you see in the upper spring perch to frame - felt like I had worn out my welcome with Steve. He would take multiple days to get back to me so when I eventually called him it was very brief and lacking detail. I think Steve is a nice guy from what I can tell - just think the instructions are lacking for someone that hasn't done this before. Understand its a lot more hand holding than he probably wants to be in for for $750 - but fixing the instructions would help." I honestly do my best at this. Having been in the chassis parts manufacturing business for 30 years (8+ at the Rod Factory before starting out on my own) I have had the chance to work with just about everyone else's product at some point. I take those experiences into account and try avoid the pitfalls of the problems I have had with those products. As for taking days to get back, I am sorry about that. Life does get in the way from time to time. I have also had some sketchy internet connections that added to mine and your frustration in this matter. Between running my business, building product and helping my customers, I don't have tons of time. Just about every customer we have had post sale contact has been very satisfied. It may be a skill level or experience thing, but I have had customers install these kits without measuring and one who installed an early release kit for the 53-56 F100 trucks without instructions. Our biggest issue is the spring pocket fit as they need to be tight around the frame to get the suspension geometry correct. This is one of the things I have been making improvements on. And as I have new information, I do update my instructions. |
|
|

|
|
|
#14 |
|
Registered User
Join Date: Sep 2016
Location: Redington Beach
Posts: 1,317
|
Re: Industrial Chassis Dakota IFS build
Hey Steve.
No worries on my end. Like I said at the beginning and in thread I know some of the problems were on mine. But I also know some of them were lack of detail. This thread really wasn't a bash on IC - quite the opposite really. I think if you took someone like yossarian up on a discounted set in return for more detailed instructions and issues and questions you would 1) Receive less emails from guys like me 2) Have more adoption an business and chat on forums about the product In the end - the crossmember and spring perches really were a good product -and by themselves NOT that hard to install. It was all the stuff that's not covered that was really the before and after parts. Thats not what you supply in your kit but it is whats required to get it all rolling and working. examples; Coil install (see my notes above using one of the coils suggested on your site) and what it took to get installed as well as how they look after. CA Bushings - you really need a press here and custom adaptor/make one. Pressed in upper balljoint. Didnt know these even existed. Where to cut, what to remove exactly. Some instruction is there .... but not complete. When to use the chevron spacers .... still dont know. Seems it would make the geometry worse by pulling the upper controlarm back further. Special adapaters, detail of controlarms/spindles you cant source easily except for junkyard. Torque Specs. Rotors/Calipers/Caliper bracket. I know you have that other page that tries to descrive interchangeability p- but Im still not 100%. In my case I used the 1989 ROTOR to get the 5x4.5 bolt pattern ...... but used the 1993 donor truck cailper and caliper bracket. Still not sure if thats right - but it all bolted up. Those were the main things for me. A perfect example is the 1st coil took me 6 hours to work out. A lot of stress and trying to think of safe alternatives. Once I worked out the 1st one - 2nd one was like 30 minutes  Anyway - thanks for popping in Steve and posting comment. Like I said in the thread - the kit is well worth the $$ ....... just if your a complete newby to custom builds/IFS and approaches - this will give you more of an idea of a few lessons learned and tips to help - felt like I was paying it forward a bit for the help I got from site/guys here. 
|
|
|

|
|
|
#15 |
|
Senior Member
 Join Date: May 2007
Location: Doodah Kansas
Posts: 7,760
|
Re: Industrial Chassis Dakota IFS build
you could hire a technical writer to publish your instructions. your current instructions give a lot of detail and some guys love reading, but a technical writer will be able to make it much simpler to understand and will use diagrams based on watching you install a kit.
I can hear the slaps in your reply above so, as friendly advice, you might want to tone that down. Being too busy for customers questions is a problem that often solves itself.
__________________
the mass of men live lives of quiet desperation if there is a problem, I can have it. new project WAYNE http://67-72chevytrucks.com/vboard/s...d.php?t=844393 |
|
|

|
 |
| Bookmarks |
|
|