
|
 01-05-2016, 09:32 PM
|
#26 |
|
Registered User
Join Date: Dec 2015
Location: tarboro nc.
Posts: 400
|
Re: 1965 C10 ... Project Name: Just Learnin'
epoxy primer is 2 parts that you mix together before you spray it .
any mixed primer left over will harden . so clean it out of your spray gun after using it. and never put any leftover mixed primer back in the can with unmixed primer it will harden . I have been doing bodywork and paint , working in body shops for over 40 years and I prefer to put body filler on bare metal that has just been grinded clean . |

|

|
|
01-07-2016, 01:39 AM
|
#27 | |
|
Registered User
Join Date: Dec 2015
Location: Okotoks Alberta
Posts: 158
|
Re: 1965 C10 ... Project Name: Just Learnin'
Quote:
|
|
|
|
|
|
01-07-2016, 02:05 AM
|
#28 |
|
Registered User
Join Date: Dec 2015
Location: Okotoks Alberta
Posts: 158
|
Re: 1965 C10 ... Project Name: Just Learnin'
On another note Im thinking a set of these shorties will work great for keeping the collectors above the frame rails.
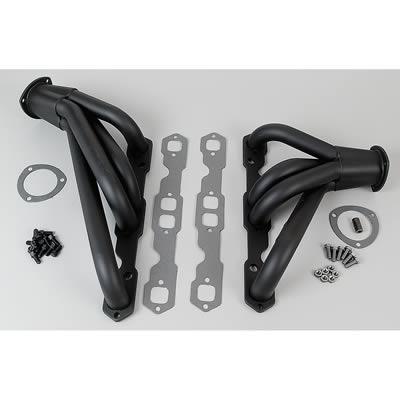 Anyone run the competition shorties? It looks like they have a couple different versions I imagine fitment won't be a huge issue but we will find out soon enough I guess. On a side note how the hell do I get these pictures smaller?!?! Last edited by Alberta65; 01-07-2016 at 02:14 AM. |
|
|
|
|
01-07-2016, 02:09 AM
|
#29 | |
|
Registered User
Join Date: Jul 2009
Location: San Jose Ca
Posts: 2,871
|
Re: 1965 C10 ... Project Name: Just Learnin'
Quote:
Do you have a large compressor? You can get a harbor freight purple gun and some epoxy. Epoxy is pretty cheap.
__________________
David Used parts build: http://67-72chevytrucks.com/vboard/s...d.php?t=638991 My brother's Nova: http://www.67-72chevytrucks.com/vboa...d.php?t=727985 Rear suspension rework: http://www.67-72chevytrucks.com/vboa...d.php?t=750557 Instagram: myfabguy |
|
|
|
|
|
01-07-2016, 02:12 AM
|
#30 | |
|
Registered User
Join Date: Dec 2015
Location: Okotoks Alberta
Posts: 158
|
Re: 1965 C10 ... Project Name: Just Learnin'
Quote:
|
|
|
|
|
|
01-12-2016, 02:30 AM
|
#31 |
|
Registered User
Join Date: Dec 2015
Location: Okotoks Alberta
Posts: 158
|
Re: 1965 C10 ... Project Name: Just Learnin'
Ok so time for some updates.
Began on the front fenders the other day.. cutting the rot off the bottom (realizing I need the braces on the backside) and finding all sorts of bondo worms and gremlins everywhere I remove paint. Anyways.. so pictures   After my first fender job I went back to the research train and learned about this lovely little skill called planishing. This one will go much smoother. Tack planish sand repeat.  Once I was done that I decided to look at getting started with the rear cab mounts.. so I crawled under to start coming up with a game plan, the driver side looks decent about a four inch section on the end to be replaced but the rot was stopped thankfully short enough to make it an easy(ish) fix. Then I looked under the passenger side....  .....not going to lie I got so discouraged by that picture I decided I needed a break from the damn body work and back to something mechanical. HELLO AIRBAGS!! Anyways the long term game plan is to do a GSI drop member and some proper a arms but in the mean time I picked up a set of cheap bag mounts from airslamit and decided to start figuring out this whole air system thing. This is definitely new for me so we will see how it goes. Start with the front lowers... (took me long enough just to figure out which ones were front and which ones were back haha)  when sitting on the lower cups they seem way to high..  CUT CUT CUT LOW LOW LOW  Better but more to go.. (forgot to get pic but they now sit nicely and safely in the pockets) I would like to call this the before picture but its drivers side (forgot to take a pic of passenger but it looks just about as bad)  and with a little wire wheel and a splash of rust paint to hold me over to the sandblast and powder coat.  Tomorrow.. I shall tackle the drivers side, now that I know what i am doing and then attempt to figure out how to run my airlines into there... 
|
|
|
|
|
01-12-2016, 02:38 AM
|
#32 |
|
Registered User
Join Date: Jul 2009
Location: San Jose Ca
Posts: 2,871
|
Re: 1965 C10 ... Project Name: Just Learnin'
Your patching and welding is looking much better! Planishing is important. Try to plan out your patches to make sure you can access the backside in order to planish.
The GSI crossmember looks good but the arms leave something to be desired. You can only adjust them so far before they begin to bind. I would rather go with Porterbuilt, Scotts, or No Limit. I believe they are similar in price. Are you comfortable welding thicker material? You can cup your arms for an additional few inch drop. If you dont want to spend money on compressors, tanks, valves, gauges, etc yet you can buy these: http://www.avsontheweb.com/1-4-push-...hraeder-valve/ and air up manually. Not the best idea if you are driving long distances but will work great to just drive around until you figure out what you want to run for air management.
__________________
David Used parts build: http://67-72chevytrucks.com/vboard/s...d.php?t=638991 My brother's Nova: http://www.67-72chevytrucks.com/vboa...d.php?t=727985 Rear suspension rework: http://www.67-72chevytrucks.com/vboa...d.php?t=750557 Instagram: myfabguy |
|
|
|
|
01-12-2016, 03:02 AM
|
#33 | |
|
Registered User
Join Date: Dec 2015
Location: Okotoks Alberta
Posts: 158
|
Re: 1965 C10 ... Project Name: Just Learnin'
Quote:
Thank you for that advice I had no idea about the GSI a arms, if price is that close than I would rather go porter built for the problem free side of things. Oh and I actually bought dual 444's a long time ago on ebay for an absolute steal and picked up an 8 valve setup and 7 switch last time I took a trip down to the states (I figured regardless of what I do with cross members and frame work I can continually use the compressors and tanks so they were a better initial investment.... Now i just need to figure out the valves ahahah |
|
|
|
|
|
01-12-2016, 03:39 AM
|
#34 |
|
Registered User
Join Date: Jul 2009
Location: San Jose Ca
Posts: 2,871
|
Re: 1965 C10 ... Project Name: Just Learnin'
The centering part is easy. Make a template of the bag and a bit of measuring is all you need.
Porterbuilt used to sell a earlier version of their dropmember that used stock arms. You can email them to see if they still offer it. It will save you 1k.
__________________
David Used parts build: http://67-72chevytrucks.com/vboard/s...d.php?t=638991 My brother's Nova: http://www.67-72chevytrucks.com/vboa...d.php?t=727985 Rear suspension rework: http://www.67-72chevytrucks.com/vboa...d.php?t=750557 Instagram: myfabguy |
|
|
|
|
01-18-2016, 11:05 PM
|
#35 |
|
Registered User
Join Date: Dec 2015
Location: Okotoks Alberta
Posts: 158
|
Re: 1965 C10 ... Project Name: Just Learnin'
So, finally got to start picking away at the truck again.. working on a new (new to me) house purchase so life is hectic.
Anyways threads suck without pictures so lets see what I took..  This is how she sits now.. got some por15 on the front end and rad supports. front bags are installed, just in the process of figuring out my airline routing... More importantly... LOOKKKK!! My new coffee mug is the only cup used in my kitchen now a days.  Now that I am feeling better after taking a little break from some body work its time to get back at it as I just can't let this thing go into the summer months. Started sanding down the front fender and look what they managed to cover up!   Sooooo thats cool... Also dug into the rear cab supports trying to get started as I got my order for the rest of my metal into lmc today.  found where solid metal stopped and started cutting.  Also cut out the rotten outer floor and i will not be welding in the cab support patch as I am going to wait until I get the outer floor panel and patch it from below so I don't have to cut the cab corner off and weld blind. and finally now as I wait a few days for LMC parts to show up (and by show up I mean ship to Montana then drive down there and get them haha)  Its time to start planning out the system.... anyways Im off to cook some dinner so till next time guys! |
|
|
|
|
01-19-2016, 02:45 AM
|
#36 |
|
Registered User
Join Date: Dec 2012
Location: Rochester, KENT
Posts: 10,476
|
Re: 1965 C10 ... Project Name: Just Learnin'
I am not looking forward to my panel work.
There is sooooo much bonds and rust on my truck, cleverly disguised as shiny paint. Planishing...... A skill I will gave to learn. You are moving along great, progress is progress.
__________________
MY BUILD LINK: http://67-72chevytrucks.com/vboard/s...585901]Redneck Express - 1966 C10 Short Fleetside MY USA ROADTRIPS http://forum.retro-rides.org/thread/...2018-humdinger IF YOU CAN'T FIX IT WITH A HAMMER, YOU'VE GOT AN ELECTRICAL PROBLEM MATE. |
|
|
|
|
01-19-2016, 05:31 PM
|
#37 |
|
Registered User
Join Date: Sep 2013
Location: Kent England
Posts: 1,025
|
Re: 1965 C10 ... Project Name: Just Learnin'
I like the bed it's a good option without spending a fortune . My local paint shop also puts paint into a can pre mixed . You have to use it that day before it goes off . I also put filler (bondo) as you guys in the states call it onto bare metal then two pac primer . Then I only put stopper over the primer if there is any small imperfections then re prime then topcoat .
__________________
FINALLY PUTTING IT BACK TOGETHER AT LONG LAST MY BUILD THREAD: http://67-72chevytrucks.com/vboard/s...d.php?t=611614 |
|
|
|
|
01-19-2016, 07:20 PM
|
#38 | |
|
Registered User
Join Date: Dec 2015
Location: Okotoks Alberta
Posts: 158
|
Re: 1965 C10 ... Project Name: Just Learnin'
Quote:
|
|
|
|
|
|
12-01-2016, 12:28 AM
|
#39 |
|
Registered User
Join Date: Dec 2015
Location: Okotoks Alberta
Posts: 158
|
Re: 1965 C10 ... Project Name: Just Learnin'
holy crap long time no talk guys... busy summer with work but the snow is flying so its time to enjoy some shop hours again. I have had some time to pick away at the air system and some metal work here and there throughout the summer. Also a little set up work on the dash. Here are a very progress pictures of where its at now.
        
|
|
|
|
|
12-01-2016, 12:37 AM
|
#40 |
|
Registered User
Join Date: Dec 2015
Location: Okotoks Alberta
Posts: 158
|
Re: 1965 C10 ... Project Name: Just Learnin'
one question for anyone out there with airbags in the stock front crossmember... i drilled a half inch hole into the back of the upper shock mounts (will get pictures tomorrow) but I have know way of really tightening the airline into the top of the airbag. would i be killing structural integrity if i cut a window in the front of that mount in order to get a wrench in there to tighten up a compression fitting??
thanks again guys |
|
|
|
|
12-02-2016, 07:37 PM
|
#41 |
|
Registered User
Join Date: Dec 2015
Location: Okotoks Alberta
Posts: 158
|
Re: 1965 C10 ... Project Name: Just Learnin'
 Got in the shop this morning and cut some windows in the end of the crossmember. I should mention that this is the second time i installed the air system, last spring I hooked everything up and used thread tape on what seemed like 200 brass fittings. Well electronically it all worked great however every fitting leaked. So this week I cut her all back apart and resealed everything using pipe dope (advice from my heavy duty buddies) and hoping tomorrow when I get everything rewired we will be going up and down and up and staying there haha |
|
|
|
|
12-02-2016, 08:05 PM
|
#42 |
|
Registered User
Join Date: Nov 2011
Location: West Plains Missouri
Posts: 2,088
|
Re: 1965 C10 ... Project Name: Just Learnin'
like your bed, I have done 2 customer beds the same way except i used a single 4x8 sheet veneer plywood in birch.
Pic #1. The sheet after it was all drilled and mocked up and stain applied. Pic #2. The finished bed. (Blakes GMC) Mark...
__________________
http://67-72chevytrucks.com/vboard/s...d.php?t=645774 Project Orangepeel 52 A.D. http://67-72chevytrucks.com/vboard/s...d.php?t=653337 John's LS 49 dodge http://67-72chevytrucks.com/vboard/s...d.php?t=655780 Blake's 67 GMC LS stepside http://67-72chevytrucks.com/vboard/s...d.php?t=690527 Reed 78 FJ40 Rebuild http://67-72chevytrucks.com/vboard/s...d.php?t=733259 Barger's 78 FJ40 |
|
|
|
|
12-03-2016, 12:21 AM
|
#43 |
|
Registered User
Join Date: Nov 2014
Location: IE California
Posts: 225
|
Re: 1965 C10 ... Project Name: Just Learnin'
fun build! i did not put glue on the tefflon tape and only one fitting leaked on y bags. I like the idea of cutting of the window u did.
|
|
|
|
|
12-03-2016, 06:33 PM
|
#44 | |
|
Registered User
Join Date: Dec 2015
Location: Okotoks Alberta
Posts: 158
|
Re: 1965 C10 ... Project Name: Just Learnin'
Quote:
|
|
|
|
|
|
12-03-2016, 06:33 PM
|
#45 | |
|
Registered User
Join Date: Dec 2015
Location: Okotoks Alberta
Posts: 158
|
Re: 1965 C10 ... Project Name: Just Learnin'
Quote:
|
|
|
|
|
|
12-03-2016, 06:41 PM
|
#46 |
|
Registered User
Join Date: Dec 2015
Location: Okotoks Alberta
Posts: 158
|
Re: 1965 C10 ... Project Name: Just Learnin'
Well I must be doing something wrong here, the guy at NAPA assured me I picked up "the absolute best" thread sealant. I even let it cure for over 24 hours before I ran any air through the system. Not a bloody hope this thing leaks worse now than it ever did with just the tape.
I don't know what to think anymore and I definitely can't afford to switch of now to any other system like the accuair. At the very least I will try it one more time with a different sealant. But I am probably going to look at dropping down to 1/4 inch airlines, with the 1/2" lines the truck basically jumps off the ground. I have 1/4" lines on the dump valves and I really like how smooth it goes down. Any suggestion 1/4 3/8 or 1/2? |
|
|
|
|
12-20-2016, 12:33 AM
|
#47 |
|
Registered User
Join Date: Dec 2015
Location: Okotoks Alberta
Posts: 158
|
Re: 1965 C10 ... Project Name: Just Learnin'
OK so I finally made some more progress, rebuilt the air system, 1/2" into all the valves and 1/4" lines from valves to bags all around. Nice and soft rise and fall now and not a single leak.
Then I got a couple pals to help me get the box back on and I got everything squared up and lined up. Really happy with the way its coming along. 
|
|
|
|
|
12-20-2016, 12:37 AM
|
#48 |
|
Registered User
Join Date: Dec 2015
Location: Okotoks Alberta
Posts: 158
|
Re: 1965 C10 ... Project Name: Just Learnin'
Drivers side door weatherstripping and floor pans all sanded off and cleaned up. And working on cleaning up the remainder of the firewall inside the cab.
   
|
|
|
|
|
12-20-2016, 12:38 AM
|
#49 |
|
Registered User
Join Date: Dec 2015
Location: Okotoks Alberta
Posts: 158
|
Re: 1965 C10 ... Project Name: Just Learnin'
I don't know if this video will work but I'll give it a shot |
|
|
|
|
12-20-2016, 12:39 AM
|
#50 |
|
Registered User
Join Date: Dec 2015
Location: Okotoks Alberta
Posts: 158
|
Re: 1965 C10 ... Project Name: Just Learnin'
Which brings me to a question, what should I use to seal the transmission tunnel, PO gobbed so much damn silicone in there its sickening and I want to put it back together correctly.
|
|
|
|
 |
| Bookmarks |
|
|


 Linear Mode

