
|
 04-14-2014, 11:42 PM
|
#1401 |
|
Senior Enthusiast
Join Date: Feb 2007
Location: Spokane Valley, WA
Posts: 8,356
|
Re: Markeb01 Build Thread
Saturday the parking brake/firewall grommet showed up and was quickly snapped in place.
We put a bunch of miles on the truck today and the new mirrors provide fantastic vision to the rear once they become familiar. I keep looking down for the mirror, my brain processes the complete lack of information, and I look up to see the new mirror and a nice view of whats going on around me! In a couple of days Ill forget all about the previous mirrors. I also ended another saga that started coincidentally when I installed the stainless windshield trim. Ive had a horrendous squeak in the cab that has been driving me nuts. For over 20 years the truck has exhibited no rattles, and no squeaks. Having one loud enough to drown out the gear drive is infuriating. At first I thought it might me the windshield trim itself, so I spent almost two weeks working on the trim trying to shorten where the two ends touch at the top center. I found a nut trapped in the lowest dash channel between the mounting brackets and the under dash gauge panel. A few days back I found the clutch pedal heim joint was dry, and most recently I lubricated the shifter and parking brake linkage. Every time Ive gone through this the squeak goes away for a few minutes or an hour, and then its back as loud as ever! Tonight I was closing the hood and noticed a squeak just as it latched, so I opened it back up. I rested the hood without latching it, went to the rear corner on each side and pressed down. The drivers side was silent. The passenger side squeaked! So I WD40d the hinge and the noise remained! Next I lubed the rubber mounting block at the back of the hood, and the mounting surface on the cowl. That was it! I hopped back in the truck and took a short ride down a bumpy road and the squeak is gone!! Yippee!! Hopefully this is the real deal. Another annoying habit the truck developed just before the new engine swap while traveling at about 60 mph is high gear, the engine will stall out - running out of gas. For the life of me I cant understand why. Ive been through everything from the carb to the tank, and everything in between is new filters, lines, and two new mechanical fuel pumps. I discovered that energizing the electric fuel pump for a few seconds solves the problem and has prevented us from being stranded several times. Its very random and happens months apart, the latest episode being yesterday. Years ago I had poor luck with electric fuel pumps, but previously I never ran them with pre-filters or electrical relays. Since my new Carter electric fuel pump has both, Im going to eliminate the mechanical pump and see if that makes the problem disappear. So tonight I replaced the momentary fuel pump toggle switch with an on/off version, and picked up a Mr. Gasket steel 2 bolt block off plate at the local Napa store:  Tomorrow Ill remove the mechanical pump, and begin relying solely on the electric pump. For now I may just connect the frame line to the engine line with a length of hose. If the problem never returns, Ill reroute new hard line up the back of the engine, eliminating more plumbing clutter up front.
__________________
My Build Thread: http://67-72chevytrucks.com/vboard/s...d.php?t=444502 |

|

|
|
04-15-2014, 01:40 AM
|
#1402 |
|
Senior Member
 Join Date: Mar 2011
Location: Tucson, Arizona
Posts: 2,069
|
Re: Markeb01 Build Thread
Do you think maybe with the mechanical pump trying to pull gas through the electric pump that it is restricting the flow enough to starve the engine at higher demands? Just a thought.
__________________
Sanity'66 http://67-72chevytrucks.com/vboard/s...d.php?t=515110 Long bed, Fleetside, Small back window I've Done So Much, With So Little, For So Long, That Now I Can Do Anything With Nothing. 
|
|
|
|
|
04-15-2014, 02:49 AM
|
#1403 |
|
Senior Enthusiast
Join Date: Feb 2007
Location: Spokane Valley, WA
Posts: 8,356
|
Re: Markeb01 Build Thread
I think it's more likely both of the mechanical pumps have a common defect in them. I've analyzed the way the electric pump is made, and with the pump turned off you can actually see through the input and output openings. I actually purchased three mechanical pumps, the first one being the earlier style that can be disassembled to clock the housing. It turned out to be broken, and the connector link to the pump arm actually fell off.
I'm wondering if mechanical pumps just aren't made as good as they used to be since all new cars have been using electric pumps for a couple of decades. I also found it interesting that my old/previous mechanical pump served for over 20 years with no hint of trouble. Trying to replace it turned out to be very difficult because all the new replacement pumps put out over 9 psi, and my Edelbrock carb can't handle more than 5. So for the first time ever I was forced to add a pressure regulator.
__________________
My Build Thread: http://67-72chevytrucks.com/vboard/s...d.php?t=444502 Last edited by markeb01; 04-15-2014 at 02:58 AM. |
|
|
|
|
04-15-2014, 07:26 PM
|
#1404 |
|
Senior Enthusiast
Join Date: Feb 2007
Location: Spokane Valley, WA
Posts: 8,356
|
Re: Markeb01 Build Thread
As of this afternoon the manual fuel pump has been eliminated and were running electric only:
It was very straight forward. I measured the distance between the fitting leading to the carb and the hard line coming from the fuel pump. I only needed about 2 of 300 psi rubber line. It was so short I put the fitting/hose assembly in the vise to squeeze the pieces together. Once the pump was out of the way I hooked them together to stop the leakage:  After removing the 4 bolt plate, I pulled the pushrod and installed both plates. I used shorter bolts on the upper two holes as the chrome block off plate is less than half the thickness of the fuel pump casting. I was also lucky on the old gasket. Since a new one didnt come with the new engine, I made my own out of gasket material. I came off looking like new so I just used it over:  And heres the finished result. Not much to look at, but thankfully there are no leaks and it works fine:  As mentioned earlier, if this turns out to be the permanent solution, Ill form new hard lines going off the back of the manifold to clean things up a bit.
__________________
My Build Thread: http://67-72chevytrucks.com/vboard/s...d.php?t=444502 |
|
|
|
|
04-15-2014, 08:34 PM
|
#1405 |
|
Registered User
Join Date: Apr 2012
Location: Searcy, AR
Posts: 4,203
|
Re: Markeb01 Build Thread
Hadn't thought about the amount of time that has passed since vehicles relied on Mechanical Pumps...
 Thanks for the Write-up Glad you are solving issues... When you wrote about looking in the direction of the old mirror location reminded me of something that I did recently...I had to laugh at myself the other day, I was doing the required paperwork to do a Tattoo on my nephew, My brother's son Per my usual routine, I checked his ID to make sure I marked the correct first initial of his last name for our paperwork filing system...:bang head: Established routines are like old habits...  Have a Great Week!!!
__________________
DON Proverbs 27:17  US Air Force Retarded errr Retired My '65 Stepper Build:http://67-72chevytrucks.com/vboard/s...d.php?t=533920 My '60 Rusty Patina Build:http://67-72chevytrucks.com/vboard/s...66#post7402266 My '72 http://67-72chevytrucks.com/vboard/s...59#post7204359 SOLD |
|
|
|
|
04-16-2014, 01:00 AM
|
#1406 |
|
Senior Enthusiast
Join Date: Feb 2007
Location: Spokane Valley, WA
Posts: 8,356
|
Re: Markeb01 Build Thread
Thanks for routinely checking in Don, it is appreciated!
It's funny about things we took for granted years ago. The dependability of a mechanical fuel pump used to be the same as the old ball bearing wheel bearings. In my old 1962 JC Whitney catalog they were so common and dependable the cost for inners was $1.98 and outers were $1.50. If they were good when I got the car (any car), with regular cleaning and repacking they lasted the life of the car. The front wheel bearings were shot when I got my GMC. I bought new ones at about $100 per side, and went through 4 sets in as many years, and I know how to set the preload on front ball bearings. The outrageous cost of inferior bearings was the main reason I swapped to the coil spring suspension! I couldnt help but laugh at your story of checking the ID of your own nephew out of routine. Both times I looked at the wrong place for the mirror, I had an instant flashback to how many times I did just the opposite when I relied on a peep mirror for over 20 years. In those days I drove mainly in commute traffic, and frequently in the early morning or late afternoon I had to swing the sun visor over to the side - blocking the mirror. Inevitably Id want to pass someone, and glance up in the mirror to make sure the lane was clear. It would take my brain a couple of nano-seconds to process the realization that I had no information and either had to cancel the pass or move the visor for a double check. It caused me to routinely get stuck behind someone I didnt want to follow, but at least I had the discipline to hold my position instead of doing something stupid. That was my biggest disappointment with peep mirrors, but to me it was a minor inconvenience for having something so cool and rare (at the time). Peep mirrors were uncommon in my childhood. There were two kinds, the type that clamped on top of the door, and a different model that clamped on the vent tray of GM cars. Both were exceedingly rare. Most people used straight arm clamp on mirrors at the front edge of the door before the factory started offering OEM options. By 1970 when I found my first peep in a wrecking yard and the mid 1980s when the aftermarket started reproducing them, the only two I ever saw were mine. The second one came into my possession when I purchased an original owner 48 Chevy coupe and found a brand new Yankee peep mirror in the original box under the back seat! I know Im almost starting to show my age,  but I still appreciate that sometimes having something cool is worth the price it costs! but I still appreciate that sometimes having something cool is worth the price it costs!
__________________
My Build Thread: http://67-72chevytrucks.com/vboard/s...d.php?t=444502 |
|
|
|
|
04-23-2014, 12:03 AM
|
#1407 |
|
Senior Enthusiast
Join Date: Feb 2007
Location: Spokane Valley, WA
Posts: 8,356
|
Re: Markeb01 Build Thread
The last few days Ive been shoveling 5 yards of bark and 5 more yards of red lava rock. With that out of the way I headed back to the truck and started working on the porthole lights again. My initial selection of lights was 16mm LED bolts for the turn signals, and 6mm LED bolts for the parking lights. All was well for about a month, when the drivers side sequencer failed to illuminate lamp #4, and coincidentally one of the parking light LEDs also failed.
The sequencer is guaranteed for life, so it was sent back and a new one was provided in a week or so. If the installation had been a typical brake light system in a trunk, I may have restored the sequencers. But since this is mounted up inside the rear of the hood, working on it is miserably painful for both my knees and back. So I deleted the sequencers for now. If my knees ever get better and I find the inspiration, I may put them back in. I originally selected the 6mm LED bolts because they were roughly one half the intensity of the turn signal bulbs. I discovered a couple of things. The 6mm versions are very delicate while the larger units are very hardy. Also, they actually put out the same light output as the bigger units, but they come with the addition of a resistor on the power line dropping their output. I also found out the same result can be achieved by wiring multiple bulbs in series. Heres a close up look of the 6mm LEDs. In the first shot both the 16mm turn signal lamp and 6mm parking lamp are off (these are on the passenger side of the hood):  In this shot just the parking lamp is lit:  From some angles it lights up the porthole better, but since there is no lens on the LED, it basically shoots light straight out the hole. In order to improve illumination without blinding other drivers, I pulled all of the 6mm LEDs and replaced them with 11mm versions for the parking circuit. In order to easily drop the light output, I wired the parking lamps in four pairs of two. In this configuration the output is roughly half the turn signal output, but since they have lenses, the portholes light up much better as the light is spread around the perimeter of the housing. Here is the front and back of a porthole mounted in the vise. The hole for the 6mm lamp was filled with a plastic snap in plug. The new hole for the 11mm lamp was mounted to the downside depending on which side of the truck the porthole was being installed (for better daytime reflection):  This shot shows how much bigger the 11mm (on the left) is compared to the hole vacated by the 6mm lamp:  And heres the new configuration shown mounted on the drivers side of the hood:   I also finally got around to snapping the clutch pedal bumper in place, and pulled the glove box emblem off for black paint detailing: 
__________________
My Build Thread: http://67-72chevytrucks.com/vboard/s...d.php?t=444502 |
|
|
|
|
04-23-2014, 04:19 PM
|
#1408 |
|
Registered User
Join Date: Apr 2012
Location: Searcy, AR
Posts: 4,203
|
Re: Markeb01 Build Thread
As always, you find the way to adapt and overcome!!!
Great Job Mark!!! 
__________________
DON Proverbs 27:17 US Air Force Retarded errr Retired My '65 Stepper Build:http://67-72chevytrucks.com/vboard/s...d.php?t=533920 My '60 Rusty Patina Build:http://67-72chevytrucks.com/vboard/s...66#post7402266 My '72 http://67-72chevytrucks.com/vboard/s...59#post7204359 SOLD |
|
|
|
|
04-24-2014, 12:55 AM
|
#1409 |
|
Senior Enthusiast
Join Date: Feb 2007
Location: Spokane Valley, WA
Posts: 8,356
|
Re: Markeb01 Build Thread
Thanks for routinely checking in Don, even when little is going on. I appreciate it.
Last night I painted the GMC emblem black, and it turned out looking crappy:  I tried twice and just couldnt get the edges to come out clean enough to attain my standards. It subsequently got washed in lacquer thinner, double waxed, and reinstalled without paint. I prefer it with black in the textured area, but only if its perfect. So Im done messing with it, the emblem will stay bare chrome (which my wife prefers anyway)! Next up I snapped a shot of the new bigger porthole lights just for comparison to the smaller ones. Heres the old lights a few days ago:  And heres the new ones, in the same location as close as I could match:  And finally, all of the squeaks in the truck are finally gone! It turned out there were numerous items generating noises at similar frequencies. The hood was the biggest one, but the last one turned out to be the pivot bolt inside the Hurst shifter mechanism:  It was at least a couple of turns loose, and simply tightening it up eliminated the last annoyance!
__________________
My Build Thread: http://67-72chevytrucks.com/vboard/s...d.php?t=444502 |
|
|
|
|
04-24-2014, 08:37 AM
|
#1410 |
|
Registered User
Join Date: Nov 2011
Location: fayetteville nc
Posts: 10,338
|
Re: Markeb01 Build Thread
Your column conversion came out great. You always do the cleanest work....you are a true master at this.
__________________
1963 Short bed step side SBW 427 big block and borg warner T-16 HD 3 speed manual http://67-72chevytrucks.com/vboard/s...d.php?t=519869 1963 Short bed fleetside BBW 348 1st gen big block w/Powerglide http://67-72chevytrucks.com/vboard/s...d.php?t=619024 1964 Short bed trailer |
|
|
|
|
04-24-2014, 12:52 PM
|
#1411 |
|
Registered User
Join Date: Apr 2003
Location: Indep, MO
Posts: 5,893
|
Re: Markeb01 Build Thread
Not for nuthin', but did you check your tank venting? Pinched/clogged, clearrrrr into the tank? I've seen 'em before where you're good to go at low speed, but at higher sustained speed (highway) you move enough fuel to vacuum lock the tank and the mech pump cant overcome it. Not just a new hose, I've seen 'em get plugged up inside the sender enough to do it also. Just a thought.
Truck looks great, congrats on the squeak eradication!
__________________
Boppa's Old Yeller Truck Build, Old Yeller's New Heart! Project Buzz Bomb Flyin' Low! |
|
|
|
|
04-24-2014, 03:46 PM
|
#1412 |
|
Registered User
Join Date: Apr 2012
Location: Searcy, AR
Posts: 4,203
|
Re: Markeb01 Build Thread
Dang squeaks and rattles... Glad you tracked them all down...
 Lights appear more noticeable... Bottom interior shot from the Apr 9th post...
__________________
DON Proverbs 27:17 US Air Force Retarded errr Retired My '65 Stepper Build:http://67-72chevytrucks.com/vboard/s...d.php?t=533920 My '60 Rusty Patina Build:http://67-72chevytrucks.com/vboard/s...66#post7402266 My '72 http://67-72chevytrucks.com/vboard/s...59#post7204359 SOLD |
|
|
|
|
04-24-2014, 07:33 PM
|
#1413 | |
|
Senior Enthusiast
Join Date: Feb 2007
Location: Spokane Valley, WA
Posts: 8,356
|
Re: Markeb01 Build Thread
Quote:
Unfortunately it made no difference. I have all new line from the tank to the carburetor, and a factory GMC canister fuel filter under the passenger door with a new filter inside. Things like this drive me nuts. When everything is old or questionable the problem could be anywhere, but when everything is new and appears to be in perfect operating condition, intermittent problems like this can be mind boggling! The upside of the recent change being I havent had a single starvation issue since the mechanical pump was removed. Well, other than the one time I forgot to turn on the electric pump before leaving a parking lot! 
__________________
My Build Thread: http://67-72chevytrucks.com/vboard/s...d.php?t=444502 |
|
|
|
|
|
04-24-2014, 07:44 PM
|
#1414 | |
|
Senior Enthusiast
Join Date: Feb 2007
Location: Spokane Valley, WA
Posts: 8,356
|
Re: Markeb01 Build Thread
Quote:

__________________
My Build Thread: http://67-72chevytrucks.com/vboard/s...d.php?t=444502 |
|
|
|
|
|
04-25-2014, 12:59 PM
|
#1415 | |
|
Registered User
Join Date: Sep 2011
Location: Tacoma, WA
Posts: 2,425
|
Re: Markeb01 Build Thread
Quote:
We had one of these trucks when I was a 15 years old, we used it to haul water. Mom got it in a trade for a horse which cost her $150. In retrospect, I wish she had had the forethought to talk to me about buying the truck from her, as I had gotten my drivers permit (at 15.5 years old), and was driving the truck and hauling the water. I would have learned auto mechanics, money management skills, responsibility, and a plethora of other life skills early on, if only this intuition had occured to her. Such is life; it is what really pleases me the most about the teen/parent builds that pop up on this board.
__________________
Michael McMurphy My 66 Stepside My 64 Tow Truck My 66 Tempest Table Of Contents Added to Page1 |
|
|
|
|
|
04-26-2014, 12:33 AM
|
#1416 |
|
Senior Enthusiast
Join Date: Feb 2007
Location: Spokane Valley, WA
Posts: 8,356
|
Re: Markeb01 Build Thread
Im there with you every time I time I read about a father/son or father/daughter project. My dad was talented and smart, but he also had a malignant personality. I learned a lot from him, and not all of it good. On the other hand I had dad figures like Joe next door, and Eddie down the street. Beyond teaching mechanical and logic skills, both took the time to explain things to me like I was an adult, instead of the 10 year old kid I really was. That left a lasting impression.
I remember an incident with my youngest son when he was about 3 or 4. He came out in the garage and held up a broken cap gun when I was right in the middle of an engine rebuild. My first thought was to yell at him for interrupting, but instead I wiped off my hands, fixed the gun, and he was off playing in just a couple of minutes. Many years later I still get comments from my daughters and wife about my ability to interrupt anything Im doing to respond to their personal needs, important or not. Whatever Im working on gets done eventually anyway, but taking the time out when it really counts can build those memories that linger for a lifetime in the next generation.
__________________
My Build Thread: http://67-72chevytrucks.com/vboard/s...d.php?t=444502 |
|
|
|
|
04-30-2014, 09:37 PM
|
#1417 |
|
Senior Enthusiast
Join Date: Feb 2007
Location: Spokane Valley, WA
Posts: 8,356
|
Re: Markeb01 Build Thread
So here I am with a finished truck that Ive historically been incapable of leaving it alone, I thought perhaps it could use a few more splashes of red in the otherwise all black interior. So a couple of days ago I decided to replace the blue metalflake Epco shift knob with an identical red version. The new one is due to arrive mid-May.
I was discussing the concept with my son, and he reminded me he had a brand new Mooneyes red metalflake steering wheel sitting in the box, and a new Epco red metalflake shift knob he bought a few years back, the same day I bought the blue one. Since he wont need either for several months, he dropped off them off so Id have a chance to test it out before spending any money. Here are the results. To me, the steering wheel seems more muted in real life, although the metal flakes really pop in the sun. The knob is a darker shade, more cherry or blood color red. Since they are all different I wont know what color the new one will be until it shows up:    Im having fun with the changes for now, and if I ever get tired of it I can always swap back to the black wheel in about 10 minutes, but I think this may become permanent. Being his fathers offspring, my son already changed his mind about how he wants to do with his car, so at his request I ordered him a new green metalflake Mooneyes wheel to replace the red one.
__________________
My Build Thread: http://67-72chevytrucks.com/vboard/s...d.php?t=444502 |
|
|
|
|
05-01-2014, 12:55 AM
|
#1418 |
|
Registered User
Join Date: Feb 2010
Location: Twin Falls, ID
Posts: 119
|
Re: Markeb01 Build Thread
Your truck is so cool. If Knight Rider drove a truck it would be like yours.

|
|
|
|
|
05-01-2014, 06:07 PM
|
#1419 |
|
Senior Enthusiast
Join Date: Feb 2007
Location: Spokane Valley, WA
Posts: 8,356
|
Re: Markeb01 Build Thread
Thanks for the compliment. I think maybe it's what Grampa Munster should have driven if they made him a truck!
Studying the most recent pictures last night, I realized how out of balance the dash was now, with the chrome GMC emblem on the glovebox door. So this morning I pulled it again and this time spent the better part of two hours masking it off, and sprayed it with Testors 1837M Revving Red lacquer. This time it turned out perfect with nice straight edges: 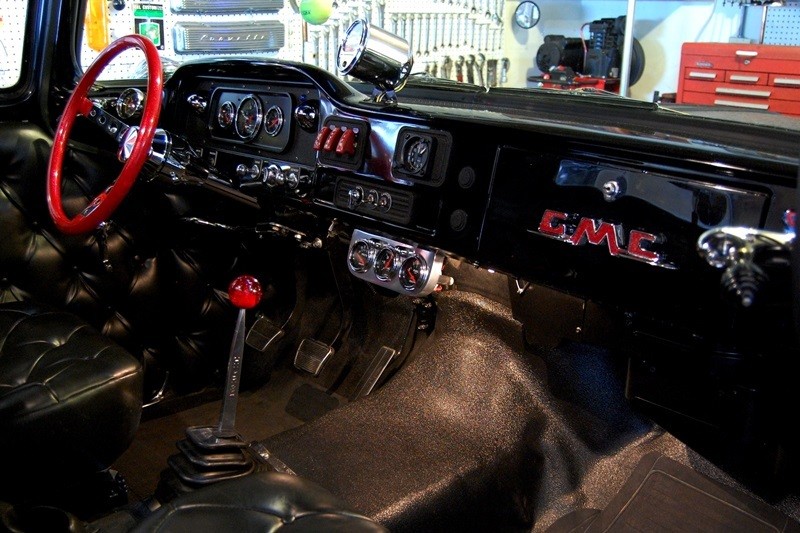 To me the dash now seems in balance from a color perspective.
__________________
My Build Thread: http://67-72chevytrucks.com/vboard/s...d.php?t=444502 |
|
|
|
|
05-01-2014, 07:25 PM
|
#1420 | |
|
Rollin' Old Skool
Join Date: Jun 2007
Location: Hattiesburg, MS
Posts: 5,371
|
Re: Markeb01 Build Thread
Quote:
However, it doesn't look bad by any means. I'd have to see the black wheel installed again with the new red accessories for a better perspective to truly compare.
__________________
_____________________________________________ Phillip My Build threads: 1966 Chevy C-10 "Black Betty" shortbed, fleetside, BBW, 327 V8/ Powerglide (under construction) http://67-72chevytrucks.com/vboard/s...ighlight=betty 1997 Chevy Tahoe, 2dr/2wd, mild custom (Daily driver) http://67-72chevytrucks.com/vboard/s...d.php?t=601142 Pics: '66 C-10 https://flic.kr/s/aHsjHWD4h9 '97 Tahoe https://flic.kr/s/aHsjGZ7wKP '93 C-1500 https://flic.kr/s/aHskxdpdnQ '88 S-10 Blazer https://flic.kr/s/aHsjYGx4Md Previous Rides: 1993 Chevy S-10 ext. cab, 4.3L, 4/5 drop (Sold) 1993 Chevy C-1500 short/step Retro-Rod (Sold) 1988 S-10 Blazer 2dr/2wd mild custom (Sold) |
|
|
|
|
|
05-01-2014, 07:43 PM
|
#1421 |
|
Senior Enthusiast
Join Date: Feb 2007
Location: Spokane Valley, WA
Posts: 8,356
|
Re: Markeb01 Build Thread
I hear you. In real life (at least to me) the steering wheel doesn't look anywhere near as bright as in the pictures. The closest photo I've taken looks most like the 1st one I posted in #1419 above . The one from the driver's side doesn't look real at all, it's way too bright compared to real life. I guess the flash really sets off the metalflake. As noted earlier, I'm having fun with it right now, but I may get sick of the red wheel eventually and switch back to the black one. Even if I do, the blue shift knob has been added to the collection and won't be going back in the truck, and the GMC emblem will also remain red.
I like all the accent colors being the same, but the wheel may prove to be too much over time. It's more 1960's cartoonish, while the shiny black model seems far more classy and rich looking.
__________________
My Build Thread: http://67-72chevytrucks.com/vboard/s...d.php?t=444502 |
|
|
|
|
05-01-2014, 09:23 PM
|
#1422 |
|
Rollin' Old Skool
Join Date: Jun 2007
Location: Hattiesburg, MS
Posts: 5,371
|
Re: Markeb01 Build Thread
Nothing wrong with playing around, as that's what makes it fun & interesting! Yeah, pics can definitely be deceiving. As you said, you can always switch back easily if you decide you want to.
__________________
_____________________________________________ Phillip My Build threads: 1966 Chevy C-10 "Black Betty" shortbed, fleetside, BBW, 327 V8/ Powerglide (under construction) http://67-72chevytrucks.com/vboard/s...ighlight=betty 1997 Chevy Tahoe, 2dr/2wd, mild custom (Daily driver) http://67-72chevytrucks.com/vboard/s...d.php?t=601142 Pics: '66 C-10 https://flic.kr/s/aHsjHWD4h9 '97 Tahoe https://flic.kr/s/aHsjGZ7wKP '93 C-1500 https://flic.kr/s/aHskxdpdnQ '88 S-10 Blazer https://flic.kr/s/aHsjYGx4Md Previous Rides: 1993 Chevy S-10 ext. cab, 4.3L, 4/5 drop (Sold) 1993 Chevy C-1500 short/step Retro-Rod (Sold) 1988 S-10 Blazer 2dr/2wd mild custom (Sold) |
|
|
|
|
05-02-2014, 05:10 AM
|
#1423 |
|
Registered User
Join Date: Dec 2012
Location: Rochester, KENT
Posts: 10,508
|
Re: Markeb01 Build Thread
Morning Mark
Sat in my car 55 miles from home at a motorway service station waiting for a colleague I am meeting here. McDonalds Free WiFi is a "blessing" when reading and catching up with threads is cool. Your thread and activities always make me grin madly. The red GMC logo has pulled it together. Looking forward to your next change.
__________________
MY BUILD LINK: http://67-72chevytrucks.com/vboard/s...585901]Redneck Express - 1966 C10 Short Fleetside MY USA ROADTRIPS http://forum.retro-rides.org/thread/...2018-humdinger IF YOU CAN'T FIX IT WITH A HAMMER, YOU'VE GOT AN ELECTRICAL PROBLEM MATE. |
|
|
|
|
05-02-2014, 10:15 AM
|
#1424 | |
|
Registered User
Join Date: Apr 2012
Location: Searcy, AR
Posts: 4,203
|
Re: Markeb01 Build Thread
Quote:
 Very Nice!!! Very Nice!!!
__________________
DON Proverbs 27:17 US Air Force Retarded errr Retired My '65 Stepper Build:http://67-72chevytrucks.com/vboard/s...d.php?t=533920 My '60 Rusty Patina Build:http://67-72chevytrucks.com/vboard/s...66#post7402266 My '72 http://67-72chevytrucks.com/vboard/s...59#post7204359 SOLD |
|
|
|
|
|
05-02-2014, 11:03 AM
|
#1425 |
|
Registered User
Join Date: Nov 2011
Location: fayetteville nc
Posts: 10,338
|
Re: Markeb01 Build Thread
Dash looks much better with the red emblem!!!! Looks great
__________________
1963 Short bed step side SBW 427 big block and borg warner T-16 HD 3 speed manual http://67-72chevytrucks.com/vboard/s...d.php?t=519869 1963 Short bed fleetside BBW 348 1st gen big block w/Powerglide http://67-72chevytrucks.com/vboard/s...d.php?t=619024 1964 Short bed trailer |
|
|
|
 |
| Bookmarks |
|
|


 Linear Mode

