
|
Register or Log In To remove these advertisements. |
|
|
|
|||||||
 |
|
|
Thread Tools | Display Modes |
 08-13-2009, 12:37 PM
|
#1 |
|
Registered User
Join Date: Oct 2005
Location: Houston Texas
Posts: 316
|
'89 3/4T 'burb front-end swap to '66 C20
I look at the restoration of my truck as two main parts: Mechanical & Aesthetics. The mechanical part being everything that's under the body & bed boards while the aesthetics are well, the rest of the stuff that makes the truck pretty.
My plan is to complete the mechanical resto first, then worry about the paint & body part. The way I'm going about this is a little different, because I drive my truck every day. Most normal people would buy their project truck, make a budget, and either buy all of the parts they're going to need up front, or tear down their truck first, then purchase the parts. Then sand blast, clean up, patch up, paint and re-assemble with new parts, engine, trans, drive line, diff, wheels exhaust cab, front clip, electrical, bed & bed wood - done! (not necessarily in that order) My approach is different for 2 reasons: 1. I don't have shop big enough to store a stripped down frame off truck for a year or so until I can finish it. 2. I drive my truck every day. The modified plan goes something like this:
I've broken the mechanical part down into 3 phases:
The Aesthetics part doesn't really break down into phases because I can do all of the work off-vehicle (with the exception of the bed because I don't have a spare one of those) and assemble it all at the final tear down. Well it's been a long time coming, but with the engine, exhaust and transmission completed like I wanted it, the time is finally here to start phase 2 of the mechanical "restoration" of my truck! My plan to upgrade my steering & brakes was to swap out a complete front suspension from a later model truck - cross member & all. Not only does this fit my modular approach to minimize down time, but it also makes it easier to avoid geometry issues and replacement parts later on. I can also sell my vintage "power assisted" steering parts at the swap meet as a complete package. Some time ago (about 4 years ago) I purchased a front end out of an '89 3/4 ton Suburban:  After a not so brief intermission, (2 years recovering from a near fatal aortic aneurysm) I was finally able to complete the re-build: 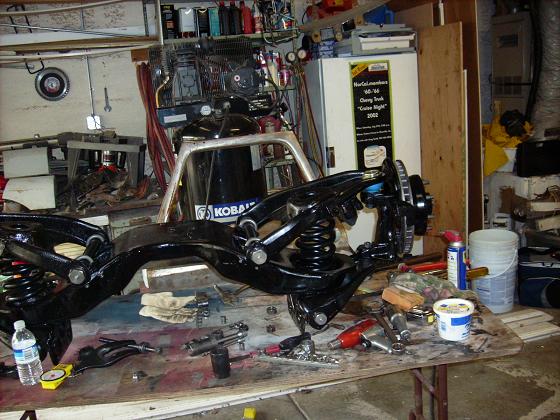 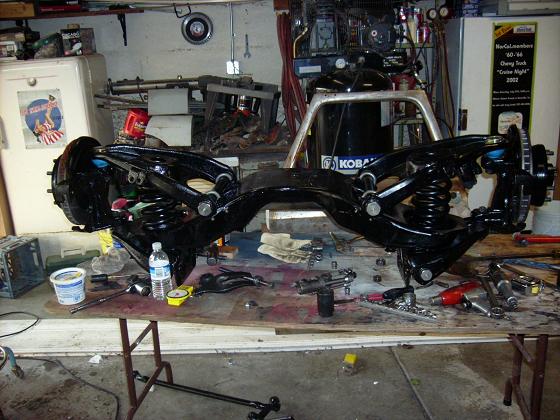 Heres most of the parts I'll need to complete the upgrade: 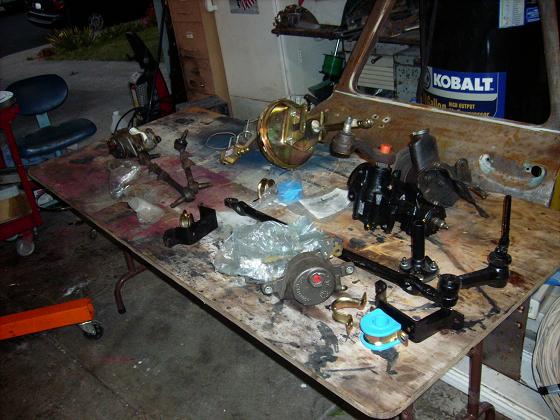 New calipers & pads, new outer tie rod ends, new dual mastercyl/brake booster kit adapted for a '66 Chevy truck, a re-manufactured p/s box from the '89 3/4 ton 'burb, new sway bar bushings, brackets, good used pitman arm (89 burb), good used inner tie rod ends, good used idler arm/center link and good used sway bar brackets for front cross-member. The huge 1-1/4" sway bar, the re-man p/s pump and the REZ adapter kit aren't pictured. I still need to purchase p/s hoses, brake lines for the fronts, and some new dust covers for the inner tie rod ends. The plan is to remove the front clip of my truck intact, jack up the frame, suspend the engine, remove the existing front-end (cross member & all) clean & POR-15 everything, then install the new cross-member, the master cylinder, p/s box, p/s pump and all the lines. Then put the "dog house" back on as it was - well, that is except for new isolators under the core support.
__________________
Greg Smith a.k.a. "The Highlander" 1966 C20 Custom Camper, 2017 Chevy Silverado 1500 Highlander's Project Pics Highlander's web site: www.6066ChevyTrucks.com |

|

|
|
08-14-2009, 09:12 PM
|
#2 |
|
Registered User
Join Date: Oct 2005
Location: Houston Texas
Posts: 316
|
Re: '89 3/4T 'burb front-end swap to '66 C20
whew! you guys really know how to bury a post!
__________________
Greg Smith a.k.a. "The Highlander" 1966 C20 Custom Camper, 2017 Chevy Silverado 1500 Highlander's Project Pics Highlander's web site: www.6066ChevyTrucks.com |
|
|
|
|
08-14-2009, 09:25 PM
|
#3 |
|
HOW long until spring??
 Join Date: Mar 2009
Location: Star Idaho
Posts: 1,413
|
Re: '89 3/4T 'burb front-end swap to '66 C20
You have done a nice job of cleaning up the front crossmember. Amazing how a garage accumulates stuff, isn't it! Looking good!!!
__________________
69 chevelle convertible 71-C-10 short-wide and low  64 C-10 custom shortbox "Bubba"s Recycling project" |
|
|
|
|
08-14-2009, 09:55 PM
|
#4 | |
|
Resistance is Futile
Join Date: Dec 2006
Location: Mesa,Arizona
Posts: 3,519
|
Re: '89 3/4T 'burb front-end swap to '66 C20
Quote:
 . J/K....looks like good progress and you will be very happy with the results, I'm sure. I'd like to see a pic of the truck when it's in 'traction' with that whole R&R going on . J/K....looks like good progress and you will be very happy with the results, I'm sure. I'd like to see a pic of the truck when it's in 'traction' with that whole R&R going on . .
__________________
64 CHEVY PICK-UP > http://67-72chevytrucks.com/vboard/s...otrash+re-hash 64 CARRYALL >http://67-72chevytrucks.com/vboard/s...=1964+suburban 66 LB >http://67-72chevytrucks.com/vboard/s...d.php?t=427852 STRENGTH/DETERMINATION/MERCILESS/FOREVER .......posted via stationary device |
|
|
|
|
|
08-14-2009, 10:06 PM
|
#5 |
|
Registered User
Join Date: Nov 2007
Location: Calais, Maine
Posts: 488
|
Re: '89 3/4T 'burb front-end swap to '66 C20
Sounds like a good plan. I am anxious to see the finished project. I'm sure ya are aware thet POR-15 is some nasty stuff if not properly ventilated. It does the trick though!
__________________
1963 Chevrolet C-10 "Ginger" 1970 C-30 Dump Truck "Scarlet" 2019 Chevy Silverado 2500 Z71 LTZ 1947 Indian Chief Roadmaster with Sidecar. 2012 Indian Chief Serial #002 of 110 built in '12 2016 Indian Chief Roadmaster |
|
|
|
|
08-14-2009, 10:50 PM
|
#6 |
|
Senior Enthusiast
Join Date: Feb 2007
Location: Spokane Valley, WA
Posts: 8,356
|
Re: '89 3/4T 'burb front-end swap to '66 C20
It's amazing how a minor thing like a near fatal event can change your priorities, and stall your progress. I've got back and knee problems and it's taken me several weeks to get half done sanding my truck for new paint, but I'm greatful I can still do it at all.
It's good to see you're again capable of moving forward. What you've done so far looks great. For what it's worth, I also did the front suspension swap with the engine in the truck. To suspend the engine, I bolted a couple of chunks of frame rail from the donor truck, to the 1955 engine mount holes at the front of the block, and rested the other end on top of my frame. It was simple and didn't require an engine hoist to be in the way. Also, on the POR-15, you may want to check out the following link, and the testing link within that thread that shows a salt water test comparison: http://autobodystore.com/forum/showt...ht=por-15+rust We painted my entire chassis and suspension with POR-15 about 10 years ago, and I must admit I'm disppointed with how it's held up. When I wash the crud off there are quite a few rust pits popping through. I found out about Zero Rust after I had completed the chassis, but I've been using it on everything since and I think it holds up better. My truck did see 9 years of Idaho winters and gravel roads so maybe nothing would have held up. Just something to consider. |
|
|
|
|
08-15-2009, 10:56 PM
|
#7 |
|
Registered User
Join Date: Oct 2005
Location: Houston Texas
Posts: 316
|
Re: '89 3/4T 'burb front-end swap to '66 C20
Thanks for the tips I was thinking of doing something like that to support the engine. I bought a whole boat load of POR-15 back when I purchased all my parts so I'm committed now. besides, the back sides of all my body panels are already coated.
__________________
Greg Smith a.k.a. "The Highlander" 1966 C20 Custom Camper, 2017 Chevy Silverado 1500 Highlander's Project Pics Highlander's web site: www.6066ChevyTrucks.com |
|
|
|
|
08-16-2009, 12:23 AM
|
#8 |
|
Registered User
Join Date: Dec 2007
Location: Palmer, Alaska
Posts: 13,821
|
Re: '89 3/4T 'burb front-end swap to '66 C20
that is one sexy cross-member

__________________
CHEVY ONLY
|
|
|
|
|
08-16-2009, 11:54 AM
|
#9 | ||
|
Registered User
Join Date: Oct 2005
Location: Houston Texas
Posts: 316
|
Re: '89 3/4T 'burb front-end swap to '66 C20
Quote:
I do this for many reasons:
Quote:
Did you prep all the surfaces with POR-15's "Metal Ready" before applying the paint? Did you spray it on or did you brush it on?
__________________
Greg Smith a.k.a. "The Highlander" 1966 C20 Custom Camper, 2017 Chevy Silverado 1500 Highlander's Project Pics Highlander's web site: www.6066ChevyTrucks.com Last edited by Hilandr451; 08-16-2009 at 11:54 AM. |
||
|
|
|
|
08-16-2009, 02:49 PM
|
#10 |
|
Registered User
Join Date: Nov 2007
Location: Calais, Maine
Posts: 488
|
Re: '89 3/4T 'burb front-end swap to '66 C20
Good deal, I didn't mean to say you weren't competent, I just have heard some really bad stull, like livers shutting down ect. from lack of proper use. I know it works wonders in the area of preservation.
__________________
1963 Chevrolet C-10 "Ginger" 1970 C-30 Dump Truck "Scarlet" 2019 Chevy Silverado 2500 Z71 LTZ 1947 Indian Chief Roadmaster with Sidecar. 2012 Indian Chief Serial #002 of 110 built in '12 2016 Indian Chief Roadmaster |
|
|
|
|
08-16-2009, 05:15 PM
|
#11 |
|
Senior Enthusiast
Join Date: Feb 2007
Location: Spokane Valley, WA
Posts: 8,356
|
Re: '89 3/4T 'burb front-end swap to '66 C20
No, I didn't find out about Metal Ready until years after I finished my chassis. Like you I brush painted mine after wire brushing everything to bare metal. I also didn't want to render it aerosol due to health risks. It might have held up better had I used Metal Ready first.
I wish more hobbyists considered the safety aspects of the current paint products. POR is no more deadly than anything else with isocynates in it, but that's the component that can kill you. I've known lots of guys that have sprayed catalyzed paint with nothing more than a respirator (including myself when I was younger), but the iso's can be absorbed through your skin and eyeballs so you really need breathing gear for spraying. That's why I painted my truck in lacquer years ago. About 6 months after I was done the breathing gear dropped in price from $2000 to about $500, and I was disappointed I hadn't waited so I could have used better paint. Even if using old Alkyd enamel which is reasonably safe, if hardener is added that has isocynates in it. This is the main reason I'm painting my truck Blitz Black (air dryed enamel). I'm too old to give up any more lung capacity and this is my last paint job so I don't want to invest in breathing equipment that will only get used once. |
|
|
|
|
09-14-2009, 11:47 AM
|
#12 |
|
Registered User
Join Date: Oct 2005
Location: Houston Texas
Posts: 316
|
Re: '89 3/4T 'burb front-end swap to '66 C20
Well, the day has come for the deed to be done. I've been forced to take a week off from work (company wide shut downs) so I'm taking advantage of the opportunity to work on my truck.
Day one - tear down:    This goes bye-bye and gets replaced with REAL power steering!!!!  
__________________
Greg Smith a.k.a. "The Highlander" 1966 C20 Custom Camper, 2017 Chevy Silverado 1500 Highlander's Project Pics Highlander's web site: www.6066ChevyTrucks.com |
|
|
|
|
09-14-2009, 12:00 PM
|
#13 |
|
Senior Enthusiast
Join Date: Feb 2007
Location: Spokane Valley, WA
Posts: 8,356
|
Re: '89 3/4T 'burb front-end swap to '66 C20
Wouldn't it be nice if they went back together as easy as they came apart?!
Not sure how well the power linkage system worked, but having the integral power box changed mine from miserable to nimble. |
|
|
|
|
09-14-2009, 09:49 PM
|
#14 |
|
Registered User
Join Date: Oct 2005
Location: Houston Texas
Posts: 316
|
Re: '89 3/4T 'burb front-end swap to '66 C20
That's what I'm counting on!! I don't know what the "power assisted" steering felt like either - it's been disconnected since I bought it 15 years ago. I hooked it up once when I repaired the p/s engine bracket, but all the hoses leaked like a red fountain. At the time, it was too hard to find hoses for so I just never got it going again.
__________________
Greg Smith a.k.a. "The Highlander" 1966 C20 Custom Camper, 2017 Chevy Silverado 1500 Highlander's Project Pics Highlander's web site: www.6066ChevyTrucks.com |
|
|
|
|
09-14-2009, 10:00 PM
|
#15 |
|
Registered User
Join Date: Dec 2007
Location: Palmer, Alaska
Posts: 13,821
|
Re: '89 3/4T 'burb front-end swap to '66 C20
Right on!
Nice progress!!!
__________________
CHEVY ONLY
|
|
|
|
|
09-14-2009, 10:39 PM
|
#16 |
|
Registered User
Join Date: Oct 2005
Location: Houston Texas
Posts: 316
|
Re: '89 3/4T 'burb front-end swap to '66 C20
Day two: Partial frame-off
My buddy John came by today and we kicked some tail!  This is what we started with at about 11:00 this morning (John needed his beauty rest) While I was waiting for him, I hooked up the battery and just drove it in under it's own power (easier on the back)  Jacked 'er up, yanked the tires. those drums are almost new - shame!  Dropped the sway bar & the steering box.  Plucked the brake booster & master cyl.  Then we popped the motor mounts free, attached a chain to the front of the motor.  Then we shoved a 2x4 under the front pulley to support the engine - worked like a charm!  We dropped the old cross-member out and the frame was bare finally! Really dirty, but free of parts.
__________________
Greg Smith a.k.a. "The Highlander" 1966 C20 Custom Camper, 2017 Chevy Silverado 1500 Highlander's Project Pics Highlander's web site: www.6066ChevyTrucks.com |
|
|
|
|
09-14-2009, 10:40 PM
|
#17 |
|
Registered User
Join Date: Oct 2005
Location: Houston Texas
Posts: 316
|
Re: '89 3/4T 'burb front-end swap to '66 C20
Day Two Continued:
 Removing the dirt was easy - I just transferred all of it to my body! My wife tells me I'm a dirt magnet & I guess this is proof!  Shazam! The dirt just flew off! I sprayed degreaser on the frame, scrubbed it down with a scrubby, then I washed it all down with the garden hose. Then a thorough wash-down with brake cleaner then I let it dry. Now that's a clean frame!  Next came the Metal Ready treatment from POR-15. I sprayed it on liberally from a spray bottle and let is stand for about 20 minutes. Then I hosed it all off again and blew it dry. The white residue is zinc phosphate an excellent rust inhibitor and etching compound for the paint. This is what you want your metal to look like before you apply POR-15  I used a propane torch to heat up areas where water would be trapped. All water needs to be removed before the paint goes on.  because of it's self leveling characteristics, you need to apply thin coats. This is how much coverage I got out of a single dip of the brush. I pour the paint into a little custard dish so I won't contaminate the can.  There! Done for the day! The finish is so smooth it looks like it was powder coated. After I was done, I wet the shop floor down to speed up the curing time. POR-15 cures by pulling moisture out of the air, so the more humid conditions are, the quicker the drying time.
__________________
Greg Smith a.k.a. "The Highlander" 1966 C20 Custom Camper, 2017 Chevy Silverado 1500 Highlander's Project Pics Highlander's web site: www.6066ChevyTrucks.com |
|
|
|
|
09-14-2009, 10:50 PM
|
#18 |
|
1961 crewcab
Join Date: Dec 2007
Location: missoula, mt
Posts: 6,164
|
Re: '89 3/4T 'burb front-end swap to '66 C20
looks great so far, I will be doing a swap like this in the future, so I am curious to see how this turns out.
|
|
|
|
|
09-14-2009, 11:00 PM
|
#19 |
|
Registered User
Join Date: Dec 2007
Location: Palmer, Alaska
Posts: 13,821
|
Re: '89 3/4T 'burb front-end swap to '66 C20
Very nice pics and commentary!!!
__________________
CHEVY ONLY
|
|
|
|
|
09-14-2009, 11:32 PM
|
#20 |
|
Registered User
 Join Date: Sep 2006
Location: San Francisco
Posts: 4,775
|
Re: '89 3/4T 'burb front-end swap to '66 C20
We should have most of it done tomorrow. And I didn't need my beauty sleep. Trying to get a 7 y/o ready for school is hard enough. I hope to have him out of the houst by 8 tomorrow so I can get up there at 9. Make sure you eat breakfast because I am not going out for any. We need to Git er Done.

__________________
"A man and his truck, what a beautiful thing" 65 Short Fleetside BBC 65 Long Fleetside 283 3 on the tree for now. my build thread http://www.67-72chevytrucks.com/vboa...d.php?t=259536 |
|
|
|
|
09-15-2009, 10:45 AM
|
#21 |
|
Registered User
Join Date: Oct 2005
Location: Houston Texas
Posts: 316
|
Re: '89 3/4T 'burb front-end swap to '66 C20
begining of day 3:
I've had me oats laddie & I'm waitin' on yoo! Oh & just so you know, you do need your beauty sleep. 
__________________
Greg Smith a.k.a. "The Highlander" 1966 C20 Custom Camper, 2017 Chevy Silverado 1500 Highlander's Project Pics Highlander's web site: www.6066ChevyTrucks.com Last edited by Hilandr451; 09-15-2009 at 11:08 AM. |
|
|
|
|
09-15-2009, 10:48 AM
|
#22 |
|
Registered User
Join Date: Sep 2006
Location: San Francisco
Posts: 4,775
|
Re: '89 3/4T 'burb front-end swap to '66 C20
Looks like 9:30 for me. Arival time that is not departure.

__________________
"A man and his truck, what a beautiful thing" 65 Short Fleetside BBC 65 Long Fleetside 283 3 on the tree for now. my build thread http://www.67-72chevytrucks.com/vboa...d.php?t=259536 |
|
|
|
|
09-15-2009, 10:41 PM
|
#23 |
|
Registered User
Join Date: Oct 2005
Location: Houston Texas
Posts: 316
|
Re: '89 3/4T 'burb front-end swap to '66 C20
Day three - Re-construction: "Let the Games Begin!"
John & I started the day off making a list of what we wanted to accomplish today, and then another list of what we needed to buy to make that happen. Today's objective was to get the crossmember installed, engine bolted in, steering box & brake booster installed. We tooled down to the hardware store & dropped a cool benjamin on some new shiny zinc coated grade 8 bolts, nuts, washers and some shop supplies. Then we headed back to the shop to dig in.....  The "new" cross member goes up for the first dry fit!  The six 1/2" bolts on the bottom fit perfectly and so did 2 of the 4 on top. All together 4 out of 14 had to be drilled.  This bolt on each side needed to be "augered" out a bit...  And this one needed a new hole to be drilled.  New hole drilled....  This one elongated just a smidge.
__________________
Greg Smith a.k.a. "The Highlander" 1966 C20 Custom Camper, 2017 Chevy Silverado 1500 Highlander's Project Pics Highlander's web site: www.6066ChevyTrucks.com |
|
|
|
|
09-15-2009, 10:42 PM
|
#24 |
|
Registered User
Join Date: Oct 2005
Location: Houston Texas
Posts: 316
|
Re: '89 3/4T 'burb front-end swap to '66 C20
 For the record: the '60-66 engine mount perches will work with the later model crossmembers without drilling any holes!!!  Rebuilt '89 power steering box installed with Rez kit. (not as much fun as I thought it would be)  New power brake booster, dual reservoir & proportioning valve installed coutesy ChevyDuty 2005. I sure hope they put some more work into their "adapter" bracket. - we needed to drill 4 new holes to make it work - none of the factory holes line up.  Mission accomplished!!! Nice day's work!  Here you go dad, here's your reward!
__________________
Greg Smith a.k.a. "The Highlander" 1966 C20 Custom Camper, 2017 Chevy Silverado 1500 Highlander's Project Pics Highlander's web site: www.6066ChevyTrucks.com |
|
|
|
|
09-15-2009, 10:55 PM
|
#25 |
|
HOW long until spring??
Join Date: Mar 2009
Location: Star Idaho
Posts: 1,413
|
Re: '89 3/4T 'burb front-end swap to '66 C20
You boys are fast!!! I started in July and I'm about the same place as you are after 3 days!! ( I keep getting pulled off task by wife and kids)
__________________
69 chevelle convertible 71-C-10 short-wide and low 64 C-10 custom shortbox "Bubba"s Recycling project" |
|
|
|
|
| Bookmarks |
| Thread Tools | |
| Display Modes | |
|
|


 Linear Mode

