
|
Register or Log In To remove these advertisements. |
|
|
|
|||||||
 |
|
|
Thread Tools | Display Modes |
 08-19-2015, 10:53 AM
|
#26 | |
|
Registered User
Join Date: Jan 2013
Location: Clinton Iowa
Posts: 337
|
Re: Retrosound Model Two Install and Review
Quote:
|
|

|

|
|
08-19-2015, 11:50 PM
|
#27 | |
|
Registered User
Join Date: Aug 2012
Location: Midland, TX
Posts: 1,267
|
Re: Retrosound Model Two Install and Review
Quote:
They are not powered subs, just speaker enclosures. Here's a link on eBay. http://www.ebay.com/itm/Undercover-I...-/261413905048 
__________________
1969 RS/SS Z10 Camaro Pace coupe 1972 GMC Short Step buildhttp://67-72chevytrucks.com/vboard/s...=1#post6356218 1979 Mazda RX7 1979 Pontiac Trans Am WS6 & 1979 Pontiac Trans Am 10th Anniversary 1999 Honda Valkyrie 2006 Corvette Z06 2010 BMW 650i |
|
|
|
|
|
03-13-2017, 02:29 PM
|
#28 | |
|
Registered User
Join Date: Sep 2012
Location: Arizona
Posts: 222
|
Re: Retrosound Model Two Install and Review
Quote:
I wanted to share a picture that may help others with the InfiniMount brackets (I initially misread the instructions above). You will only be using the two forward-most screw holes on the radio body with only the two rear-most slots on the InfiniMount brackets. Picture below, the top of the picture is the front of the radio. Secondly, the biggest potential hassle in all of this is the radio-knob post adjustment, the instructions above were spot on! I threaded the initial nut on the post one-thread past half-way and it worked out very well, you could probably do exactly half-way and be perfect. As stated, be very careful installing the radio to the dash, the chrome bezel is tightly secured in the main radio opening and the corners of this bezel will scratch/chip your paint (mine did on three corners, probably because the layers of paint made the opening 'smaller', nothing a sharpie couldn't fix! LOL). The $20 screen protector, look fantastic from 5-10 feet away, they are just a thick sticker and not 100% exact the same size as the radio face, nor would stick 100% around the edges, oh well. Maybe I was just expecting too much. When both knobs were installed, the forward most knobs looked like they stuck too far out and the gap between the front and rear knob felt like it was too much, nothing to do with the adjustment of the posts. Once the rubber post covers were cut down and installed between the two knobs, it looks much more acceptable, I just wanted to point that out. Thanks again for the write up!
__________________
You remember when drinking too many beers was a bad idea? Me neither. |
|
|
|
|
|
05-21-2017, 06:08 PM
|
#29 |
|
Registered User
Join Date: Mar 2012
Location: Gallipolis, Ohio
Posts: 296
|
Re: Retrosound Model Two Install and Review
Am i missing something or do i need to adjust my studs in
|
|
|
|
|
05-24-2017, 06:49 PM
|
#30 |
|
Registered User
Join Date: Aug 2012
Location: Midland, TX
Posts: 1,267
|
Re: Retrosound Model Two Install and Review
Adjust your stud depth. I'll try and take a pic of mine when I go over to my shop across town.
__________________
1969 RS/SS Z10 Camaro Pace coupe 1972 GMC Short Step buildhttp://67-72chevytrucks.com/vboard/s...=1#post6356218 1979 Mazda RX7 1979 Pontiac Trans Am WS6 & 1979 Pontiac Trans Am 10th Anniversary 1999 Honda Valkyrie 2006 Corvette Z06 2010 BMW 650i |
|
|
|
|
05-24-2017, 07:25 PM
|
#31 |
|
Registered User
Join Date: Nov 2007
Location: Indianapolis
Posts: 1,160
|
Re: Retrosound Model Two Install and Review
does a hidden antenna work well with this radio?
|
|
|
|
|
05-25-2017, 01:34 AM
|
#32 | |
|
Registered User
Join Date: Aug 2012
Location: Midland, TX
Posts: 1,267
|
Re: Retrosound Model Two Install and Review
Quote:
__________________
1969 RS/SS Z10 Camaro Pace coupe 1972 GMC Short Step buildhttp://67-72chevytrucks.com/vboard/s...=1#post6356218 1979 Mazda RX7 1979 Pontiac Trans Am WS6 & 1979 Pontiac Trans Am 10th Anniversary 1999 Honda Valkyrie 2006 Corvette Z06 2010 BMW 650i |
|
|
|
|
|
06-09-2017, 05:45 PM
|
#33 |
|
Registered User
Join Date: Feb 2011
Location: Santa Rosa, CA
Posts: 672
|
Re: Retrosound Model Two Install and Review
FYI, there are apparently two different bezel options with the 67-72 trucks, mine didnt extend to the arms, only surrounded the display, and extends alot more into the cab. i like it! helps keep it even with the knobs alot more! I just dont know if they offer this bezel anymore...
My unit is a Model 2, i think they were discontinued and replaced with new names?? anyways, they still sell this bezel on the new units with fancy names like Hermosa (cheaper unit) and Long Beach (equivalent to Model 2) my unit part number is RetroSound M2CB-119-03-73  Here is mine placed in my K5, not wired yet but sitting in the dash. 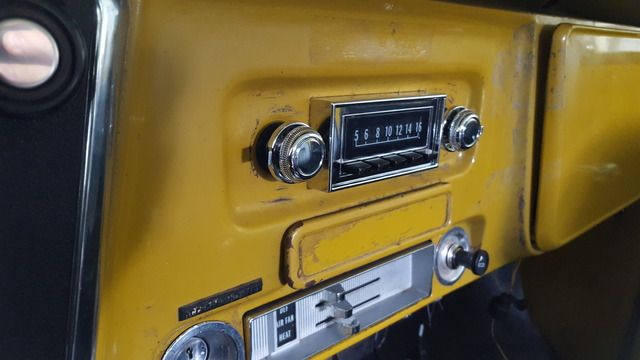 UPDATE: I contacted Retrosound about my Bezel, apparently my bezel is the corvette bezel, #108, they used to offer it with the 67-72 truck radios but no longer do? The 108 bezel is available at this site if you want to have a radio extend into the cab a little more to line it up with the knobs... https://www.retromanufacturing.com/p...ant=7979753859 the standard 67-72 unit is "119" which is weird, since 119 was in my part number.....
__________________
1955 2nd Series 3100 - 400 Pontiac / BW Super T-10 4-Speed 1972 K5 Blazer 350 Auto 4x4 1928 Ford Model A Tudor Last edited by Maximus; 06-09-2017 at 06:28 PM. |
|
|
|
|
12-25-2017, 01:46 PM
|
#34 |
|
Registered User
Join Date: Jun 2017
Location: Raleigh
Posts: 97
|
Re: Retrosound Model Two Install and Review
Maximus....could you upload a photo other than photo bucket? I just can’t see that format for some reason....
__________________
You'll never know unless you try |
|
|
|
|
12-25-2017, 08:43 PM
|
#35 | |
|
The Older Generation
  Join Date: Aug 2006
Location: Montezuma, Iowa
Posts: 25,329
|
Re: Retrosound Model Two Install and Review
Quote:
He hasn't been on the board since 8/14/2017. He may log on one of these days but it may be a while..... The reason you can't see the pictures is because photobust started charging big $ to let people post their pictures on any forums. LockDoc
__________________
Leon Locksmith, Specializing In Antique Trucks, Automobiles, & Motorcycles (My Dually Pickup Project Thread) http://67-72chevytrucks.com/vboard/s...d.php?t=829820 - |
|
|
|
|
|
06-10-2019, 08:32 PM
|
#36 | |
|
Registered User
Join Date: Feb 2016
Location: Coombs, BC
Posts: 15
|
Re: Retrosound Model Two Install and Review
Quote:
|
|
|
|
|
|
| Bookmarks |
|
|


 Linear Mode

