
|
Register or Log In To remove these advertisements. |
|
|
|
|||||||
 |
|
|
Thread Tools | Display Modes |
 05-16-2019, 02:59 PM
|
#126 |
|
Registered User
Join Date: Apr 2015
Location: Finland
Posts: 133
|
Re: 1968 Chevy Bel Air Wagon Project
Thank you for the nice comments on the exhaust sound. It does sound nice
and throaty, but Almost too loud, I'm afraid. We'll see, I have driven the wagon with no door seals, so it might feel different when those are done. Must be something with the previous owners of my cars. So many things done so wrong. When I removed the door seals, I marked them with masking tape for orientation and by door ( eg left front door ). I do mistakes, but I remember taking them off two different days, and the left hand ones were marked with red marker, and the right hand ones with black, so I'm pretty confident they were marked right. Of freaking course the PO had put the right hand side front door seal on the driver's side! When I had done the front door, and was working on the rear door seal, I noticed that they were inside out, opposed to eachother. I tried the fit, and decided the front door one was the wrong way around. Deep sigh, and picking out thirty odd little plastic fasteners, putting them into the other door seal, and working out how it would mount. I'll get it sorted, but it's like biking uphill all the time 
|

|

|
|
05-19-2019, 07:46 AM
|
#127 |
|
Registered User
Join Date: Apr 2015
Location: Finland
Posts: 133
|
Re: 1968 Chevy Bel Air Wagon Project
I was so annoyed with those door seals. I know, my own fault for putting one on
the wrong door. Still annoyed the heck out of me, having to pull all the little plastic fasteners out of the new painted window frame. Easy to blame the PO. Yesterday we had a cruis in at a local gas station/diner. A guy who took pics of all the cars at a previous event, April 30, happened to snap one of mine too, so I asked for promision to use it, so here it is. 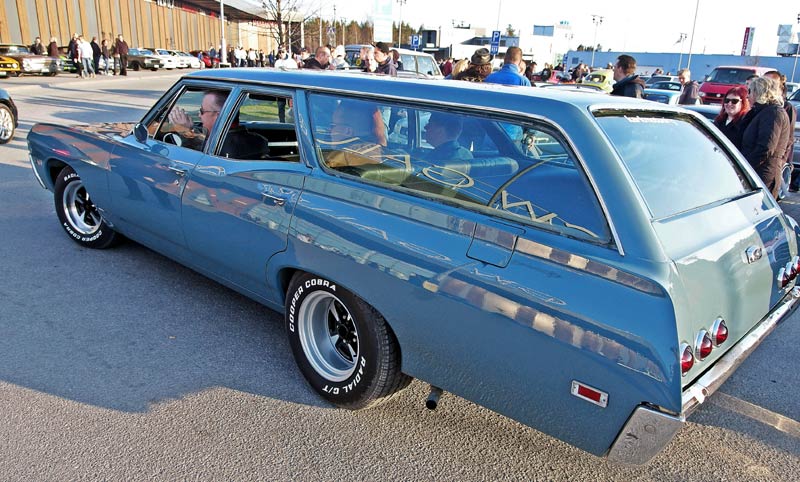 With new exhaust and door seals in place, the ride is pretty nice. I just need to get the front lowered and aligned. (some additional work may be needed  ) )
|
|
|
|
|
05-19-2019, 08:23 AM
|
#128 |
|
Proprietor of Dale's Corner
 Join Date: Nov 2012
Location: Vacaville , CA
Posts: 15,834
|
Re: 1968 Chevy Bel Air Wagon Project
Looks great out in the sun.
__________________
"Some Days Chickens And Some Days Feathers" Dale XNGH ECV Sam Brannan 1004 R.I.P. 67ChevyRedneck R.I.P. Grumpy Old Man |
|
|
|
|
06-13-2019, 03:59 PM
|
#129 |
|
Registered User
Join Date: Apr 2015
Location: Finland
Posts: 133
|
Re: 1968 Chevy Bel Air Wagon Project
It's been some time, and I've been waiting for the driver for the sequential
turn lights. A good friend of mine has made the system, and programmed the micro controller. I just got it home, and of course there's a lot of work to do with packaging, mounting of the driver, and getting all the cables and leads to go to their respective bulbs. So here's the whole gorgeousness sprawled out on the kitchen table:  Workflow from left to right: In: -Left and right front turn signal wires (the original relay will be shorted). -Brake light wire from pedal switch -Hazard (also relay removed/shorted) These signals will be processed by the programmable Arduino micro controller to send on signals to certain outputs. These signals go to the amplifier card, so that they get powerful enough to drive the relays on the relay card. There are eight relays on the relay card. Six for each one of the tail turn/brake light filaments, and one each for the front turn lights. The "Low park driver" will supply a lower voltage to the rear park light on the side to which the turn signals are blinking. This will require another two relays. I've also planned to put in a panic switch, that gets me brake lights if this whole system fails for some reason, just as a safety precaution. Normal tail lights will work even if the system is shut down The Arduino controller will be powered off a 12V to USB thingy, a bit like a phone car charger. The relay card and amplifier card will be powered off 12V when ignition is on. Chevrolets have working brake lights at all times, but in this case the break lights will work only when the ignition is switched on, like in most any European car. The remote is just silly. There's a radio receiver on the relay card, so you can remotely turn on any one of all tail lights with the remote, if the relay card is getting its 12V power supply. I have no idea when to use this, but it came with the system at no cost. Actually the whole shebang was gifted to me. It's really great to have good friends 
|
|
|
|
|
06-13-2019, 05:42 PM
|
#130 |
|
Registered User
Join Date: Apr 2015
Location: Finland
Posts: 133
|
Re: 1968 Chevy Bel Air Wagon Project
|
|
|
|
|
06-17-2019, 07:31 PM
|
#131 |
|
Proprietor of Dale's Corner
Join Date: Nov 2012
Location: Vacaville , CA
Posts: 15,834
|
Re: 1968 Chevy Bel Air Wagon Project
That's cool! Ilike it a lot
__________________
"Some Days Chickens And Some Days Feathers" Dale XNGH ECV Sam Brannan 1004 R.I.P. 67ChevyRedneck R.I.P. Grumpy Old Man |
|
|
|
|
06-17-2019, 08:07 PM
|
#132 |
|
Registered User
Join Date: Apr 2015
Location: Finland
Posts: 133
|
Re: 1968 Chevy Bel Air Wagon Project
Thanks, Ol Blue K20, I'll be back in a bit, there's work with the boat going
on, and midsummer's coming up. Hopefully I'm back on track in a week or so. I was to the local speed shop today, and bought new bushings for the lower front control arms, so when I lower it, I assume there will be potential for a bit better handling. I'm going to put in a good bit of caster, and try to get camber close to zero. More caster, because I think it's too twitchy now. Like Arnie said: "I'll be back" |
|
|
|
|
06-17-2019, 08:18 PM
|
#133 |
|
Registered User
Join Date: Apr 2015
Location: Finland
Posts: 133
|
Re: 1968 Chevy Bel Air Wagon Project
Oh, befoe I forget:
We visited an American car meeting this weekend. It doesn't show in this pic, but there were at least a couple hunded American cars in attendance. 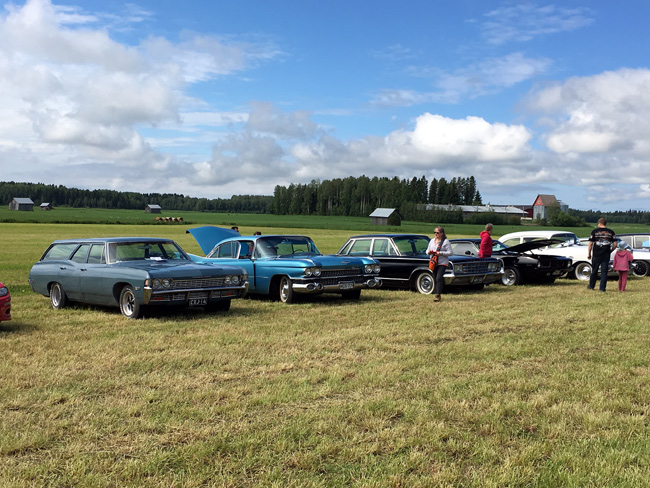 What bugs me, is that the wagon still seems to have this effect on other people and their cars: 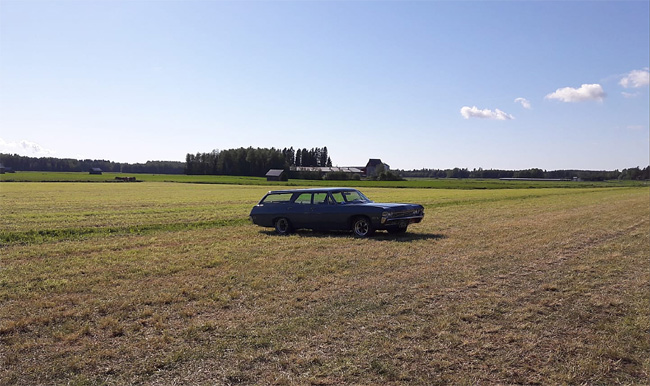
|
|
|
|
|
07-03-2019, 04:44 AM
|
#134 |
|
Registered User
Join Date: Apr 2015
Location: Finland
Posts: 133
|
Re: 1968 Chevy Bel Air Wagon Project
Finally something happening on the wagon. Some work on the boat has been
done, and some boating, of course. Anyway, time to work on the altitude in the front of the wagon. After some measuring and planning, the desired amount of lowering is about three inches. I measured the coils and decided a bit more than one coil will have to go. When I got the spring out, though, it was tighter coiled in the ends, than in the middle, so the amount of coil cutting is still in the open. 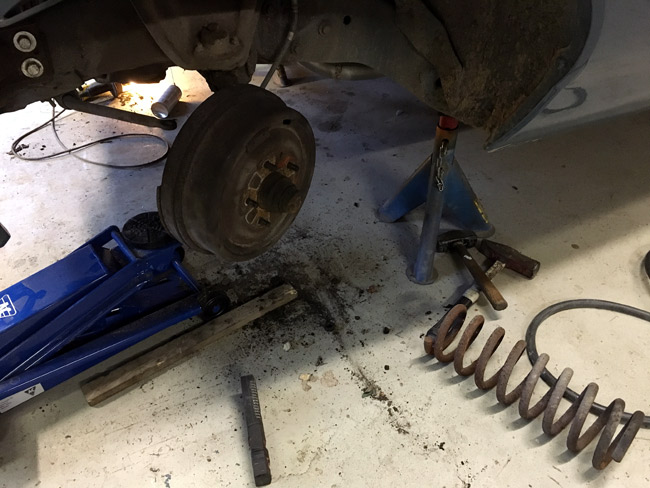 The coils are tighter towards the ends. Oh well, it's just a matter of deciding. The rubber around the lower ball joints were shot, and as the local speed shop can't get new rubber, I had to order new ball joints too. $150 a pair, if you care to know. 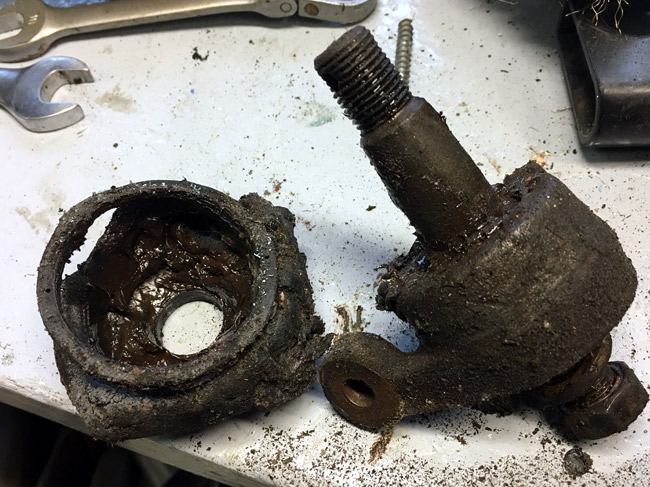 I was investigating the shims situation in small parts drawer, when it dawned on me, that the reason for there not being any shims, migt be that you don't use shims on this kind of car. After some studying I learned how to do it. On the forward strut on the lower control arm, you adjust caster on this nut: 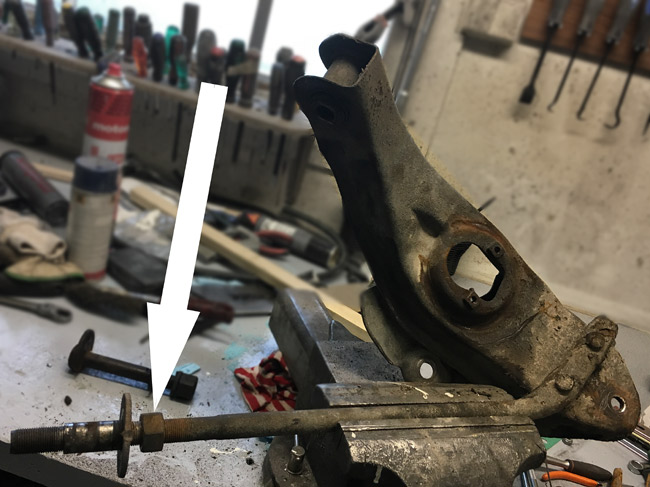 The nut, of course has some washers and grommets, and another nut on the other side of what is a mounting point in the frame. Then the inner bolt that attaches the lower control arm to the frame is excentrical, and that's what you adjust caster with. 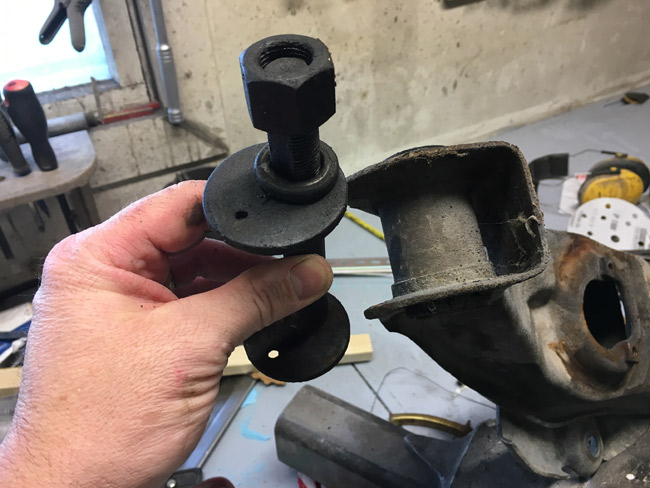 You learn new things every time you work on a car. It's a great part of our hobby. Now out to the shop to change all the bushings! Oh, and I know it's not recommended to lower a car by cutting coils, but it's worked for me. An old front spring that's a bit soft gets a bit stiffer when shortened, and I like the firmer ride. A good alignment job usually make the cars drive decently after. |
|
|
|
|
07-03-2019, 05:25 AM
|
#135 |
|
Post Whore
 Join Date: May 2015
Location: Alabama
Posts: 14,579
|
Re: 1968 Chevy Bel Air Wagon Project
what ive done in the past was cut one full coil,,(red mark)...then heat the coil...(blue mark)...to replicate the original compressed part of spring..so it sits flat on spring pad...
usually, but not always ,1 coil is about 2in....
__________________
Mongo...aka Greg RIP Dad RIP Jesse 1981 C30 LQ9 NV4500..http://67-72chevytrucks.com/vboard/s...d.php?t=753598 Mongos AD- LS3 TR6060...http://67-72chevytrucks.com/vboard/s...34#post8522334 Columbus..the 1957 IH 4x4...http://67-72chevytrucks.com/vboard/s...63#post8082563 2023 Chevy Z71..daily driver |
|
|
|
|
07-16-2019, 04:15 AM
|
#136 |
|
Registered User
Join Date: Apr 2015
Location: Finland
Posts: 133
|
Re: 1968 Chevy Bel Air Wagon Project
It took a while to get the wagon back on the road. All kinds of stuff need
attention in the summer. Anyway, after cutting an undisclosed amount of coils off of the front springs, the stance is more or less exactly what I wanted. In other words the same distance between the rim and the top of the wheel opening front and back. I think that makes for a well balanced, and nicely defined forward rake, just as I like them  So no, I couldn't resist making the hazard sequence animation. Too bad it's still only in my imagination. I really hope to get time to splice in the sequential turn signals into the electrical system soon. Just now, we're leaving for a one week road trip with the blue wagon. It will only be some 800 miles, but she's old and technically I don't really know her that well yet. I wasn't going on a trip with only an idiot light, so I mounted a temp gauge yesterday to be able to keep track of the health of the little 327. There's going to be a big cruising saturday evening, and my Pontiac has had its only over heating tendencies in this very cruising in past years. |
|
|
|
|
07-16-2019, 05:31 AM
|
#137 |
|
Post Whore
Join Date: May 2015
Location: Alabama
Posts: 14,579
|
Re: 1968 Chevy Bel Air Wagon Project
Looks much better..!
__________________
Mongo...aka Greg RIP Dad RIP Jesse 1981 C30 LQ9 NV4500..http://67-72chevytrucks.com/vboard/s...d.php?t=753598 Mongos AD- LS3 TR6060...http://67-72chevytrucks.com/vboard/s...34#post8522334 Columbus..the 1957 IH 4x4...http://67-72chevytrucks.com/vboard/s...63#post8082563 2023 Chevy Z71..daily driver |
|
|
|
|
07-16-2019, 08:26 AM
|
#138 |
|
Proprietor of Dale's Corner
Join Date: Nov 2012
Location: Vacaville , CA
Posts: 15,834
|
Re: 1968 Chevy Bel Air Wagon Project
It looks sporty now. I like the sequential light idea.
__________________
"Some Days Chickens And Some Days Feathers" Dale XNGH ECV Sam Brannan 1004 R.I.P. 67ChevyRedneck R.I.P. Grumpy Old Man |
|
|
|
|
07-16-2019, 08:14 PM
|
#139 |
|
1965 Chevy C10, 2005 4.8L/4l60
Join Date: Aug 2004
Location: DFW Texas
Posts: 8,539
|
Re: 1968 Chevy Bel Air Wagon Project
Damn nice job! Looks a lot like one my dad had way back
__________________
Clyde65 Rebuild of Clyde http://67-72chevytrucks.com/vboard/s...84#post8338184 69 Aristocrat Lo Liner build http://67-72chevytrucks.com/vboard/s...84#post7561684  support our troops! |
|
|
|
|
07-16-2019, 11:16 PM
|
#140 |
|
Senior Member
Join Date: Dec 2009
Location: TN.
Posts: 7,697
|
Re: 1968 Chevy Bel Air Wagon Project
Great Work as always.
Looks Great. As for your cruzin trip. Take plently of water for The Wagon and You and the wife. .
__________________
________________________________________________________________________________________ ____________________________________________ 84 Chevy K-20 63 Impala (my high school car) http://67-72chevytrucks.com/vboard/s...Crew Cab Build |
|
|
|
|
07-23-2019, 05:50 PM
|
#141 |
|
Registered User
Join Date: Apr 2015
Location: Finland
Posts: 133
|
Re: 1968 Chevy Bel Air Wagon Project
Thank you mongocanfly, Ol Blue K20, Clyde65 and Getter-Done for the kind words!
Back from a 1000 mile trip last night. The wagon ran perfectly all the time. Total fuel consumption was 17 mpg, which is about what I had expected, a good chunk, almost one third, being urban driving/commuting. (327, original Rochester Qjet, points ignition, new rings, bearing shells, and a bit bigger cam a couple years ago, TH-400 and who-knows-what-cogs) It ran great, but when we had a hundred miles to go, we noticed a bad smell. It seemed to come out of the technical end, and sniffing around under the hood, I found it was the battery that was cooking. I had brought some tools along, and put the multimeter to work. Over 16 volts. We continued cooking, and this morning I checked the battery voltage,and it was 13.6Volts(engine off). I put in another battery, started her up, and got 18 Volts. After some digging around the regulator, I found that the ground lead was loose. The hole for the sheet metal screw was too big, which seemed to be the problem. I found a bigger screw, sanded the connecting surfaces with some emery cloth, and connected the ground. Now we have 14,25 Volts, and all is good I topped up the battery with distilled water, and will try to use it. A lot of the acid had boiled off, so I guess there's a good risk it's shot. |
|
|
|
|
07-23-2019, 07:03 PM
|
#142 |
|
Proprietor of Dale's Corner
Join Date: Nov 2012
Location: Vacaville , CA
Posts: 15,834
|
Re: 1968 Chevy Bel Air Wagon Project
I like simple solutions. I hope the battery is ok. 1000 miles! sounds like a good time.......
__________________
"Some Days Chickens And Some Days Feathers" Dale XNGH ECV Sam Brannan 1004 R.I.P. 67ChevyRedneck R.I.P. Grumpy Old Man Last edited by Ol Blue K20; 07-23-2019 at 07:05 PM. Reason: add to the message |
|
|
|
|
07-23-2019, 07:27 PM
|
#143 |
|
Registered User
Join Date: Apr 2008
Location: Md
Posts: 2,451
|
Re: 1968 Chevy Bel Air Wagon Project
Nice work, Beautiful car. You should see what Ford used for sequencial turn signals in the 60's.Yikes...Stance looks great, 68-72..last of the great looking wagons. Friend's dad had the Olds Vista Cruiser, from my way back when.
__________________
http://67-72chevytrucks.com/vboard/s...d.php?t=635605 |
|
|
|
|
07-23-2019, 11:05 PM
|
#144 | |
|
Proprietor of Dale's Corner
Join Date: Nov 2012
Location: Vacaville , CA
Posts: 15,834
|
Re: 1968 Chevy Bel Air Wagon Project
 Quote:
__________________
"Some Days Chickens And Some Days Feathers" Dale XNGH ECV Sam Brannan 1004 R.I.P. 67ChevyRedneck R.I.P. Grumpy Old Man |
|
|
|
|
|
11-01-2021, 03:34 PM
|
#145 |
|
Registered User
Join Date: Apr 2015
Location: Finland
Posts: 133
|
Re: 1968 Chevy Bel Air Wagon Project
Over two years past due I suddenly noticed a mistake I made:
The caption for this pic is wrong, some will probably have caught it. You adjust the CAMBER with this excentical bolt. In other words you adjust the lower ball joint in ot out to the side, relative to the centerline of the car. The wagon was sold in to gain funds for a new project car, a 1930 Buick Marquette, a hot rod Build. Follow this link to HAMB to see what I'm up to nowadays: https://www.jalopyjournal.com/forum/...moval.1223573/ |
|
|
|
|
11-01-2021, 09:08 PM
|
#146 |
|
Senior Member
Join Date: Dec 2009
Location: TN.
Posts: 7,697
|
Re: 1968 Chevy Bel Air Wagon Project
Good too hear from you
 I checked out the Hamb Stuff
__________________
________________________________________________________________________________________ ____________________________________________ 84 Chevy K-20 63 Impala (my high school car) http://67-72chevytrucks.com/vboard/s...Crew Cab Build |
|
|
|
|
| Bookmarks |
| Thread Tools | |
| Display Modes | |
|
|


 Linear Mode

