
|
 08-04-2019, 06:42 PM
|
#201 |
|
Registered User
Join Date: May 2012
Location: Houston
Posts: 461
|
Re: Jesses' 48 PU
I used 3/16 metal and welded them on the rear with the nut secured on the inside for easy install.
__________________
 Semper Fi Semper FiCheck out my project: http://67-72chevytrucks.com/vboard/s...d.php?t=559086 |

|

|
|
08-04-2019, 06:46 PM
|
#202 |
|
Registered User
Join Date: May 2012
Location: Houston
Posts: 461
|
Re: Jesses' 48 PU
I got some new toys!!!
Eastwood TIG welder and plasma cutter... The plasma made fast work of cutting the 1/8 metal. No more noisy cutting wheels
__________________
Semper FiCheck out my project: http://67-72chevytrucks.com/vboard/s...d.php?t=559086 Last edited by Jesse49chevy; 08-04-2019 at 07:29 PM. |
|
|
|
|
08-04-2019, 06:51 PM
|
#203 |
|
Registered User
Join Date: May 2012
Location: Houston
Posts: 461
|
Re: Jesses' 48 PU
Used cardboard to draw out the pieces. Transferred them to 1/8 metal and cut them with my plasma....
Did I mention I got a new toy??? 
__________________
Semper FiCheck out my project: http://67-72chevytrucks.com/vboard/s...d.php?t=559086 |
|
|
|
|
08-04-2019, 06:54 PM
|
#204 |
|
Registered User
Join Date: May 2012
Location: Houston
Posts: 461
|
Re: Jesses' 48 PU
I tried TIG welding, but I need practice and this is not a piece I want to take that chance so MIG'd them.
__________________
Semper FiCheck out my project: http://67-72chevytrucks.com/vboard/s...d.php?t=559086 Last edited by Jesse49chevy; 08-04-2019 at 07:32 PM. |
|
|
|
|
08-04-2019, 06:58 PM
|
#205 |
|
Registered User
Join Date: May 2012
Location: Houston
Posts: 461
|
Left side, spot welded in for now. Will make some square 3/16 washers for final install.
__________________
Semper FiCheck out my project: http://67-72chevytrucks.com/vboard/s...d.php?t=559086 |
|
|
|
|
08-04-2019, 07:01 PM
|
#206 |
|
Registered User
Join Date: May 2012
Location: Houston
Posts: 461
|
Re: Jesses' 48 PU
Right side, ran out of time so I will tackle to crossmember next weekend.

__________________
Semper FiCheck out my project: http://67-72chevytrucks.com/vboard/s...d.php?t=559086 |
|
|
|
|
08-05-2019, 11:39 AM
|
#207 | |
|
Senior Member
 Join Date: Sep 2016
Location: Hershey, PA
Posts: 1,004
|
Re: Jesses' 48 PU
Quote:
 Plasma cutter looks like its doing real nice!
__________________
Current Build Thread 1930 Ford Model A Modern Twist: Ford Model A Rat Rod With a Modern Twist Build Thread Phase 1 "The Swap": 1949 3100 with S10 swap. Beginner build with ambition! Build Thread Phase 2 "The Drop": Beginner Build with Ambition gets Air Ride |
|
|
|
|
|
08-10-2019, 02:44 PM
|
#208 |
|
Senior Member
 Join Date: May 2007
Location: Doodah Kansas
Posts: 7,747
|
Re: Jesses' 48 PU
holy strong floor!
__________________
the mass of men live lives of quiet desperation if there is a problem, I can have it. new project WAYNE http://67-72chevytrucks.com/vboard/s...d.php?t=844393 |
|
|
|
|
08-12-2019, 12:06 AM
|
#209 | |
|
Senior Member
  Join Date: Nov 2008
Location: Glendora, CA
Posts: 6,331
|
Re: Jesses' 48 PU
Quote:
 (Sorry, I couldn't pass up the lead in) Really enjoying what I've read so far. Question: What type of MIG welder are you using? I ask because I have a Hobart 140 that is supposed to be able to weld up to 3/16" but I have doubted if it can really get penetration on that thick material.
__________________
'55 Big Window Shortbed, Drive-It-&-Work-On-It slid down the "slippery slope" to a Frame-Off Rodstoration! LQ4/4l85e/C4 IFS/Mustang 8.8 rearend w/3.73's Dan's '55 Big Window "Build" - Well, Kinda! Last edited by Dan in Pasadena; 08-12-2019 at 11:34 PM. |
|
|
|
|
|
08-22-2019, 08:25 PM
|
#210 |
|
Registered User
Join Date: May 2012
Location: Houston
Posts: 461
|
Re: Jesses' 48 PU
Thanks guys...trying to do what I can to keep it going. I use my Millermatic 135 to Mig weld. I bevel the edges to get as much penetration and run it a bit hotter than suggested. I have yet to use my new Eastwood Mig 250. I bought it a while back but was put up all of this time. I finally put it together and as my luck would have it, it didn't work right so I sent it back. Just got the replacement but have yet to unbox it. Kinda skeptical now, but my Millermatic is old and acting up so guess I'll break it out soon...
__________________
Semper FiCheck out my project: http://67-72chevytrucks.com/vboard/s...d.php?t=559086 |
|
|
|
|
08-22-2019, 08:31 PM
|
#211 |
|
Registered User
Join Date: May 2012
Location: Houston
Posts: 461
|
Re: Jesses' 48 PU
I fab'd and welded the new cross member/brace with the loop for driveshaft clearance. I had a piece of 2x5 with 1/8 thick wall laying around. Bought the loop from Jegs and got busy. Turned out okay I guess... Tried my Tig skills again, but failed, need practice... I was thinking of closing in the bottom to make it a solid piece, just feel it will flex with the bottom part open.
__________________
Semper FiCheck out my project: http://67-72chevytrucks.com/vboard/s...d.php?t=559086 Last edited by Jesse49chevy; 08-22-2019 at 09:54 PM. |
|
|
|
|
08-22-2019, 08:40 PM
|
#212 |
|
Registered User
Join Date: May 2012
Location: Houston
Posts: 461
|
Re: Jesses' 48 PU
OH yea, you can see the rear cab mounts I fab'd. I haven't welded them in just yet as I want to make sure nothing changed when I removed the original cross member. Oh and even worse, I have a huge dilemma... My rear axle is one inch off center... I realized that when I put in the driveshaft... Rookie mistake I guess. So now I get to redo that too... It's a 10 bolt I bought off craigslist came off a 2000 S10 blazer. A friend said I should cut one inch off one end and either add it on the other or add a wheel spacer if it clears the frame.
I'm thinking if I'm going to do all that, might as well cut up a 9 inch or 8.8 Ford diff.. Need advise guys, what is my best option. I am running an LS engine with a 4L60.
__________________
Semper FiCheck out my project: http://67-72chevytrucks.com/vboard/s...d.php?t=559086 Last edited by Jesse49chevy; 08-22-2019 at 09:55 PM. |
|
|
|
|
08-22-2019, 09:48 PM
|
#213 | |
|
Registered User
Join Date: May 2012
Location: Houston
Posts: 461
|
Re: Jesses' 48 PU
Quote:
__________________
Semper FiCheck out my project: http://67-72chevytrucks.com/vboard/s...d.php?t=559086 |
|
|
|
|
|
08-22-2019, 09:51 PM
|
#214 | |
|
Registered User
Join Date: May 2012
Location: Houston
Posts: 461
|
Re: Jesses' 48 PU
Quote:

__________________
Semper FiCheck out my project: http://67-72chevytrucks.com/vboard/s...d.php?t=559086 |
|
|
|
|
|
08-23-2019, 02:45 PM
|
#215 |
|
Registered User
Join Date: Nov 2010
Location: calgary alberta
Posts: 7,835
|
Re: Jesses' 48 PU
don't cut up the axle, just get a centered one or deal with the offset. if you do wanna cut up an axle might as well make it a tougher unit. the 8.8 is plentiful compared to the 9". if buying all new stuff it wouldn't matter. the 8.8 is usually offset except in mustangs. lots of guys just redrill the axles and rotors for a chevy pattern. some cut the long side and make it the same length as the short side then use a short side axle in the cut off side. 8.8 comes with 3.73 ratio and posi with discs and an easy park brake set up. it's almost a 9" and is a copy of the 12 bolt almost too.
if using the offset diff you really have to look closely at the driveline angles both from the side and from the top view. curious on the center cross member. do you plan to have a full circle (oblong) on the driveshaft loop? |
|
|
|
|
08-23-2019, 08:01 PM
|
#216 | |
|
Registered User
Join Date: May 2012
Location: Houston
Posts: 461
|
Re: Jesses' 48 PU
Quote:
__________________
Semper FiCheck out my project: http://67-72chevytrucks.com/vboard/s...d.php?t=559086 |
|
|
|
|
|
08-24-2019, 06:49 PM
|
#217 |
|
Registered User
Join Date: Dec 2015
Location: Beaver Falls, Pa
Posts: 165
|
Re: Jesses' 48 PU
When you say "its an inch off center", are you talking the measurement from the frame to the wheel flange from one side compared to the other or are you talking the pinion is an inch off center (to the Right) in the frame when the rear end is properly centered in the frame? Lorne
|
|
|
|
|
08-24-2019, 10:30 PM
|
#218 |
|
Registered User
Join Date: May 2012
Location: Houston
Posts: 461
|
Re: Jesses' 48 PU
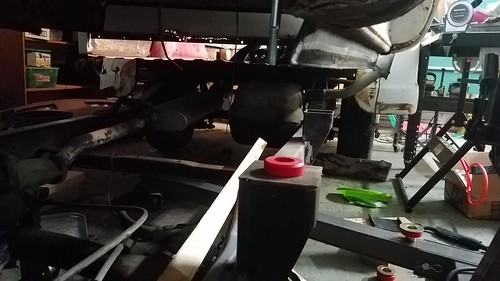
Hey Haulin'It, it's an offset diff. I failed to realize that when I bought it. The rear end is centered on the frame, but the pinion is one inch to the left. I ran a string from the center of the rear to the center of the engine. You can see how the driveshaft is off to the passenger side.
__________________
Semper FiCheck out my project: http://67-72chevytrucks.com/vboard/s...d.php?t=559086 |
|
|
|
|
08-24-2019, 10:31 PM
|
#219 |
|
Registered User
Join Date: May 2012
Location: Houston
Posts: 461
|
Re: Jesses' 48 PU
The pinion is offset
__________________
Semper FiCheck out my project: http://67-72chevytrucks.com/vboard/s...d.php?t=559086 |
|
|
|
|
08-24-2019, 10:39 PM
|
#220 |
|
Registered User
Join Date: May 2012
Location: Houston
Posts: 461
|
Re: Jesses' 48 PU
Did something different today, my job requires that I travel, so when I'm home on the weekends I try to split my time between family and truck/projects. My daughter blessed us with our first grandchild last year. She sent me a text with a picture one day this week and asked "dad can you build this?" It's for the baby.
__________________
Semper FiCheck out my project: http://67-72chevytrucks.com/vboard/s...d.php?t=559086 |
|
|
|
|
08-24-2019, 10:42 PM
|
#221 |
|
Registered User
Join Date: May 2012
Location: Houston
Posts: 461
|
Re: Jesses' 48 PU
When my only daughter asks and says its for my only grandchild....well I guess everything else can wait.... I pulled out the saws, drills and a quick trip to Home Depot and waalaaaa!!!!
__________________
Semper FiCheck out my project: http://67-72chevytrucks.com/vboard/s...d.php?t=559086 Last edited by Jesse49chevy; 08-24-2019 at 10:53 PM. |
|
|
|
|
08-24-2019, 10:45 PM
|
#222 |
|
Registered User
Join Date: May 2012
Location: Houston
Posts: 461
|
Re: Jesses' 48 PU
 
__________________
Semper FiCheck out my project: http://67-72chevytrucks.com/vboard/s...d.php?t=559086 |
|
|
|
|
08-24-2019, 11:26 PM
|
#223 |
|
Senior Member
Join Date: Mar 2011
Location: West Plains, Missouri
Posts: 7,553
|
Re: Jesses' 48 PU
Nice job...Jim
__________________
my build thread: http://67-72chevytrucks.com/vboard/s...d.php?t=459839 Jimbo's long bed step build:http://67-72chevytrucks.com/vboard/s...t=464626<br /> |
|
|
|
|
08-25-2019, 09:27 AM
|
#224 |
|
Senior Member
Join Date: Jan 2015
Location: pembroke pines, fl
Posts: 696
|
Re: Jesses' 48 PU
came out great!
|
|
|
|
|
08-25-2019, 03:00 PM
|
#225 | |
|
Registered User
Join Date: Dec 2015
Location: Beaver Falls, Pa
Posts: 165
|
Re: Jesses' 48 PU
Quote:
On to the rear end. There is nothing wrong with what you have. That will go MANY miles just like that without ever giving you a problem! What is important is that you have the driveline angles correct or real close to correct, the U-joints phased on the driveshaft, ect. If your truck has a vibration when its done, look elsewhere because the off-set is not going to be the problem. Think of it this way...your engine/transmission & rear end are most likely not exactly the same height off the ground. Basically no vehicle is. There will be variation up/down. Likewise proper alignment for a street driven vehicle does not point the transmission directly at the pinion. Envision if you turned your truck on its side...you would have the same thing you do now...the engine/transmission would be one inch higher than the pinion, Correct? That's what U-joints are for. Click on the link below, that photo has been around forever & shows what you're looking for. It shows the off-set to the driver's side but that is just for reference...what matters is the parallel units, engine/trans & rear axle. Put er together! Lorne https://www.bing.com/images/search?v...j_RJH8bYgAAAA& |
|
|
|
|
 |
| Bookmarks |
|
|


 Linear Mode

