
|
 12-01-2012, 09:24 PM
|
#1 |
|
Registered User
 Join Date: Nov 2011
Location: Lagrange,ME
Posts: 349
|
The Build Begins
Finally got truck into basement garage, had to flatten front tires to get enough clearance but we made it fit.
started to tear it down: removed seats, carpet removed both doors Should have left the carpet, only thing between us and the ground not really that bad but bad enough. One door hinge was tack welded to inside of door so had to remove hinge from door post. Found plenty of hidden rot, inside cab corners, floor ,under kick plates, inside steps had a cover over the holes. Have a gentleman that has built a 58 show truck coming tomorrow to take a look and offer suggestions and guidance as to what we need to do next or what not to do. On the up side headliner looks good and we found 35 cents,a bottle opener, and a keychain almost makes it all worth the effort. lol Pictures included First pic is of a pedal up near firewall on drivers side, would like to know what it is.
__________________
1955 2nd on 86 chassis Daily driver |

|

|
|
12-01-2012, 09:28 PM
|
#2 |
|
Registered User
Join Date: Nov 2011
Location: Lagrange,ME
Posts: 349
|
Re: The Build Begins
more pictures
__________________
1955 2nd on 86 chassis Daily driver |
|
|
|
|
12-02-2012, 12:35 AM
|
#3 |
|
Registered User
Join Date: Jan 2012
Location: Motown
Posts: 7,666
|
Re: The Build Begins
nothing we haven't seen before, though who ever welded that hinge should be taken out back and shot
i suspect the lever in the first picture is a windshield washer spray from a 70s maverick or pinto patch panels are available for every rusty spot on your truck, i'd polish the church key up before doing anything to the truck you might need it, often  welcome to the 4eyes club
__________________
cool, an ogre smiley Ogre's 58 Truk buildhow to put your truck year and build thread into your signature shop air compressor timer |
|
|
|
|
12-02-2012, 01:52 AM
|
#4 |
|
Registered User
Join Date: Aug 2007
Location: Corona, California
Posts: 7,998
|
Re: The Build Begins
I agree with Ogre. Nothing out of the ordinary for these old trucks.
Kim |
|
|
|
|
12-03-2012, 10:50 PM
|
#5 |
|
Registered User
Join Date: Nov 2011
Location: Lagrange,ME
Posts: 349
|
Re: The Build Begins
Second night on tear down. I have 2 questions:
Is the front of frame suppose to look like pic 1? Is body suppose to sit on the valve covers last pic ? OrrieG, I need your help and wisdom on this build, going to go back to a stock frame if I can find a good one up here in Maine. Going to go look at one wednesday, hope its a short bed. Is there a difference between stepside and fleetside frames in the short bed trucks? I want to keep the 4x4 suspension so anyone that has done this besides OrrieG please chime in, need all the help I can get and then some.
__________________
1955 2nd on 86 chassis Daily driver |
|
|
|
|
12-05-2012, 07:07 PM
|
#6 |
|
Registered User
Join Date: Nov 2011
Location: Lagrange,ME
Posts: 349
|
Re: The Build Begins
Found a mint frame, the rest of the truck is toast in my opinion anyway. Need to finish stripping parts off blazer frame then start building from ground up on new frame.
__________________
1955 2nd on 86 chassis Daily driver |
|
|
|
|
12-06-2012, 03:00 PM
|
#7 |
|
Registered User
Join Date: Nov 2011
Location: Lagrange,ME
Posts: 349
|
Re: The Build Begins
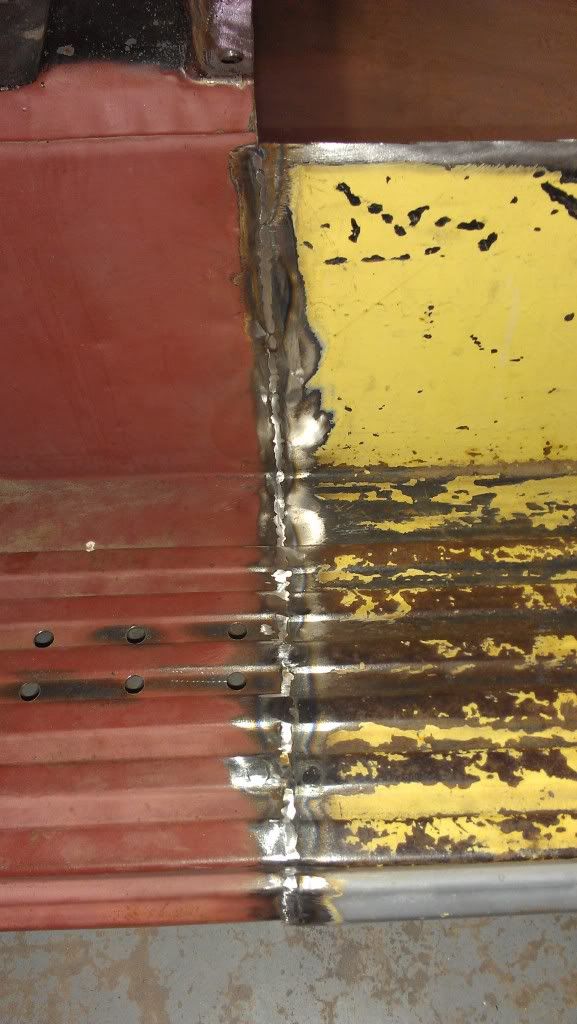
Can the entire drivers side cab corner be replaced?
__________________
1955 2nd on 86 chassis Daily driver |
|
|
|
|
12-06-2012, 04:49 PM
|
#8 |
|
Registered User
Join Date: Apr 2009
Location: Chandler AZ
Posts: 750
|
Re: The Build Begins
If you have a good donor replacement it can be done. i just finished doing my PS lower cab corner.
|
|
|
|
|
12-06-2012, 10:49 PM
|
#9 |
|
Registered User
Join Date: May 2010
Location: Lawrenceville, Ga
Posts: 2,640
|
Re: The Build Begins
It's hard to find used body panels that aren't as rusty as what you already have, but you can get any part you need for these trucks new. Here's a link to the LMC catalog. http://www.lmctruck.com/icatalog/ca/full.aspx?Page=27
There's lots of sources for parts but I think LMC has the best catalog. |
|
|
|
|
12-11-2012, 03:32 PM
|
#10 |
|
Registered User
Join Date: Nov 2011
Location: Lagrange,ME
Posts: 349
|
Re: The Build Begins
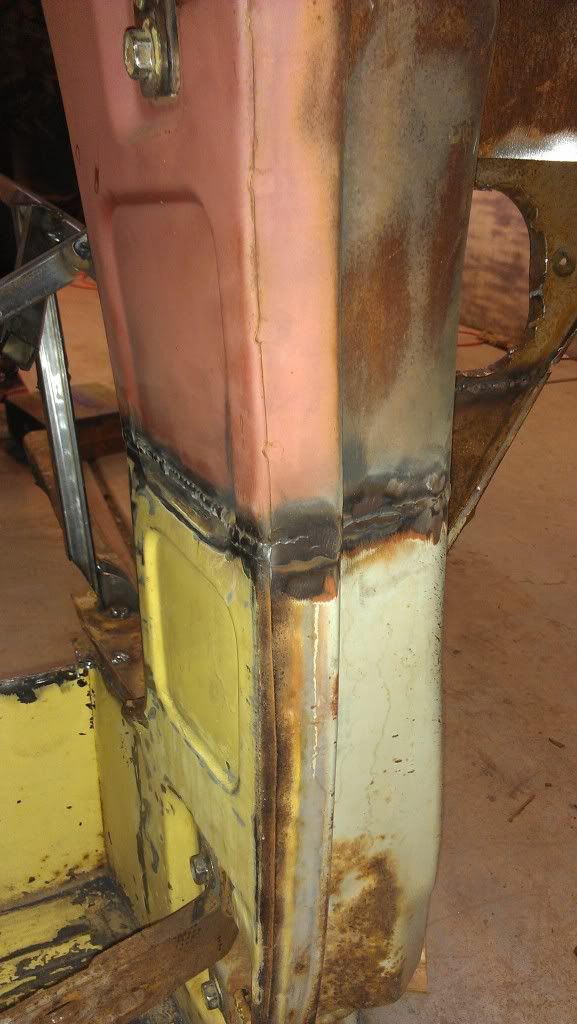
Having frames taken to shop and start the build on them, remove from 72 frame and add to 59 frame. Body parts were to far gone to repair alot of very thin metal and rust.
cab is iffy at best ,doesnt look like DS A pillar lines up at all where po patched it together, new cab corners already starty to rust, floor is real bad as is firewall. Am considering finding another cab in much better shape that hasnt been hacked up and welded up wrong. Will get the running gear and frame ready so when I find replacement cab or decide to fix the one I have wont take long to put it all back together.
__________________
1955 2nd on 86 chassis Daily driver |
|
|
|
|
12-16-2012, 01:00 PM
|
#11 |
|
Registered User
Join Date: Mar 2012
Location: Vail AZ.
Posts: 104
|
Re: The Build Begins
I am with everyone else, there is nothing in those photos that can't be fixed, welcome to the group, super nice group of guys here. Good luck and keep the pictures coming
__________________
http://67-72chevytrucks.com/vboard/s...74#post5272074 http://67-72chevytrucks.com/vboard/s...03#post6183103 I would rather spend 2 hours making a part than spend $2.00 buying one |
|
|
|
|
12-16-2012, 03:43 PM
|
#12 |
|
Registered User
Join Date: May 2010
Location: Lawrenceville, Ga
Posts: 2,640
|
Re: The Build Begins
One of the pics was a foot windshield washer pedal. Does your truck have factory windshield washers or was that something that someone added? If it's factory it's a very rare option and worth keeping.
|
|
|
|
|
12-16-2012, 03:53 PM
|
#13 |
|
Registered User
Join Date: Nov 2011
Location: Lagrange,ME
Posts: 349
|
Re: The Build Begins
I think it was added but never hooked up, no water lines,no water resevoir, and no nozzels in cowl.
Madd Doc, thanks for the good luck,we will need it. Plan is to replace entire floor pan, both cowl A pillars, and firewall.
__________________
1955 2nd on 86 chassis Daily driver |
|
|
|
|
12-27-2012, 09:08 PM
|
#14 |
|
Registered User
Join Date: Nov 2011
Location: Lagrange,ME
Posts: 349
|
Re: The Build Begins
making progress on 4x4 conversion to stock frame. axels installed,new shock mounts on rear, motor mounted( not sure if location is right yet) will figure it out soon. Waiting on new power brake unit to arrive so we can mock up tranny support.
One good thing we did happen to find and purchase a complete rust free truck so we can swap body parts onto 4x4 setup. Truck was in process of being restored ,the owner became ill and unable to finish it. All body work complete, just needs to be put back together. Trying to line up shipment from Nevada to Maine. We will try and repair parts we have from original truck at some point.
__________________
1955 2nd on 86 chassis Daily driver |
|
|
|
|
01-07-2013, 09:35 PM
|
#15 |
|
Registered User
Join Date: Nov 2011
Location: Lagrange,ME
Posts: 349
|
Re: The Build Begins
New body on its way from Nevada. Slow progress on 4x4 conversion, still waiting on parts.
__________________
1955 2nd on 86 chassis Daily driver |
|
|
|
|
01-07-2013, 10:55 PM
|
#16 | |
|
Registered User
Join Date: Apr 2009
Location: Chandler AZ
Posts: 750
|
Re: The Build Begins
Quote:
|
|
|
|
|
|
01-07-2013, 11:19 PM
|
#17 |
|
Registered User
Join Date: Nov 2011
Location: Lagrange,ME
Posts: 349
|
Re: The Build Begins
Thanks, all we have to do is put it all back together on 4x4 chassis

__________________
1955 2nd on 86 chassis Daily driver |
|
|
|
|
01-08-2013, 12:47 AM
|
#18 |
|
Registered User
Join Date: Aug 2007
Location: Corona, California
Posts: 7,998
|
Re: The Build Begins
Looks like a real clean body.
Kim |
|
|
|
|
01-14-2013, 07:56 AM
|
#19 |
|
Registered User
Join Date: Nov 2011
Location: Lagrange,ME
Posts: 349
|
Re: The Build Begins
Our new truck arrives today, time to get to work and get this project rolling.
__________________
1955 2nd on 86 chassis Daily driver |
|
|
|
|
01-14-2013, 02:32 PM
|
#20 |
|
Registered User
Join Date: Nov 2011
Location: Lagrange,ME
Posts: 349
|
Re: The Build Begins
New body arrived and we gotta tell you it is great to see a complete body with no rot,rust or damage. This is going to make our build go much quicker and look alot better when when done. At some point we will try and restore first cab and any other parts that are worth saving.
__________________
1955 2nd on 86 chassis Daily driver |
|
|
|
|
01-15-2013, 05:31 PM
|
#21 |
|
Registered User
Join Date: Nov 2011
Location: Lagrange,ME
Posts: 349
|
Re: The Build Begins
Got the new body off the frame, pushed frame outside now building a dolly for the cab.
parts finally arrived that were needed to continue on the original frame 4x4 conversion. Spent 2 hours digging sand and debri out of front pillars and rear cab corners. PO replaced one cab corner but failed to replace inner corner, looks like he just cut away rotted area and sealed it with undercoating or rust proofing material. Removed about two and half gallons of sand from pillars and cab corner was really packed in and very wet. Now I need to get some rust proofing into cab corner and hopefully pillars somehow. Need pics of how side spare tire mounts are installed. Truck came with side mount fender and wife likes that look so I need to see how it all goes together. Po made some cuts in cab floor where old gas tank was and then beat a section of the floor up into cab, have no idea as to why, also cut notches in back of cab so it would sit down on 76 frame. I think would have been smarter to shim cab up an inch. pics to follow later tonite. Lots of little things to keep me busy, but atleast no rust problems to fix.
__________________
1955 2nd on 86 chassis Daily driver |
|
|
|
|
03-03-2013, 06:11 PM
|
#22 |
|
Registered User
Join Date: Nov 2011
Location: Lagrange,ME
Posts: 349
|
Re: The Build Begins
Not much progress, as many of you know these trucks have an adverse effect on your wallet.
I did however get motor mounts and crossmember mount for transfer case fabbed and installed. We were able to use the factory frame mount for transfer case. We scraped and sanded the frame to get ready for paint and por-15. In removing transfer case, I managed to drop it but luckily no damage was done. It is now clean and ready for paint. Next, need to remove transmission, and clean and paint. What is the best paint to use on above mentioned parts? Next step is to pull the motor so we can finish cleaning the frame, and to clean the motor.
__________________
1955 2nd on 86 chassis Daily driver |
|
|
|
|
03-04-2013, 11:04 AM
|
#23 |
|
Registered User
Join Date: Aug 2007
Location: Corona, California
Posts: 7,998
|
Re: The Build Begins
Looking good.
I used engine paint on my trans. Kim |
|
|
|
|
03-04-2013, 11:17 AM
|
#24 |
|
Registered User
Join Date: Nov 2011
Location: Lagrange,ME
Posts: 349
|
Re: The Build Begins
Thanks,Kim57.
I have a question about fuel tanks, I would like to have my fill tube come out the back or the side with out much modification. Truck is going to be a work truck and being in the bed just wont work . So if anyone has any ideas about fuel tank please respond, also need to know what tank I should use . David
__________________
1955 2nd on 86 chassis Daily driver |
|
|
|
|
07-19-2014, 06:57 PM
|
#25 |
|
Registered User
Join Date: Nov 2011
Location: Lagrange,ME
Posts: 349
|
Re: The Build Begins
No real progress since I last posted about this build, life got in the way as it has to many in this forum.
Plans for truck have gone in many directions since the beginning, frame swap, 2 wheel drive, 4x4, a couple more frame swap ideas, etc. Final plan 4x4 original frame 2005 dodge axles (I know track width is an issue), 2003 LQ9 6.0 aluminum block and heads, 4l60e trans, transfer case(push button 4x4 I hope). Coil over suspension all around. Engine placement and suspension started a long way to go but making progress. Comments and suggestions always welcome
__________________
1955 2nd on 86 chassis Daily driver |
|
|
|
 |
| Bookmarks |
|
|


 Linear Mode

