
|
 12-15-2017, 06:02 PM
|
#26 |
|
Registered User
Join Date: Dec 2017
Location: Howard, PA.
Posts: 44
|
Re: My Dream 1950 Chevy
That's primarily the brand's I was looking at, biggest problem I have is that I don't have 220 in the garage but I could pull it from my laundry room.
I was looking at floor pans today, with the floor and part of the angled part of the firewall missing would it be worth it to purchase a complete floor pan to save time? I started to to look at pullys, alts, starters, ext. For the engine I need to get this truck running anyone have a good resource to look at for the smallblock? |

|

|
|
12-15-2017, 08:21 PM
|
#27 | |
|
Registered User
Join Date: Oct 2008
Location: Perry OK
Posts: 121
|
Re: My Dream 1950 Chevy
Quote:
|
|
|
|
|
|
12-15-2017, 08:35 PM
|
#28 | ||
|
Senior Member
 Join Date: May 2007
Location: Doodah Kansas
Posts: 7,746
|
Re: My Dream 1950 Chevy
Quote:
Quote:
just being real with you. I want to see it finished as much as you do, I love seeing these old trucks cruising around.
__________________
the mass of men live lives of quiet desperation if there is a problem, I can have it. new project WAYNE http://67-72chevytrucks.com/vboard/s...d.php?t=844393 |
||
|
|
|
|
12-15-2017, 09:19 PM
|
#29 |
|
Registered User
Join Date: Dec 2017
Location: Howard, PA.
Posts: 44
|
Re: My Dream 1950 Chevy
Yea I hear ya, I think putting more TIME into the project will be the better option, I'm going make Momma happy by getting the basement finished " only trim left" thankfully I busted my butt the last year and it's almost finished 95% was done myself.
But in the meantime I will be able to get my manuals here and start looking at all the specs, get the truck setup in the garage and pull off the body getting a better look at it and the chassis. Once it's in the garage I will post pics of the cab and get opines for the gallery on the best way to tackle the cab floor. I did find out that the chassis is a 96 and the trans isn't standard it auto, which would exlain the chevy auto steering column. It did come with petals and another bracket I believe for the petals but I'm not 100. I won't be purchasing anything but essential tools and components like I was advised to get the body mounted and engine running. I also have my son's first car outside that needs a little work done on it. But at least it is driveable needs a new chapter axle and lower control arm it's pretty much his X-Mass gift. |
|
|
|
|
12-15-2017, 09:46 PM
|
#30 |
|
Registered User
Join Date: Dec 2017
Location: Howard, PA.
Posts: 44
|
Re: My Dream 1950 Chevy
I could be over reacting based on what I see myself about the cab floor but for what I paied for it and the fact that I have a lot of patch pannels lower doors, cab corners, rockers, kickplates, floor plates and all the extras I think I have enough metal there to pretty much rebuild the entire floor pan.
|
|
|
|
|
12-15-2017, 10:31 PM
|
#31 |
|
Senior Member
Join Date: May 2007
Location: Doodah Kansas
Posts: 7,746
|
Re: My Dream 1950 Chevy
I had a 49 that looked pretty rust free but some jackhole shot up the truck from the back and one bullet popped out the windshield seal, not a hole, but pushed it out away from the metal and water just poured in and sat on the floor. the floor in front of the seat was probably 85% gone but behind the seat it was better, and those two patch panels you have fixed it. I drilled all the spot welds and left the structure under the floor and then laid down the new floor and welded it to the supports again. there was some rust on the firewall but flat sheet took care of it.
if your floor sounds like that, you may not need a whole cab floor. honestly, if your plans are for a cool retro cruiser you may find you dont want to replace literally everything thats rusted just yet.
__________________
the mass of men live lives of quiet desperation if there is a problem, I can have it. new project WAYNE http://67-72chevytrucks.com/vboard/s...d.php?t=844393 |
|
|
|
|
12-15-2017, 10:38 PM
|
#32 |
|
Registered User
Join Date: Dec 2017
Location: Howard, PA.
Posts: 44
|
Re: My Dream 1950 Chevy
Ok well that concerns me a little now from your explanation of your cab, there is literally nothing in the bottom of the cab.
|
|
|
|
|
12-15-2017, 11:05 PM
|
#33 |
|
Senior Member
Join Date: May 2007
Location: Doodah Kansas
Posts: 7,746
|
Re: My Dream 1950 Chevy
sounds like all the floor supports are gone too. how about a picture?
does the entire floor replacement come with the supports on it? I dont remember
__________________
the mass of men live lives of quiet desperation if there is a problem, I can have it. new project WAYNE http://67-72chevytrucks.com/vboard/s...d.php?t=844393 |
|
|
|
|
12-15-2017, 11:20 PM
|
#34 |
|
Registered User
Join Date: Dec 2017
Location: Howard, PA.
Posts: 44
|
Re: My Dream 1950 Chevy
I will get more pics up, but the main supports are still there I believe all the sheet metal is gone. I do believe it comes with the supports.
|
|
|
|
|
12-16-2017, 01:05 AM
|
#35 | |
|
Senior Member
Join Date: May 2007
Location: Doodah Kansas
Posts: 7,746
|
Re: My Dream 1950 Chevy
Quote:
cutting out the supports will let the body sag, it may be imperceptible or it may be obvious, but cutting out the supports means you need to brace the body laterally and diagonally beforehand. that makes it fun to get the complete floor in too haha
__________________
the mass of men live lives of quiet desperation if there is a problem, I can have it. new project WAYNE http://67-72chevytrucks.com/vboard/s...d.php?t=844393 |
|
|
|
|
|
12-16-2017, 05:58 PM
|
#36 |
|
Registered User
Join Date: Dec 2017
Location: Howard, PA.
Posts: 44
|
Re: My Dream 1950 Chevy
Lady luck is falling my way for the floor pans just part of the firewall and the part in front of the seat mount is going to need repair.
|
|
|
|
|
12-16-2017, 06:00 PM
|
#37 |
|
Registered User
Join Date: Dec 2017
Location: Howard, PA.
Posts: 44
|
Re: My Dream 1950 Chevy
All the extra parts for the truck were packed inside the cab when I was taking pictures so it was hard to see everything.
|
|
|
|
|
12-19-2017, 01:59 PM
|
#38 |
|
Senior Member
 Join Date: Sep 2016
Location: Hershey, PA
Posts: 1,004
|
Re: My Dream 1950 Chevy
I'm not the one who did the rear end swap. I happened to have had a long bed already. This thread is the most recent I can think of, but not very descriptive
http://67-72chevytrucks.com/vboard/s...d.php?t=750872 Anytime you're in E-town, give me a holler. I'm maybe 15 minutes from there. This might be the link everyone talks about. Photobucket broke the pictures, so I "borrowed" them for you https://www.killbillet.com/showthrea...-(step-by-step) Normally what guys use for these swaps is a long bed regular cab S10 because the wheel base is almost perfectly matched to the 48 truck's 116" wheelbase. My donor is a short bed and only 108" so I had to correct this issue. The cool thing is that the front leaf spring mounts are riveted to the frame. I just popped the rivets out, moved teh mounts back 8" and drilled new holes and bolted them on with grade 8 bolts. the rear hole on the bottom could not be bolted due to interference with some bracing so I just plug welded that hole and welded around that end of the mount. 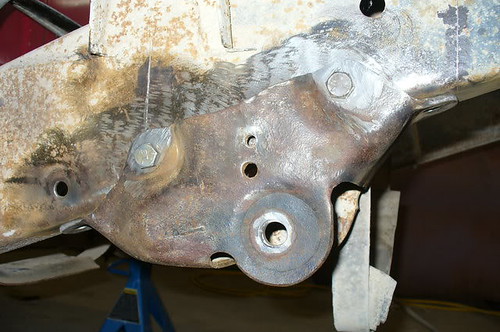  Now for the rear mounts. The rear mount is kinda built into the frame: 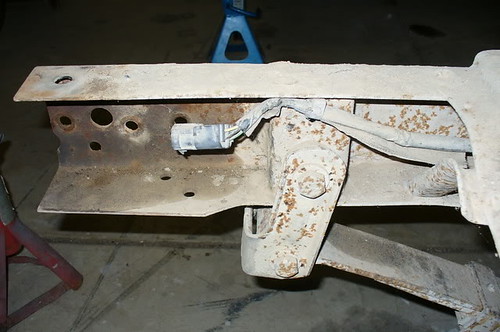 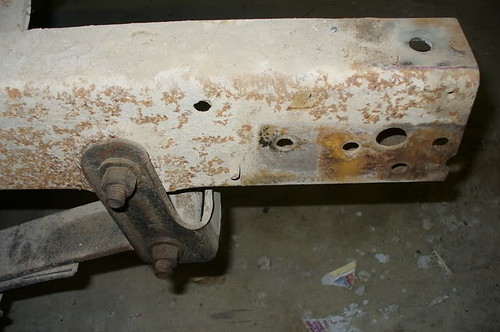 ...so I couldn't slide those back very easily. So after a little measuring I cut the last 11" off the frame on both sides and swaped them side to side effectively moving the rear mounts back 8". 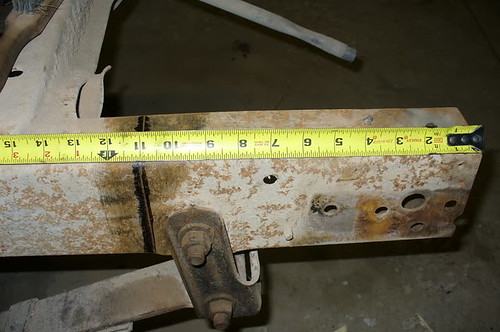 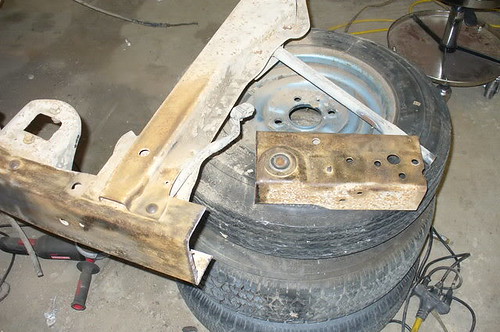 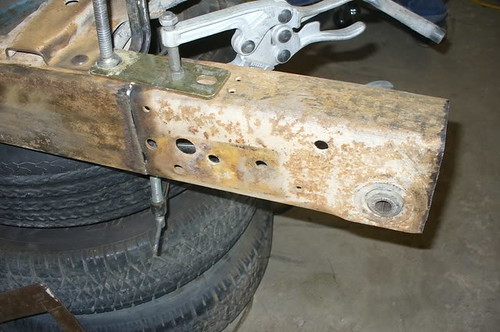 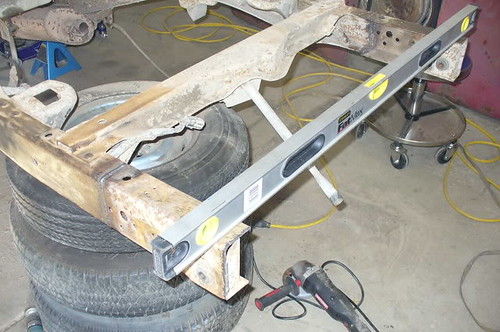 Then we threw the springs and 8.8 under it: 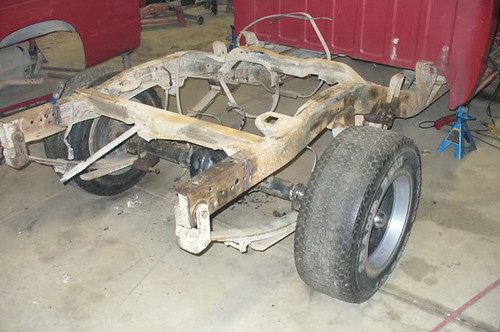
__________________
Current Build Thread 1930 Ford Model A Modern Twist: Ford Model A Rat Rod With a Modern Twist Build Thread Phase 1 "The Swap": 1949 3100 with S10 swap. Beginner build with ambition! Build Thread Phase 2 "The Drop": Beginner Build with Ambition gets Air Ride Last edited by gigamanx; 12-19-2017 at 02:21 PM. |
|
|
|
|
12-19-2017, 10:28 PM
|
#39 |
|
Registered User
Join Date: Dec 2017
Location: Howard, PA.
Posts: 44
|
Re: My Dream 1950 Chevy
Thanks GIG now I have an idea of what I need to do when I cross that bridge
|
|
|
|
|
12-20-2017, 10:09 PM
|
#40 | |
|
Senior Member
Join Date: Sep 2016
Location: Hershey, PA
Posts: 1,004
|
Re: My Dream 1950 Chevy
Quote:
 I would heed JoeDoh's message not to gather a bunch of parts too soon. That's how I burned money early on was getting stuff I thought I would need. By the time I got to that point in the project, I had learned enough to realize I needed different stuff. My 350 came without any accessory drive. I got a new starter. I spent a boat load of money getting that stupid thing running. A few ways to research: 1. Will it be cheaper to find a donor 350 that rebuild that one? 2. It will be cheaper to find the full accessory drive from a late model truck like a Silverado. I believe mine was from a 1995 Chevy 1500. On CL or eBay, you can grab the whole set of brackets and pulleys for maybe $200. eBay search "sbc 350 serpentine" you'll see what I mean. 3. Hit up a junk yard and pull all the accessories from a 350. The most expensive way is to do what I did...source each part new and try and hobble it together only to turn around and have to go with option #2 because there are a hundred options that don't work together haha.
__________________
Current Build Thread 1930 Ford Model A Modern Twist: Ford Model A Rat Rod With a Modern Twist Build Thread Phase 1 "The Swap": 1949 3100 with S10 swap. Beginner build with ambition! Build Thread Phase 2 "The Drop": Beginner Build with Ambition gets Air Ride |
|
|
|
|
|
12-20-2017, 10:24 PM
|
#41 |
|
Senior Member
Join Date: May 2007
Location: Doodah Kansas
Posts: 7,746
|
Re: My Dream 1950 Chevy
be careful with dryer plugs some are only rated at 30A and a welder doing frame work might be more than 40. check your breaker box for the rating on the dryer outlet and dont just swap the breaker if its 30, the breaker is sized to protect the wire.
most breaker boxes are in the garage now a days so pulling a 6/3 into the (shut off) box and wiring in a 50A breaker and a 50A plug is not really a problem. if you havent done anything like this, its an hour job for an electrician and about $50 in parts, if the breaker box is in the garage that is. I dug up a couple pictures of the supports under the floor, I drilled holes and "spot welded" the new pieces to the supports (not shown, although it does show my terrible cut around the battery box haha, still dont miss that one)  IMG_2345 by Joe Doh, on Flickr IMG_2345 by Joe Doh, on Flickr IMG_2346 by Joe Doh, on Flickr IMG_2346 by Joe Doh, on Flickryou can see there is plenty of strength to build the mounts and hold the cab even without the sheet of the floor, just the supports.
__________________
the mass of men live lives of quiet desperation if there is a problem, I can have it. new project WAYNE http://67-72chevytrucks.com/vboard/s...d.php?t=844393 |
|
|
|
|
12-20-2017, 11:34 PM
|
#42 |
|
Registered User
Join Date: Dec 2017
Location: Howard, PA.
Posts: 44
|
Re: My Dream 1950 Chevy
Thanks for the tips, I did already ask my counterpart at work he is the electric shop instructor and he advised even with the Flux core I would need a designated 30 amp. I have no more room in my pannel box as of right now, and my main pannel is in my mechanical room in the basement, it will take me a little figuring out to drop a sub pannel,in my garage but it may be worth the time and little cash for the appropriate power source right there in the garage.
On the engine this is the same engine that the previous owner intended to use in his everyday driver along with the trans, I will verify that this engine is good to go, there is some new components already mounted like the fuel pump, from what I could see already and there is a new manifold as well. On a really good not my project just got a much needed financial bump, needless to say my contractor has to pay "re-emburse" us 15k for the floors that he installed and voided our warranty. So we will have a nice X-Mass bonus next week. This will be a great start to getting the chassis and body mounts made and mounted, along with a running engine. But like,everyone has advised body work and mounting first and get the engine running and drive this Beast down the road. |
|
|
|
|
12-21-2017, 06:40 PM
|
#43 |
|
Registered User
Join Date: Dec 2017
Location: Howard, PA.
Posts: 44
|
Re: My Dream 1950 Chevy
Well look what showed up today my golden ticket.
|
|
|
|
|
12-21-2017, 06:42 PM
|
#44 |
|
Registered User
Join Date: Dec 2017
Location: Howard, PA.
Posts: 44
|
Re: My Dream 1950 Chevy
Forgot to add pic
|
|
|
|
|
02-03-2018, 07:01 PM
|
#45 |
|
Registered User
Join Date: Dec 2017
Location: Howard, PA.
Posts: 44
|
Re: My Dream 1950 Chevy
So it's been,a while since I posted, I have a little snag with the title but it's all good. So I took some more pics of the engine took the hood off to get a better look.
|
|
|
|
 |
| Bookmarks |
|
|


 Linear Mode

