
|
Register or Log In To remove these advertisements. |
|
|
|
|||||||
 |
|
|
Thread Tools | Display Modes |
 07-03-2020, 04:45 PM
|
#1 |
|
Senior Member
 Join Date: Feb 2009
Location: Northern Nevada
Posts: 7,118
|
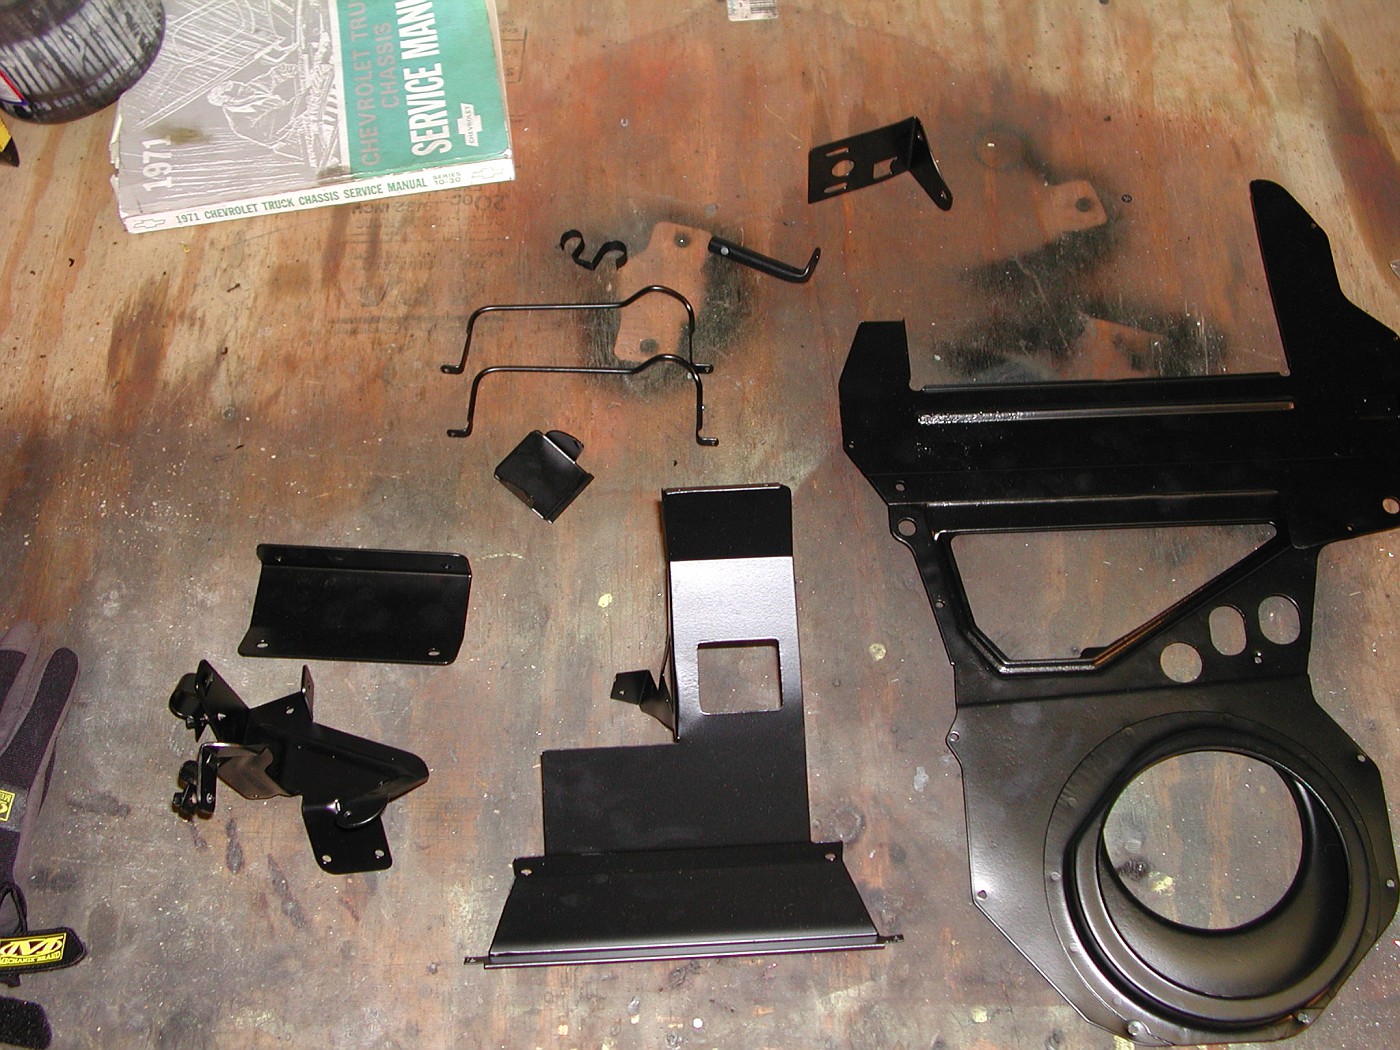
Restoring Evaporator Box
Some questions about restoring an evap. box.
The box took some over-spray long ago with black aerosol. So first order is to remove it. I know a guy who can blast it, not sure what material he uses (black something), but it's much finer than sand. Is there a better way considering these are plastic? I know some people remove the rivets for the bracket, but I think I can away without doing that. A finish guy and I agree that he paints what's black first, then clear coat the entire unit. I think these had a satin sheen, does that sound right for a restoration? Is there a way to remove the door flapper on these without damaging it? The flapper is still good. If he needs to paint around it OK, but I'd rather remove it cleanly if possible. Unless I'm missing something I don't think it can be removed, similar the A/C diverted flapper. Makes me wonder how they assembled them to begin with. Thanks! Thank you
__________________
Tony 71 Custom Deluxe, SWB, 2WD, 402, A/C. I developed an assm. guide "kit" for restoring it from ground up. With assys, the guide accts for 1000s of OEM identifications and part numbers, all written in short order. 700+ images include assm, illust., charts, and points of interest. Much of the info. applies to all 67-72 GM trucks, and to a lessor degree all 67-72 GM vehicles. My build thread, and more on the guide https://67-72chevytrucks.com/vboard/...d.php?t=730025 |

|

|
|
07-03-2020, 05:23 PM
|
#2 |
|
Registered User
Join Date: May 2000
Location: Petrolia,Ontario,Canada but working in Port Huron,Mi.
Posts: 1,769
|
Re: Restoring Evaporator Box
I disassembled the whole thing and powder coated all the metal parts.
 After the rebuild 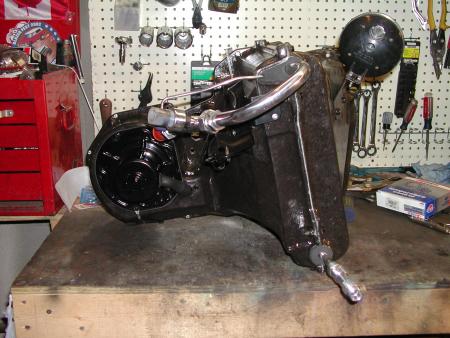 Here's a link to my rebuild of my A/C/Heater https://public.fotki.com/blazbk/blaz...e/?view=roll#1 .
__________________
71 blazer,350SBC,approx.375HP,700R4,factory GM TPI.Dual electric fans,33x12.5x15 ATR on stock suspension. Petrolia,Ontario,Canada but working in Port Huron,MI. See ALL my Blazer pic's HERE Last edited by BobbyK; 07-05-2020 at 01:27 PM. |
|
|
|
|
07-03-2020, 10:32 PM
|
#3 |
|
Senior Member
Join Date: Feb 2009
Location: Northern Nevada
Posts: 7,118
|
Re: Restoring Evaporator Box
Looks nice. How did you finish the container?
__________________
Tony 71 Custom Deluxe, SWB, 2WD, 402, A/C. I developed an assm. guide "kit" for restoring it from ground up. With assys, the guide accts for 1000s of OEM identifications and part numbers, all written in short order. 700+ images include assm, illust., charts, and points of interest. Much of the info. applies to all 67-72 GM trucks, and to a lessor degree all 67-72 GM vehicles. My build thread, and more on the guide https://67-72chevytrucks.com/vboard/...d.php?t=730025 |
|
|
|
|
07-03-2020, 10:41 PM
|
#4 |
|
Registered User
Join Date: May 2000
Location: Petrolia,Ontario,Canada but working in Port Huron,Mi.
Posts: 1,769
|
Re: Restoring Evaporator Box
Sprayed it with clear-coat (aerosol)
__________________
71 blazer,350SBC,approx.375HP,700R4,factory GM TPI.Dual electric fans,33x12.5x15 ATR on stock suspension. Petrolia,Ontario,Canada but working in Port Huron,MI. See ALL my Blazer pic's HERE |
|
|
|
|
07-03-2020, 11:11 PM
|
#5 |
|
Senior Member
Join Date: Feb 2009
Location: Northern Nevada
Posts: 7,118
|
Re: Restoring Evaporator Box
Here's some pictures of the original finish. Pretty sure these were clear coated, however, there might be another option: http://www.67-72chevytrucks.com/vboa...d.php?t=268199
Seems to me once blasted and polished they're back to their former glory, pending a clear finish. EDIT: Just dawned on me aircraft paint remover might be a good option to take the paint off prior to blasting the unit, it s pretty thick in places. Thought it might damage the plastic, but why would it? Think I've read oven cleaner removes paint from plastic, but don't quote me on it.
__________________
Tony 71 Custom Deluxe, SWB, 2WD, 402, A/C. I developed an assm. guide "kit" for restoring it from ground up. With assys, the guide accts for 1000s of OEM identifications and part numbers, all written in short order. 700+ images include assm, illust., charts, and points of interest. Much of the info. applies to all 67-72 GM trucks, and to a lessor degree all 67-72 GM vehicles. My build thread, and more on the guide https://67-72chevytrucks.com/vboard/...d.php?t=730025 Last edited by 71CHEVYSHORTBED402; 07-03-2020 at 11:59 PM. |
|
|
|
|
07-04-2020, 12:13 PM
|
#6 |
|
Senior Member
Join Date: May 2010
Location: Wisconsin & Arizona
Posts: 4,838
|
Re: Restoring Evaporator Box
When new, the box was not clear coated or painted. It appears to be a rather fibrous fiberglass type material, so I think blasting it would alter the texture. All I did with mine is clean it thoroughly and apply ArmorAll, and it looks new. I believe I first used ArmorAll on it in the 70s and only once or twice since.
__________________
Jim Last edited by FirstOwner69; 07-04-2020 at 01:42 PM. |
|
|
|
|
07-04-2020, 02:24 PM
|
#7 | |
|
Senior Member
Join Date: Feb 2009
Location: Northern Nevada
Posts: 7,118
|
Re: Restoring Evaporator Box
Quote:
 Some research shows the best method for removing paint off fiberglass is soda blasting. Then again, there's this. I've already tried lacquer thinner. Slow, but doesn't harm. I read acetone destroys fiberglass. https://www.youtube.com/watch?v=ckW0b-x-y1A
__________________
Tony 71 Custom Deluxe, SWB, 2WD, 402, A/C. I developed an assm. guide "kit" for restoring it from ground up. With assys, the guide accts for 1000s of OEM identifications and part numbers, all written in short order. 700+ images include assm, illust., charts, and points of interest. Much of the info. applies to all 67-72 GM trucks, and to a lessor degree all 67-72 GM vehicles. My build thread, and more on the guide https://67-72chevytrucks.com/vboard/...d.php?t=730025 Last edited by 71CHEVYSHORTBED402; 07-04-2020 at 03:26 PM. |
|
|
|
|
|
07-04-2020, 06:18 PM
|
#8 |
|
Senior Member
Join Date: Feb 2009
Location: Northern Nevada
Posts: 7,118
|
Re: Restoring Evaporator Box
Think I'll give aircraft paint remover a thumbs down for these. Doesn't eat it up say, but it will etch the surface. I put a fat glob on this, left it on there 5-6 minutes, which is plenty. Oil following makes no difference. I may be able to get away with it because the paint should come off quickly - but think I'll pass. A lot of paint on the RH side.
Flapper is in real nice shape, no rust anywhere. My excuse for not dismantling it 
__________________
Tony 71 Custom Deluxe, SWB, 2WD, 402, A/C. I developed an assm. guide "kit" for restoring it from ground up. With assys, the guide accts for 1000s of OEM identifications and part numbers, all written in short order. 700+ images include assm, illust., charts, and points of interest. Much of the info. applies to all 67-72 GM trucks, and to a lessor degree all 67-72 GM vehicles. My build thread, and more on the guide https://67-72chevytrucks.com/vboard/...d.php?t=730025 Last edited by 71CHEVYSHORTBED402; 07-04-2020 at 06:49 PM. |
|
|
|
|
07-04-2020, 09:11 PM
|
#9 |
|
Senior Member
 Join Date: Aug 2019
Location: Cheraw
Posts: 1,305
|
Re: Restoring Evaporator Box
If memory serves me correctly they started out with a flexible sheet of plastic on both sides and some kind of fibrous material in the middle. When put in the mold or press it was heated up for short time and came out looking like that. It just needed to have some of the flashing trimmed away. If you look at the edges you can see where they are rough and not shiny.
|
|
|
|
|
07-05-2020, 06:47 PM
|
#10 | |
|
Senior Member
Join Date: Feb 2009
Location: Northern Nevada
Posts: 7,118
|
Re: Restoring Evaporator Box
Did some work on these today, one done, the other partially. A lot of paint on these. I remember it's not spray bomb, I used an automotive paint on it in 93 when my buddy and I R&Rd the engine. I sprayed everything in a COLD winter outdoors
surprisingly it stuck well, just looked like half a jobRubbing alcohol is good for cleaning these, but lacquer thinner is the cat's meow. I tried oven cleaner to remove the paint. 25 minutes in it may etch slightly, so I left it on short that & no harm done. Can't swear it helped though, because none came off with the hose. Once in a lacquer thinner bath however some flaked off immediately. End of the day I found lacquer thinner is the only method I know for removing paint on these, assuming you desire to save the original surface. Takes a long while, nylon brush, and light brushing with a brass where it's 2-3 coats in places. Glad you chimed in Jim, I was taking the wrong route, these won't be blasted or clear coat. Quote:
__________________
Tony 71 Custom Deluxe, SWB, 2WD, 402, A/C. I developed an assm. guide "kit" for restoring it from ground up. With assys, the guide accts for 1000s of OEM identifications and part numbers, all written in short order. 700+ images include assm, illust., charts, and points of interest. Much of the info. applies to all 67-72 GM trucks, and to a lessor degree all 67-72 GM vehicles. My build thread, and more on the guide https://67-72chevytrucks.com/vboard/...d.php?t=730025 Last edited by 71CHEVYSHORTBED402; 07-11-2020 at 09:03 PM. |
|
|
|
|
|
07-07-2020, 05:03 AM
|
#11 |
|
70+ ( Old Skool Club )
Join Date: Nov 2003
Location: Saskatoon, Saskatchewan ,Canada
Posts: 9,073
|
Re: Restoring Evaporator Box
I have a new heater core waiting to go in my truck and am thinking I should pull the whole works out at the same time. Long Cold Winter home project. I'm procrastinating taking it out cause never done it but have procrastinated on doing things to my truck before and finally just going for it did it and things worked out fine.
__________________
1972 C10 Custom/Deluxe 613 Highlander 406/700R4 1999 White Tahoe LS 4x2 with Z56 Police Package 1992 K1500 GMC Suburban Members I have personally met: MusicMan70 - HeavyD - ChewyChevy67 - StingRay -71SWB4x4 - 67 Burb - DeadheadNM - too much stuff - bc65 - das601 " Circumsatances Do Not Change Responsibility " " The Sky is not the Limit, Your Mind is." Marilyn Monroe .. RIP Charlie Watts 1941 - 2021 |
|
|
|
|
07-07-2020, 12:34 PM
|
#12 | |
|
Senior Member
Join Date: May 2010
Location: Wisconsin & Arizona
Posts: 4,838
|
Re: Restoring Evaporator Box
Quote:
http://67-72chevytrucks.com/vboard/s...9&postcount=23 Suggestion... don't wait until it leaks like I did.
__________________
Jim |
|
|
|
|
|
07-07-2020, 07:44 PM
|
#13 |
|
Senior Member
Join Date: Feb 2009
Location: Northern Nevada
Posts: 7,118
|
Re: Restoring Evaporator Box
Few seconds of carelessness in my youth turned out to be 4-5 hours to clean-up. That was a job, but I got the paint off the fiberglass.
Nearly the entire RH side was painted, and real heavy in places. Pretty sure the oven cleaner helped somewhat. Other than that lacquer thinner and patience. Still have to prep the metal yet, but it will come easy. They're good without a painted finish. I ordered ROLITE FIBERGLASS POLISH. Expensive - hopefully it's the ticket.
__________________
Tony 71 Custom Deluxe, SWB, 2WD, 402, A/C. I developed an assm. guide "kit" for restoring it from ground up. With assys, the guide accts for 1000s of OEM identifications and part numbers, all written in short order. 700+ images include assm, illust., charts, and points of interest. Much of the info. applies to all 67-72 GM trucks, and to a lessor degree all 67-72 GM vehicles. My build thread, and more on the guide https://67-72chevytrucks.com/vboard/...d.php?t=730025 |
|
|
|
|
| Bookmarks |
|
|


 Linear Mode

