
|
 12-06-2017, 02:49 PM
|
#227 | |
|
Senior Member
 Join Date: Sep 2016
Location: Hershey, PA
Posts: 1,004
|
Re: 1949 Chevy with S10 swap. Beginner build with ambition!
Quote:
__________________
Current Build Thread 1930 Ford Model A Modern Twist: Ford Model A Rat Rod With a Modern Twist Build Thread Phase 1 "The Swap": 1949 3100 with S10 swap. Beginner build with ambition! Build Thread Phase 2 "The Drop": Beginner Build with Ambition gets Air Ride |
|

|

|
|
12-06-2017, 06:32 PM
|
#229 |
|
Senior Member
 Join Date: May 2007
Location: Doodah Kansas
Posts: 7,747
|
Re: 1949 Chevy with S10 swap. Beginner build with ambition!
hahaha I drove mine around without the drivers door and without any lights too, its irresistible !
how nice is it to have a truck that moves? I love that milestone because my days of shoving it around are over
__________________
the mass of men live lives of quiet desperation if there is a problem, I can have it. new project WAYNE http://67-72chevytrucks.com/vboard/s...d.php?t=844393 |
|
|
|
|
12-06-2017, 07:52 PM
|
#230 | |
|
Senior Member
Join Date: Sep 2016
Location: Hershey, PA
Posts: 1,004
|
Re: 1949 Chevy with S10 swap. Beginner build with ambition!
Quote:
The majority of the cost and learning I feel are behind me. Now I get to enjoy! You were right from the beginning that working on a running truck is so much easier...and more enjoyable. I'm already half way through doing the bed floor 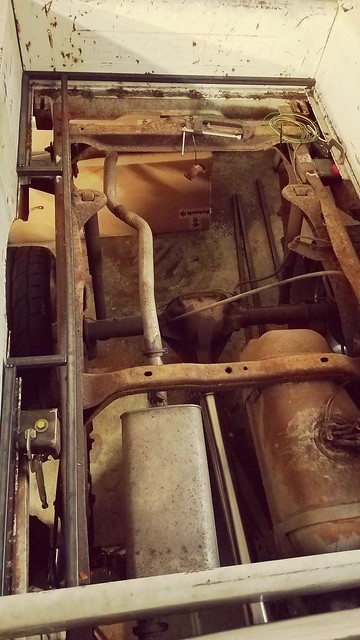 
__________________
Current Build Thread 1930 Ford Model A Modern Twist: Ford Model A Rat Rod With a Modern Twist Build Thread Phase 1 "The Swap": 1949 3100 with S10 swap. Beginner build with ambition! Build Thread Phase 2 "The Drop": Beginner Build with Ambition gets Air Ride Last edited by gigamanx; 12-11-2017 at 10:31 AM. |
|
|
|
|
|
12-07-2017, 11:09 AM
|
#231 |
|
Senior Member
Join Date: Sep 2017
Location: Bryan, Texas
Posts: 2,275
|
Re: 1949 Chevy with S10 swap. Beginner build with ambition!
Congratulations! It feels good.
|
|
|
|
|
12-08-2017, 12:38 PM
|
#232 |
|
Registered User
Join Date: Jan 2010
Location: Titusville, PA
Posts: 3,585
|
Re: 1949 Chevy with S10 swap. Beginner build with ambition!
Building my 51' taught me soooo much in life. I never even changed my own brakes bf. I learned to build engines, weld, paint, and use my brain alot. I'v been fortunate to sell a truck and now build one for someone. Have another truck to finish for a friend and more lined up of my own. Its a great accomplishment and learning experience. Most of all for me, being a builder I'v taking so much pride in that, where I have to do everything myself for the most part. Like all my house projects etc (fortunate to have grown up with carpenters and workers). most all my own daily driver work too. I'v learned not to really value money like I use to. I thought I could build a my truck for 5k and doubled it in the end, now I budget 3x's that amount for a build. I use to think it was the end of the world if my daily driver needed a few hundred dollars worth of work! Congrats to you and the fruits of your labor are paying off.
__________________
51' 99toLife finished 2011,355 sbc,5speed, patina, redoing whole truck, inter, bags, etc http://67-72chevytrucks.com/vboard/s...d.php?t=382481 49Hardtimes s/10 susp- bagged, vortec sbc, 5 speed, patina, sold http://67-72chevytrucks.com/vboard/s...d.php?t=594874 VIDEOS https://youtu.be/E8zHhjgS_lA https://youtu.be/E8zHhjgS_lA Geronimo 54' LS engine, static drop IFS, Client build, just about done http://67-72chevytrucks.com/vboard/s...62#post7399162 52' 3100 Slowly in progress, will be painted two toned, have 235 with a t-5, lowered OG frame Other projects, 49' farmuse 3100, killer Patina, will be slammed, LS engine, full done interior up next! www.coffeeandcustoms.com |
|
|
|
|
12-17-2017, 08:02 PM
|
#233 |
|
Senior Member
Join Date: Sep 2016
Location: Hershey, PA
Posts: 1,004
|
Re: 1949 Chevy with S10 swap. Beginner build with ambition!
Haven't updated in a while. A combination of holiday shopping and most of my task list being pretty boring stuff. Running wires, head light switch, column switches, taillights.
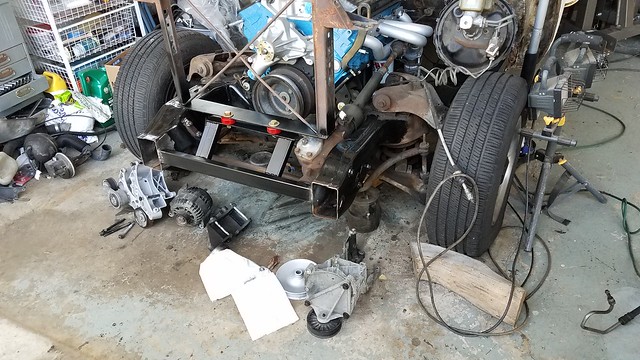
Today, I tried finding somewhere for the battery. Turns out there are a lot fewer places than I thought. Under the cab just didn't work...too tight between the cab and frame. I then tried the bed. Drivers side has the gas tank...passenger side has the exhaust. ugh. I looked for a bunch of options and most people just don't have the size constraints I do because of body placement on the frame. Here's what I now have. It's super close to the muffler so I'm worried about heat transferring to the battery. The only really clear place is the very end of the frame on the drivers side. Basically as far from the starter as possible haha. I'm planning on a rear mount gas tank though, so that space may be gone sooner rather than later. 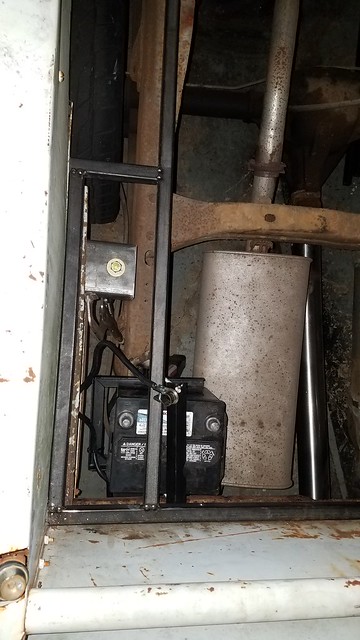 
__________________
Current Build Thread 1930 Ford Model A Modern Twist: Ford Model A Rat Rod With a Modern Twist Build Thread Phase 1 "The Swap": 1949 3100 with S10 swap. Beginner build with ambition! Build Thread Phase 2 "The Drop": Beginner Build with Ambition gets Air Ride |
|
|
|
|
12-17-2017, 08:37 PM
|
#234 |
|
Registered User
Join Date: Aug 2012
Location: Northeast KS
Posts: 1,775
|
Re: 1949 Chevy with S10 swap. Beginner build with ambition!
Waaaaaayyyyyy to close to the muffler. The heat cycles that thing will see will kill it in no time, if it doesn't end up with a hole first. It may just be the picture, but man, that's closer than I would be comfortable with.
I mounted mine up in the bed, above where the floor will be. Gives easy access and you've got many different options for a cover.
__________________
1999 GMC Suburban K2500 SLT, 454/4L80E 1991 Z/28, 6.0L/T56 1949 GMC 250, S10 Frame, 6.0L/4L80E Instagram @aceshighspeedshop |
|
|
|
|
12-18-2017, 01:47 AM
|
#235 |
|
Senior Member
Join Date: May 2007
Location: Doodah Kansas
Posts: 7,747
|
Re: 1949 Chevy with S10 swap. Beginner build with ambition!
it fits on the firewall, on the passenger side. but something tells me you may not want it there. I like putting them there because I dont have to extend the lines
__________________
the mass of men live lives of quiet desperation if there is a problem, I can have it. new project WAYNE http://67-72chevytrucks.com/vboard/s...d.php?t=844393 |
|
|
|
|
12-18-2017, 10:46 AM
|
#236 |
|
Registered User
Join Date: Jan 2010
Location: Titusville, PA
Posts: 3,585
|
Re: 1949 Chevy with S10 swap. Beginner build with ambition!
I like to put them behind the seat on pass side. I run a kill switch under the seat and then directly under cab onto starter, keeps the wires straight. I order 0/2 welding cable and crimp on my own terminals. If you decide to keep battery where it is now. I'd just wrap it with heat shield and you'll be good. You could also turn your muffler 90* and or put another little bend farther up to make it route a few inches closer to driveshaft. If you turn your muffler vertical it gives you more room between frame and driveshaft. You could poss turn your battery 90* also by the looks of it.
__________________
51' 99toLife finished 2011,355 sbc,5speed, patina, redoing whole truck, inter, bags, etc http://67-72chevytrucks.com/vboard/s...d.php?t=382481 49Hardtimes s/10 susp- bagged, vortec sbc, 5 speed, patina, sold http://67-72chevytrucks.com/vboard/s...d.php?t=594874 VIDEOS https://youtu.be/E8zHhjgS_lA https://youtu.be/E8zHhjgS_lA Geronimo 54' LS engine, static drop IFS, Client build, just about done http://67-72chevytrucks.com/vboard/s...62#post7399162 52' 3100 Slowly in progress, will be painted two toned, have 235 with a t-5, lowered OG frame Other projects, 49' farmuse 3100, killer Patina, will be slammed, LS engine, full done interior up next! www.coffeeandcustoms.com |
|
|
|
|
12-18-2017, 05:27 PM
|
#237 | |
|
Senior Member
Join Date: Sep 2016
Location: Hershey, PA
Posts: 1,004
|
Re: 1949 Chevy with S10 swap. Beginner build with ambition!
Quote:
__________________
Current Build Thread 1930 Ford Model A Modern Twist: Ford Model A Rat Rod With a Modern Twist Build Thread Phase 1 "The Swap": 1949 3100 with S10 swap. Beginner build with ambition! Build Thread Phase 2 "The Drop": Beginner Build with Ambition gets Air Ride |
|
|
|
|
|
12-18-2017, 11:53 PM
|
#238 |
|
Registered User
Join Date: Jan 2010
Location: Titusville, PA
Posts: 3,585
|
Re: 1949 Chevy with S10 swap. Beginner build with ambition!
honestly, have had no issues with acid battery in cab, but.... after hearing about how they CAN leak and create fires, I decided to go with an optima which is a gel type battery.
__________________
51' 99toLife finished 2011,355 sbc,5speed, patina, redoing whole truck, inter, bags, etc http://67-72chevytrucks.com/vboard/s...d.php?t=382481 49Hardtimes s/10 susp- bagged, vortec sbc, 5 speed, patina, sold http://67-72chevytrucks.com/vboard/s...d.php?t=594874 VIDEOS https://youtu.be/E8zHhjgS_lA https://youtu.be/E8zHhjgS_lA Geronimo 54' LS engine, static drop IFS, Client build, just about done http://67-72chevytrucks.com/vboard/s...62#post7399162 52' 3100 Slowly in progress, will be painted two toned, have 235 with a t-5, lowered OG frame Other projects, 49' farmuse 3100, killer Patina, will be slammed, LS engine, full done interior up next! www.coffeeandcustoms.com |
|
|
|
|
12-20-2017, 03:13 PM
|
#239 |
|
Registered User
Join Date: Aug 2014
Location: Vacaville, CA
Posts: 133
|
Re: 1949 Chevy with S10 swap. Beginner build with ambition!
I think if I installed windows, I'd die from CO poisoning long before the battery gets me. Haha.
I wanted to put the battery in the bed but I had temporarily placed it in the cab just to get the truck on the road. I think I'll keep it behind the seat with the addition of a battery box. |
|
|
|
|
12-20-2017, 09:59 PM
|
#240 | |
|
Senior Member
Join Date: Sep 2016
Location: Hershey, PA
Posts: 1,004
|
Re: 1949 Chevy with S10 swap. Beginner build with ambition!
Quote:

__________________
Current Build Thread 1930 Ford Model A Modern Twist: Ford Model A Rat Rod With a Modern Twist Build Thread Phase 1 "The Swap": 1949 3100 with S10 swap. Beginner build with ambition! Build Thread Phase 2 "The Drop": Beginner Build with Ambition gets Air Ride |
|
|
|
|
|
12-20-2017, 10:33 PM
|
#241 |
|
Senior Member
Join Date: May 2007
Location: Doodah Kansas
Posts: 7,747
|
Re: 1949 Chevy with S10 swap. Beginner build with ambition!
I wouldnt run a battery inside without a box and a vent (or a sealed battery like an optima), a charging battery will put off hydrogen and since I like to put other stuff behind the seat like electronic components, the risk is too great. you can use a regular box and vent it right out the bottom. be sure to use two vents so there is a place for air to come in.
edit: I said hydrogen was heavier than air but thats (obviously) not true, I was thinking of acetylene
__________________
the mass of men live lives of quiet desperation if there is a problem, I can have it. new project WAYNE http://67-72chevytrucks.com/vboard/s...d.php?t=844393 |
|
|
|
|
12-21-2017, 03:22 PM
|
#242 |
|
Senior Member
Join Date: Sep 2016
Location: Hershey, PA
Posts: 1,004
|
Re: 1949 Chevy with S10 swap. Beginner build with ambition!
Ok, thought I would validate some of my wiring by connecting up the battery and playing around. Oh man there are some gremlins! I followed the manuals I did have and guessed some of the others. I'm hoping you guys can see if there is something glaring I missed. Here's where we're at:
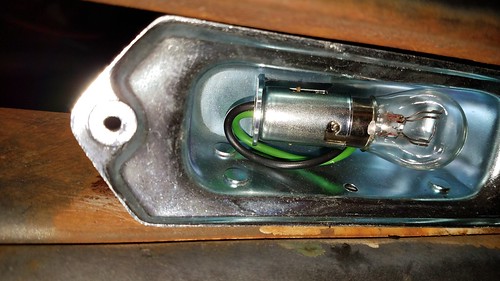
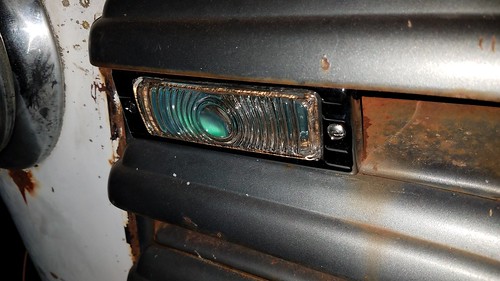
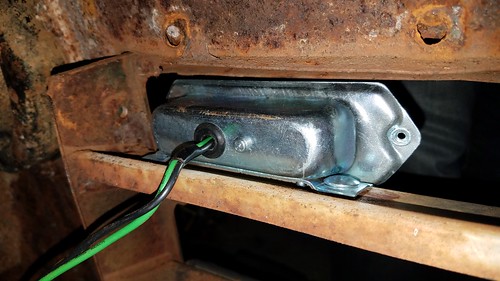
Park head lamps don't work Front turn signals work, but only when the light switch is pulled to first position Right front turn signal also seems to be leaking power to the fuel pump and kicking it on in sycn with the clicking. Yay  Brake lights are on in all positions Brake switch doesn't affect rear lights Turn signal works for right rear light but not left. Turn signals only click the relay when the ignition is turned to on or acc. In good news the license plate light works when the light switch is set to first position. haha. I didn't have a manual for the light switch so I guessed on that one... AUX = Power for gauges BAT = Fat wire labelled "Head light switch power" TAIL = Rear Tail Lights PARK = Front Park Lights HEAD = Low Beam There's an extra black screw on the front I think that's the dome light? 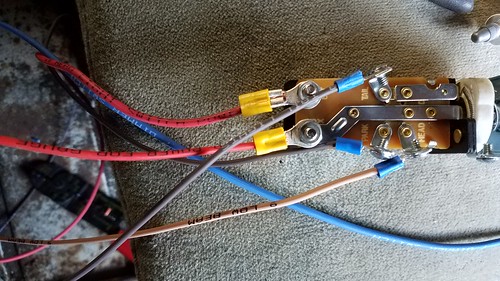 Second set of wiring I don't have a manual for. The S10 brake light. CENTER = Brake Switch Power White = Brake Switch to Turn  Finally, my column group. I followed the manual I got for the GM connector on the wiring group end not the column group end. I assumed the column group was already wired correctly as it came with a GM connector when I bought it  Currently breaking out the multimeter and troubleshooting one at a time. So the front park and turn is first....I got the double contact kind and I'm assuming the housing is the ground bolted to the front fender with the other two as either turn or park depending on brightness. They didn't come with a manual either
__________________
Current Build Thread 1930 Ford Model A Modern Twist: Ford Model A Rat Rod With a Modern Twist Build Thread Phase 1 "The Swap": 1949 3100 with S10 swap. Beginner build with ambition! Build Thread Phase 2 "The Drop": Beginner Build with Ambition gets Air Ride Last edited by gigamanx; 12-21-2017 at 04:49 PM. |
|
|
|
|
12-21-2017, 05:34 PM
|
#243 |
|
Senior Member
Join Date: May 2007
Location: Doodah Kansas
Posts: 7,747
|
Re: 1949 Chevy with S10 swap. Beginner build with ambition!
most aftermarket harnesses, even if they are wired for a GM column, come with two ways to wire for the turn signals to the rear, one system is a double bulb (separate brake and turn bulbs) and the other is a single bulb with double contacts (combined brake and turn bulbs). make sure you have the proper wiring at the column, sounds like that may be your issue in the rear.
yes, a double contact bulb will have two wires and the outside is the ground. it may sound too simple but make certain you have a ground wire from your battery to the cab, and another (heavier) one from the battery to the frame, and still another to the engine. these are called "differential grounds", not differential as in axle but differential as in ground potential. not having them introduces ground "loops", where power seeks a pathway to ground through any means possible. differential grounding gives a single point of ground potential, at the negative terminal. for example, your brake lights are grounded, and that ground travels through the brake light filaments along the brake wire to the column and flasher and finally the switch, so when the brake/turn light is off, there is still a viable path to ground! when its on, though, that ground goes away. its a little remembered fact except to the old repair guys but 90% of the time a non working cruise control on an older GM was a bad bulb or bad ground at the rear of the car, because the cruise system grounded through the brake bulbs! (the cruise "shut off" when you stepped on the brake, this was an easy method!) wiring isnt fun but it is rewarding from a "look what I did" factor. keep it neat! dont over do the zip ties, in fact years ago in avionics I learned how to aircraft lace wiring, always wanted to do that on a project instead of split loom.
__________________
the mass of men live lives of quiet desperation if there is a problem, I can have it. new project WAYNE http://67-72chevytrucks.com/vboard/s...d.php?t=844393 |
|
|
|
|
12-22-2017, 11:22 AM
|
#244 | |
|
Senior Member
Join Date: Sep 2016
Location: Hershey, PA
Posts: 1,004
|
Re: 1949 Chevy with S10 swap. Beginner build with ambition!
Quote:
What it sounds like you're saying is that I need the cab to have a shorter route back to the negative on the battery. I am still popping fuses but I did troubleshoot a bit further. I reduced my circuits down and took the bulb and fixture out of the front park light. If I ground/neg the light fixture to the frame, the park light works. As soon as I let the park light housing ground through the front grill like its supposed to, I pop the fuse. I even tried attaching a ground wire from the housing to the frame and that popped the fuse too. Almost like the power is going back through the cab instead of completing the circuit at the bulb. Makes no sense to me. I bought a big box of 25a so I can keep trying haha. I can't seem to find any good basic information for this though Edit: I moved the strap from the engine to the cab so it now goes from the negative cable lug on the frame to the cab instead. That stopped the fuse popping when I turn on the lights, but didn't get the park light working. Turn signals seem to be ok though.
__________________
Current Build Thread 1930 Ford Model A Modern Twist: Ford Model A Rat Rod With a Modern Twist Build Thread Phase 1 "The Swap": 1949 3100 with S10 swap. Beginner build with ambition! Build Thread Phase 2 "The Drop": Beginner Build with Ambition gets Air Ride Last edited by gigamanx; 12-22-2017 at 12:36 PM. |
|
|
|
|
|
12-22-2017, 03:08 PM
|
#245 |
|
Registered User
Join Date: Jan 2010
Location: Titusville, PA
Posts: 3,585
|
Re: 1949 Chevy with S10 swap. Beginner build with ambition!
I wouldn't go directly off of color like Joedoh is saying. Lets focus on one thing at a time. Headlight switch, dimmer switch and front lights.
1.What harness do you have? There are slight differences in companies. 2.Do you have your Hi/Lowbeam switch on floor? also called a dimmer switch? 3.Do you have 12v bulbs? stupid but necessary question. Your "Dimmer switch" wire should go from Headlight switch down to Dimmer switch. Then your low beam wire goes off dimmer switch out to your low beams. YOUR LIST with my answers. Park head lamps don't work use a test light on them or wire in some known lights that work. The stock lamps are grounded inside the unit and they get rusty and the stock wires suck. so get some basic 12v lights to use for testing turn signals or park lamps. But could be wiring issue also, lastly make sure you have 12v bulbs in those park lamps. Front turn signals work, but only when the light switch is pulled to first position. Did you turn ignition on? turn signals get their pwr through Headlight switch, so if key isn't on you need to have lights on opening the pwr circuit to them, headlights aren't controlled with ignition (which is why we often kill our battery!!) Right front turn signal also seems to be leaking power to the fuel pump and kicking it on in sycn with the clicking. I'd put a kill switch toggle inline on the fuel pump. No need to have it kick on just cause you have ign on or for this matter, the headlight switch is allowing the fuel pump to kick on. You can trace that down later, once you get the headlight switch properly wired. Brake lights are on in all positions Brake switch is wired wrong prolly, I'll get you picture of mine. Orange should be PWR and White is the Switch side you just need to know which is which, also make sure the button is pressed in to get the lights to go off. Brake switch doesn't affect rear lights- could be a simple wire swap to fix. Turn signal works for right rear light but not left. check grounds and bulbs and also that your wires are correct up on your column. Turn signals only click the relay when the ignition is turned to on or acc. This should be how it works as I stated above. I'm almost certain but not pos!! I didn't have a manual for the light switch so I guessed on that one... AUX = Power for gauges -- should be right BAT = Fat wire labelled "Head light switch power" -- should be right TAIL = Rear Tail Lights -- should be right PARK = Front Park Lights --should be right HEAD = Low Beam --as mentioned above, Head is your Dimmer switch PWR There's an extra black screw on the front I think that's the dome light? YES
__________________
51' 99toLife finished 2011,355 sbc,5speed, patina, redoing whole truck, inter, bags, etc http://67-72chevytrucks.com/vboard/s...d.php?t=382481 49Hardtimes s/10 susp- bagged, vortec sbc, 5 speed, patina, sold http://67-72chevytrucks.com/vboard/s...d.php?t=594874 VIDEOS https://youtu.be/E8zHhjgS_lA https://youtu.be/E8zHhjgS_lA Geronimo 54' LS engine, static drop IFS, Client build, just about done http://67-72chevytrucks.com/vboard/s...62#post7399162 52' 3100 Slowly in progress, will be painted two toned, have 235 with a t-5, lowered OG frame Other projects, 49' farmuse 3100, killer Patina, will be slammed, LS engine, full done interior up next! www.coffeeandcustoms.com |
|
|
|
|
12-22-2017, 03:10 PM
|
#246 |
|
Registered User
Join Date: Jan 2010
Location: Titusville, PA
Posts: 3,585
|
Re: 1949 Chevy with S10 swap. Beginner build with ambition!
I'm taking a guess here, your parking lights are 6v that is why when you ground them they work. 6V is pos ground. when hooked other way you are popping fuse.
__________________
51' 99toLife finished 2011,355 sbc,5speed, patina, redoing whole truck, inter, bags, etc http://67-72chevytrucks.com/vboard/s...d.php?t=382481 49Hardtimes s/10 susp- bagged, vortec sbc, 5 speed, patina, sold http://67-72chevytrucks.com/vboard/s...d.php?t=594874 VIDEOS https://youtu.be/E8zHhjgS_lA https://youtu.be/E8zHhjgS_lA Geronimo 54' LS engine, static drop IFS, Client build, just about done http://67-72chevytrucks.com/vboard/s...62#post7399162 52' 3100 Slowly in progress, will be painted two toned, have 235 with a t-5, lowered OG frame Other projects, 49' farmuse 3100, killer Patina, will be slammed, LS engine, full done interior up next! www.coffeeandcustoms.com |
|
|
|
|
12-22-2017, 03:22 PM
|
#247 | |||||
|
Senior Member
Join Date: Sep 2016
Location: Hershey, PA
Posts: 1,004
|
Re: 1949 Chevy with S10 swap. Beginner build with ambition!
Quote:
 Quote:
 Quote:
__________________
Current Build Thread 1930 Ford Model A Modern Twist: Ford Model A Rat Rod With a Modern Twist Build Thread Phase 1 "The Swap": 1949 3100 with S10 swap. Beginner build with ambition! Build Thread Phase 2 "The Drop": Beginner Build with Ambition gets Air Ride |
|||||
|
|
|
|
12-22-2017, 03:39 PM
|
#248 |
|
Registered User
Join Date: Jan 2010
Location: Titusville, PA
Posts: 3,585
|
Re: 1949 Chevy with S10 swap. Beginner build with ambition!
Yes, work with one circuit at a time and test. Your fuel pump is wired to acc bc it needs to kick on and prime bf you go to full start. again, why I would put a toggle in between that. No need to have fuel pump on when you are testing circuits etc. Do you have a picture or any diagrams of your parking lights? The park lamp should not need to be a two way bulb unless your plan to use them as turn signals. make sure your other park lamp wire isn't touching something or is capped off, if you are working with only one park lamp. which is what I would do, eliminate one thing and work on one thing. So wire up one park lamp, cap off other, turn your headlight switch on (key shouldn't need to be on actually).
What I would do instead of popping fuses. Take the fuse out of the circuit ex park lamp fuse. take a test light and ground it, then stick it in that fuse. If it lights up with key or headlight switch off, it is not correct. Saves you a fuse. When I did my first harness I couldn't figure out why the battery was arching when I went to attach the cables. I did the process of elimination through pulling each fuse and putting the battery cable on, it finally came down to the cig lighter being grounded wrong. but it taught me to pull a fuse then check that circuit, if it lights your light, you know its not grounded properly, if you have pwr off to that circuit and its lighting it up.
__________________
51' 99toLife finished 2011,355 sbc,5speed, patina, redoing whole truck, inter, bags, etc http://67-72chevytrucks.com/vboard/s...d.php?t=382481 49Hardtimes s/10 susp- bagged, vortec sbc, 5 speed, patina, sold http://67-72chevytrucks.com/vboard/s...d.php?t=594874 VIDEOS https://youtu.be/E8zHhjgS_lA https://youtu.be/E8zHhjgS_lA Geronimo 54' LS engine, static drop IFS, Client build, just about done http://67-72chevytrucks.com/vboard/s...62#post7399162 52' 3100 Slowly in progress, will be painted two toned, have 235 with a t-5, lowered OG frame Other projects, 49' farmuse 3100, killer Patina, will be slammed, LS engine, full done interior up next! www.coffeeandcustoms.com |
|
|
|
|
12-22-2017, 03:45 PM
|
#249 | |
|
Senior Member
Join Date: Sep 2016
Location: Hershey, PA
Posts: 1,004
|
Re: 1949 Chevy with S10 swap. Beginner build with ambition!
Quote:
   I can't believe I'm having trouble with something as simple as a lightbulb
__________________
Current Build Thread 1930 Ford Model A Modern Twist: Ford Model A Rat Rod With a Modern Twist Build Thread Phase 1 "The Swap": 1949 3100 with S10 swap. Beginner build with ambition! Build Thread Phase 2 "The Drop": Beginner Build with Ambition gets Air Ride |
|
|
|
|
|
12-22-2017, 05:04 PM
|
#250 |
|
Senior Member
Join Date: May 2007
Location: Doodah Kansas
Posts: 7,747
|
Re: 1949 Chevy with S10 swap. Beginner build with ambition!
I still think you are lacking a ground, and you have a ground loop that is letting the lights ground through the taillight bulbs
nothing and I mean NOTHING short of a dead short will pop a 25A fuse. an ATC type fuse will pass 300% its rated current for about a second before blowing. a dead short is the only thing that will pop a fuse instantly. that means you have something grounded that should not be (pinched wire, bare end touching metal), or you have something wired incorrectly. that steering column thing catches everyone. once you understand that on a single bulb system the turn signal is actually the brake light, it just kind of clicks that you have to have the correct wiring at the column and brake switch.
__________________
the mass of men live lives of quiet desperation if there is a problem, I can have it. new project WAYNE http://67-72chevytrucks.com/vboard/s...d.php?t=844393 |
|
|
|
 |
| Bookmarks |
|
|


 Linear Mode

