
|
 03-23-2012, 05:41 PM
|
#51 |
|
Registered User
 Join Date: May 2011
Location: Missoula, MT
Posts: 934
|
Re: George...
So I went to a local shop to purchase some long u bolts for drop blocks and when I told the guys what I wanted they told me that I was wrong and that in his 30 years he had never had a gm truck that used a ¾ inch U bolt or one that was 3 ½ inches wide. He didnt even ask me if I was sure, he just told me that he would make them, they are non refundable and that I could use them for horse shoes when they didnt work. So to be on the safe side I went back to the house and brought what I had left of the bolt (a 5 section) to him and the lower shock bracket and told him I needed a bolt this size to go through these holes and I needed it 10 long. Guess what I walked out with, a ¾ inch U bolt that is 3 ½ inches wide and is 10 long. Looking at these things I understand why he had his doubts, they are huge, but he dint need to make me feel stupid. Guess I learned my lesson, if I have parts, or parts of parts, to take them with me when I buy replacement stuff, even if you know what you want, just to prove the jack wagon across the counter that he doesnt know everything!
|

|

|
|
03-23-2012, 11:33 PM
|
#52 |
|
Registered User
Join Date: Apr 2011
Location: Mustang, Oklahoma
Posts: 2,807
|
Re: George...
Nice parts! gotta love the parts jockeys. I went to a store in need of a set of lifters for a 327 once upon a time and the guy asked: how many? A whole set I replied. So what like twelve? he says. I say no, lets see V8, 2 valves per cylinder.... he just looked at me and I finally said 16 lifters please..
__________________
Dan <---(my name) 67 SWB C10 project "GEORGIA"-59 Brookwood 2dr wag...Next project-03 Tahoe 4x4 5.3 family ride-07 Hondur Accord, commuter car |
|
|
|
|
04-16-2012, 03:51 PM
|
#53 |
|
Registered User
Join Date: May 2011
Location: Missoula, MT
Posts: 934
|
Re: George...
So, a mechanic that does work on some of the repo vehicles for us asked me if I was interested in a 69 Chevy he was taking the engine out of for his brother and they were going to have crushed. I wasnt too interested in it because I have a 69 and there isnt anything I really need from the same year vehicle I have, but I went to take a look any way. Well he was wrong, the truck was a 72 and it is a Swiss cheese body but has a solid frame and suspension under it. So I bid him $150 and now I own an ochre 2 tone with discs to convert George up front. It will take a little elbow grease to clean up and some time to swap, but after I crush this truck when I am done (this truck needs to be shot and taken off the road) I think I will be at even money or slightly ahead!
Check out the seat belt tied to the fuel lines and the lack of a rocker! The PO also took the bumpers off a friends 73-87 and put them on, when we unloaded it the front one fell off and he used a hammer to pound the fenders in under the taillights to make the rear fit! |
|
|
|
|
04-16-2012, 05:18 PM
|
#54 |
|
Registered User
Join Date: Apr 2003
Location: Indep, MO
Posts: 5,893
|
Re: George...
Bahaha! Good snag!
Posted via Mobile Device
__________________
Boppa's Old Yeller Truck Build, Old Yeller's New Heart! Project Buzz Bomb Flyin' Low! |
|
|
|
|
04-16-2012, 05:21 PM
|
#55 |
|
Registered User
Join Date: Apr 2003
Location: Indep, MO
Posts: 5,893
|
Re: George...
Might take a long look at those doors- 71/72 doors have an extra support
Posted via Mobile Device
__________________
Boppa's Old Yeller Truck Build, Old Yeller's New Heart! Project Buzz Bomb Flyin' Low! |
|
|
|
|
04-16-2012, 05:24 PM
|
#56 |
|
Registered User
Join Date: May 2011
Location: Missoula, MT
Posts: 934
|
Re: George...
Thanks for the tip I will look at them
|
|
|
|
|
04-24-2012, 01:23 PM
|
#57 |
|
Registered User
Join Date: May 2011
Location: Missoula, MT
Posts: 934
|
Re: George...
Its time to start giving George some pep to his step! I was looking around the forum for simple upgrades to his old and tired 350 while I give him an over due tune up and I came across a thread talking about using junkyard HEI units to replace the points system that originally came in these trucks. I felt this would fit right into the realm of recycling and upgrading the spark in my truck.
There are several different types of HEI units available, some which are controlled by computers (4wire), some that have computers and sensor wires (5 wire) and the original 2 wire setup. I went with a simple 2 wire setup. All that is needed is a full 12v power source, there is a tach wire that comes from the unit that helps to tune the advance, but you only need the power wire to run the HEI. So I called a mechanic buddy of mine to ask where to start looking for one and he had one just layin around so he gave it to me for FREE! But nothing is free so off to Orilley I went. New Accel rotor and cap $42, cheap wires $18 (I will upgrade later), Mr. Gasket curve kit $17 and the cheapest tach they had $20 just so I can tune it (I will upgrade later as well). If you have not done this to your old truck, you are missing out! First thing I did was replace the cap and rotor in the HEI unit, this involves removing the coil from the old cap and installing it in the new cap with a new electrode and screwing on the new rotor. While I was in there I also installed a re-curve kit from Accel. The Accel kit has replacement bushings for the weights, modified weights and three different sets of springs to adjust how fast and aggressive the advance engages, all of this allows you to increase rpm faster than the stock setup, increasing horsepower and timing. With the new bushings, springs and the modified weights my timing begins to advance much faster than stock, about 800 rpm. So after all of the parts are replaced in your HEI you need to get rid of a few things in the engine bay. I began by taking off the negative terminal on the battery, removed the cap from the old distributor and marked the location of where the rotor is pointing on the manifold by placing a piece of tape on the manifold and remove the rest of the distributor assembly. Next step was to insert the HEI rotor with the cap off in the same position as marked with the tape, place the cap on the new unit, run the new wires and gap all the plugs to .045 (with all of the extra spark you get from the HEI you can run a wider gap and get better burn in the combustion chamber, POWER!!). The last step I needed to do to install the unit is dig into the loom that runs across the firewall under the hood, remove the white braided resistance wire and replace it with a red 12ga wire to powers the unit. Points style coils could not handle a constant 12 volt power source or they would burn up, but they needed 12 volts to start the vehicle, so GM installed the white braided resistance wire to knock the voltage down to about 9 volts at the coil and a wire that ran from the starter solenoid to the coil to give it 12v to get it started. The HEI unit needs 12 volts constantly, so by pulling the spade for the resistor wire at the firewalls harness, replacing it with a new spade attached to a12ga wire, running the wire through the loom (or in my case rewrap the wires in electrical tape), and removing the lead from the starting solenoid all that is needed is to connect the new 12ga wire to the red wire on the HEI plug. After reconnecting the negative battery terminal, a few pumps of the gas pedal and a turn of the key the truck was running. I then took my timing light and advanced the timing to 14*. With a hotter spark from the coil, and an adjusted timing and the modified curve the 350 has lost allot of the sluggishness that it had with points. Pages on how to tune an HEI unit- http://67-72chevytrucks.com/vboard/s...05#post5189005 http://www.73-87.com/7387garage/drivetrain/hei.htm http://www.chevyhiperformance.com/ho...438/index.html The first picture is the old coil and distributor, the second picture is the new HEI installed and the third picture shows where I removed the white resistor wire on the firewall mount and replaced it with a red 12ga wire. |
|
|
|
|
04-26-2012, 03:18 PM
|
#58 |
|
Registered User
Join Date: May 2011
Location: Missoula, MT
Posts: 934
|
Re: George...
I think of myself as an open minded guy, but the one thing that bothers me about my truck is the once red sparkled steering wheel that has faded to pink. First who thought a red sparkly steering wheel was a good idea? Second, no MAN has a pink steering wheel on his pickup! Sorry guys with pink steering wheels, someone had to tell you. Thank you parts truck for having a black steering wheel, even if it is off of a late 70s Chevy, it will get me through until I find the wheel I cant live without!
Now when you buy a truck form the brother of a man they call Stinky Charlie it is pretty safe to assume that it is genetic and his brother has similar hygiene disabilities. It took me, and I am not kidding, 45 min and a half of a bottle of simple green to clean all of the grease and cigarette tar off of the wheel. All of the work I had to do was better than a pink sparkly steering wheel! I know in the picture the wheel looks maroon, but trust me, it is PINK, filppin PINK with sparkles!!! |
|
|
|
|
04-26-2012, 04:01 PM
|
#59 |
|
Registered User
Join Date: May 2011
Location: Missoula, MT
Posts: 934
|
Re: George...
While I was removing Donna Summers from my cab I shorten the steering column by 1.5 inches, all of the posts about it said it was quick and easy and for the most part it was. The one thing the threads on the subject did not tell me was that you can only shorten it 1 inch or less or go 2 inches or longer. If you go any longer than 1 inch you must move the back up light switch that is attached to bottom of the column inside the cam by the fire wall outside of the cab and if you dont go 2 inches the switch will be stuck inside the firewall and that cant happen.
I decided to go for 1 inch because I didnt need much more room, but a little would be nice. First remove the intermediate shaft from the truck and shorten the shaft and inch. (Note-you must completely remove the bolt that connects the shaft to the column!!!! Completely!!!!) The intermediate shaft is made of 2 different pieces of metal that slide inside of each other so if you get into an accident it compresses instead of the wheel compressing you. The shaft is held at a certain length by 4 small holes that are glued into place so in order to shorten the shaft you need to drill out the glue, spray the shaft with Sea-Foam Deep Creep or PB Blaster at the slide point and let it sit for about 1 beer. Then take a hammer to tap on the overlap area of the shafts to loosen any left over rust and gunk holding the shaft in position. Now you are ready to compress the shaft with a piece of wood and a hammer (you might need a big hammer)! |
|
|
|
|
04-26-2012, 04:06 PM
|
#60 |
|
Registered User
Join Date: May 2011
Location: Missoula, MT
Posts: 934
|
Re: George...
Now go under the dash and remove the trim cover, support plate and the retaining strap from under the steering column. Go back under the hood and loosen the retaining strap that is against the firewall. You then need to undo the shift linkage so you can rotate the drive shaft and lengthen the centering notch in the top of the shaft that centers the column under the dash, I drilled a hole 1inch up from the notch and connected the hole and notch with a cutting tool (sorry, no pic). Then rotate the column back up in place and loosely strap it in making sure it is seated in the slot you just extended, push it as far away from you as you can, tighten the bolts and reconnect everything like it was before.
|
|
|
|
|
04-26-2012, 04:17 PM
|
#61 |
|
Registered User
Join Date: May 2011
Location: Missoula, MT
Posts: 934
|
Re: George...
I know you cant see much of a difference, but it certainly feels different. That 1" of extra space give me allot more room and comfort behind the wheel, for the hour and a half it took I would highly recommend this for anyone looking for a little more room.
|
|
|
|
|
06-19-2012, 01:04 PM
|
#62 |
|
Registered User
Join Date: May 2011
Location: Missoula, MT
Posts: 934
|
Re: George...
Well it happened; the one thing I didn’t plan to replace in the near future is starting to die a slow and miserable death. For the last month I haven’t really been motivated to work on the truck since I noticed there is a heavy thud to the engine when it is running and we narrowed it down to a cam bearing or lobe on its last leg. All I have been doing is researching engines and parts. I picked up an L31 from a friend the other day for $250 and I just dropped it off at the machine shop. I know there is an issue with it because it was taken out of the 00 escalade for low compression on cylinder 3 even after the heads were reworked, but for that price I am going to take the gamble because the cylinder walls look good. When I talk to the machinist I will know more.
|
|
|
|
|
06-20-2012, 12:15 PM
|
#63 |
|
Registered User
Join Date: Jul 2011
Location: Farmville, Va
Posts: 3,027
|
Re: George...
shapping up
|
|
|
|
|
06-20-2012, 12:20 PM
|
#64 |
|
dazed and confused
Join Date: Jul 2008
Location: marion nc
Posts: 1,649
|
Re: George...
Cool
Posted via Mobile Device
__________________
members met: redbaron69, billsbowtie,nc67 |
|
|
|
|
06-22-2012, 06:32 PM
|
#65 |
|
Registered User
Join Date: May 2011
Location: Missoula, MT
Posts: 934
|
Re: George...
Just got word from the machine shop and it is looking a little interesting. I was there when they took the engine out of the 00 Cadillac so I know where it came from and whoever owned this vehicle earlier did some creative work to get it down the road. For starters the block is early 90s, the heads area vortec but one is a 906 and the other is a 062, they used rtv sealant to close off the block mount fuel pump holes, the cam was installed wrong and it moved back and forth killing 2 lifters (that is where the compression issue came from), it has been bored .040 over already and the crank is already slightly undersized. The good news is that the mismatch heads are just fine together and everything looks real good with the exception of the cam and the 2 lifters, just a hone, rings, cam bearings and a cam that I was gonna swap out anyway.
What a roller coaster! |
|
|
|
|
06-25-2012, 07:17 PM
|
#66 | |
|
Senior Member
Join Date: Oct 2011
Location: Lewiston, ID.
Posts: 627
|
Re: George...
Quote:
. .  ' '. .
__________________
Wade  , JUST WALK AWAY, AND I'LL SPARE YOUR LIVES!!! , Build thread "TANGERINE" http://67-72chevytrucks.com/vboard/s...d.php?t=498570 Board Members Met: bigblock68, ol_skool_chevy ,68TT,atvpro |
|
|
|
|
|
06-26-2012, 11:28 AM
|
#67 |
|
Registered User
Join Date: May 2011
Location: Missoula, MT
Posts: 934
|
Re: George...
wade, you are telling me that all of the little pieces I have go together and make that! What are you useing that for?
|
|
|
|
|
06-26-2012, 01:09 PM
|
#68 | |
|
Senior Member
Join Date: Oct 2011
Location: Lewiston, ID.
Posts: 627
|
Re: George...
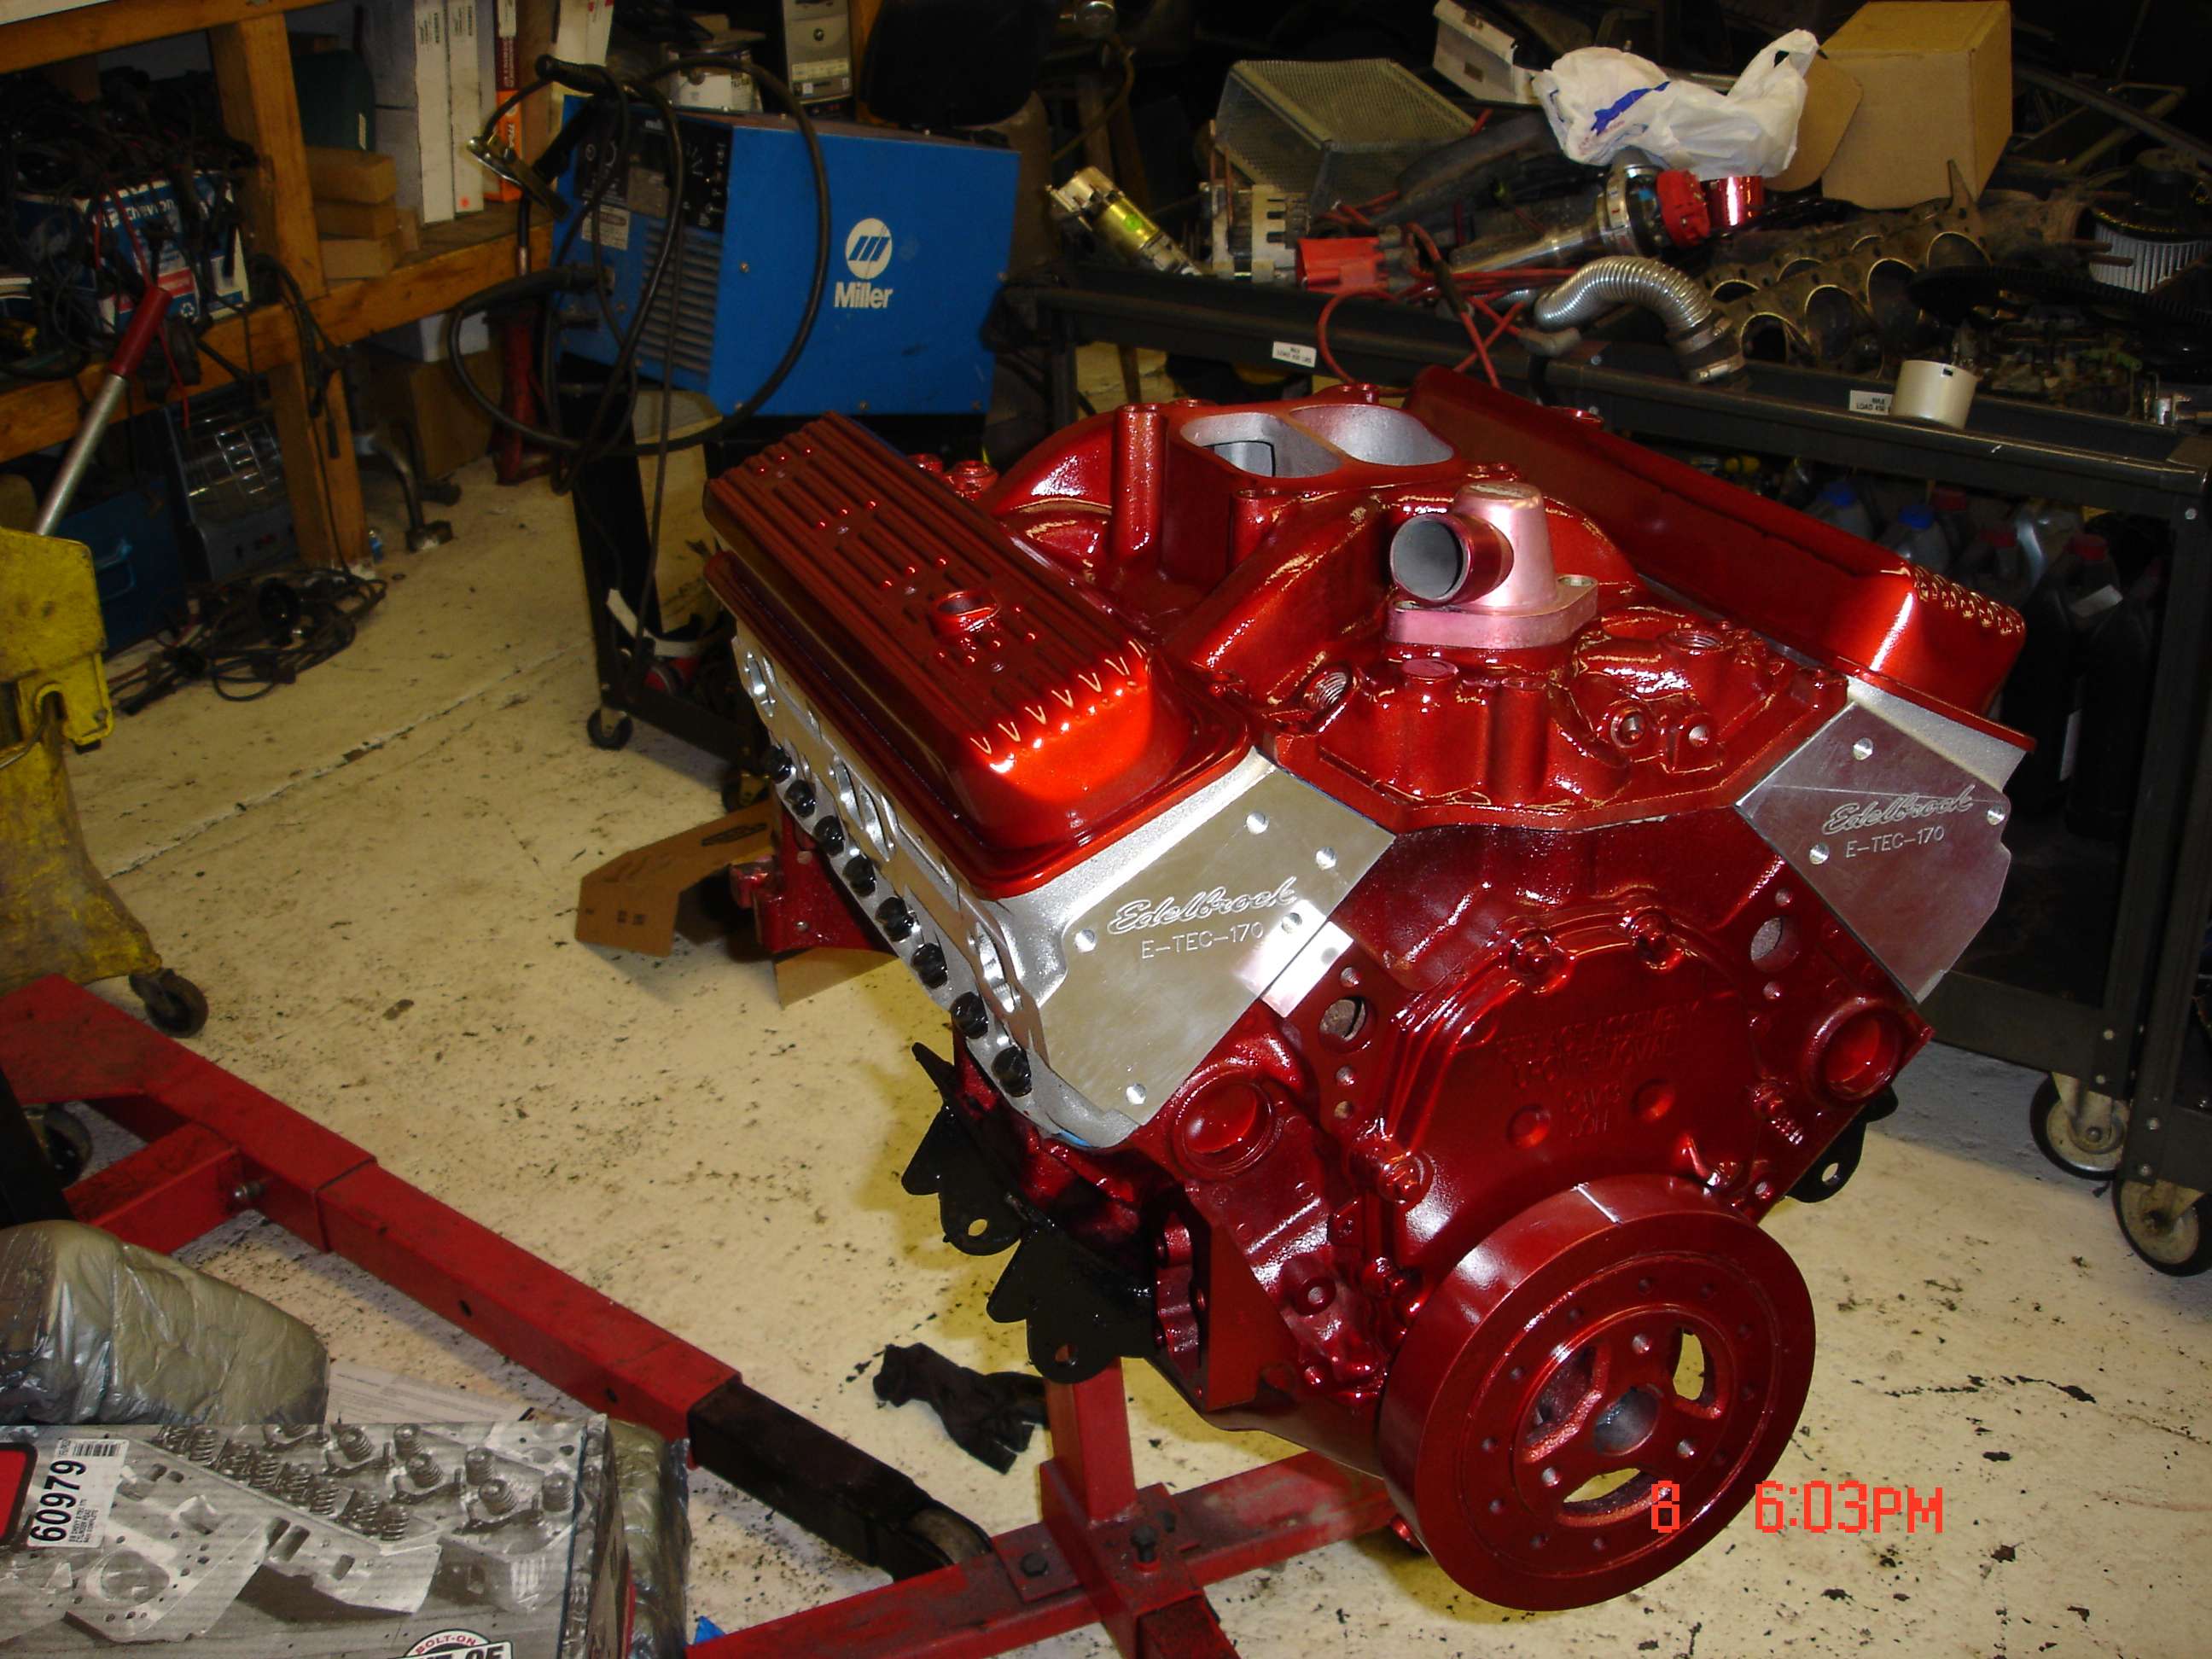
Quote:
.  , , , ,. It's nothing to fancy, the block was bored .030 over and the crank was turned .010 under, the factory "powder" rods were re-sized, cast pistons and the factory rollers were used on a GM "hot cam". Threw a set of Edelbrock E-Tec 170 heads on it with a set of roller tip rockers and Smith Bros. pushrods. The intake manifold is a Chinese knock off of an Edelbrock Performer manifold. The engine is probably in the 325 h.p. range and max RPM 5500. Just a nice little street motor. If I had to do it again I would probably go with some R.H.S. cast iron heads,, better performance, cheaper price. 
__________________
Wade , JUST WALK AWAY, AND I'LL SPARE YOUR LIVES!!! , Build thread "TANGERINE" http://67-72chevytrucks.com/vboard/s...d.php?t=498570 Board Members Met: bigblock68, ol_skool_chevy ,68TT,atvpro |
|
|
|
|
|
06-26-2012, 03:43 PM
|
#69 |
|
Registered User
Join Date: May 2011
Location: Missoula, MT
Posts: 934
|
Re: George...
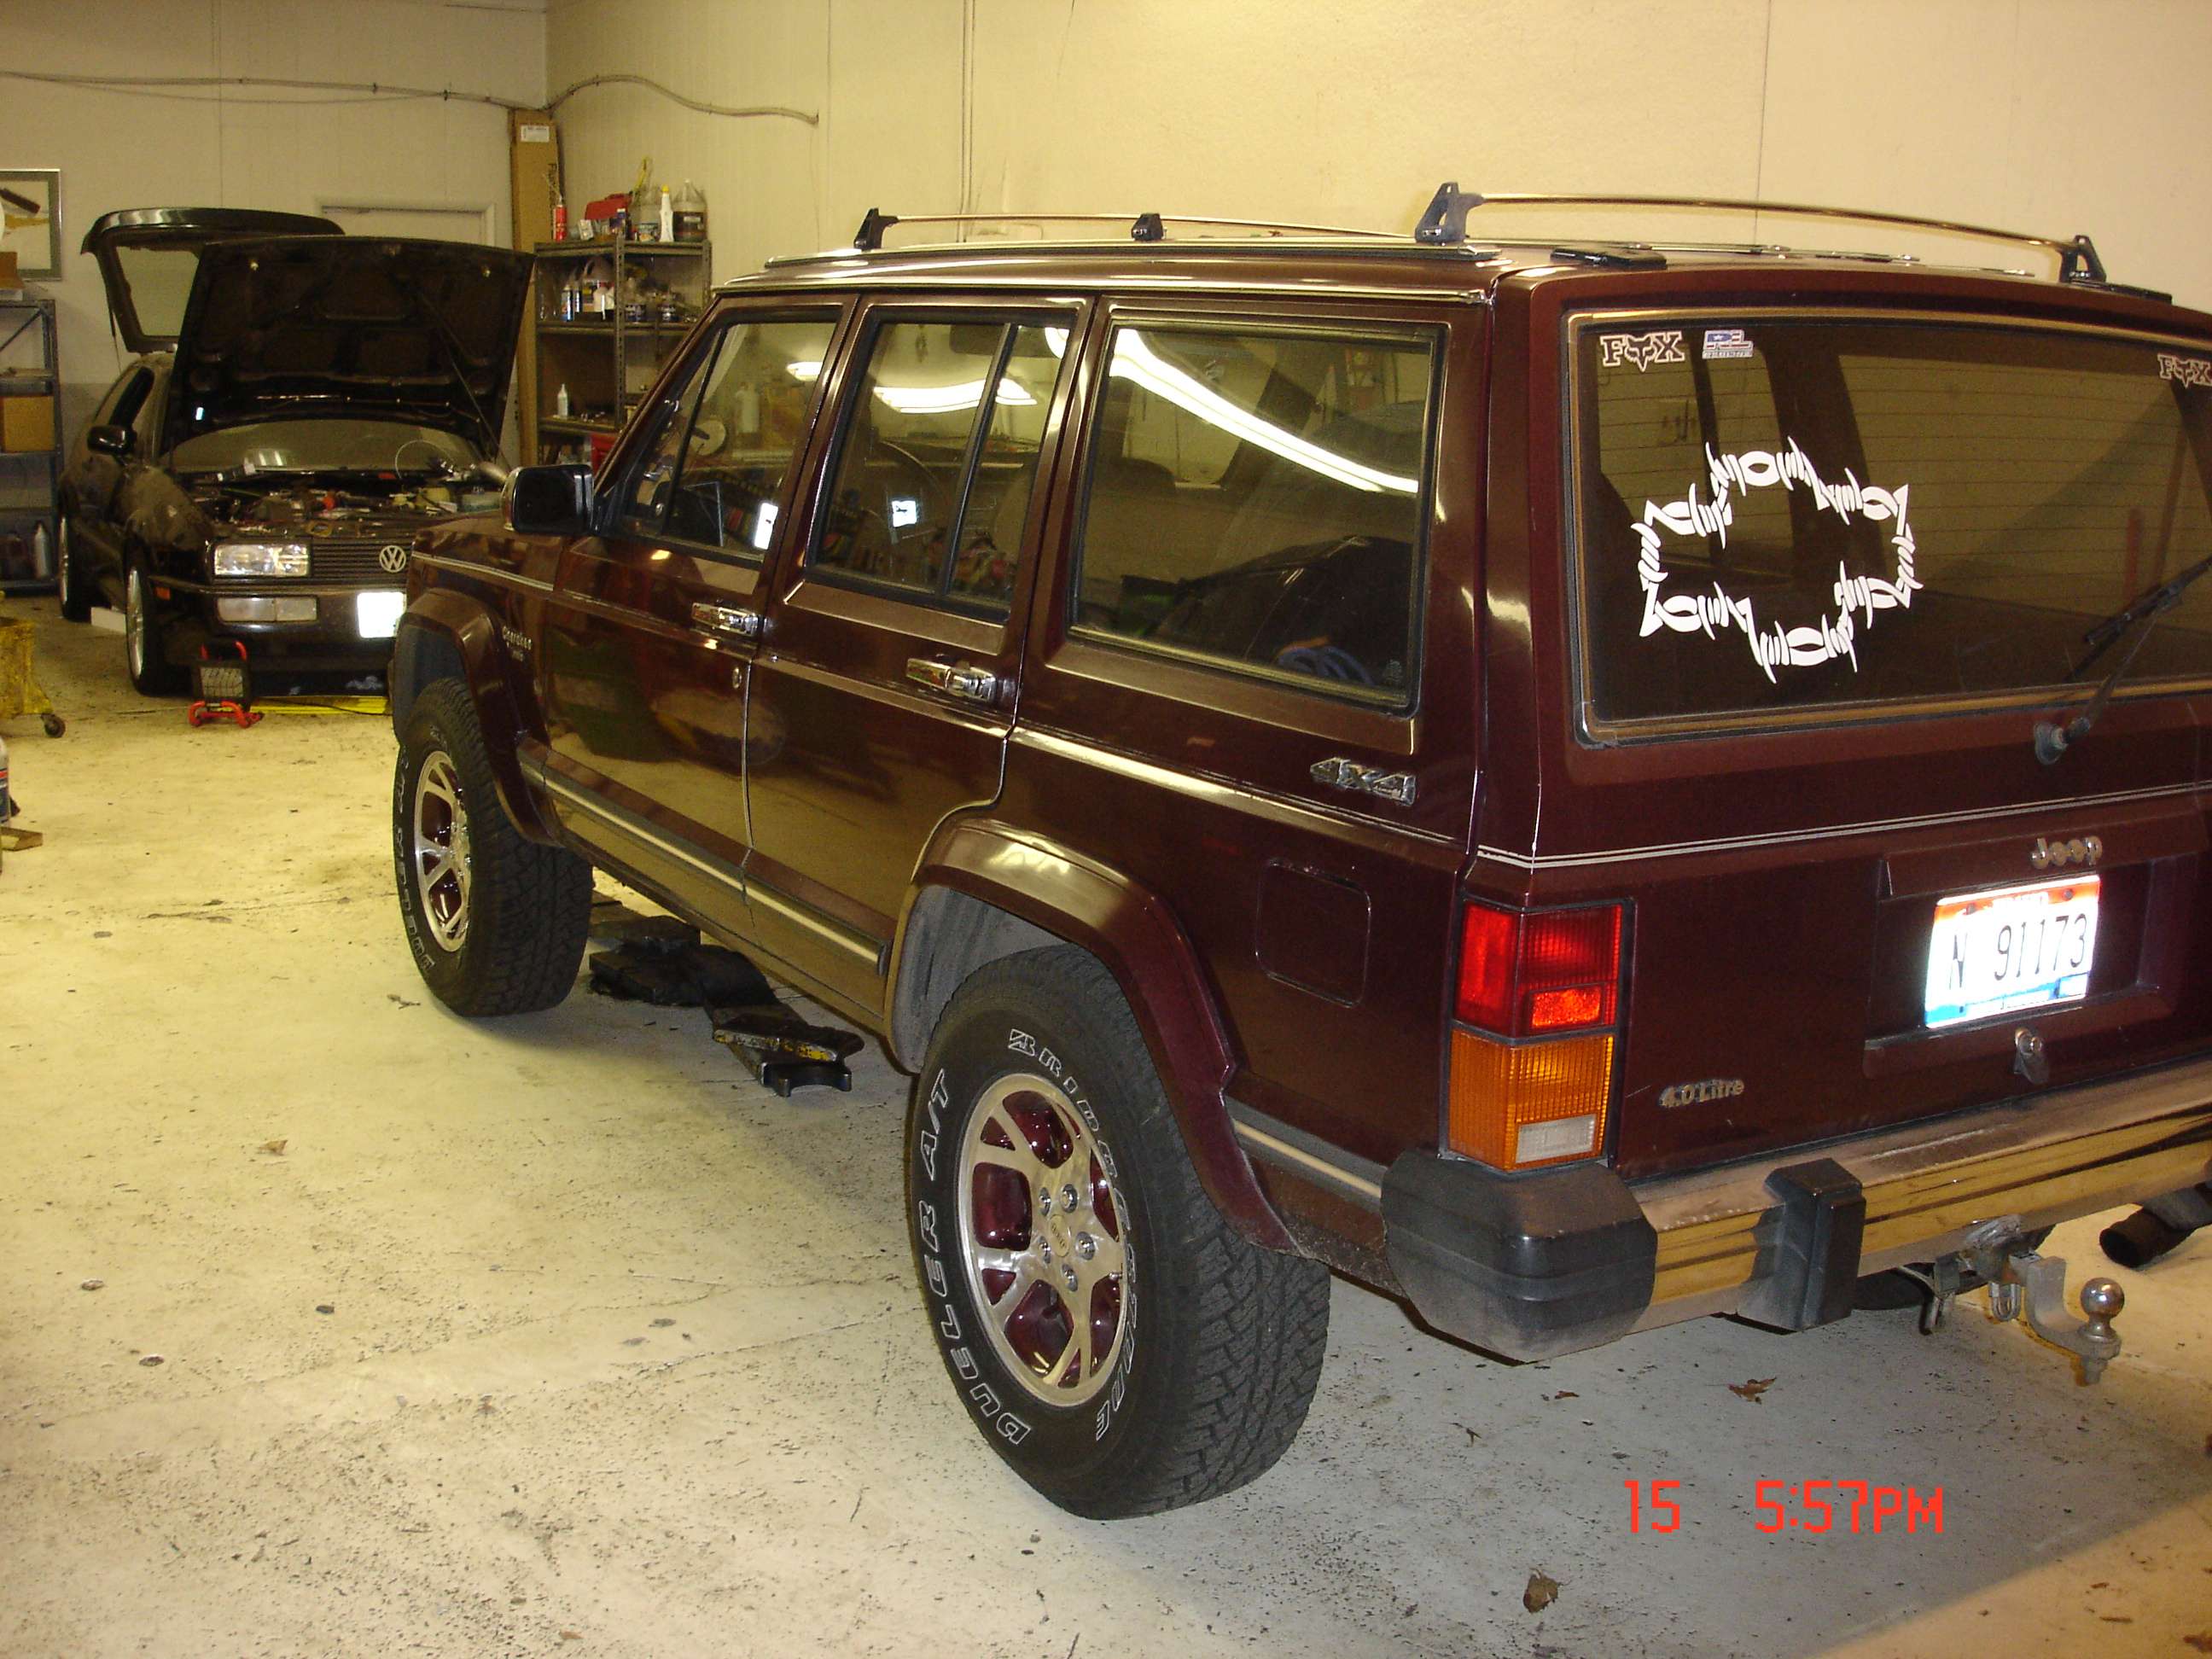
I used to have a jeep just like that. I always wanted a v8 in it instead of the 2.8l that it had. I am sure it screams! The computer program I have tells me with the cam and configuration I am going with that my power should be between 300 and 320 horepower and 340 to 360 foot lbs, I think it will be a fun driver. Thanks for sharing those awesome photos!
|
|
|
|
|
07-24-2012, 06:01 PM
|
#70 |
|
Registered User
Join Date: May 2011
Location: Missoula, MT
Posts: 934
|
Re: George...
Taking my engine to the machine shop I knew it was going to take some time because he strait up told me it would. He builds race car engines and my engine is not the top priority, but everyone I talk to assures me it will be worth the wait. All of the extra little things he does make a big difference.
While the new engine is at the salon getting worked over I got a little board and decided to see if I can swap the leafs for trailing arms before we drop the new engine in. With the help of some friends I go the bed off and then I started digging into it one piece at a time trying to fight off that feeling of being totally overwhelmed. First to go was the exhaust, followed by all the unused and misc hangers bolted and riveted to the frame. If you ever ask someone on this forum, How difficult it is to convert from leafs to trailing arms? and they reply If you get the parts form a junk yard or from forum member it bolts right in. dont believe them!!!!!! While it is not beyond the grasp of the normal idiot, like my self to do, you do need to be equipped with more info than that, or at least in the case of my truck frame I did. There were no existing holes for my cross member to bolt into, not even one to index it off, but I did find a diagram of frame dimensions a few weeks ago thought it was nifty and saved it to my desktop. With a little math that single image gave me the distance from the front rivet of the trailing arm cross member to the center of the spring and shock mount cross member, effectively preventing me form spiraling into an alcoholic pile of crap and getting yelled at by my wife! Thank you forum for telling me the answer, darn you forum for sending me into the world unprepared! By the way if you find yourself in this situation; from the math that I did the center of the spring and shock cross member lines up on the center on the oval on the frame rail. |
|
|
|
|
07-24-2012, 06:35 PM
|
#71 |
|
Registered User
Join Date: Jul 2011
Location: Farmville, Va
Posts: 3,027
|
Re: George...
nice progress since I was here last, like what U did 2 the Jeep
|
|
|
|
|
07-25-2012, 01:53 PM
|
#72 |
|
Registered User
Join Date: May 2011
Location: Missoula, MT
Posts: 934
|
Re: George...
I went home and started working on the trailing arm cross member and now I am at a crossroad on how to move the rear axle back 1.5”, do I move the cross member or just use spacers?
|
|
|
|
|
08-07-2012, 04:29 PM
|
#73 |
|
Registered User
Join Date: May 2011
Location: Missoula, MT
Posts: 934
|
Re: George...
Thank you gringoloco, you have been a huge source of info on how to convert to trailing arms.
Trying to keep the vehicle down for as little time as possible I have decided to leave the trailing arm cross member where it is until after I switch to a 4 speed auto, hopefully next year. This way I dont need to lengthen the driveshaft 1.5 or move the trans cross member and engine mounts back 1.5 and then do it again when I install the new transmission. After I bolted the cross member in I took the entire rear suspension off, axle, leafs and brackets then I set the truck on jack stands under the cab. It was at this point in the middle of summer and 3 days before my birthday that I get a respiratory cold and another week went by without being able to do anything to the truck. My neighbors hate me, but its ok they are hippies. So Sunday I got back at it and flipped the mounting brackets on the trailing arm cross member, painted (por15) the shock cross member and bolted it back in for hopefully the final time, and cleaned the trailing arms to prep them for por15. WARNING: Undercoating is indestructible and should only be confronted by professionals! If you want to clean up your trailing arms, do your self a favor, rub your nickels together and buy a sand blaster or have them blasted! I used a paint/rust stripping disc for a drill and what used to be my hands, it has been two days and a bottle of ibuprofen later and the clubs on the ends of my arms still hurt! I wont do that again!!!!!!!!!!! |
|
|
|
|
08-07-2012, 04:39 PM
|
#74 |
|
Registered User
Join Date: May 2011
Location: Missoula, MT
Posts: 934
|
Re: George...
See the Subaru in the background, I told you they were hippies! Yes that is the No Limit pan hard bar bracket on the frame. It fought me for 3 hours, it just wouldn’t line up on the oval frame hole, I had to enlarge some holes and get crafty with a motorcycle strap but it is one stout and awesome part!
|
|
|
|
|
08-07-2012, 07:41 PM
|
#75 |
|
Registered User
Join Date: Apr 2011
Location: Mustang, Oklahoma
Posts: 2,807
|
Re: George...
Great progress on George!!
__________________
Dan <---(my name) 67 SWB C10 project "GEORGIA"-59 Brookwood 2dr wag...Next project-03 Tahoe 4x4 5.3 family ride-07 Hondur Accord, commuter car |
|
|
|
 |
| Bookmarks |
|
|


 Linear Mode

