
|
 01-13-2008, 06:52 AM
|
#151 |
|
On the fast track to nowhere..
Join Date: May 2006
Location: Splendora, Texas
Posts: 5,316
|
Re: progress pics
Cool! At least you finally got it back. Can't wait to see some pics!
__________________
-Mike Owen- Norwood, Houston, Cecilia, Jackson, Monroe and counting |

|

|
|
01-21-2008, 10:38 AM
|
#152 |
|
Senior Member
Join Date: May 2004
Location: johnstown, NY
Posts: 2,393
|
Re: progress pics
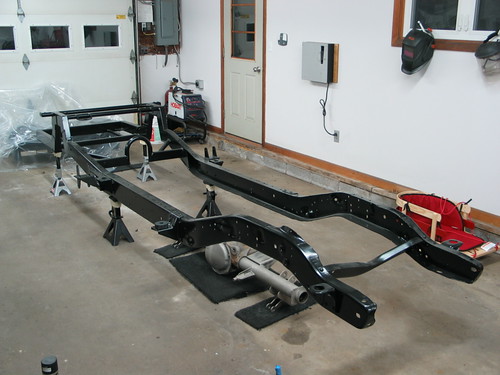
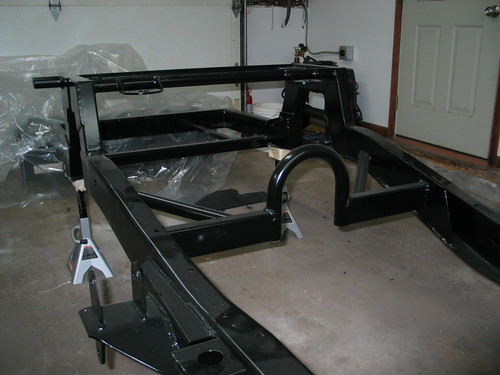
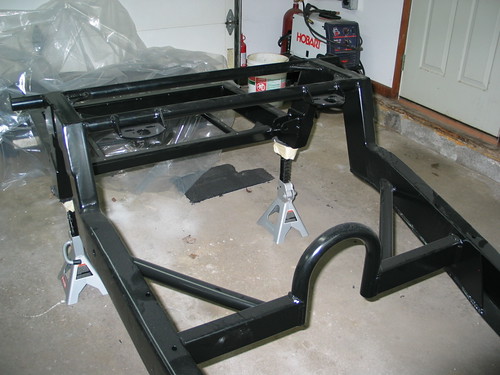
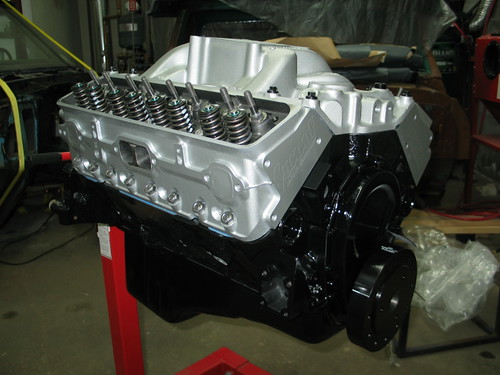
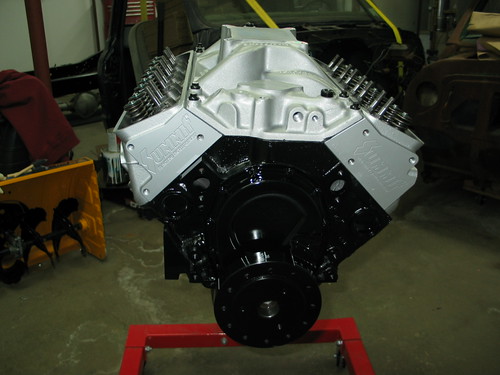
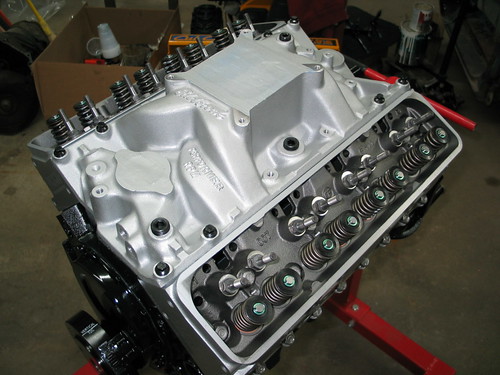
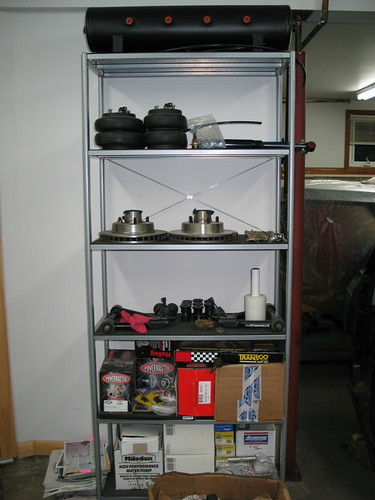
Not any progress on my end. I wanted to show these pics with the chassis put together, but I'm having some painting issues, so all my parts are not finished. So here is just the bare frame. Excuse the dust. Also are pics of my engine I just picked up from the builder. Its a 350 with summit racing vortec heads and an edelbrock intake. I'm going monday to talk with the builder about the exact specs on the internals. Last pic is a shelf of parts waiting to be used.
|
|
|
|
|
01-21-2008, 12:57 PM
|
#153 |
|
Registered User
Join Date: Mar 2007
Location: West Virginia
Posts: 481
|
Re: progress pics
That motor looks really good. Nice and clean look. Good Job
|
|
|
|
|
02-12-2008, 10:23 PM
|
#154 |
|
Registered User
Join Date: Oct 2007
Location: hopewell jct new york
Posts: 140
|
Re: progress pics
hey i have been following your build for a while and i wanan know any one can give me input how tall is your tires for a "lay frame " truck cause im gonna do it to my 67 thanks send me pm's if possiable thanks guys
|
|
|
|
|
02-13-2008, 04:17 AM
|
#155 | |
|
Senior Member
Join Date: May 2004
Location: johnstown, NY
Posts: 2,393
|
Re: progress pics
Quote:
progress pics soon fellas! Painting sucks!!!!!! Shoulda, woulda, coulda had it powder coated! Last edited by jlaird; 02-13-2008 at 04:18 AM. |
|
|
|
|
|
02-13-2008, 10:38 AM
|
#156 |
|
Registered User
Join Date: Oct 2007
Location: hopewell jct new york
Posts: 140
|
Re: progress pics
let me ask another question i know u didnt z your frame thats what im gonna do but what if i zed and sectiond my engine crossmember to the point where i would have to tranny tub the cab do you thiink the motor will be to low. it was just a thought i love your set up mines gonna be a little diff but u give me ideas great build. any one could answear this

|
|
|
|
|
02-13-2008, 11:53 AM
|
#157 |
|
Senior Member
Join Date: May 2004
Location: johnstown, NY
Posts: 2,393
|
Re: progress pics
Theres no need to do both a z and a sectioned crossmember. You can lay with either one.
|
|
|
|
|
02-13-2008, 12:37 PM
|
#158 |
|
Registered User
Join Date: Feb 2008
Location: Windsor, Ontario, CANADA
Posts: 15
|
Re: progress pics
Nice build. I didn't notice anyone else comment, but I have to tell you that you are laying some nice welds.
|
|
|
|
|
02-13-2008, 08:23 PM
|
#159 |
|
Registered User
Join Date: Oct 2007
Location: hopewell jct new york
Posts: 140
|
Re: progress pics
not sctioni it to the point where the crossmember moves up in the frame i wanna section it to moce the motor mounts down basicaly to drop the motor into the crossmember so there is no need to tun the cab and then you can keep your stock drive line set up and your radiator will be in the same spotso you can run a fan but the front member where the pully is will have to be modified. i think it may work but may need shorth headers
i need some input and thoughts i hope you dont mind me doing this i cant start my own threads yet i need to join as a supporting member soon. |
|
|
|
|
02-13-2008, 10:05 PM
|
#160 | |
|
Senior Member
Join Date: May 2004
Location: johnstown, NY
Posts: 2,393
|
Re: progress pics
Quote:
|
|
|
|
|
|
02-18-2008, 10:48 AM
|
#161 |
|
Registered User
Join Date: Oct 2007
Location: hopewell jct new york
Posts: 140
|
Re: progress pics
hey whats the diameter of the ring u used for ur arm mod and are u running a drop spindel
thanks |
|
|
|
|
02-18-2008, 09:47 PM
|
#162 | |
|
Senior Member
Join Date: May 2004
Location: johnstown, NY
Posts: 2,393
|
Re: progress pics
Quote:
|
|
|
|
|
|
03-09-2008, 09:03 PM
|
#163 |
|
Registered User
Join Date: Oct 2007
Location: hopewell jct new york
Posts: 140
|
Re: progress pics
did u purchase upper control arms because ur ball joints are binding cause i did the same lower arm as u and i cant get mine to come as close ot the crossmember and i wanan know how to fix it im thiinking about pie cutting the upper to make the arm streight cause the ball joint mounts on an angle im mad confused on what to do
|
|
|
|
|
03-09-2008, 11:55 PM
|
#164 |
|
Senior Member
Join Date: May 2004
Location: johnstown, NY
Posts: 2,393
|
Re: progress pics
billdo, I'm not quite following what your saying. You can't get what close to the crossmember? The reason I got the uppers was because the cost to rebuild the stockers with new balljoints and crosshafts was reason enough to just spend a little more and get the tubulars.
|
|
|
|
|
03-10-2008, 12:28 AM
|
#165 |
|
Registered User
Join Date: Oct 2007
Location: hopewell jct new york
Posts: 140
|
Re: progress pics
my bad my lower control arm will not come as close to the crossmember like yours there is 3 inches or so from lower a arm to crossmember. thats all the travel i get cause my upper ball joint just stops
Last edited by billdo; 03-10-2008 at 12:28 AM. |
|
|
|
|
03-10-2008, 02:50 AM
|
#166 | |
|
Senior Member
Join Date: May 2004
Location: johnstown, NY
Posts: 2,393
|
Re: progress pics
Quote:
|
|
|
|
|
|
03-10-2008, 04:35 AM
|
#167 | |
|
Signals in the bumper.
Join Date: Feb 2003
Location: East TN
Posts: 856
|
Re: progress pics
Quote:
__________________
Jeff C. 1981 Chevrolet Silverado - Under major construction...again. link 1962 Chevrolet Impala 4D Sedan moredoorclassics.com 1936 Ford Pickup - Frame-off in progress link 1979 Chevrolet Camper Special Flatbed link |
|
|
|
|
|
03-10-2008, 05:14 AM
|
#168 | |
|
Senior Member
Join Date: May 2004
Location: johnstown, NY
Posts: 2,393
|
Re: progress pics
Quote:
http://*****************/SteelTubingBent.php |
|
|
|
|
|
03-11-2008, 04:42 AM
|
#169 |
|
Registered User
Join Date: Oct 2007
Location: hopewell jct new york
Posts: 140
|
Re: progress pics
i know i did the same bag pocket step for step as u but my upper ball joint wont let me go as low
|
|
|
|
|
03-11-2008, 06:29 AM
|
#170 | |
|
Senior Member
Join Date: May 2004
Location: johnstown, NY
Posts: 2,393
|
Re: progress pics
Quote:
|
|
|
|
|
|
03-11-2008, 08:26 PM
|
#171 |
|
Registered User
Join Date: Oct 2007
Location: hopewell jct new york
Posts: 140
|
Re: progress pics
that shouldnt matter because the travel should be the same you just moving the crossmember up in the frame and i zed mine.
Last edited by billdo; 03-11-2008 at 08:27 PM. |
|
|
|
|
03-17-2008, 06:17 PM
|
#172 |
|
Senior Member
Join Date: May 2004
Location: johnstown, NY
Posts: 2,393
|
Re: progress pics
Heres some updated pics of the front suspension:
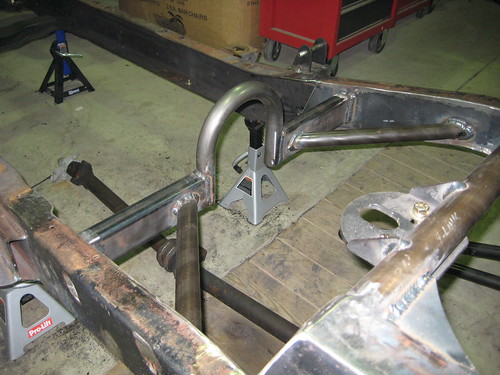
So the only thing powdercoated is the frame. Everything else I sprayed with POR-15, then topcoated with POR Chassiscoat semi-gloss black. You can hardly tell the difference between the powder and por. Actually an average person would never know. Point being, it was a surprisingly good match. 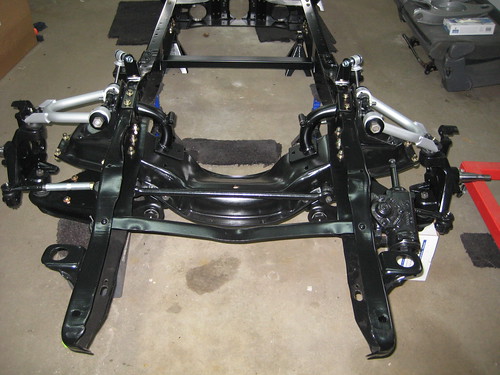 The silver parts are POR Sterling Silver. It's a little too matte for my liking, but oh well. I'm imagining it will probably mark up easy. Here's a good view of the CPP sleeves that I clearcoated over the bare metal. 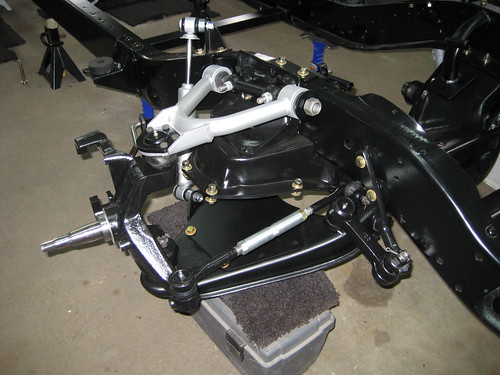 Heres a view of the new upper and lower shock mounts. I modified the lower mount and made a new upper mount for more travel and better alignment of the shock. The shocks are good ol monroes and I put poly shock bushings in. 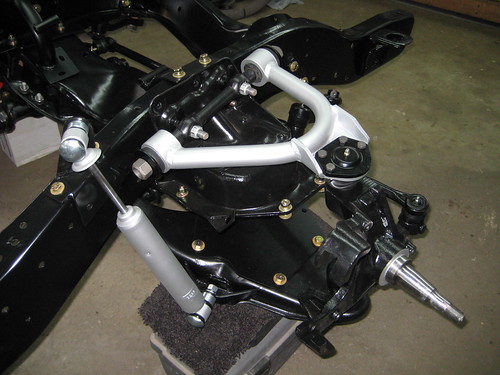 Close up of the upper shock mount: 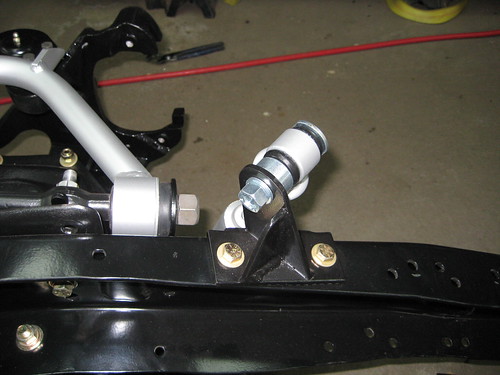 Super-duper cool performance online tubular engine mounts: 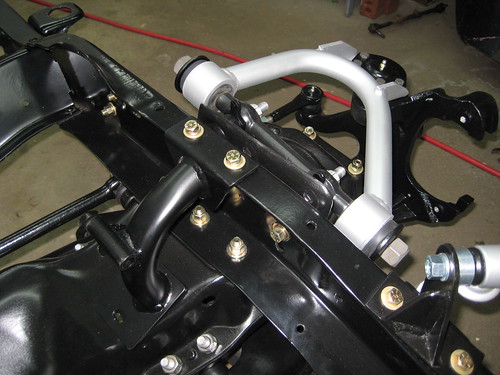 Manual steering box! oh yea! 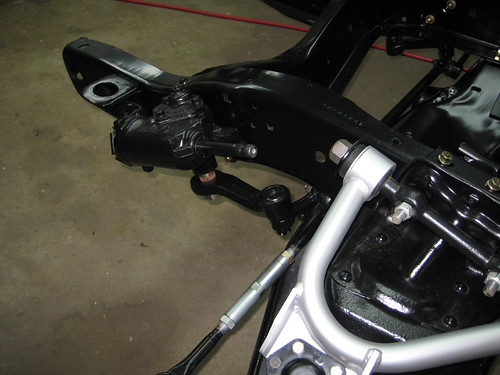
Last edited by jlaird; 03-17-2008 at 06:20 PM. |
|
|
|
|
03-17-2008, 06:38 PM
|
#173 |
|
LAIDOUT
Join Date: Jan 2005
Location: NW Montana
Posts: 928
|
Re: progress pics
Looks very nice, great work and attention to detail!
|
|
|
|
|
03-17-2008, 08:25 PM
|
#174 |
|
Registered User
Join Date: Mar 2007
Location: West Virginia
Posts: 481
|
Re: progress pics
Looks very clean. I really like the way the por 15 turned out. I didnt know that they made it in silver though?? Great work
__________________
My Build Thread http://67-72chevytrucks.com/vboard/s...d.php?t=269019 Petitioning *No Regrets* MD/WV |
|
|
|
|
03-17-2008, 08:29 PM
|
#175 | |
|
Registered User
Join Date: Apr 2006
Location: Arkansas
Posts: 835
|
Re: progress pics
Quote:

__________________
Jim '71 Blazer-Porterbuilt Dropmember C4/LS1/6L80E '57 VW beetle - Oct. 2006 Hot VW's pg. 87 - 350hp intercooled, turbocharged, EFI 2.3liter and 5spd in the works '87 BMW 325i - daily driver |
|
|
|
|
 |
| Bookmarks |
|
|


 Linear Mode

