
|
Register or Log In To remove these advertisements. |
|
|
|
|||||||
 |
|
|
Thread Tools | Display Modes |
|
|
 06-29-2016, 09:34 PM
|
#1 |
|
Registered User
Join Date: Jan 2016
Location: San Jose, CA
Posts: 68
|
Turn indicator switch replacement - lots of pictures
As part of my rewiring project I needed to replace the cracked turn signal switch. Searching here for words of wisdom yielded some information, but nothing that shared a start-to-finish description of the job. As it turns out the project isnt very difficult, but there are a few things you need to know in order to be successful. Note that everything here is for a stock, non-tilt column. I dont know what differences there may be for a tilt column.
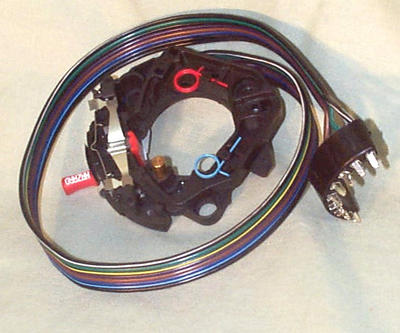
You will need to remove the steering wheel first. My steering wheel was already off of the column, so Im going to skip that part there are plenty of good threads here for that. With the wheel removed, this is what you see:  I have already removed the turn signal and shift levers. You will need to disconnect the turn signal wiring from the dash harness. First, unplug the semi-circular connector. Next, remove each of the wires from the connector, noting their position (or you can match them up to the other half of the connector still attached to the dash wiring). Take a tiny screwdriver, stiff wire or paper clip and push it in just alongside the terminal on both sides the plug, then gently pull back on the wire. You will need to fiddle around a bit to find the little clip that holds the connector in place. Be patient.  You will probably need to bend the little tabs back out in order to reinstall the wire.  The three screws in the 12, 5 and 8 oclock positions secure the switch. One by one, back them out almost all the way but not so much that you can remove them. Youll need to click the switch down to the left turn position to get at the one on the top. Once they are all loose, grab the turn signal housing and turn in counter-clockwise about 1/8 of a turn.  You can now pull the housing with the switch still attached off of the steering shaft. Theres a bearing that sits on top of the assembly, so you may need to tug on it a little.  Now you can remove the three screws that hold the switch in place and remove it. My 1970 C10 has the small emergency flasher stalk, not the larger knob that later model trucks have, so you should be able to simply tip the whole thing out. I think on later models you need to first unscrew the flasher knob, but I dont have any first-hand experience with that. Remove the switch and this is whats left the upper bearing housing.  From here its a pretty simple matter of reversing the procedure. Install your new switch on to the upper bearing housing, lining up the little stud on the back of the switch with the recessed hold on the housing:   Give em a good squeeze together they should fit pretty tight. You want them to fit together with no gaps.  Thread the wires from the switch through the turn signal housing and tip the switch back in.   Replace the three screws; thread them in just until they are flush with the back of the housing. Heres a view from the back side of the housing showing the cutout where the wires go. You can also see how the screws that hold the switch are just flush with the back. Note the three thumbnail-shaped cutouts on the inside edge of the housing well get to those in a second.  Thread the wires down the column, through the shift lever housing.  The column has three little bumps on the tube that help lock the housing in place, heres one of them:  Take the switch housing and line it up about 1/8 of a turn counter-clockwise from its final location. One of those little thumbnail cutouts will line up with one of the little bumps on the column tube. You may need to wiggle it around a little, but it will eventually drop in to place. Rotate the housing clockwise until it locks into place. Tighten up the three screws and youre almost done.  Grease the bearing if it needs it and slide it back on to the column shaft. It fits just with finger pressure; the steering wheel nut holds everything together.   Route your wires, plug them back in to the connector and reinstall your steering wheel. Job done! Hopefully this helps.
__________________
Dennis '70 CST/10 '55 Bel Air wagon |

|

|
|
06-29-2016, 10:02 PM
|
#2 |
|
Registered User
Join Date: Jun 2015
Location: @
Posts: 890
|
Re: Turn indicator switch replacement - lots of pictures
thanks I need to do this soon mine is cracked and po tried to safety wire it back together it didn't hold and now the right side wont stop flashing unless I turn it back to center . I remember sometimes . other times people wonder where the hell I'm going
|
|
|
|
|
06-29-2016, 10:03 PM
|
#3 |
|
Registered User
Join Date: Sep 2014
Location: Woodinville, WA
Posts: 170
|
Re: Turn indicator switch replacement - lots of pictures
This rocks - thank you for the effort. Everything is easier done a second time!
|
|
|
|
|
09-12-2017, 07:23 PM
|
#4 |
|
Registered User
 Join Date: Dec 2013
Location: Omaha NE
Posts: 620
|
Re: Turn indicator switch replacement - lots of pictures
Great info, thanks
__________________
1972 C10 Custom Deluxe LWB, 402/400, PS, PB, A/C, Highlander, Hugger / White 1971 C10 Cheyenne LWB (SWB), 350/350, PS, PB, A/C, Dark Olive / White. |
|
|
|
|
09-12-2017, 07:36 PM
|
#5 |
|
20' Daredevil (Ret)
Join Date: May 2003
Location: Jefferson State
Posts: 13,497
|
Great info.... bookmarked.
__________________
- Mike - 1972 K20 LWB 350/350/205 RIP El Jay |
|
|
|
|
09-12-2017, 08:31 PM
|
#6 |
|
Registered User
Join Date: Apr 2015
Location: East Tn (In the heart of the Smoky Mtns)
Posts: 1,846
|
Re: Turn indicator switch replacement - lots of pictures
Great thread. I have to replace my canceling cam, this shows me what I need to know

|
|
|
|
|
09-12-2017, 10:37 PM
|
#7 |
|
Senior Member
Join Date: Feb 2009
Location: Northern Nevada
Posts: 7,118
|
Re: Turn indicator switch replacement - lots of pictures
Awesome, thank you.
__________________
Tony 71 Custom Deluxe, SWB, 2WD, 402, A/C. I developed an assm. guide "kit" for restoring it from ground up. With assys, the guide accts for 1000s of OEM identifications and part numbers, all written in short order. 700+ images include assm, illust., charts, and points of interest. Much of the info. applies to all 67-72 GM trucks, and to a lessor degree all 67-72 GM vehicles. My build thread, and more on the guide https://67-72chevytrucks.com/vboard/...d.php?t=730025 |
|
|
|
|
09-12-2017, 11:17 PM
|
#8 |
|
Account Suspended
 Join Date: Jul 2016
Location: Tacoma, WA
Posts: 6,873
|
Re: Turn indicator switch replacement - lots of pictures
I will add that anytime your in the column you should remove the shifter arm and then the shift bowl, clean and lube it, the grease dries out and they then don't slide well. It slides right off after the shifter arm is removed. On top or it is the indexed plastic washer then the tapered rubber that tensions the upper shift tube.
|
|
|
|
|
09-13-2017, 08:29 AM
|
#9 |
|
Registered User
Join Date: May 2017
Location: Inman/Boiling Springs, SC
Posts: 420
|
Re: Turn indicator switch replacement - lots of pictures
Nice job on the tutorial. My only question is why pull the wires out of connector? I never have had to do that although most have had one of these adapters.
|
|
|
|
|
09-13-2017, 10:57 AM
|
#10 |
|
Registered User
Join Date: Jan 2016
Location: San Jose, CA
Posts: 68
|
Re: Turn indicator switch replacement - lots of pictures
In order to pull the wires out of the housing you will need to remove the connector - it doesn't fit through the space between the housing and the column. Once you get the hang of releasing the wires it's pretty simple. The key is to take your time and not force anything.
__________________
Dennis '70 CST/10 '55 Bel Air wagon |
|
|
|
|
09-13-2017, 05:04 PM
|
#11 |
|
Registered User
Join Date: May 2017
Location: Inman/Boiling Springs, SC
Posts: 420
|
Re: Turn indicator switch replacement - lots of pictures
What I was getting at is some of the TS switches have a strait plug and need the adapter I posted to work. Makes it easier to slip through the housing.
|
|
|
|
|
09-15-2017, 03:36 PM
|
#12 | |
|
Registered User
Join Date: Jan 2016
Location: San Jose, CA
Posts: 68
|
Re: Turn indicator switch replacement - lots of pictures
Quote:
__________________
Dennis '70 CST/10 '55 Bel Air wagon |
|
|
|
|
|
09-15-2017, 08:53 AM
|
#13 |
|
Registered User
Join Date: Aug 2013
Location: Atlanta, GA
Posts: 702
|
Re: Turn indicator switch replacement - lots of pictures
Subbed
__________________
1968 C10 292/3 spd - sold 1969 K10 350/3 spd/205 - sold 1971 K5 350/4 spd/ 205 - sold 1970 K20 350/350/205 - sold 1969 K20 396/400/205 - work in process |
|
|
|
|
08-18-2018, 09:49 PM
|
#14 |
|
Registered User
Join Date: Mar 2012
Location: Hillsboro, OR
Posts: 287
|
Re: Turn indicator switch replacement - lots of pictures
Great tutorial, thanks Dennis.
I just used your instructions to replace my TS switch. Worked great, and I would add 3 things I learned:
Thanks again! Jon |
|
|
|
|
08-19-2018, 10:02 AM
|
#15 |
|
Registered User
Join Date: Oct 2015
Location: Dallas Texas
Posts: 1,380
|
Re: Turn indicator switch replacement - lots of pictures
I just read thru this...nice tutorial. Thanks
|
|
|
|
|
06-16-2019, 07:40 PM
|
#16 |
|
Registered User
Join Date: Dec 2012
Location: Green Bay Wisconsin
Posts: 126
|
Re: Turn indicator switch replacement - lots of pictures
I've been procrastinating for 4 years on this project, my new steering wheel should be here next week as well as some old caddy horns, so may as well install the turn signal my kids got me for fathers day 4 years ago!
__________________
1969 Chevy C/10 Stepside, Short Box. LQ4/4L80E swap in progress! (Donations being accepted!) |
|
|
|
|
07-12-2019, 08:16 PM
|
#17 |
|
Registered User
Join Date: Jun 2019
Location: California Central Coast
Posts: 82
|
Re: Turn indicator switch replacement - lots of pictures
Please help. Im replacing my turn signal switch and I found this. The rubber bushing is distorted and I would like to replace it. Anyone know what its called?
|
|
|
|
|
07-12-2019, 09:45 PM
|
#18 |
|
Registered User
Join Date: Jun 2019
Location: California Central Coast
Posts: 82
|
Re: Turn indicator switch replacement - lots of pictures
After more scouring of this site (not on a phone) for a steering column diagram, I think I've found it. It's a "rubber ring" that fits around the "plastic thrust washer". Now to find one. Anyone ever had to buy one?
|
|
|
|
|
07-12-2019, 10:44 PM
|
#19 |
|
Registered User
Join Date: Feb 2019
Location: Nor Cal
Posts: 822
|
Re: Turn indicator switch replacement - lots of pictures
I just did mine last week, got the Switch assembly from ManesTruck Parts, It went in very smoothly, fit was excellent.
__________________
1968 C20 Fleetside 396 4sp PS PB AC CST . https://www.youtube.com/watch?v=RWK8GgWD4uA |
|
|
|
|
07-21-2020, 04:43 PM
|
#20 |
|
Registered User
Join Date: Sep 2016
Location: Ft Smith, AR
Posts: 543
|
Re: Turn indicator switch replacement - lots of pictures
I will add a couple of comments in case it helps someone. I was working on a 71 C10>
-The 1971 has a removable "tunnel" for the turn signal wiring. It is a lot easier than the above situation. -Most of the time the problem is not in the electrics but instead is just the cam which is replaceable component of the switch. About $12. It is a bit fiddly to work with and you need to be careful to attach all of the little pieces from your old cam. |
|
|
|
|
07-21-2020, 04:47 PM
|
#21 |
|
Registered User
Join Date: Sep 2016
Location: Ft Smith, AR
Posts: 543
|
Re: Turn indicator switch replacement - lots of pictures
-A quick shout out to one tool that has saved me several times including today. It's a magnet. When spring loaded items suddenly break loose all over the place, this thing can find parts you literally cant see.
|
|
|
|
|
07-21-2020, 06:23 PM
|
#22 |
|
Registered User
Join Date: Aug 2012
Location: St. Croix River Valley, WI
Posts: 795
|
Re: Turn indicator switch replacement - lots of pictures
Great write up! Make note of this in case you have the "horn stuck on" syndrome after replacing the turn signal switch.
http://67-72chevytrucks.com/vboard/s...d.php?t=765275
__________________
Meet "Old Roy": http://67-72chevytrucks.com/vboard/s...d.php?t=707801 |
|
|
|
|
09-12-2020, 02:36 PM
|
#23 |
|
Registered User
Join Date: Jan 2007
Location: Columbus, Ohio
Posts: 4,338
|
Re: Turn indicator switch replacement - lots of pictures
just used these instructions today to swap the switch in my 71 blazer project that always had a loose turn signal since I bought it 4+ years ago.
Wow - this is what I have been missing! Thanks to the original poster! |
|
|
|
|
09-12-2020, 09:40 PM
|
#24 |
|
Registered User
Join Date: Apr 2015
Location: East Tn (In the heart of the Smoky Mtns)
Posts: 1,846
|
Re: Turn indicator switch replacement - lots of pictures
Subbed
|
|
|
|
|
02-22-2022, 09:19 PM
|
#25 |
|
Senior Member
Join Date: Dec 1999
Location: TX
Posts: 1,517
|
Re: Turn indicator switch replacement - lots of pictures
Help. The pictures are gone.
I'm working on a non-tilt auto column and have a new switch that has the half round connector. Was really just trying to figure out how to depin the connector(if necessary) and had this saved for refence but sadly the 'lots of pictures' are gone. |

|
|
|
| Bookmarks |
|
|


 Hybrid Mode
