
|
 06-30-2019, 11:20 PM
|
#226 |
|
Registered User
Join Date: Apr 2014
Location: Azle,Texas
Posts: 2,248
|
Re: TA_C10: Stage 1
Dude! Congratulations!!
 It really looks good to me. If it is better in person I'd say you nailed it. What all were you able to get painted tonight? I wish I was able to get over and learn a bit, since I'm a noob at painting. Maybe when you spray the bed I can make it. It really looks good to me. If it is better in person I'd say you nailed it. What all were you able to get painted tonight? I wish I was able to get over and learn a bit, since I'm a noob at painting. Maybe when you spray the bed I can make it.
__________________
Brian 1972 C10, "Loyd", LWB to SWB, 5.3, L83/6L80e, 4:11 Tru Trac, Air Ride, VA, DD, 20" Coys, 4 wheel disc, A quick LS swap turned into a 6 year frame off resto-mod. |

|

|
|
06-30-2019, 11:26 PM
|
#227 | |
|
Registered User
Join Date: Jun 2018
Location: Texas
Posts: 1,353
|
Re: TA_C10: Stage 1
Quote:
Yeah I wish I would have seen your PM earlier. I could have used the help, it's a lot of work that has to be done in just the right order and having an extra hand would really make things easier and faster. I painted the inside of the cab and firewall only. Because it's metallic I have to assemble the whole truck and paint it all at once so each panel is uniform. So it will be a while before that happens. But when I do I will shoot you a message. 
__________________
TA_C10 Stage 1 build - http://67-72chevytrucks.com/vboard/s....php?p=8333444 "It's only money". 
|
|
|
|
|
|
06-30-2019, 11:40 PM
|
#228 |
|
Senior Member
 Join Date: Dec 1999
Location: TX
Posts: 1,517
|
Re: TA_C10: Stage 1
What was the high build primer you used?
|
|
|
|
|
06-30-2019, 11:54 PM
|
#229 | |
|
Registered User
Join Date: Jun 2018
Location: Texas
Posts: 1,353
|
Re: TA_C10: Stage 1
Quote:
I got gray epoxy and black high build 2k. Here are my part numbers: 
__________________
TA_C10 Stage 1 build - http://67-72chevytrucks.com/vboard/s....php?p=8333444 "It's only money".
|
|
|
|
|
|
07-02-2019, 12:04 AM
|
#230 |
|
Registered User
Join Date: Jan 2018
Location: Spokane, WA
Posts: 321
|
Re: TA_C10: Stage 1
Man that's really starting to come together! Nice work! Looking forward to seeing more pics of that color
|
|
|
|
|
07-05-2019, 11:31 PM
|
#231 | |
|
Registered User
Join Date: Jun 2018
Location: Texas
Posts: 1,353
|
Re: TA_C10: Stage 1
Quote:
.
__________________
TA_C10 Stage 1 build - http://67-72chevytrucks.com/vboard/s....php?p=8333444 "It's only money".
|
|
|
|
|
|
07-05-2019, 11:56 PM
|
#232 |
|
Registered User
Join Date: Jun 2018
Location: Texas
Posts: 1,353
|
Re: TA_C10: Stage 1
Update - Gas Pedal - DBW
I'm ready to mount this cab finally on the frame, but first I need to finish a few things. 1. DBW pedal 2. lizard skin the inner firewall and floor 3. exhaust 4. install torque converter 5. install remote trans cooler 6. install rubber insulated clamps on brake lines and fuel lines 7. install remote battery tray I started with the DBW pedal. I found other members ideas and ended up doing something similar but had to do my own thing because I had different parts than they did. Member edgooch had a great idea rebuilding his DBW adjustable pedal so I did something similar, but my original pedal was different so I found a way to just utilize the LS pedal instead. I cut down the main base and the pedal itself. I shaved the pedal arm quite a bit too making it skinnier to fit my application. I think it turned out pretty decent. I then made my own bracket out of 20awg steel. I ended up reinforcing it with 2 extra strips of 20awg just to make sure it was strong enough to handle abuse. I really went fast on this bracket and it's not perfect but it should work.  2005 GM adjustable style pedal I had:  Modified:  Removed this junk:   The new hardware:  Assembled:    Pedal at normal position:  Pedal fully depressed:   The bracket I made. I welded the nuts on the back side creating studs for the pedal. Drilled out the holes in base of pedal. I will be using nylock locking nuts to hold it in place. And I didn't buy hartrod's bracket, or made one identical because I already welded my original screw holes shut when I smoothed the firewall - OOPS!!        
__________________
TA_C10 Stage 1 build - http://67-72chevytrucks.com/vboard/s....php?p=8333444 "It's only money".
Last edited by TA_C10; 07-06-2019 at 12:08 AM. |
|
|
|
|
07-06-2019, 12:24 AM
|
#233 |
|
Registered User
Join Date: Apr 2014
Location: Azle,Texas
Posts: 2,248
|
Re: TA_C10: Stage 1
Great write up and resourcefulness. I hope to be at this stage sooner than later and I've been scratchin my head about what I'll need to do. Thanks.
More painting this weekend?
__________________
Brian 1972 C10, "Loyd", LWB to SWB, 5.3, L83/6L80e, 4:11 Tru Trac, Air Ride, VA, DD, 20" Coys, 4 wheel disc, A quick LS swap turned into a 6 year frame off resto-mod. |
|
|
|
|
07-06-2019, 12:29 AM
|
#234 | |
|
Registered User
Join Date: Jun 2018
Location: Texas
Posts: 1,353
|
Re: TA_C10: Stage 1
Quote:
Yeah, tomorrow I am going to remove some of the dynomat that the PO installed incorrectly up on the firewall area, scuff, clean, lay down some rust converter then spray my leftover lizard skin on the inner firewall, floor, and maybe part of the back wall of cab and down in the cab corners. .
__________________
TA_C10 Stage 1 build - http://67-72chevytrucks.com/vboard/s....php?p=8333444 "It's only money".
|
|
|
|
|
|
07-06-2019, 03:39 PM
|
#235 |
|
Registered User
Join Date: Jun 2018
Location: Texas
Posts: 1,353
|
Re: TA_C10: Stage 1
Update - Lizard Skin Ceramic - Inside Cab
I love this stuff. It is so easy to shoot and really looks good when done. I bought 1 gallon of this stuff. I put 3 coats under cab and was able to get 4 more coats for inside the cab from high up on firewall all the way to high up on back of cab. I went ahead and coated over the top of the existing dynomat. Got the new DBW pedal installed too.      
__________________
TA_C10 Stage 1 build - http://67-72chevytrucks.com/vboard/s....php?p=8333444 "It's only money".
|
|
|
|
|
07-07-2019, 09:37 PM
|
#236 |
|
Registered User
Join Date: Jun 2018
Location: Texas
Posts: 1,353
|
Re: TA_C10: Stage 1
Update - Exhaust
Time for exhaust. I first cut out the cross member using a 4 inch hole saw. I saw LMC or BrotherTrucks makes a really nice kit that helps you template the cut. But instead of spending the money I just traced my 4" hole saw where I wanted the hole, cut a strip of sheet metal, and welded it in the middle. Then I measured the center of hole and drilled a pilot hole. Done. You will see in my pics I adjusted my center hole as needed. I didn't like where I traced the hole saw. Worked out pretty good. Then I started cutting up my old existing exhaust. I am going to use this exhaust as it still has lots of life left. There will be more on this later. I made it this far today.       
__________________
TA_C10 Stage 1 build - http://67-72chevytrucks.com/vboard/s....php?p=8333444 "It's only money".
Last edited by TA_C10; 07-08-2019 at 10:52 AM. |
|
|
|
|
07-08-2019, 09:45 AM
|
#237 |
|
Senior Member
Join Date: Aug 2018
Location: Western Colorado
Posts: 1,165
|
Re: TA_C10: Stage 1
Nice job on that pedal mod. I cut off all the extra junk and mounted mine, but closer to the firewall. My plan is to bend up a custom rod, I've got custom trim brake and gas pedals on order and want to use them.
__________________
1964 Chevy C10 - Gen IV 5.3 Restomod http://67-72chevytrucks.com/vboard/s...d.php?t=768632 1968 GMC C15 - Gen III 6.0 Restomod http://67-72chevytrucks.com/vboard/s...d.php?t=772047 1969 Chevy C10 - Restoration http://67-72chevytrucks.com/vboard/s...d.php?t=809184 1978 Chevy Scottsdale K20 1993 Chevy C1500 - 5.3/T56 swapped 2008 Silverado Duramax |
|
|
|
|
07-08-2019, 10:19 AM
|
#238 |
|
Almost Satisfied
 Join Date: Mar 2002
Location: Springfield, MO
Posts: 2,928
|
Re: TA_C10: Stage 1
Nice progress! Pedal looks good
__________________
1971 C10 Stepside. LSx 6.0 with BTR Stage IV, Speed Engineering Headers, 4L80e transmission w/3200 Circle-D Stall. 3.73. Posi. Purchased this truck when I was 17. I started the rebuild (or take apart) in 1993. I have drug it around all over the country in pieces. Finally back on the road in 2021. "I can't complain, but sometimes I still do. Life's been good to me so far." |
|
|
|
|
07-08-2019, 10:54 AM
|
#239 | ||
|
Registered User
Join Date: Jun 2018
Location: Texas
Posts: 1,353
|
Re: TA_C10: Stage 1
Quote:
Quote:
Thanks guys. I am really trying to get this truck done ASAP. So some of my projects aren't getting the attention I wished I could spend on them. And I fixed my pictures in the last post. Exhaust pics are working now. .
__________________
TA_C10 Stage 1 build - http://67-72chevytrucks.com/vboard/s....php?p=8333444 "It's only money".
|
||
|
|
|
|
07-10-2019, 10:28 AM
|
#240 |
|
Registered User
Join Date: Jun 2018
Location: Texas
Posts: 1,353
|
Re: TA_C10: Stage 1
Delivery coming today! I'm excited about this one.

__________________
TA_C10 Stage 1 build - http://67-72chevytrucks.com/vboard/s....php?p=8333444 "It's only money".
|
|
|
|
|
07-16-2019, 09:38 PM
|
#241 |
|
Registered User
Join Date: Jun 2018
Location: Texas
Posts: 1,353
|
Re: TA_C10: Stage 1
Brown Truck!
     Funny I have heard of places like brothers selling items from other parts suppliers but didn't expect to see this one! It's a reman windshield wiper motor. 
__________________
TA_C10 Stage 1 build - http://67-72chevytrucks.com/vboard/s....php?p=8333444 "It's only money".
|
|
|
|
|
07-18-2019, 11:33 AM
|
#242 |
|
Registered User
Join Date: Jun 2012
Location: Portland
Posts: 1,330
|
Re: TA_C10: Stage 1
I did a similar exhaust mod on my 66 GMC. I was paranoid about the crossmembers, so I found a steel shop and had them cut me some pipe I could weld in to reinforce where I had made holes for the exhaust.
|
|
|
|
|
07-18-2019, 11:58 AM
|
#243 |
|
Senior Member
Join Date: Aug 2018
Location: Western Colorado
Posts: 1,165
|
Re: TA_C10: Stage 1
It's like Christmas every month building these trucks! What stall did you get?
__________________
1964 Chevy C10 - Gen IV 5.3 Restomod http://67-72chevytrucks.com/vboard/s...d.php?t=768632 1968 GMC C15 - Gen III 6.0 Restomod http://67-72chevytrucks.com/vboard/s...d.php?t=772047 1969 Chevy C10 - Restoration http://67-72chevytrucks.com/vboard/s...d.php?t=809184 1978 Chevy Scottsdale K20 1993 Chevy C1500 - 5.3/T56 swapped 2008 Silverado Duramax |
|
|
|
|
07-18-2019, 12:50 PM
|
#244 |
|
Registered User
Join Date: Aug 2007
Location: Midlothian VA
Posts: 37
|
Re: TA_C10: Stage 1
Just an FYI. If you run into situation where you need to build up body filler thicker than 1/8", you should consider using fiberglass reinforced filler or "alumafill" metal impregnated filler. The other benefit is both fiberglass filler and metal filler are much more moisture resistant that standard filler which just absorbs moisture like a sponge. Which is why a lot of repairs over metal with pin holes or not fully welded seams will rust out under the filler, and eventually filler will blister and pop off.
From what I could see in the pics, it looked like the molded plastic center vent may not have been flat or did not have correct contour. Unfortunately, our demand for cheap parts means poor quality Chinese crap is usually to blame.
__________________
1972 Cheyenne C10 LWB 1970 C10 292 I6 3 speed 2017 Silverado LS 4x4 1978 El Camino SS, LT1 swap 2016 Camaro SS |
|
|
|
|
07-21-2019, 07:42 PM
|
#245 | |||
|
Registered User
Join Date: Jun 2018
Location: Texas
Posts: 1,353
|
Re: TA_C10: Stage 1
Quote:
Quote:
Quote:
 Thanks for the advice though, I used premium body filler from eastwood, I hope it doesn't have problems..... Live and learn man.
__________________
TA_C10 Stage 1 build - http://67-72chevytrucks.com/vboard/s....php?p=8333444 "It's only money".
|
|||
|
|
|
|
07-21-2019, 07:46 PM
|
#246 |
|
Registered User
Join Date: Jun 2018
Location: Texas
Posts: 1,353
|
Re: TA_C10: Stage 1
Update - Vintage Air firewall holes
I ended up having to redo my paint. I found out I had too much air pressure at the gun so I took advantage and drilled the holes for my VA kit. Not much too it. Taped it to the firewall, drilled a pilot hole in center, then used a step bit, then used a die grinder to finish them up.     I didn't get completed pics. I will take some and post later. .
__________________
TA_C10 Stage 1 build - http://67-72chevytrucks.com/vboard/s....php?p=8333444 "It's only money".
|
|
|
|
|
07-21-2019, 07:51 PM
|
#247 |
|
Registered User
Join Date: Jun 2018
Location: Texas
Posts: 1,353
|
Re: TA_C10: Stage 1
And here we go again, scuffed the paint, taped it off, and sprayed it again. This time the paint came out much smoother, I still needed less air at the gun but it's soooo much better. Turns out my little regulator gauge is crap. Long story short, too much air at the gun atomized the paint too much causing it to almost dry instantly which gives a rough surface to the paint. So I didn't trust the gauge this time and just played with it till I liked the wetness on cardboard. Then tested it on one of my doors. Then shot the truck with 3 more coats. I can run a microfiber towel over it now and it doesn't catch like it did before. When I do the whole truck, I will dial the air back just a tad more and I think it will be good to go.

__________________
TA_C10 Stage 1 build - http://67-72chevytrucks.com/vboard/s....php?p=8333444 "It's only money".
|
|
|
|
|
07-21-2019, 07:54 PM
|
#248 |
|
Registered User
Join Date: Jun 2018
Location: Texas
Posts: 1,353
|
Re: TA_C10: Stage 1
And after finishing paint, I got to work on boxing the trailing arm crossmember where I cut the holes for exhaust. I was talking with my cousin and convinced me that boxing in the xmember will be both stronger and easier than welding in a piece of 4" pipe in the hole. Stay tuned for more on this.
 
__________________
TA_C10 Stage 1 build - http://67-72chevytrucks.com/vboard/s....php?p=8333444 "It's only money".
Last edited by TA_C10; 07-24-2019 at 11:46 PM. |
|
|
|
|
07-22-2019, 11:12 PM
|
#249 |
|
Registered User
Join Date: Jun 2018
Location: Texas
Posts: 1,353
|
Re: TA_C10: Stage 1
Update - Boxing in the trailing arm xmember
Got the plates cut and fitting. Tacked them into place. Next I will burn them all the way in and cut the 4" holes for the exhaust. These guys should really beef up the structure. I'm also thinking I will box in the frame rail right next to the xmember just because I have the steel. I might take a piece and box in the power steering box too.   
__________________
TA_C10 Stage 1 build - http://67-72chevytrucks.com/vboard/s....php?p=8333444 "It's only money".
|
|
|
|
|
07-23-2019, 11:21 PM
|
#250 |
|
Registered User
Join Date: Jun 2018
Location: Texas
Posts: 1,353
|
Re: TA_C10: Stage 1
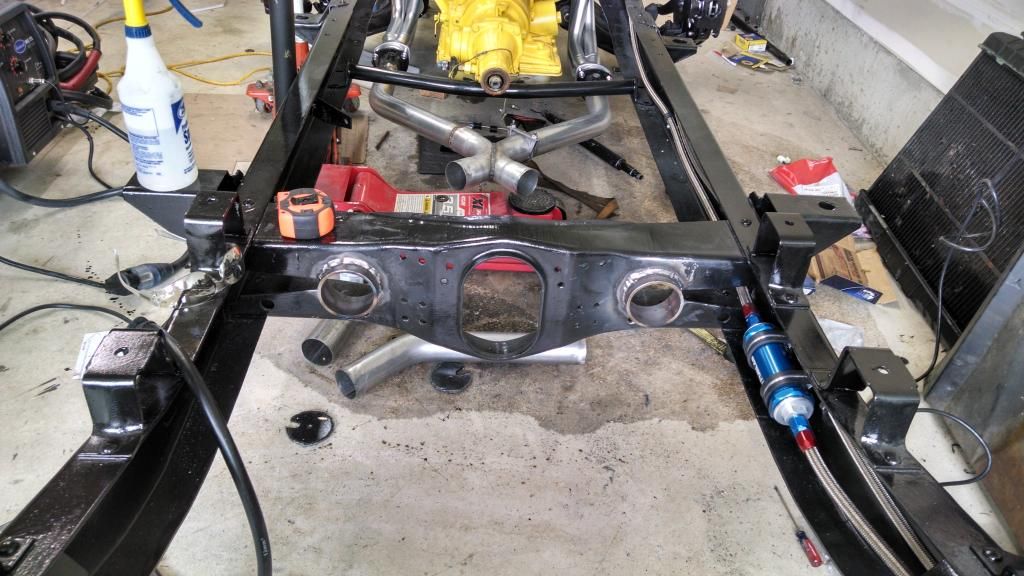
Update - Boxed the T.A. CrossMember
TA X-Member is boxed. Turned out better than I expected. Welds had good penetration. Holes cut for exhaust. I still plan to box in at the frame rail a little bit. I should have enough steel plate left over to box in the frame rail behind the power steering gear too. I don't think our lowered 2wd trucks have the frame cracking issue like the the 4wd trucks do but whatever, cheap insurance.   3 drills and 2 batteries later, the holes are cut       
__________________
TA_C10 Stage 1 build - http://67-72chevytrucks.com/vboard/s....php?p=8333444 "It's only money".
Last edited by TA_C10; 07-24-2019 at 11:44 PM. |
|
|
|
 |
| Bookmarks |
|
|


 Linear Mode

