
|
 11-26-2011, 08:49 PM
|
#26 |
|
Registered User
Join Date: Aug 2011
Location: Bradley, South Carolina
Posts: 277
|
Re: my Defroster Debacle
if mine breaks i am selling my truck or moving to fla.. i'll file this but i hope i don't need it.. great documentation..
|

|

|
|
11-26-2011, 11:09 PM
|
#27 |
|
Registered User
Join Date: Aug 2011
Location: Winnsboro TX
Posts: 234
|
Re: my Defroster Debacle
Success!!!!
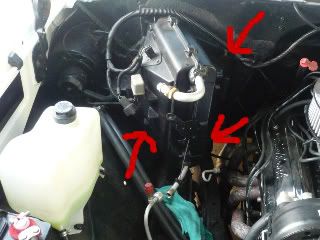
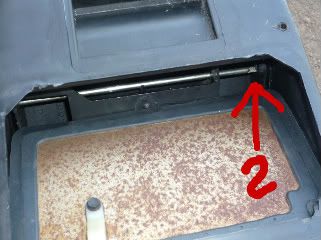
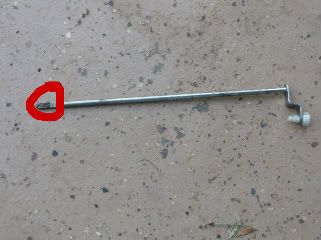
 Couple of things I learned: - A universal and a couple of extensions made short work of the dreaded firewall nut - The rod that the door pivots on slides out...mine was stuck because of the heater core leak and I spent about 30 mins thinking there was something holding it in. - I turned my blend door accuator upside down to make the vacuum lines hook up alot easier...otherwise, I would've had to do some modifications Don't know why the port is at 2 o'clock...the one I took off (Delco) had the port at about 10 o'clock - Don't attempt to hook up the threaded rod thing on top until you have your a/c on and the door is closed. If you do it, you'll likely to end up with a broken white thing like the pic above - ATTACH THE A/C-HEAT CABLE BEFORE YOU PUT IT BACK IN THE FIREWALL. Just because it would've been much simpler...trust me All in all this is one  of a right up!!!! Thanks for the info and pics...they certainly served well today!!! of a right up!!!! Thanks for the info and pics...they certainly served well today!!!
__________________
1st - '68 long bed 2nd - '81 SWB Now - '86 SWB, Edelbrock 1406/stock 350/700r4 |
|
|
|
|
11-26-2011, 11:19 PM
|
#28 |
|
Registered User
Join Date: Apr 2003
Location: Indep, MO
Posts: 5,893
|
Re: my Defroster Debacle
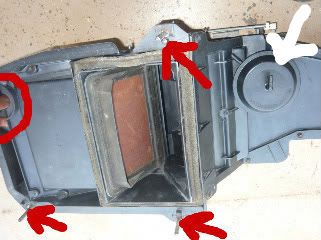
Ah, it's been a helluva day. Just bought a sweet little 87 swb for a great price and went to fix some issues. This thread was a big help with some of the issues. First, no high on fan. O'reilly sold me the wrong high relay, but it turned out it didn't matter. If you have problems ithe the high on the fan, look at the junction block on the drivers side firewall. There are two studs, the fan direct attaches to the left one. Make sure it's solid! Mine was melted and loose, leading to erratic performance. New terminal and moved to the right post and wha-la! Fan on high! Still no defrost. Check defrost door with mity-vac, works great. Giant gap in main-to defrost duct, put round foam in firewalll side, aluminum duct tape other three sides. Better, but still weak. Check blend door, AH-HA! Door works, but little white plastic clip is broken. Where can one get the little white clip dealie?
__________________
Boppa's Old Yeller Truck Build, Old Yeller's New Heart! Project Buzz Bomb Flyin' Low! |
|
|
|
|
11-26-2011, 11:47 PM
|
#29 |
|
Registered User
Join Date: Apr 2003
Location: Indep, MO
Posts: 5,893
|
Re: my Defroster Debacle
Ah, a little hunting got me this:
http://www.classicparts.com/1983-85-...ctinfo/68-248/ Thanks again all!
__________________
Boppa's Old Yeller Truck Build, Old Yeller's New Heart! Project Buzz Bomb Flyin' Low! |
|
|
|
|
11-29-2011, 11:38 AM
|
#30 |
|
Registered User
Join Date: Dec 2010
Location: sioux city, iowa
Posts: 619
|
Re: my Defroster Debacle
The cable PULLS to open the flapper door and PUSHES to close? Correct?
|
|
|
|
|
12-02-2011, 09:51 PM
|
#31 |
|
Plays with trucks
Join Date: Sep 2003
Location: Asheville, NC
Posts: 433
|
Re: my Defroster Debacle
Crazeetxn- sorry I missed your PM earlier, I'm glad to see you guys got it all figured out!
__________________
Gary My Dad's Old Truck 1985 
|
|
|
|
|
09-15-2014, 07:42 PM
|
#32 |
|
Registered User
Join Date: Aug 2014
Location: New Bern NC
Posts: 142
|
Re: my Defroster Debacle
Thanks for this write-up and Pics. Helped me see how to replace my blower switch!
|
|
|
|
|
11-26-2014, 01:21 AM
|
#33 | ||
|
Registered User
Join Date: Nov 2014
Location: Louisville
Posts: 2
|
Re: my Defroster Debacle
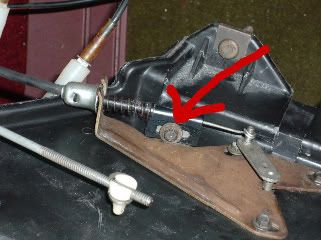
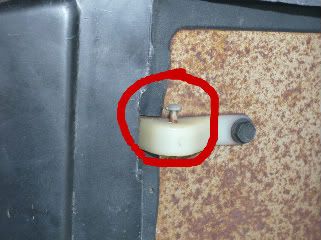
Going to try to bring some life back to this one... First of all, thanks for the excellent write-up! Wish I had found this before I took on this project with my 86 K10. A couple questions on replacement parts... Any idea where I can find the black clip in the third pic?
Also, I was thinking the rod for the flapper popped out of the heater box... I ended up breaking the housing trying to pop it out instead of appropriately sliding it out. It's looking like the junkyard is about the only place I am going to find a new heater box... Does anyone know some super-secret place the sells them new? I'm at my wits hunting for a new one. Quote:
Quote:
|
||
|
|
|
|
11-26-2014, 11:38 AM
|
#34 |
|
Registered User
Join Date: Aug 2012
Location: Oklahoma City, OK
Posts: 2,476
|
Re: my Defroster Debacle
Nebk10 - the clip you asked about appears to be the same on my 75. So you should be able to go to a 'u pull it' type place and find a suitable replacement.
What I find odd is the difference in how the example and mine are assembled. Wonder if some PO or mechanic reassembled one of them wrong or if GM changed how they went together at some point? Also, for those whose hot-cold adjustment is hard to move, I found the best place to put a drop of oil was where the cable lever slides behind the control assembly. Oiling the end of the cable shown in the pic made little difference. Sorry, didn't take a picture while I had that open. |
|
|
|
|
11-26-2014, 11:56 AM
|
#35 |
|
Registered User
Join Date: Aug 2012
Location: Oklahoma City, OK
Posts: 2,476
|
Re: my Defroster Debacle
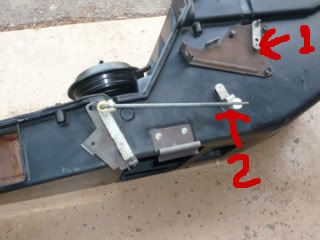
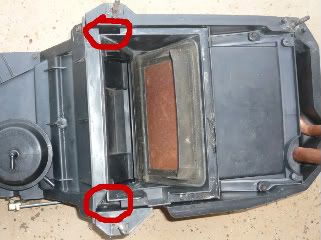
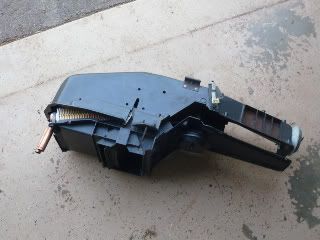
A home made fix for the blend door actuator plastic piece that was broken on mine. I had read this thread before pulling this out to replace the heater core and discovered the broken plastic piece which explained why the air was coming out everywhere. Rather then trying to find a new piece, figured it would be about as easy to make one out of some small bits of scrap metal, and a lot faster then waiting for a replacement part to arrive. (The weather was really nice while I was replacing the core and threatening to quit being nice, I don't have an inside repair place.) Pic1 shows the two holes I drilled in the door. Pic 2 shows the two metal replacement parts I made using the plastic piece as a pattern. They started as a flat piece of metal. I cut with a plasma cutter but a thin metal jig saw blade should work as well. A vise and suitable hammering gave the 90 degree bend. Since they are out of sight, pretty really doesn't matter. Used the original pin to attach the vacuum pot. Pic 3 is the silicone seal job to both provide an air seal and help hold the pin in place. The little black clip that held it in place escaped.
|
|
|
|
|
11-26-2014, 06:39 PM
|
#36 | |
|
Registered User
Join Date: Jul 2011
Location: SW Ontario
Posts: 1,199
|
Re: my Defroster Debacle
Quote:
In another thread somebody mentioned one of their vacuum lines disappeared INTO the box, others claimed this was not so, turns out mine has the same vacuum line that disappears into the box. (there is a slot on the top edge that a red rubber hose disappears into, its attached to the plastic vacuum lines that make up the typical hvac vacuum line spaghetti. When I yank out the plenum I'll find out how its nested in there, but since winter is here I am going to ignore that project for a few more months. |
|
|
|
|
|
11-26-2014, 09:59 PM
|
#37 |
|
Registered User
Join Date: Nov 2014
Location: Louisville
Posts: 2
|
Re: my Defroster Debacle
Thanks for the replies everyone! The plastic i broke is not the white plastic retainer, but the entire outer housing (the heater box). This is the part I am going to have to replace, as it is definitely not fixable. If I haven't figured it out by the time I get back home next week I will post a pic when I do get back.
|
|
|
|
|
02-22-2015, 11:30 AM
|
#38 |
|
*************
 Join Date: Apr 2005
Location: Pensacola, FL
Posts: 17,827
|
Re: my Defroster Debacle
Great write up! I don't think I could have accomplished this chore with out it. Bravo!
__________________
Rob - https://www.instagram.com/hart_rod_c10 As Iron Sharpens Iron, So One Man Sharpens Another. Proverbs 27:17 FOR SALE: DBW pedal bracket - http://67-72chevytrucks.com/vboard/s...d.php?t=651123 FOR SALE: Hood Brackets http://67-72chevytrucks.com/vboard/s...d.php?t=679945 1987 Silverado SWB - 34.5K original miles http://67-72chevytrucks.com/vboard/s...d.php?t=801834 1969 SuperBurb - http://67-72chevytrucks.com/vboard/s...d.php?t=200387 1968 Farm truck - http://67-72chevytrucks.com/vboard/s...d.php?t=358692 1968 SWB - http://67-72chevytrucks.com/vboard/s...d.php?t=551258 1948 Chevy - http://67-72chevytrucks.com/vboard/s...=122164&page=3 |
|
|
|
|
04-10-2017, 10:11 PM
|
#39 |
|
Registered User
Join Date: Jul 2015
Location: Longview wa
Posts: 53
|
Re: my Defroster Debacle
my rig is all torn apart right now. i might as well go deeper and check out the hvac. i know its not working right...
thanks for the great write up! |
|
|
|
|
08-14-2017, 02:39 PM
|
#40 |
|
Registered User
Join Date: Jan 2009
Location: Arkansas
Posts: 670
|
Re: my Defroster Debacle
Gotta love the photobucket extortion going on.
Anyone have pics they can post of this process? My temp lever won't go all the way to cold. I'm wondering if something built a nest up in the fan housing somewhere.... |
|
|
|
|
08-15-2017, 09:59 AM
|
#41 |
|
78K & 79C Jimmys
Join Date: Nov 2009
Location: Ottawa Ont CANADA
Posts: 7,901
|
Re: my Defroster Debacle
What process are you looking for?
Remove the tube under the glove box and you can see the blend door
__________________
John 1978 GMCJimmy4X4-350/203 1979 GMCJimmy4X2-305/350 |
|
|
|
|
08-15-2017, 11:20 AM
|
#42 | |
|
Registered User
Join Date: Jan 2009
Location: Arkansas
Posts: 670
|
Re: my Defroster Debacle
Quote:
The truck sat up for several years with a busted out back glass and a tarp over the top so I would like to nose around and see if I can find any kind of critter nests that would be messing with my temp control. |
|
|
|
|
 |
| Bookmarks |
|
|


 Linear Mode

