
|
 09-09-2010, 06:38 PM
|
#1 |
|
Registered User
Join Date: Apr 2008
Location: Angleton, TX
Posts: 2,219
|
Labor Day project!
Since the suburban section usually moves a little slow I thought I would show what I did to my burb over the Labor Day weekend.
Since I have no shop and it is still HOT outside I parked the old burb under a shadetree and went to work.  The task for the weekend was to get rid of the old 45 gallon dealer installed tank and put in a new factory style tank. I had a couple of reasons for wanting to do this. First this tank is so big that I cant put a frame hitch on the suburban. This is an issue for me because once I get the engine rebuilt I plan on this bieng my tow rig/ swap meet rig. Second even though the tank looked clean when I first re installed it, I have constantly been sucking up rust particles and fine sediments out of the old tank. The third reason is my favorite. My parents bought a new gas tank kit for my birthday so the only thing this project cost me was time. Picture of the old tank.  It was a pretty decent job getting the tank out by myself; especially since it had about 25 gallons of gas in it. Here is a picture of the old tank and new tank side by side. The old tank must be even rustier on the inside than it is on the outside.  There are no pictures of me fighting with the new tank to get it in, but trust me nothing about this job was easy. Now if there would have been two people doing this it would have been a very easy job. I spent alot of time crawling under the burb only to get back out for a forgotten tool, or rolling around looking for a tool that I was laying on. Anyways it took much longer than anticipated but here is the finished project.  After getting the tank in I noticed the burb was running rough so I had my dad rebuild the carb for me. When I put it back on it ran great but was dripping fuel out from the housing where the fuel line goes into the carb. To stop this I put some teflon tape on the fuel line threads and re installed the line. Unfortunately I severely cross threaded it and ruined my carburator; or at least the housing of the carburator. So now I am on the lookout for another early generation quadrajet. I will post a WTB in the parts section so if anyone thinks they might have what I need please check that thread out for me. Heres a picture of my carburator I accidently trashed. The tape is where I labeled vacuum lines. 
__________________
I don't always drive trucks; but when I do I prefer Chevy's. Stay driving my friends. '72 blazer 2wd build 67-72 Factory Big Block Registry |

|

|
|
09-09-2010, 08:04 PM
|
#2 |
|
What?
Join Date: Jun 2007
Location: Southern California
Posts: 7,617
|
Re: Labor Day project!
 I frickin feel ya on that tank project! I did mine by myself, as with everything else I have done and still do on the burb. I frickin feel ya on that tank project! I did mine by myself, as with everything else I have done and still do on the burb.Though your story sounded just like mine, I was waiting for the comment about slicing a finger as I did on the edge of the tank. Sounds like you were able to wrestle that thing in with out drawing any blood as I did. Looks good! That sucks about your Qjet though. If you are so inclined to get a rebuilt one, I got mine from these guys years ago and it's still running fine. http://www.carb-x.com/index.php/vmchk/Chevrolet-Trucks
__________________
Chris 1968 K20 Suburban 1972 K10 LWB PU |
|
|
|
|
09-09-2010, 11:05 PM
|
#3 |
|
Registered User
Join Date: Feb 2010
Location: Southern California
Posts: 543
|
Re: Labor Day project!
man... that old tank was HUGE. Looks good with the new tank. Is there any way you can re-thread the piece on the carb? Bummer that you'd have to get another one because of the threads on that line.
Looks good!
__________________
Doug '72 GMC K2500 Suburban 4x4 |
|
|
|
|
09-09-2010, 11:08 PM
|
#4 |
|
Registered User
Join Date: Jul 2008
Location: Kansas
Posts: 707
|
Re: Labor Day project!
Thanks for sharing with us. You're like me as far as working on my burb. I don't have a garage that the burb will fit in and my carport isn't big enough to do any work so I work on her in the driveway. After a couple of hours laying on rocks, my body really gets sore.
As you know, I'm planning on replacing my tank as well. Thanks for the pictures as they have really helped out. I'll have my sons helping me so hopefully it won't be too bad and I'll be careful about the sharp edges. Thanks again--good post. Joe |
|
|
|
|
09-10-2010, 06:22 AM
|
#5 |
|
Registered User
Join Date: Jul 2008
Location: louisville, ky
Posts: 502
|
Re: Labor Day project!
Good post. I should post a picture of the greasy clothes pile that sits outside our back door until my wife forces me to throw them away. She won't touch them--for good reason.
On the q-jet, depending on how good you and your dad are with them, you could try getting the cheapest chevy carb you can find on ebay or wherever and then swap all your good parts onto the new fuel bowl section. The problem with this is you have to get as close to the same year as you can, and then stare at your new fuel bowl for about an hour to make sure it is identical to the one you had. You might have a shot with one from say 70-74. Or not. There are lots of little differences, and some bigger one. Some q-jets have 2 screws holding the thottle section on, some have 3 screws. Years ago I used the throttle section (base plate) from a q-jet I had from a '74 454 Monte Carlo for use on my '72 burb carb. I don't know if this is alot of help, and you may not want to go this way, but it could save you some cash. It may be of more use to people who have a bunch of q-jets laying around (I have 17). Good luck. |
|
|
|
|
09-10-2010, 04:53 PM
|
#6 |
|
Registered User
Join Date: Aug 2009
Location: Alden NY
Posts: 2,705
|
Re: Labor Day project!
Tank looks real good. That old one was a monster. Did the sending unit work with your new stock tank? I bought a brand new tank off Craig's list for $35. Mine doesn't leak yet, but I have no doubt it will in the future. I know what you mean about working alone and laying on your back. I have a great garage but I am getting old. I was reminded of that last winter when I pulling the truck 4 speed out and installing the 200 4R by myself. I'm going to do it all over again because I am going to replace the 307 with a 350 I'm freshening. I like your Burb.
__________________
1961 C1 Corvette 1959 El Camino 350 TPI, 9" 4 w disc 69 Blazer K5 - sold July '20 2021 Durango RT 5.7 |
|
|
|
|
09-10-2010, 11:01 PM
|
#7 |
|
Registered User
Join Date: Apr 2008
Location: Angleton, TX
Posts: 2,219
|
Re: Labor Day project!
Thanks for the compliments everyone!
Vectorit, Fortunately no blood drawn on this task. Just alot of frustration. Thanks for the link. I will check it out! dougo, Yeah the tank was a monster. Fortunately a previous owner went thru the trouble of cutting off the 1/2" thick metal strips that were around the tank making a homemade frame hitch. I am really bummed about the carburator. My dad ran the stamping numbers for me and all the numbers line up that it was most likely the original carb. that my suburban left the factory with. I might try to re-thread it but I did a pretty good number on it. JoeKan, Thanks! Looking back I should have taken more pics and made this more of a how to swap a tank on your own thread. Good luck with your tank swap! zac, Thanks for all of the quadrajet information. I found out today that the 70-74 quadrajets are pretty much the same as you said, so now I know what years I have to work with. Like you said all I need is a good housing and I am back in business. rsavage, The fuel guage never worked with the old tank, but when I hooked up the new tank and sending unit the guage started working. No more keeping a notebook of mileage so I know when to fill up! You got a killer deal on your tank. For some reason I never find those deals. Good luck with your engine swap, rolling around under a truck is definately exhausting. Thanks for the comment on the burb. After I get my blazer project done I will be starting a build thread on the burb.
__________________
I don't always drive trucks; but when I do I prefer Chevy's. Stay driving my friends. '72 blazer 2wd build 67-72 Factory Big Block Registry |
|
|
|
|
09-11-2010, 02:54 AM
|
#8 |
|
I had a V-8
Join Date: May 2003
Location: Phoenix AZ
Posts: 1,116
|
Re: Labor Day project!
Nice job on the tank replacement.
You actually have a few options on your carb situation. You figured the first one out already--replace it. This is a legit option, but I think the possibility of having a similar or worse problem outweigh the possiblity of gettting a good one--it is a big game of chance. This is especially so because you have one that works great, but has an inlet issue. This inlet issue is nothing new and you are probably the millionth person to mis-thread that fine thread nut into the housing. That being the case, Motormite/Dorman (the red HELP packages at the parts house) offer oversize self-threading replacement nuts to repair exactly what you did. There are a couple pros to this method the biggest being you keep your great functioning carb. The second is you keep the filter in the carb--everything is as it was. Now, some feel this is a "hokey" method, but it does work and I have seen many rebuilt carbs come out of the box with one of these fittings installed from the remanufacturer. Now, if your inlet threads are so damaged that the repair nut will not work (I doubt they are) the next method of repair is to remove the filter and spring and epoxy the nut into the housing and run an inline filter between the pump and carb. I always used Loctite p/n 14600 epoxy for this but I have heard that JB weld is ok to use with fuel--I have never tried it though. Back in the day when carburetors freely roamed the earth, this was a much more common problem. These days, not so much, but either of these fixes will repair YOUR carb and not have you rolling the dice on a replacement unit.
__________________
1972 K20 Suburban, 5.9L Cummins, Banks Power Pack, NV4500HD, NP205, H.A.D., D60/14FF ARB Link To Build: HERE. Last edited by mosesburb; 09-11-2010 at 02:55 AM. |
|
|
|
|
09-11-2010, 09:14 AM
|
#9 |
|
Registered User
Join Date: Apr 2008
Location: Angleton, TX
Posts: 2,219
|
Re: Labor Day project!
Mosesburb, Great Information! While I am out and about to day I may stop by the parts store and check out the HELP section. I would love to keep using the original carb. even if it has to have a slight modification.
__________________
I don't always drive trucks; but when I do I prefer Chevy's. Stay driving my friends. '72 blazer 2wd build 67-72 Factory Big Block Registry |
|
|
|
|
09-12-2010, 04:11 PM
|
#10 |
|
Licensed driver
Join Date: Jun 2010
Location: Tarrytown, NY
Posts: 161
|
Re: Labor Day project!
Cool stuff - sorry about the carb though. I've got the same/similar tank (word is this one is 50 gallon) - however it does have a decent tow set up (see photo below). I'm not sure if your post is encouragement for me (you did it) or discouragement (bigger hassle than you thought) - they way I do things I'd probably start taking it apart, by myself, some Sunday night...
Thumbs up on the job (best of luck with the carb). Tim 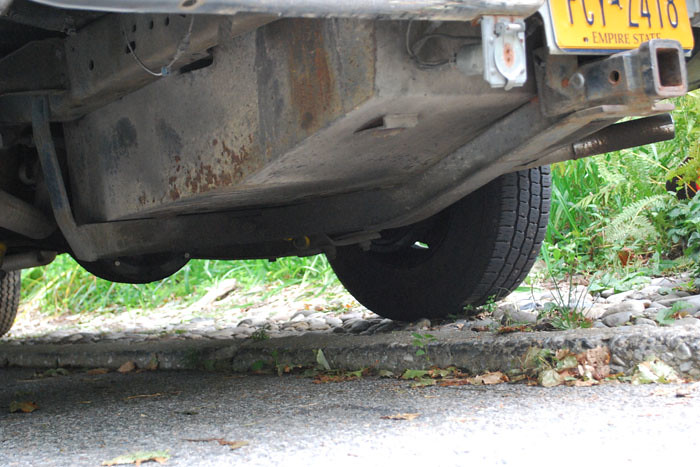
|
|
|
|
|
09-12-2010, 04:52 PM
|
#11 |
|
Registered User
Join Date: Apr 2008
Location: Angleton, TX
Posts: 2,219
|
Re: Labor Day project!
Eyebuzz, Thanks! Good luck if you decide to make the change!
Good luck about the carburator issue! I found another carburator just like my old one today at a local swap meet. It is even a 72 model carb. I also have a couple of leads on the parts board that I might get for my blazer and for a spare! That and NFL started today and my team won (Texans). This is turning into a good day!
__________________
I don't always drive trucks; but when I do I prefer Chevy's. Stay driving my friends. '72 blazer 2wd build 67-72 Factory Big Block Registry |
|
|
|
|
09-13-2010, 10:09 PM
|
#12 | |
|
Account Suspended
Join Date: Aug 2010
Location: Los Angeles, CA
Posts: 2
|
Re: Labor Day project!
Quote:
|
|
|
|
|
|
09-15-2010, 06:50 PM
|
#13 |
|
Registered User
Join Date: Mar 2010
Location: Sin City, Nevada
Posts: 152
|
Re: Labor Day project!
Wow!!! This must be "Pull your monster tank" month.
I am in the process of pulling that same tank out of my '68. However, over the past 42 years, the two rear mounting bolts have fused themselves to the tank. Not the nuts to the bolts, but the bolts to the tank ?! Therefore, I am hoping the PB Blaster that I drowned them in, will start working it's magic. Since mines still in there.... I'll take a bunch of photos, and pick-up where you left-off. |
|
|
|
|
09-15-2010, 07:02 PM
|
#14 |
|
Registered User
Join Date: Apr 2008
Location: Angleton, TX
Posts: 2,219
|
Re: Labor Day project!
Mulk, I also had a terrible problem with the large bolts; except my bolts were fused to the wierd nut things?!
HID Solutions, WOW!! Only two posts and already banned from the forum! Is that a new record?
__________________
I don't always drive trucks; but when I do I prefer Chevy's. Stay driving my friends. '72 blazer 2wd build 67-72 Factory Big Block Registry Last edited by 1956cameo; 09-15-2010 at 07:03 PM. |
|
|
|
|
09-15-2010, 07:04 PM
|
#15 | |
|
What?
Join Date: Jun 2007
Location: Southern California
Posts: 7,617
|
Re: Labor Day project!
Quote:
Wonder what the heck happened?
__________________
Chris 1968 K20 Suburban 1972 K10 LWB PU |
|
|
|
|
|
09-15-2010, 09:00 PM
|
#16 |
|
Registered User
Join Date: May 2003
Location: Saginaw, MI
Posts: 46
|
Re: Labor Day project!
Have the same tank - and - ditched the hitch to put a hidden hitch on it (flip up lic. plate) - Thanks to Dave @ Early Classic - Nice hitch - dropped right in place!
|
|
|
|
|
09-15-2010, 10:27 PM
|
#17 |
|
Registered User
Join Date: Jul 2008
Location: Kansas
Posts: 707
|
Re: Labor Day project!
I apologize if this is being hijacked, but I was wondering if I couldn't take my two tanks off, fill them with water, swish it around, pour it out and see if there's any rust that will come out.
If no rust then can I assume that the tank is good? I'm asking about this because it's going to hurt spending $200 for a 21 gallon tank. Do you think this would work? Thanks, Joe |
|
|
|
|
09-15-2010, 11:00 PM
|
#18 |
|
Registered User
Join Date: May 2009
Location: Eliot, Maine
Posts: 1,314
|
Re: Labor Day project!
they make chemicals and treatments for cleaning out old tanks and resealing them.....if they are not rusted too bad.
|
|
|
|
|
09-16-2010, 07:18 AM
|
#19 |
|
Registered User
Join Date: Apr 2008
Location: Angleton, TX
Posts: 2,219
|
Re: Labor Day project!
JoeKan, What capevan86 said is right. You can get tank seal kits although I am not sure how expensive those kits are. A while back I had a blazer with a dirty tank. I bought 1 gallon of rust eater (mild phosphoric acid) at the local auto parts store. I put half of it into the tank sloshed it around ALOT. Let it sit for a day or two, sloshed it again. I did this over the course of a week then drained it and washed it with water. I then put 2-3 gallons of water in the tank and sloshed it over and over again and drained the tank. I did this 8-10 times until nothing came out. I then did the acid wash again and nothing came out. Last I put about a gallon of gas into the tank and sloshed it around to get all the water out. I drained it out, then I hooked up the tank and everything seemed to work fine; however I sold the truck a month later so I don't know how it did in the long haul.
__________________
I don't always drive trucks; but when I do I prefer Chevy's. Stay driving my friends. '72 blazer 2wd build 67-72 Factory Big Block Registry Last edited by 1956cameo; 09-16-2010 at 07:19 AM. |
|
|
|
|
09-16-2010, 10:04 AM
|
#20 |
|
Licensed driver
Join Date: Jun 2010
Location: Tarrytown, NY
Posts: 161
|
Re: Labor Day project!
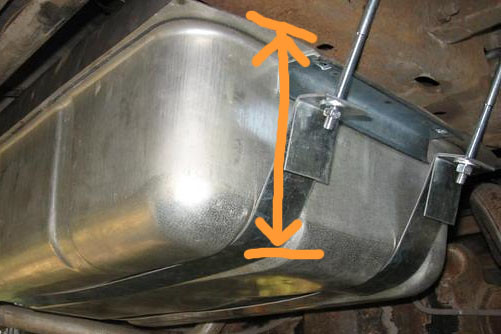
1956cameo - can you let me know the height/clearance of the tank from the visible middle seam part of the tank down (see photo...hope you don't mind, I hijacked your photo) - looks like the middle seam of the tank and then towards the ground. If I switch up, I'd like to keep my hitch set up and want to see if a newer tank would still fit. Also does that middle seam sit on the lower part of the frame?
|
|
|
|
|
09-16-2010, 12:53 PM
|
#21 |
|
Registered User
Join Date: Apr 2008
Location: Angleton, TX
Posts: 2,219
|
Re: Labor Day project!
eyebuzz, I will try and get the measurement for you this evening after work. The middle seam (where the top and bottom of the tank are welded together) actually sits below the frame, and they have bumps on the top that fit directly into factory holes that are on the bottom of the frame.
__________________
I don't always drive trucks; but when I do I prefer Chevy's. Stay driving my friends. '72 blazer 2wd build 67-72 Factory Big Block Registry |
|
|
|
|
09-16-2010, 01:07 PM
|
#22 |
|
Licensed driver
Join Date: Jun 2010
Location: Tarrytown, NY
Posts: 161
|
Re: Labor Day project!
thanks so much...and I appreciate the extra effort.
Tim |
|
|
|
|
09-20-2010, 12:28 PM
|
#23 |
|
Registered User
Join Date: Apr 2008
Location: Angleton, TX
Posts: 2,219
|
Re: Labor Day project!
Eyebuzz, Very sorry. My schedule unexpectedly got very hectic Thursday afternoon and I have not been able to get that measurement for you. I will try to get it for you soon.
__________________
I don't always drive trucks; but when I do I prefer Chevy's. Stay driving my friends. '72 blazer 2wd build 67-72 Factory Big Block Registry |
|
|
|
|
09-20-2010, 06:28 PM
|
#24 |
|
Registered User
Join Date: Apr 2008
Location: Angleton, TX
Posts: 2,219
|
Re: Labor Day project!
Eyebuzz, I got the measurements. The tank goes down 6.5 inches from the middle seal to the bottom. Also the front of the tank at the bottom is 5.5 inches back from the backside of the rear axle pumpkin. Hope that helps!
__________________
I don't always drive trucks; but when I do I prefer Chevy's. Stay driving my friends. '72 blazer 2wd build 67-72 Factory Big Block Registry |
|
|
|
|
09-20-2010, 09:56 PM
|
#25 |
|
Licensed driver
Join Date: Jun 2010
Location: Tarrytown, NY
Posts: 161
|
Re: Labor Day project!
Thanks for the measurement 1956cameo. Nothing I have planned too soon - but I'll store the info when I do make the switch. To the other thread - go for the white bottom stripe - mine needs to be repainted (after I replace that back panel) - the two tone is nice - you don't have to paint the WHOLE thing at once. I dig the roof rack you got.
Best, TT |
|
|
|
 |
| Bookmarks |
|
|


 Linear Mode

