
|
 05-12-2012, 02:51 PM
|
#176 |
|
The 60-66 GMC/Pontiac guy....
Join Date: Oct 2010
Location: Apache Junction, Arizona
Posts: 1,306
|
Re: Markeb01 Build Thread
I'm not here to bash any of the parts importers but I will relate the following experience.
 I have ordered approximately 17 different parts from LMC. 5 were kept and 12 returned because of quality issues. I have been searching for GMC parts since that is what I focus on in the trucks and many of the Chevy parts are quite obviously different. It makes total sense since they were very different divisions back then.  Glad to see you found someone that has better quality parts.  Thanks for your posts of your experiences. 
__________________
Building Genuine Pontiac Firepowered cars and trucks for several decades.  Why Pontiac?? That's just me daring to be different. Projects.. 63 C10 Short Wheel Base fleetside (The Pro-Street) currently under reconstruction. 440CID 2X4 Pontiac 
|

|

|
|
05-12-2012, 05:16 PM
|
#177 |
|
Senior Enthusiast
Join Date: Feb 2007
Location: Spokane Valley, WA
Posts: 8,356
|
Re: Markeb01 Build Thread
Yes, my intent is not to bash any particular supplier either. Im just trying to share my experience in case it makes a difference to someone else and they can avoid wasting their money like I did.
My son surprised me today by showing up a week ahead of schedule to slap the custom rear springs back in. Man sitting here looking at the picture its pretty obvious I need to repaint those drums the next time I have the wheels off!  They certainly are beefier than the Jeep springs and put some rake back in the ride height. The wire diameter on the custom springs is nearly 11/16, while the Jeep spring wire is a tad over 9/16, and there are far fewer coils. I have to hand it to the people that make Jeep Skyjacker springs. After the dirt was washed off the powder coat finish looks almost as good as the day they were installed:  Next time I wash the truck Ill take some pictures showing change in ride height.
__________________
My Build Thread: http://67-72chevytrucks.com/vboard/s...d.php?t=444502 |
|
|
|
|
05-18-2012, 05:26 PM
|
#178 |
|
Senior Enthusiast
Join Date: Feb 2007
Location: Spokane Valley, WA
Posts: 8,356
|
Re: Markeb01 Build Thread
Back to the windshield trim project, Ive been reading everything I can find trying to determine who makes the best windshield gasket for a 60-63 with stainless trim. It appears Precision is the best brand available on the market. The next problem was discovering where to buy one.
Ive read several posts indicating Steele Rubber Products distributes the Precision windshield seal, but they want $75 plus shipping. Ive seen Ebay ads specifically listing a Precision windshield gasket, but some of the angry customer feedback indicated they had received a Counterbrand gasket instead. So I started with the As and figured Id ask every supplier until I found one that would commit to sending me a Precision branded gasket. Im happy to report my first stop was American Classic Truck Parts. Ive done business with them before and always received quality products without shipping errors. Another benefit was their pricing - $35.00 for their part number WSG60DX. http://www.americanclassic.com/asp/d...ype=to&exyear= I was advised they actually have six different suppliers for their windshield gaskets, with Precision being the best brand by far. I specifically requested a Precision Gasket only with no substitutions, and their customer service promised to mark the order with a copy of my email request. I placed the order online and added the no substitution note in the special instructions field. I just received the gasket today, and Im delighted to report they sent me exactly what I asked for. So for anyone interested, here is one supplier that sells the preferred gasket, and at a comparatively inexpensive price. Its pretty obvious if you receive a genuine Precision gasket. It comes in a big plastic bag with markings all over one side:  Heres the Precision part number for the 1960-63 gasket with the deluxe trim slot:  And heres another sticker hand marked to indicate the corresponding American Classic part number:  I inspected every inch of the gasket, and it looks great. The vulcanized joint in the middle looks perfect. There are no twists, kinks, or malformed portions. Since this wont be installed for at least a couple of months, I wanted it laid out flat to give it the best chance of conforming to the windshield. It turns out we have a platform bed with a contained area underneath just the size of the windshield gasket. The seal was tucked inside two large trash bags to keep the dust off, and arranged around the perimeter so there wont be any twists or stretching in it when time comes for installation. If all goes well the wide stainless trim will arrive soon, and the project will get back on track in time for Spokane Goodguys in August.
__________________
My Build Thread: http://67-72chevytrucks.com/vboard/s...d.php?t=444502 |
|
|
|
|
05-18-2012, 05:34 PM
|
#179 |
|
The 60-66 GMC/Pontiac guy....
Join Date: Oct 2010
Location: Apache Junction, Arizona
Posts: 1,306
|
Re: Markeb01 Build Thread
That is fantastic information. I have the 2 63's that I need windshield gaskets for and I have put off getting them because of the bad experiances I have had with ordering other stuff. I don't want the chrome trim, just a good quailty seal. Thanks!
__________________
Building Genuine Pontiac Firepowered cars and trucks for several decades. Why Pontiac?? That's just me daring to be different. Projects.. 63 C10 Short Wheel Base fleetside (The Pro-Street) currently under reconstruction. 440CID 2X4 Pontiac
|
|
|
|
|
05-19-2012, 03:46 PM
|
#180 |
|
Senior Enthusiast
Join Date: Feb 2007
Location: Spokane Valley, WA
Posts: 8,356
|
Re: Markeb01 Build Thread
We stopped by the Spokane River access point in Liberty Lake this morning to see if we could get a couple of shots while the river is near flood stage. I was surprised to see the water level nearly touching the cross supports under the bridge. I always seem to pick the wrong time of day in this spot when the lighting is very harsh. Regardless Im glad to have picked up a couple of shots, the first Ive taken of the outside of the truck since the engine compartment project was completed and the rear springs installed. Im very pleased with the ride height and comfort level. Both are exactly as I want them:
  
__________________
My Build Thread: http://67-72chevytrucks.com/vboard/s...d.php?t=444502 |
|
|
|
|
05-19-2012, 05:34 PM
|
#181 |
|
Registered User
Join Date: Feb 2011
Location: muskogee, ok
Posts: 1,091
|
Re: Markeb01 Build Thread
ur truck is looking mint as always!!! nice pics too!!
__________________
 bagged 66 longbed build http://67-72chevytrucks.com/vboard/s...d.php?t=449548 my favorite colors.. black, rust, and shiny!!!! instagram: @coulter918 |
|
|
|
|
05-20-2012, 01:17 AM
|
#182 |
|
60-66 Nut
  Join Date: Mar 2007
Location: Coeur d'Alene, Idaho
Posts: 23,246
|
Re: Markeb01 Build Thread
Some more very nice pictures Mark
 You always seem to have some of the nicest pictures of your truck. Thanks for the info on the windshield gaskets.
__________________
Power Steering Box Adapter Plates For Sale HERE Power Brake Booster Adapter Brackets For Sale '63-'66 HERE and '67-'72 HERE and '60-'62 HERE and "60-'62 with clutch HERE Rear Disc Brake Brackets For Sale. Impala SS calipers HERE Camaro Calipers HERE D52 Calipers HERE 6 Lug HERE Hydroboost Mounting Plates HERE |
|
|
|
|
05-20-2012, 02:08 AM
|
#183 |
|
chevy only
Join Date: Sep 2006
Location: Phoenix, AZ
Posts: 6,619
|
Re: Markeb01 Build Thread
truck looks great!
__________________
CHEVY ONLY... Nothin Else ! |
|
|
|
|
05-20-2012, 02:21 AM
|
#184 |
|
But Found Her 25yrs Later!
Join Date: Oct 2010
Location: Oregon City, Oregon
Posts: 10,468
|
Re: Markeb01 Build Thread
I really like the second pic.
Posted via Mobile Device
__________________
I lost my 65 - Found it 25 years later: http://67-72chevytrucks.com/vboard/s...d.php?t=426650 66 C20 Service Truck: http://67-72chevytrucks.com/vboard/s...d.php?t=428035 |
|
|
|
|
05-20-2012, 04:31 AM
|
#185 |
|
Senior Member
Join Date: Mar 2011
Location: Tucson, Arizona
Posts: 2,058
|
Re: Markeb01 Build Thread
The pics of the truck look great!
|
|
|
|
|
05-20-2012, 10:59 AM
|
#186 |
|
Registered User
Join Date: Sep 2011
Location: Tacoma, WA
Posts: 2,425
|
Re: Markeb01 Build Thread
Your truck looks immaculate man, I cannot wait to see it in person!
For your photos here are a couple tricks: It is UV saturation that makes them look so washed out of color, especially the higher in elevation you go. That is why the sky is almost white. To combat this you can get a UV filter for your camera, and that will bring the blue back to the sky, and the green to the areas of grass that are in the most direct sunlight. However that will not help you with the sharp and hard shadows you experience with daylight shots. A cheap way of working around both these issues is shoot your pics an hour to 30 min before sunrise. The atmosphere will be mostly dust free at that time, the water in the background should be (more) stilled, and all your shadows will be softer allowing more detail to show in your shot. And the UV wont be such an issue. Morning is preferred for cleaner and less diffused pics than say twilight after the dust of the day has gotten into the air as it will tend to tint your shots with that signature orange you see often in photos from that time of day. This photo is of my original 66 Tempest Custom 2dr no post coupe that was stolen while I was posted in Korea. It was taken at Parcourse Lake on Ft Rucker, Alabama an hour before sunrise with a Minolta Maxxum 7000i 35mm SLR using Kodak film (I forget now what speed film it was) this photo was taken June of 1999. I do not know why but it is a fact of nature that bodies of water are the most calm before sunrise. Sometimes just for fun I will hand the original of this photo to people upside down to see if they catch it. The only other way I know of is to shoot on cloudy days. But in those you have to compose you photos to crop out the grey cloudy skies. And I suppose you risk getting rained on too  I am sure Shrunken has more or better tips than that, IIRC he is a professional photographer wereas I was only semi-pro for a while.
__________________
Michael McMurphy My 66 Stepside My 64 Tow Truck My 66 Tempest Table Of Contents Added to Page1 Last edited by McMurphy; 05-20-2012 at 11:10 AM. Reason: added photo and more blah blah blah... LOL |
|
|
|
|
05-20-2012, 11:54 AM
|
#187 |
|
But Found Her 25yrs Later!
Join Date: Oct 2010
Location: Oregon City, Oregon
Posts: 10,468
|
Re: Markeb01 Build Thread
I did it for kicks, Mike.
Pretty impressive. 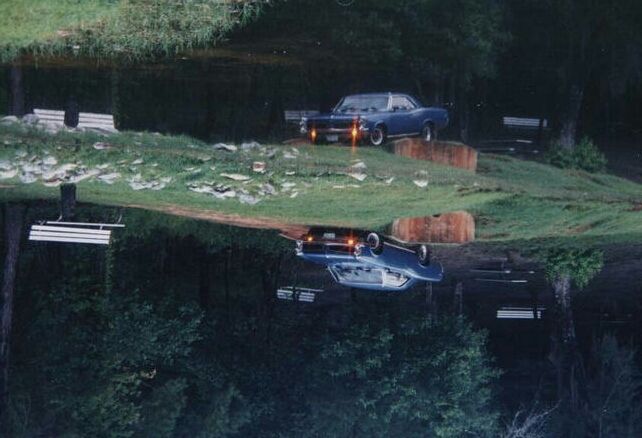 Posted via Mobile Device
__________________
I lost my 65 - Found it 25 years later: http://67-72chevytrucks.com/vboard/s...d.php?t=426650 66 C20 Service Truck: http://67-72chevytrucks.com/vboard/s...d.php?t=428035 |
|
|
|
|
05-20-2012, 12:06 PM
|
#188 |
|
Senior Enthusiast
Join Date: Feb 2007
Location: Spokane Valley, WA
Posts: 8,356
|
Re: Markeb01 Build Thread
Thanks for all the comments guys.
Very cool photo, and thanks for the tips. Long ago I used either a Polarized or UV filter on my film old Nikon film camera, but that stuff is long gone. It's time to pick up a filter or two that fit the Nikon digital I'm using now. As you mentioned, for car photos I usually try to shoot on cloudy days, in the early morning or during the magic hour at sunset, but nature doesn't allow for much spontaneity. A small investment would produce much better results. Fyi I just ordered a Nikon UV and circular Polarizing filter. I can't believe I failed to order these when I got the camera several years ago. The filters were what made my old Nikon film camera work so well, and the UV filter is such great protection for the lens. Thanks again for the tip. Now I can't wait for them to arrive so I can go back and try a few more shots under similar conditions.
__________________
My Build Thread: http://67-72chevytrucks.com/vboard/s...d.php?t=444502 Last edited by markeb01; 05-20-2012 at 12:54 PM. |
|
|
|
|
05-20-2012, 01:38 PM
|
#189 |
|
Registered User
Join Date: Sep 2011
Location: Tacoma, WA
Posts: 2,425
|
Re: Markeb01 Build Thread
Absolutely my pleasure!
At an average 1800 to 2200 feet above sea level that Spokane sits at, that UV filter will help alot in your color crispness and depth. As you may well recall from your earlier work. I forgot Coulter too, he has some mad camera skills as well, perhaps he will chime in here too! Thanks for flipping that photo, it took me by surprise!
__________________
Michael McMurphy My 66 Stepside My 64 Tow Truck My 66 Tempest Table Of Contents Added to Page1 Last edited by McMurphy; 05-20-2012 at 01:39 PM. Reason: bad bad bad grammer !! |
|
|
|
|
05-20-2012, 08:17 PM
|
#190 |
|
Senior Enthusiast
Join Date: Feb 2007
Location: Spokane Valley, WA
Posts: 8,356
|
Re: Markeb01 Build Thread
In the never ending quest to keep making small improvements, my wife pointed out the rocker sills looked pretty crappy with rust showing around the screw holes. I knew they’ve looked bad for a long time, but just didn’t pay all that much attention to them. They are aftermarket GMC sills, and have been deteriorating almost since the day I bought them back in 1998. I wouldn’t have bought them in the first place, except my truck came with one Chevy and one GMC rocker sill. Looking back, the mismatched originals were nearly twice as thick and the aftermarket versions.
Anyway the new ones have been getting rusty right along, so I decided to paint them wrinkle black just to be different. That was, until I took them off. The tops looked bad enough, but the bottoms have been eating themselves up, and depositing rusty crap on top of the floor paint. I also forgot I had torn the front hole out of one side trying to install the Steele Products door gaskets. The door seal was so stiff, rather than compressing the gasket by tightening the sill, it simply pulled the screw right through the trim plate.   So I gave up on the wrinkle paint and ordered generic polished stainless plates like these instead:  I also had been noticing small rust blisters forming on the lower right rear tailgate, and decided it needed some attention.  Looking things over a little closer, I realized there were also rust blisters on the inside near the deck level on the right side:  I pulled the tailgate and started looking it over. The first thing I noticed was there were no drain holes on the side with the rust, only the ends and one on the driver side:  So two more drain holes were added, one in the center and one on the passenger side:  After stripping the paint, the outside face of the tailgate revealed some good news. No cancer. There was surface rust trapped under the powder coating which took 14 years to reveal itself. Ground clean and treated with Picklex 20, it will be epoxy primed, filled, and the outside reshot in Blitz Black.  The inside was bad news. The blistered paint popped right through showing cancer holes, and looking inside the lower portion looks like the Titanic:  
__________________
My Build Thread: http://67-72chevytrucks.com/vboard/s...d.php?t=444502 Last edited by markeb01; 05-22-2012 at 04:12 PM. |
|
|
|
|
05-22-2012, 04:30 PM
|
#191 |
|
Senior Enthusiast
Join Date: Feb 2007
Location: Spokane Valley, WA
Posts: 8,356
|
Re: Markeb01 Build Thread
More progress on the tailgate yesterday and this morning. ½ holes were bored in the inner walls of the sockets which capture the tailgate hinges/bearings.
 This allowed air in and debris out. The better part of an hour was spent scraping the inside of the lower tailgate cavity and blowing rusty scale out. When there wasnt any more loose debris, I taped off all the entry holes but the two on the ends. I grabbed an old can of anti-rust spray paint, pulled the spray nozzle and replaced it with a tube nozzle from a can of WD40. From each end I emptied the can of paint into the tailgate until it was leaking out both ends. The tailgate was then flipped front over back several times to distribute as much of the paint as possible on all of the inner surfaces. The holes in the back side were repaired with JB Kwik. The face of each hole was beveled to provide more surface area to grip, and the tailgate elevated above the bench with the damage holes facing down. A generous amount of JB Kwik was pressed into the holes until it started oozing back out. It was smoothed back into the tailgate, and 2 masking tape quickly applied. A piece of sheet metal was then shoved against the tape/tailgate and held in place by a powerful magnet until the epoxy went off. This is what the repaired area looked like after the JB Kwik was ground flat with a DA.  Next, epoxy primer was mixed up and after waiting the 30 minute induction time, applied to both the back and front repair areas with a foam brush.   This morning, with the epoxy cured, a tiny smear of Rage body filler was mixed up and applied to the pits in the face of the tailgate.  Next on the schedule was an application of UPOL 2K high fill primer. Ive always known there is a shelf life to hardener that has been opened, but I never knew what that time period was until this morning. For my can of UPOL hardener, it had gone off after 3 years. I used some of it about a year ago when it was 2 years old and it still worked fine. The primer was opened and stirred to a smooth consistency, and a small amount transferred to a mixing cup. Then I carefully attempted to pour the correct amount of hardener, tipping it a little further, and a little further until the can was straight upside down! I soon discovered the hardener had become a clear plastic gelatinous mass in the bottom of the can! So off to the paint store for a fresh can of primer and hardener. This time I found the product offered in grey, which I certainly prefer over the hideous yellow/beige I got last time, but since I still had enough of the old stuff for the job, I used it instead to keep the new grey primer fresh for the next project. So heres the face repair with a slathering of 2K primer, again done with a foam brush. Its going to be blocked out anyway, so the brush on application saves a great deal of mess and clean up.  Once its cured and blocked out (probably tomorrow), Im going to reshoot the top, bottom, and face with Blitz Black. Rather than putting a great deal of effort into the back side which is rarely seen by anyone, Im going to shoot it with Raptor bedliner. I have two spare bottles of the stuff left over from the firewall project. This should look much more appropriate than the splotchy black powder coating thats been covering the inside of the tailgate for the last 14 years. Eventually I might actually spray the inner bed walls with Raptor and have a decent looking bedliner presentation. The interior appearance of the bed has never been much of a priority to me because we actually use the truck, and the Gaylord cover hides everything.
__________________
My Build Thread: http://67-72chevytrucks.com/vboard/s...d.php?t=444502 |
|
|
|
|
05-22-2012, 10:02 PM
|
#192 |
|
Rollin' Old Skool
Join Date: Jun 2007
Location: Hattiesburg, MS
Posts: 5,371
|
Re: Markeb01 Build Thread
looking good!
__________________
_____________________________________________ Phillip My Build threads: 1966 Chevy C-10 "Black Betty" shortbed, fleetside, BBW, 327 V8/ Powerglide (under construction) http://67-72chevytrucks.com/vboard/s...ighlight=betty 1997 Chevy Tahoe, 2dr/2wd, mild custom (Daily driver) http://67-72chevytrucks.com/vboard/s...d.php?t=601142 Pics: '66 C-10 https://flic.kr/s/aHsjHWD4h9 '97 Tahoe https://flic.kr/s/aHsjGZ7wKP '93 C-1500 https://flic.kr/s/aHskxdpdnQ '88 S-10 Blazer https://flic.kr/s/aHsjYGx4Md Previous Rides: 1993 Chevy S-10 ext. cab, 4.3L, 4/5 drop (Sold) 1993 Chevy C-1500 short/step Retro-Rod (Sold) 1988 S-10 Blazer 2dr/2wd mild custom (Sold) |
|
|
|
|
05-24-2012, 11:51 PM
|
#193 |
|
Senior Enthusiast
Join Date: Feb 2007
Location: Spokane Valley, WA
Posts: 8,356
|
Re: Markeb01 Build Thread
This morning was invested in block sanding the repaired area on the tailgate along with everything else on both sides.
 It was then suspended from the ceiling and washed down with wax and grease remover:   The original plan this morning was to shoot the backside first with Raptor bedliner, and once cured, mask that area and shoot the rest with Blitz Black. Then it occurred to me, once I mixed in the catalyst Id lose whatever Raptor I couldnt use, (most of the bottle) leaving me with only one spare bottle of material. Two bottles are sufficient to do all 3 bed walls and the tailgate, so I opted to skip the bedliner and do the inside of the tailgate later when and if I get around to doing the inside bed walls. That simplified things by requiring no masking. The premixed left over paint from the main paint job was stirred and strained straight into the SataJet 90 spray gun, and applied:   The finish turned out at least as good as it was before the rust repair, so it will be going back on the truck tomorrow morning. The tailgate has a few waves in it after 52 years of use, but Im reluctant to restore it to perfect, or buy a new Mar-K tailgate as having a mint tailgate would probably deter me from using the truck as a truck.
__________________
My Build Thread: http://67-72chevytrucks.com/vboard/s...d.php?t=444502 |
|
|
|
|
05-25-2012, 01:23 AM
|
#194 |
|
Senior Enthusiast
Join Date: Feb 2007
Location: Spokane Valley, WA
Posts: 8,356
|
Re: Markeb01 Build Thread
Heading out the door to work, the wife offered a hand to get the tailgate back on, so thats done. Tomorrow the stainless door sills arrive and that will take care of everything until the new windshield trim arrives in a few days. The bumper sure does need a polish job.

__________________
My Build Thread: http://67-72chevytrucks.com/vboard/s...d.php?t=444502 |
|
|
|
|
05-25-2012, 01:38 AM
|
#195 |
|
But Found Her 25yrs Later!
Join Date: Oct 2010
Location: Oregon City, Oregon
Posts: 10,468
|
Re: Markeb01 Build Thread
Looks good.
__________________
I lost my 65 - Found it 25 years later: http://67-72chevytrucks.com/vboard/s...d.php?t=426650 66 C20 Service Truck: http://67-72chevytrucks.com/vboard/s...d.php?t=428035 |
|
|
|
|
05-25-2012, 03:07 PM
|
#196 |
|
Registered User
Join Date: Nov 2011
Location: mid ga
Posts: 552
|
Re: Markeb01 Build Thread
Good job on the repair Mark,I sure hope I have the will power to keep my trucks in tip top shape when they are done.Enjoy reading your thread.
__________________
check out SANFORD build thread http://67-72chevytrucks.com/vboard/s...d.php?t=522019 |
|
|
|
|
05-25-2012, 05:04 PM
|
#197 |
|
Senior Enthusiast
Join Date: Feb 2007
Location: Spokane Valley, WA
Posts: 8,356
|
Re: Markeb01 Build Thread
Thanks for the comments guys.
The Chevy Duty (ClassicParts) door sills showed up today.   The pictures do not do them justice. These things are beautiful! They are polished to a blinding shine and snugged right into place like factory units. Theyre not for the purist, having no Chevy or GMC logo and the embossing is more shallow, no doubt for ease of production polishing. But these really brighten up the whole interior compared to originals in any condition. Its amazing how one improvement can inspire another. The sills look so great, now my floor looks pathetic. I currently have a tired rubber mat and a metal floor covered with chipped paint. It may be time for carpet or one of those LMC Polyvinyl mats that cover the entire floor.
__________________
My Build Thread: http://67-72chevytrucks.com/vboard/s...d.php?t=444502 |
|
|
|
|
05-25-2012, 09:06 PM
|
#198 |
|
Senior Member
Join Date: Sep 2011
Location: Hanford, CA
Posts: 1,027
|
Re: Markeb01 Build Thread
Looks Great! You make it all look so easy.
Posted via Mobile Device
__________________
Poor and content is Rich...and Rich enough! - William Shakespeare 1966 C10 Custom Cab "Luigi" Big Window - SWB Fleetside 350 V-8 - Powerglide My not so much a build thread as a "Slow Progression Thread":http://67-72chevytrucks.com/vboard/s...d.php?t=486894 |
|
|
|
|
05-26-2012, 03:34 PM
|
#199 |
|
Senior Member
Join Date: Mar 2011
Location: Tucson, Arizona
Posts: 2,058
|
Re: Markeb01 Build Thread
The work on the tailgate and the new door sills look great. I know I've seen it before in your thread but could you tell me again what seats you've got in your truck? They are very similar to what I have in mind for my truck.
|
|
|
|
|
05-26-2012, 06:06 PM
|
#200 |
|
Senior Enthusiast
Join Date: Feb 2007
Location: Spokane Valley, WA
Posts: 8,356
|
Re: Markeb01 Build Thread
They are Procar Low Back Seats by Scat. They are reasonably attractive, dont break down after years of use by a hefty guy, have an adjustable back and mounting points, and are relatively inexpensive. Mine are 10 years old and look (and feel) virtually the same as they did when first installed. The Recaro seats I had previously lasted exactly 3 years, when overnight they broke down to the point I couldnt drive the truck.
Procar seats are sold at Summit and Jegs. Amazon still has them listed but as Currently Unavailable.. As a person with missing spinal discs and chronic back pain, I find them very comfortable. The only downside is that compared to a mid-60s GM bucket seat they are somewhat smaller and not as important looking. http://www.summitracing.com/parts/SCA-80-1400-51L/ http://www.jegs.com/i/Scat/942/80-1400-51L/10002/-1
__________________
My Build Thread: http://67-72chevytrucks.com/vboard/s...d.php?t=444502 |
|
|
|
 |
| Bookmarks |
|
|


 Linear Mode

