
|
Register or Log In To remove these advertisements. |
|
|
|
|||||||
 |
|
|
Thread Tools | Display Modes |
 07-03-2018, 08:56 PM
|
#1 |
|
Senior Member
 Join Date: Sep 2016
Location: Hershey, PA
Posts: 1,004
|
Help -- Old Fashioned engine tuning with vacuum gauge
Hey all.... I gave up trying to guess my way to a good tune of the chevy 350 engine. Craigslist uncovered a kit with timing light, vacuum gauge, and a 7 function analyzer. I've watched a few youtube videos trying to learn how to set timing.
The problem: Engine is running rich because I get "run on" or dieseling when I turn the truck off. Just a few seconds, but I'm pretty sure that's bad. I dialed my carb all the way in on the idle screws and I can smell the richness in the exhaust gas smell (no color just smells oily). There doesn't seem to be a way to get it any leaner. Edelbrock 1406 carb right out of the box, so no needle changes or springs just yet. Low idle, the engine feels rough...when I accelerate, no problems. Sounds good and feels good. I'm asking the more seasoned tuners among us to help me understand how to set timing and lean/rich mixture. I can't see the timing marks because there is a water pump and power steering pump right where the zero mark is, so that's basically useless. I read somewhere I could do this with just a vacuum gauge and the RPM marker on the 7 way analyzer. So far so good...I have the timing set where I get a consistent -30 on the vacuum gauge. Not sure if that's good bad or otherwise. If I retard or advance, I notice the vacuum drop slightly. So, I'm pretty sure I'm with a couple of degrees of "correct." The rpm is set to 1000 rpm at idle which I understand to be too high. Supposed to be around 600rpm right? If I adjust the idle screw that low, the engine doesn't want to idle. Very rough. Question 1: Is that the right way to do timing? Question 2: How else can I make the carb leaner. I didn't seem to have as much of a problem until I installed a phenolic spacer between the carb and intake manifold. I did install the correct gaskets. I would think I would have a lean issue not a too rich issue. Brand new carb, brand new gaskets, brand new intake manifold. Any help is appreciated!  pics for clicks: 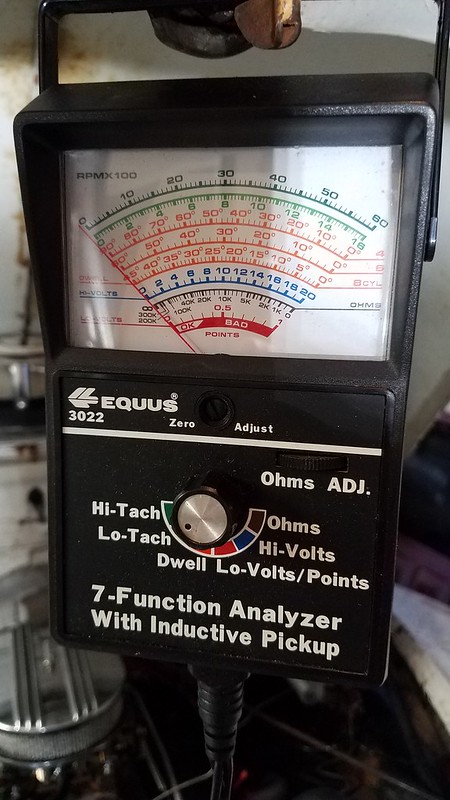 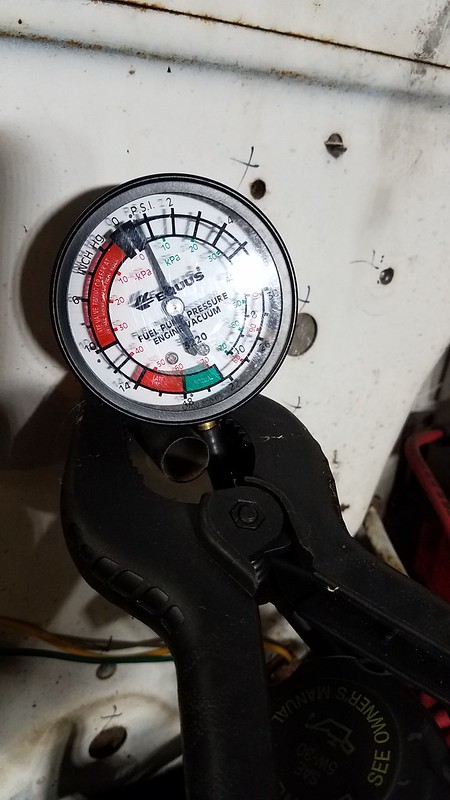
__________________
Current Build Thread 1930 Ford Model A Modern Twist: Ford Model A Rat Rod With a Modern Twist Build Thread Phase 1 "The Swap": 1949 3100 with S10 swap. Beginner build with ambition! Build Thread Phase 2 "The Drop": Beginner Build with Ambition gets Air Ride Last edited by gigamanx; 07-05-2018 at 12:11 PM. |

|

|
|
07-03-2018, 10:03 PM
|
#2 |
|
Registered User
Join Date: Mar 2012
Location: Lakes Region NH
Posts: 3,152
|
Re: Help -- Old Fashioned engine tuning with vacuum gauge
Ohboy... where to start?
Congratulations on choosing to use methods that most have forgotten about. And for using your senses. You'd be amazed at how many kids these days are "Toonerz" because they have a laptop and an exhaust oxygen sensor. Few develop a sense of what's happening like the folks that spent years actually wrenching on engines. The vacuum gauge is a way to determine how much the engine wants to accelerate compared to how much the throttle is holding it back. In the old days guys would set the timing for maximum vacuum at idle. The fuel mixture screws would be adjusted in and out while watching the vacuum gauge and like the timing, if the gauge dropped when the screw was turned that meant you were going the wrong way. Eventually both the timing and mixture screws would be at the point where engine vacuum was strongest and the idle speed would be given a final set. Engines today are not always set for maximum vacuuum as that can increase tailpipe emissions. And cams are not always ground to deliver smooth idle. So how about some details? Without knowing heads, cam, and compression ratio, it's going to be tougher to cover everything. As far as stated goals, what I'm seeing is that you want to stop the "dieseling" that occurs after the engine is shut off. The answer to this is simple: Decrease fuel and air allowed into the engine to the point that that compression ignition does not occur. Generally speaking you are going to want to balance reducing the throttle angle with setting timing. If the cam grind creates a rough idle when the throttle is closed then you are likely to end up with a rough idle. If the cam grind has a large amount of overlap and encourages exhaust dilution at idle then you are likely to smell a rich exhaust when you are done. The engine is running at 1000 rpm, the idle mixture screws are all the way in, spark advance is probably advanced over original, and the exhaust smells rich. If your carburetor is not leaking then there's a chance that your engine's combination of cam/heads/compression ratio are going to smell rich at idle. The idle screws should not be closed. In order to get enough fuel for the engine to operate they should be open about 1 to 1 and 1/2 turns. Start there. Check to see if you have ported or manifold vacuum at the distributor. Ported vacuum is a source where no vacuum is present when the throttle plates are it idle but is present when the throttle plates are opened. If you have vacuum at idle the result can be extra advance at idle which makes it harder to idle the engine down. It can also cause vacuum advance to begin operating during cranking which can be a real challenge on hot days. I tend to prefer ported vacuum on mild engines. If ported vacuum is not available be prepared to decrease timing slightly or disconnect and plug the vacuum line during testing. After opening mixture screws and getting the vacuum situated, check to see if the throttle angle needs to be decreased. If decreasing timing reduced engine speed that might be enough to cure the run-on. Of course this might be all wrong if you're running a fairly stock '80s engine. Those were often set up with little advance timing, throttle plate open at idle, and relatively low vacuum. Yep, details might help. 
Last edited by 1project2many; 07-03-2018 at 10:24 PM. |
|
|
|
|
07-03-2018, 10:08 PM
|
#3 |
|
Registered User
Join Date: Jun 2011
Location: Unionville CT
Posts: 168
|
Re: Help -- Old Fashioned engine tuning with vacuum gauge
This is a good article.....
http://automotivemileposts.com/garage/v2n8.html
__________________
http://67-72chevytrucks.com/vboard/s...d.php?t=481531 |
|
|
|
|
07-03-2018, 10:13 PM
|
#4 |
|
Senior Member
Join Date: Sep 2016
Location: Hershey, PA
Posts: 1,004
|
Re: Help -- Old Fashioned engine tuning with vacuum gauge
Awesome info, thanks! I bought the truck originally because I wanted to go old school and get away from computers. I spend too much time on them at work already. I have a degree in computer science, spent years programming, and now in management...which nowadays means staring at a computer.
Details I have... 1996 Chevy C1500 small block 350. Vortec Heads. Edelbrock 1406 carb Edelbrock 2701 intake manifold Vacuum test is coming out of the distributor advance vacuum of the carburetor.
__________________
Current Build Thread 1930 Ford Model A Modern Twist: Ford Model A Rat Rod With a Modern Twist Build Thread Phase 1 "The Swap": 1949 3100 with S10 swap. Beginner build with ambition! Build Thread Phase 2 "The Drop": Beginner Build with Ambition gets Air Ride |
|
|
|
|
07-03-2018, 10:18 PM
|
#5 | |
|
Senior Member
Join Date: Sep 2016
Location: Hershey, PA
Posts: 1,004
|
Re: Help -- Old Fashioned engine tuning with vacuum gauge
Quote:
__________________
Current Build Thread 1930 Ford Model A Modern Twist: Ford Model A Rat Rod With a Modern Twist Build Thread Phase 1 "The Swap": 1949 3100 with S10 swap. Beginner build with ambition! Build Thread Phase 2 "The Drop": Beginner Build with Ambition gets Air Ride |
|
|
|
|
|
07-03-2018, 10:57 PM
|
#6 | |
|
Registered User
Join Date: Mar 2012
Location: Lakes Region NH
Posts: 3,152
|
Re: Help -- Old Fashioned engine tuning with vacuum gauge
Quote:
Hmmm... I had forgotten about the engine thread you had going: http://67-72chevytrucks.com/vboard/s...d.php?t=741282 Did you end up changing the cam? If not this may be a pretty simple task. What intake are you using? |
|
|
|
|
|
07-03-2018, 11:30 PM
|
#7 |
|
Registered User
Join Date: Aug 2009
Location: Bowser
Posts: 13,508
|
Re: Help -- Old Fashioned engine tuning with vacuum gauge
A couple things I might add.
Whichever fuel pump you chose has too much fuel pressure. Your eddy carb likes no more than 5 psi. You’ll need a return style regulator. Your carb is likely flooding a bit. You’ll need to fix this before you can set your mix screws. Electric pumps don’t like to be dead headed. That’s why you need a return type reg. You likely can’t see your timing marks because you’re looking in the wrong spot. Yours should be seen straight down behind the water pump. There’s also no reason you can’t move your tab/balancer marks to a better location you can see. Just confirm tdc #1 with a piston stop, remark yourbalancer and set up a new timing tab. |
|
|
|
|
07-03-2018, 11:48 PM
|
#8 |
|
Registered User
Join Date: Jan 2018
Location: Knoxville TN
Posts: 87
|
Re: Help -- Old Fashioned engine tuning with vacuum gauge
30" of vacuum at idle? Whats your elevation. sea level or below?
Normal at my elevation (1000') runs between 17" and 22" at idle. When setting an engine via the vacuum method I've had the best luck by 1st adjusting the idle to spec. 350's w/ auto's are spec'd to idle at 600-650 in drive. It'll raise a couple hundred rpm in park/neutral. Straight stick is 600-650 in neutral. Then set your timing to max vacuum at the spec'd rpm then back it off approx 2" of vacuum. If your max vacuum is 30 then retard the timing to get 28" of vacuum. Now adjust the fuel/air mixtures at idle to max vacuum. If the rpm raises turn it down via the idle speed setting. Don't be surprised if your vacuum drops some when you back the rpm down. Remember you want to adjust the carb to max vacuum (-2") at spec'd idle rpm, (600-650 rpm in drive) not at 1000 rpm. To get best lean idle, with your idle set to spec and timing at 2 inches below max vacuum, go back to you idle mixture screws and turn them in (clockwise), 1 at a time, inorder to just get a small drop in rpm (approx 20-40 rpm) or (a very small negative movement on the vacuum gauge, maybe 1/4"-1/2" per adjustment screw) Theres alot of going back and forth using this setting method and alot of idling, make sure the exhaust is well ventilated. Good luck Dave |
|
|
|
|
07-03-2018, 11:56 PM
|
#9 |
|
Registered User
Join Date: Jul 2007
Location: Toppenish, WA
Posts: 15,261
|
Re: Help -- Old Fashioned engine tuning with vacuum gauge
On most older engines 16 to 18 inches of vacuum at an idle is considered Ideal. Some newer tight tolerance engines might pull a bit more but those generally fall into the computer controlled area anyhow or at least they were originally designed to be computer controlled.
The link that Nordic gave in post 3 is real good with one exception. The writer is ASSUMING that everyone reading it has an engine with a distributor that rotates the same way as the one he is describing. What he is describing is backwards for a Chevrolet engine. Reading what he wrote here he is describing an engine with a distributor that turns counter clockwise rather than one that turns clockwise. ....4. Keep in mind when adjusting the timing, you have to turn the distributor clockwise to advance and counter-clockwise to retard. Mr48Chev note: This works on a Ford V8 but is backwards for a Chevrolet V8. ___________________________________________________________________ 5. While watching the vacuum gauge, slowly turn the distributor clockwise (advance timing) and look for a maximum reading on the gauge. For instance, if the reading on your gauge peaks at 18 inches of vacuum, that is the maximum for your engine. (The normal range could be from a high of 20 inches to a low of 15 inches, depending on the internal condition of your motor). The reading will drop off if you advance too far, so turn the distributor counter-clockwise (retard timing) to go back to the peak reading on your gauge. Outside of assuming that everyone reading it is working on a Ford V8 his info is good and moving the distributor to get max inches of vacuum and then backing off slightly should work and not ping. With cruddy gas you may have to back it off slightly more though. It may be a set it, go try it and adjust if needed deal. A quick fiy, on any engine you aren't all that familiar with if you wrap your thumb around the vacuum advance and wrap your index finger around the distributor housing on the side the advance is on, your index finger will be pointing in the direction of distributor rotation.
__________________
Founding member of the too many projects, too little time and money club. My ongoing truck projects: 48 Chev 3100 that will run a 292 Six. 71 GMC 2500 that is getting a Cad 500 transplant. 77 C 30 dualie, 454, 4 speed with a 10 foot flatbed and hoist. It does the heavy work and hauls the projects around. |

|
|
|
07-04-2018, 12:57 AM
|
#10 |
|
Registered User
Join Date: Nov 2010
Location: calgary alberta
Posts: 7,816
|
Re: Help -- Old Fashioned engine tuning with vacuum gauge
sometimes the dieseling issue is because the throttle plates are open after the key is shut off. this can be especially true for a high perf engine that has trouble idling because we automatically speed up the idle, this allows the engine to draw in air/fuel mixture until the engine stops rotating. if the engine is hot when shut off this mixture can self ignite in the chamber from a hot plug or some carbon build up, causing the dieseling or "run on" and that pinging sound. on newer carbed engines they used the old fashioned idle speed adjuster screw to adjust the throttle plates so they would close as much as possible without actually jamming inside the bores, then an electric solenoid was used to bring the throttle lever on the carb up to a suitable idle speed when the key was on to energize the solenoid. the solenoid had an adjustable plunger to adjust the length and so adjust the throttle plate angle-idle speed. with the key on the idle was set but as soon as the key was off the throttle plates snapped shut so no more air could pass and bring a bit of fuel with it. you may also check for a vac leak under the carb or an intake manifold gasket. the latter can be especially true with heads that have been planed down several times because the angle and distance between the head gasket surfaces and the intake gasket surface changes when the heads are planed. check anything connected to your intake system, hoses, brake booster vacuum advance operation, centrifugal advance mechanism etc. check the age and quality of the fuel as well because lower octane fuel explodes easier than higher octane. check where you buy fuel as well, some places have the same octane level advertised but they start off with poor quality of fuel and add alcohol and other things to bring the octane level up. some of these newer fuels also eat up fuel system components on older systems. you could start with checking the entire system, a valve adjustment check, compression test, spark plug check, complete ignition system check, fuel pressure and flow check, carb settings, proper pcv valve, vacuum hoses and fittings etc. just to be sure the whole system is functioning properly. they are all related.
here is a quick article that may help you do a few more checks, worth a read anyway. http://www.badasscars.com/index.cfm/...d=94/prd94.htm |
|
|
|
|
07-04-2018, 01:24 AM
|
#11 |
|
Registered User
Join Date: Nov 2010
Location: calgary alberta
Posts: 7,816
|
Re: Help -- Old Fashioned engine tuning with vacuum gauge
you may also want to check the advance characteristics of the distributor. here is a quick read for you that may help.
http://www.badasscars.com/index.cfm/...d=76/prd76.htm or here http://www.superchevy.com/how-to/97438/ or here for the carb basics https://www.hotrod.com/articles/rebu...ck-carburetor/ or here for the edelbrock tuning guide http://www.edelbrock.com/automotive/...ers-manual.pdf hope this helps |
|
|
|
|
07-04-2018, 07:10 AM
|
#12 | ||
|
Registered User
Join Date: Mar 2012
Location: Lakes Region NH
Posts: 3,152
|
Re: Help -- Old Fashioned engine tuning with vacuum gauge
Quote:
 Quote:
I believe you will have better results if you work out a way to set and check timing using a light. I've found that painting the tab on the L31 timing cover with white or silver paint can help. Last edited by 1project2many; 07-04-2018 at 07:17 AM. |
||
|
|
|
|
07-04-2018, 07:44 AM
|
#13 |
|
laying low
Join Date: Mar 2001
Location: Searcy, Ark. USA
Posts: 12,946
|
Re: Help -- Old Fashioned engine tuning with vacuum gauge
Here is a vacuum tuning chart one of our members posted some years ago.
__________________
Boog 69 Chevy stepside, 358/T350, 4.11 posi, 4.5/4 drop, rallys, poboy driver primer is finer 91 Chevy sportside, Tahoe, Yukon & GMC Crewcab All GM..'nuff said. I stand for the flag and kneel at the cross |
|
|
|
|
07-04-2018, 09:48 AM
|
#14 |
|
Senior Member
Join Date: Sep 2016
Location: Hershey, PA
Posts: 1,004
|
Re: Help -- Old Fashioned engine tuning with vacuum gauge
Ok all, I got it! Went out this morning before the heat wave cooked me in the garage. So the issue was I had started off with idle too far in to begin with. I was sitting at 1000rpm and 1600rpm when I adjusted the idle mix screws. I followed the link from Nordic and the hint from MARTINSR on distributor. I first set the idle to 600rpm then set the timing.
Problem #2, I attached the vacuum to the vac advance port not the manifold vacuum port. By putting the gauge on the right port, I was at 16-17 when timing was set. The needle hardly moved, so I was happy. From there, I set the idle mix screws 1 turn out to begin with. I then started turning them out and watching the rpm. Once rpm was as high as it would go, I turned down the idle back to 700rpm. Then I did it all over again until the idle mix screws wouldn't increase rpm. I then turned in the idle mix screws 1/4 turn to drop the rpm by 50. Went for a drive and bam, nice pull, nice power, and no dieseling. Thanks all! I'm so pumped
__________________
Current Build Thread 1930 Ford Model A Modern Twist: Ford Model A Rat Rod With a Modern Twist Build Thread Phase 1 "The Swap": 1949 3100 with S10 swap. Beginner build with ambition! Build Thread Phase 2 "The Drop": Beginner Build with Ambition gets Air Ride |
|
|
|
|
07-13-2018, 10:29 AM
|
#15 |
|
Senior Member
Join Date: Sep 2016
Location: Hershey, PA
Posts: 1,004
|
Re: Help -- Old Fashioned engine tuning with vacuum gauge
Adding my funny story from yesterday. A mechanic buddy noticed my fuel pressure jumping around and that I was still getting some dieseling issues. I let some pressure out by opening the gas cap like I usually do and he said, why did you do that?
Well, ever since the engine has been installed I've always noticed a bunch of pressure build up in the tank. After a drive, I open the gas cap and let it out. Since I'm new to car mechanics, the gas tank, the engine, the fuel pump, pretty much everything, I assumed it was normal. Low and behold back in 2017 some guy (this guy  ) covered up the S10 vent tube and return line hole so grinding dust wouldn't get in them back. With only one place for fuel and air to escape, I was essentially pressurizing my fuel line to the carb. ) covered up the S10 vent tube and return line hole so grinding dust wouldn't get in them back. With only one place for fuel and air to escape, I was essentially pressurizing my fuel line to the carb. Reinstalled the S10 carbon filter for the vent line. Runs so much nicer now! 
__________________
Current Build Thread 1930 Ford Model A Modern Twist: Ford Model A Rat Rod With a Modern Twist Build Thread Phase 1 "The Swap": 1949 3100 with S10 swap. Beginner build with ambition! Build Thread Phase 2 "The Drop": Beginner Build with Ambition gets Air Ride Last edited by gigamanx; 07-13-2018 at 10:43 AM. |
|
|
|
|
07-19-2018, 10:49 PM
|
#16 |
|
Registered User
Join Date: Mar 2013
Location: albuquerque New Mexico
Posts: 522
|
Re: Help -- Old Fashioned engine tuning with vacuum gauge
this is a fun read for me. I just vacuum tuned my carb with great results.
|
|
|
|
|
07-20-2018, 09:41 AM
|
#17 | |
|
Senior Member
Join Date: Sep 2016
Location: Hershey, PA
Posts: 1,004
|
Re: Help -- Old Fashioned engine tuning with vacuum gauge
Quote:
__________________
Current Build Thread 1930 Ford Model A Modern Twist: Ford Model A Rat Rod With a Modern Twist Build Thread Phase 1 "The Swap": 1949 3100 with S10 swap. Beginner build with ambition! Build Thread Phase 2 "The Drop": Beginner Build with Ambition gets Air Ride |
|
|
|
|
|
07-20-2018, 11:00 AM
|
#18 |
|
Registered User
Join Date: Jul 2007
Location: Toppenish, WA
Posts: 15,261
|
Re: Help -- Old Fashioned engine tuning with vacuum gauge
I had a similar timing light won't work on a 350 when I put the 350 out of a 79 ElCamino we had that my son wrecked in my 71 GMC and used the short 71 water pump. Tab was hidden by the water pump. If you have the long pump you should be able to shine the light straight down between the pump and the timing cover though.
Had one of those in a customer car at a shop I worked at a few years ago where the customer bought a rebuilt long block from the shop, installed it and in the process put a chrome timing tab on it and then couldn't get it to run because he was turning the crank to line up the mark on his chrome tab when it should have been lined up with the factory tab that was still on the timing cover an he had the long pump. It took two of us to figure that one out. We pulled #1 and bumped it over on compression and the mark wasn't close to lining up with the chrome tab and after a couple of tries We started hunting where the mark was and it was spot on with the stock tab. Then the light came on for us that it was a later engine.
__________________
Founding member of the too many projects, too little time and money club. My ongoing truck projects: 48 Chev 3100 that will run a 292 Six. 71 GMC 2500 that is getting a Cad 500 transplant. 77 C 30 dualie, 454, 4 speed with a 10 foot flatbed and hoist. It does the heavy work and hauls the projects around. |
|
|
|
|
07-23-2018, 03:47 PM
|
#19 |
|
Senior Member
Join Date: Sep 2016
Location: Hershey, PA
Posts: 1,004
|
Re: Help -- Old Fashioned engine tuning with vacuum gauge
Well, did this right before the torrential rain arrived in PA. Haven't had a long test, but so far it feels good.
Made my own timing tape. Set initial timing to 10. If I set it to 8 or 12, I get slight dieseling. Amazing how small of an adjustment makes a difference. 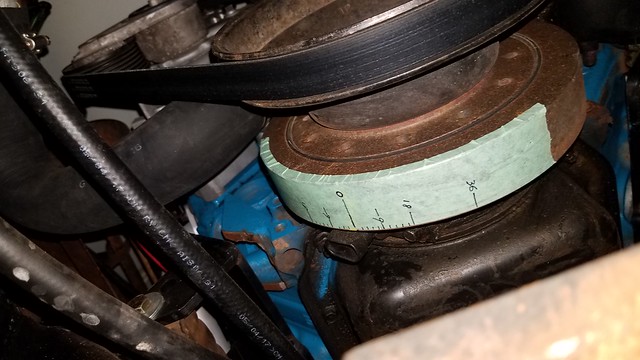 I found a way to see the timing marker with the gun, so we were in business. What was interesting was my vacuum/hand timing had set it at about 20 degrees initial timing (maybe 18). That's where the engine "sounded" happiest. At full throttle, timing was around 40 with some lovely little pings at high torque load. By setting initial timing to 10 deg, I noticed the engine does sound like its working harder but the engine is more responsive, less vibration, and sets the vacuum timing to hit right at 32 degrees with higher rpm. So, I went to the Google machine and low and behold, every article I could find about a vortec/SBC 350 suggests 10 degrees initial and 32 to 36 degrees at higher RPM. I've certainly learned a lot by this process and hoping I solved the issue. Have to wait for the rain to stop so I can do a longer test drive.
__________________
Current Build Thread 1930 Ford Model A Modern Twist: Ford Model A Rat Rod With a Modern Twist Build Thread Phase 1 "The Swap": 1949 3100 with S10 swap. Beginner build with ambition! Build Thread Phase 2 "The Drop": Beginner Build with Ambition gets Air Ride |
|
|
|
|
08-11-2018, 09:01 PM
|
#20 |
|
Senior Member
Join Date: Sep 2016
Location: Hershey, PA
Posts: 1,004
|
Re: Help -- Old Fashioned engine tuning with vacuum gauge
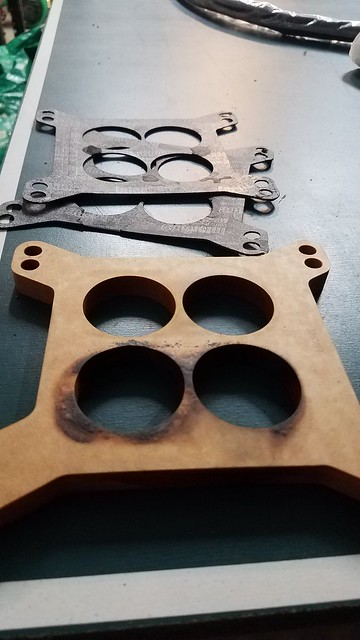
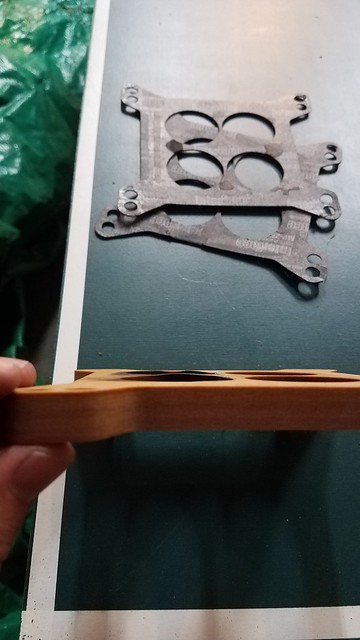
Longer test drive proved two things for me. Dieseling still occurring and I continue to get an odd flutter in low RPM that I don't remember having before. Decided to take the carb off and this may be the culprit. The wooden phenolic spacer is no longer flat...looks like two cylinders cooked the insides...
  In other news: I went back to the drawing board and decided to try the "cylinder stop" method of finding TDC. So I put a cylinder stopper in spark plug #1. Turned the engine by hand until the cylinder hit the stopper and made a mark. I then turned the engine the opposite direction until I hit the cylinder stopper again. Made a mark. Supposedly, the TDC is half way between the two marks. Turns out TDC is about 1/2" off from where the notch is in the harmonic balancer as it lines up with the timing cover mark. Set timing to 10deg again and I can feel the power band. Solid pedal response from about 1000rpm all the way up. Before I did this, and assuming TDC was when the balancer notch was lined up with the timing cover, I would get solid pedal response around 1800, 2000 rpm. Win! So I'm basically working on figuring out 800rpm to 1200rpm, trying to fix the odd flutter I'm getting at low RPM, and still trying to fix the dieseling issue (although much less now)
__________________
Current Build Thread 1930 Ford Model A Modern Twist: Ford Model A Rat Rod With a Modern Twist Build Thread Phase 1 "The Swap": 1949 3100 with S10 swap. Beginner build with ambition! Build Thread Phase 2 "The Drop": Beginner Build with Ambition gets Air Ride |
|
|
|
|
02-06-2019, 06:07 PM
|
#21 |
|
Registered User
Join Date: Jan 2007
Location: Puyallup, WA
Posts: 1,661
|
Re: Help -- Old Fashioned engine tuning with vacuum gauge
Did you ever get this squared away?
__________________
72 C10 lwb fleetside -stock 350/350 combo |
|
|
|
|
02-08-2019, 11:21 AM
|
#22 | |
|
Senior Member
Join Date: Sep 2016
Location: Hershey, PA
Posts: 1,004
|
Re: Help -- Old Fashioned engine tuning with vacuum gauge
Quote:
My car buddies just told me that everything I went through could have been solved if I just got a Holley carb. Not sure how true that is, but the Edelbrock 1409 does seem pretty finicky.
__________________
Current Build Thread 1930 Ford Model A Modern Twist: Ford Model A Rat Rod With a Modern Twist Build Thread Phase 1 "The Swap": 1949 3100 with S10 swap. Beginner build with ambition! Build Thread Phase 2 "The Drop": Beginner Build with Ambition gets Air Ride |
|
|
|
|
|
| Bookmarks |
| Thread Tools | |
| Display Modes | |
|
|


 Linear Mode

