
|
Register or Log In To remove these advertisements. |
|
|
|
|||||||
 |
|
|
Thread Tools | Display Modes |
 12-05-2012, 06:33 PM
|
#151 |
|
Registered User
Join Date: Sep 2008
Location: Bailey, NC
Posts: 2,462
|
Re: butt fit butt welded marker lamp install....
Nice work. What kind of disk are you using around 1.25 in the video? Small and yellow. Is it a small worn disk or something else?
__________________
Jeramy '84 GMC project truck '85 Chevy 4X4 SOLD '07 Chevy Trailblazer SS 5th Annual SHPHC Car/Truck Show Pics http://67-72chevytrucks.com/vboard/s...d.php?t=543605 UPDATED PICS! CHECK 'EM OUT |

|

|
|
12-06-2012, 11:23 AM
|
#152 |
|
Registered User
Join Date: Nov 2001
Location: Concord, NC
Posts: 2,489
|
Re: butt fit butt welded marker lamp install....
Jeramy, I use a few different brands of abrasives. The yellow ones are Klingspor.
Posted via Mobile Device |
|
|
|
|
12-06-2012, 12:24 PM
|
#153 |
|
Registered User
Join Date: Sep 2008
Location: Bailey, NC
Posts: 2,462
|
Re: butt fit butt welded marker lamp install....
Thanks ebfabman. I am going to begin my project soon. Its been awhile since I done any body work. Just wondering if there was something new for small areas. Thanks again.
__________________
Jeramy '84 GMC project truck '85 Chevy 4X4 SOLD '07 Chevy Trailblazer SS 5th Annual SHPHC Car/Truck Show Pics http://67-72chevytrucks.com/vboard/s...d.php?t=543605 UPDATED PICS! CHECK 'EM OUT |
|
|
|
|
04-25-2014, 01:46 PM
|
#154 | |
|
Registered User
Join Date: Dec 2000
Location: Boise, Idaho
Posts: 6,001
|
Re: butt fit butt welded marker lamp install....
Quote:
If you haven't heard of this, it will blow your mind big time. I started working on my truck after 20 years of it sitting in my back yard. I haven't done any serious custom work in about that long, having closing my shop and going to work in the real world involving collision repair. Anyway, so I am in the office (where I now work) and the new estimator asks me if I am going to gas, tig or mig my custom work I am doing on the truck, (top chop, section, etc.) and followed before I even answered with "If you say MIG I won't even talk to you anymore", LOL I said I was thinking about gas as I haven't done it in years and it would bring back great memories of working on my truck years ago when I chopped it in 1974 (the first cab I had on the truck). But welding that seam across the middle of the roof would have to be MIGed and he proceeded to teach me a method that I never thought possible, CRAZY in fact. This guy, an estimator had worked at a full on restoration/hotrod shop a few years before and was a metal master! He told me of the method in which you make perfect gaps, we are talking flawless gaps, where if it's not flawless you planish it on dolly to make it perfect. It is so perfect, that you then TIG or gas weld it without any filler rod! Ok, are you ready for this? I don't know if you are, sit back and soak this in. You weld without stopping, the entire seam! You don't touch it with a hammer and dolly, you don't do anything to it, you weld from one end to the other without stopping! Now, you have tacked it previously every inch or so with quick tack keeping the panels level with each other. This is again done without any filler rod. Once you have done this you plannish it flat and then simply weld the entire seam at once, it doesn't matter where this seam is, across the middle of the roof, you weld it one end to the other then let it cool before you touch it with the hammer and dolly. You can't believe how well this works! Yes, it goes against everything we have ever heard, you had to "control" the heat was the way it was always taught, weld small welds then hammer the area bringing it back to shape before welding more. That is how I was taught. To weld across the whole thing was just crazy, NUTS. It took me a while to grab ahold of what this man was telling me. I started doing it and it is AMAZING. You see, now think about this, if you weld the seam with a constant speed, without any gaps in your seam, the heat stays constant, it doesn't come and go up and down like if you were skipping around welding to keep the heat down like I was taught all these years. I did all this welding with a jewelers torch, a very tiny torch that simply hooks up to the gas hoses to my ox acy tanks. You can see in this photo how consistent the HAZ is.  This is right after welding and letting it cool on it's own, NEVER EVER cool a weld.  I in no means mean to highjack your thread so sorry about the long post but I thought if anyone would find this interesting it would be you. And yes, the welds suck, this is literally one of the first gas welds I have laid in 20 years. I am not big on practicing on scrap simply because I am so short on time I don't want to waste a minute on anything that isn't productive.  But of course practicing on strap is highly recommended. But of course practicing on strap is highly recommended.Brian
__________________
1948 Chevy pickup Chopped, Sectioned, 1953 Corvette 235 powered. Once was even 401 Buick mid engined with the carburetor right between the seats! Bought with paper route money in 1973 when I was 15. "Fan of most anything that moves human beings" |
|
|
|
|
|
04-25-2014, 02:39 PM
|
#155 |
|
Registered User
Join Date: Dec 2000
Location: Boise, Idaho
Posts: 6,001
|
Re: butt fit butt welded marker lamp install....
Boy this is confusing and so odd, it took me days of my "mentor" (he's half my age) explaining the procedure to me before it hit me.
Let me expand on one thing. The welding all at once down the seam creating a uniform HAZ allows the metal to expand and contract the same the whole way down the seam. After it cools all on it's own it has contracted the same, you then planish it a little back to where to belongs. Hope that clears up a little bit. Brian
__________________
1948 Chevy pickup Chopped, Sectioned, 1953 Corvette 235 powered. Once was even 401 Buick mid engined with the carburetor right between the seats! Bought with paper route money in 1973 when I was 15. "Fan of most anything that moves human beings" |
|
|
|
|
04-25-2014, 05:44 PM
|
#156 |
|
Registered User
Join Date: Feb 2007
Location: Marana, Arizona
Posts: 3,416
|
Re: butt fit butt welded marker lamp install....
Brian, thanks for bring up this thread. I have read it many times.
Always a treat. What you did to that roof is what I'd like to learn. (someday) David Gardiner's videos describe what you have done. For now I will practice my MIG. As filling my tanks is not in the cards right now. Interesting how ebfabman, doesn't seem to planish between spots. (or grind) I love seeing how different craftsman get the same results by using different styles. Gives me hope. 
__________________
"I feel the need for speed!"... as soon as I am done with my nap. |
|
|
|
|
04-25-2014, 05:52 PM
|
#157 |
|
Registered User
Join Date: Dec 2000
Location: Boise, Idaho
Posts: 6,001
|
Re: butt fit butt welded marker lamp install....
I didn't see how old it was, sorry for the faux paus of resurrecting an old thread but if there is any that SHOULD be resurrected it's this one! What a amazing work!
This is always a good subject to bring up, one that we all need to study. It's like what my mentor as done for me, I THOUGHT I had it all together but he has shown me I still have a lot to learn. Brian
__________________
1948 Chevy pickup Chopped, Sectioned, 1953 Corvette 235 powered. Once was even 401 Buick mid engined with the carburetor right between the seats! Bought with paper route money in 1973 when I was 15. "Fan of most anything that moves human beings" |
|
|
|
|
04-25-2014, 05:58 PM
|
#158 | |
|
Registered User
Join Date: Dec 2000
Location: Boise, Idaho
Posts: 6,001
|
Re: butt fit butt welded marker lamp install....
Quote:
Brian
__________________
1948 Chevy pickup Chopped, Sectioned, 1953 Corvette 235 powered. Once was even 401 Buick mid engined with the carburetor right between the seats! Bought with paper route money in 1973 when I was 15. "Fan of most anything that moves human beings" |
|
|
|
|
|
04-25-2014, 06:15 PM
|
#159 | |
|
Registered User
Join Date: Feb 2007
Location: Marana, Arizona
Posts: 3,416
|
Re: butt fit butt welded marker lamp install....
Quote:
I started reading MP&C's tutorials http://67-72chevytrucks.com/vboard/member.php?u=122218 He grinds each tack and planishes them. He was who I was thinking of as he is different in his approach yet has excellent results like ebfabman. I am back to trying a variety to see whats best. (for me) I too hate practicing, seems like nothing is getting done.
__________________
"I feel the need for speed!"... as soon as I am done with my nap. |
|
|
|
|
|
04-25-2014, 11:12 PM
|
#160 |
|
Registered User
Join Date: Jan 2013
Location: Leonardtown, MD
Posts: 1,633
|
Re: butt fit butt welded marker lamp install....
What Brian is showing in fusion welding, it can be done either by Tig or O/A, and it's as good as it gets.. You have to get perfect joints with no gaps, but the minimal/non-existent clean up afterward makes it all worth it.
Much of the distortion you see in welding will be caused by inconsistency in the HAZ, and starting and stopping. Just weld some 1/2" long passes, skip around until it's filled in, and you'll see a slight pucker right where each weld starts and stops. With fusion welding, by welding non stop from one end to the other, you lose all that distortion. One of the downsides to welding with a MIG is that in order to weld sheet metal and get good weld penetration each and every time, we are virtually forced to do so by welding "dots" at a higher amperage setting than you normally would with a full weld pass. Try this welding a full pass and the weld will start to burn away the parent metal as the panel gets hot. Try using the factory suggestions on your welder with dot welding and you'll have weld dots sitting high up on the surface with no penetration, looking like a mud dauber has been there.  The downside to this "dot" welding method is that the weld dot and HAZ surrounding it will shrink, each and every time. By comparison, a TIG or O/A fusion weld with absolutely tight joints and no filler, can be done as one continuous pass from one end of the joint to the other. The benefit here is that the weld and HAZ heat up and cool down progressively as you weld, so the shrinking effects are less than you see with a MIG dot shrinking circumferentially around each dot. The downside to this "dot" welding method is that the weld dot and HAZ surrounding it will shrink, each and every time. By comparison, a TIG or O/A fusion weld with absolutely tight joints and no filler, can be done as one continuous pass from one end of the joint to the other. The benefit here is that the weld and HAZ heat up and cool down progressively as you weld, so the shrinking effects are less than you see with a MIG dot shrinking circumferentially around each dot. For all the guys doing these type of repairs at home in your garage, most have a Mig welder, and it's ease of "point and shoot". Make no mistake, you can still get similar/acceptable results using the MIG, but it will require planishing each dot to stretch the affected area back out, then grinding down each dot so it will be out of the way for the next welded dot to be planished. Just by virtue of the planishing and grinding process, the other methods are very much a cleaner, faster, and preferred method if you can master the fusion process and not need filler rod. I am still working on that ability myself, hence still using my MIG crutch  . I should clarify that using Tig or O/A processes with filler rod can also give a softer, easier to work weld, but someone who can't walk and chew gum at the same time may have issue with sitting there too long while feeding filler, so if that's the case, the HAZ can be wider and more inconsistent than that of a properly done MIG weld. All operator dependent. Where Mig welds are typically harder than that of Tig or O/A, by using EZ grind or ER70S-7 wire, you can get some softer welds, and the -7 gives you flatter welds, so in addition to softer it gives you less weld that needs grinding. By striving for consistency in weld size, overlap spacing, etc., you can improve some of the shortcomings of the Mig welding. Will it still be more work, yep, you bet. But until we all get proficient in fusion welding..... Now if we can sweet talk Brian into doing a fusion welding video... . I should clarify that using Tig or O/A processes with filler rod can also give a softer, easier to work weld, but someone who can't walk and chew gum at the same time may have issue with sitting there too long while feeding filler, so if that's the case, the HAZ can be wider and more inconsistent than that of a properly done MIG weld. All operator dependent. Where Mig welds are typically harder than that of Tig or O/A, by using EZ grind or ER70S-7 wire, you can get some softer welds, and the -7 gives you flatter welds, so in addition to softer it gives you less weld that needs grinding. By striving for consistency in weld size, overlap spacing, etc., you can improve some of the shortcomings of the Mig welding. Will it still be more work, yep, you bet. But until we all get proficient in fusion welding..... Now if we can sweet talk Brian into doing a fusion welding video... 
__________________
Robert |
|
|
|
|
04-26-2014, 09:45 AM
|
#161 |
|
Registered User
Join Date: Jul 2008
Location: Buckeye, Arizona
Posts: 694
|
Re: butt fit butt welded marker lamp install....
it would be great if one of you made a short video demonstrating the fusion method with TIG.
__________________
"Fear makes the wolf look bigger" http://67-72chevytrucks.com/vboard/s...d.php?t=305629 |
|
|
|
|
04-27-2014, 07:24 AM
|
#162 | |
|
Registered User
Join Date: Dec 2000
Location: Boise, Idaho
Posts: 6,001
|
Re: butt fit butt welded marker lamp install....
Quote:
On the MIG, the one way I have learned to get a pretty neat weld distortion free (or close to it) is to do a very fast, hot spot. A VERY fast and hot weld which is literally a tiny spot, a quarter inch big at most. I was regularly butt welding 22 gauge Toyota quarter panels using this method with great success. A quick,hot weld then moving to a part of the seam that is far enough away where the heat isn't going to join with the last one. We are talking depending on the seam 8-12 inches from one another. Once welding a few tacks leaving it ALONE until it cools on it's own. Don't EVER cool it, it will shrink beyond how far it's expanded as mentioned earlier. Cooling the welds with air or water is an old husbands myth and should NEVER be done UNLESS you do want to shrink for some reason. But to MIG a seam skipping around and allowing it to cool COMPLETELY before the next tack or tacks works remarkably well to control the distortion. Welding up a hole on a door where you are filling the door handle for instance could literally take me all day long. Why not, there ARE other things you could be doing right? Put a few tacks and then go work on something else on the car, come back and do a few more tacks, go work on something else on the car. It sure as heck isn't like you have nothing else to do, right? Brian
__________________
1948 Chevy pickup Chopped, Sectioned, 1953 Corvette 235 powered. Once was even 401 Buick mid engined with the carburetor right between the seats! Bought with paper route money in 1973 when I was 15. "Fan of most anything that moves human beings" |
|
|
|
|
|
04-28-2014, 12:19 PM
|
#163 | |
|
Registered User
Join Date: Apr 2003
Location: Indep, MO
Posts: 5,893
|
Re: butt fit butt welded marker lamp install....
Quote:
Whatever happened to EBFabman?
__________________
Boppa's Old Yeller Truck Build, Old Yeller's New Heart! Project Buzz Bomb Flyin' Low! |
|
|
|
|
|
05-04-2014, 12:52 AM
|
#164 |
|
Registered User
Join Date: Jan 2013
Location: Leonardtown, MD
Posts: 1,633
|
Re: butt fit butt welded marker lamp install....
No video, but I did practice some fusion welding today at a metalshaping workshop. Here's the front showing some slight undercutting..
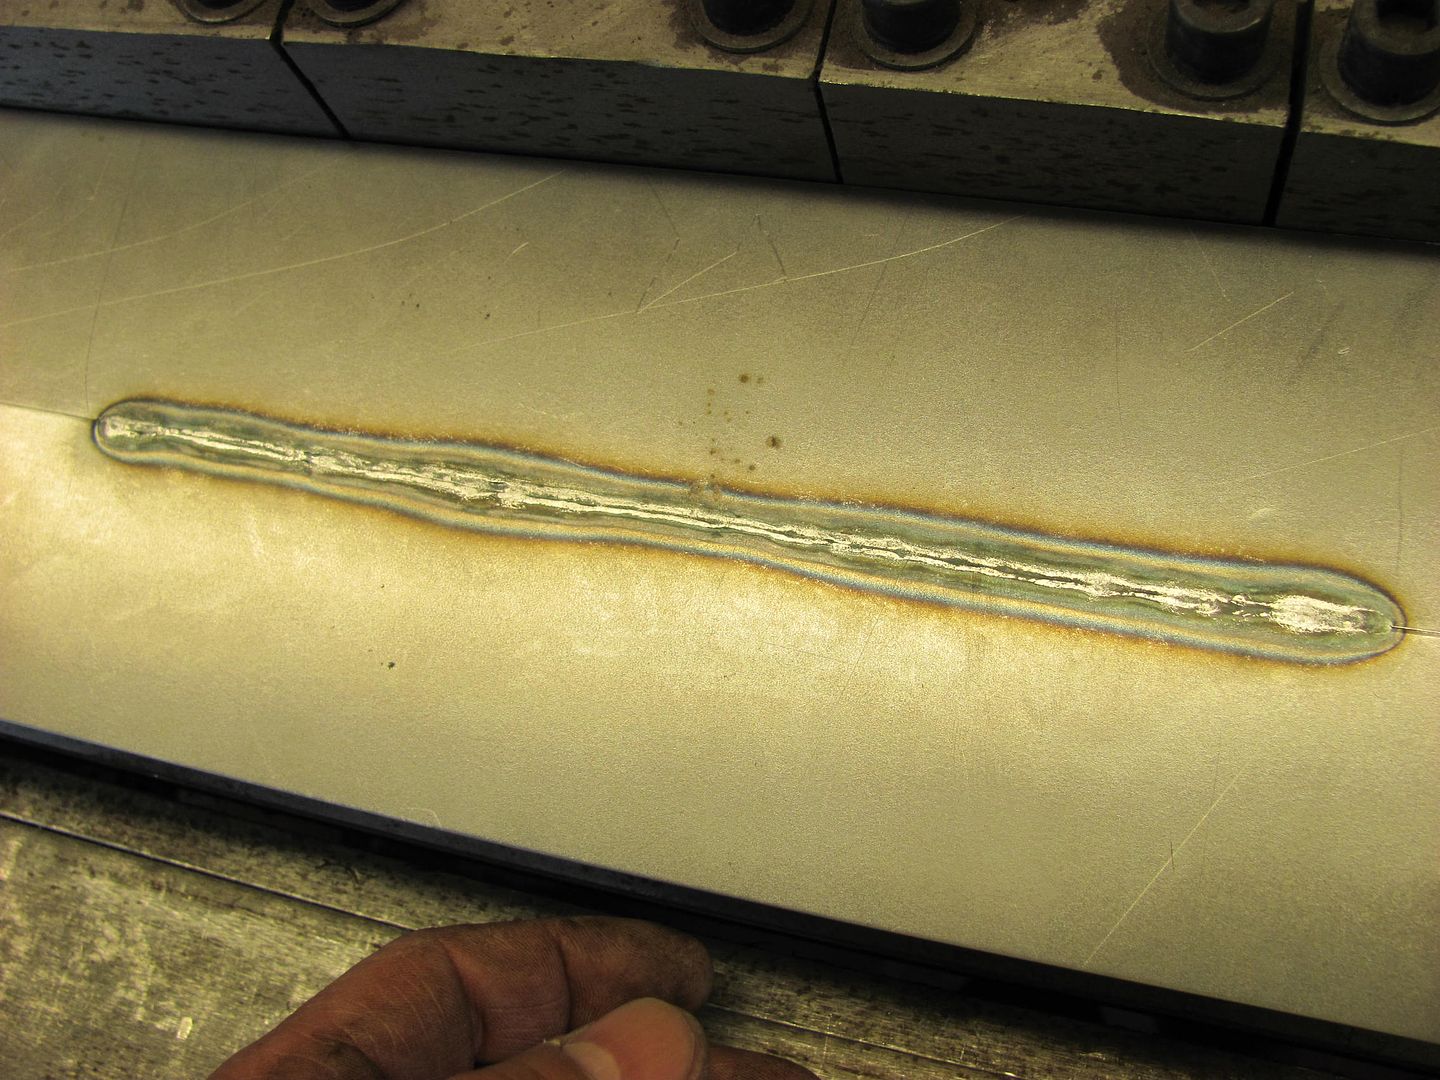 The rear side shows some good weld penetration in some areas and needs more practice in others.. Nice consistency on the HAZ width.. 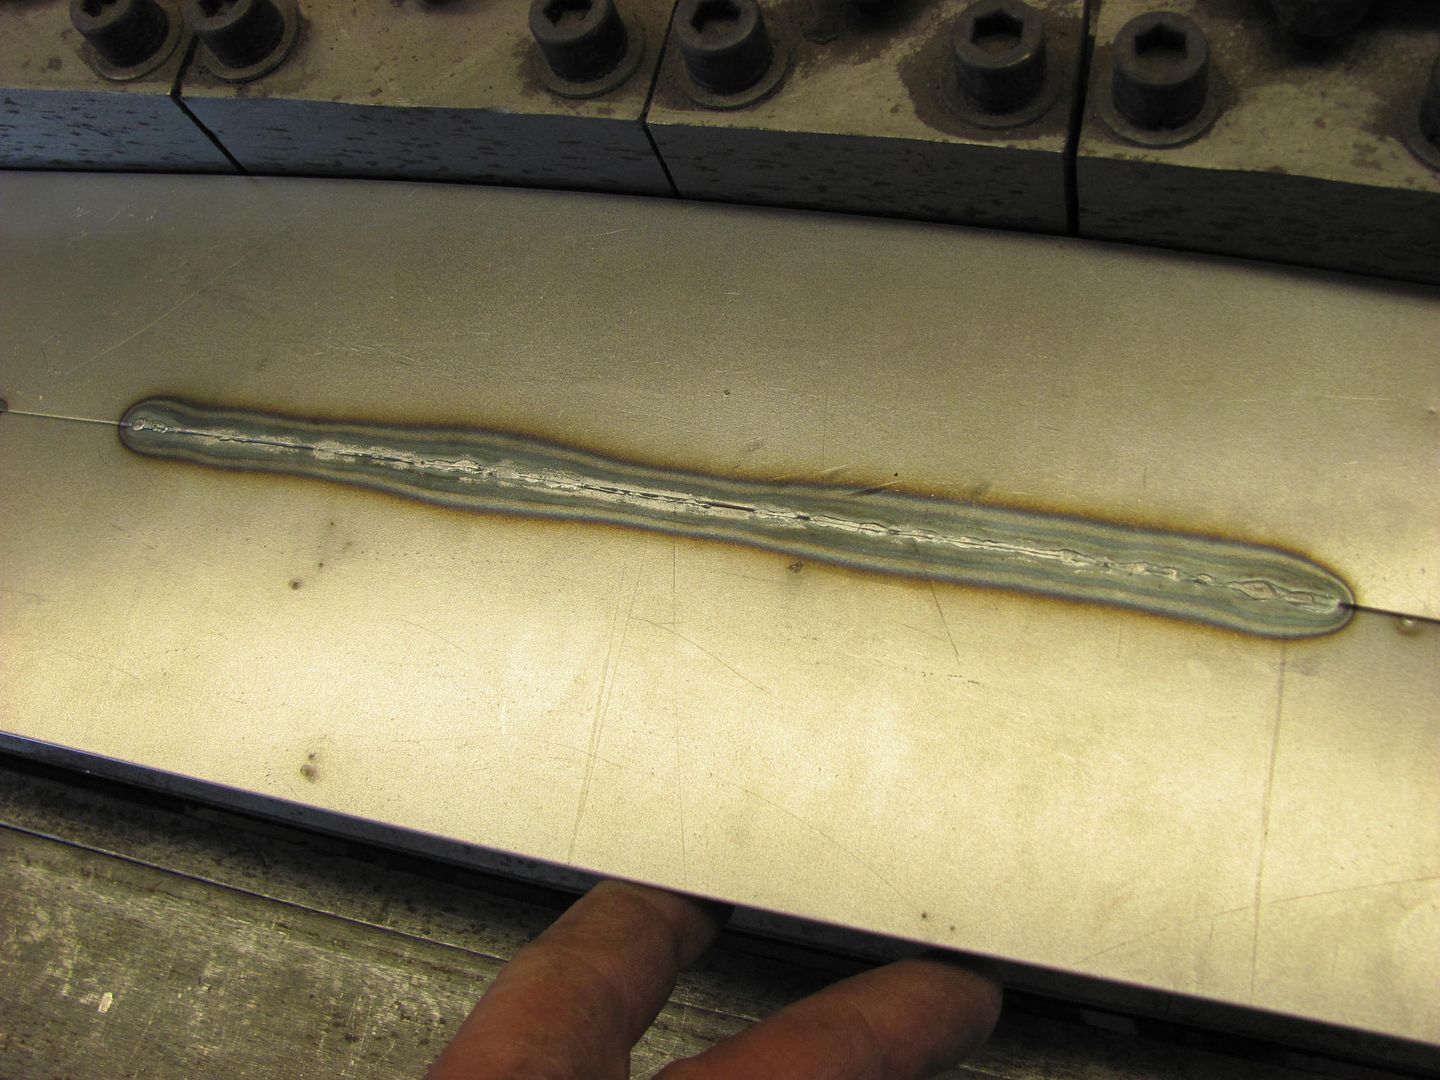 Just to show that slight undercutting on fusion welding is not an issue in the joint's strength, the seam was clamped in the apron brake and bent to 135 degrees, with no detriment to the weld.. 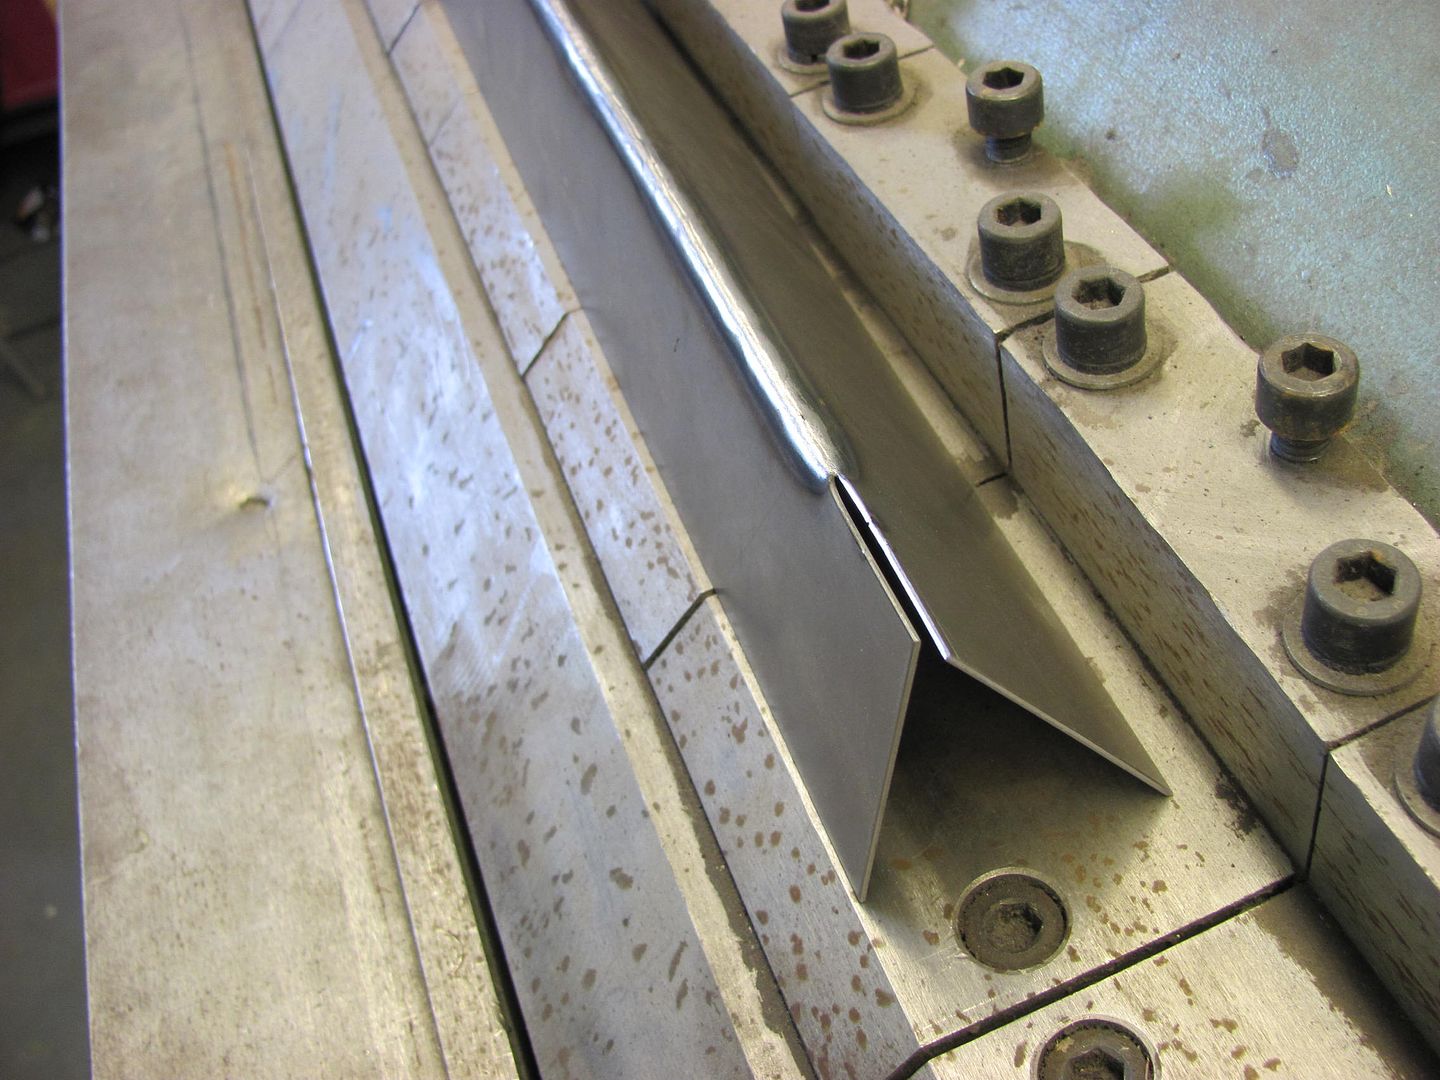 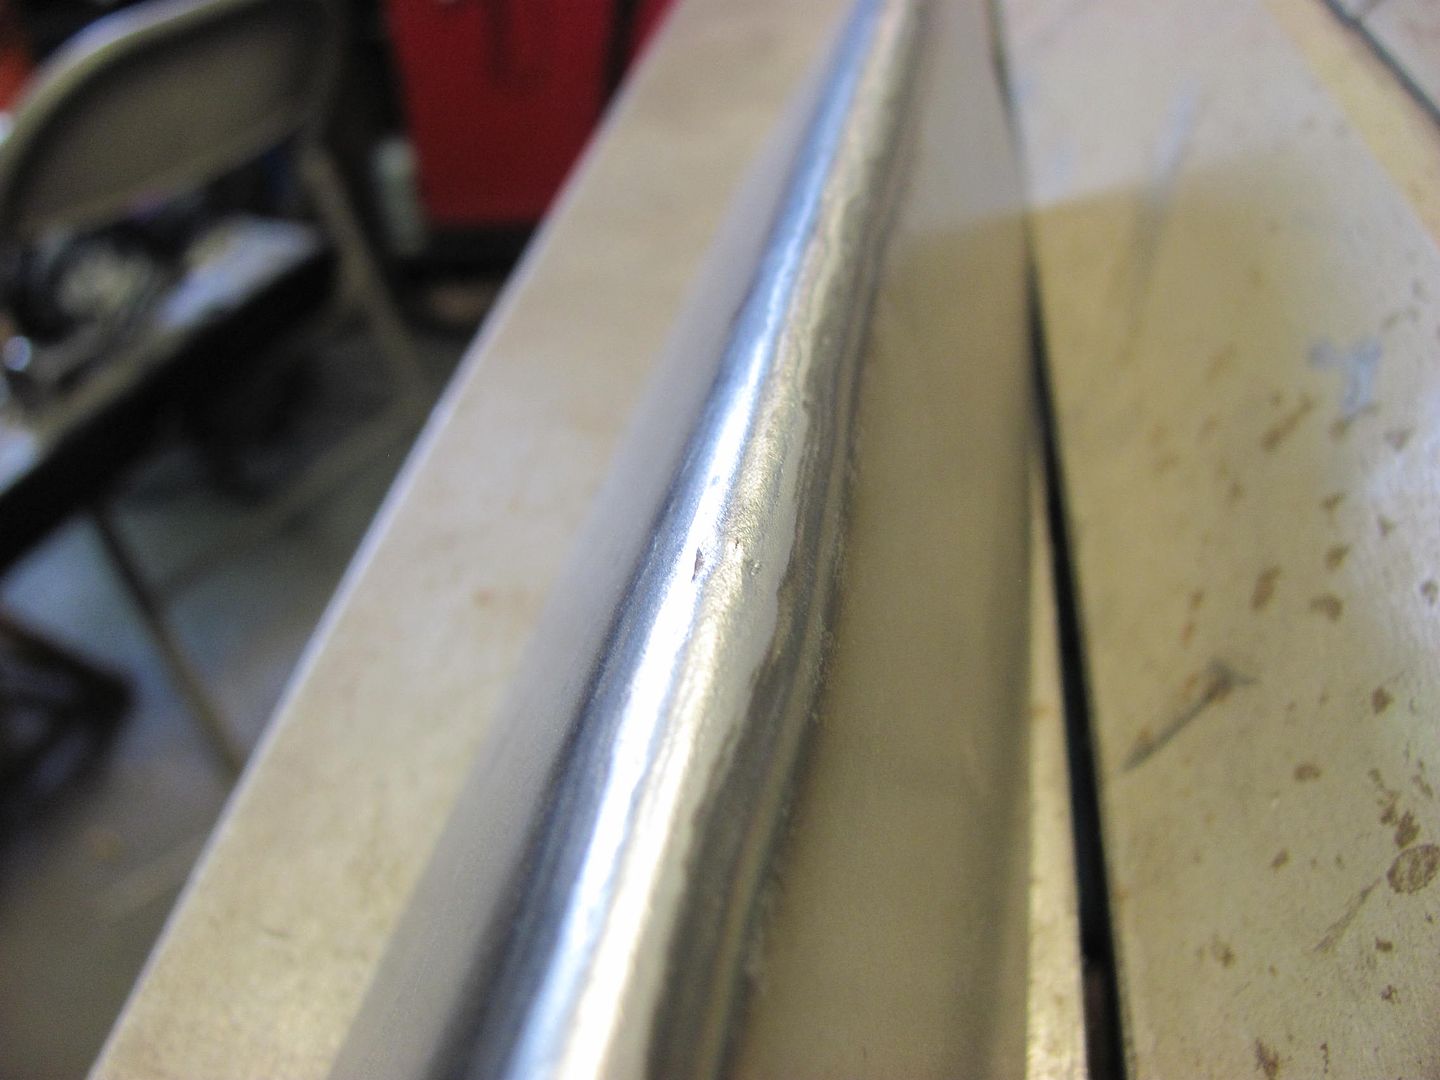
__________________
Robert |
|
|
|
|
05-04-2014, 01:39 AM
|
#165 |
|
Hollister Road Co.
Join Date: Apr 2005
Location: Houston
Posts: 6,134
|
Re: butt fit butt welded marker lamp install....
One thing you may want to try if your using a Mig is to run a short bead and grind it off immediately, no cool off , just drop the gun and grind it. Then move to another area and do the same. Mig leaves a bead of metal much thicker than the pieces being joined, It also leaves a harder material than the base metal so if you have a bead and in some cases a high bead it contracts much more than the base metal stressing the panel. Grinding the bead flat reduces the amount of metal that can contract and pull the base metal out of shape and grinding immediately allow the joint to go back up in temp and anneal it as you grind. If its still hot and you grind the bead and the joint turns blue or brown its annealed making it softer and removes the stresses.
Fusion weld leaves less metal at the joint and a softer joint so minimal contraction occurs and as long as the joints are perfect and you move at a constant pace you end up with a very nice seam and minimal warping but fitment is key |
|
|
|
|
05-04-2014, 01:53 AM
|
#166 |
|
Registered User
Join Date: Apr 2014
Location: calgary alberta
Posts: 1,248
|
Re: butt fit butt welded marker lamp install....
wow just came across this dude your welding is crazy good it is more like art you would almost not want to paint over it .. my hats off to you
|
|
|
|
|
05-04-2014, 11:10 AM
|
#167 |
|
Registered User
Join Date: Dec 2000
Location: Boise, Idaho
Posts: 6,001
|
Re: butt fit butt welded marker lamp install....
Yes, awesome stuff!
Brian
__________________
1948 Chevy pickup Chopped, Sectioned, 1953 Corvette 235 powered. Once was even 401 Buick mid engined with the carburetor right between the seats! Bought with paper route money in 1973 when I was 15. "Fan of most anything that moves human beings" |
|
|
|
|
| Bookmarks |
| Tags |
| butt weld butt welding, metal finishing |
|
|


 Linear Mode

