
|
Register or Log In To remove these advertisements. |
|
|
|
|||||||
 |
|
|
Thread Tools | Display Modes |
|
|
 01-04-2009, 08:46 PM
|
#1 |
|
Registered User
Join Date: Jun 2008
Location: Louisiana
Posts: 493
|
Re: Lurker OrrieG Progress Pics
I am in the process of building the seat frames for my buckets in my 50, one thing I learned is the seats are lower in the back than the front. I had mine all level and it looked wrong. the back is 1 to 1.5 inches lower than the front.
__________________
1971 Corvette convertible 454@ 525 hp  1936 Chevy Truck street rod 1952 Chevy truck hot rod build http://www.killbillet.com/showthread...2-Chevy-Cut-up 1964 F 100 custom street rod http://www.ford-trucks.com/forums/12...mark-viii.html 1950 custom Chevy Truck |

|

|
|
01-04-2009, 09:01 PM
|
#2 | |
|
Registered User
Join Date: Jun 2006
Location: Idaho
Posts: 8,800
|
Re: Lurker OrrieG Progress Pics
Quote:
__________________
1959 Chevy Short Fleetside w/ 74 4WD drive train (current project) OrrieG Build Thread 1964 Chevelle Malibu w/ 355-350TH (daily driver) Helpful AD and TF Manual Site Old Car Manual Project |
|
|
|
|
|
01-05-2009, 12:02 AM
|
#3 | |
|
Registered User
Join Date: Jun 2008
Location: Louisiana
Posts: 493
|
Re: Lurker OrrieG Progress Pics
Quote:
__________________
1971 Corvette convertible 454@ 525 hp 1936 Chevy Truck street rod 1952 Chevy truck hot rod build http://www.killbillet.com/showthread...2-Chevy-Cut-up 1964 F 100 custom street rod http://www.ford-trucks.com/forums/12...mark-viii.html 1950 custom Chevy Truck Last edited by 50adrod; 01-05-2009 at 02:50 PM. |
|
|
|
|
|
01-05-2009, 01:22 PM
|
#4 |
|
Registered User
Join Date: Jun 2006
Location: Idaho
Posts: 8,800
|
Re: Lurker OrrieG Progress Pics
You have a challenge with the floor difference, mine is flat except for a couple of crossbraces. I measured the position of the seat in my wife's CRV for angle of the seat back since I know that is comfortable on long trips. I am going to use 5/8" treaded rod with nuts on the top and bottom of frame at the front for adjustment. The frame lines up with the stock mounting locations with an additional brace in the center front and back.
__________________
1959 Chevy Short Fleetside w/ 74 4WD drive train (current project) OrrieG Build Thread 1964 Chevelle Malibu w/ 355-350TH (daily driver) Helpful AD and TF Manual Site Old Car Manual Project |
|
|
|
|
01-24-2009, 08:39 PM
|
#5 |
|
Registered User
Join Date: Jun 2006
Location: Idaho
Posts: 8,800
|
Re: Lurker OrrieG Progress Pics
Since I got buried on page three figured I'd better post some progress pics. First is the SECOND column in its final mockup place. I talked to EZ wire and they confirmed that GM only had two types of column connectors between 70 and 92 and they supply both in their kit. Figured out the rod for the high beam moves away from the bracket so no conflict, I think I will need to figure out that wiring when I get the kit to circumvent the floor switch. Next is photo of transfer shifter and seat, no interference. Next is shot of steering shaft location. Then a close up showing that while the shifter arm clears the exhaust manifold it would go right through the brake pedel. Good news is Lokar makes a cable kit just for that purpose, easy fix just another $125 to spend. Finally the suspense was killing me so I jammed my free vintage air system up under the dash to check fit. Tight but it was made for the space. You end up with a "glove" box about 2" deep. I don't care for the outlets, the plastic looks a little cheesy. I may end up with a center console for ac outlets, guages and some power outlets, and the required cup/can holders. Enjoy, I am (according to my wife way to much).
__________________
1959 Chevy Short Fleetside w/ 74 4WD drive train (current project) OrrieG Build Thread 1964 Chevelle Malibu w/ 355-350TH (daily driver) Helpful AD and TF Manual Site Old Car Manual Project |
|
|
|
|
01-24-2009, 08:55 PM
|
#6 |
|
Registered User
Join Date: Jun 2008
Location: Louisiana
Posts: 493
|
Re: Lurker OrrieG Progress Pics
looking good, billet specialties and a few others make some nice a/c vents. I agree the plastic ones look cheap. interference with the brake pedal is one reason I went with a floor shifter, that and I had a free one from an 08 mustang GT.
__________________
1971 Corvette convertible 454@ 525 hp 1936 Chevy Truck street rod 1952 Chevy truck hot rod build http://www.killbillet.com/showthread...2-Chevy-Cut-up 1964 F 100 custom street rod http://www.ford-trucks.com/forums/12...mark-viii.html 1950 custom Chevy Truck Last edited by 50adrod; 01-25-2009 at 04:51 PM. |
|
|
|
|
01-24-2009, 09:21 PM
|
#7 |
|
Senior Member
 Join Date: Nov 2008
Location: Fannystelle, Manitoba, Canada
Posts: 849
|
Re: Lurker OrrieG Progress Pics
Great looking project, i like the seat you are using, these will solve my seat belt issues. I will be looking for a set for my project. Keep up the good work.
__________________
Jean-Marc Lacasse 57 GMC 55 GMC 55 Belair 99 S10 http://67-72chevytrucks.com/vboard/s...d.php?t=316140 http://67-72chevytrucks.com/vboard/s...d.php?t=806011 |
|
|
|
|
01-24-2009, 11:50 PM
|
#8 |
|
Registered User
Join Date: Feb 2007
Location: TN
Posts: 164
|
Re: Lurker OrrieG Progress Pics
Just a tip I found working on my 57 - I got a tilt column from a Chevy Astro van and the shift arm is on the driver side of the column so no engine interference. It used these big old adjustable rods that looked hard to adapt so I am gonna use a Lokar type cable shifter I got on the e-nasty auction for $40. [Some day I am gonna actually start my thread with pictures and everthing]
|
|
|
|
|
01-25-2009, 02:39 PM
|
#9 |
|
Registered User
Join Date: Jun 2006
Location: Idaho
Posts: 8,800
|
Re: Lurker OrrieG Progress Pics
It its last life I had a 67 Camaro floor shifter but found when I had one of the kids in the middle seat they would sometimes kick it out of gear and I want to keep the floor as clear as possible. I went with these seats because of the integrated seat belts too, minimize interior cutting and reinforcing on the body for the upper third point attachment. I looked at the Astro columns but already had the eldo column before I found this site, and like others bucks are tight.
Hotrodsbyray - have you put on the shifter cable assy yet? From the pics at the Lokar site it looks pretty straight forward.
__________________
1959 Chevy Short Fleetside w/ 74 4WD drive train (current project) OrrieG Build Thread 1964 Chevelle Malibu w/ 355-350TH (daily driver) Helpful AD and TF Manual Site Old Car Manual Project Last edited by OrrieG; 01-26-2009 at 12:45 PM. |
|
|
|
|
01-26-2009, 12:34 AM
|
#10 |
|
Registered User
Join Date: Jun 2006
Location: Idaho
Posts: 8,800
|
Re: Lurker OrrieG Progress Pics
Here are photos of the steering column drop bracket I fabricated. It uses the stock bracket modified to fit a muffler U bracket. The drop is acheived using 3/8" couplings and threaded rod. The first two photos show the stock bracket from the bottom and side. Next ploto shows the modified bracket, the sides towards the firewall and stock dash mount wings are trimmed off, spot welded to the U piece. I then checked the fit and welded it up, last photo shows the finished piece ready to paint. It will be covered after installation.
__________________
1959 Chevy Short Fleetside w/ 74 4WD drive train (current project) OrrieG Build Thread 1964 Chevelle Malibu w/ 355-350TH (daily driver) Helpful AD and TF Manual Site Old Car Manual Project Last edited by OrrieG; 01-26-2009 at 12:44 PM. |
|
|
|
|
01-26-2009, 02:46 AM
|
#11 |
|
Registered User
Join Date: Jun 2008
Location: Louisiana
Posts: 493
|
Re: Lurker OrrieG Progress Pics
using your head and stuff you probably had lying around. good job
__________________
1971 Corvette convertible 454@ 525 hp 1936 Chevy Truck street rod 1952 Chevy truck hot rod build http://www.killbillet.com/showthread...2-Chevy-Cut-up 1964 F 100 custom street rod http://www.ford-trucks.com/forums/12...mark-viii.html 1950 custom Chevy Truck |
|
|
|
|
01-26-2009, 12:43 PM
|
#12 | |
|
Registered User
Join Date: Jun 2006
Location: Idaho
Posts: 8,800
|
Re: Lurker OrrieG Progress Pics
Quote:
__________________
1959 Chevy Short Fleetside w/ 74 4WD drive train (current project) OrrieG Build Thread 1964 Chevelle Malibu w/ 355-350TH (daily driver) Helpful AD and TF Manual Site Old Car Manual Project |
|
|
|
|
|
02-01-2009, 11:56 PM
|
#13 |
|
Registered User
Join Date: Jun 2006
Location: Idaho
Posts: 8,800
|
Re: Lurker OrrieG Progress Pics
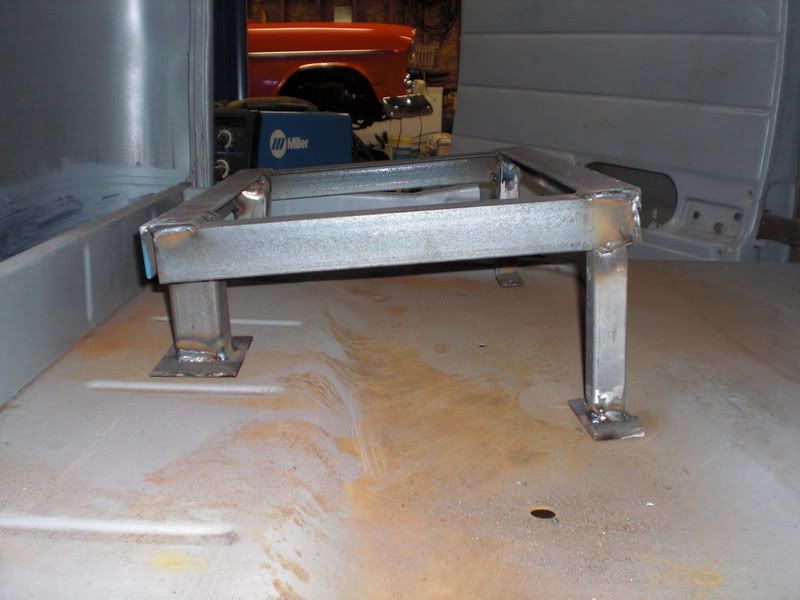
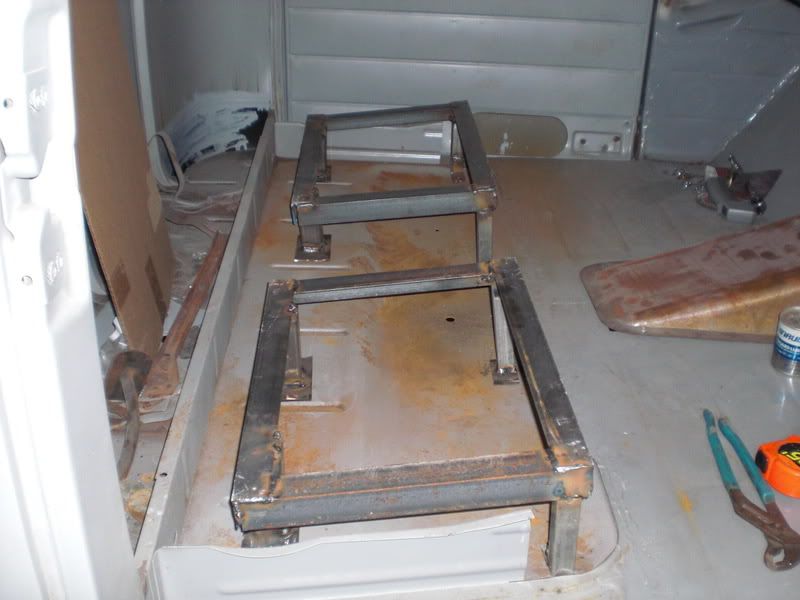
Todays progress was finishing up the bottom steering column bracket and continuing work on the seat frame now that the steering is set. First photo shows the bracket, shaped to fit in the odd shaped recess. Bonus is it covers the clutch and elongated steering holes. I made it in two pieces and welded it to the column, makes for a sturdy clean floor. Next photo is the rear seat frame to floor bracket. Bottom is in the stock location, top will be drilled for a 1/2" bolt to allow adjustment. Last photo is a mock up of the front using 5/8" threaded rod for adjustment.
__________________
1959 Chevy Short Fleetside w/ 74 4WD drive train (current project) OrrieG Build Thread 1964 Chevelle Malibu w/ 355-350TH (daily driver) Helpful AD and TF Manual Site Old Car Manual Project |
|
|
|
|
| Bookmarks |
|
|


 Hybrid Mode
