
|
 07-06-2009, 09:57 AM
|
#1 |
|
Registered User
Join Date: Jan 2009
Location: Springfield, MO
Posts: 258
|
48 Build Pictures
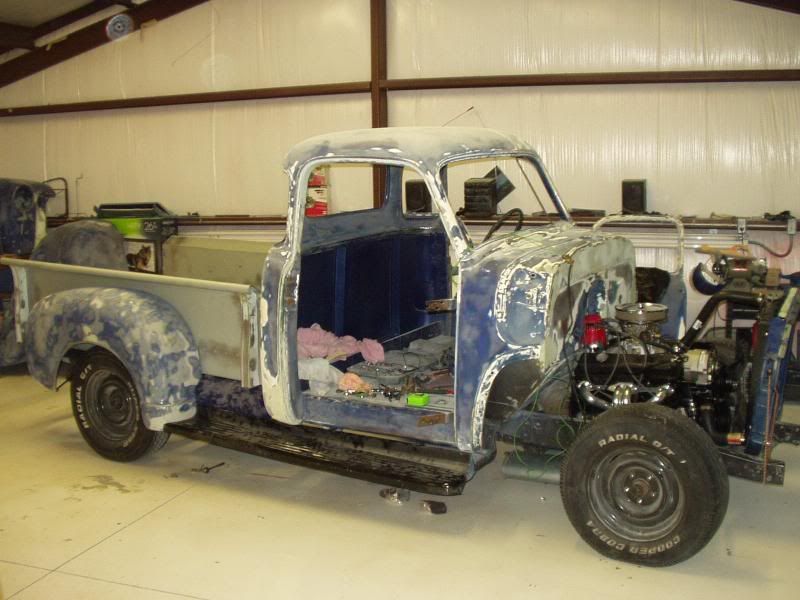
I finally decided to post some pictures of the tear down on the 48. I bought the truck with some work done and a lot of new parts. It was blasted to bare metal then repainted, but I did not care for the guys bodywork or lack of. The owner did not want filler used so the shop etched, sealed, base coated and cleared the truck. Some panels looked pretty good, others were too wavy for me. I am blocking the whole truck letting the previous paint help fill some of the low spots, then I am going to seal and do the body work and paint. It is a very solid truck. It is very dirty right now as I am just sanding and fitting a few things before I clean it up. The engine block in the truck is just for mock up, I am putting a 350 from an 88 Suburban converted to carburation. It has a power rack and I bought some drop spindles for the front I have not got on yet. I will try load some pictures from time to time. And I am sure I will have lots of questions for you experts.
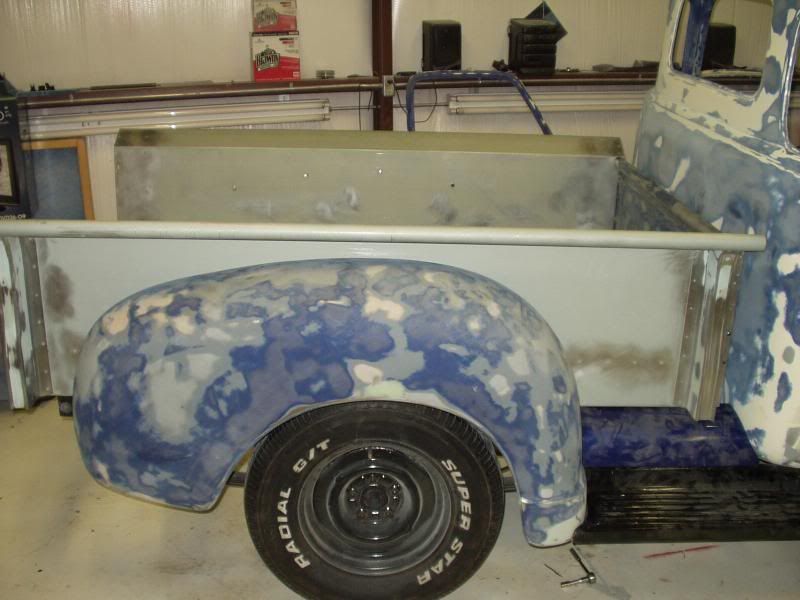
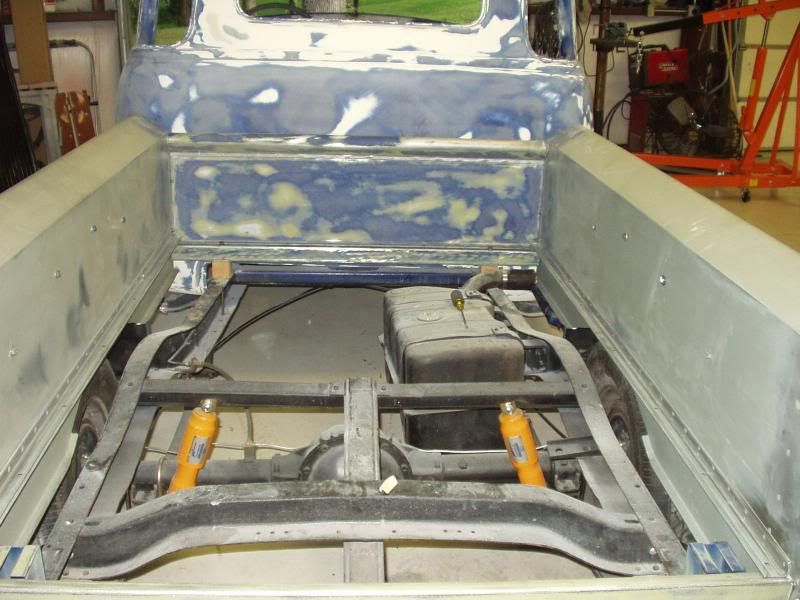
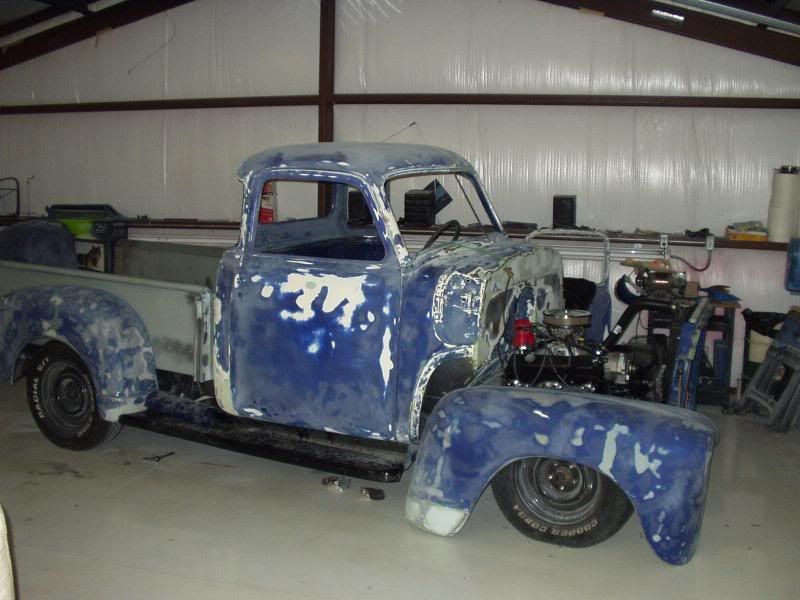
Day she came home 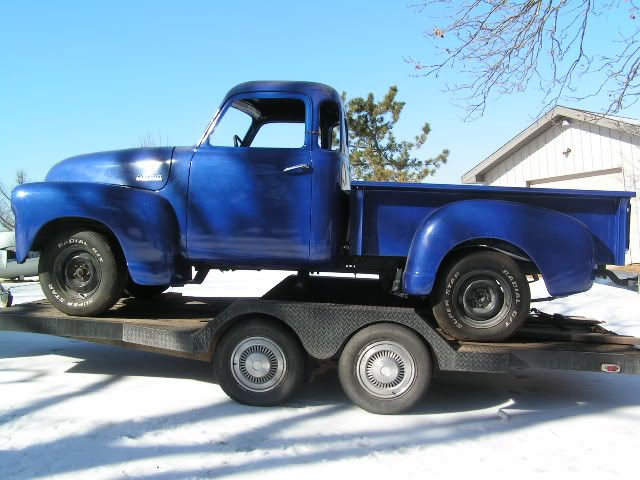 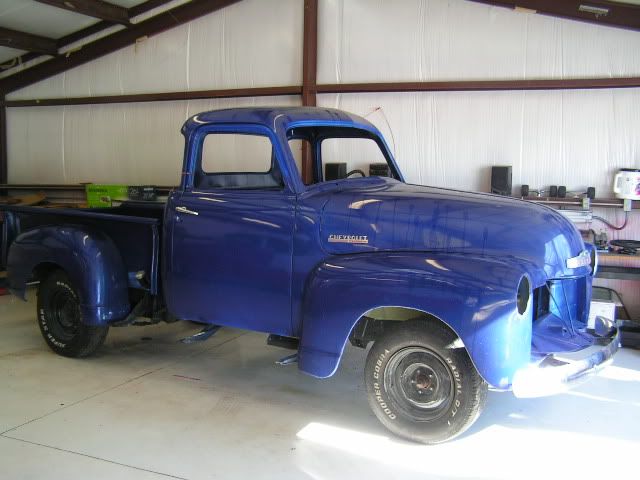 Here is how it sits now, most parts sanded and piled in the corner 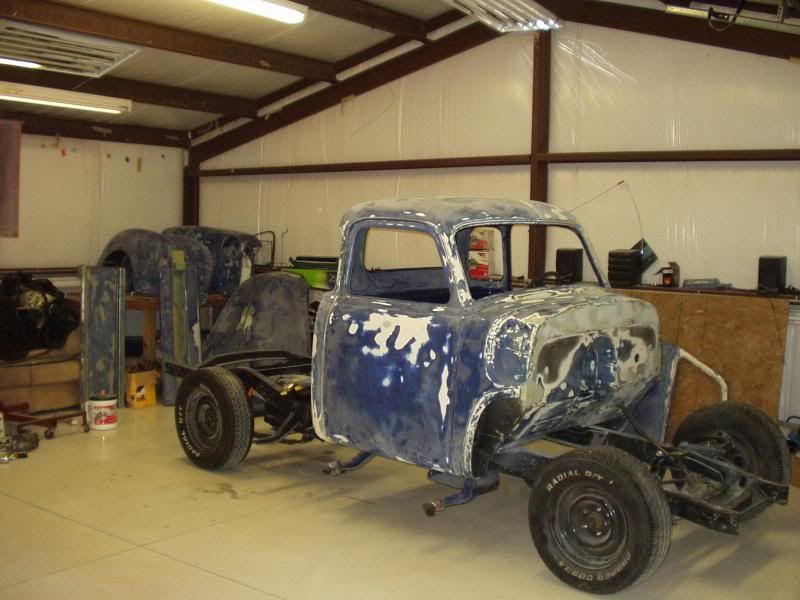 Rear end 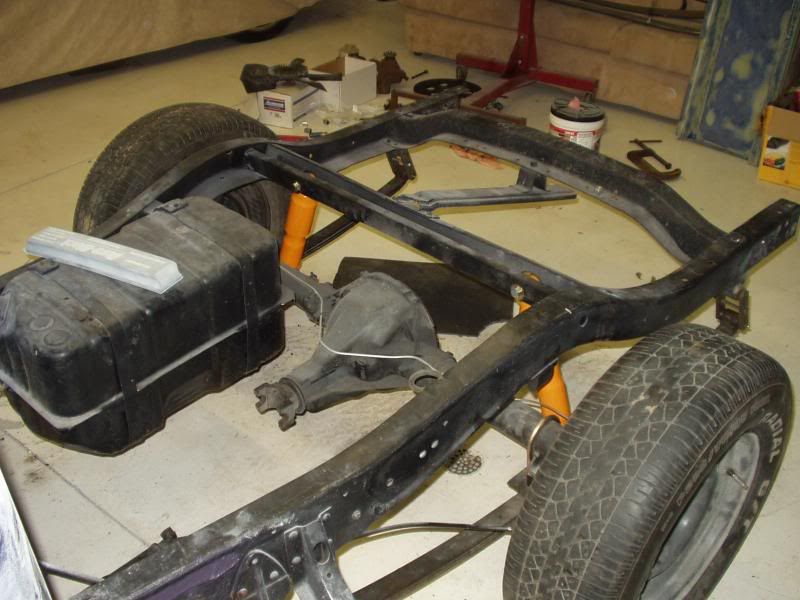 Header and steering worked out 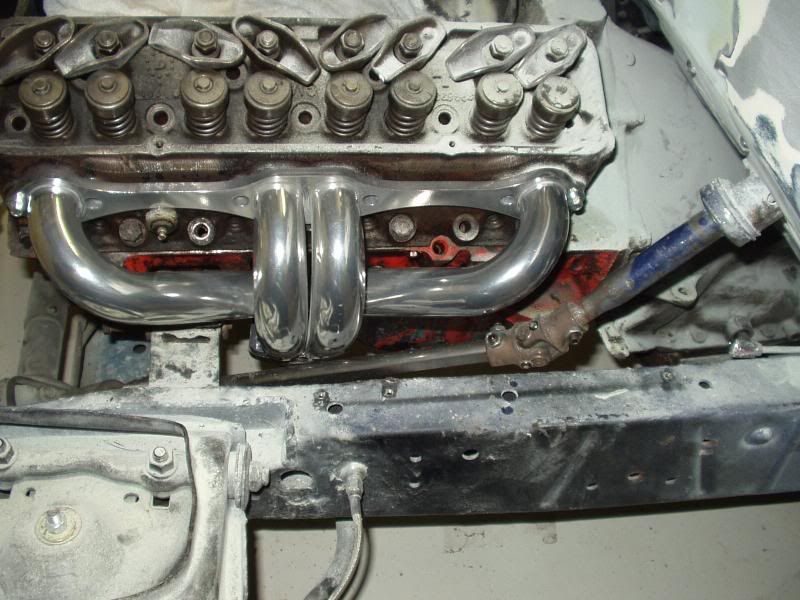
|

|

|
|
07-06-2009, 03:14 PM
|
#2 |
|
Registered User
Join Date: Jun 2007
Location: Saskatoon, Saskatchewan,:
Posts: 2,901
|
Re: 48 Build Pictures
looked decent before, but we all know she will look better after, what color you planning and drivetrain?
__________________
James 1968 GMC "HAVOC" 1986 GMC "Frank" J.J.R.H. Design & Consulting My 68`Rebuild "HAVOC": http://67-72chevytrucks.com/vboard/s...d.php?t=316300 A 58' chev build thread: http://www.67-72chevytrucks.com/vboa...d.php?t=311238 1969 Camaro Pro Touring http://67-72chevytrucks.com/vboard/s...61#post3513361 Swiss Cheese: http://67-72chevytrucks.com/vboard/s...d.php?t=384390 Adjustable Trailing Arm How-To: http://67-72chevytrucks.com/vboard/s...d.php?t=321100 1968 Ford Farm Truck: http://67-72chevytrucks.com/vboard/s...=1#post6555587 |
|
|
|
|
07-06-2009, 04:22 PM
|
#3 |
|
Registered User
Join Date: Jan 2009
Location: Springfield, MO
Posts: 258
|
Re: 48 Build Pictures
350 with 350 tranney most likely. Still deciding on color but thinking maybe a silver. It came with a 350 from an 88 suburban that he had wrecked so I am going to see if that engine is good. If so, I will probably use it. It was a pretty decent truck to begin with and I was going to go more of a rat rod style, but once I got into it, the truck was so solid, I decided to go with more of a street rod.
|
|
|
|
|
07-06-2009, 06:29 PM
|
#4 |
|
Registered User
Join Date: May 2009
Location: Tucson, AZ
Posts: 75
|
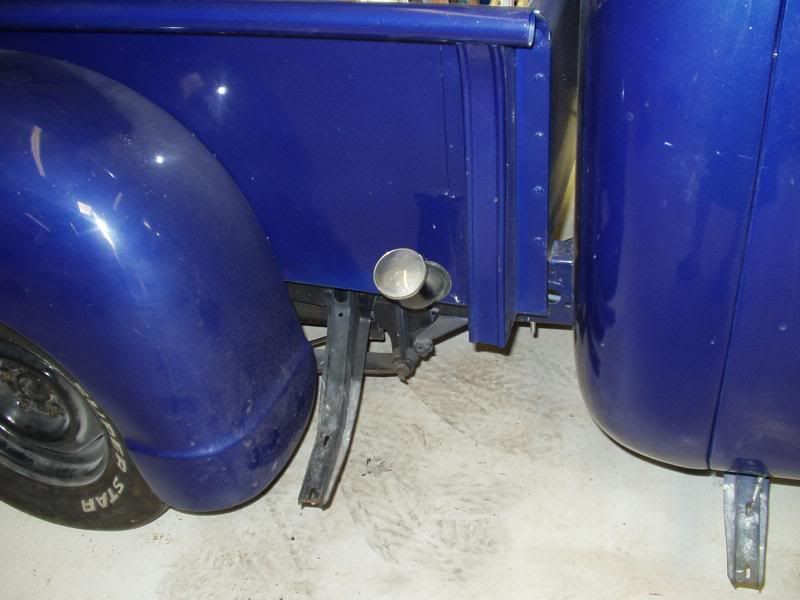
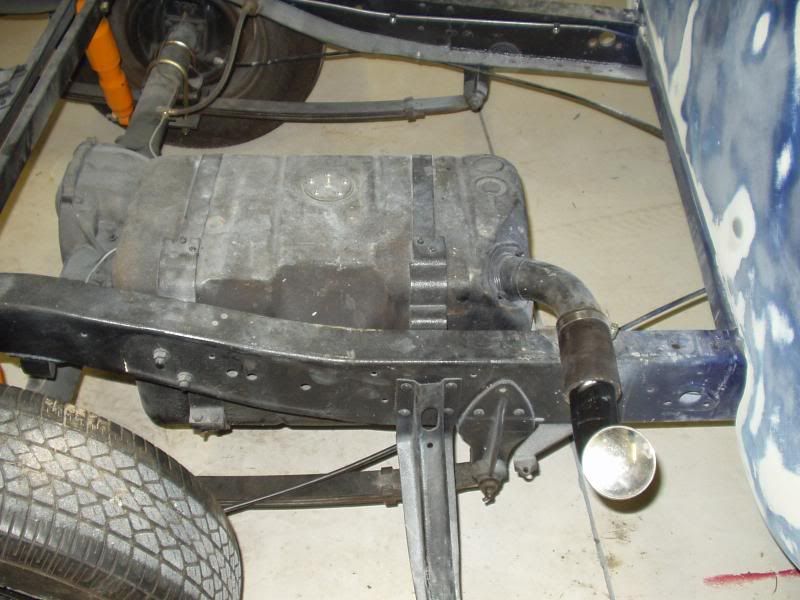
I've got a '49 I'm working on, and yours is the first I've seen with a saddle tank.
I've been looking high and low for someone who had done this! So lemme fire of a few questions at ya... 1. What tank is that from? 2. Where is the fill neck located? Body modifications? 3. Can you post some more pics? I really wanna keep a spare under the bed in the back and get the current tank out of the cab. So any info you could give me would be super appreciated. Great looking truck btw! |
|
|
|
|
07-06-2009, 10:48 PM
|
#5 |
|
Registered User
Join Date: Jan 2009
Location: Springfield, MO
Posts: 258
|
Re: 48 Build Pictures
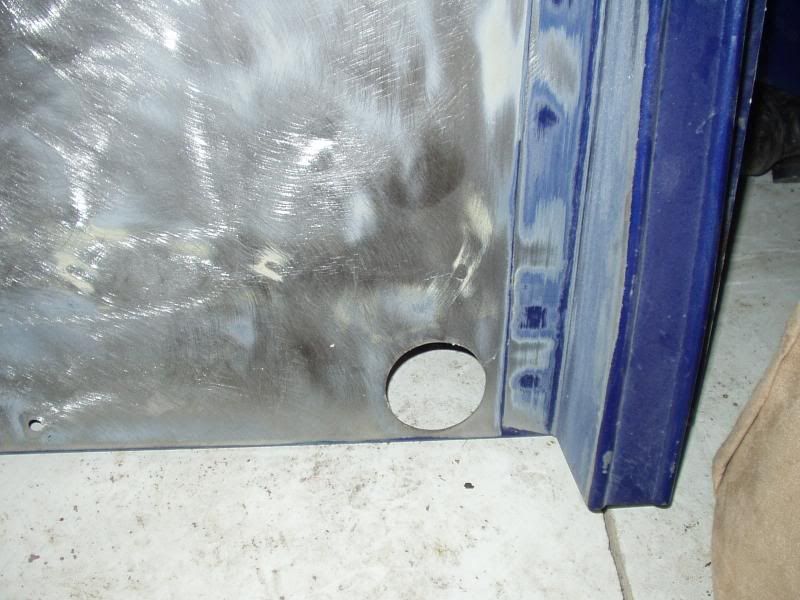
The tank was already there, I believe it is the original. It was coated on the inside. In on of my pictures you can see how it comes out the side of the bed. There is a rubber hose that clamps to the tank spout and the fill spout that goes through the side of the bed under the floor area. You can see it in one of the pictures above, but I can try to take something closer or see if I have one when the bed was on the truck.
|
|
|
|
|
07-06-2009, 10:57 PM
|
#6 |
|
Registered User
Join Date: Jan 2009
Location: Springfield, MO
Posts: 258
|
Re: 48 Build Pictures
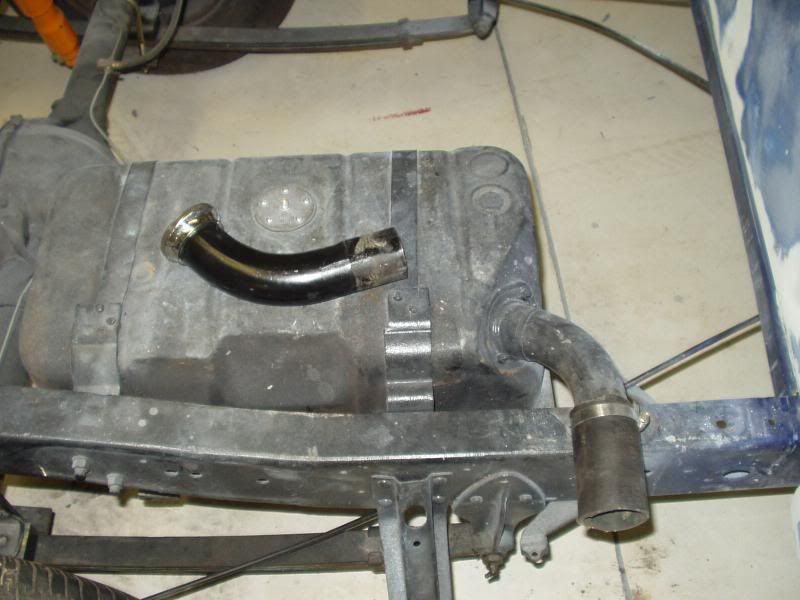
Here is a closer picture of the tank. It has a nice rubber grommet that the fill spout goes through.
|
|
|
|
|
07-07-2009, 10:26 AM
|
#7 |
|
Registered User
Join Date: May 2009
Location: Tucson, AZ
Posts: 75
|
Re: 48 Build Pictures
Thanks for the quick reply.
So is the fill spout visible inside the bed? [edit, just realized you said it went under the bed floor] Is there any way you might take some measurements for me? I'm hoping I can find a tank to fit, S10, maybe. Thanks again! Last edited by sn33kyp3t3; 07-07-2009 at 10:37 AM. Reason: changed questions |
|
|
|
|
07-07-2009, 11:36 AM
|
#8 |
|
Registered User
Join Date: Jan 2009
Location: Springfield, MO
Posts: 258
|
Re: 48 Build Pictures
Sure, what measurements do you need? I can take some better pictures as well.
|
|
|
|
|
07-07-2009, 11:44 AM
|
#9 |
|
Registered User
Join Date: May 2009
Location: Tucson, AZ
Posts: 75
|
I just need the WxHxL and the H of the fill neck from the bottom.
Thanks again, I really appreciate it. I didn't mean to hijack your thread 
|
|
|
|
|
07-07-2009, 10:42 PM
|
#10 |
|
Registered User
Join Date: Jan 2009
Location: Springfield, MO
Posts: 258
|
Re: 48 Build Pictures
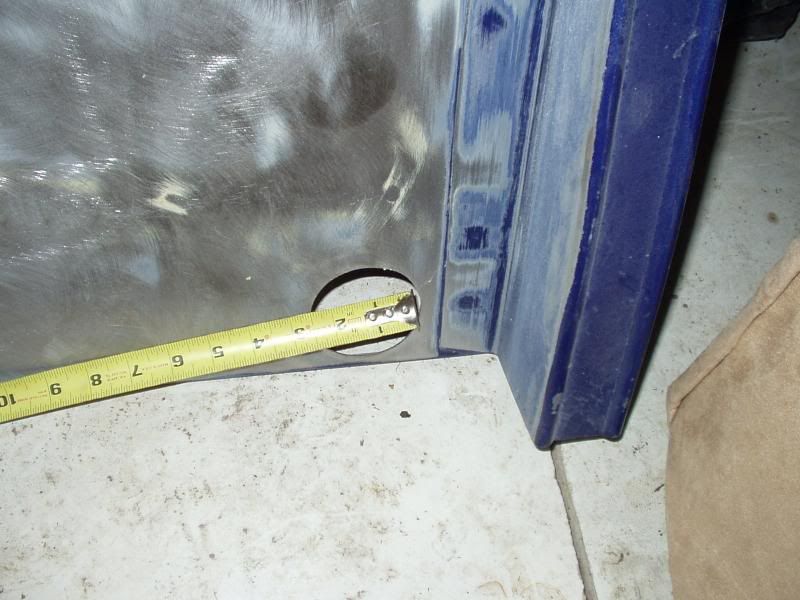
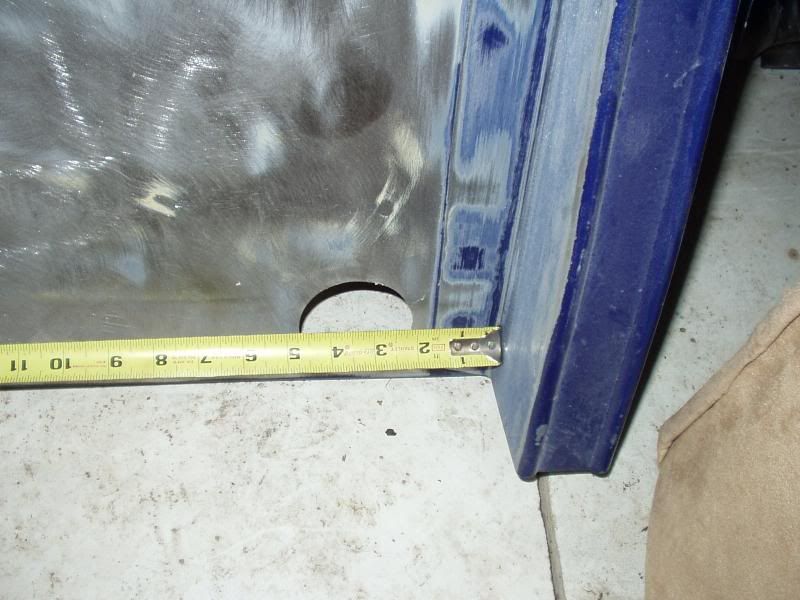
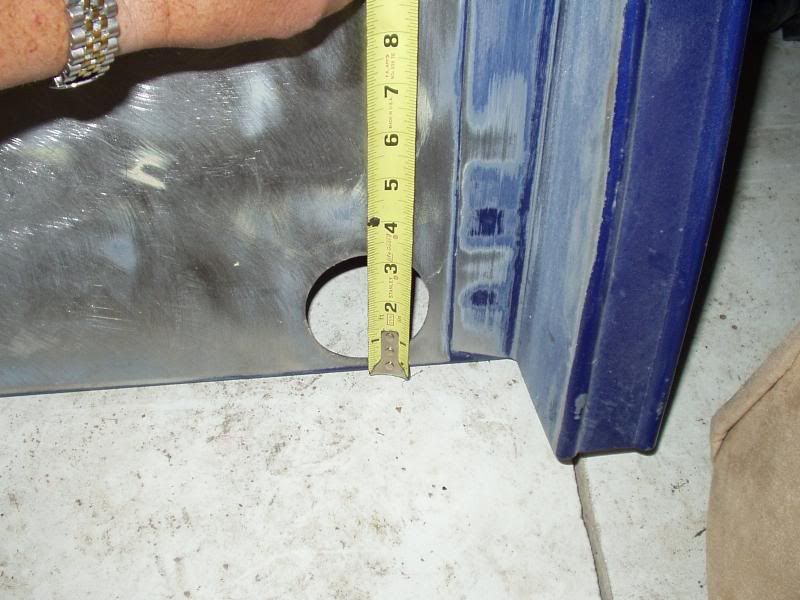
Here are some pictures that might help you. I measured where the center of the hole would be in the bedside. It is about 3 1/4" from the stake post and about 1 3/4" from the bottom of the bedside. That would be about right to drill your hole. The hole itself is 2 1/2". As you can see there is a piece of hose between the filler neck and the tank neck, so you have some flexibility and there is a rubber grommet that cover the edges of the hole. Let me know if you need anything else. That's whats great about these sites, helping each other out.
|
|
|
|
|
07-07-2009, 11:28 PM
|
#11 | |
|
Registered User
Join Date: Jun 2006
Location: Idaho
Posts: 8,800
|
Re: 48 Build Pictures
Quote:
__________________
1959 Chevy Short Fleetside w/ 74 4WD drive train (current project) OrrieG Build Thread 1964 Chevelle Malibu w/ 355-350TH (daily driver) Helpful AD and TF Manual Site Old Car Manual Project |
|
|
|
|
|
07-08-2009, 02:24 PM
|
#12 |
|
Registered User
Join Date: May 2009
Location: Tucson, AZ
Posts: 75
|
Re: 48 Build Pictures
That is awesome, thanks for all your help.
@OrrieG: Thanks for your input too, my truck came with an original Maint. Manual, so I did some reading and this is what I found: "If truck is equipped with a standard GMC cab, the fuel tank is mounted inside cab, behind driver's seat. On other trucks, fuel tank is mounted on outer side of right-hand frame side rail, except on truck Series 100-22, 150-22 and 250-22. on these Series, tank is mounted on inner side of right-hand frame side rail." Looks like I will be looking up LMC truck for a repro tank to put back there! Kick ass! I thought "behind the seat" was the only option back in those days. Thanks again! |
|
|
|
|
07-09-2009, 11:39 AM
|
#13 |
|
Registered User
Join Date: Jul 2007
Location: Toppenish, WA
Posts: 15,265
|
Re: 48 Build Pictures
That is the original fuel tank for the 48 in the original position.
They were on 47/48 trucks. Back when 50 an up trucks would try to slip into the N.S.R.A. pre 48 events posing as a 48 that was one of the indicators that you had a real 47/8 truck. I've still got the original tank off mine but haven't used it in years having gone to an aluminum tank under the back of the bed. |
|
|
|
|
07-09-2009, 11:17 PM
|
#14 |
|
Registered User
Join Date: May 2009
Location: Tucson, AZ
Posts: 75
|
Re: 48 Build Pictures
And now for something completely different....
What are your plans for the rear? Looks like you got the truck with a lot of modern mods. What are you planning on changing? |
|
|
|
|
07-10-2009, 08:32 AM
|
#15 |
|
Registered User
Join Date: Jan 2009
Location: Springfield, MO
Posts: 258
|
Re: 48 Build Pictures
I moved the rear end back about an 1 1/2" and put a drop block, still messing with what else might need to be done. This is just going to be a cruiser so I don't plan on any real elaborate setup on the rear of the truck.
|
|
|
|
|
07-10-2009, 01:30 PM
|
#16 |
|
Registered User
Join Date: Jul 2007
Location: Toppenish, WA
Posts: 15,265
|
Re: 48 Build Pictures
Probably the worse thing about having the stock tank in that location is that it gets in the way of putting a normal set of V8 dual pipes on the truck.
One more thing, from my own experience, and a bad one at that. Never run the truck without a gas cap as it will suck in road dust and dirt in the filler neck real easy. I killed a fuel pump in the big middle of Montana when I left my gas cap on the pump at the gas station at Grand Teton National park's main lodge. |
|
|
|
|
08-11-2009, 09:57 PM
|
#17 |
|
Registered User
Join Date: Jan 2009
Location: Springfield, MO
Posts: 258
|
Re: 48 Build Pictures
Making some progress. Got the new bed sides and decided I better install them and fit the fenders, running boards etc before I seal and prime the truck. I did drop the 350 in it to see if it was good, and it sounds really strong, so I plan to use the engine that came with the truck. The truck looks like a calico cat right now after blocking the previous paint work. I am hoping to get it sealed this weekend and start skim coating and blocking some more. I hope to have some paint on this thing by November so I can put it all together over the winter.
|
|
|
|
|
08-11-2009, 10:07 PM
|
#18 |
|
Registered User
Join Date: May 2009
Location: Tucson, AZ
Posts: 75
|
Re: 48 Build Pictures
Lookin good.
I can't tell from the pictures, but are you doing shaved doors? If so, are you putting in a hidden release? |
|
|
|
|
08-11-2009, 10:15 PM
|
#19 |
|
Registered User
Join Date: Jan 2009
Location: Springfield, MO
Posts: 258
|
Re: 48 Build Pictures
No, not doing shaved doors, just don't have any handles on it right now. I am really debating on what seat to put in the truck. I found a really nice truck at a car show last weekend and he had a nice bench with a fold down armrest that I really liked. The guy was not around and I could not find out what the seat came from. I have plenty of time to figure that out I guess.
|
|
|
|
|
08-12-2009, 01:53 AM
|
#20 |
|
Registered User
Join Date: May 2009
Location: Tucson, AZ
Posts: 75
|
Re: 48 Build Pictures
Same here with the seat. I would really like some cup holders/armrest, but have the luxury of fitting one more person in if need be.
So let us know if you find a good candidate for the seat. |
|
|
|
|
09-01-2009, 11:10 PM
|
#21 |
|
Registered User
Join Date: Jan 2009
Location: Springfield, MO
Posts: 258
|
Re: 48 Build Pictures
I was able to seal and prime some parts tonight. Hopefully, do a few more tomorrow night.
|
|
|
|
|
09-02-2009, 12:37 AM
|
#22 |
|
Registered User
Join Date: Jul 2007
Location: Toppenish, WA
Posts: 15,265
|
Re: 48 Build Pictures
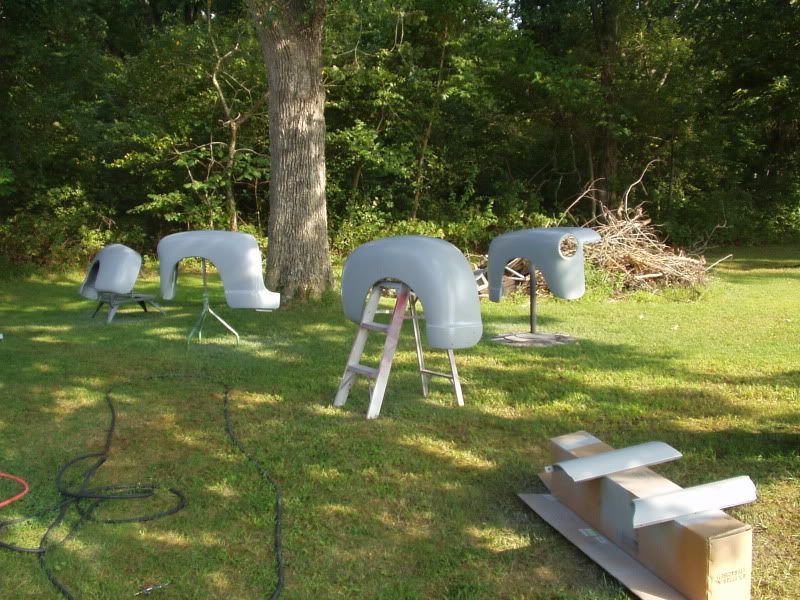
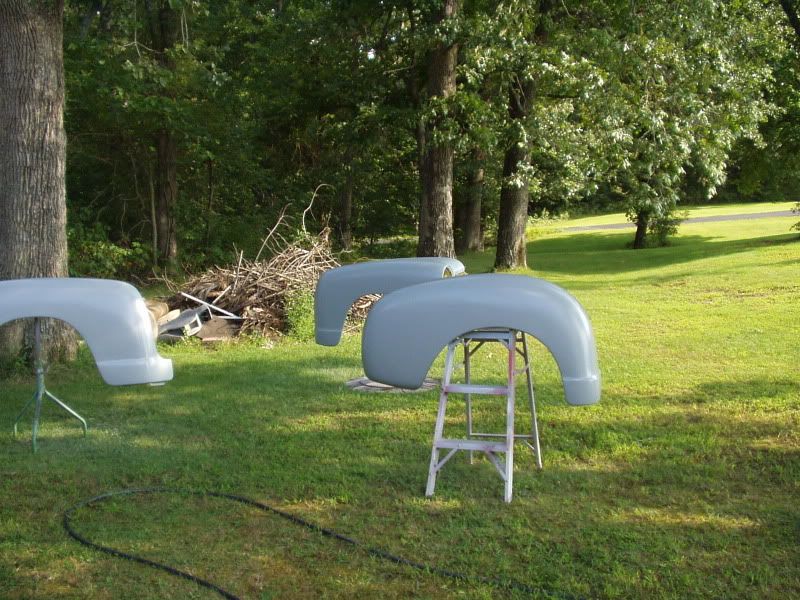
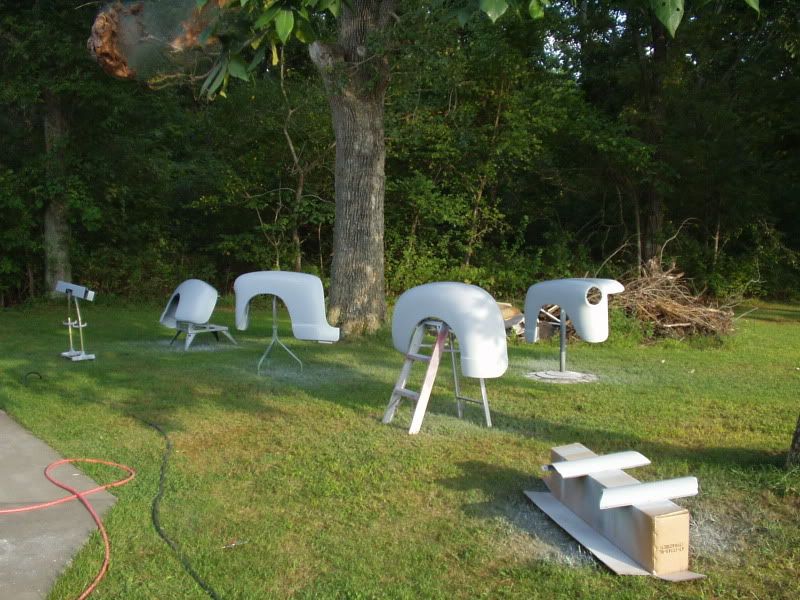
The fenders sitting in the yard look like a form of modern art that we see in the Northwest.
It's looking good, wish I had similar progress photos to post. |
|
|
|
|
09-02-2009, 02:39 AM
|
#23 |
|
Senior Member
  Join Date: Nov 2008
Location: Glendora, CA
Posts: 6,331
|
Re: 48 Build Pictures
What kind of primer did you use on those fenders, misc parts? Did you mechanically strip the fenders all the way to bare metal or to the level shown a few pictures up above on this page? Looks like a mix of bare metal spots and some of the blue showing, some other colors. If so, how are the finished results? I ask because I intend to mechanically strip as many of my parts on my '46 as I can with 80 grit sandpaper, though I am worried a bit about flat spotting locations and/or can I really get all the old finishes off this way? Enquiring minds want to know!
Last edited by Dan in Pasadena; 09-02-2009 at 02:41 AM. |
|
|
|
|
09-02-2009, 08:48 AM
|
#24 |
|
Registered User
Join Date: Jan 2009
Location: Springfield, MO
Posts: 258
|
Re: 48 Build Pictures
I use Spies Hecker products and normally I would strip parts to the bare metal with a DA or chemical or blasting. But in this case the blue paint was fairly new by the previous owner. The parts had been stripped to the bare metal prior to his painter painting the truck blue. Therefore, I block sanded the blue paint and used it somewhat as a primer to fill the low spots. Then I used the Spies sealer directly over the old paint and a few bare metal spots. The Spies 8590 is a excellent sealer and is designed to seal over old paint, bodywork and some bare metal and keeps anything under it from bleeding through. The sealer also gives you a good base to do any filler work that you might need to do. Any parts I have that I needed to strip to the bare metal will be shot with etch and then sealer. Then I applied a couple coats of Spies 5310 high build primer. That was the final coats last night. Next I will fog the panels as a guide coat and start block sanding looking for any low or high spots that might need filler or attention. Then block sand and block sand some more. That part seems like never ends. The more time you put in on the body prep the better your results will be.
|
|
|
|
|
09-02-2009, 08:54 AM
|
#25 |
|
Registered User
Join Date: Jan 2009
Location: Springfield, MO
Posts: 258
|
Re: 48 Build Pictures
From a distance last night I could not decide if the yard looked like a cemetary with tombstones or a flower garden with truck part growing out of the ground. I like the modern art idea!
|
|
|
|
 |
| Bookmarks |
| Tags |
| 48 truck pictures |
| Thread Tools | |
| Display Modes | |
|
|


 Linear Mode

