
|
 04-24-2011, 12:18 AM
|
#1 |
|
Plays with trucks
Join Date: Sep 2003
Location: Asheville, NC
Posts: 433
|
my Defroster Debacle
My defroster quit working and I heard what sounded like a vacuum leak coming from the heater/defrost/a/c control unit in the dash. I started trying to track down the leak and before I knew it (actually about 2 weeks later) I had my dash completely ripped apart and my heater box laying on the garage floor. My handy-dandy "mity-vac" brake bleeder pump confirmed what I suspected- the "heater blend door actuator" was bad. If your defroster isn't working and your vacuum lines are OK, this could easily be your problem as well. They're a bear to get to because the whole box has to come out. I hit RockAuto.com to do some shopping.
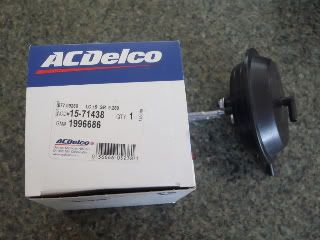 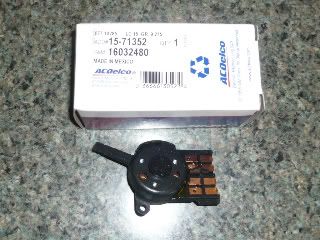 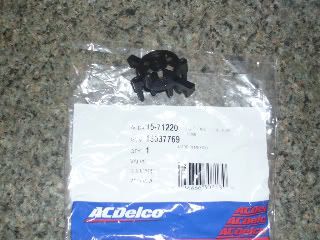 Heater blend door actuator- 28.79 A/C and heater control switch- 6.98 A/C Vacuum control valve- 9.65 My fan switch has been broken for several years, it was functional but the knob wouldn't stay on. The vacuum valve was cheap insurance. I'll try to clarify anything if I can. Just ask.
__________________
Gary My Dad's Old Truck 1985 
Last edited by 85gmcguy; 04-24-2011 at 06:59 PM. |

|

|
|
04-24-2011, 05:41 PM
|
#2 |
|
Plays with trucks
Join Date: Sep 2003
Location: Asheville, NC
Posts: 433
|
Re: my Defroster Debacle
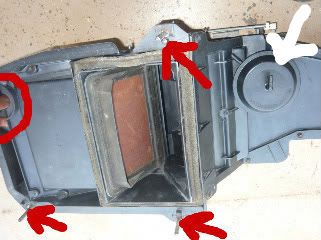
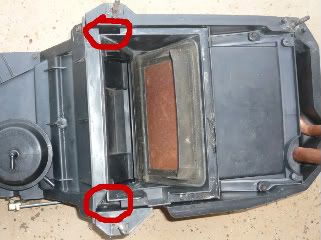
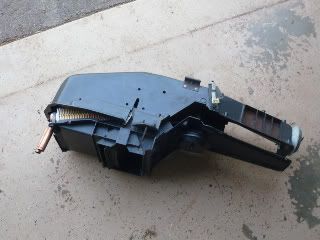
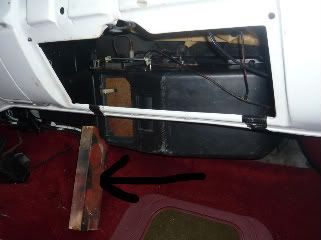
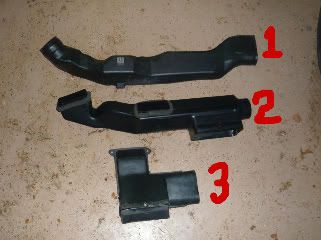 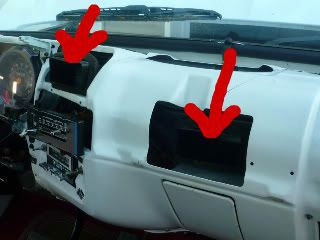  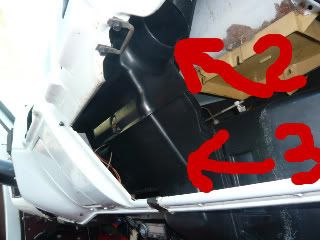  Ok, first thing is to get the dash pad and glove box removed. Be very careful not to rip the ducts loose from the dash pad. Once those are gone you have to remove the heater/defrost and a/c ducting (items 1,2, and3) May seem a little confusing, but stay with me. Duct 3 fastens to the heater box with 2 screws and to duct 2 with 1 screw and then slides down from under a clamp strip. With it removed, you can work on duct 2. It has a screw through the top of the metal dash holding it up (just above the center).With it removed, duct 1 can be freed from below the column and wiggled out of the way. The last photo is the view with all ducting removed.
__________________
Gary My Dad's Old Truck 1985
|
|
|
|
|
04-24-2011, 06:57 PM
|
#3 |
|
Plays with trucks
Join Date: Sep 2003
Location: Asheville, NC
Posts: 433
|
Re: my Defroster Debacle
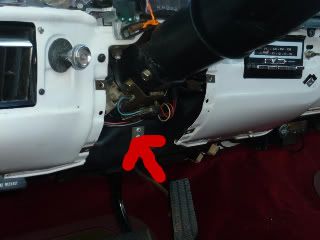
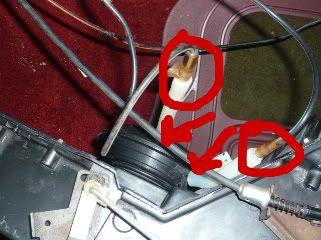
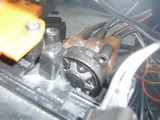
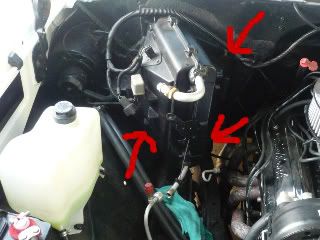  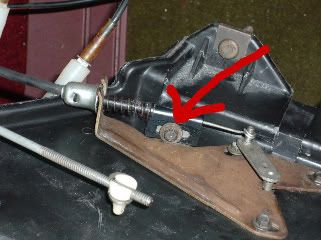 First picture shows approximate location of the studs sticking through the firewall (arrows). Second picture shows actual studs on removed heater box. Upper left circle shows heater hose connectors. Please note- the heater hoses MUST be removed, they will not come through the firewall. (Ask me how I know). The white arrow is the "heater blend actuator". This is the new one. Should give you an idea of how tight to the firewall it really is. The cable from the dash control that operates the heat flapper must also be disconnected (picture 3).
__________________
Gary My Dad's Old Truck 1985
Last edited by 85gmcguy; 04-24-2011 at 08:24 PM. |
|
|
|
|
04-24-2011, 07:32 PM
|
#4 |
|
Registered User
Join Date: Oct 2009
Location: Redmond, OR
Posts: 217
|
Re: my Defroster Debacle
Nice write up! Thanks for the info and photos. It looks like fun.
 I just did this to my Suburban, but I had to drop the fender and inner fender to get my box off the firewall. How did you get yours out without doing that? I need to do my crew cab here pretty soon and would like to know. Thanks! |
|
|
|
|
04-24-2011, 07:37 PM
|
#5 |
|
Plays with trucks
Join Date: Sep 2003
Location: Asheville, NC
Posts: 433
|
Re: my Defroster Debacle
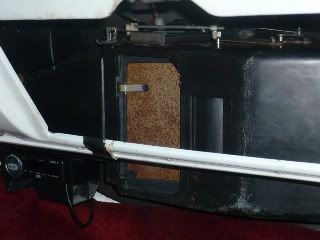
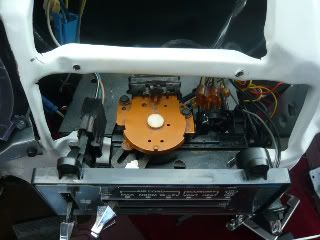
 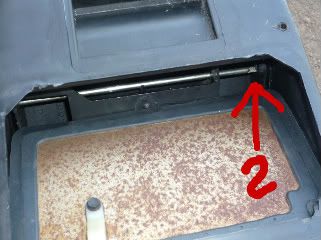 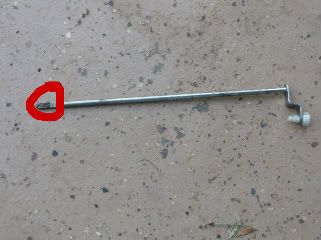 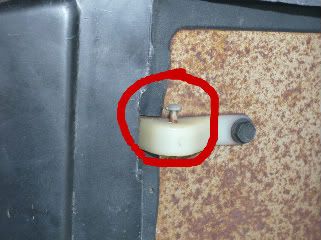   The heater box splits into two pieces. The plate (1) mounts the HOT/COLD cable, and is held by three screws. The mixer door is held in by and pivots on a pin (2) which must be removed. Note the position of the flat "tang" on the end, it only goes back in one way. The pin in the fourth picture goes through the end of the "blend door actuator". The circled screws in photo five are under a foam seal which must be removed to access them. Keep it to put back on. The rest of the screws are easy enough to find, remove them all. The last pictures shows the halves being separated.
__________________
Gary My Dad's Old Truck 1985
Last edited by 85gmcguy; 05-15-2011 at 10:02 PM. |
|
|
|
|
04-24-2011, 07:50 PM
|
#6 |
|
Plays with trucks
Join Date: Sep 2003
Location: Asheville, NC
Posts: 433
|
Re: my Defroster Debacle
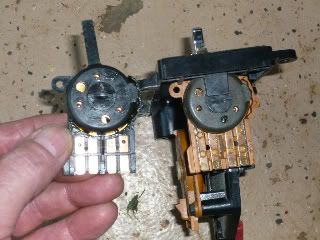
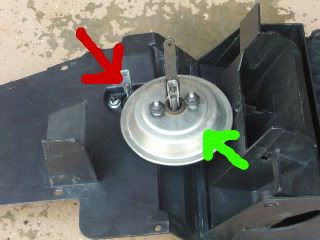 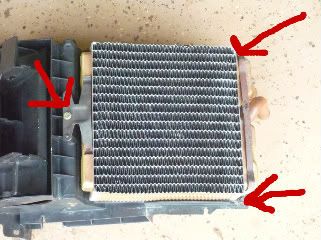 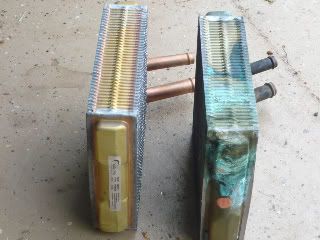 First picture is the new actuator installed (red arrow) with the old one beside it (green arrow). The arm hasn't been switched over yet. Second picture shows heater core mounting- it's only three screws. Last picture shows old and new heater cores. I didn't even suspect a leak, but at just over 25.00 you could consider it cheap insurance.
__________________
Gary My Dad's Old Truck 1985
|
|
|
|
|
04-24-2011, 08:50 PM
|
#7 | |
|
Plays with trucks
Join Date: Sep 2003
Location: Asheville, NC
Posts: 433
|
Re: my Defroster Debacle
Quote:
I'm not sure if they are different or not. The bottom stud is really close to the fender, but I got my (fairly large) hand to it. I didn't remove the fan box because I didn't need to for this project, but I could see having to remove the fender to get it out.
__________________
Gary My Dad's Old Truck 1985
|
|
|
|
|
|
04-24-2011, 09:26 PM
|
#8 |
|
Plays with trucks
Join Date: Sep 2003
Location: Asheville, NC
Posts: 433
|
Re: my Defroster Debacle
Putting the case back together is pretty much the reverse of taking it apart. If you have a vacuum pump you can confirm proper operation before you reinstall it. The next few steps can be done with the assembly sitting on the floor of the truck.
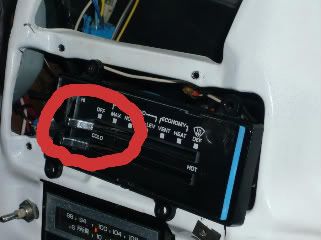  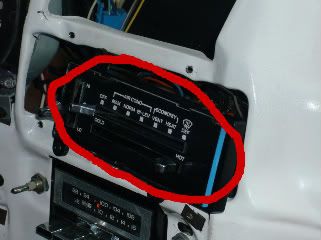   First picture shows the adjustment point for the heat flapper door. With the selector in COLD (picture 2) I adjusted the cable so that the door was completely closed (picture 3). With the selector in HOT (picture 4) the flapper should be fully open (picture 5). Note exposed heater core. The ports on the new actuator are larger on the new actuator than the old one (picture 6), I made adapters from larger tubing and barbed connectors.
__________________
Gary My Dad's Old Truck 1985
|
|
|
|
|
04-24-2011, 09:37 PM
|
#9 |
|
Plays with trucks
Join Date: Sep 2003
Location: Asheville, NC
Posts: 433
|
Re: my Defroster Debacle
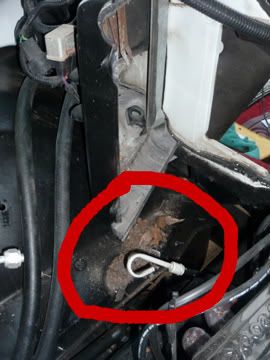
 Once everything is hooked up and adjusted, feed the studs and the heater core inlet/outlet through the firewall. I used my trusty helper (arrow) to hold it in place till I could get the nuts started on the studs. Make a last check to be sure nothing is between the heater box and firewall before you tighten it up. Attach your heater hoses and anything else you disconnected and you're good to go. Duct work installation is reverse of removal.
__________________
Gary My Dad's Old Truck 1985
|
|
|
|
|
04-24-2011, 09:56 PM
|
#10 |
|
Plays with trucks
Join Date: Sep 2003
Location: Asheville, NC
Posts: 433
|
Re: my Defroster Debacle
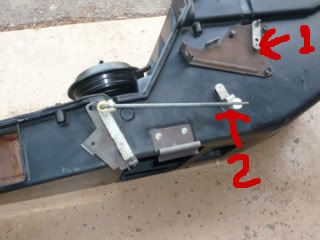
     While the heat selector cable was disconnected, I unhooked the connectors, removed the light, and pulled out the control unit. (picture 1). The fan switch (picture 2) is a simple matter of one screw, then it slides out. The vacuum valve is held by 2 screws, picture 3 shows the bottom view, picture 4 shows it from the top. Picture 5 shows the vacuum connector, there are 2 long legs with push nuts that hold it in place. The vac selector CAN be changed without pulling the controller, but it ain't easy.
__________________
Gary My Dad's Old Truck 1985
|
|
|
|
|
04-24-2011, 10:08 PM
|
#11 |
|
Plays with trucks
Join Date: Sep 2003
Location: Asheville, NC
Posts: 433
|
Re: my Defroster Debacle
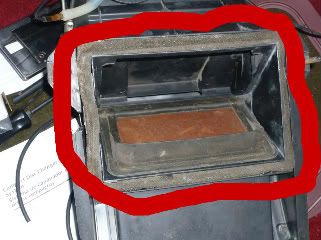
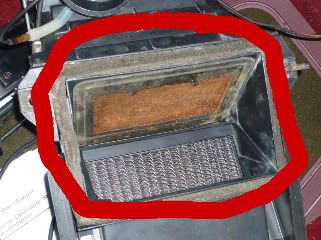
 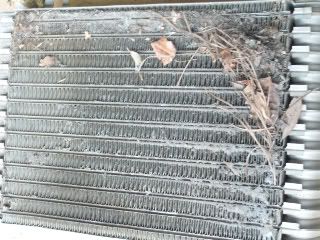 Because I am also trying to get my A/C working again, I wanted to check out the evaporator. The circle in the first picture is what fell out when I removed it. Second picture shows just how nasty it was. It's since been cleaned and reinstalled. Almost ready to service it, just in time for warm weather. I hope this write-up helps somebody (anybody). 
__________________
Gary My Dad's Old Truck 1985
|
|
|
|
|
04-24-2011, 11:56 PM
|
#12 |
|
Registered User
Join Date: Dec 2010
Location: sioux city, iowa
Posts: 619
|
Re: my Defroster Debacle
Great info. I don't see why they made it so complicated. Is all that ducting necessary? Do you think the heater would get hot enough to melt wiring? I am setting mine up all toggle switches and was thinking a choke cable for the flapper door.
|
|
|
|
|
04-25-2011, 08:15 AM
|
#13 | |
|
Plays with trucks
Join Date: Sep 2003
Location: Asheville, NC
Posts: 433
|
Re: my Defroster Debacle
Quote:
The ducting feeds the defroster vents and dash vents, the heater is basically just the default, it feeds out to the floor. I don't think the heater gets hot enough to melt things, but it would kinda depend on your thermostat. Choke cable (or similar) would most likely be fine for flapper door.
__________________
Gary My Dad's Old Truck 1985
|
|
|
|
|
|
04-25-2011, 09:07 AM
|
#14 |
|
Registered User
Join Date: Dec 2010
Location: Alberta
Posts: 165
|
Re: my Defroster Debacle
This will help me out tons! Thank you for posting it on my thread(Dash "cage").
Grant |
|
|
|
|
04-26-2011, 12:09 AM
|
#15 |
|
Registered User
Join Date: Dec 2010
Location: sioux city, iowa
Posts: 619
|
Re: my Defroster Debacle
I thank you too. Great thread !!!

|
|
|
|
|
04-26-2011, 12:33 AM
|
#16 |
|
6.0 powered square
Join Date: Feb 2008
Location: Mesquite texas
Posts: 3,459
|
Re: my Defroster Debacle
nice write up Gary I wish I had the patience to fix the factory air in my truck but it was missing every a/c part under the hood, and all the vacuum lines and the vacuum operated pieces so I ripped it all out
__________________
Aaron 1980 c-10 short bed lowered, cammed 6.0, 4l80e 3600 stall, smp tune, wilwoods, and flames best time so far best et 7.86 @87 on motor 7.57 90 on a 75 shot Build http://67-72chevytrucks.com/vboard/s...d.php?t=283326 |
|
|
|
|
05-15-2011, 10:01 AM
|
#17 |
|
Registered User
Join Date: Dec 2010
Location: sioux city, iowa
Posts: 619
|
Re: my Defroster Debacle
Question: If I hook a positive 12v wire to the one lead on the heater blower motor on my 83 it should come on right ??? Cuz mine don't.
Last edited by rayfinseats; 05-15-2011 at 10:06 AM. |
|
|
|
|
05-15-2011, 10:38 AM
|
#18 |
|
78K & 79C Jimmys
Join Date: Nov 2009
Location: Ottawa Ont CANADA
Posts: 7,901
|
Re: my Defroster Debacle
Good info it answers some FAQ
Should work ,ive done it with an aligator clip...check the ground or do your own Posted via Mobile Device
__________________
John 1978 GMCJimmy4X4-350/203 1979 GMCJimmy4X2-305/350 Last edited by motornut; 05-15-2011 at 10:42 AM. |
|
|
|
|
05-15-2011, 10:10 PM
|
#19 | |
|
Plays with trucks
Join Date: Sep 2003
Location: Asheville, NC
Posts: 433
|
Re: my Defroster Debacle
Quote:
__________________
Gary My Dad's Old Truck 1985
|
|
|
|
|
|
05-15-2011, 11:55 PM
|
#20 | |
|
In the Forgotten far North.
 Join Date: Jul 2007
Location: Anchorage, Alaska
Posts: 2,627
|
Re: my Defroster Debacle
Quote:
__________________
1987 R3500 CREW CAB DUALLY (BIG RED)Acquired 06/12/2015 1990 chevy suburban V2500 5.7L My cluster Mods-Nov 2007 overhead console Stereo install Round 2 Aug 2009 Heated/turn signal mirror upgrade |
|
|
|
|
|
05-21-2011, 09:12 AM
|
#21 |
|
Registered User
Join Date: Dec 2010
Location: sioux city, iowa
Posts: 619
|
Re: my Defroster Debacle
Thanks guys. I was pretty sure but just wanted to check. It's grounded and looks pretty easy to change.
|
|
|
|
|
10-13-2011, 09:42 PM
|
#22 |
|
Registered User
Join Date: Aug 2011
Location: Winnsboro TX
Posts: 234
|
Re: my Defroster Debacle
WOW! Awesome write up! Found it off another thread...unfortunatetly, mines about to get ripped out too.
__________________
1st - '68 long bed 2nd - '81 SWB Now - '86 SWB, Edelbrock 1406/stock 350/700r4 |
|
|
|
|
11-26-2011, 12:46 PM
|
#23 |
|
Registered User
Join Date: Aug 2011
Location: Winnsboro TX
Posts: 234
|
Re: my Defroster Debacle
Question...the pin that the blend door pivots on, how the heck did you get that out? Does it just "slide" out? That things giving me more fits that the bolt on the firewall.
Thanks for the info...
__________________
1st - '68 long bed 2nd - '81 SWB Now - '86 SWB, Edelbrock 1406/stock 350/700r4 |
|
|
|
|
11-26-2011, 02:14 PM
|
#24 |
|
Registered User
Join Date: Dec 2010
Location: sioux city, iowa
Posts: 619
|
Re: my Defroster Debacle
The cable PULLS to open the flapper door and PUSHES to close? Correct?
|
|
|
|
|
11-26-2011, 03:38 PM
|
#25 |
|
78K & 79C Jimmys
Join Date: Nov 2009
Location: Ottawa Ont CANADA
Posts: 7,901
|
Re: my Defroster Debacle
its like a nail, i used pliers
__________________
John 1978 GMCJimmy4X4-350/203 1979 GMCJimmy4X2-305/350 |
|
|
|
 |
| Bookmarks |
| Thread Tools | |
| Display Modes | |
|
|


 Linear Mode

