
|
 02-11-2014, 11:11 AM
|
#1276 |
|
Registered User
Join Date: Apr 2012
Location: Searcy, AR
Posts: 4,203
|
Re: Markeb01 Build Thread
 is all I got... is all I got...
__________________
DON Proverbs 27:17  US Air Force Retarded errr Retired My '65 Stepper Build:http://67-72chevytrucks.com/vboard/s...d.php?t=533920 My '60 Rusty Patina Build:http://67-72chevytrucks.com/vboard/s...66#post7402266 My '72 http://67-72chevytrucks.com/vboard/s...59#post7204359 SOLD |

|

|
|
02-11-2014, 04:49 PM
|
#1277 |
|
Registered User
Join Date: Dec 2012
Location: Rochester, KENT
Posts: 10,473
|
Re: Markeb01 Build Thread
You Sir, are a LEGEND !!
Amazing build. Now, relax.
__________________
MY BUILD LINK: http://67-72chevytrucks.com/vboard/s...585901]Redneck Express - 1966 C10 Short Fleetside MY USA ROADTRIPS http://forum.retro-rides.org/thread/...2018-humdinger IF YOU CAN'T FIX IT WITH A HAMMER, YOU'VE GOT AN ELECTRICAL PROBLEM MATE. |
|
|
|
|
02-11-2014, 07:37 PM
|
#1278 |
|
Senior Enthusiast
Join Date: Feb 2007
Location: Spokane Valley, WA
Posts: 8,356
|
Re: Markeb01 Build Thread
Thanks to everyone that has stopped by and left a compliment or comment. I’ll continue to check in on the site daily, but the next build thread update will likely be a few weeks from now when my GMC glove box emblem comes back from chrome.
__________________
My Build Thread: http://67-72chevytrucks.com/vboard/s...d.php?t=444502 |
|
|
|
|
02-11-2014, 10:25 PM
|
#1279 |
|
Registered User
 Join Date: Sep 2009
Location: menifee california
Posts: 788
|
Re: Markeb01 Build Thread
I didn't want to say anything when you were not going to put the buttons on BUT they look soooooooo much better now. good job as always!!!!!!
|
|
|
|
|
02-14-2014, 04:35 PM
|
#1280 |
|
Senior Enthusiast
Join Date: Feb 2007
Location: Spokane Valley, WA
Posts: 8,356
|
Re: Markeb01 Build Thread
I just about forgot about the third labeled safety cover until it showed up today. They are now complete and functioning perfectly:
__________________
My Build Thread: http://67-72chevytrucks.com/vboard/s...d.php?t=444502 |
|
|
|
|
02-15-2014, 02:56 PM
|
#1281 |
|
Registered User
Join Date: Jan 2011
Location: Tulare, CA
Posts: 731
|
Re: Markeb01 Build Thread
Darn it Mark! I just barely got my piezo buzzer hooked up for my headlights and you post about using a chime instead. Why didn't I think of that? I always enjoy your informative "How To" articles with pictures. But you're making me look bad. I've purchased a 21 circuit aftermarket wiring harness, a complete power window and door lock wiring harness from a 75 C10 with the lock solenoids and a Dolphin Power window kit for flat glass yet I haven't gotten around to installing any of this stuff yet.
You always seem to get everything done in record time and I have a hard time getting around to doing much of anything to my truck. I have to say Great Job to you though and keep up the good work!!!!! |
|
|
|
|
02-15-2014, 08:07 PM
|
#1282 |
|
Senior Enthusiast
Join Date: Feb 2007
Location: Spokane Valley, WA
Posts: 8,356
|
Re: Markeb01 Build Thread
And here I thought I was going to get in trouble for going too slow!
 Thanks so much for the positive comments, they are much appreciated. Thanks so much for the positive comments, they are much appreciated.Theres actually a method to my madness. 40+ years ago I had back surgery, and operated backs are never as dependable as OEM. From then on my work output was always interrupted by my defective spine. I would perform some measure of work whether it was prepping a car for paint, or remodeling a house. I might work a few hours or a whole day. Usually the next day Id be in bed anywhere from a couple of days to several weeks, before I recovered enough to advance to the next phase. It took forever (months) to complete any task, large or small. Then 30 years ago my current wife came along and became my Massage Therapist and Chiropractor. That changed everything. She has fixed my back twice a day ever since. Her repair skills allowed me to continue working no matter how badly I wrecked myself the day before. Shed crunch it back into alignment, and Id keep going until I could no longer function, and the drill was repeated. The memories of being debilitated for long periods remain fresh, so I consistently plow ahead as quickly as I can, in case the day arrives when I cant get out of bed again. Its ironic that the last few months have been an absolute marathon of back breaking labor. First the upholstery, then the burned wire/complete rewire of the truck, and finally the seat covers. I made it through the whole thing without any real problems other than chronic pain. The day after I finished the seat covers, I went to put my socks on and my lower back blew out! So Ive been off line for the last 4 days except for installing the switch cover! Maybe its natures way of telling me to take a break. In truth it couldnt come at a better time since I dont really have any other projects to start on. The next planned project in the spring remains the new fiberglass drop center concept hood. Its a tremendous amount of work and a significant monetary investment. Im not sure if it will ever get completed, but I really want something different and believe it can be achieved. Im also thinking about installing 54 or 55 Buick portholes on the sides if I can find a way to wire them up to the distributor. I want to have led(s) in each porthole that fire in sequence with the plug wires. Should be an interesting light show going from idle to full throttle if I can figure out how to do it! Again, thanks for stopping by and sharing your input. 
__________________
My Build Thread: http://67-72chevytrucks.com/vboard/s...d.php?t=444502 |
|
|
|
|
02-15-2014, 10:23 PM
|
#1283 |
|
Senior Member
Join Date: Mar 2011
Location: Tucson, Arizona
Posts: 2,058
|
Re: Markeb01 Build Thread
I just wanted to take a minute and thank you for the great write up on the rewire job. I've mentioned several times the quality of work you do and the help I have gotten from your detailed explanations. I understand the pain thing completely as I have also had back surgery and both of my shoulders are pretty much shot so I have to rest up in between doing stuff, also. Keep on Truckin, man.

__________________
Sanity'66 http://67-72chevytrucks.com/vboard/s...d.php?t=515110 Long bed, Fleetside, Small back window I've Done So Much, With So Little, For So Long, That Now I Can Do Anything With Nothing.
|
|
|
|
|
02-21-2014, 12:11 AM
|
#1284 |
|
Senior Enthusiast
Join Date: Feb 2007
Location: Spokane Valley, WA
Posts: 8,356
|
Re: Markeb01 Build Thread
With my rechromed glove box emblem still a week or two away, I picked up a second emblem off Ebay a couple of days ago. The chrome is decent looking with some blistering, but it was a rare version with the Hydra-Matic tag underneath:
 The piece underneath attaches through the standard mounting bosses on the flying M emblem, (meaning it comes off with two screws). It arrived today, and looks exactly like I expected. The Hydra-Matic emblem is nearly perfect, while the upper portion is good enough for mock-up purposes. I set about measuring up the glove box door, both with and without the lower piece: 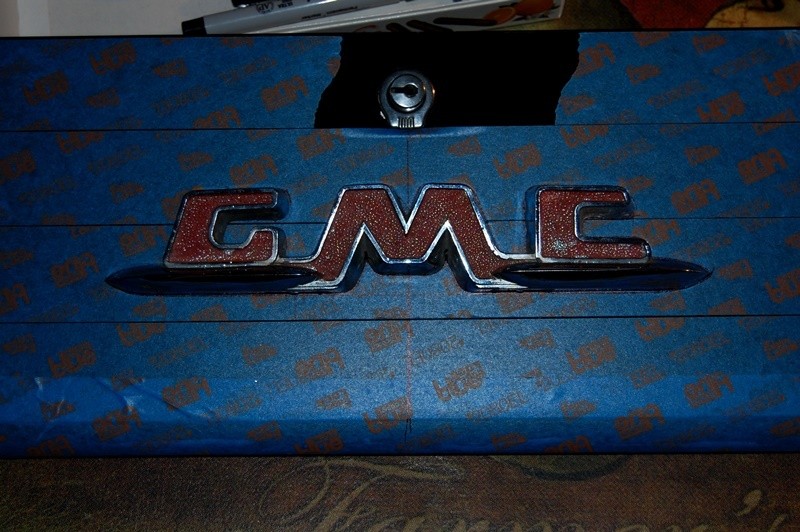 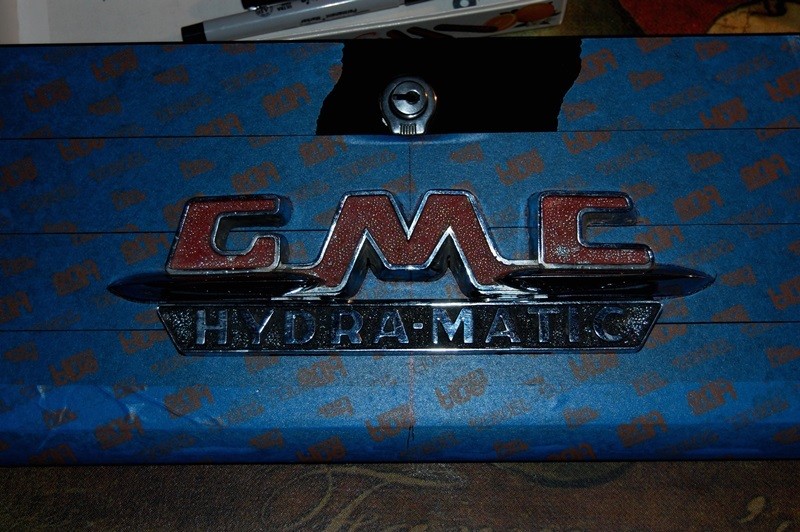 My thought was if I ever have to give up the 4 speed, perhaps Ill hang this on the glove box (even though I would never use a Hydramatic transmission). The red paint was pretty tired, so I freshened it up with a big fat red king size Sharpie. Here it is reattached to the dashboard: 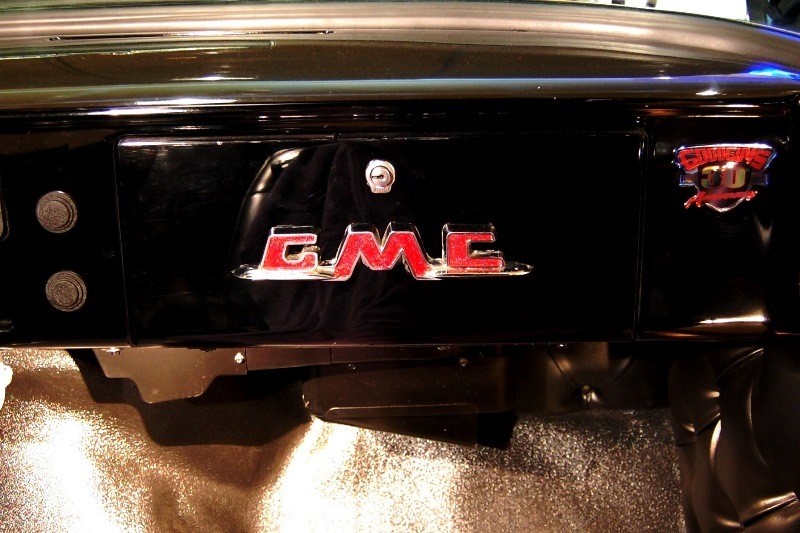 Problem is Im not sure I want to stay with the red coloring. Im thinking black might make it look more refined. So rather than masking it off and painting the thing (since Im not going to be using it anyway), I did a rather poor rendition with MS Paint. The next few photos show the comparisons: 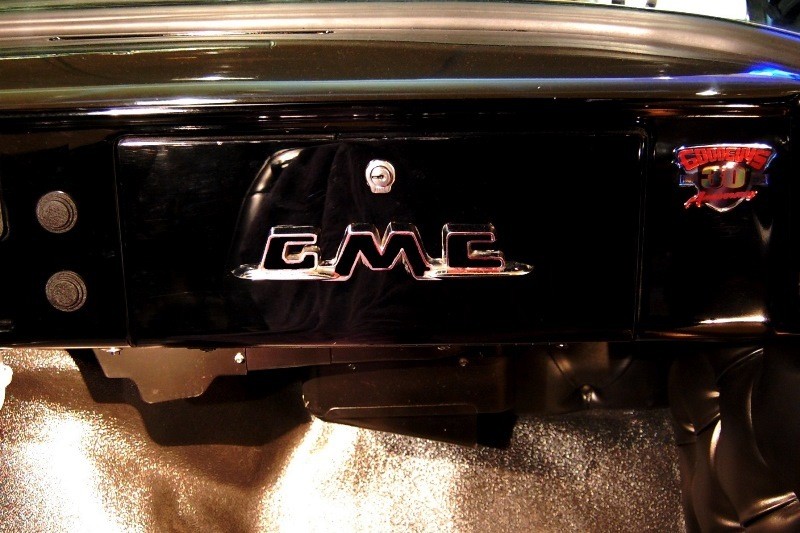 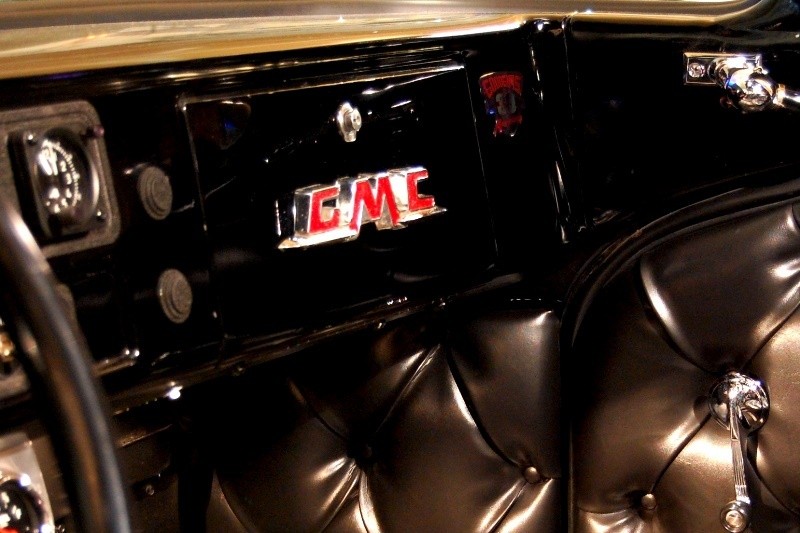 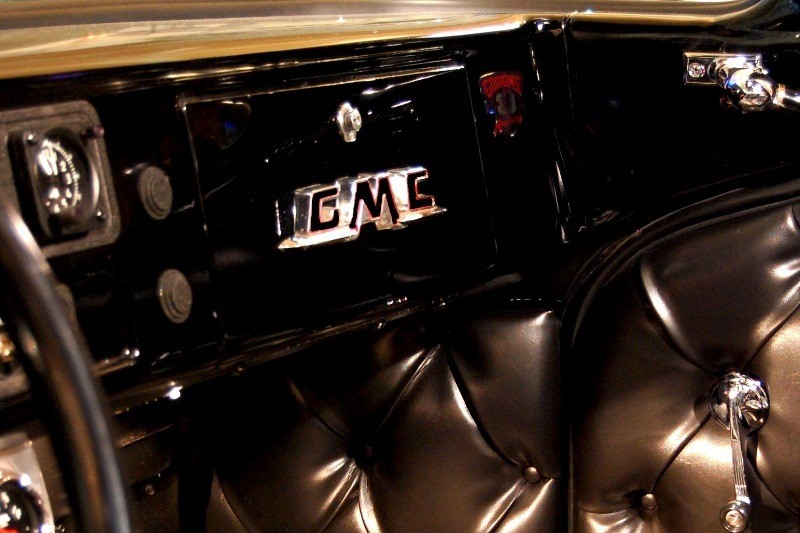 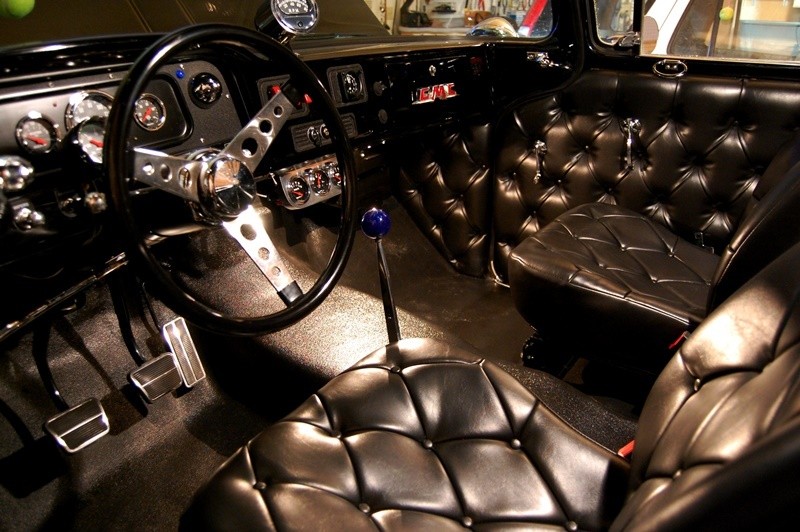 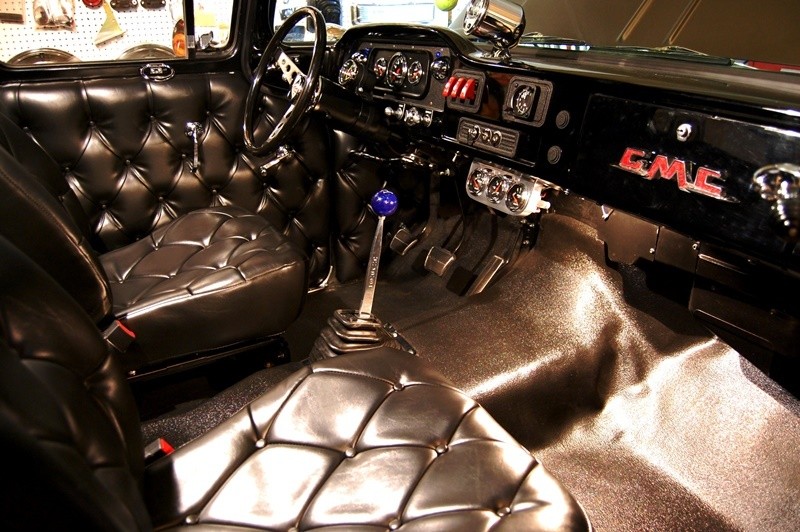 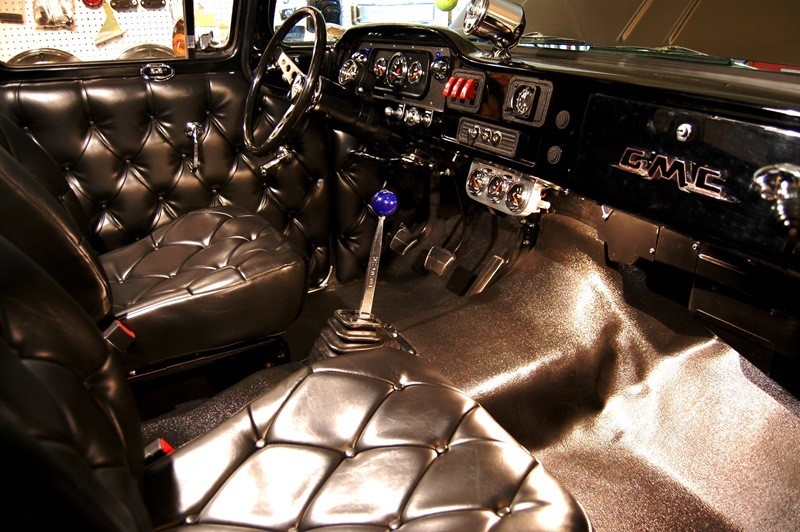 Ill probably go out tomorrow and paint the thing black with another king size Sharpie and see how that turns out. I just want to make a decision before the good one comes back from chrome, so I only have to paint it once. Any opinions on which color looks better?
__________________
My Build Thread: http://67-72chevytrucks.com/vboard/s...d.php?t=444502 |
|
|
|
|
02-21-2014, 11:38 AM
|
#1285 |
|
Rollin' Old Skool
Join Date: Jun 2007
Location: Hattiesburg, MS
Posts: 5,371
|
Re: Markeb01 Build Thread
I like the emblem, & you actually gave me a possible idea for my Tahoe.
 As for colors, I like the subtlety of the black. However, looking at the next to last pic, the red kinda balances out when looking at your gauge needles, labeled safety covers, & seat belt "buttons." Guess it just depends on how much you want it to stand out. As for colors, I like the subtlety of the black. However, looking at the next to last pic, the red kinda balances out when looking at your gauge needles, labeled safety covers, & seat belt "buttons." Guess it just depends on how much you want it to stand out.
__________________
_____________________________________________ Phillip My Build threads: 1966 Chevy C-10 "Black Betty" shortbed, fleetside, BBW, 327 V8/ Powerglide (under construction) http://67-72chevytrucks.com/vboard/s...ighlight=betty 1997 Chevy Tahoe, 2dr/2wd, mild custom (Daily driver) http://67-72chevytrucks.com/vboard/s...d.php?t=601142 Pics: '66 C-10 https://flic.kr/s/aHsjHWD4h9 '97 Tahoe https://flic.kr/s/aHsjGZ7wKP '93 C-1500 https://flic.kr/s/aHskxdpdnQ '88 S-10 Blazer https://flic.kr/s/aHsjYGx4Md Previous Rides: 1993 Chevy S-10 ext. cab, 4.3L, 4/5 drop (Sold) 1993 Chevy C-1500 short/step Retro-Rod (Sold) 1988 S-10 Blazer 2dr/2wd mild custom (Sold) |
|
|
|
|
02-21-2014, 11:56 AM
|
#1286 |
|
Registered User
Join Date: Nov 2011
Location: fayetteville nc
Posts: 10,338
|
Re: Markeb01 Build Thread
I like the black emblem better personally
__________________
1963 Short bed step side SBW 427 big block and borg warner T-16 HD 3 speed manual http://67-72chevytrucks.com/vboard/s...d.php?t=519869 1963 Short bed fleetside BBW 348 1st gen big block w/Powerglide http://67-72chevytrucks.com/vboard/s...d.php?t=619024 1964 Short bed trailer |
|
|
|
|
02-21-2014, 05:33 PM
|
#1287 |
|
Old and crusty
Join Date: Jan 2009
Location: Surprise, AZ
Posts: 462
|
Re: Markeb01 Build Thread
Black!!
__________________
65 Chevy long wide daily driver - SOLD! 64 Chevy Short Step LS |
|
|
|
|
02-21-2014, 08:17 PM
|
#1288 |
|
Senior Member
Join Date: Mar 2011
Location: Tucson, Arizona
Posts: 2,058
|
Re: Markeb01 Build Thread
I like that touch of red.
__________________
Sanity'66 http://67-72chevytrucks.com/vboard/s...d.php?t=515110 Long bed, Fleetside, Small back window I've Done So Much, With So Little, For So Long, That Now I Can Do Anything With Nothing.
|
|
|
|
|
02-21-2014, 10:46 PM
|
#1289 |
|
Senior Enthusiast
Join Date: Feb 2007
Location: Spokane Valley, WA
Posts: 8,356
|
Re: Markeb01 Build Thread
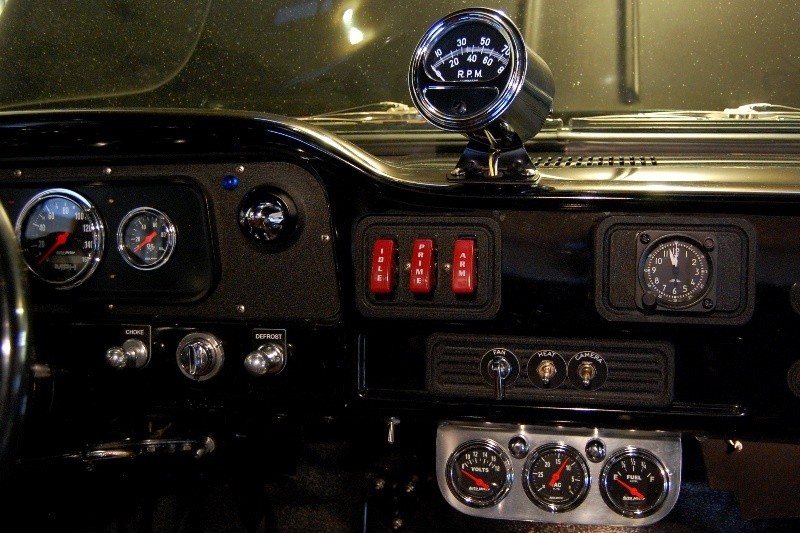
Thanks for the feedback guys. I really like the red. I was even considering swapping to a red metalflake shift knob, but Im concerned the red paint makes it look too much like the GMC fender emblem it is! With the black paint, it seems more refined like something that could be custom, at least to someone unfamiliar with these old trucks.
This morning I pulled the emblem back off and wiped it down with lacquer thinner which removed all the felt marker ink with no trouble. It then received 3 coats of gloss black model car enamel applied with a brush. What an improvement. It was reinstalled and aligned a tad better. It is cold and overcast today, so I pulled it outside to see if I could capture a couple of better quality photos. Indoor lighting tends to make the floor mat look gray, while natural sunlight and flash can sometimes help make it look pitch black (which it really is). Here are a few shots from today after the repaint: 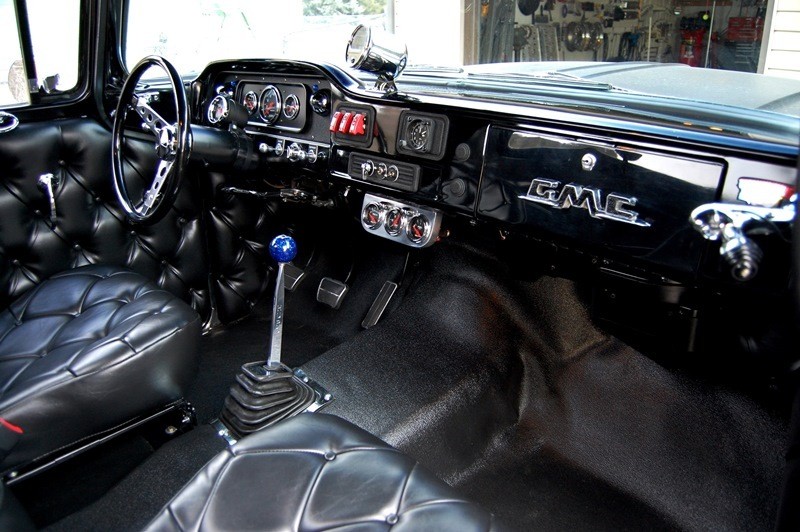 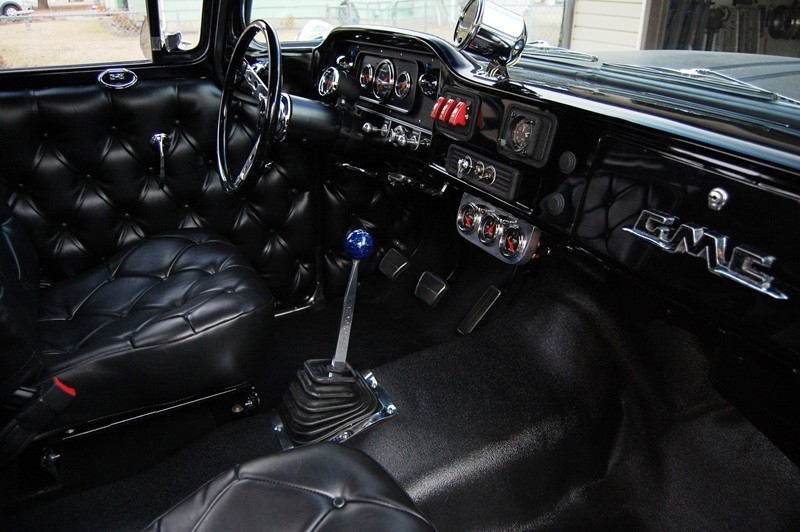 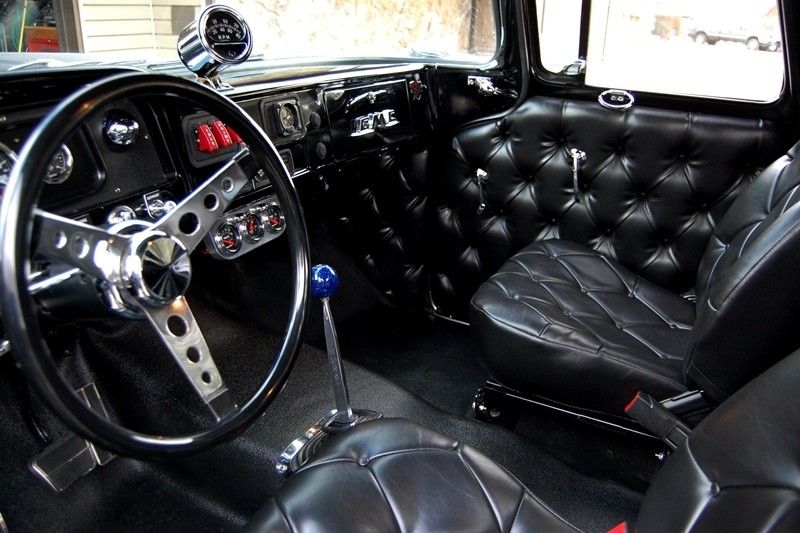 Yesterday I discovered I had wired the back-up lights to a hot feed. Im not a fan of dead batteries so that wire was relocated to an ignition powered terminal. This ability to change things is one of the main features I love about the Ron Francis wiring system. For several years Ive also been toying with the idea of hooking up Buick portholes to the sides of the hood, with led lights firing in sequence with the ignition system. Subsequently I thought it might be kind of cool to use them as side marker turn signals, blinking sequentially like the old Cougars, from front to rear. Im close to figuring out how to do it with 4 portholes on each side. I ordered one new 1955 Buick porthole to check for size and appearance, and dont think its going to work. It does fit, and if positioned carefully almost fits flush with the hood side on the flattest portion. So although 4 could fit, I dont think they will work. They might be too big to look proportioned on the side of the truck. Ill have to do some photo shopping next time I can take pictures outside (were due for a couple more snow days). I may pick up one 54 Buick porthole and repeat the experiment, or just abandon the concept and move on to something else. I like things that are interesting and different, but I dont want the truck to look hokey, like some aging dope didnt know when to leave it alone!
__________________
My Build Thread: http://67-72chevytrucks.com/vboard/s...d.php?t=444502 |
|
|
|
|
02-22-2014, 04:26 PM
|
#1290 |
|
Registered User
Join Date: Sep 2011
Location: Tacoma, WA
Posts: 2,425
|
Re: Markeb01 Build Thread
Dear Mark....
LoL You know I cannot leave well enough alone, and knowing how you like detailed things, I felt compelled to make this suggestion. I think I would try leaving a 1/16 or 1mm border of red on the letters, and fill the centers with black. I belive it would tie in the rest of the interior decor, look basically stock, and appease your sense of aesthetics. For your consideration: As a matter of fact, I am now contemplating this very suggestion for the SS part of my emblems....
__________________
Michael McMurphy My 66 Stepside My 64 Tow Truck My 66 Tempest Table Of Contents Added to Page1 Last edited by McMurphy; 02-22-2014 at 04:27 PM. Reason: spelling SUX !! |
|
|
|
|
02-22-2014, 05:47 PM
|
#1291 |
|
Senior Enthusiast
Join Date: Feb 2007
Location: Spokane Valley, WA
Posts: 8,356
|
Re: Markeb01 Build Thread
Thanks Mike! I'll give that a try with MS Paint. If it turns out decent I'll see if I can achieve it with real paint! Maybe even one side, or top or bottom like a reverse red shadow.
Thanks for the suggestion.
__________________
My Build Thread: http://67-72chevytrucks.com/vboard/s...d.php?t=444502 |
|
|
|
|
02-22-2014, 08:09 PM
|
#1292 |
|
Post Whore
Join Date: Mar 2013
Location: Southern Oregon
Posts: 10,384
|
Re: Markeb01 Build Thread
Mark,
One heck of a great job on this build! You have some of the neatest ideas!
__________________
1966 Chevy C10 "Project Two Tone" http://67-72chevytrucks.com/vboard/s...d.php?t=596643 1964 GMC "Crustine" semi-build:http://67-72chevytrucks.com/vboard/s...d.php?t=665056 My youtube channel. Username "Military Chevy": https://www.youtube.com/channel/UC_h...fzpcUXyK_5-uiw |
|
|
|
|
02-22-2014, 10:00 PM
|
#1293 |
|
Registered User
Join Date: Sep 2013
Location: Strawberry Arkansas
Posts: 1,137
|
Re: Markeb01 Build Thread
Your truck looks great!
__________________
http://67-72chevytrucks.com/vboard/s...d.php?t=605217 |
|
|
|
|
02-23-2014, 10:30 AM
|
#1294 |
|
Senior Enthusiast
Join Date: Feb 2007
Location: Spokane Valley, WA
Posts: 8,356
|
Re: Markeb01 Build Thread
Thanks for the comments and stopping by to check things out. I try to be creative and do stuff I dont see very often, but I also end up testing out a lot of concepts that never make it too. Heres a recent example. Years ago I read about how a Buick employee customized his late model Buick by cutting portholes in his fenders and added lighting in them that illuminated in firing order sequence off the distributor (simulating fighter plane exhaust). Management loved his idea and Buick Ventiports went into production (minus the lights), becoming a Buick signature item for many years.
I always thought that would be fun to do, but Ive never figured out how he hooked the lights up to the engine. I recently purchased one 1955 Buick porthole to check for size and spacing, to see if it was something I could incorporate into my hood. It turns out round holes just dont blend in with the style of my truck, although if they came out like this next photo I might have thought about it a bit longer: 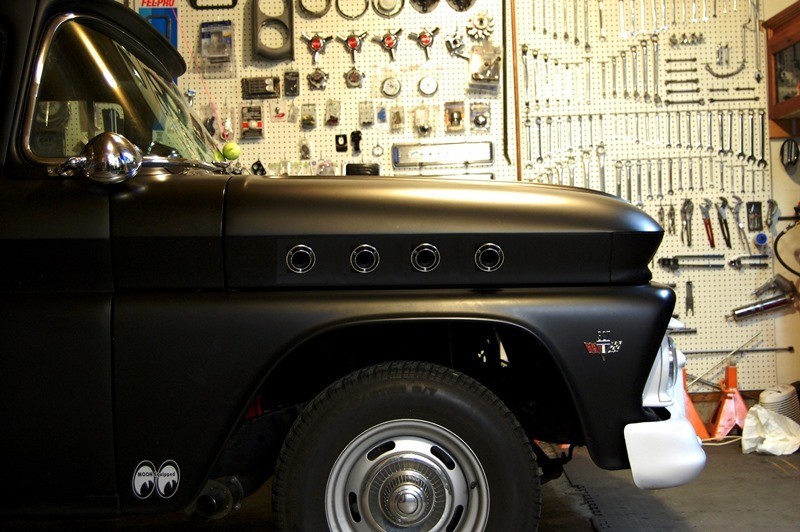 Unfortunately they didnt. In the above photo they are reduced 20% photographically, something I cant do in real life. The photo below shows the real size, just too big to look good:  So the 55 porthole will become a garage wall feature, probably hooked up to a light of some kind. Before I abandon the concept however, I went ahead and purchased one 54 Buick Porthole that looks like these: 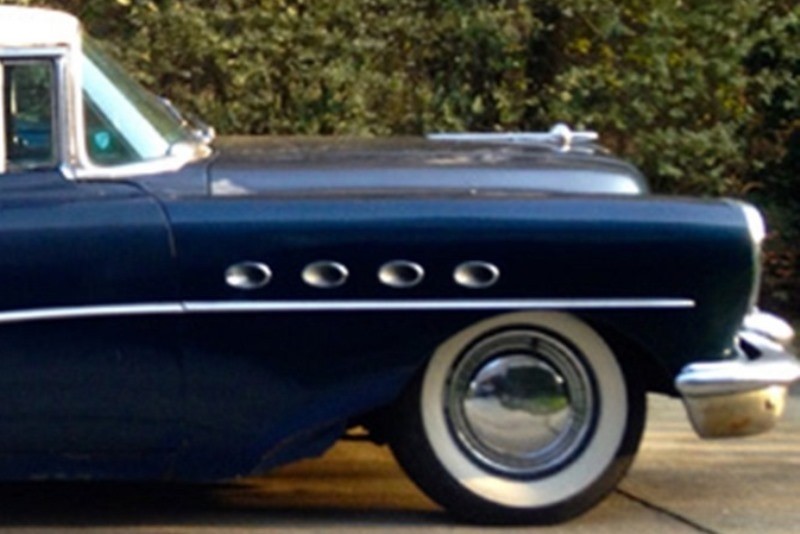 The oval shape may look/fit better, or it may also be too big or look cluttered or stupid. I wont know if it will work until it arrives and I know its exact dimensions. If they do work, I wont be hooking them up to the engine timing. Theyll become sequential turn signals like 69 Cougar tail lights. The lights will be amber, and flash from front to rear. Most likely they wont end up on the truck and will become additions to my collectables, but I wont know without trying.
__________________
My Build Thread: http://67-72chevytrucks.com/vboard/s...d.php?t=444502 |
|
|
|
|
02-23-2014, 05:20 PM
|
#1295 |
|
Registered User
Join Date: Sep 2011
Location: Tacoma, WA
Posts: 2,425
|
Re: Markeb01 Build Thread
I bet you.... a small guage positive wire pushed into the sparkplug boot at the distributor for each cylinder to an LED light in the portholes would do the trick.
__________________
Michael McMurphy My 66 Stepside My 64 Tow Truck My 66 Tempest Table Of Contents Added to Page1 |
|
|
|
|
02-23-2014, 07:16 PM
|
#1296 |
|
Senior Enthusiast
Join Date: Feb 2007
Location: Spokane Valley, WA
Posts: 8,356
|
Re: Markeb01 Build Thread
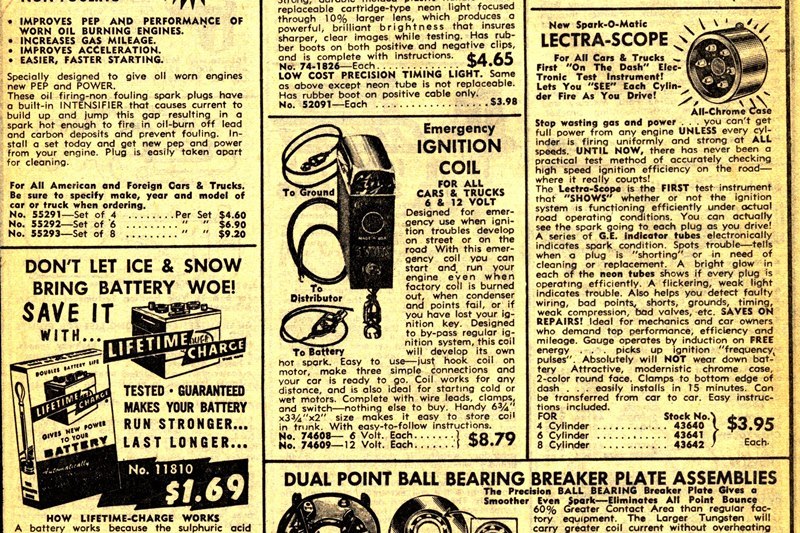
In continuing pursuit of knowledge, I went back through my 1962 JC Whitney catalog and discovered the name of the dash gadget they sold back in the 50’s-70’s for “monitoring” ignition performance (?)! It was called the Spark-O-Matic Lectra-Scope:
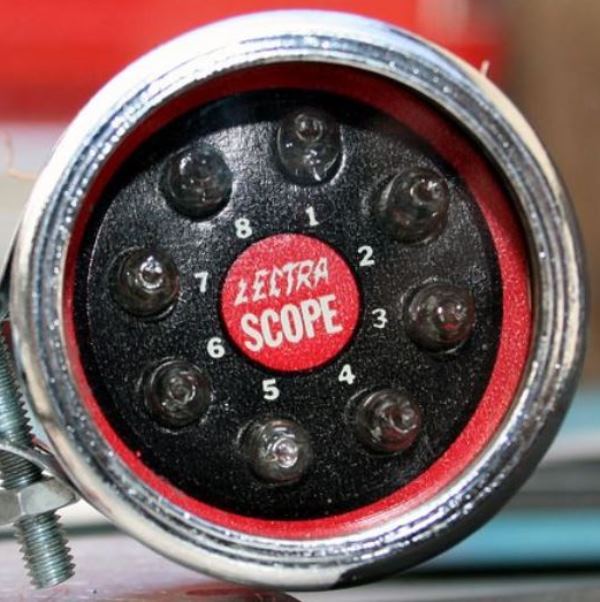 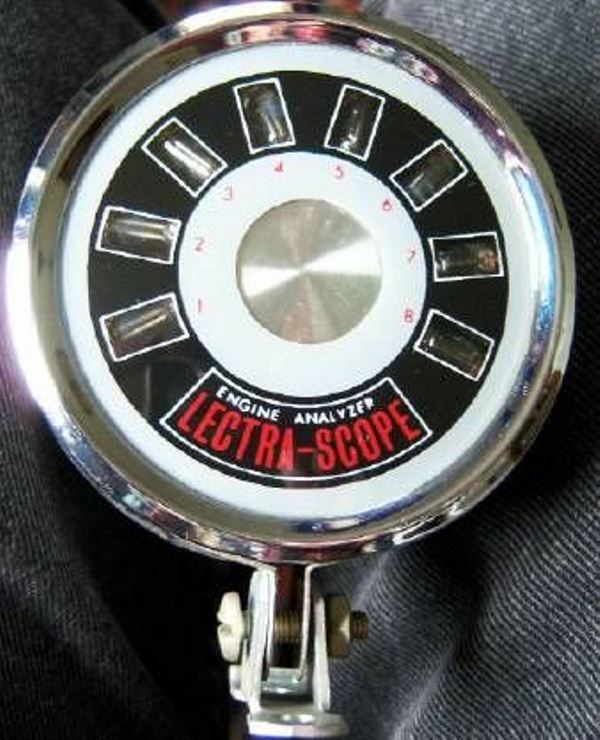 Knowing what it was called allowed me to find pictures of two models, and the actual instruction sheet for installation! 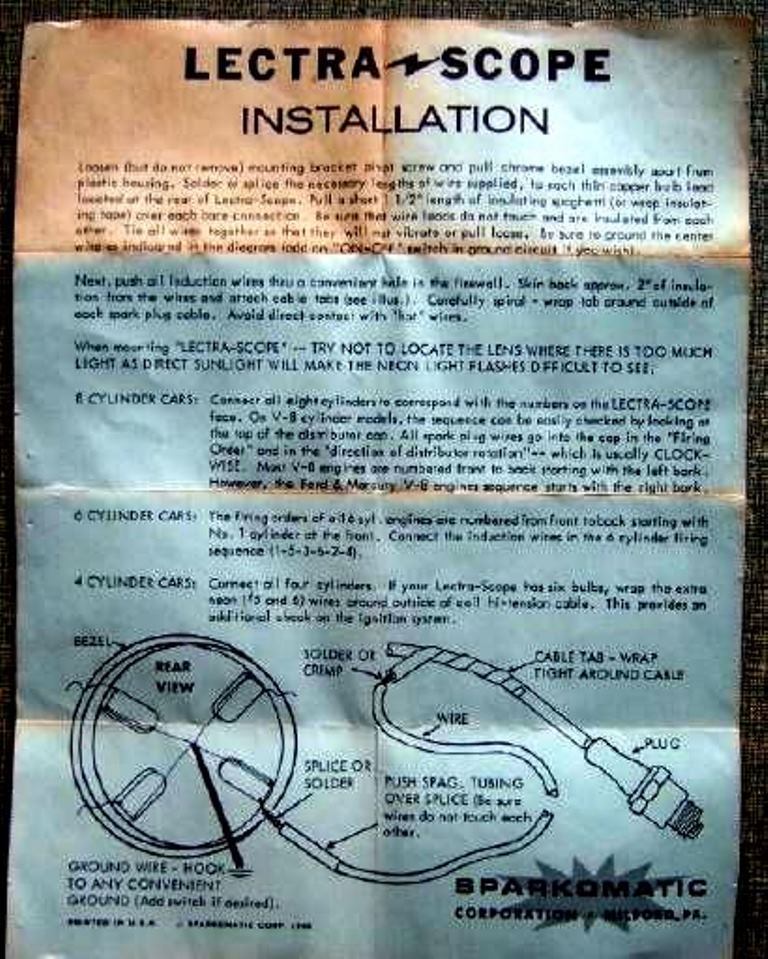 It’s rather blurry, but good enough to understand. It confirms the bulbs in the gauge were neon, and small gauge wire was simply wrapped around the spark plug wires. I’m not sure this actually helps at all, but I found it interesting none the less:
__________________
My Build Thread: http://67-72chevytrucks.com/vboard/s...d.php?t=444502 Last edited by markeb01; 02-24-2014 at 04:13 AM. |
|
|
|
|
02-24-2014, 10:44 AM
|
#1297 |
|
Registered User
Join Date: Jun 2012
Location: Selkirk Ontario Canada
Posts: 1,141
|
Re: Markeb01 Build Thread
i like the 54 ports it seams to flow better
__________________
My 63 GMC Panel Slow Build http://67-72chevytrucks.com/vboard/s...=1#post5457281 63 
|
|
|
|
|
02-25-2014, 10:28 AM
|
#1298 |
|
Senior Enthusiast
Join Date: Feb 2007
Location: Spokane Valley, WA
Posts: 8,356
|
Re: Markeb01 Build Thread
I received word my test example 54 Buick porthole is on the way. Before it arrives for confirmation of actual size, I thought Id play around with pictures again to check potential spacing between the portholes and orientation on the hood.
My first attempts werent very accurate because I was trying to match up tire size between the donor Buick photo and my truck, which arent even close to being the same. Then it occurred to me they both have 15 wheels, so I shrunk or stretched each photo until both wheels were exactly the size of a small Post-It note on my computer screen. Using this method, Im pretty sure the size of the portholes in the following photos are reasonably close to accurate: This picture spaces the portholes exactly the same as on the 54 Buick, and places the rear unit comfortably under the rear hood/hinge support brace:  Moved back as far as I can go under the hood support brace:  Here spacing is the same, but moved back onto the cowl extension so they are more closely oriented to the door edge like on the original car:  And finally all mounted on the hood, as far to the rear as practical, with the gap between each piece closed up. I think Im leaning toward this arrangement, but not really sure at this point. 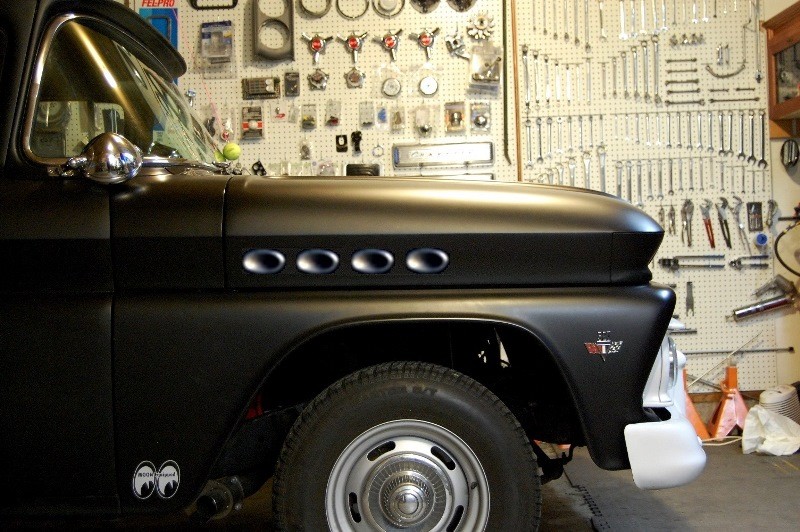 Im still not sure what to do with the lights yet either. They could fire off the ignition, become sequential turn signals, or simply become extra parking lights/turn signals that blink off and on with the others. Heres a photo I found on the internet showing a set of 54 portholes with lights added: 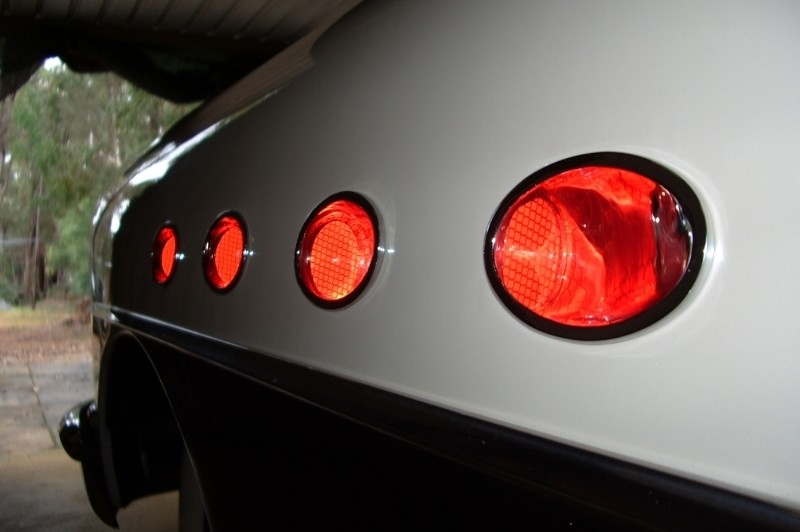 I think they look pretty cool lit up. Ive already located similar amber LED clearance lights if this project moves forward. This entire concept could easily end up going nowhere, but Im starting to become a bit more enthusiastic if the real deal turns out to be a cosmetically acceptable size.
__________________
My Build Thread: http://67-72chevytrucks.com/vboard/s...d.php?t=444502 |
|
|
|
|
02-25-2014, 10:36 AM
|
#1299 |
|
Registered User
Join Date: Apr 2012
Location: Searcy, AR
Posts: 4,203
|
Re: Markeb01 Build Thread
Thanks for sharing the info on the Lectrascope...
 I don't believe I ever even heard of those before The Porthole idea is interesting, waiting to see what you decide...
__________________
DON Proverbs 27:17 US Air Force Retarded errr Retired My '65 Stepper Build:http://67-72chevytrucks.com/vboard/s...d.php?t=533920 My '60 Rusty Patina Build:http://67-72chevytrucks.com/vboard/s...66#post7402266 My '72 http://67-72chevytrucks.com/vboard/s...59#post7204359 SOLD |
|
|
|
|
02-25-2014, 04:01 PM
|
#1300 |
|
Senior Enthusiast
Join Date: Feb 2007
Location: Spokane Valley, WA
Posts: 8,356
|
Re: Markeb01 Build Thread
Thanks Don. Ive never seen one in real life. I only read about them in the JC Whitney catalogs as a kid. They were usually near the back with all the other incredulous gas saving and performance improving devices. I imagine their primary function was to short out the ignition system before they were discarded!
 Im waiting to see what I decide on the porthole idea myself! Thats a lot of precision holes to cut in a perfectly good hood. And if I go with this idea it will kill the fiberglass hood project. If I build the custom drop center hood I intend to claim it was recently discovered in the garage of an old GM design engineer, and was created as the prototype 1963 production hood at the Corvette facility (explaining the fiberglass construction). I think Buick portholes hanging on it would really challenge the credibility of my story!
__________________
My Build Thread: http://67-72chevytrucks.com/vboard/s...d.php?t=444502 |
|
|
|
 |
| Bookmarks |
|
|


 Linear Mode

