
|
 04-19-2013, 10:12 AM
|
#176 | |
|
Registered User
Join Date: Aug 2011
Location: new york, ny
Posts: 1,063
|
Re: Trying to make Junky perhaps just a little bit Funky...
Quote:
Thanks for the tips! There is very little instructions with the HF spot welder; they do give some information, but there is no nice sticker on the side like there is with my MIG welder. So, I am figuring it out as I go along. You did such a good job on the floor work, you really want to start over? I am kind of torn between replacing the entire piece I had taped off in the pics above, or just replacing the smaller piece that I cut out. The smaller piece would be easier, and I am not sure I really need to do the whole thing. I thought I had seen you with a portable spot welder, but I must be thinking about another thread. And, yes, NY Yankees. I was born and raised in NYC! The new stadium is pretty nice, although the novelty has kind of worn off for me by now. They are going to have a tough year with Jeter and the other major players out of commission. If you ever visit NY again, you should get tickets and check out the stadium. I am getting more comfortable with the body work now, and things are moving along a bit smoother. I have also gotten more motivated. Unfortunately, I have not had a chance to do much this week between the game, a work trip, and a doctors appt and grocery shopping last night. Hoping tonight to get some time, and then tomorrow is shot as well. Maybe Sunday, although the wife is going to try and get me to fix some stuff around the house. Darien |
|

|

|
|
04-22-2013, 09:49 PM
|
#177 |
|
Registered User
Join Date: Aug 2011
Location: new york, ny
Posts: 1,063
|
Re: Trying to make Junky perhaps just a little bit Funky...
Ok, so I have made a little progress on the mechanical side.
Ok, so I have attached pics of the power steering gear box and pump, the carb on the engine, and I'll post some pics and talk about the steering wheel, but it might need to be in a separate post. So, I cleaned up the area on the frame where the power steering gear box is supposed to go as it was really nasty. Sprayed some Eastwood Rust Encapsulator on it, and attached the "new" Power Steering Gear box. It is so much heavier than the manual gear box. Wish I had someone with me to hold it while I installed the bolts. I bought the gear box off Ebay over a year ago, so I hope it works also. The guy was nice and smart enough to make a mark with a sharpie on the pitman arm so I can replace it exactly the same way. Of course, the nut that holds the pitman arm to the box is an odd size. My 1-1/4" socket is too small, and the 1-1/2" I bought at Autozone is too big. I need to take it with me (would have been too easy to bring it with me the first time I went to Autozone) and find the right size. Anyone have experience with this? I cleaned up the PS pump and the fuel pump and was about to paint it, when I realized the only High Heat paint I have is black. My silver paint ran out; add it to the Autozone shopping list. My plan is to mount the engine on the frame, reattach the master cylinder and the gas tank, along with the "new" steering wheel, and make it a drivable frame with the old cab attached. This allows me to make sure the engine and carb works, and have space in my garage when needed. I want to get this done before the Rhinebeck car show, which is May 4-6, so it may keep me busy this weekend. I probably won't get it done in time, but I will try. I am going to list my steering wheel problem in another post. Going to do some research before I write the post. |
|
|
|
|
04-22-2013, 10:47 PM
|
#178 |
|
Registered User
Join Date: Aug 2011
Location: new york, ny
Posts: 1,063
|
Re: Trying to make Junky perhaps just a little bit Funky...
Ok, here is my steering wheel part of the project. I am paying attention to this now, because when it gets to that point, I want to be able to install it and not worry about it. Also, as I mentioned before, I want to make the old cab and frame driveable the way it is now.
In September 2011, I was in FL for vacation; it was shortly after I had gotten the truck and it had not quite hit me how much work I would be doing. I also had not discovered this forum as yet. My primary source for parts was Craigslist, and I was buying stuff quite anxiously. I purchased an automatic steering column for the truck from someone. I probably paid too much for it, not the mention the added cost of packing it and the charge for extra luggage on my flight home. Anyway, so I realized that some of the arms were broken and it needed a little work, but it did not seem that big of a deal. Most of these parts seem pretty cheap on LMC. I could switch some parts over from the existing column as they seem to have some parts in common. I might just get new parts as it is easier - I won't have to clean up the old stuff - and I would like to try and sell the original steering column. Anyway, I mentioned in one of my original threads that I got the truck from some kids that put a Camaro 305 engine and the TH350 transmission in. I think they also added the steering wheel, and the parts I see on LMC do not match some of the parts I actually have. I am trying to figure out what I need to get and what I should keep. Should I get a different steering wheel or keep what I have? Can I attach a horn to the wheel I have? Is it any good? It's pretty obvious, but the one on the left is the one I bought. The LMC pic is from 2 pages of their catalog that I pieced together. I think I am missing part #8 and #10 on the top of the page, the Canceling Cam and the horn Contact kit. Please let me know if you think I am missing anything, what your thoughts are on the steering wheel, should I get another one, or keep this one? |
|
|
|
|
05-04-2013, 04:52 PM
|
#179 |
|
Registered User
Join Date: Aug 2011
Location: new york, ny
Posts: 1,063
|
Re: Trying to make Junky perhaps just a little bit Funky...
Been running around today. Have not had a chance to do anything to the truck. The most I have done so far is spray paint my power steering brackets and put oven cleaner on the a/c brackets.
Had to go down to Home Depot and pick up the birthday gift from the wife this morning. It was too big for her to get herself. She had the online receipt already for me, ordered it to pick up in the store. It was ready and waiting for me when I got there! Need to run the power and set up the hoses, but it's pretty cool. Looking forward to actually being able to use my air tools now! Headed to the Rhinebeck Car Show tomorrow. Hoping to score some cheap parts! |
|
|
|
|
05-16-2013, 08:52 PM
|
#180 |
|
Registered User
Join Date: Aug 2011
Location: new york, ny
Posts: 1,063
|
Re: Trying to make Junky perhaps just a little bit Funky...
Very quick update, it's honestly not even worth posting, but what the hell. I cleaned up my starter and a/c compressor brackets. I picked up almost the complete set of a/c parts from another board member, because the price was right. I realize I am pretty far away from that step in the process, but I will have it when I need it.
In the meantime, I wanted to get it all cleaned up. So, following some advice I read on this forum, I got some oven cleaner, sprayed it on and left it overnight. Well, a week and a half later (I've been really busy lately), I went back to it. Took a garden hose and sprayed it off, took a rag and wiped it down, spray again wipe with dry cloth and spray with an air hose. Came out pretty nice. It actually took all of the paint off of the A/C bracket. Was not expecting that, but makes it easier for me to re-paint it. Next I started to install the power steering pulley. Was having trouble getting it to mount. Probably need some lubricant on the shaft.  Well, i got frustrated and left it to another day. It's partly on the shaft, so I need to remove it, lube it, and reinstall it. Well, i got frustrated and left it to another day. It's partly on the shaft, so I need to remove it, lube it, and reinstall it.Did not really see a problem with spraying the starter with a hose. It sits at the bottom of the engine, so I figure it gets plenty wet and dirty anyway. I wiped and aired it out right after. Here are some pics of the cleanup job on the starter and a/c brackets. Wish I had some before pics. |
|
|
|
|
06-09-2013, 09:56 PM
|
#181 |
|
Registered User
Join Date: Aug 2011
Location: new york, ny
Posts: 1,063
|
Re: Trying to make Junky perhaps just a little bit Funky...
So, last weekend the wife and I spent a few days in Cape Cod for our 5th anniversary. On the way home, we stopped in RI and picked up a rear bumper for the truck. It was a good deal that I could not pass up, and the convenience of being able to pick it up was just great timing.
So I figured the best way to store it is to install it. If it's on the truck it's out of the way. Installing it was a PITA, but I got it in. Good thing I remembered to pick up some new grade 8 bolts when we made a stop at Lowe's today. Something I would like an opinion on is the gap on each side of the bumper. Is it supposed to be like that? I am guessing not, although I find it odd that the gap is on both sides. I am guessing there is some more body work in my future if and when I ever get to the bed of the truck. I just don't know what the PO could have done to create identical dents on each side of the rear... After spending quite a bit of time under the bed, I did learn that frame in the back will need some serious work with a wire brush. The front is so much cleaner and nicer; the rear is filled with rust. So, my plan in case I have not mentioned it is to get the engine installed and running. I want to be able to move the truck out of the garage if necessary with the original cab. Also, it's been 1-1/2 years roughly since I had the engine rebuilt. I need to make sure it works. So I will be re-installing the master cylinder, gas tank, and installing the automatic shift steering column. The engine is almost ready to be mounted on the frame. Been really busy with other stuff lately, but hope to have some time over the next month. Anyway, here are the pics of the bumper. Let me know what you think about how it looks, and the gaps. Later on we will clean it up and paint it. Oh, and the downside of installing the bumper - I can no longer fit my lawn mower underneath the truck! Damn! |
|
|
|
|
07-01-2013, 11:18 PM
|
#182 |
|
Registered User
Join Date: Aug 2011
Location: new york, ny
Posts: 1,063
|
Re: Trying to make Junky perhaps just a little bit Funky...
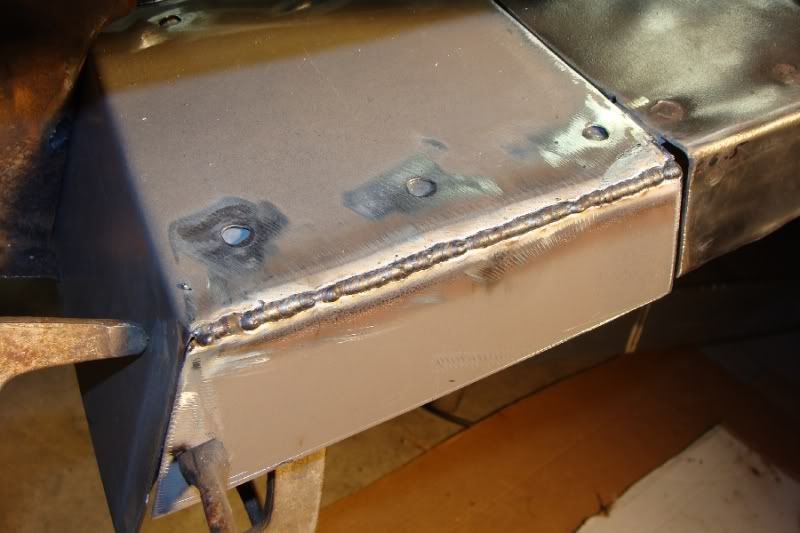
I am getting frustrated. I am getting reminded of why I don't like bodywork. When I bought this truck, I was looking for something I could work on, but more engine than body. I am having issues mounting the cab support. I can't figure out the best way to weld it to the frame and floor pan. I'll do a search on the forum for tips, and hopefully that will help.
I have a spot welder, but I can't fit it in the space needed to be of much help. My welding skills are not totally there yet, so when I tried welding the edges, that did not go so well as you will see in the pics I attached. I posted before and after pics. I was having a lot of trouble getting the support to attach to the frame. It kept coming loose after I release the clamp. I finally remembered what Dan told me about spot welding with a MIG welder and cranked up the heat, which seemed to work (even though this was not a spot weld, the idea worked). Is this a suitable way of attaching the support or am I going to have issues? Is anyone still reading this thread? |
|
|
|
|
07-01-2013, 11:24 PM
|
#183 |
|
Registered User
Join Date: Feb 2011
Location: Riverbank, Ca
Posts: 1,006
|
Re: Trying to make Junky perhaps just a little bit Funky...
I'm still reading, and I'm a fabricator. When welding the seam, try moving slower and weld tight cursive e's. small, small, small sections; 3/4 to an inch. Tale your time. Do and inch and wait half hour. Repeat. Repeat. You're doing fine.
If you have any questions you are more than welcome to pm me. Posted via Mobile Device
__________________
Rob 1971 c10 - ground up in progress Tripp's Speed Shop Build - http://67-72chevytrucks.com/vboard/s...d.php?t=589750 |
|
|
|
|
07-01-2013, 11:26 PM
|
#184 |
|
Registered User
Join Date: Feb 2011
Location: Riverbank, Ca
Posts: 1,006
|
Re: Trying to make Junky perhaps just a little bit Funky...
Btw. What welder are you using and what are your settings at. Looking at the pics closely, you may have your wire speed too high.
Posted via Mobile Device
__________________
Rob 1971 c10 - ground up in progress Tripp's Speed Shop Build - http://67-72chevytrucks.com/vboard/s...d.php?t=589750 |
|
|
|
|
07-01-2013, 11:40 PM
|
#185 | |
|
Registered User
Join Date: Aug 2011
Location: new york, ny
Posts: 1,063
|
Re: Trying to make Junky perhaps just a little bit Funky...
Quote:
The support seems to be decently in place now on that side (I hope). Thanks for the help and the tips. I appreciate it. I'll try and slow down a bit tomorrow evening. |
|
|
|
|
|
07-01-2013, 11:46 PM
|
#186 |
|
Registered User
Join Date: Feb 2011
Location: Riverbank, Ca
Posts: 1,006
|
Re: Trying to make Junky perhaps just a little bit Funky...
Slow and steady. I assume you have a bottle hooked up? What mix are you using and what's the regulator set to. All that comes into play when welding. Another huge thing a lot of people over look are your consumables. What tips and wire size. For most all autobody .024 is what you'll need. .030-.035 will just be globs.
Posted via Mobile Device
__________________
Rob 1971 c10 - ground up in progress Tripp's Speed Shop Build - http://67-72chevytrucks.com/vboard/s...d.php?t=589750 |
|
|
|
|
07-02-2013, 12:00 AM
|
#187 | |
|
Registered User
Join Date: Aug 2011
Location: new york, ny
Posts: 1,063
|
Re: Trying to make Junky perhaps just a little bit Funky...
Quote:
I don't know what the Argon/Co2 mix is. The local welding shop refilled it for me. I have the gauge on the tank set between 9 and 10 usually. |
|
|
|
|
|
07-02-2013, 12:04 AM
|
#188 | |
|
Registered User
Join Date: Feb 2011
Location: Riverbank, Ca
Posts: 1,006
|
Re: Trying to make Junky perhaps just a little bit Funky...
Quote:
Posted via Mobile Device
__________________
Rob 1971 c10 - ground up in progress Tripp's Speed Shop Build - http://67-72chevytrucks.com/vboard/s...d.php?t=589750 |
|
|
|
|
|
07-02-2013, 12:18 AM
|
#189 | |
|
Registered User
Join Date: Aug 2011
Location: new york, ny
Posts: 1,063
|
Re: Trying to make Junky perhaps just a little bit Funky...
Quote:
Are you suggesting I increase the regulator from 10 to 30 or 35? Or are you saying the argon only if it was separate? Thanks for your help. Posted via Mobile Device |
|
|
|
|
|
07-02-2013, 12:37 AM
|
#190 |
|
Registered User
Join Date: Feb 2011
Location: Riverbank, Ca
Posts: 1,006
|
Re: Trying to make Junky perhaps just a little bit Funky...
You can use two bottles, but premixed is fine and what most people use. I mean increase the regulator from 10 to 30 or 35. It's for the has coverage, not just the argon. Sorry if its confusing.
Posted via Mobile Device
__________________
Rob 1971 c10 - ground up in progress Tripp's Speed Shop Build - http://67-72chevytrucks.com/vboard/s...d.php?t=589750 |
|
|
|
|
07-02-2013, 12:51 AM
|
#191 | |
|
Registered User
Join Date: Aug 2011
Location: new york, ny
Posts: 1,063
|
Re: Trying to make Junky perhaps just a little bit Funky...
Quote:
Posted via Mobile Device |
|
|
|
|
|
07-02-2013, 06:25 AM
|
#192 |
|
Registered User
Join Date: Apr 2011
Location: Mustang, Oklahoma
Posts: 2,807
|
Re: Trying to make Junky perhaps just a little bit Funky...
Still here buddy. Hardesty has some great advice for you. .024 solid wire, slow down and either turn the heat up or wire speed down if it is popping or globbing, the 75/25 Ar/Co2 setting should be 25 CFH when your on the trigger so it is typically set to 30ish when you're not on the trigger. Make sure you are actually getting flow out of th tip and clean the tip regularly. If you are using an extension cord make sure it is the same wire gauge as the welder and or the house wiring and just long enough to get around whenre you need it, (dont use a 50 ft 18 ga extension cord). I have a 12/3 cord that is 12' when needed for my Hobart 110v. I noticed personally when I used the copper weld primer that I had to increase the heat but maybe I sprayed it on a little too thick. I have also heard many complaints about HF mig wire. If you are using HF wire you might want to try something else, hobart,miller, or lincoln wire.
__________________
Dan <---(my name) 67 SWB C10 project "GEORGIA"-59 Brookwood 2dr wag...Next project-03 Tahoe 4x4 5.3 family ride-07 Hondur Accord, commuter car |
|
|
|
|
07-02-2013, 09:11 AM
|
#193 | |
|
Registered User
Join Date: Aug 2011
Location: new york, ny
Posts: 1,063
|
Re: Trying to make Junky perhaps just a little bit Funky...
Quote:
How are you doing? How's the littlest one coming along? Thanks for the additional tips. I will stop by the local welding shop and see if I can get another brand of wire, or maybe I'll check Amazon first since they sell almost everything. My wiring is pretty decent; I have an extension cord that is only about 10-15 feet, and it's 12 gauge wire. While my garage is detached, it's not that far of a run to the house, and that is also 12 gauge wire underground, so I think I am in good shapre there. I'll try all of your suggestions out over the next couple of days and see what happens. Much appreciated! Thanks! PS - Found this truck on Ebay with a rusted frame. Would love to get it and just transfer the cab. But my wife would give me a hard time about spending the cash, and she hates the color, so I would still need to re-paint it. Would also need to go through the hassle of selling the engine and transmission as I already have a rebuilt one of each. http://cgi.ebay.com/ebaymotors/ws/eB...ORS:1123#v4-37 |
|
|
|
|
|
07-02-2013, 11:15 AM
|
#194 |
|
Still Learning
Join Date: Jul 2009
Location: Central Oklahoma
Posts: 10,108
|
Re: Trying to make Junky perhaps just a little bit Funky...
I would add this, If you can't get to your spot welder into an area, you can drill a 1/4"-5/16" dia. hole in your sheetmetal then clamp it to the mating piece, then just crank your heat up a little fill the hole with weld in a circular motion. Then grind the weld smooth. This will make a super strong joint. You can see more of my cab repair starting on page 29 HERE. This is a patch I fabicated for my floor using the hole technique
 I have done some of the very same repairs you are doing to your cab. Hang in there, some folks just read and look at pics without ever replying to your thread. We are here to help. Just like the guys that have helped us. 
|
|
|
|
|
07-02-2013, 11:27 AM
|
#195 | |
|
Registered User
Join Date: Aug 2011
Location: new york, ny
Posts: 1,063
|
Re: Trying to make Junky perhaps just a little bit Funky...
Quote:
|
|
|
|
|
|
07-02-2013, 10:20 PM
|
#196 |
|
Registered User
Join Date: Aug 2011
Location: new york, ny
Posts: 1,063
|
Re: Trying to make Junky perhaps just a little bit Funky...
I ordered the Hobart .024 wire today from Amazon. I will have it on Friday and will update over the weekend. I had some stuff to do tonight so I could not spend much time on the truck, but I did finally finish bolting up the transmission pan; It was missing some bolts. Also installed my engine mounts, opened my box from Summit which has a new double groove power steering pulley and the steering linkage for the transmission.
Managed to damage my puller by using the wrong parts to try and remove the orignial pulley. That's about it. Thanks again for all of your help, Rob, Dan, and Mike. I should be trying out your suggestions by the weekend! |
|
|
|
|
07-02-2013, 11:53 PM
|
#197 |
|
Registered User
Join Date: Feb 2011
Location: Riverbank, Ca
Posts: 1,006
|
Re: Trying to make Junky perhaps just a little bit Funky...
That's what we're here for! Let me know how it turns out.
Posted via Mobile Device
__________________
Rob 1971 c10 - ground up in progress Tripp's Speed Shop Build - http://67-72chevytrucks.com/vboard/s...d.php?t=589750 |
|
|
|
|
07-05-2014, 02:20 PM
|
#198 |
|
Registered User
Join Date: Aug 2011
Location: new york, ny
Posts: 1,063
|
Re: Trying to make Junky perhaps just a little bit Funky...
Hello, I hope everyone is having a great 4th of July weekend! It has taken almost a year, but after dealing with the cold weather and all the snow, being sidetracked with home improvement projects, a fair amount of procrastination, and a severe lack of motivation, I have finally started working on the truck again.
I decided a while ago, after reading one of the threads on this board, to just replace the entire floor pan rather than trying to repair the existing one. I would like to get the floor done before I retire, which is not for at least 20 years, so I think the floor pan replacement is the way to go. It looks way easier than trying to repair everything. So I started the process of bracing the cab. I would appreciate anyone's opinion on whether I have enough bracing. I have done one door and the inside of the cab. I have not finished the other door as yet. Some of the bracing material might look a bit odd. We had some steel garden posts that we did not need, so I decided to recycle them and use them as braces. I went to Home Depot to get more steel rods, but they were out of the size I needed. I then saw these really thick garden posts for 1/2 the price of a steel rod. I got a few of them, cut it to size, and shaved off the paint on the contact points. Works really well, and they are very strong. The last picture was actually taken first, before I added all the braces in the other photos. Anyway, hope everyone has been doing well. Appreciate your feedback when you have a chance. Thanks! Darien
__________________
___________________________________________ Darien 1971 C10 LWB http://67-72chevytrucks.com/vboard/s...d.php?t=502964 Last edited by DD1; 07-05-2014 at 02:30 PM. |
|
|
|
|
07-07-2014, 08:42 PM
|
#199 |
|
Registered User
Join Date: Aug 2011
Location: new york, ny
Posts: 1,063
|
Re: Trying to make Junky perhaps just a little bit Funky...
I think I am done with the bracing unless someone tells me otherwise.
I took the advice of someone on another post and made a brace from one door to the other. I think I have gone into overkill mode, but overkill is good; better to have too much than not enough. Not sure how much more I will get done this week, but next steps are to remove the remaining rocker panel, and start drilling out the spot welds in the back of the cab. Let me know what you think. Thanks!
__________________
___________________________________________ Darien 1971 C10 LWB http://67-72chevytrucks.com/vboard/s...d.php?t=502964 |
|
|
|
|
07-09-2014, 01:21 PM
|
#200 |
|
Registered User
Join Date: Jul 2006
Location: Central PA
Posts: 12,201
|
Re: Trying to make Junky perhaps just a little bit Funky...
I did this floor as well. Make sure that you take a lot of reference pics with measurements in them (hold up a tape measure).
I focused the bracing on the door frames since the middle will follow that area. cross brace in all three axis then lay cab on it's back to install the new floor. I drilled out the spot welds in the front and back and reused those holes for the new floor. My 68 had extra braces under the gas tank that I don't see on yours, they also helped for allignment. i also used a lot of sheet metal screws to initial fitting Good luck.
__________________
The Garage: 1968 K-10 SWB - "Project Money Pit" 1996 Z-71 - "huntin rig" 1969 C-10 LWB (SOLD) "Project flip that truck or else" 1993 Passport, F@rd 1-ton (SOLD)"Project Cousin Eddie" My Garage Build "The 1,000 footer" |
|
|
|
 |
| Bookmarks |
|
|


 I have been to a few stadiums but not that one, My wife went to the old Yank stadium.


 Linear Mode

