
|
 08-11-2012, 05:18 PM
|
#401 |
|
Registered User
Join Date: Jul 2011
Location: Des Moines, Iowa
Posts: 3,016
|
Re: Barn raising
Safety first. Sorry to hear about your dad's leg(s)? Burned both? ouch
__________________
project: "my happy mess" |

|

|
|
08-12-2012, 01:04 AM
|
#402 |
|
Registered User
Join Date: Apr 2003
Location: Indep, MO
Posts: 5,893
|
Re: Barn raising
Saw in the C10 video, truck looks cool!
Posted via Mobile Device
__________________
Boppa's Old Yeller Truck Build, Old Yeller's New Heart! Project Buzz Bomb Flyin' Low! |
|
|
|
|
08-12-2012, 01:13 AM
|
#403 |
|
Registered User
 Join Date: Apr 2008
Location: San Diego California
Posts: 1,316
|
Re: Barn raising
Thanks it was a fun show. Glad we got it well documented
__________________
I'd rather attempt something great and fail.. than try something ordinary and succeed. Norman Vincent Peale Project: Barn Raising http://67-72chevytrucks.com/vboard/s...d.php?t=414961 Project: 30 Be Low https://67-72chevytrucks.com/vboard/...d.php?t=830583 |
|
|
|
|
08-12-2012, 06:47 AM
|
#404 |
|
Registered User
Join Date: Dec 2010
Location: Port St Lucie,FL
Posts: 203
|
Re: Barn raising
I went back to pg.5 where you made the spoiler, maybe you could bend a piece of metal like you did there and mount with spacer tabs towards each end of the doors (not on the doors)for air flow.You could paint the metal to match the the exhaust or to match the truck like they did on the 50's rods.
Or even design (you are good at that) some kind of shields you could pop on for the ride, but take off for shows, They would have to attach securely enough to stay on for the ride, but easy enough to take off w/o alot of trouble obviously. Wear gloves. 
|
|
|
|
|
08-12-2012, 03:47 PM
|
#405 |
|
Registered User
Join Date: Apr 2008
Location: San Diego California
Posts: 1,316
|
Re: Barn raising
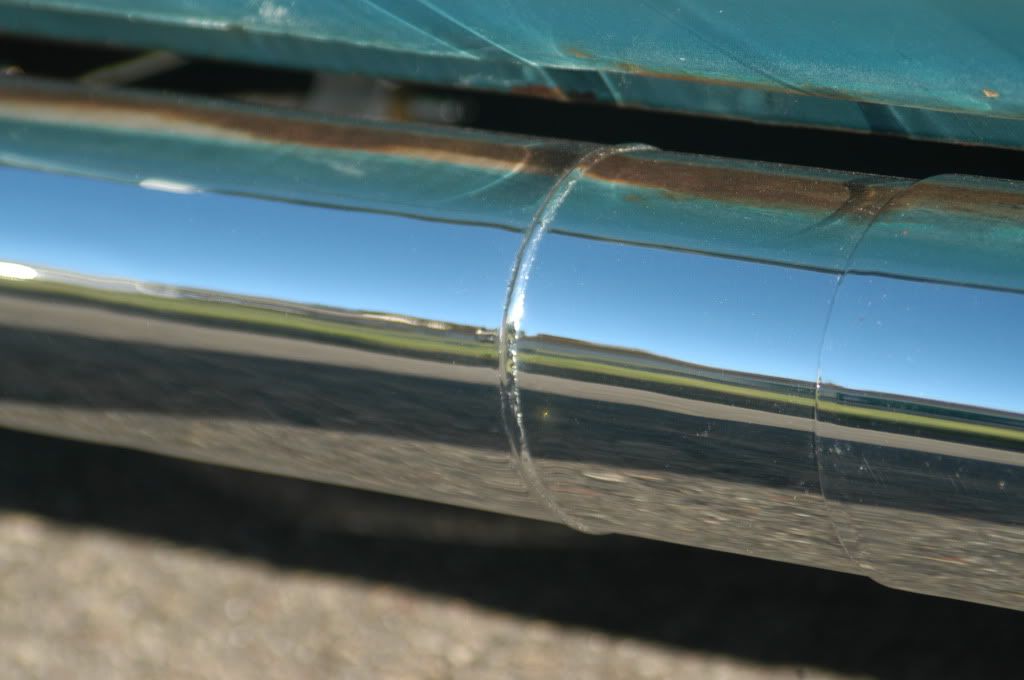
Yes that is what I need to do but I am thinking more of an active rather than passive method. Because I know that one time I forget to take something on or off that is the time someone will get burned. I will probably use the rest of the tube from the spoiler in this project though, good idea!
Here is an idea of what I am thinking. It will use a windshield wiper motor or power window motor and will be activated by the door being opened or closed. Sorry for the crude sketch I only have MS Paint. I would love to get this done in Solid Works so I can see it move and refine it before I break out the plasma cutter.  Here is another version with a chrome shield attached to the bar for added protection. 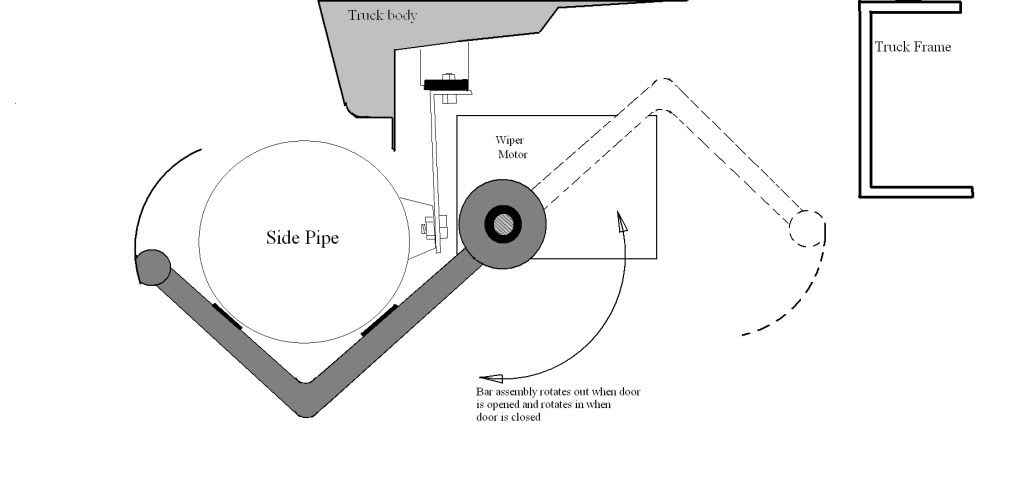
__________________
I'd rather attempt something great and fail.. than try something ordinary and succeed. Norman Vincent Peale Project: Barn Raising http://67-72chevytrucks.com/vboard/s...d.php?t=414961 Project: 30 Be Low https://67-72chevytrucks.com/vboard/...d.php?t=830583 |
|
|
|
|
08-12-2012, 05:31 PM
|
#406 |
|
GEARHEAD
Join Date: Aug 2003
Location: MN
Posts: 6,115
|
Re: Barn raising
If there is enough room between the pipe and the rocker, maybe a rotating half circle shield that would turn 180 out and over the pipe in the area where your leg would reach, then 180 back to hidden under the floor. Less cumbersome and probably easier to make. It actually would not need to be circular either, but would rotate like a clock as you look down at it. Would not have to be metal, but that would work. Maybe some plastic or plexi type material, since it's not a step, just a guard.
__________________
If no one knows what you're doing, they can't tell you you're doing it wrong HG's Dream Car Build - Shelby Cobra Kit Build your own adjustable track bar 71  Long Fleet C/10 Long Fleet C/10 72  Jimmy 4x4 (Junkyard Jimmy) Jimmy 4x4 (Junkyard Jimmy)HG's Plow Truck '78  K35 Dually K35 DuallyBigass Farm Truck HG's thread of miscellaneous stuff |
|
|
|
|
08-12-2012, 06:16 PM
|
#407 |
|
Registered User
Join Date: Dec 2010
Location: Port St Lucie,FL
Posts: 203
|
Re: Barn raising
I see where you were going with the Ford power running boards idea.
While expensive, the smaller Amp bed steps may work - or if you find a big truck with one that you can look under, it you may get more of an idea on how to fit what you want. http://www.electricstep.com/AMP-Rese...dStep2-c98.htm Last edited by ThreeQtr; 08-12-2012 at 06:17 PM. Reason: Added link |
|
|
|
|
08-12-2012, 10:08 PM
|
#408 |
|
Registered User
Join Date: Apr 2008
Location: San Diego California
Posts: 1,316
|
Re: Barn raising
There is not much space in between the rocker and pipe. It is tucked up pretty tight. I see what you mean about being a little complex but it really is just a simple 180 turn on a worm drive motor. The main thing is that whatever the mecanism is it needs to be far enough away from the pipe while driving so that the shield does not heat up just as hot as the pipe. My motor cycle has a metal heat shield on the exhaust and after a long ride it is pretty hot also.
__________________
I'd rather attempt something great and fail.. than try something ordinary and succeed. Norman Vincent Peale Project: Barn Raising http://67-72chevytrucks.com/vboard/s...d.php?t=414961 Project: 30 Be Low https://67-72chevytrucks.com/vboard/...d.php?t=830583 |
|
|
|
|
08-12-2012, 10:10 PM
|
#409 | |
|
Registered User
Join Date: Apr 2008
Location: San Diego California
Posts: 1,316
|
Re: Barn raising
Quote:
__________________
I'd rather attempt something great and fail.. than try something ordinary and succeed. Norman Vincent Peale Project: Barn Raising http://67-72chevytrucks.com/vboard/s...d.php?t=414961 Project: 30 Be Low https://67-72chevytrucks.com/vboard/...d.php?t=830583 |
|
|
|
|
|
08-13-2012, 07:58 AM
|
#410 |
|
Registered User
Join Date: Jan 2011
Location: Gilberts IL.
Posts: 2,488
|
Re: Barn raising
[QUOTE=
The covers were tightened to spec and still leaks. Finally removed the gaskets and put a finger smear of RTV on the top and bottom of the gasket. Next day the same oil drip was on the pan. I then removed the valve covers again and installed the FelPro rubber ones that were on the truck before the bent push rod. They are a much better design, I guess I was just going on the thought that since the new ones were designed for fabricated covers they should be better for my application. So far I have driven the truck about 30 miles on the better gaskets and they are not leaking, but time will tell. They make extra thick ones for the cast valve covers that is what I used because with the stock ones the valve covers hit the intake runners causing them not to tighten down all the way
__________________
94 k2500 EXCab Long Bed 350ci New Toy 95 K2500 Suburban New PlowTruck 454ci Support our Troops @ http://anyairman.com http://www.woundedwarriorproject.org/ |
|
|
|
|
08-14-2012, 11:08 AM
|
#411 |
|
Registered User
Join Date: Apr 2008
Location: San Diego California
Posts: 1,316
|
Re: Barn raising
Thanks for the info Frankie, I eventually did get the extra thick Mr. Gasket ones and they leak by far the least, but still just a little gets by.
__________________
I'd rather attempt something great and fail.. than try something ordinary and succeed. Norman Vincent Peale Project: Barn Raising http://67-72chevytrucks.com/vboard/s...d.php?t=414961 Project: 30 Be Low https://67-72chevytrucks.com/vboard/...d.php?t=830583 |
|
|
|
|
08-23-2012, 11:53 PM
|
#412 |
|
Registered User
Join Date: Apr 2008
Location: San Diego California
Posts: 1,316
|
Re: Barn raising
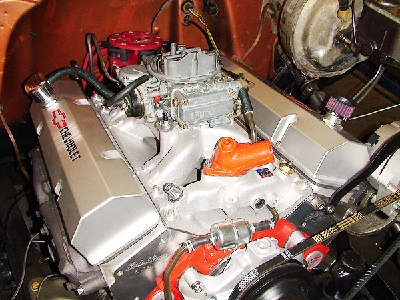
I have another thought on my leaky valve covers. I noticed that my breather that has the pcv valve installed is is not blowing gasses out but it is sucking in through the carb. The side where it is leaking has the breather that is not hooked up to the carb and will actually blow gasses out through the holes in the bottom, those gasses eventually fill up the little sponge filter in the breather and it is saturated with oil, then it is blown out onto the top of the valve cover where it leaks down on the valve cover. I am going to hook the breather up to the carb port and see if it reduces the amount of oil on the bottom of the engine.
Posted via Mobile Device
__________________
I'd rather attempt something great and fail.. than try something ordinary and succeed. Norman Vincent Peale Project: Barn Raising http://67-72chevytrucks.com/vboard/s...d.php?t=414961 Project: 30 Be Low https://67-72chevytrucks.com/vboard/...d.php?t=830583 |
|
|
|
|
08-24-2012, 01:38 AM
|
#413 |
|
60-66 Nut
 Join Date: Mar 2007
Location: Coeur d'Alene, Idaho
Posts: 23,246
|
Re: Barn raising
If your pcv that is likely the problem. The pcv is sucking air thru the breather is is sitting in instead of thru the breather on the other side. Consequently it is not evacuating the crankcase. Try inserting the pcv directly into the valve cover. Of course there needs to be a baffle inside the valve cover, under the pcv. I think this may solve most if not all of your oil leak.
__________________
Power Steering Box Adapter Plates For Sale HERE Power Brake Booster Adapter Brackets For Sale '63-'66 HERE and '67-'72 HERE and '60-'62 HERE and "60-'62 with clutch HERE Rear Disc Brake Brackets For Sale. Impala SS calipers HERE Camaro Calipers HERE D52 Calipers HERE 6 Lug HERE Hydroboost Mounting Plates HERE |
|
|
|
|
08-24-2012, 08:36 AM
|
#414 |
|
Registered User
Join Date: Jan 2011
Location: Gilberts IL.
Posts: 2,488
|
Re: Barn raising
I think Captainfab is on to something is there a baffle on the valve cover so you aren't getting oil directly on the breather. You might also want to try a solid cap on the valve cover like the newer cars with PVC valves do, with the open breather you might not be getting enough suction to get all the vapor out and when at idle the heat from the engine maybe carrying oil vapor with it an collecting in the breather. Something to think about and would be an easy fix.
__________________
94 k2500 EXCab Long Bed 350ci New Toy 95 K2500 Suburban New PlowTruck 454ci Support our Troops @ http://anyairman.com http://www.woundedwarriorproject.org/ |
|
|
|
|
08-24-2012, 06:48 PM
|
#415 |
|
Registered User
Join Date: Apr 2008
Location: San Diego California
Posts: 1,316
|
Re: Barn raising
Yes it has a baffle in both valve covers. When I first installed the PCV on the drivers side, the passenger side sponge filter was nice and clean for a long time. That tells me that the crank case gasses were effectively being evacuated through the valve.
I think when I let off the throttle a bit more back pressure develops in the passenger side baffle. Having it hooks up to the carb on that side should relieve any excessive pressures. Posted via Mobile Device
__________________
I'd rather attempt something great and fail.. than try something ordinary and succeed. Norman Vincent Peale Project: Barn Raising http://67-72chevytrucks.com/vboard/s...d.php?t=414961 Project: 30 Be Low https://67-72chevytrucks.com/vboard/...d.php?t=830583 |
|
|
|
|
08-25-2012, 01:12 AM
|
#416 | |
|
60-66 Nut
Join Date: Mar 2007
Location: Coeur d'Alene, Idaho
Posts: 23,246
|
Re: Barn raising
Man, I need to stop posting when I'm so tired
 Should have read like this: If your pcv valve is installed in a breather that is likely the problem. The pcv valve is sucking air thru the breather it is sitting in instead of thru the breather on the other side. Consequently it is not evacuating the crankcase. Try inserting the pcv valve directly into the valve cover. Of course there needs to be a baffle inside the valve cover, under the pcv valve. I think this may solve most if not all of your oil leak. That's a little easier to understand. A typical pcv system has the pcv valve in the valve cover on one side of the engine, and a breather on the opposite side of the engine Quote:
__________________
Power Steering Box Adapter Plates For Sale HERE Power Brake Booster Adapter Brackets For Sale '63-'66 HERE and '67-'72 HERE and '60-'62 HERE and "60-'62 with clutch HERE Rear Disc Brake Brackets For Sale. Impala SS calipers HERE Camaro Calipers HERE D52 Calipers HERE 6 Lug HERE Hydroboost Mounting Plates HERE |
|
|
|
|
|
08-25-2012, 10:34 AM
|
#417 |
|
Registered User
Join Date: Apr 2008
Location: San Diego California
Posts: 1,316
|
Re: Barn raising
Back when I installed the PCV I knew it would be working against itself by trying to suck both through the breather holes and the PCV. I knew it would make it less effective but I wanted the look of the breathers vs just the PCV. When I milled out my breather to accept the PCV I also welded up the holes on the bottom of the breather, so the PCV system is working as designed even though it appears to be a passive breather system. The only difference is the addition of the sponge type filter in the breather head. Although this is a pain to always have to clean it out, it is nice to know that all that oil is not making it's way into the combustion chamber.
I really think the fix is to connect the other breather to the intake like it was originally so that both sides are are actively drawing pressure off the crank case. Posted via Mobile Device
__________________
I'd rather attempt something great and fail.. than try something ordinary and succeed. Norman Vincent Peale Project: Barn Raising http://67-72chevytrucks.com/vboard/s...d.php?t=414961 Project: 30 Be Low https://67-72chevytrucks.com/vboard/...d.php?t=830583 |
|
|
|
|
08-25-2012, 11:43 PM
|
#418 | |
|
Registered User
Join Date: Jul 2011
Location: Des Moines, Iowa
Posts: 3,016
|
Re: Barn raising
Quote:
__________________
project: "my happy mess" |
|
|
|
|
|
10-28-2012, 01:36 PM
|
#419 |
|
Registered User
Join Date: Oct 2012
Location: Lebanon Ohio
Posts: 187
|
Re: Barn raising
You have an awesome truck!
I'm new here but love what you did to your truck. Great information too! Was wondering if there are anymore pics of your truck? How does the interior look? Again, great job.....
__________________
1971 Chevrolet C10 Inflation Fighter  1994 C3500 Crew Cab Dually 454
|
|
|
|
|
11-03-2012, 12:25 AM
|
#420 |
|
Registered User
Join Date: Apr 2008
Location: San Diego California
Posts: 1,316
|
Re: Barn raising
Hi Dave welcome to the site. You will find it quite inspiring.
As far as anymore pics of the interior My photo bucket account is all I have. it is pretty much stock with some weathering from age. it is no show stopper on the inside because it was good enough to not need attention but just bad enough to not look too good in pictures. The only upgrade I did was to add a tach to the original dash. Thanks for following along.
__________________
I'd rather attempt something great and fail.. than try something ordinary and succeed. Norman Vincent Peale Project: Barn Raising http://67-72chevytrucks.com/vboard/s...d.php?t=414961 Project: 30 Be Low https://67-72chevytrucks.com/vboard/...d.php?t=830583 |
|
|
|
|
11-03-2012, 01:14 AM
|
#421 |
|
60-66 Nut
Join Date: Mar 2007
Location: Coeur d'Alene, Idaho
Posts: 23,246
|
Re: Barn raising
How's the new engine running? Are your valve covers still leaking?
__________________
Power Steering Box Adapter Plates For Sale HERE Power Brake Booster Adapter Brackets For Sale '63-'66 HERE and '67-'72 HERE and '60-'62 HERE and "60-'62 with clutch HERE Rear Disc Brake Brackets For Sale. Impala SS calipers HERE Camaro Calipers HERE D52 Calipers HERE 6 Lug HERE Hydroboost Mounting Plates HERE |
|
|
|
|
11-05-2012, 11:08 AM
|
#422 |
|
Registered User
Join Date: Apr 2008
Location: San Diego California
Posts: 1,316
|
Re: Barn raising
he rebuild is running great. I think that the only oil that I am getting now on the sides of my engine is from the one breather that is not plummed into the intake. Once I do that I should be fine.
__________________
I'd rather attempt something great and fail.. than try something ordinary and succeed. Norman Vincent Peale Project: Barn Raising http://67-72chevytrucks.com/vboard/s...d.php?t=414961 Project: 30 Be Low https://67-72chevytrucks.com/vboard/...d.php?t=830583 |
|
|
|
|
11-05-2012, 12:43 PM
|
#423 | |
|
Registered User
Join Date: Dec 2009
Location: Kirkland, WA
Posts: 1,302
|
Re: Barn raising
Quote:
__________________
1968 LWB C20 / AC / Wood Bed |
|
|
|
|
|
11-05-2012, 04:51 PM
|
#424 | |
|
Registered User
Join Date: Oct 2012
Location: Lebanon Ohio
Posts: 187
|
Re: Barn raising
Quote:
 This site is great... learning a lot I'm using on of your pics at the bridge as my wallpaper Thanks Again Posted via Mobile Device
__________________
1971 Chevrolet C10 Inflation Fighter 1994 C3500 Crew Cab Dually 454
|
|
|
|
|
|
11-05-2012, 05:02 PM
|
#425 | |
|
Registered User
Join Date: Oct 2012
Location: Lebanon Ohio
Posts: 187
|
Re: Barn raising
Quote:
Posted via Mobile Device
__________________
1971 Chevrolet C10 Inflation Fighter 1994 C3500 Crew Cab Dually 454
|
|
|
|
|
 |
| Bookmarks |
|
|


 Linear Mode

