
|
Register or Log In To remove these advertisements. |
|
|
|
|||||||
 |
|
|
Thread Tools | Display Modes |
 02-21-2016, 02:50 PM
|
#1 |
|
Registered User
Join Date: Feb 2013
Location: GA
Posts: 1,313
|
Where to start on this blasted cab?
Been waiting a long time to get to this, but I have finally gotten my cab blasted and delivered and I knew it was going to be alot of work with my MIG. But whats the right steps to take to get it done?
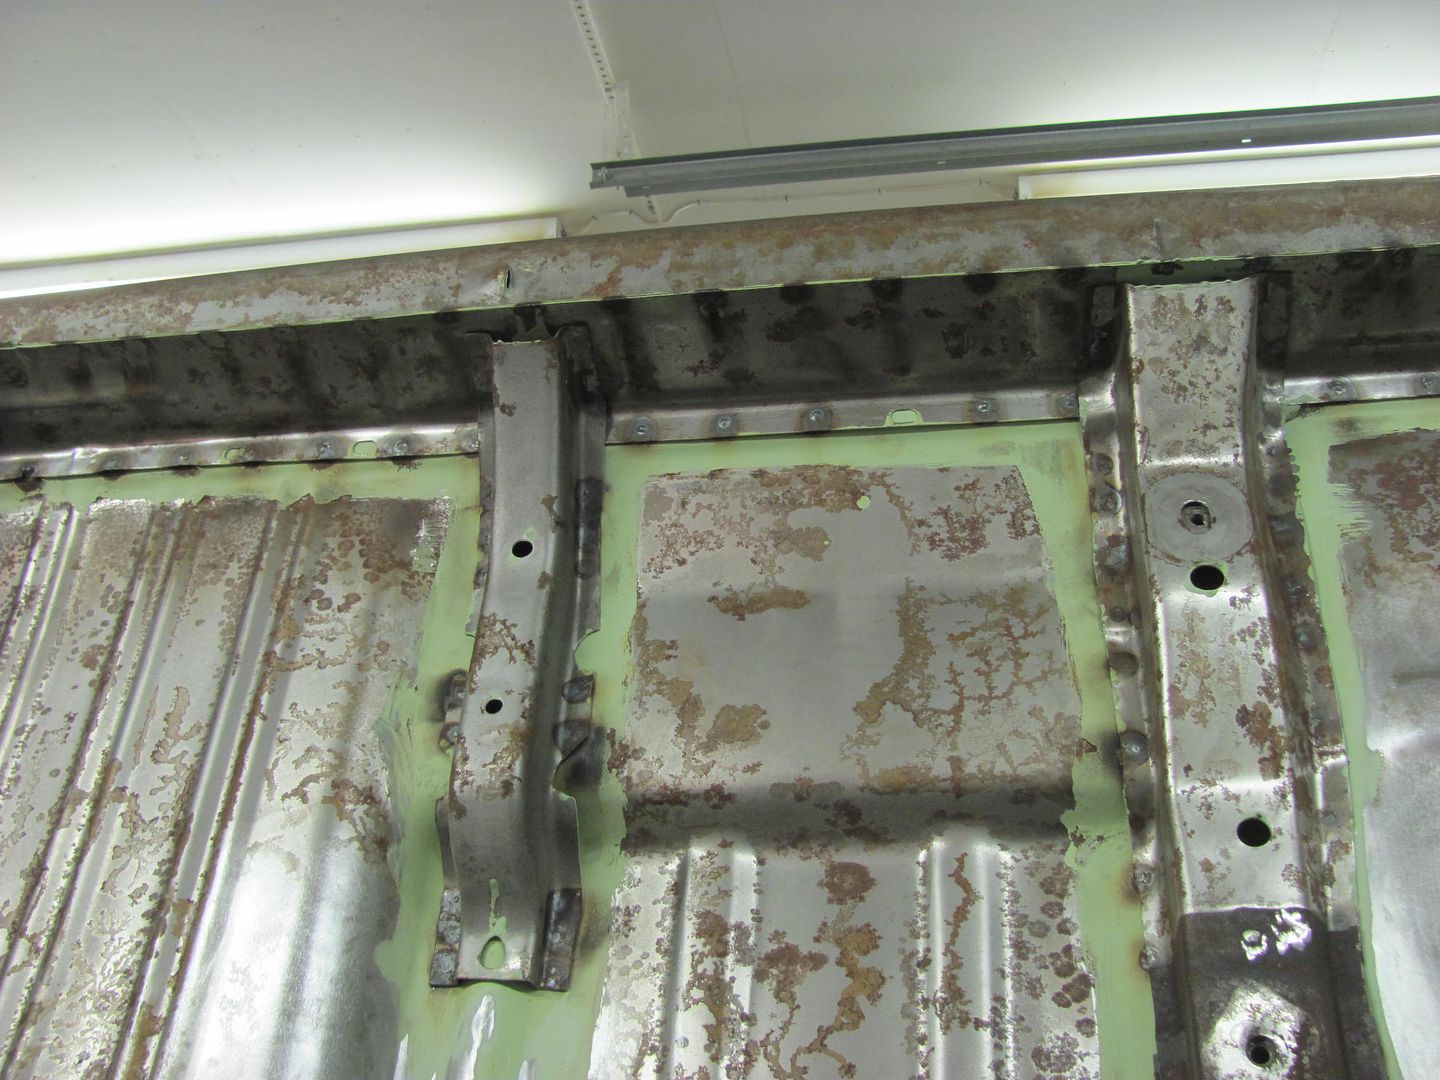
Here is what it looks like, both driver and passenger sides are in the same shape.      I have patch panels for the floor front side, rocker panels and cab corners so far. QUESTIONS
Any tips/tricks you guys have for getting this done right would be appreciated. |

|

|
|
02-21-2016, 03:30 PM
|
#2 |
|
Registered User
Join Date: Jul 2011
Location: Kent, WA.
Posts: 834
|
Re: Where to start on this blasted cab?
I hope you get some experts to answer your questions.
I would clean the metal and prime it. Then add some braces inside of it (top to bottom, side to side) sand off the primer where you need to weld. Btw if patch panels are larger than you rusted area I personally would cut down the new panels rather than cut off good metal. I probably would start with the rockers. This is a perfect post for bodywork and paint section. |
|
|
|
|
02-21-2016, 04:50 PM
|
#3 |
|
Registered User
Join Date: Oct 2010
Location: La Prairie, Quebec
Posts: 230
|
Re: Where to start on this blasted cab?
I am in the same rusted boat as you. I started on the passenger side as a learning ground, if I made errors, i would learn from that side and not see them everytime i get in the truck.
I drilled the welds that hold the rocker in place. cut out the rusted floor, and the kick panel, welded in new metal. I think i need to deal with the cab corner next, then put the rocker back in. Grind stuff some and do the body work. Gonna follow along on this one. Good luck |
|
|
|
|
02-21-2016, 06:30 PM
|
#4 |
|
Registered User
Join Date: Jan 2013
Location: Calgary Alberta
Posts: 1,164
|
Re: Where to start on this blasted cab?
I overlapped some of the panels. I think it would have been better to cut to fit and then butt weld them. I don't know if it is possible but like you say it would be nice to have a way of jigging the panels for proper alignment. BTW yours is not so bad compared to some.
|
|
|
|
|
02-21-2016, 08:19 PM
|
#5 |
|
Registered User
Join Date: Nov 2014
Location: Red Deer, Alberta, Canada
Posts: 166
|
Re: Where to start on this blasted cab?
You have some work ahead of you for sure. I couldn't agree with 3drburb more. Get some epoxy primer on there to protect the blasted metal your not cutting out. Then make sure to brace your cab especally if your doing inner and outter rockers. I posted a reply (72 something or other I cant remember off the top of my head) under the paint and body section for my repair on my 66. It is more of a novel then a post. It was my first time attempting anything like this and I'm still not where I want to be with my cab but it is coming along. If you read my other reply under paint and body and have more questions I'll be more than happy to answer. Wish I'd have asked like you before I started but hey whats learning without making mistakes anyway!Lol! looks like your in the same boat as most of us. I'll be keeping an eye on this one as well to see what some more seasoned guys say.
good luck. |
|
|
|
|
02-21-2016, 09:00 PM
|
#6 |
|
Registered User
Join Date: Sep 2010
Location: Winchester Oregon, formerly Vancouver BC
Posts: 2,949
|
Re: Where to start on this blasted cab?
The first thing you need to do is pop those rockers off, then start. I have a heated garage and my sandblasted hood has been in there for a year and has no rust on it. To me it is a waste of time prime ring and then grinding it off.
|
|
|
|
|
02-21-2016, 10:33 PM
|
#7 |
|
Registered User
Join Date: Sep 2006
Location: Louisiana
Posts: 373
|
Re: Where to start on this blasted cab?
I agree with LT1 Burb. I used phosphoric acid on mine until I was ready to prime. Phosphoric acid is applied with a spray bottle, scuffed with a pad and then wiped with a paper towel. Once you apply phosphoric acid, it keeps metal from rusting as long as the cab doesn't get wet. The only thing you need to decide with using phosphoric acid is what brand/type of primer you will be applying afterward. Some primers have phosphoric acid in them already. The general rule is only one application of phosphoric acid, thus if you do what I am recommending, you can't use a primer that has phosphoric acid as well. I use epoxy primer that is called Kirker Enduro that doesn't have phosphoric acid. When I am ready to prime, I scuff, clean and use a wax and grease remover, then shoot the primer.
Hope that helps. Regards, Steve New Orleans |
|
|
|
|
02-22-2016, 12:03 AM
|
#8 |
|
Registered User
Join Date: Dec 2015
Location: tarboro nc.
Posts: 400
|
Re: Where to start on this blasted cab?
it depends on how damp it gets where his cab is stored and what kind of garage he has .
I have a un insulated un heated metal building with a cement floor and when it rains a lot everything metal gets condensation on it in my garage . so I cant leave that much bare metal without everything getting rusty . and then you get the people that have to touch bare metal , and then you have rusty hand prints too .. so I prime everything that is not getting replaced to avoid all that extra work. |
|
|
|
|
02-22-2016, 12:53 AM
|
#9 | ||||
|
Registered User
Join Date: Feb 2013
Location: GA
Posts: 1,313
|
Re: Where to start on this blasted cab?
Quote:
Quote:
Quote:
 Quote:
Thanks also to LT1Burb, Slorio and 60ChevyJim for replying! My garage is insulated and I do run a dehumidifier, so Im leaning towards waiting to degrease and epoxy primer til after I get the repairs made. I'll keep an eye on rust and always have my nitrile gloves on to keep from contaminating the bare metal. The paint I chose is from Southern Polyurethane Inc, (SPI) and have had to take some parts that some jerk at the blasters didnt use nitrile gloves and their handprints got all over it. So after talking with the tech line at SPI they recommend using Ospho for rust and that it works best with their products. The pain though is that to neutralize Ospho you have to use water dry off the metal, but it still flash rusts a bit and it freaks me out. They sell a wax and grease remover that I also use after the ospho (when needed). So far following their directions has been to the letter and worked out great. The only difference with this cab vs a fender for example is that the fender is easier to sand without alot of intricate curved and embossed areas. SPI recommends to reshoot paint within 6-7 days for best adhesion on a recoat, and this repair is gonna take me a while. I'll give it another day or so before I get to chopping, the bracing seems like the way to go before a cut..I guess I need to go buy some steel rods and tack them. I recall seeing someone do this in a thread. I'll snoop some more and report back. Thanks again all!! |
||||
|
|
|
|
02-22-2016, 01:40 AM
|
#10 |
|
60-66 Nut
  Join Date: Mar 2007
Location: Coeur d'Alene, Idaho
Posts: 23,246
|
Re: Where to start on this blasted cab?
When you tack in your supports, you want to position them so that you can still install the doors to check your fitment and gaps.
__________________
Power Steering Box Adapter Plates For Sale HERE Power Brake Booster Adapter Brackets For Sale '63-'66 HERE and '67-'72 HERE and '60-'62 HERE and "60-'62 with clutch HERE Rear Disc Brake Brackets For Sale. Impala SS calipers HERE Camaro Calipers HERE D52 Calipers HERE 6 Lug HERE Hydroboost Mounting Plates HERE |
|
|
|
|
02-22-2016, 10:26 AM
|
#11 |
|
Registered User
Join Date: Jan 2010
Location: Regina, SK
Posts: 804
|
Re: Where to start on this blasted cab?
I used the cut to fit method on the passenger side and it went "ok"... On the drivers side I would cut out the rusted section to the point where the patch panel overlaps the old metal about 2 inches, then clamp securely and used a few self tapping screws through both layers, then cut both layers at once. I couldn't believe how much easier, faster and better this method is. Even if your cut isn't perfectly straight, it's fine because both sides of the cut match.
Get the extra thin cut off wheels and ya end up with a perfect mig gap. |
|
|
|
|
02-22-2016, 04:15 PM
|
#12 |
|
Registered User
Join Date: Jan 2013
Location: Leonardtown, MD
Posts: 1,634
|
Re: Where to start on this blasted cab?
Leave anything sit long enough in bare metal and you will have plenty of surface rust issues to deal with. Hindsight and all that, I should have media blasted each piece inside and out (yes, even the new stuff) to promote adhesion and epoxy primed each piece individually, inside and out, BEFORE assembly.
 Now we are looking at media blasting the body as it will get into all those nooks and crannies quicker and easier than us doing it by hand. Disclaimer: I have never restored a truck cab, so take this with a grain of salt.. Any assembly, especially given the reproduction parts of today, is likely to be just a little bit different from what the factory did, which in all fairness, even then wasn't up to the same standards that many of us work toward today. But once you assemble a few parts on parts in succession, any imperfection may compound in what can be called "tolerance stacking". For order of assembly, I would think it easier to cover any final fitment defects under a piece of carpet than in the door/fender/rocker gaps. So MY preference is to start from the outside and work your way in. Start with the lower A/B pillars and outer rocker panel, mocking up the parts to form a "door frame". Just like building a house, the door frame gets squared up before worrying about the other details. So mock up/clamp these outer parts, hang the door and adjust the door gaps, and start tacking all these parts once you're happy with the fitment. After all, the gaps around the door are likely the most scrutinized, much less than what's under the floor covering. Get these outside VISIBLE parts as perfect as possible, any other variances in panel fitment (floors, inner rocker, etc) can be hidden. Once your "door frame" is welded, then move on to the inner rockers, braces, floors. There's a million different ways to do something, in the end you lean toward the method you are most comfortable with based on skillset, experience, tooling, etc. If what I mentioned doesn't work for your truck cab, please refer to disclaimer above.. 
__________________
Robert |
|
|
|
|
02-22-2016, 05:41 PM
|
#13 |
|
Registered User
Join Date: Aug 2006
Location: Athens, Georgia
Posts: 1,456
|
Re: Where to start on this blasted cab?
In 20 years of writing magazine tech articles, I've learned from some of the best in the business.
First thing I would do is hang the doors back on it, with rebuilt hinges. Everything on that truck right now, is a factory fit... rusted, but a factory fit. All the gaps and alignment is as it was from the factory (with fresh hinges). Align the doors with fresh hinges, to the factory location of the rockers. Then replace the rockers and get them fitted and gapped to the factory location of the door. Without seeing the back side and underside of the rockers, I'm not sure I'd fully replace them. There's a couple small holes in the face of it, below the door. I'd poke that with a screwdriver and see how much of that metal is good... if most of it is, I think I'd just patch the face of it. For the top where it's rusted, I'd cut that out and use a repro rocker as a donor. Butt-weld it, and the seam will be under the rocker sill plate. A mistake a lot of people make is thinking they need to "get their money's worth" by using an entire replacement panel. I like to see as much of the original metal retained as possible. I might think about repairing that rear cab corner before I did anything with the rocker. The stock rocker in the stock location will make the alignment of the cab corner more exact. I'd replace the floor sections and fit them to the stock bottom edge of the firewall toeboards, at the same time replacing the bottom edge of the firewall where it's needed. I had to fabricate the bottom edge of the firewall on my '61, and recreate the factory flange in some areas, before finishing the floor pan installation. -Brad
__________________
'61 Suburban daily driver: off the road due to 180-pound 8-pt buck! '62 K-10 long-step project '61 C30 Camper, aka "Valdez" There's no cool like Old School |
|
|
|
|
02-22-2016, 05:43 PM
|
#14 | |
|
Registered User
Join Date: Aug 2006
Location: Athens, Georgia
Posts: 1,456
|
Re: Where to start on this blasted cab?
Quote:
-Brad
__________________
'61 Suburban daily driver: off the road due to 180-pound 8-pt buck! '62 K-10 long-step project '61 C30 Camper, aka "Valdez" There's no cool like Old School |
|
|
|
|
|
02-22-2016, 09:01 PM
|
#15 |
|
1 thing at a time is progress.
Join Date: Jun 2007
Location: Ball Ground GA
Posts: 5,511
|
Re: Where to start on this blasted cab?
__________________
Alan
Philippians 2:14-16 |
|
|
|
|
02-26-2016, 01:14 AM
|
#16 | ||||
|
Registered User
Join Date: Feb 2013
Location: GA
Posts: 1,313
|
Re: Where to start on this blasted cab?
Quote:
Quote:
Quote:
Quote:
     Thanks for the pic Alan, seems like I recalled from an earlier post Id seen from you somewhere. Is that bracing stuff you get at home depot or Lowes? |
||||
|
|
|
|
02-26-2016, 01:36 AM
|
#17 |
|
Registered User
Join Date: Nov 2014
Location: Red Deer, Alberta, Canada
Posts: 166
|
Re: Where to start on this blasted cab?
Your cab looks way better then mine in ways and way worse in others. That rear seam where the back of the cab joins the floor was a major pain. I took the replacement cab corner to a sheet metal shop so they could see the seam profile, they bent up a few pieces of scrap for 20 bucks. I was able to use them to re work the seam from one side to the other with them. it was very challenging. how bad is the inside of that lip?
|
|
|
|
|
02-26-2016, 08:54 AM
|
#18 | |
|
Registered User
Join Date: Aug 2006
Location: Athens, Georgia
Posts: 1,456
|
Re: Where to start on this blasted cab?
Quote:
If you do one side at a time, and do them one component at a time, I don't really see why you'd need to weld braces into the cab to keep it together. For instance, if you start with the driver's side rocker panel, you'll cut out the rocker, but the floor will still be in there--and the floor will keep the cap together. Then when the new rocker is in, cut out the floor pan section and the cab is held together with the rocker. AND, the other side of the vehicle that you haven't touched yet. If you're going to cut out both rockers and the floor pan at the same time, then yeah, I'd brace it. But otherwise there's enough there to hold it all together on its own. -Brad
__________________
'61 Suburban daily driver: off the road due to 180-pound 8-pt buck! '62 K-10 long-step project '61 C30 Camper, aka "Valdez" There's no cool like Old School |
|
|
|
|
|
02-26-2016, 10:36 AM
|
#19 |
|
Registered User
Join Date: Jan 2010
Location: Regina, SK
Posts: 804
|
Re: Where to start on this blasted cab?
Damn those floor braces are nice. I wish my truck was that solid when I started.
I agree with Brad, you might be able to get away without bracing, BUT for the small cost and small amount of effort, why not? I used angle iron and did like Capt said, welded it so you could hang the doors. Doors fit back on excellent. Also doesn't hurt to drill a small hole through the hinges and hinge plates in the pillar before taking the doors off, then you can use the drill bits to line the door back up. |
|
|
|
|
02-27-2016, 01:45 AM
|
#20 |
|
60-66 Nut
Join Date: Mar 2007
Location: Coeur d'Alene, Idaho
Posts: 23,246
|
Re: Where to start on this blasted cab?
At a minimum you are going to need cab corners, outer rockers and inner rockers and outer floor. I would get the one piece outer floor with the inner rocker. Those are much easier to work with and get things straight IMO. Some of the back of the cab you will either need to fab yourself or find a donor cab to cut that section from.
__________________
Power Steering Box Adapter Plates For Sale HERE Power Brake Booster Adapter Brackets For Sale '63-'66 HERE and '67-'72 HERE and '60-'62 HERE and "60-'62 with clutch HERE Rear Disc Brake Brackets For Sale. Impala SS calipers HERE Camaro Calipers HERE D52 Calipers HERE 6 Lug HERE Hydroboost Mounting Plates HERE |
|
|
|
|
02-28-2016, 09:19 AM
|
#21 |
|
Registered User
Join Date: Feb 2015
Location: Belmont Ontario Canada
Posts: 418
|
Re: Where to start on this blasted cab?
I wish mine was that nice....but I like custom trucks...LOL...good luck it'll be sweet when done Im sure..
|
|
|
|
|
02-28-2016, 01:51 PM
|
#22 | |
|
Registered User
Join Date: Aug 2006
Location: Athens, Georgia
Posts: 1,456
|
Re: Where to start on this blasted cab?
Quote:
A GREAT piece of advice I got from Ron Covel during one of his metal fab classes was "Be comfortable when you work. It allows you to work fussy... you won't hurry something up because you're in an awkward position, cramped or exhausted." One of the most valuable piece of advice I ever got. -Brad
__________________
'61 Suburban daily driver: off the road due to 180-pound 8-pt buck! '62 K-10 long-step project '61 C30 Camper, aka "Valdez" There's no cool like Old School |
|
|
|
|
|
02-28-2016, 01:59 PM
|
#23 |
|
Registered User
Join Date: Oct 2015
Location: Kentucky
Posts: 172
|
Re: Where to start on this blasted cab?
That bracing looks like it would make it hard to test fit the doors while lining up the rockers!?
|
|
|
|
|
02-28-2016, 02:10 PM
|
#24 | ||||
|
Registered User
Join Date: Feb 2013
Location: GA
Posts: 1,313
|
Re: Where to start on this blasted cab?
Quote:
Quote:
I had a thread on it here http://67-72chevytrucks.com/vboard/s...d.php?t=690647 Quote:
 Quote:
But for today I will set my sights on the hood that the blaster couldnt get all of the top off. I had removed the inner bracing and they didnt want to warp it so it s me and some paint stripper today. 
|
||||
|
|
|
|
02-28-2016, 03:45 PM
|
#25 |
|
Registered User
Join Date: Feb 2013
Location: GA
Posts: 1,313
|
Re: Where to start on this blasted cab?
Capt, I just realized those rockers appear to be the inner ones that I bought many years ago. Maybe Im better off buying the part you described with the outer floor and inner rocker combined? I have not found it yet, best Ive found is this outer floor.
http://www.classicparts.com/1960-66-.../#.VtNNkpMrLsE |
|
|
|
|
| Bookmarks |
|
|


 Linear Mode

