
|
Register or Log In To remove these advertisements. |
|
|
|
|||||||
 |
|
|
Thread Tools | Display Modes |
 11-04-2014, 02:01 PM
|
#1 |
|
Registered User
Join Date: Dec 2010
Location: Carnation, Wa
Posts: 142
|
Subaru bucket seats & a console without any new holes to my floor - How I did it
So, I wanted buckets & a console, but the price of factory bucket/console combos are approaching $1000, and even then they'll likely need to be recovered.
When it's all said and done, you'll have 1800 bucks into 40 year old seat technology. I've bought whole trucks for half that price! Yes, factory correct stuff is the right way to do it, and for some trucks out there, it's the only way to go. But what if you've just got a driver and just want a happier butt? Including the wallet it's sitting on. I scanned the forums, found some decent threads, like Beaumont's 73-87 bucket adaption And the Picture request thread on seat swaps But no decent write-ups on start to finish of odd-ball wrecking yard seat swaps, so here we go. This is the first thread I've ever started, so bear with me... Before  After  My wife likes Subaru's the same way I like Chevy trucks. After numerous road trips in her numerous Subaru's, I realized that I can sit in those seats all the way across the country, and still function the next day! So when we visited a wrecking yard for parts, I snagged a pair of seats out of a 2007 Impreza. $140 or so.  These seats don't mount to their floor flat, and I wanted flat surfaces to work with. So I ground off all of the Subaru specific mounts and ground the rails down flat, being very careful not to wreck the sliders. When I had a flat level surface at each corner, I welded some bolts I had in my 5 gallon bucket of spares- making sure that the threads were all similar and they were grade 5 or better. I used a square to try my best at getting them perpendicular to the rails and parallel with each other. I give myself a B- on that accomplishment...  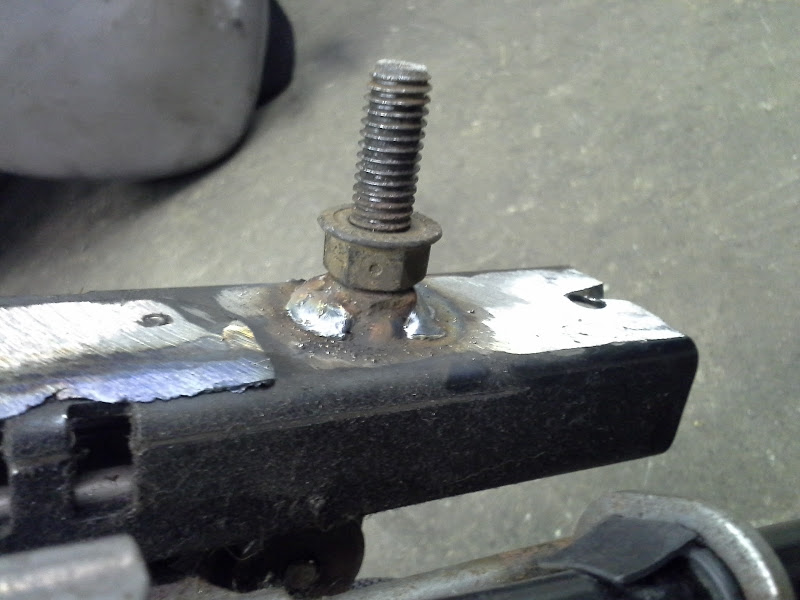 After the bolts cooled off, I ran some nuts- the kind with a shoulder on them- upside-down on my new threads. This will give me some adjustment of things aren't 100% level from corner to corner. Or if I have to, I can crank them down and lift the seat up a little bit, but I'll rely on good measurements before I have to resort to that... |

|

|
|
11-04-2014, 02:05 PM
|
#2 |
|
Registered User
Join Date: Dec 2010
Location: Carnation, Wa
Posts: 142
|
Re: Subaru bucket seats & a console without any new holes to my floor - How I did it
 I left the bench seat mounts bolted to my floor. I didn't want to drill any more holes in my truck (rust has that market cornered), so the only holes I have to work with are on the far ends. My plan is to build a rack for everything to sit on, which is dual purpose: I can remove the whole thing and sell it if I don't like it. The seats also sit a bit low, so this will kick things up just a tiny bit. It also gives me one whole level plane to work from. No floor humps or height differences to account for. |
|
|
|
|
11-04-2014, 02:10 PM
|
#3 |
|
Registered User
Join Date: Dec 2010
Location: Carnation, Wa
Posts: 142
|
Re: Subaru bucket seats & a console without any new holes to my floor - How I did it
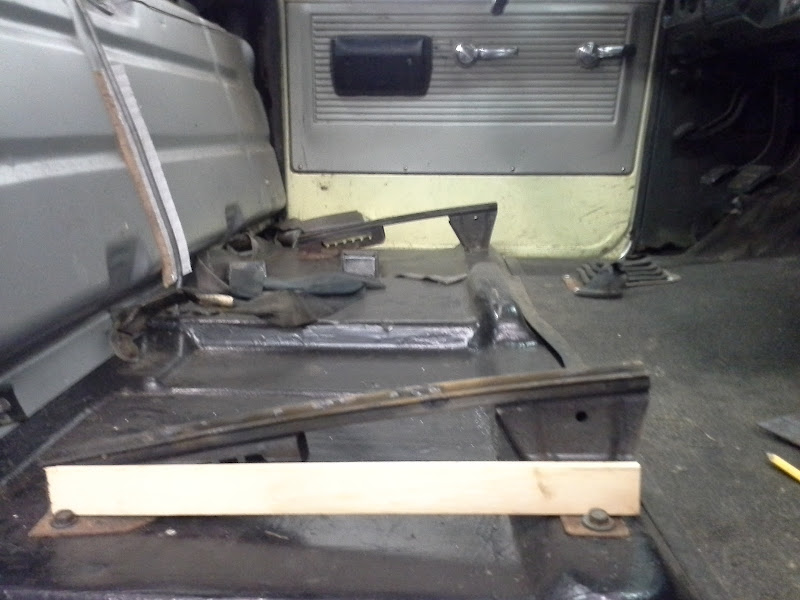
 Next up, I cut the bench brackets off lower and level-er. I put some 1x1" square tube in the slots created in the old mounts and measured everything on both sides to make them as equal and parallel as possible. Before we start welding let me just say that that gas tank is new and it is empty- something to think about for your project. Safety 3rd! |
|
|
|
|
11-04-2014, 02:14 PM
|
#4 |
|
Registered User
Join Date: Dec 2010
Location: Carnation, Wa
Posts: 142
|
Re: Subaru bucket seats & a console without any new holes to my floor - How I did it
 By setting my seats in the cab, in roughly the position I wanted them, I was able to determine where a perimeter frame would need to sit. I ran the longer horizontal bars and used a square everywhere it would fit to make sure we were starting out at right angles. The new seats also need to sit flat instead of leaned back like the bench was. |
|
|
|
|
11-04-2014, 02:21 PM
|
#5 |
|
Registered User
Join Date: Dec 2010
Location: Carnation, Wa
Posts: 142
|
Re: Subaru bucket seats & a console without any new holes to my floor - How I did it
 Got the truck outside so I can get to it from both doors. With the passenger seat mocked in, I could tell where my bolt studs poked down and that would tell me where I needed cross pieces with holes in them for my studs to poke through. I was able to sit in the seat at this point and adjust the recline angle that would work at a driving position. Also important- I measured each seat and ran blue painter's tape down the exact middle of each seat. I also ran tape down from my glove box button and the horn button. This was to mark where the center of the seats should be in relation to the truck. I wanted these things to feel right, not like they were some hacked-in wrecking yard seats out of an import! |
|
|
|
|
11-04-2014, 02:26 PM
|
#6 |
|
Registered User
Join Date: Dec 2010
Location: Carnation, Wa
Posts: 142
|
Re: Subaru bucket seats & a console without any new holes to my floor - How I did it
 I wasn't wild about the front rail of my bracket. It was too visible and felt like it crowded the cab, too close to the trans hump and really didn't serve a purpose there in the middle. I mocked in the console after the driver's seat was mocked and with the console in place, I could tell that I would be safe with an indent. So I C clamped a long 2x4 along the front of my bracket so it would stay in shape and welded in an indent. I cleaned up my booger welds while the thing was out too. |
|
|
|
|
11-04-2014, 02:30 PM
|
#7 |
|
Registered User
Join Date: Dec 2010
Location: Carnation, Wa
Posts: 142
|
Re: Subaru bucket seats & a console without any new holes to my floor - How I did it
 While I was mocking up the console, I figured out how high I wanted it to sit and made this U piece out of square tube. I drilled some holes that lined up with the front console holes and welded some nuts on the back side of my holes in the square tube. After measuring for center of the console and center of the gap between my seats, I took the console with the U bolted to the bottom of the console and set in it place. Tacked it with the welder. |
|
|
|
|
11-04-2014, 02:32 PM
|
#8 |
|
Registered User
Join Date: Dec 2010
Location: Carnation, Wa
Posts: 142
|
Re: Subaru bucket seats & a console without any new holes to my floor - How I did it
 I took the whole enchilada out again and did a similar trick for bolting up the back of the console only I just used angle iron with nuts welded under the back holes I drilled to mount the console. when it was still in the truck, I tested the opening and closing of the console lid to make sure it cleared the tank and the seats. |
|
|
|
|
11-04-2014, 02:35 PM
|
#9 |
|
Registered User
Join Date: Dec 2010
Location: Carnation, Wa
Posts: 142
|
Re: Subaru bucket seats & a console without any new holes to my floor - How I did it
 So with all the welds cleaned, sanded, re welded and re sanded. all the burrs and gunk and spatter was cleared off. Then I primed and painted, underside first then the top part last. I used Rustoleum's Appliance Epoxy because I had mostly had good luck with it holding up on other things. |
|
|
|
|
11-04-2014, 02:38 PM
|
#10 |
|
Registered User
Join Date: Dec 2010
Location: Carnation, Wa
Posts: 142
|
Re: Subaru bucket seats & a console without any new holes to my floor - How I did it
 I bolted the rack in first, then the seats, then the console. I had to use my adjuster nuts on just one corner. The seats almost dropped right into their 4 holes, one corner of the driver's side needed some persuasion, but somehow I got everything in without scratching the paint on the rack. The rack stays put and the subaru seat sliders still do their job. If you slide them forward a bit, the seats can still recline- a bit useless in a pickup, but nice to have the option. |
|
|
|
|
11-04-2014, 02:43 PM
|
#11 |
|
Registered User
Join Date: Dec 2010
Location: Carnation, Wa
Posts: 142
|
Re: Subaru bucket seats & a console without any new holes to my floor - How I did it
 The Blazer console was a swap meet find, $70 or so, I think.  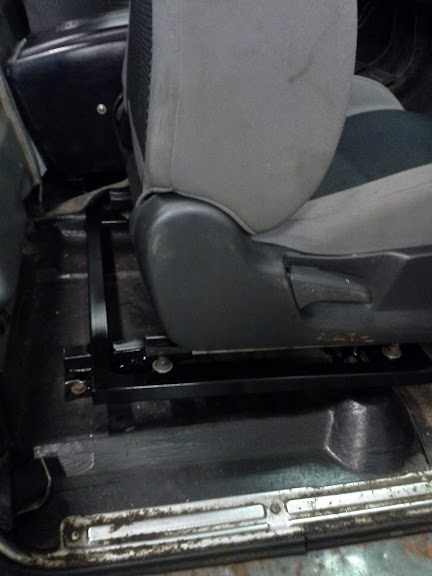 These seats are kind of dirty, but eventually I plan to have them recovered in more 70's appropriate attire but with heated inserts put in prior to the recovering. I'm planning on putting the heated seat controls in the console to stay closer to stock looking. I'm trying to stick to a sleeper theme, making the good stuff only appear to the trained eye. |
|
|
|
|
11-04-2014, 02:45 PM
|
#12 |
|
Registered User
Join Date: Dec 2010
Location: Carnation, Wa
Posts: 142
|
Re: Subaru bucket seats & a console without any new holes to my floor - How I did it
So what have you guys done? Post up your version! Be sure to say what model you scavenged yours from and tweaks you had to do to make them work in your cab.
|
|
|
|
|
11-04-2014, 05:10 PM
|
#13 |
|
Registered User
Join Date: Feb 2013
Location: Northwest NJ
Posts: 684
|
Re: Subaru bucket seats & a console without any new holes to my floor - How I did it
Very nice job...thanks for posting those informative pics ! This method could be used to mount just about any seats in our trucks. Good luck with the rest of your project !
|
|
|
|
|
11-04-2014, 06:31 PM
|
#14 |
|
Roto Reuter thats the name...
 Join Date: Feb 2010
Location: Darien, NY
Posts: 1,848
|
Re: Subaru bucket seats & a console without any new holes to my floor - How I did it
Nice work. Thanks for the time taken to post this.
__________________
~ Dan  My 70 K10 SWB build:http://67-72chevytrucks.com/vboard/s...d.php?t=782232 My 71 SWB build:http://67-72chevytrucks.com/vboard/s...d.php?t=651394 1970 SWB Fleet K10 4X4, 5.3L LM7, 4L60E, Dakota Digital RTX, Vintage Air, Ididit tilt 1971 SWB Fleet C10 - Original SWB Arizona truck, new custom restoration project "Kick out your motor and drive while you're still alive - kick it out!" - Heart 1977 |
|
|
|
|
11-04-2014, 07:00 PM
|
#15 |
|
Registered User
Join Date: Jan 2013
Location: Buffalo Gap, TX
Posts: 216
|
Re: Subaru bucket seats & a console without any new holes to my floor - How I did it
Very nice! I'm in the middle of putting '04 Silverado seats into my '69, this gives me ideas...
__________________
My Chevy Truck Project Build Thread '62 Ranchero - 200 I6, 3-on-the-tree, power nothing. '71 LeSabre - 455 Stage 1, power everything. |
|
|
|
|
| Bookmarks |
| Tags |
| bucket seats, buckets, console, installation, wrecking yard |
|
|


 Linear Mode

