
|
 01-29-2018, 08:55 PM
|
#126 |
|
Registered User
Join Date: Aug 2012
Location: Northeast KS
Posts: 1,775
|
Re: 1941 1/2 ton project Hannah
My vote would still be for the 3rd gen, but I'm biased!
BMW looks clean.
__________________
1999 GMC Suburban K2500 SLT, 454/4L80E 1991 Z/28, 6.0L/T56 1949 GMC 250, S10 Frame, 6.0L/4L80E Instagram @aceshighspeedshop |

|

|
|
01-29-2018, 09:19 PM
|
#127 |
|
Senior Member
 Join Date: May 2007
Location: Doodah Kansas
Posts: 7,746
|
Re: 1941 1/2 ton project Hannah
yeah I like the 3rd gens too but I owned a bunch of old BMWs back before all the hipsters started stancing them. this might be my perfect car.
__________________
the mass of men live lives of quiet desperation if there is a problem, I can have it. new project WAYNE http://67-72chevytrucks.com/vboard/s...d.php?t=844393 |
|
|
|
|
01-30-2018, 09:43 PM
|
#128 |
|
Senior Member
Join Date: May 2007
Location: Doodah Kansas
Posts: 7,746
|
Re: 1941 1/2 ton project Hannah
I got the steering column in and its a half inch inboard like I thought it would be, but its not really noticeable. I have to say, man, planning is nice but some things just work on dumb luck. the end of the column points right at the firewall opening, and moving the mounts in gave just enough room at the seat. the pedals are in exactly the right spot, the seat is in the right spot so even a jabba like me fits perfect. (the wrinkle on the corner is from being stored on its side, it will relax)
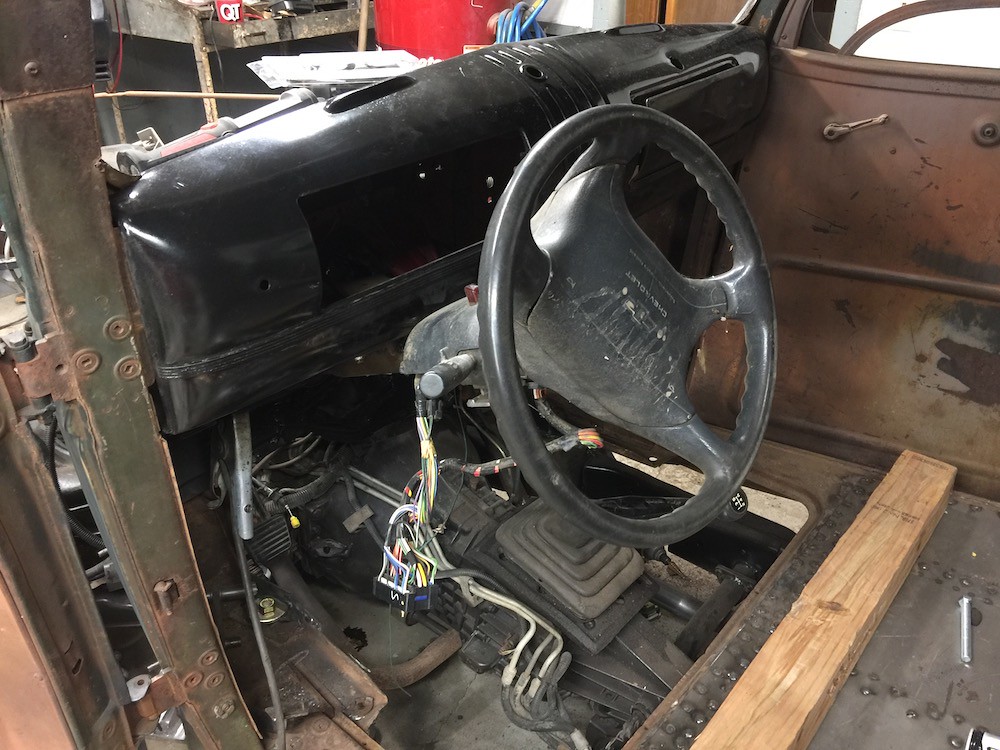 53903435651__00F3FF95-B2F2-4A50-83B6-5E7D8B59F402 by Joe Doh, on Flickr 53903435651__00F3FF95-B2F2-4A50-83B6-5E7D8B59F402 by Joe Doh, on Flickr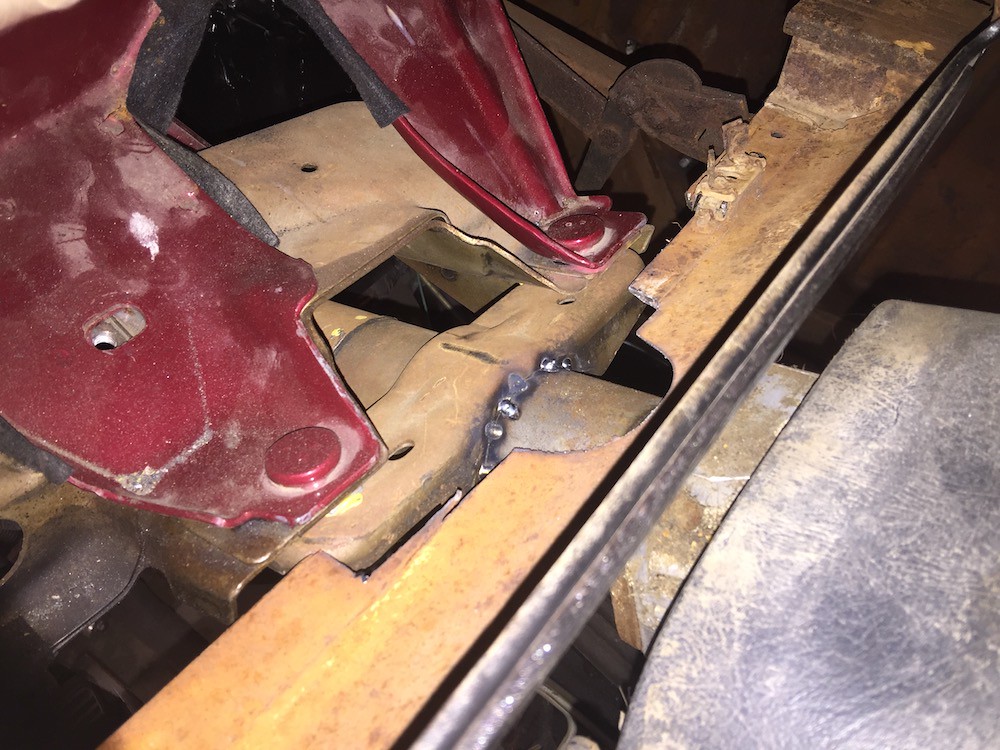 IMG_8262 by Joe Doh, on Flickr IMG_8262 by Joe Doh, on Flickr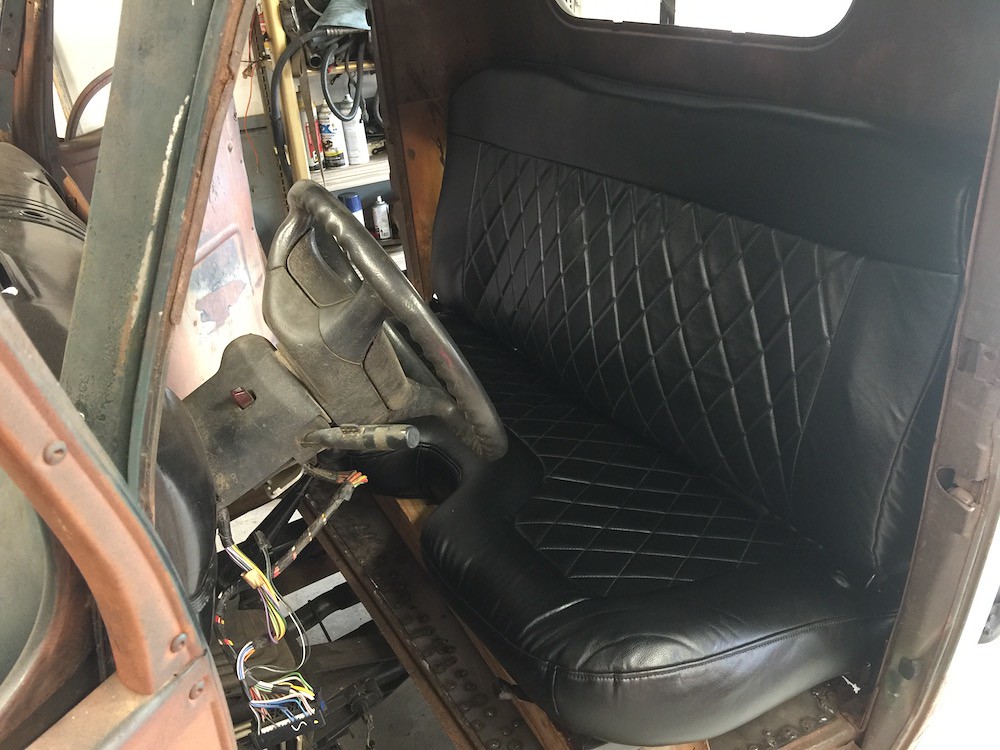 IMG_8272 by Joe Doh, on Flickr IMG_8272 by Joe Doh, on Flickr IMG_8271 by Joe Doh, on Flickr IMG_8271 by Joe Doh, on Flickrpopped the new steering wheel on for a look see, gives another two inches in the lap.  IMG_8275 by Joe Doh, on Flickr IMG_8275 by Joe Doh, on Flickr IMG_8274 by Joe Doh, on Flickr IMG_8274 by Joe Doh, on Flickrtomorrow I will sand the dash and paint it again, the first paint was just a quick shot to see the dings and dents. then its ready for the HVAC and wiring.
__________________
the mass of men live lives of quiet desperation if there is a problem, I can have it. new project WAYNE http://67-72chevytrucks.com/vboard/s...d.php?t=844393 |
|
|
|
|
02-02-2018, 10:27 PM
|
#129 | |
|
Senior Member
 Join Date: Sep 2016
Location: Hershey, PA
Posts: 1,004
|
Re: 1941 1/2 ton project Hannah
Quote:
 Would make a good forum thread...what do you drive when you can't drive the truck? I can appreciate the budget daily driver. Groceries don't care how you got them home 
__________________
Current Build Thread 1930 Ford Model A Modern Twist: Ford Model A Rat Rod With a Modern Twist Build Thread Phase 1 "The Swap": 1949 3100 with S10 swap. Beginner build with ambition! Build Thread Phase 2 "The Drop": Beginner Build with Ambition gets Air Ride |
|
|
|
|
|
02-03-2018, 01:03 PM
|
#130 | |
|
Senior Member
Join Date: May 2007
Location: Doodah Kansas
Posts: 7,746
|
Re: 1941 1/2 ton project Hannah
Quote:
I have the saturn for mpg and groceries! this is the extra, I will fix the paint on the hood and it will be the nice day fun drive car. maybe after a while even a track car but if values keep climbing, maybe not.
__________________
the mass of men live lives of quiet desperation if there is a problem, I can have it. new project WAYNE http://67-72chevytrucks.com/vboard/s...d.php?t=844393 |
|
|
|
|
|
02-15-2018, 07:36 PM
|
#131 |
|
Senior Member
Join Date: May 2007
Location: Doodah Kansas
Posts: 7,746
|
Re: 1941 1/2 ton project Hannah
lots going on, seems like every weekend. I was sick for a week, then suz was sick a week, it all adds up. not complaining, I will be honest I am enjoying taking drives in the M3 lately.
anyway, taking care of some work I had been putting off. I buttoned up the front end, shocks, cotter pins, calipers, pads. I mentioned way back that the guy had replaced the upper control arms (complete) and lower balljoints but didnt put cotter pins in. well it turns out he didnt take the old ones out. I didnt know it was possible but he got the castle nuts off without taking the cotter pins out, so they were jammed in the holes. it only took a couple hours to get them out. ridiculous. no pictures, but the front is done. painted the artilleries, was on the fence between cream and black and I think black fits the fallen angel better.  IMG_8348-1 by Joe Doh, on Flickr IMG_8348-1 by Joe Doh, on Flickr IMG_8353 by Joe Doh, on Flickr IMG_8353 by Joe Doh, on FlickrI got "chevrolet" script decals for the smoothie caps, they should look great. got the shortbed tacked. those $6 butt weld clamps work great, I highly recommend.  IMG_8354 by Joe Doh, on Flickr IMG_8354 by Joe Doh, on Flickr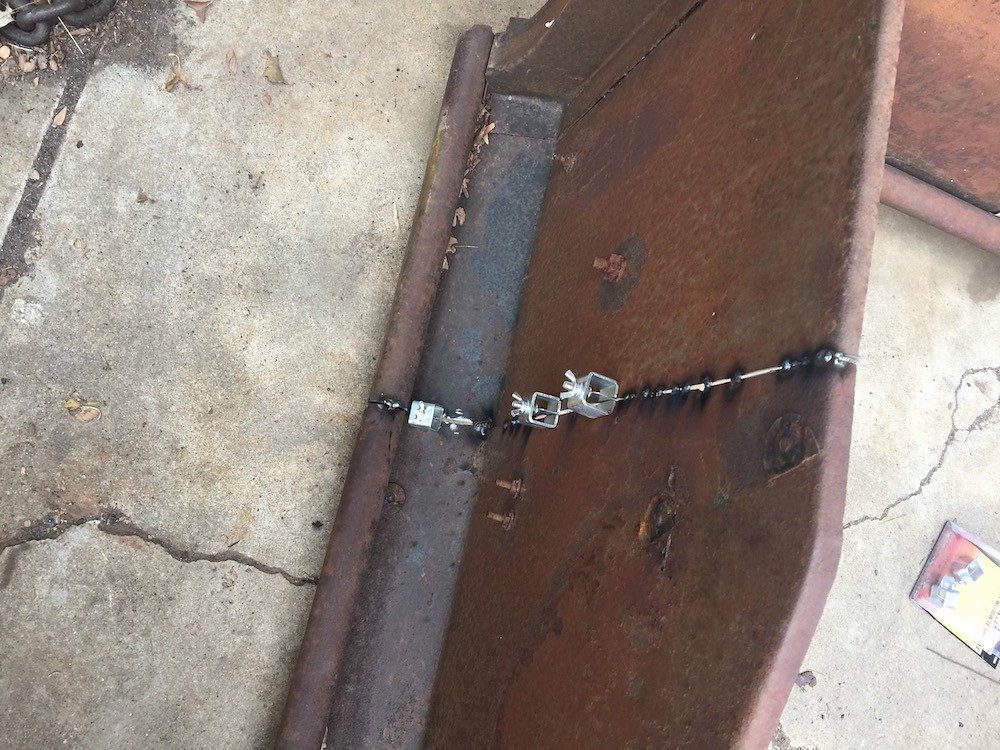 IMG_8355 by Joe Doh, on Flickr IMG_8355 by Joe Doh, on Flickrthe tailgate is giving me a quandry, I am thinking of leaving it as-is, but I will probably just cut off the rusted top (its upside down in the picture) and weld on some muffler pipe as a repair.  IMG_8356 by Joe Doh, on Flickr IMG_8356 by Joe Doh, on FlickrI also got the seat mount lined out and the floor seam sealed. next is battery and wiring.
__________________
the mass of men live lives of quiet desperation if there is a problem, I can have it. new project WAYNE http://67-72chevytrucks.com/vboard/s...d.php?t=844393 |
|
|
|
|
02-15-2018, 10:13 PM
|
#132 |
|
Post Whore
 Join Date: May 2015
Location: Alabama
Posts: 14,579
|
Re: 1941 1/2 ton project Hannah
your moving right along...i used those panel clamps on my bed shortening job and they worked great...except where I had my gap pulled together to tight and had trouble gettin it outta the gap after i tacked it up...wound up breaking 2...but they did the job...
__________________
Mongo...aka Greg RIP Dad RIP Jesse 1981 C30 LQ9 NV4500..http://67-72chevytrucks.com/vboard/s...d.php?t=753598 Mongos AD- LS3 TR6060...http://67-72chevytrucks.com/vboard/s...34#post8522334 Columbus..the 1957 IH 4x4...http://67-72chevytrucks.com/vboard/s...63#post8082563 2023 Chevy Z71..daily driver Last edited by mongocanfly; 02-16-2018 at 03:40 AM. |
|
|
|
|
02-15-2018, 10:22 PM
|
#133 |
|
Registered User
Join Date: Aug 2012
Location: Northeast KS
Posts: 1,775
|
Re: 1941 1/2 ton project Hannah
We've had that garbage floating around our house too. Glad to see you making progress. I've been focusing on turning the FX2 into "my" DD. Need to get back in the bed of the '49 and button that project up.
|
|
|
|
|
02-25-2018, 05:58 PM
|
#134 |
|
Senior Member
Join Date: May 2007
Location: Doodah Kansas
Posts: 7,746
|
Re: 1941 1/2 ton project Hannah
I keep seeing that GMC up by you and wanting to call, but need to finish this one before I worry about anything else.
so in that same vein.... hahahahahaha. I always start looking for a new donor truck when there is about a month to go, that way I can rest a second and start tearing up again. I saw an ad on craigslist for an 03 longbed and figured what the heck, right? I love the 03 as a donor because its got the LU3 engine (best series of the 4.3) and the 0411 PCM (fastest PCM of the era, best program too). the ad said collision damage, and I sure dont care about that. It also said it ran really good but that wasnt true, we got it to start, it had been sitting about 6 months, but if you tried to give it any gas it backfired immediately. he said he thought it was the cat and had cut it off, but I knew it had nothing to do with the cat. Here is the idle video, it idled so smoothly, but you couldnt even give it a gentle prod on the gas. click to play 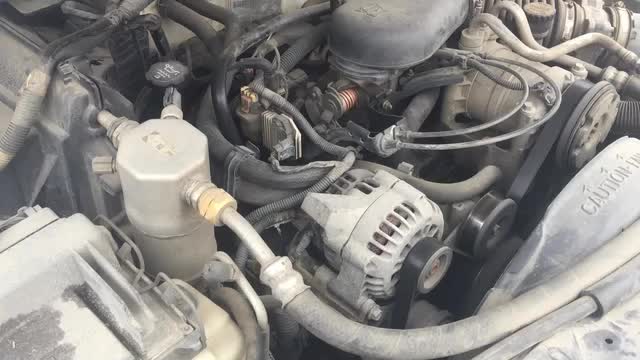 IMG_8249 (1) by Joe Doh, on Flickr IMG_8249 (1) by Joe Doh, on FlickrIt was about 14 degrees so I told him I would come back with a cap and rotor when it warmed up, if it was still available. today was really nice, in the high 40s, so I called, the truck was still there. I dug around the shop and found a new cap, but no rotor, so I grabbed some sandpaper and figured I could clean the rotor up enough with the new cap. hubris, friends. hubris. I took the cap loose and this is what I found.  IMG_8264 by Joe Doh, on Flickr IMG_8264 by Joe Doh, on Flickrso I had to run from BFE to the nearest parts store which was actually right around the corner for a 9 dollar rotor. It worked. perfect running, well almost. the trans was a little sticky which I attributed to sitting and if the truck were a hip hop artist its name would be MC Loudas****. but other than that, I made an offer, he took it, and threw in the toolboxes and an extra set of swirlies. woop woop.  IMG_8265 by Joe Doh, on Flickr IMG_8265 by Joe Doh, on Flickr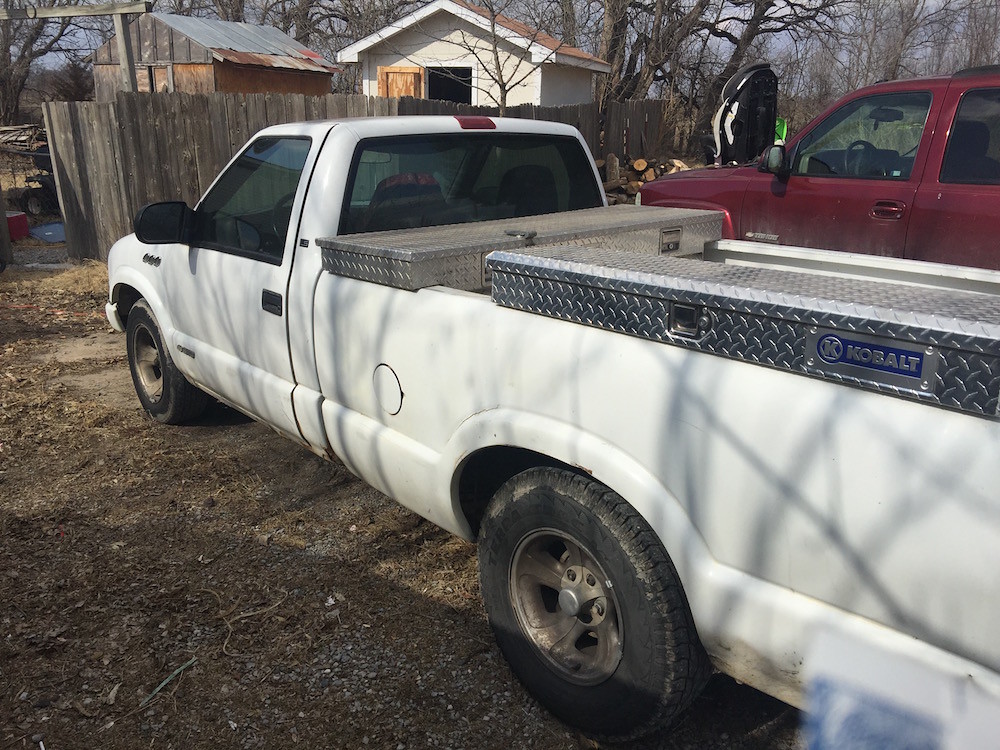 IMG_8266 by Joe Doh, on Flickr IMG_8266 by Joe Doh, on Flickrhe was super nice, I was happy with the deal and I think he was too, especially since it ran really well again, seemed like that made a difference for him. I have some work done on Hannah too but I am on a different computer getting some interior light pictures for another board member, so I will probably update Hannah tomorrow.
__________________
the mass of men live lives of quiet desperation if there is a problem, I can have it. new project WAYNE http://67-72chevytrucks.com/vboard/s...d.php?t=844393 |
|
|
|
|
02-25-2018, 08:46 PM
|
#135 |
|
Senior Member
Join Date: Jul 2012
Location: Oblong, Illinois
Posts: 7,017
|
Re: 1941 1/2 ton project Hannah
Wow, lining up the next one already!
Rotor had seen better days. Amazing it started. Nice diagnostics too...reminds us to check basics. |
|
|
|
|
02-26-2018, 06:41 AM
|
#136 |
|
Registered User
Join Date: Aug 2012
Location: Northeast KS
Posts: 1,775
|
Re: 1941 1/2 ton project Hannah
Definitely got all the good out of that one! It's amazing to me how some routine maintenance items get completely overlooked.
__________________
1999 GMC Suburban K2500 SLT, 454/4L80E 1991 Z/28, 6.0L/T56 1949 GMC 250, S10 Frame, 6.0L/4L80E Instagram @aceshighspeedshop |
|
|
|
|
03-01-2018, 10:32 PM
|
#137 |
|
Senior Member
Join Date: May 2007
Location: Doodah Kansas
Posts: 7,746
|
Re: 1941 1/2 ton project Hannah
tires mounted, look great!
 IMG_8359 by Joe Doh, on Flickr IMG_8359 by Joe Doh, on Flickr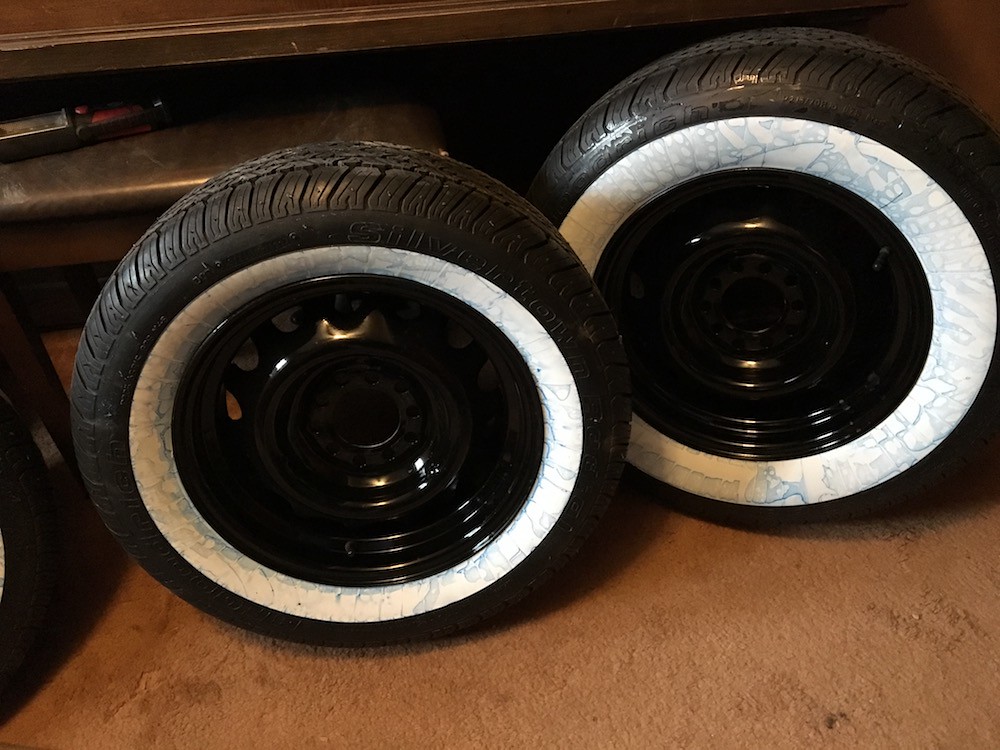 54051522560__6562BCC7-5DA9-4CC3-8C61-AD082E0ACDA9 by Joe Doh, on Flickr 54051522560__6562BCC7-5DA9-4CC3-8C61-AD082E0ACDA9 by Joe Doh, on Flickrsteering done too, well except a squirt of paint. I had another doofy moment, when I looked up how to use a support bearing it had a parts list and on the list was a double u joint, sort of like a double carden joint, so I ordered it from borgeson. I installed it all and cut the DD shaft to fit, and the side with the double joint wallered around like a broken leg. I thought, oh! I have the double joint on the wrong side of the support bearing, I will just switch it to the othe... wait a minute. the double joint was the problem. I would have needed a second support bearing on the second shaft. so I ordered a single joint and everything works like it should. reading later, the double joint is for when you need more than 35 degrees of angle on the shaft, which I dont. all the shafts are drilled for the set screws and its done. 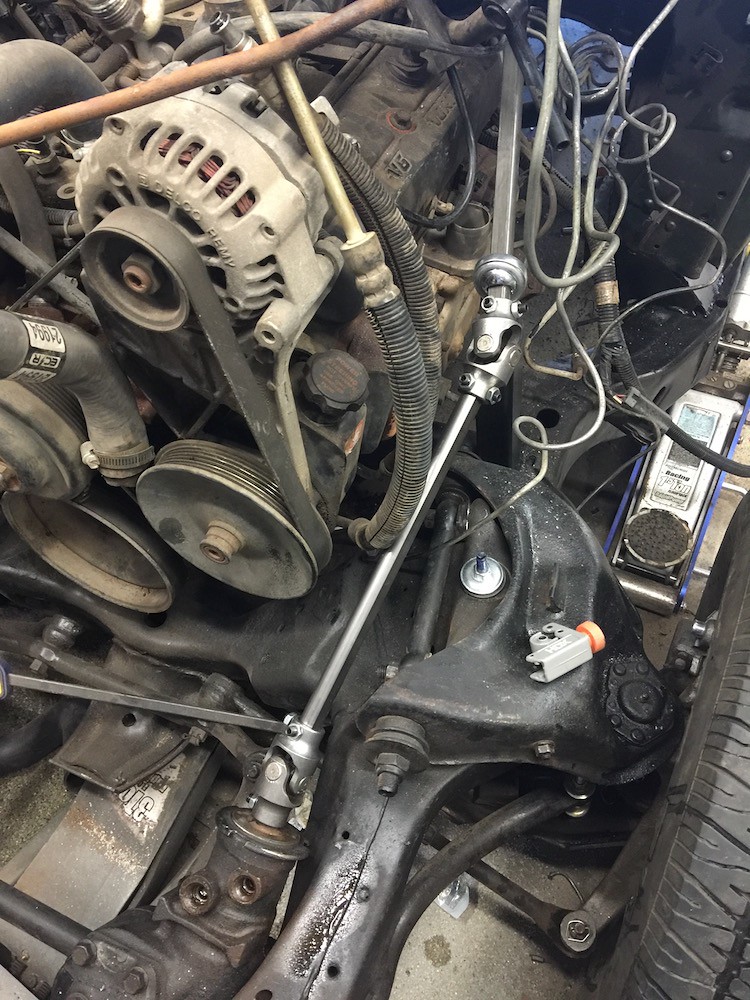 IMG_8270 by Joe Doh, on Flickr IMG_8270 by Joe Doh, on FlickrI even used the factory rubber firewall seal for the shaft,, neat way to close it out.  IMG_8276 by Joe Doh, on Flickr IMG_8276 by Joe Doh, on Flickrthen I got the eastwood tubing bender and the factory power steering line yielded to my ministrations. it was upside down and bent the wrong direction, but this worked out perfect. waste not want not. need to get the return hose from the parts store, the original is a bit short.  54145728266__400BBF19-0389-4013-B255-AC5F8D9D3E4F by Joe Doh, on Flickr 54145728266__400BBF19-0389-4013-B255-AC5F8D9D3E4F by Joe Doh, on Flickrtoday I finished the dash too. shaved the light switch hole and fixed a little damage. its not perfect but the only flaws are only visible because its so black and shiny. I was pretty floored how nice this came out for a rattle job. it will match the steering wheel perfectly. 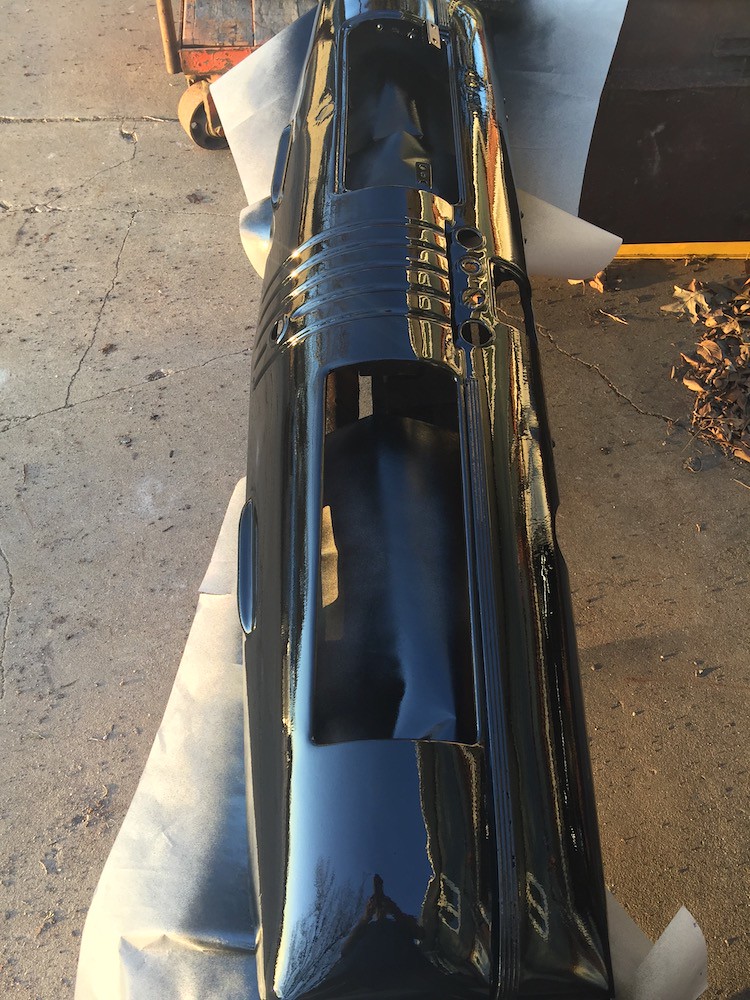 IMG_8294 by Joe Doh, on Flickr IMG_8294 by Joe Doh, on Flickr
__________________
the mass of men live lives of quiet desperation if there is a problem, I can have it. new project WAYNE http://67-72chevytrucks.com/vboard/s...d.php?t=844393 |
|
|
|
|
03-01-2018, 11:00 PM
|
#138 |
|
Registered User
Join Date: Aug 2012
Location: Northeast KS
Posts: 1,775
|
Re: 1941 1/2 ton project Hannah
Nice progress compadre!
__________________
1999 GMC Suburban K2500 SLT, 454/4L80E 1991 Z/28, 6.0L/T56 1949 GMC 250, S10 Frame, 6.0L/4L80E Instagram @aceshighspeedshop |
|
|
|
|
03-02-2018, 08:30 PM
|
#139 |
|
Registered User
Join Date: Sep 2012
Location: Midway, NC
Posts: 3,275
|
Re: 1941 1/2 ton project Hannah
Dash looks good.
__________________
http://67-72chevytrucks.com/vboard/s...d.php?t=581873 The low buck build threads. Check'em out! http://67-72chevytrucks.com/vboard/s...d.php?t=666022 My build thread Crossmembers CC |
|
|
|
|
03-02-2018, 09:46 PM
|
#140 |
|
Senior Member
Join Date: May 2007
Location: Doodah Kansas
Posts: 7,746
|
Re: 1941 1/2 ton project Hannah
thanks! I may cut and buff it haha
the battery tray I had in the back yard was trash, it would have taken more work to fix than to just make a new one. so I made a new one.  IMG_8306 by Joe Doh, on Flickr IMG_8306 by Joe Doh, on Flickrfits!  IMG_8307 by Joe Doh, on Flickr IMG_8307 by Joe Doh, on Flickryou can still add oil, albeit after pulling the battery, but that will be easy enough. 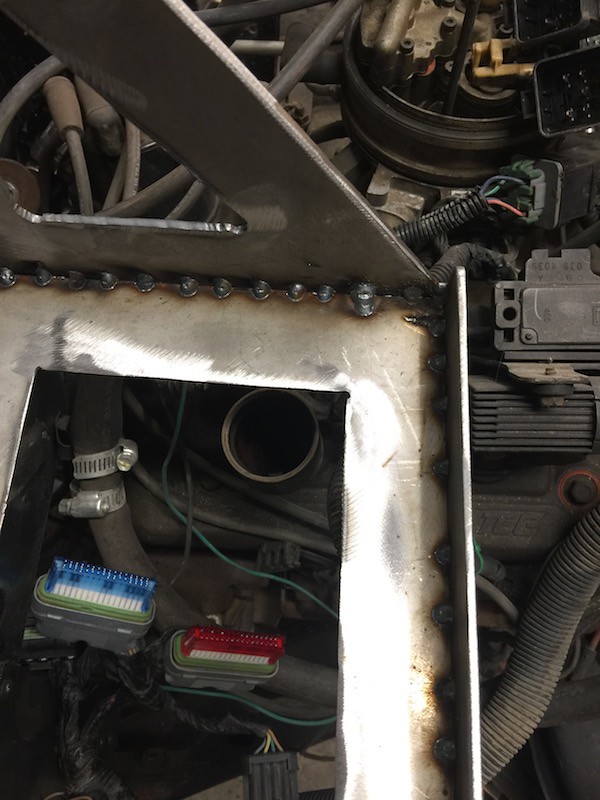 IMG_8309 by Joe Doh, on Flickr IMG_8309 by Joe Doh, on Flickrin a perfect world I would put the battery somewhere else but this will work.
__________________
the mass of men live lives of quiet desperation if there is a problem, I can have it. new project WAYNE http://67-72chevytrucks.com/vboard/s...d.php?t=844393 |
|
|
|
|
03-05-2018, 01:09 AM
|
#141 |
|
Registered User
Join Date: Jul 2017
Location: Joshua, Texas.
Posts: 1,303
|
Re: 1941 1/2 ton project Hannah
I really like reading the different build threads. You really can pick up lots of little tips. Your truck is looking awesome, saw the pic from when you bought it.. you've come a long way. Did the farmer have a title for this thing?
__________________
1950 Build |
|
|
|
|
03-05-2018, 09:34 AM
|
#142 |
|
Senior Member
Join Date: May 2007
Location: Doodah Kansas
Posts: 7,746
|
Re: 1941 1/2 ton project Hannah
no, but the affidavit coupled with old registration made it not a big deal to get one. I do registration before building in case there are any difficulties. you have to do your homework!
here she is as a well/boom truck, front end in the shed. 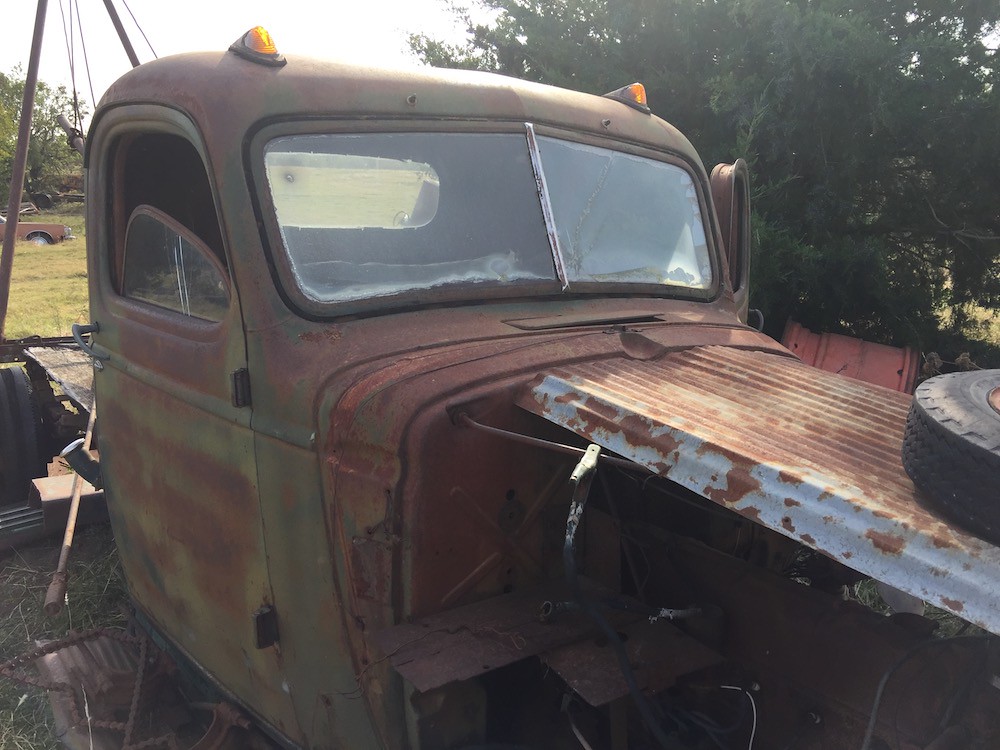
__________________
the mass of men live lives of quiet desperation if there is a problem, I can have it. new project WAYNE http://67-72chevytrucks.com/vboard/s...d.php?t=844393 |
|
|
|
|
03-05-2018, 06:43 PM
|
#143 |
|
Senior Member
Join Date: May 2007
Location: Doodah Kansas
Posts: 7,746
|
Re: 1941 1/2 ton project Hannah
I flipped the valve covers side to side and that worked ok till I put the air cleaner on. I cut the air cleaner snorkel (and stove pipe valve to fit and maybe I will just put on a nice shiny one.
 IMG_8334 by Joe Doh, on Flickr IMG_8334 by Joe Doh, on Flickr IMG_8335 by Joe Doh, on Flickr IMG_8335 by Joe Doh, on Flickrbolted the battery box in and fixed all the plug wires (they had come off whilst cherry picking. hooked up everything on the firewall and bobs your uncle.  IMG_8336 by Joe Doh, on Flickr IMG_8336 by Joe Doh, on Flickrtrial fit of the pedals, with my wife as a helper. seat is permanent now, slides back and forth like a champ 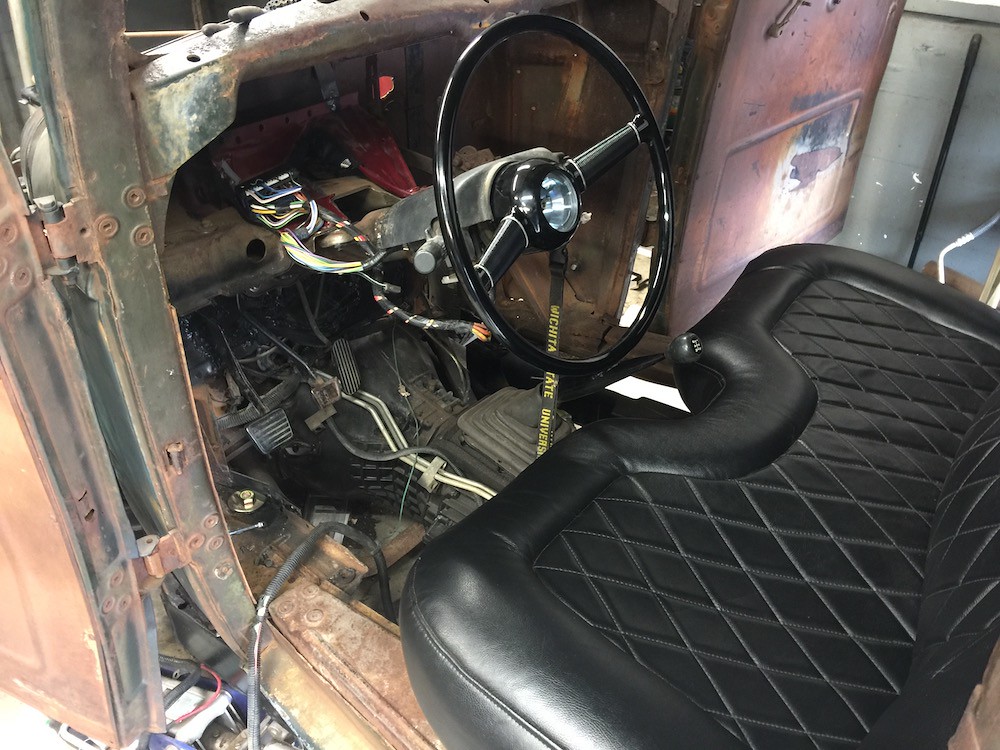 IMG_8323 by Joe Doh, on Flickr IMG_8323 by Joe Doh, on Flickr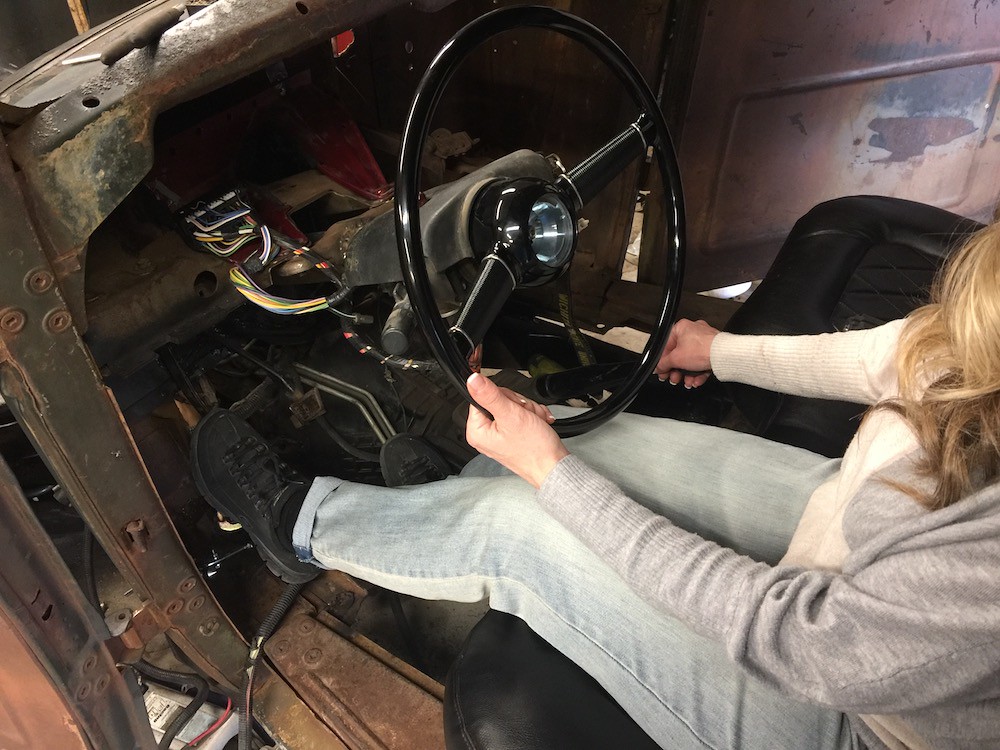 IMG_8322 by Joe Doh, on Flickr IMG_8322 by Joe Doh, on Flickrwaste not want not. flipped the section of the floor with the shifter hole with some creative measuring.  IMG_8337 by Joe Doh, on Flickr IMG_8337 by Joe Doh, on Flickr IMG_8338-1 by Joe Doh, on Flickr IMG_8338-1 by Joe Doh, on Flickr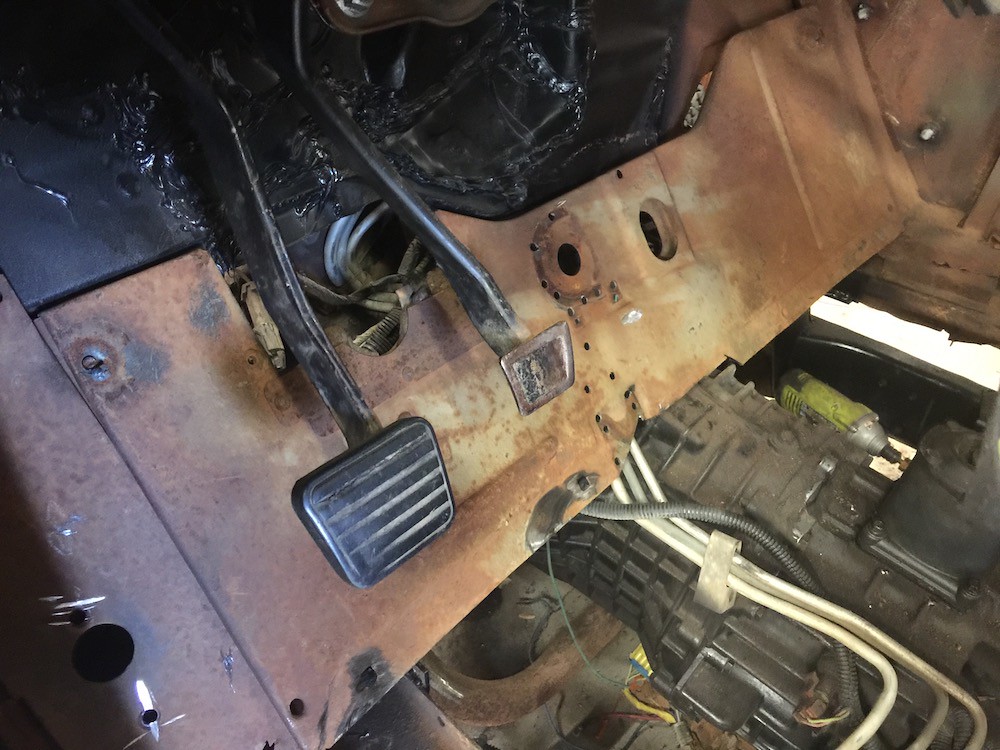 IMG_8340 by Joe Doh, on Flickr IMG_8340 by Joe Doh, on Flickrgas pedal needed some wrangling (re-angling)  IMG_8339 by Joe Doh, on Flickr IMG_8339 by Joe Doh, on Flickrmore to come!
__________________
the mass of men live lives of quiet desperation if there is a problem, I can have it. new project WAYNE http://67-72chevytrucks.com/vboard/s...d.php?t=844393 |
|
|
|
|
03-06-2018, 10:48 PM
|
#144 |
|
Senior Member
Join Date: May 2007
Location: Doodah Kansas
Posts: 7,746
|
Re: 1941 1/2 ton project Hannah
got the floor lined out and some of it actually bolted in. I had to be careful of the fuel lines but a little precision sledgehammering (isnt that a bit like saying bulldozer gardening?) and it gave me the 1/4" and the inch buffer I was looking for.
you know how great that shifter hole worked out? the factory S10 foam around the shift tower fits! go figure! 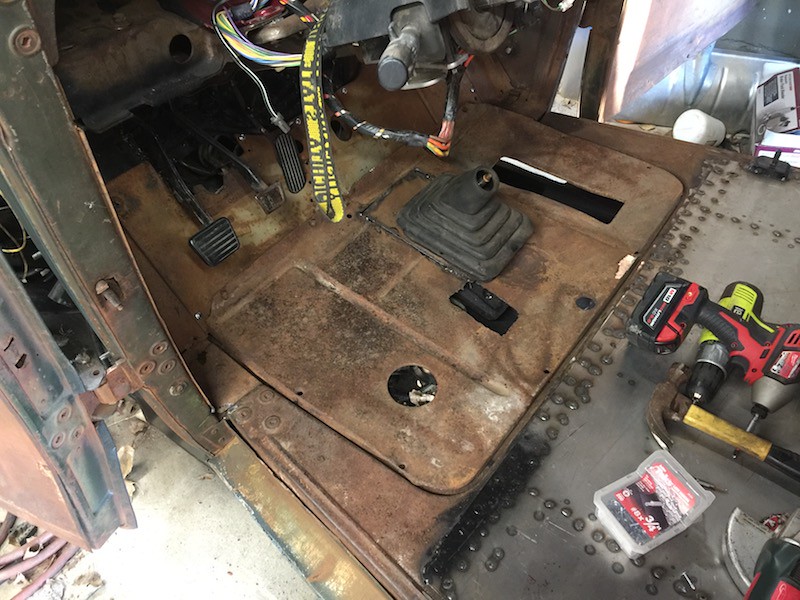 IMG_8358-1 by Joe Doh, on Flickr IMG_8358-1 by Joe Doh, on Flickrand another shot with the gas pedal hooked up to the TBI, with just enough room under it for the jute and the carpet! woop woop!  IMG_8360 by Joe Doh, on Flickr IMG_8360 by Joe Doh, on Flickrhere is the shot that was missing yesterday, musta missed a dot comma. today you can see the core support rods are installed and tight though  IMG_8362 by Joe Doh, on Flickr IMG_8362 by Joe Doh, on FlickrI used a highly scientific method of determining if the cab was square on the chassis and then to see if the support rods were centered. 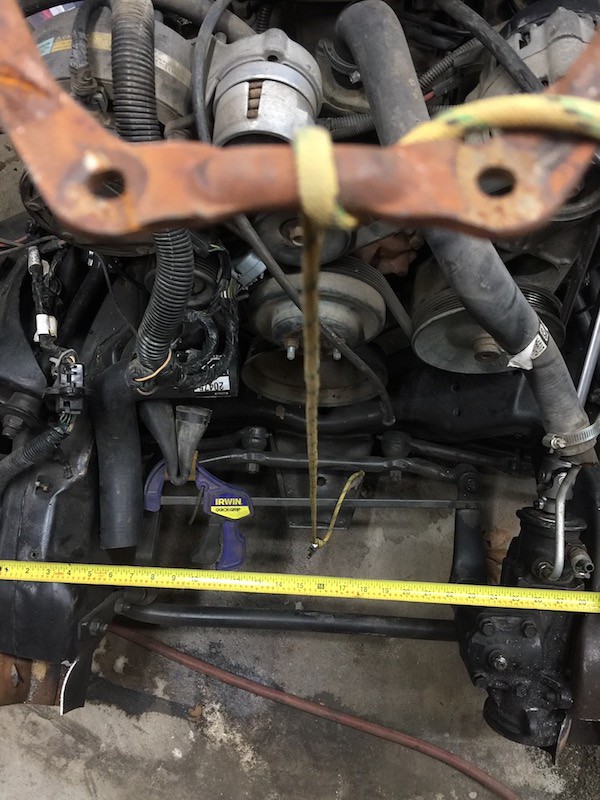 IMG_8359 by Joe Doh, on Flickr IMG_8359 by Joe Doh, on Flickrmore hammering got the windshield hinges loose, I have been soaking them for a couple weeks now.  IMG_8363 by Joe Doh, on Flickr IMG_8363 by Joe Doh, on Flickrhere is another ironic problem. I only had 14 ET bulge seat lug nuts on the shelf, I like using the ET for the extra thread length when bolting on spacers. I have the 2.5 spacers here now and the 1" for the front will be here in the morning, so I ordered some more ET nuts so they would all be here at the same time. but with a plan for installing the artillery wheels tomorrow (I need to get the current wheelset on that 03 I just got, its tires are terrible swimmers and cant hold their breath very long) I thought I would put the 2.5 rear spacers on tonight. 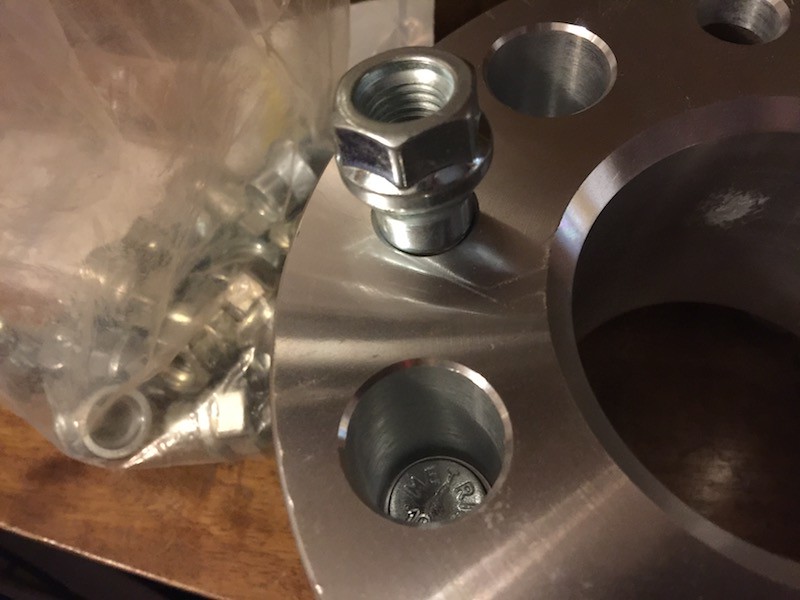 IMG_8364 by Joe Doh, on Flickr IMG_8364 by Joe Doh, on Flickrwelp. crud. part of me wants to drill out the holes so the ET set fits, but I also have some tall thread open nuts and the other part of me says people install these all the time without ET nuts. I guess I will decide in the morning. on another note, its been almost 2 months since our 21 year old cat wandered off presumably into the sunset but more likely into a foxes maw. we said we would wait a while to get another cat but our good friends momma cat had another litter and there is a pair that stick together, a slinky black one with serious claws and an orange tabby just like our old guy. we visited a couple times to gauge the temperament, and it will be a few weeks before they could go anywhere anyway, but I think my wife made up her mind.  IMG_7582 by Joe Doh, on Flickr IMG_7582 by Joe Doh, on Flickrthats the old cat tree from the last kitten we had, my daughters cat that moved when she did.
__________________
the mass of men live lives of quiet desperation if there is a problem, I can have it. new project WAYNE http://67-72chevytrucks.com/vboard/s...d.php?t=844393 |
|
|
|
|
03-06-2018, 11:30 PM
|
#145 |
|
Senior Member
Join Date: Jul 2012
Location: Oblong, Illinois
Posts: 7,017
|
Re: 1941 1/2 ton project Hannah
That was some good problem solving with the transmission shifter hole reversal. Moving right along.
|
|
|
|
|
03-12-2018, 08:11 PM
|
#146 |
|
Senior Member
Join Date: May 2007
Location: Doodah Kansas
Posts: 7,746
|
Re: 1941 1/2 ton project Hannah
thanks doug!
finished up the floor panels today, patched the holes and gave a coat of undercoat. I want these to be removable because its a standard trans and if it ever needs a clutch it can be done from the top.  IMG_8411 by Joe Doh, on Flickr IMG_8411 by Joe Doh, on Flickr IMG_8414 by Joe Doh, on Flickr IMG_8414 by Joe Doh, on Flickrwhile I was in there I took care of something else that was bugging me, I had measured from the front cab mounts to the frame and it was a perfect 4", but the drivers side looked a bit low when standing in front. I had already taken care of the s10 lean, so with the floor out and able to measure to the floor from the front window corners, I instead found the drivers side was indeed low 1/4". since the "hay was in the barn", the mounts burned in and done, I made a simple spacer of two pieces of 18th using my circle guides, and it was done. installed it and measured again, but the measurement wasnt as satisfying as standing in front and seeing the cab level finally. these things were hand built after all, some variation to be expected.  IMG_8416 by Joe Doh, on Flickr IMG_8416 by Joe Doh, on Flickr IMG_8417 by Joe Doh, on Flickr IMG_8417 by Joe Doh, on Flickrpainted the air cleaner  IMG_8421 by Joe Doh, on Flickr IMG_8421 by Joe Doh, on Flickrfinished welding everything I could reach on the bed and flipped it over.  IMG_8423 by Joe Doh, on Flickr IMG_8423 by Joe Doh, on Flickr IMG_8420 by Joe Doh, on Flickr IMG_8420 by Joe Doh, on Flickrthose little clamps from cardboard freight worked perfectly. I did more, but of little consequence, moving battery cables and painting the bare steel parts under the hood, finished the rad mount. I will show more tomorrow.
__________________
the mass of men live lives of quiet desperation if there is a problem, I can have it. new project WAYNE http://67-72chevytrucks.com/vboard/s...d.php?t=844393 |
|
|
|
|
03-12-2018, 10:20 PM
|
#147 |
|
Registered User
Join Date: Aug 2012
Location: Northeast KS
Posts: 1,775
|
Re: 1941 1/2 ton project Hannah
Looking good! I need to get a set of those guides for my plasma.
__________________
1999 GMC Suburban K2500 SLT, 454/4L80E 1991 Z/28, 6.0L/T56 1949 GMC 250, S10 Frame, 6.0L/4L80E Instagram @aceshighspeedshop |
|
|
|
|
03-13-2018, 10:27 PM
|
#148 |
|
Senior Member
Join Date: May 2007
Location: Doodah Kansas
Posts: 7,746
|
Re: 1941 1/2 ton project Hannah
they are awesome as long as you can get smooth with them. I got mine from 911 motorsports on ebay. I think they would work better a little thicker, I drug right off the one I use all the time and had to make a new one out of some 1/8th. maybe I will tack a few washers to the bottom, I think an air gap would work perfect because slag from the pierce always ends up stuck to the guide
I thought I took more pictures today but I didnt. I got everything tucked and taped and out of the way for the front end install, brake lines clipped and even found some bare wires that had been rubbing and fixed them. The negative battery cable did not reach the battery box but I just pulled the bolt and star washer from where it mounted the cable low on the block and moved it up to an empty hole in the head. waste not want not! 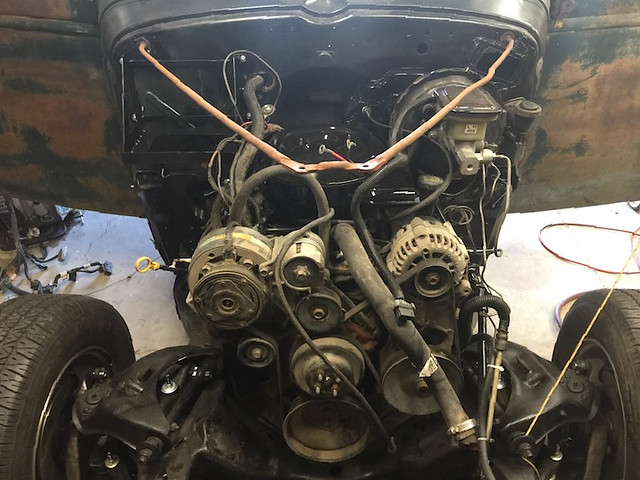 IMG_8425 by Joe Doh, on Flickr IMG_8425 by Joe Doh, on Flickrthen I fixed the rusted portions of the cab that would be under the fenders and would let water pour into the interior if left unfixed. nothing fancy, just some sheetmetal and screws that tie the repair to the strength of the body mount area. finished up with a liberal coat of some undercoating to seal inside and out. then came time to put the front end on.  IMG_8433 by Joe Doh, on Flickr IMG_8433 by Joe Doh, on Flickr IMG_8436 by Joe Doh, on Flickr IMG_8436 by Joe Doh, on Flickr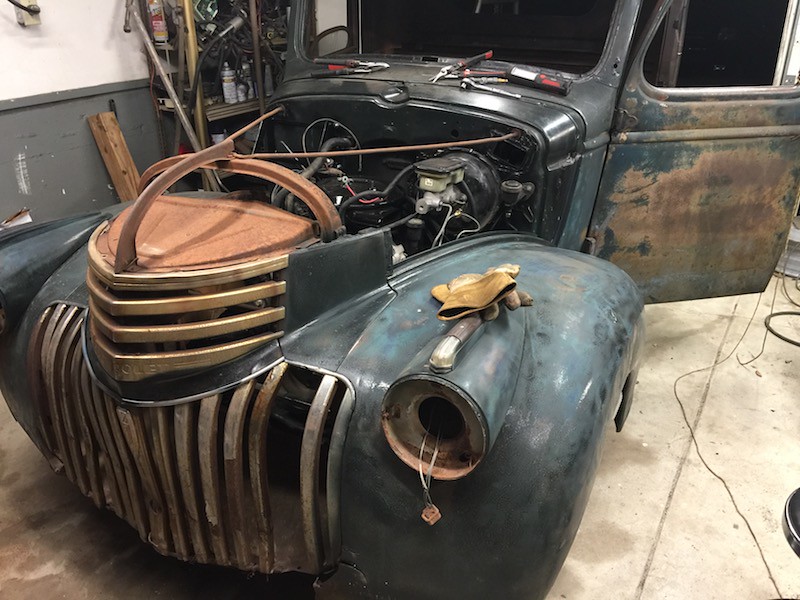 IMG_8434 by Joe Doh, on Flickr IMG_8434 by Joe Doh, on FlickrI know it looks like tons of room for a mechanical fan, but it would have cut the lower rad hose in half so I am using an electric. 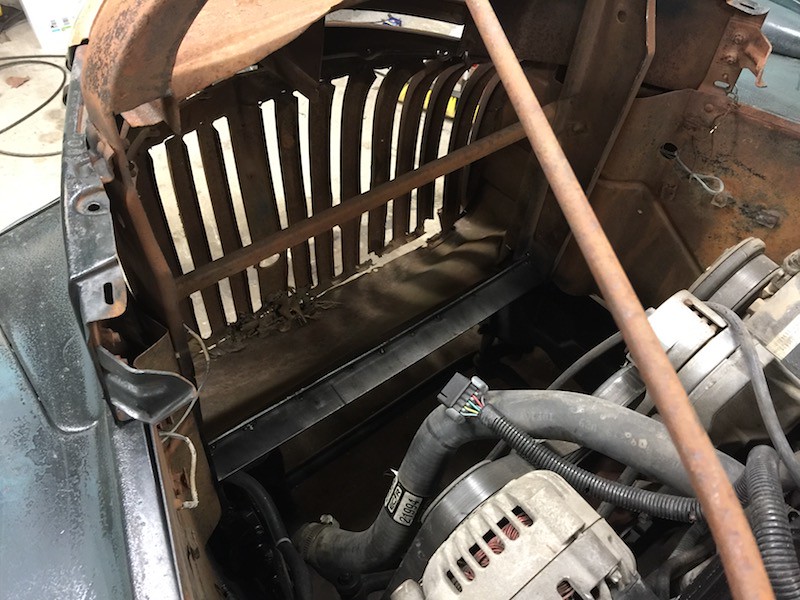 IMG_8435 by Joe Doh, on Flickr IMG_8435 by Joe Doh, on FlickrI ordered an upper rad hose doohickey that lets me install a temp probe after seeing guys talking about on on the main forum. I was down to make my own but I didnt have any stainless, didnt have any way to swedge the ends, and dont have any stainless wire for the welder anyway. it was 9 bucks, comes tapped for a 1/8NPT, I hope the project gods will forgive me not making one of my own. I hoped to have the front clip DONE today but it will have to take an extra day because I didnt clearance for the steering box when I was bumping the air director with my 5lb persuader. so the front has to come off briefly again in the morning.
__________________
the mass of men live lives of quiet desperation if there is a problem, I can have it. new project WAYNE http://67-72chevytrucks.com/vboard/s...d.php?t=844393 |
|
|
|
|
03-14-2018, 09:28 PM
|
#149 |
|
Registered User
Join Date: Jul 2017
Location: cumberland
Posts: 12
|
Re: 1941 1/2 ton project Hannah
awsome work ,
|
|
|
|
|
03-15-2018, 09:21 AM
|
#150 |
|
Registered User
Join Date: Aug 2012
Location: Northeast KS
Posts: 1,775
|
Re: 1941 1/2 ton project Hannah
Starting to look like a pickup again!
__________________
1999 GMC Suburban K2500 SLT, 454/4L80E 1991 Z/28, 6.0L/T56 1949 GMC 250, S10 Frame, 6.0L/4L80E Instagram @aceshighspeedshop |
|
|
|
 |
| Bookmarks |
| Thread Tools | |
| Display Modes | |
|
|


 Linear Mode

