
|
 07-19-2017, 03:52 PM
|
#1 |
|
Registered User
Join Date: Apr 2017
Location: Atlanta georfia
Posts: 48
|
Choppin block help!?
Hey guys so i got a full choppin block for my truck and im going to document the install because for some reason knowbody has directions or anything! But does anyone have a bolt diagram? So im putting out the correct info? Some of them are straight forward and i have called bc fab, emailed cbchasis and called azperformance still no luck on getting a diagram. Bags werent labeled as well!! Any help is appreciated
|

|

|
|
07-19-2017, 05:05 PM
|
#2 |
|
Registered User
Join Date: Feb 2014
Location: Land of the Lost...Bay area,CA
Posts: 80
|
Re: Choppin block help!?
Hi there. I recently did a Chopping Block kit myself. None of their stuff is labelled or comes with instructions. There is diagram for it. What do you need? I just found which bolts seemed to fit best and used those. once you start putting it together it will make a little more sense.
|
|
|
|
|
07-19-2017, 05:10 PM
|
#3 | |
|
Registered User
Join Date: Apr 2017
Location: Atlanta georfia
Posts: 48
|
Re: Choppin block help!?
Quote:
Well i have the whole thing cut and mocked up and holes drilled. I have a general idea, where did you put the bolts that had a space after the bolt head before the threads ( dont know what they are called sorry) and how did you go about welding your axle brackets? As far as making sure they are setup so you can dial in your pinion angle? Thanks! |
|
|
|
|
|
07-19-2017, 05:32 PM
|
#4 |
|
Moderator
  Join Date: Aug 2011
Location: China Spring, TX
Posts: 7,280
|
Re: Choppin block help!?
I might be misrepresenting (in my mind) here, but am I reading this correctly? - the guys who put this kit together just put everything in a box no labels no instructions and sold it that way? After the word got out more than one person said "that's what I want" ???
Just asking. 
__________________
Master Chief, US Navy, Retired 1964 C10 Step-side Short Bed - In Progress 2009 2500HD Duramax LTZ 1948 GMC Panel 1956 Big Window Stepside 1953 5 Window Chevy Stepside 1932 Coupe New Seat Foam for Bench Seats? |
|
|
|
|
07-19-2017, 05:35 PM
|
#5 | |
|
Registered User
Join Date: Apr 2017
Location: Atlanta georfia
Posts: 48
|
Re: Choppin block help!?
Quote:
|
|
|
|
|
|
07-19-2017, 06:21 PM
|
#6 |
|
Registered User
Join Date: Feb 2014
Location: Land of the Lost...Bay area,CA
Posts: 80
|
Re: Choppin block help!?
So their kits do not come with any instructions. Most of it is straight forward, but it should have at least some basics.
Dwolfe I believe the large bolts with a long "shoulder" are most likely the bolts used for the four link ends (eight total). If they are thinner bolts, they may be for the battery mount. |
|
|
|
|
07-19-2017, 06:39 PM
|
#7 | |
|
Registered User
Join Date: Apr 2017
Location: Atlanta georfia
Posts: 48
|
Re: Choppin block help!?
Quote:
|
|
|
|
|
|
07-19-2017, 06:48 PM
|
#8 |
|
Registered User
Join Date: Feb 2014
Location: Land of the Lost...Bay area,CA
Posts: 80
|
Re: Choppin block help!?
As for the rear end and hangers, I tried to level the truck as best I could on jack stands. Then I placed the rear end on a jack and set it where I wanted it (centered up side to side). I then clamped the hangers onto the rear axle and connected the four links. I used a digital level to get the pinion angle to match the frames angle (no driveshaft yet). Once I had things lined up fairly well I raised and lowered the rear end with the jack to simulate suspension travel. Once I was happy with it I marked the rear end and sent it out for welding.
|
|
|
|
|
07-20-2017, 09:37 AM
|
#9 | |
|
Registered User
Join Date: Apr 2017
Location: Atlanta georfia
Posts: 48
|
Re: Choppin block help!?
Quote:
|
|
|
|
|
|
07-20-2017, 09:41 AM
|
#10 |
|
Registered User
Join Date: Apr 2017
Location: Atlanta georfia
Posts: 48
|
Re: Choppin block help!?
Finally figured out bolts hers some pics of the rear choppin block! And the front - drop spindles , disc conversion new brake lines, ball joints, hubs, power steering conversion, and steering linkage
|
|
|
|
|
07-20-2017, 10:20 AM
|
#11 |
|
67-72 parts collector,
 Join Date: Nov 2002
Location: Mid-MO
Posts: 22,681
|
Re: Choppin block help!?
Not running the Choppin Block front kit?
__________________
Keith Convert to disc brakes. http://67-72chevytrucks.com/vboard/s...d.php?t=444823 |
|
|
|
|
07-20-2017, 10:23 AM
|
#12 | |
|
Registered User
Join Date: Apr 2017
Location: Atlanta georfia
Posts: 48
|
Re: Choppin block help!?
Quote:
|
|
|
|
|
|
07-20-2017, 12:09 PM
|
#13 |
|
Registered User
Join Date: Feb 2014
Location: Land of the Lost...Bay area,CA
Posts: 80
|
Re: Choppin block help!?
I adjusted all of the links in to their shortest position when I mocked it up. That way I could get maximum adjustment in either direction. I basically tried to match the pinion angle to the frames since the drive shaft should be close to the same. That being said, I am still making adjustments to the pinion angle to eliminate a vibration at around 2000 rpm.
When I first installed the kit and had things running I didn't have any vibration. But at that time the rear end was in a pretty straight line between the trans/center bearing/ rear end. Now that I'm sitting much lower, I'm getting the vibration at 2k. This is because the angles on the rear half of the two piece drive shaft are much higher than before. As I understand it, the more severe the angles the closer they have to match. I figure one or two more adjustments and I should be good. |
|
|
|
|
07-20-2017, 12:42 PM
|
#14 |
|
Registered User
Join Date: Mar 2017
Location: Post Falls, ID
Posts: 52
|
Re: Choppin block help!?
Stupid question but is a chopping block just a notched frame for air bags?
|
|
|
|
|
07-20-2017, 01:55 PM
|
#15 | |
|
Registered User
Join Date: Apr 2017
Location: Atlanta georfia
Posts: 48
|
Re: Choppin block help!?
Quote:
Its pretty much a new frame for the front cab mounts back , with all the crossmembers , bog mounts and 4 link ready to go |
|
|
|
|
|
07-20-2017, 01:57 PM
|
#16 | |
|
Registered User
Join Date: Apr 2017
Location: Atlanta georfia
Posts: 48
|
Re: Choppin block help!?
Quote:
Oh okay im getting what your saying so when you say match the frame angle are you talking the pinion on the axle like pointed down? Or? Also do you have any pics of your set up? Bc fab told me to weld the brackets on the axle paralell , but should i do that with the axle straight at 0 then i can adjust? Or have the axle down a couple degrees |
|
|
|
|
|
07-20-2017, 06:31 PM
|
#17 |
|
Registered User
Join Date: Feb 2014
Location: Land of the Lost...Bay area,CA
Posts: 80
|
Re: Choppin block help!?
When they say parallel I think they are just referring to welding them both at the same angle on the rear end. When I matched the angle between the frame and the rear end, I used the rear face of the crossmember and the mounting face of the u joint caps on the rear end. This moved the rear wheels as far forward in the wheel well ass possible (I like them towards the front of the opening). If you have adjust the pinion angle up, just turn out the upper links. Need it pointed further down, turn out the lower links. I started as close to zero as I could get it. When I did the final install I had the pinion angled up a bit to start. It's much easier to adjust the pinion downward after its all together. I'll see if I have any decent pics to post.
Unfortunately I'm not the best at taking progress pictures. This pic is what the driveshaft angles were looking like when I first her together. As you can see the u joint angles were pretty small. I don't recall for sure, but I believe this was a lowered position (because the front inner fenders were still in at the time I couldn't get very low) Last edited by 1hihum; 07-21-2017 at 07:56 AM. |
|
|
|
|
07-22-2017, 02:49 PM
|
#18 | |
|
Registered User
Join Date: Apr 2017
Location: Atlanta georfia
Posts: 48
|
Re: Choppin block help!?
Quote:
So degrees here ? To match this crossmember ? |
|
|
|
|
|
07-22-2017, 02:50 PM
|
#19 |
|
Registered User
Join Date: Apr 2017
Location: Atlanta georfia
Posts: 48
|
Re: Choppin block help!?
And here
|
|
|
|
|
07-22-2017, 03:00 PM
|
#20 | |
|
Moderator
Join Date: Aug 2011
Location: China Spring, TX
Posts: 7,280
|
Re: Choppin block help!?
Quote:
I'd probably measure it like this, but thats just me: 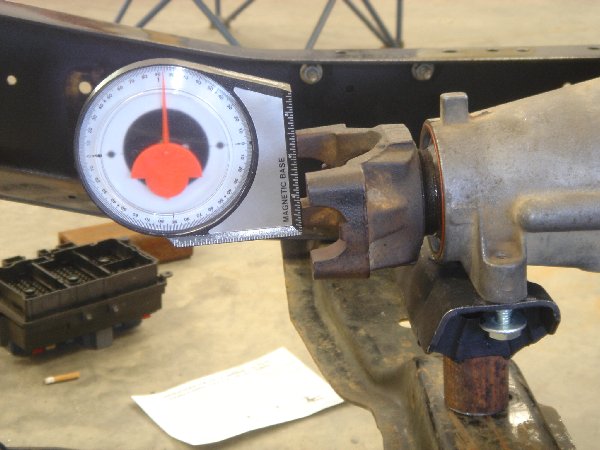
__________________
Master Chief, US Navy, Retired 1964 C10 Step-side Short Bed - In Progress 2009 2500HD Duramax LTZ 1948 GMC Panel 1956 Big Window Stepside 1953 5 Window Chevy Stepside 1932 Coupe New Seat Foam for Bench Seats? |
|
|
|
|
|
07-22-2017, 05:11 PM
|
#21 |
|
Registered User
Join Date: Apr 2017
Location: Atlanta georfia
Posts: 48
|
Re: Choppin block help!?
Some more updates used those angles ziptied the brackets and started attaching the bars. For some reason my kit might be updated because my upper bars have 3 different sdjusting holes in them. Think once i set the bars all to the shortest dial in the pinion close and make sure all the brackets are even and rear soacing. I can weld it all up.
|
|
|
|
|
07-22-2017, 05:12 PM
|
#22 | |
|
Registered User
Join Date: Apr 2017
Location: Atlanta georfia
Posts: 48
|
Re: Choppin block help!?
Quote:
|
|
|
|
|
|
07-22-2017, 06:13 PM
|
#23 |
|
Moderator
Join Date: Aug 2011
Location: China Spring, TX
Posts: 7,280
|
Re: Choppin block help!?
So what degree will you set the rear end at if you have nothing to shoot for?
__________________
Master Chief, US Navy, Retired 1964 C10 Step-side Short Bed - In Progress 2009 2500HD Duramax LTZ 1948 GMC Panel 1956 Big Window Stepside 1953 5 Window Chevy Stepside 1932 Coupe New Seat Foam for Bench Seats? |
|
|
|
|
07-23-2017, 10:23 AM
|
#24 | |
|
Registered User
Join Date: Apr 2017
Location: Atlanta georfia
Posts: 48
|
Re: Choppin block help!?
Quote:
|
|
|
|
|
|
07-24-2017, 02:55 AM
|
#25 | |
|
Registered User
Join Date: Feb 2014
Location: Land of the Lost...Bay area,CA
Posts: 80
|
Re: Choppin block help!?
Quote:
In theory this means that the center bearing is positioned high enough to level the front half of the shaft and as such, the rear half of the shaft should be where your angles must match. But since you don't have the shaft in yet, you are just making your best guess, and in theory, that means the front half of the shaft should be parallel to surface #1 in my pic. So starting the rear end off at 90 degrees to this angle should be the best starting point given the adjust ability of the 4 link. Does that make sense? |
|
|
|
|
 |
| Bookmarks |
|
|


 Linear Mode

