
|
|
|
 11-18-2008, 10:32 PM
|
#1 |
|
Registered User
Join Date: Aug 2008
Location: DFW, Texas
Posts: 389
|
Re: The Story Of A Suburban (Lots Of Pics)
any updates? Id really like to see how you mounted your a/c compressor. Im about to tackle this hurdle. It sucks I have to cut up a fresh powdercoated frame

|

|

|
|
11-19-2008, 12:52 AM
|
#2 | |
|
I had a V-8
Join Date: May 2003
Location: Phoenix AZ
Posts: 1,116
|
Re: The Story Of A Suburban (Lots Of Pics)
Quote:
As far as the compressor mounting goes, it will mount directly to the four holes that go into the water inlet housing horizontally. It mounts above the water inlet hole and below the flat surface on the top where the bottom of the alternator will mount. I have not acquired a compressor for it yet, so I can't show a pic of how it will mount. There is no "adapter" or bracket for it--it mounts directly to the water inlet housing. I dug through my stash of "collected" images and found this:  I do not know any specifics of what this pic is, but it appears to be the same water inlet housing that I am using, so this is what it will look like with a compressor mounted to it. Hope it helps.
__________________
1972 K20 Suburban, 5.9L Cummins, Banks Power Pack, NV4500HD, NP205, H.A.D., D60/14FF ARB Link To Build: HERE. Last edited by mosesburb; 11-13-2017 at 02:55 AM. |
|
|
|
|
|
11-23-2008, 02:04 AM
|
#3 |
|
I had a V-8
Join Date: May 2003
Location: Phoenix AZ
Posts: 1,116
|
Re: The Story Of A Suburban (Lots Of Pics)
Well, after doing some work on the steering shaft in my wife's truck this morning, I decided to try my luck at doing something on the Suburban. Almost immediately it resulted in a pretty good display of blood-letting. It wasn't bad enough that my right index finger knuckle somehow touched a surfacer disc on a grinder that was spinning down and made a 1/8" x 3/16 hole in said knuckle, but while retrieving the bandages from my work bag, I managed to completely open up a wound I created on Thursday with a hammer and drift on my left index finger resulting in significantly more blood than the initial injury created. I was a bit aggravated at this point. I decided to press on and see if I could keep it together enough to get something done. Perseverance prevailed and I successfully accomplished something.
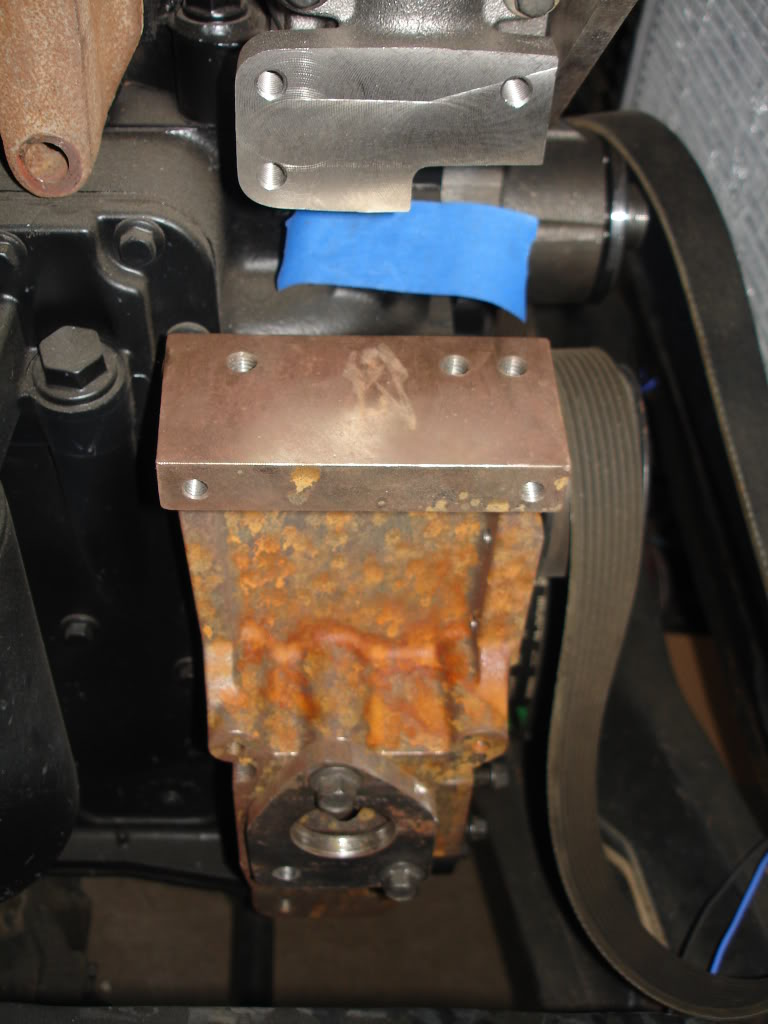
I decided the fun-for-the-day would be the lower alternator bracket that I ordered months ago from Cummins and am still waiting for. I started with this: 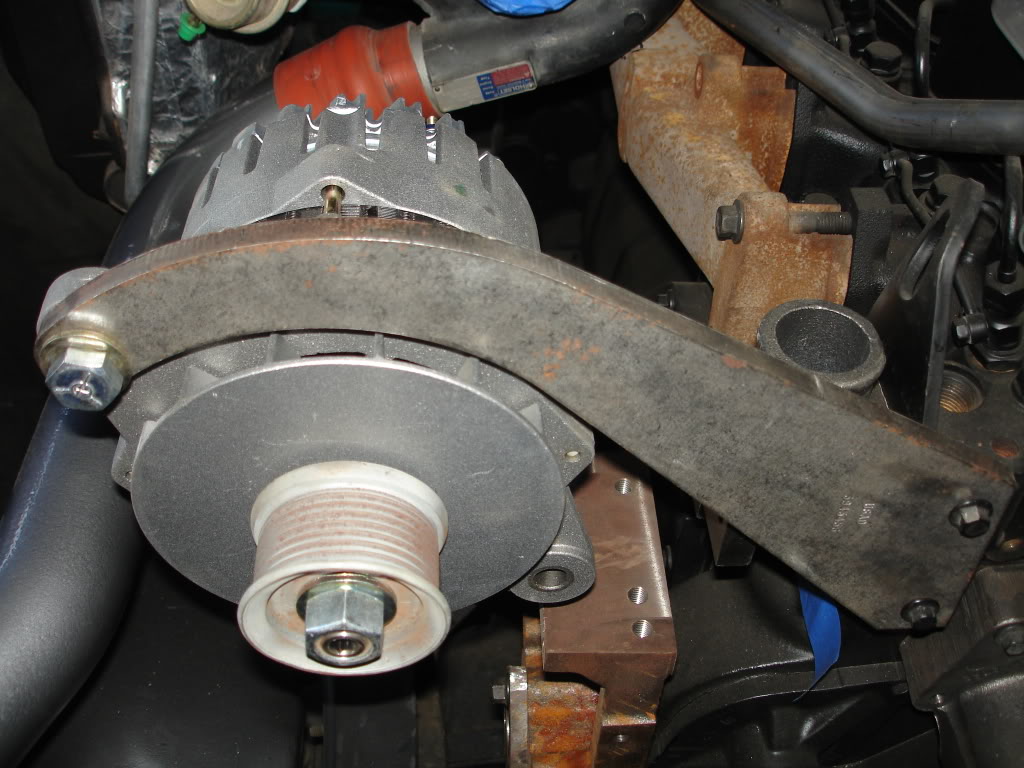 I took a piece of 1/2" plate and cut a piece to fit the top of the water inlet housing mounting to the two rear holes (front hole not used). Then I took a piece of 3/8" plate to make legs that look similar to this: 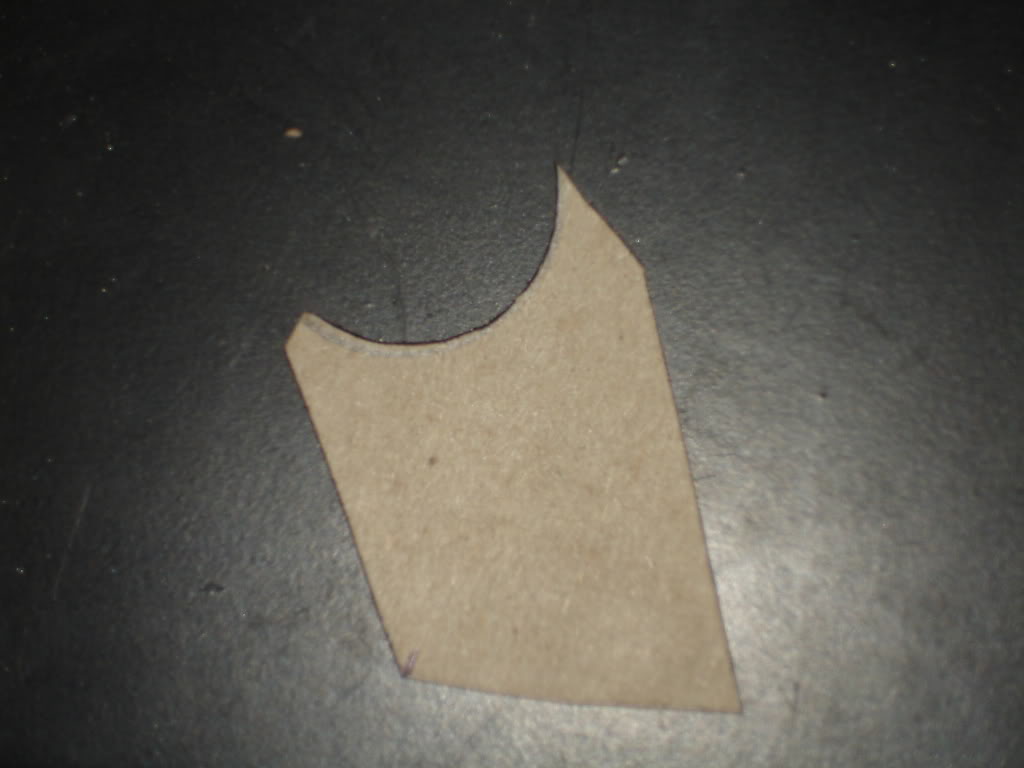 The legs will go between the 1/2" plate and the 1" round bar that Russ (BadDog) bored a .500" through-hole for me. I welded it all together and ended up with this: 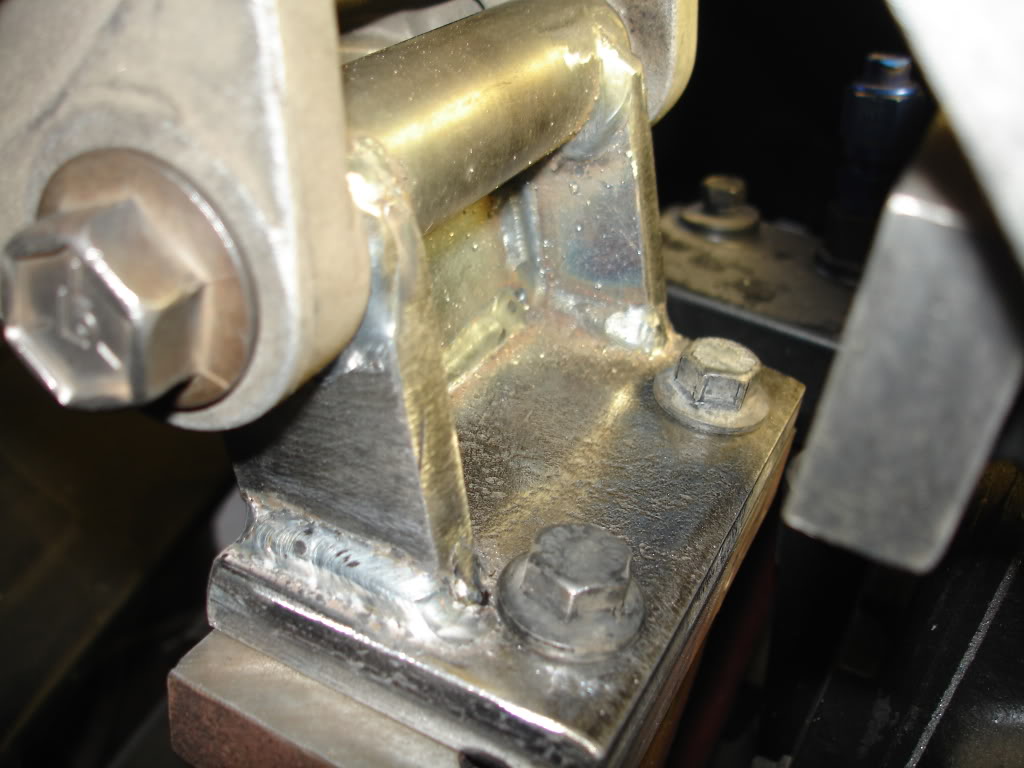 It turned out good. Mounted up and gave some more girth to an already fairly stout upper bracket. While I was doing this, I got a call from Russ and was informed that he had finished machining an uber cool part that I dreamed up to solve a problem that arose in an area near this. I will post details and pics after I get over to his place and acquire the part. Stay tuned.
__________________
1972 K20 Suburban, 5.9L Cummins, Banks Power Pack, NV4500HD, NP205, H.A.D., D60/14FF ARB Link To Build: HERE. Last edited by mosesburb; 11-13-2017 at 02:53 AM. |
|
|
|
|
11-23-2008, 10:18 AM
|
#4 |
|
PROJECT 7DEUCE
 Join Date: Dec 2002
Location: GRANTS PASS OR
Posts: 21,590
|
Re: The Story Of A Suburban (Lots Of Pics)
Nice work keep on pluggin away...
__________________
GO BIG GREEN  GO DUCKS GO DUCKSMEMBER #6377 72 k-5 daily driver 6'' lift 35'' 350-350-205 slowly getting rust free. Project "7DEUCE" check out my build http://67-72chevytrucks.com/vboard/s...d.php?t=267665 Tim Powell..R.I.P EastSideLowlife..... R.I.P.. |
|
|
|
|
11-24-2008, 02:26 PM
|
#5 |
|
Registered User
Join Date: Aug 2005
Location: Hillsboro Oregon
Posts: 6,449
|
Re: The Story Of A Suburban (Lots Of Pics)
Looking good man!
|
|
|
|
|
11-24-2008, 04:15 PM
|
#6 |
|
Registered User
Join Date: Mar 2007
Location: Ben Wheeler,Texas
Posts: 992
|
Re: The Story Of A Suburban (Lots Of Pics)
Thanks for the write up. I've been looking for a 4BT to drop in a 1/2 ton.
__________________
05 2500HD 6.0 excab 69 LWB-Gone but not forgotten! 68 Dodge Charger 383/727 69 Dodge Charger-440/4spd |
|
|
|
|
11-25-2008, 04:07 PM
|
#7 |
|
I had a V-8
Join Date: May 2003
Location: Phoenix AZ
Posts: 1,116
|
Re: The Story Of A Suburban (Lots Of Pics)
Ok, so where to get a slug that will be of decent enough quality to machine what I am envisioning?? My buddy Russ has a friend with a machine shop that has bins of drops (cutoffs) and said he was going down there to get something and he would check to see what he had that we might be able to use. He found an unmarked slug in a bin of 4140 and 4142 drops, so it should be one or the other which would machine easily, but have good strength. Well, it turns out to be something completely different. Russ found this out after beginning the machining process. The material coming off of the slug was like a coiled up razor blade and would not break!! After some investigation, he determined that it is annealed 4340 spring steel. Way overkill for what we need, but it's what we have. He managed to find a feed setting that would break the material coming off into about 4-5 inch pieces (he was getting 4-5 FOOT long pieces of razor blades coming off of it). The material composition did not lend itself well to a nice surface, but it isn't going to be seen, so I don't care. This is what we ended up with: (no pics of it being machined, but here is one of the bolt circle being drilled)
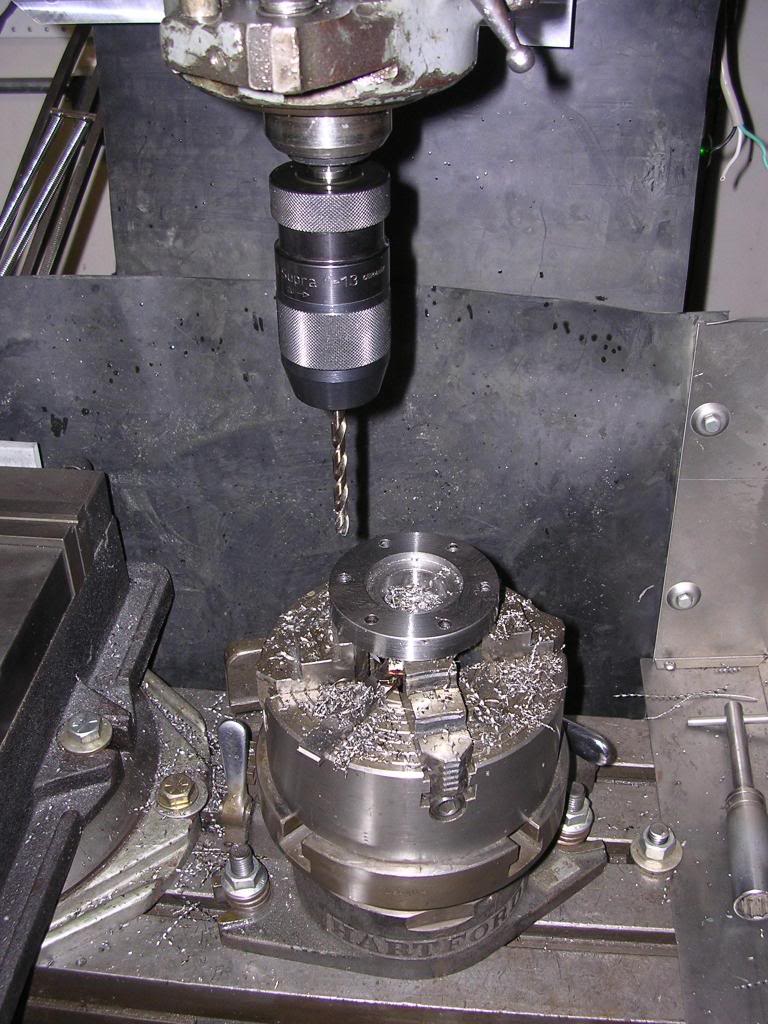 If you look closely at this pic, you can see the one dimension I gave him to start with (one inch): 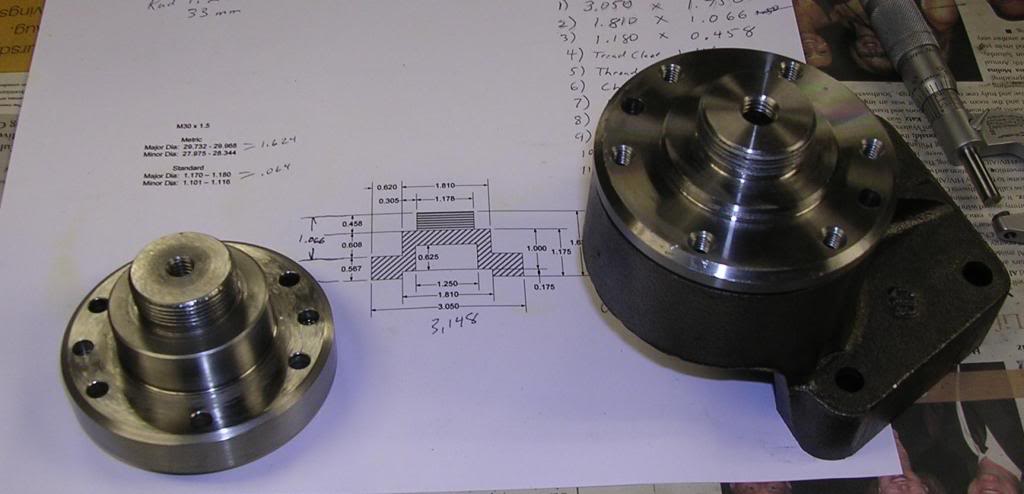 The threads are 30mm 1.5 left hand threads. They turned out better than the ones on the stock hub. This pic shows the 1/4" hardened pins that Russ added for more insurance in alignment and strength: 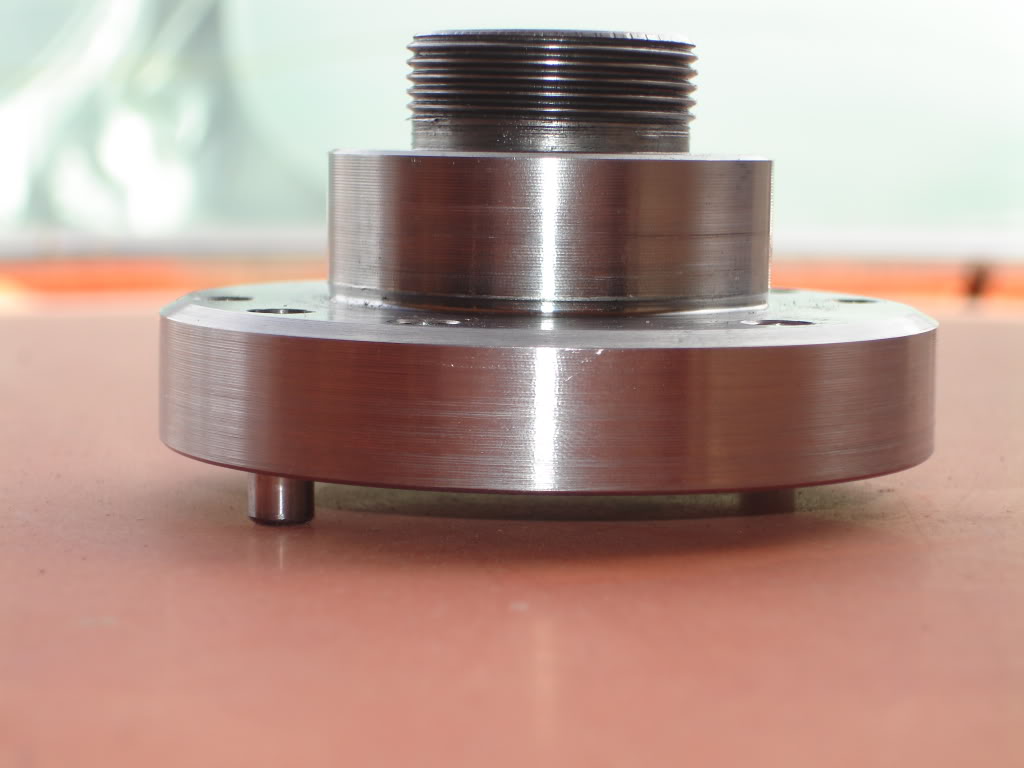 Another angle: 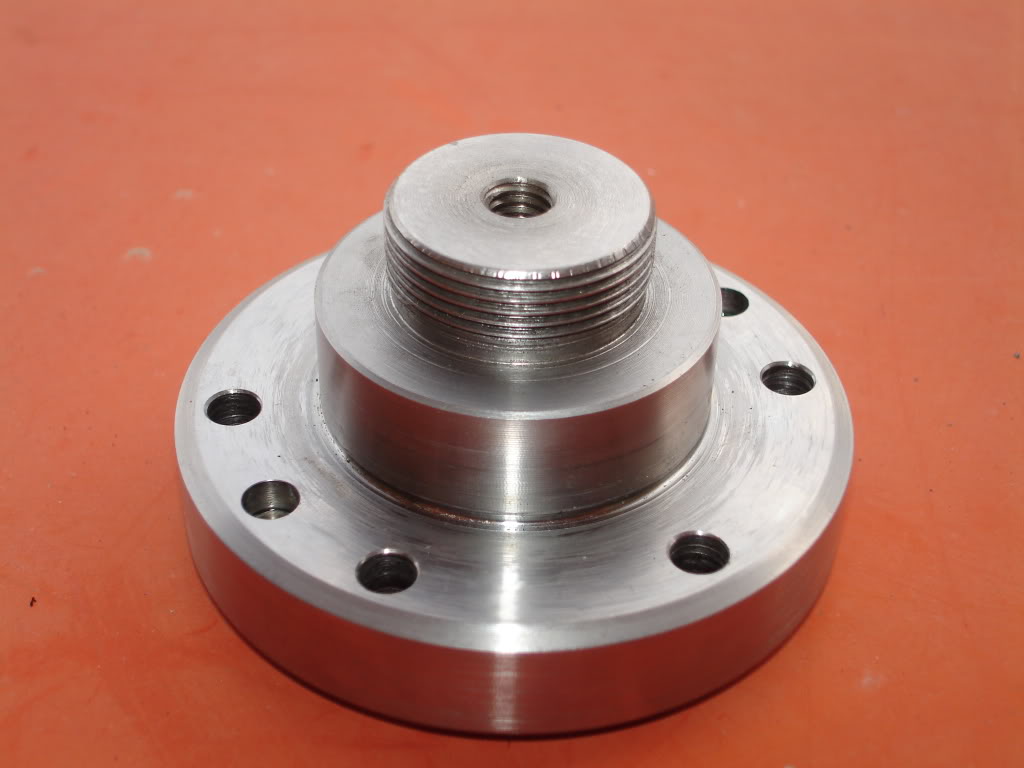 We decided to go with the pulley for the long hub so the spacer could mount directly to the hub and have a nice shoulder for strength. Here is a test fit on the motor: 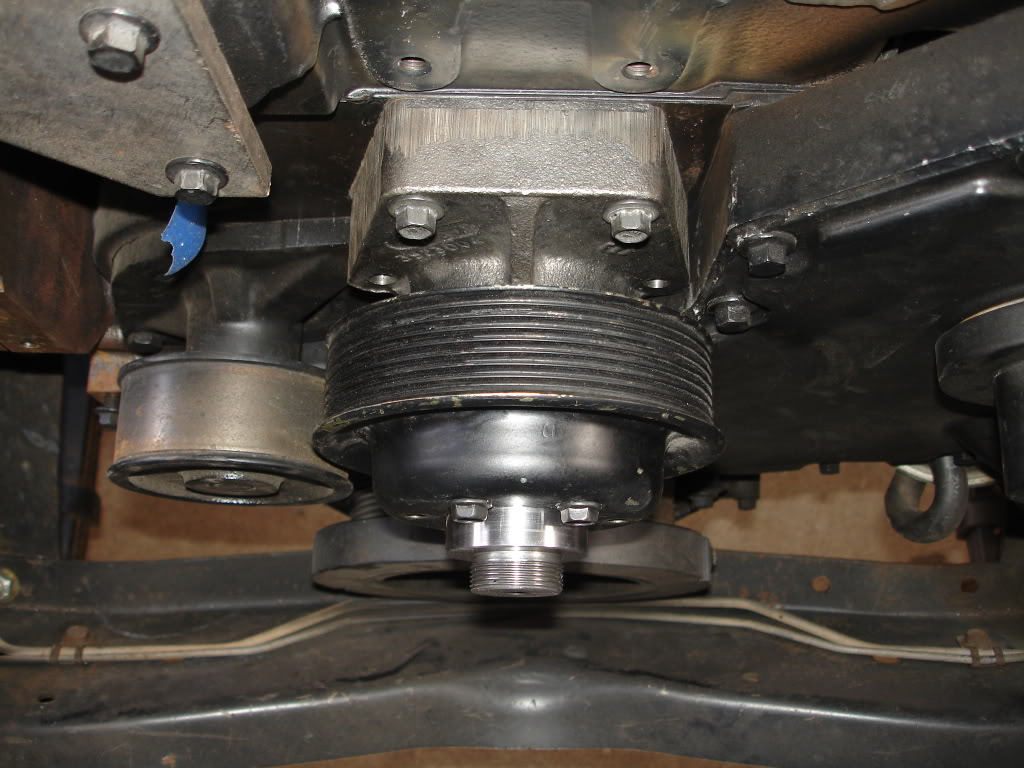 Looks sweet. Let's try the fan now: 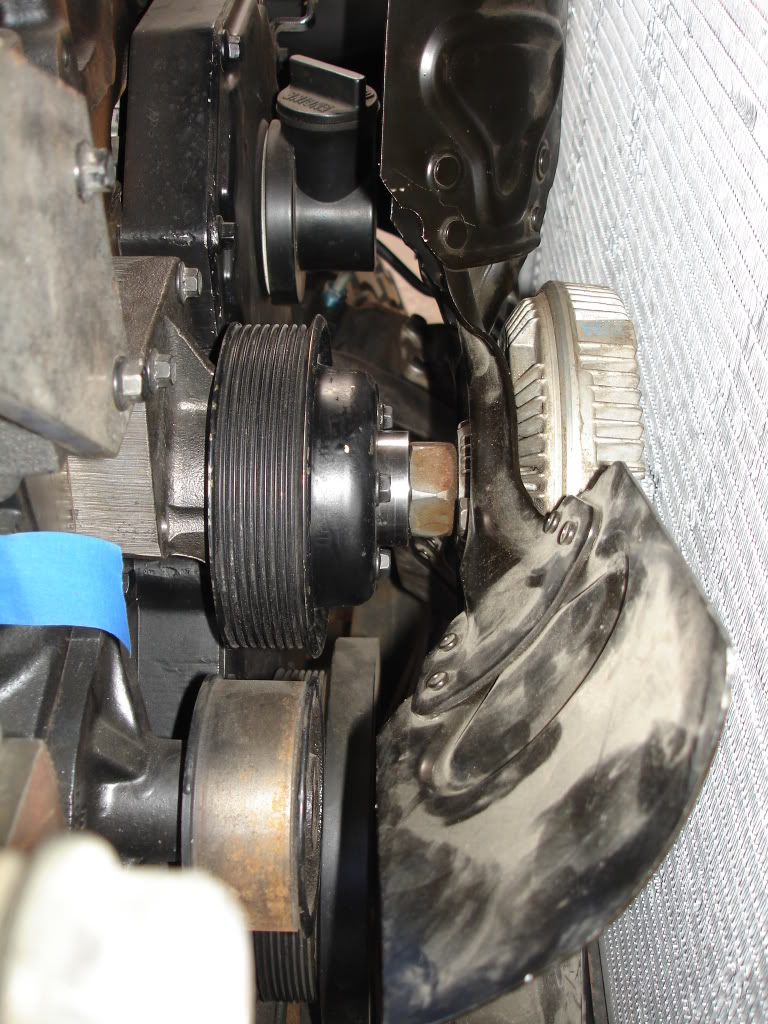 It fits good with good clearance to the radiator (pic does not show this well) and 3/16-1/4" between the fan and the oil fill, water pump and crank pulley. Now for a shroud: 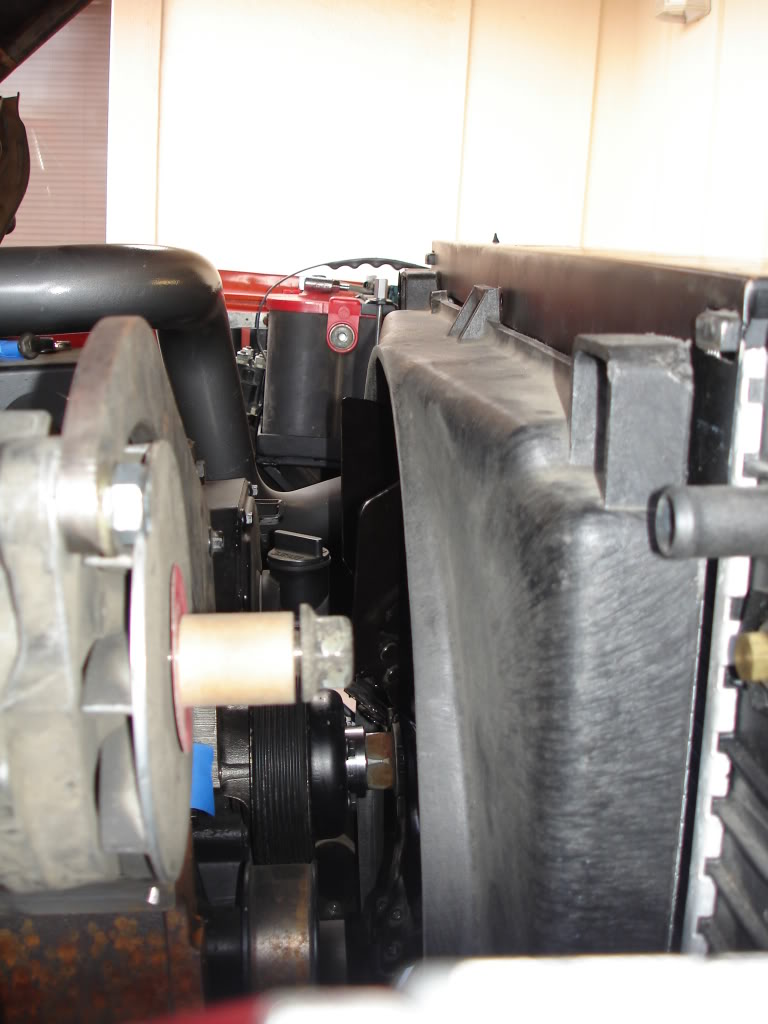 It fits good. Not quite half-in half-out, But I'm calling it good enough at this point. I did all of my test fitting with the stock viscous clutch because it is less cumbersome that the Horton that has a leash (Harness) that seems to always be in the way when working with it. The clearance between the clutch and the radiator is great enough that it will clear the Horton fine. So there you have it. One bishin' piece of engineering to solve a strange problem. Many thanks go out to Russ for his perseverance and skill in turning an otherwise generic slug of metal into spiral razor blades and a hub that alleviates a major roadblock on my path. Thanks again!!
__________________
1972 K20 Suburban, 5.9L Cummins, Banks Power Pack, NV4500HD, NP205, H.A.D., D60/14FF ARB Link To Build: HERE. Last edited by mosesburb; 11-13-2017 at 03:22 AM. |
|
|
|
|
11-29-2008, 01:26 PM
|
#8 |
|
Tonawanda 454
Join Date: Mar 2004
Location: Liquid Sunshine State
Posts: 2,755
|
Re: The Story Of A Suburban (Lots Of Pics)
looking amazing so far.... keep us going, want to see more... and thanks for so much so far.
Makes me appreciate my current stock GenV Tonnawanda 454 in my beast.
__________________
91 Chevy Suburban Tonawanda 454 R2500 - SOLD!!!  04 Dodge Durango 5.7L Hemi 2WD, 24K miles (as of July 2011) In the past 30 years about 90% of Fords are still on the road, the other 10% made it home. ------------------- |
|
|
|
|
11-30-2008, 05:46 AM
|
#9 |
|
I had a V-8
Join Date: May 2003
Location: Phoenix AZ
Posts: 1,116
|
Re: The Story Of A Suburban (Lots Of Pics)
I have to stay up real late tonight, so I figured I'd go out in the shop and get something accomplished. I did not know what, so I decided to think outside the engine compartment for a change. Fuel lines, that will be the project for tonight, err, this morning. I was hoping to be able to use what is on the truck for fuel lines, but they run down the right frame rail and the fittings are on the left side of the Cummins. I could not devise a non-hack approach to get the fuel from one side of the frame to the other so, as usual, I had to make something different.
I started with the rear lines. The only specs I have to go by are the diameters of the connections on the motor. The lift pump uses a 5/16" hose barb and the return line uses a 1/4" nipple. My tank is set up for 3/8" line, so I decided to make the feed line 3/8" instead of 5/16". Now, I am no pro at bending steel line, but I have learned a few things over the years. I recently upgraded my equipment from a POS Snap-On tubing bender that did 1/4", 5/16" and 3/8" tubing in one tool that was absolutely horrible for anything over 1/4" because the handles are too short, and went to four different Ridgid benders. Man, what a difference that made. Another thing I learned long ago is that one line is simple to make, but making a second line match the first line requires some skill--which I do not have much of. I realized that, lacking this skill, I should start with the larger diameter tubing and match the smaller tubing to it. This made my life much easier as the smaller tubing is much easier to manipulate to match the larger diameter. It took me a couple hours and probably would have taken someone with bending skills about half an hour to forty-five minutes, but hey, time is cheap in the middle of the night. Anyways, here is what I ended up with: Rear lines (there are two stacked on top of each other)  The variances in the ends are for hose clearance to each other. I am running them in factory type clamps that hold both lines tight together, so at the end the lines they have to splay out or at least take a different angle so that a hose and clamp can go on each one without interfering with the other. The front lines:  All lines together: 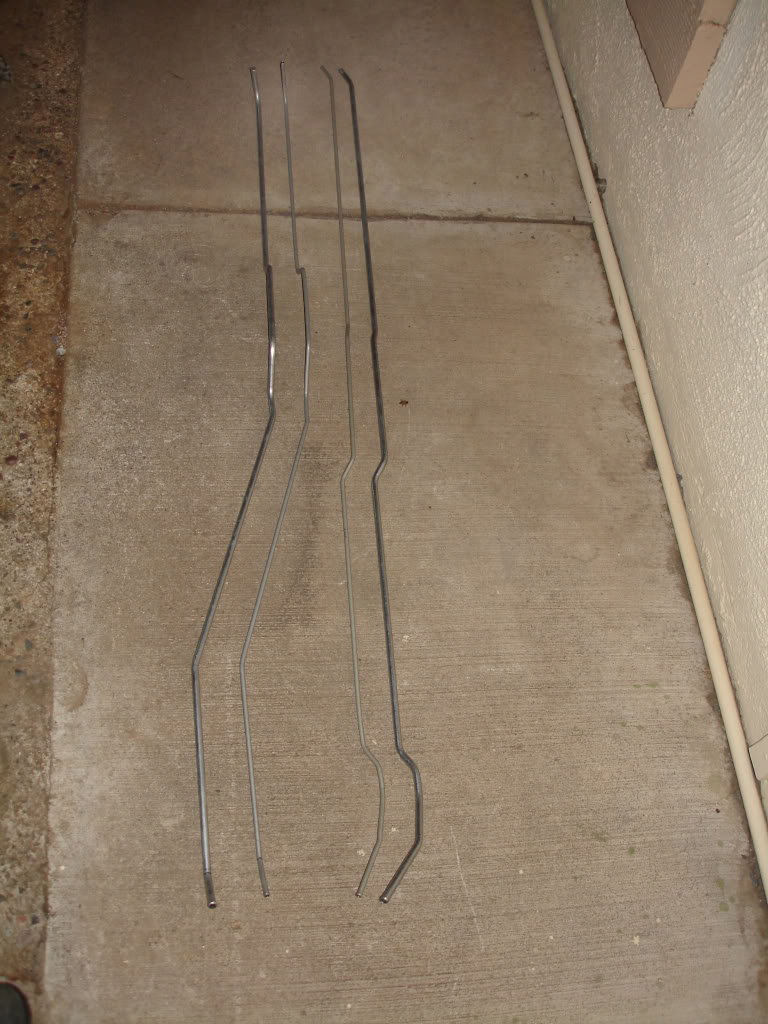
__________________
1972 K20 Suburban, 5.9L Cummins, Banks Power Pack, NV4500HD, NP205, H.A.D., D60/14FF ARB Link To Build: HERE. Last edited by mosesburb; 11-13-2017 at 03:29 AM. |
|
|
|
|
12-01-2008, 09:27 AM
|
#10 |
|
Registered User
Join Date: Mar 2007
Location: Ben Wheeler,Texas
Posts: 992
|
Re: The Story Of A Suburban (Lots Of Pics)
I love this build, I would love to do the swap myself but man it looks like a PITA!
__________________
05 2500HD 6.0 excab 69 LWB-Gone but not forgotten! 68 Dodge Charger 383/727 69 Dodge Charger-440/4spd |
|
|
|
|
12-28-2008, 04:02 AM
|
#11 |
|
I had a V-8
Join Date: May 2003
Location: Phoenix AZ
Posts: 1,116
|
Re: The Story Of A Suburban (Lots Of Pics)
I have actually been making some progress on this, but I haven't loaded the pics etc, so here are a couple pics for now.
I got my power steering lines done!! 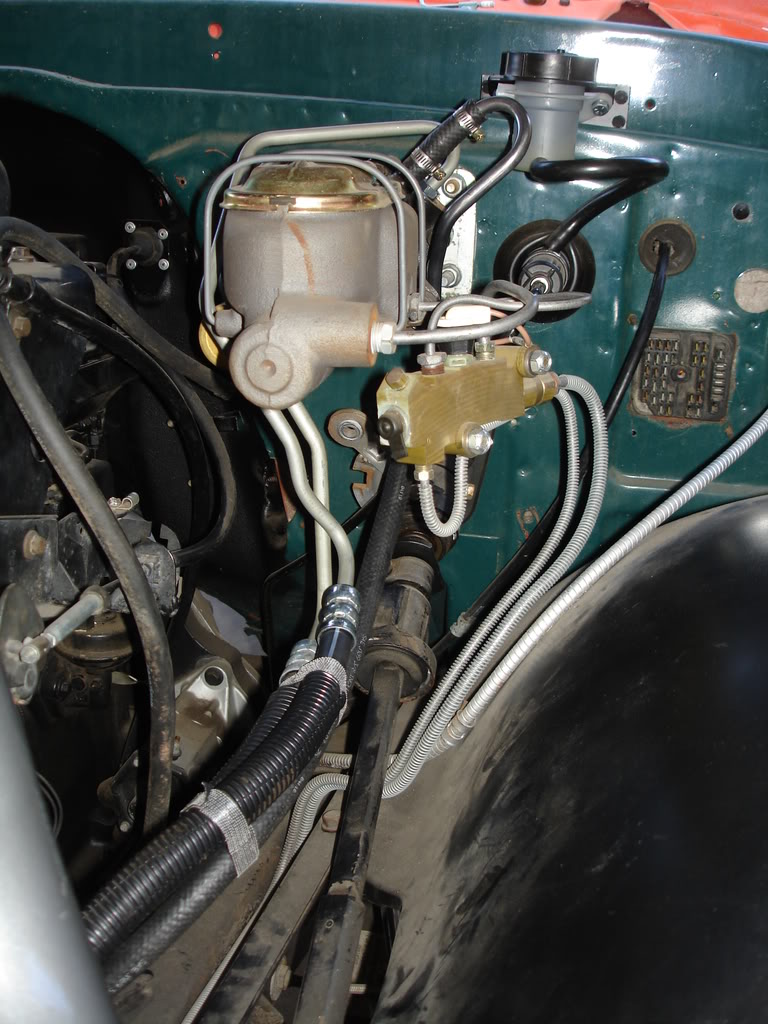 I know there are a couple people here who have been waiting to see this thing get wired, so here is the start of it. This is the big block harness that I made, grouped in circuits, awaiting routing and fitment. 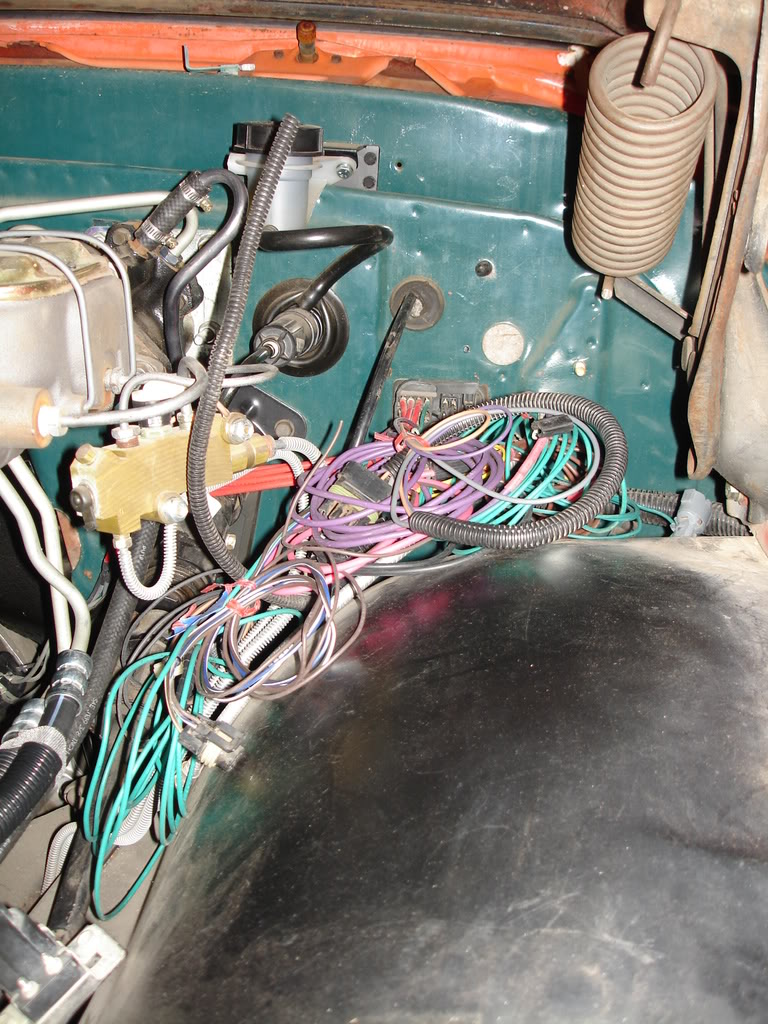 Those of you who know my stash of GM electrical components will understand when I say that I am waiting on a large box of electrical stuff that I plan on working on this harness once. And nevermore......
__________________
1972 K20 Suburban, 5.9L Cummins, Banks Power Pack, NV4500HD, NP205, H.A.D., D60/14FF ARB Link To Build: HERE. Last edited by mosesburb; 11-13-2017 at 03:33 AM. |
|
|
|
|
12-29-2008, 03:10 AM
|
#12 |
|
I had a V-8
Join Date: May 2003
Location: Phoenix AZ
Posts: 1,116
|
Re: The Story Of A Suburban (Lots Of Pics)
I figured it was about time to get a belt on this thing. The sticking point that I was dealing with was the tensioner. The water inlet housing that I used has provisions to mount a tensioner bracket on it in one of two locations. One is down low (there are two bolts in the lower holes in this pic) and one upper (you can just make out some silver spots in the pic where the upper mounting location is).
 This plate is used to mount the tensioner to the water inlet housing: 3/8" plate 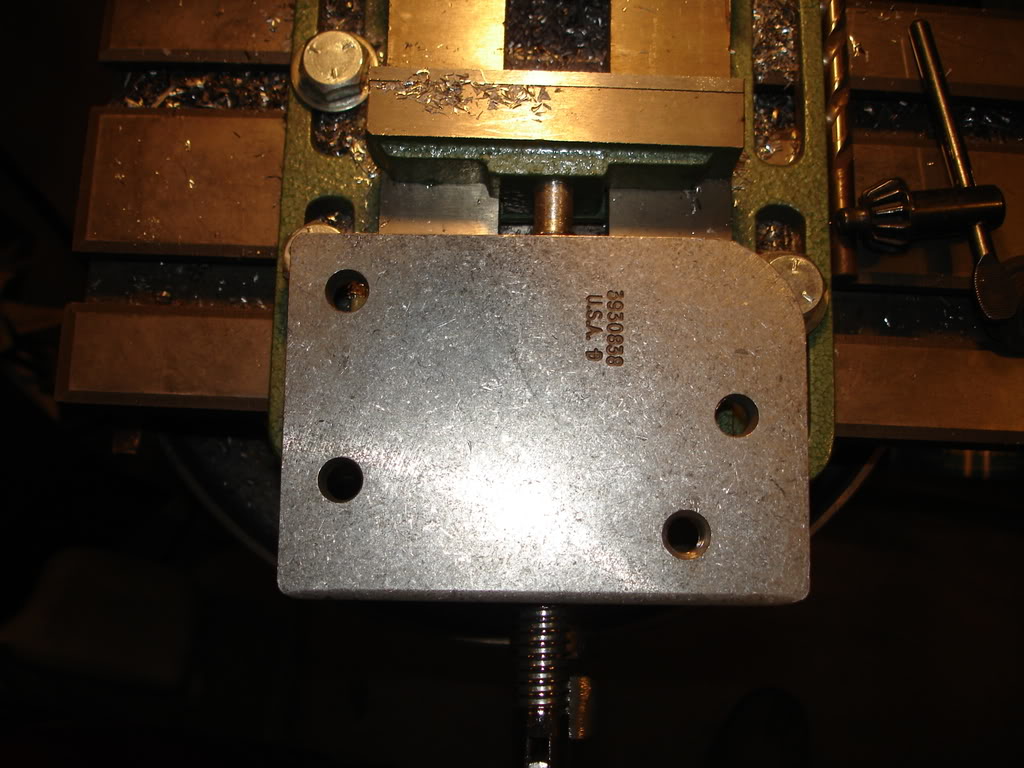 The problem with this setup is the location of the mounting holes in the inlet housing. The upper holes are directly in front of where the compressor will mount. This is bad. The lower holes put the bracket and plate into the frame rail. This is bad also. A plan "C" is going to be necessary. After staring at it for a few hours, I got an idea. The upper alternator bracket is a nice stout piece of 3/8" plate. Hmmm, that is the same as the tensioner bracket.... So I decided to route a belt on it and see if my theory would fly. I grabbed an old belt I had from a 4.3L and routed it around and used a clamp to make it the correct length. It looked like it should work, so I went ahead and drilled and tapped the hole in the plate to mount the tensioner. I did not drill the hole for the indexing pin yet. 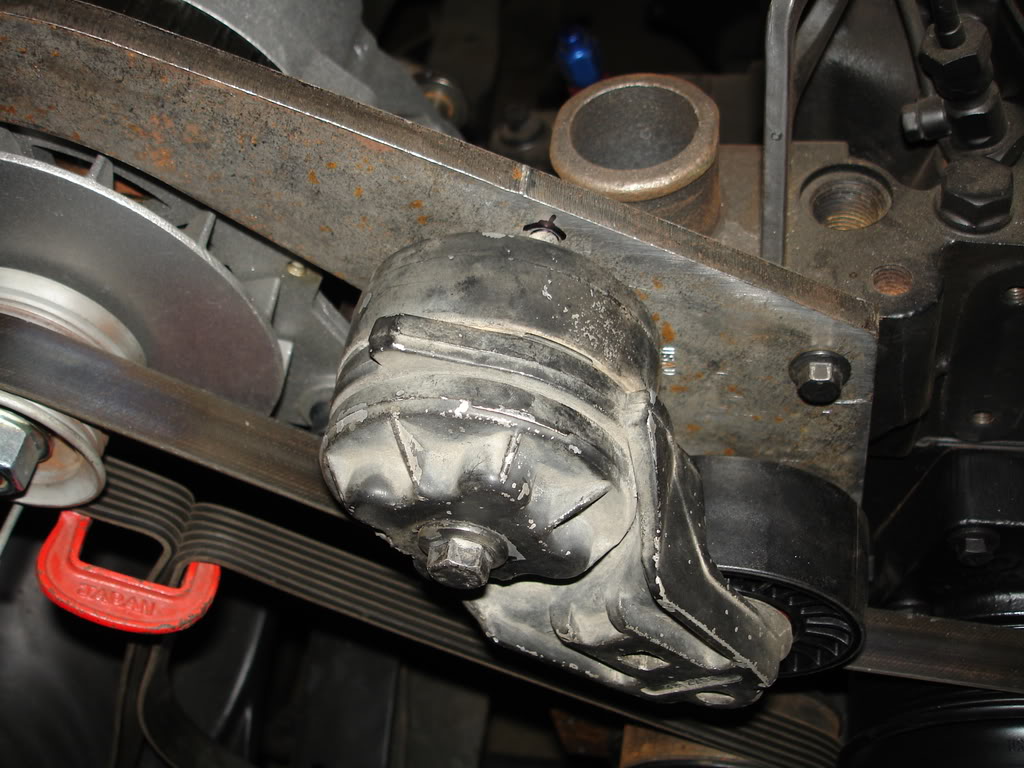 It looks like it should work. 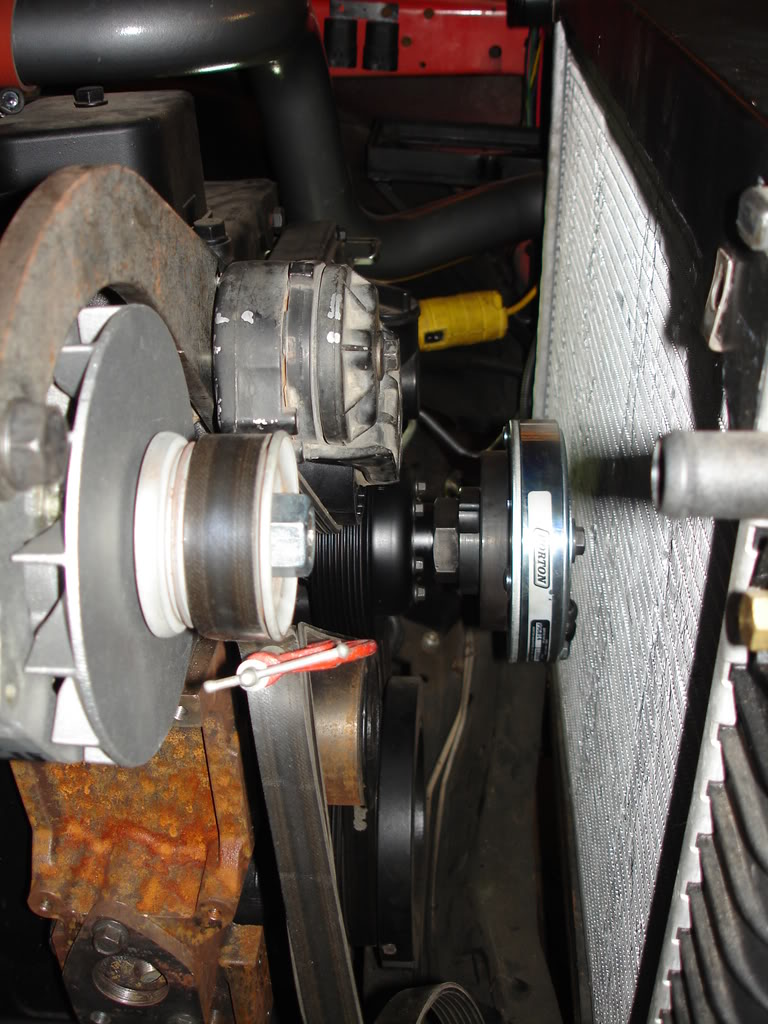 Now, it is hard to tell from the pic, but the routing of the belt was not ideal. It came straight up off of the crank to the fan hub, went around that, under the tensioner, around the alternator, down around the water pump and then back to the crank. I got a couple belts this length, but before I even tried them, I decided this was not a good setup. The fan hub had only about 90* coverage. When that Horton fan clutch engages, the belt is going to scream like a scalded ape. I decided to re-route the belt (I'm glad I made this decision before I bored the hole for the indexing pin on the tensioner). Now, the belt comes off the crank and goes to the water pump, wraps around it (over 180* coverage), then goes over to the fan hub and wraps around it (well over 180* coverage), then under the tensioner, around the alternator and back down to the crank. So with this change, I got excellent coverage on all the high-drag components without resorting to adding pulleys etc. This is what I ended up with: 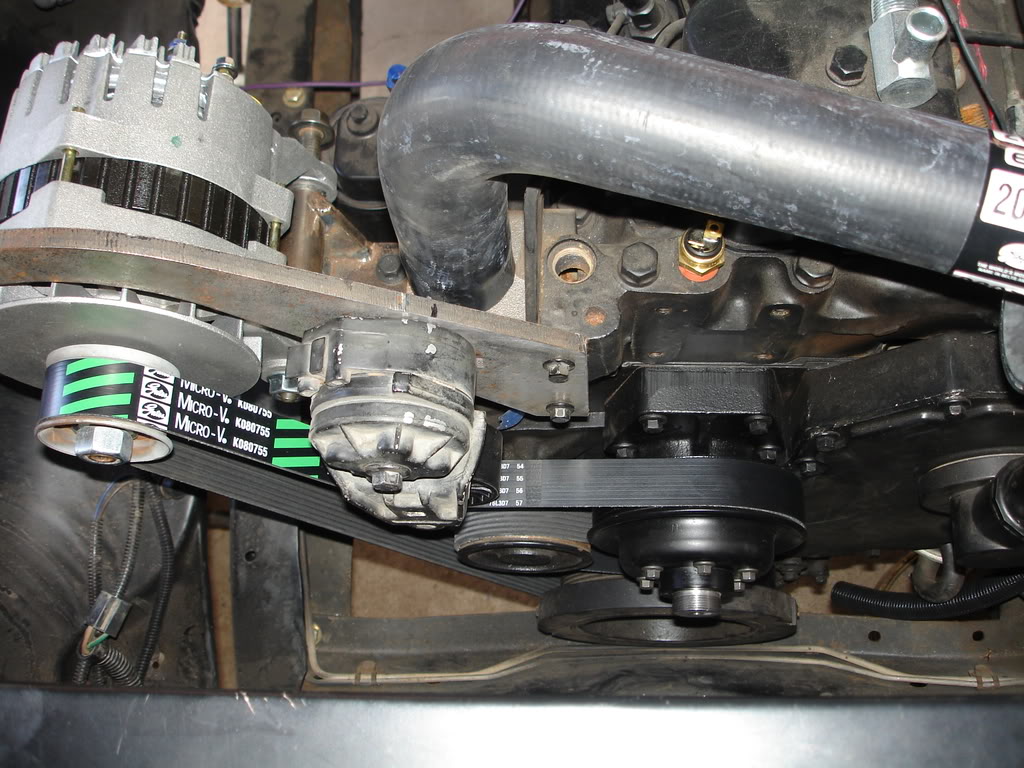 I was concerned with the location of the indexing hole for the tensioner, but in the end I got it right on the money. With the tensioner pulled all the way back, a belt can JUST be slipped on and when relaxed the tensioner is at 3/4 of its range. With that done, I started looking in my box of stuff left to put on. Unfortunately, my box appears to have more stuff in it than there is room left under the hood for it. I decided to tackle the horns. They are Delco replacement horns, but they look like something off of a European import. I tested them out and they are loud as hell and have a domestic tone to them (no import squeak horns here). I toyed around with a few mounting locations. I do not recall this thing having horns on it when I got it, so I do not know where they are supposed to be, but I found a place that works well and would otherwise be unused space. 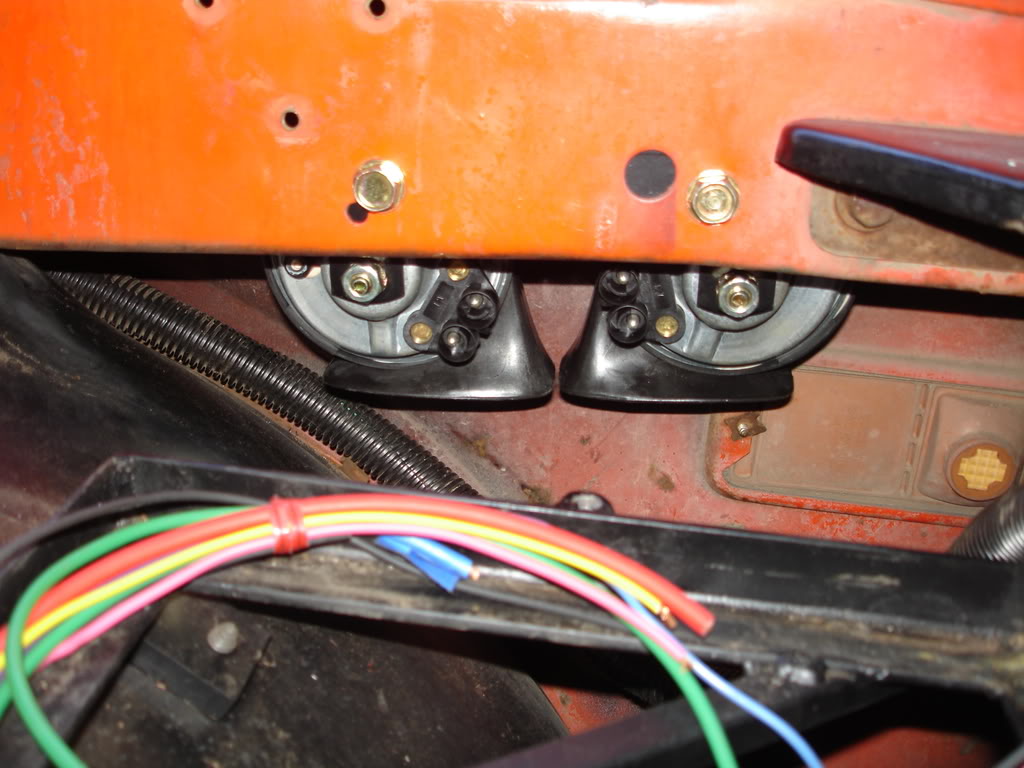 I'm getting closer.......
__________________
1972 K20 Suburban, 5.9L Cummins, Banks Power Pack, NV4500HD, NP205, H.A.D., D60/14FF ARB Link To Build: HERE. Last edited by mosesburb; 11-13-2017 at 03:50 AM. |
|
|
|
|
12-29-2008, 10:20 AM
|
#13 |
|
high-Tech Red Neck
Join Date: Feb 2008
Location: Livingston, MT/On my boat WA/BC/AK
Posts: 2,294
|
Re: The Story Of A Suburban (Lots Of Pics)
Its looking good man, I am really liking what you have done so far.
Just curious though, why go through all the trouble with the fan when you could just put a set of twin electrics on it and be done with it?
__________________
"He used to be a pretty nice feller, now he's a welder!" |
|
|
|
|
12-30-2008, 01:43 AM
|
#14 | ||
|
I had a V-8
Join Date: May 2003
Location: Phoenix AZ
Posts: 1,116
|
Re: The Story Of A Suburban (Lots Of Pics)
Quote:
Quote:
I have not had great luck with electric fans in this state and I absolutely, positively, despise a vehicle that can not be run at maximum power under ANY condition. There are mountain passes around here that have signs saying turn off A/C and slow down. When I pass these signs, the throttle goes down and I turn the A/C to high (I have radiators in my S10s with 4.3L's that could keep a big block in a passenger car cool). I ran into a guy years back that had done a Cummins conversion on his mid-'80's Sub and he had used two electrics because of fitment issues. When pulling long passes at high boost pressures his temp would creep up and not drop back down until he slowed down significantly. It was such a problem for him that he re-designed his cool-pack to make enough room for a factory fan and clutch setup. The amount of air that a stock belt driven fan can pull dwarfs the best electric fans out there. I am *hoping* that the fan clutch wil not engage too often, but I'm sure it will run more than I would like. In my opinion, hoping it doesn't come on too often is better than having to hope the engine temp will go down soon on a ten mile long, 7% grade on a balmy 115 degree ambient afternoon. I figure doing the engineering now is easy compared to having to go back into the project to re-do something.
__________________
1972 K20 Suburban, 5.9L Cummins, Banks Power Pack, NV4500HD, NP205, H.A.D., D60/14FF ARB Link To Build: HERE. |
||
|
|
|
|
12-30-2008, 02:20 AM
|
#15 |
|
I had a V-8
Join Date: May 2003
Location: Phoenix AZ
Posts: 1,116
|
Re: The Story Of A Suburban (Lots Of Pics)
It is time to get something done on the hot side of the head. I got the manifold surfaced (turns out it was very straight already). I mounted it up to the head with new gaskets and new bolts. Then I hung the turbo on it with a new gasket. When I inverted the manifold I created an issue with the oil feed line for the turbo and the drain pipe that returns the oil from the turbo to the pan. The oil feed line was fairly easy as the ends of the line are standard 5/8-11 thread (same as the nuts on 3/8" steel line). This lent itself well to adapting something to work in place of the stock setup.
I went and dug through my stash of AN fittings and line. I found a nice piece of braided line with a teflon liner, but no fittings--drat. Then I found a real nice forged 90 hose end, a nice straight end, a couple of 5/8-11 inverted flare to -06 adapters and then I found a piece of hose (silicone liner) that was about three inches too LONG!! We are in business!! I added them all together, shortened the hose and came up with this: 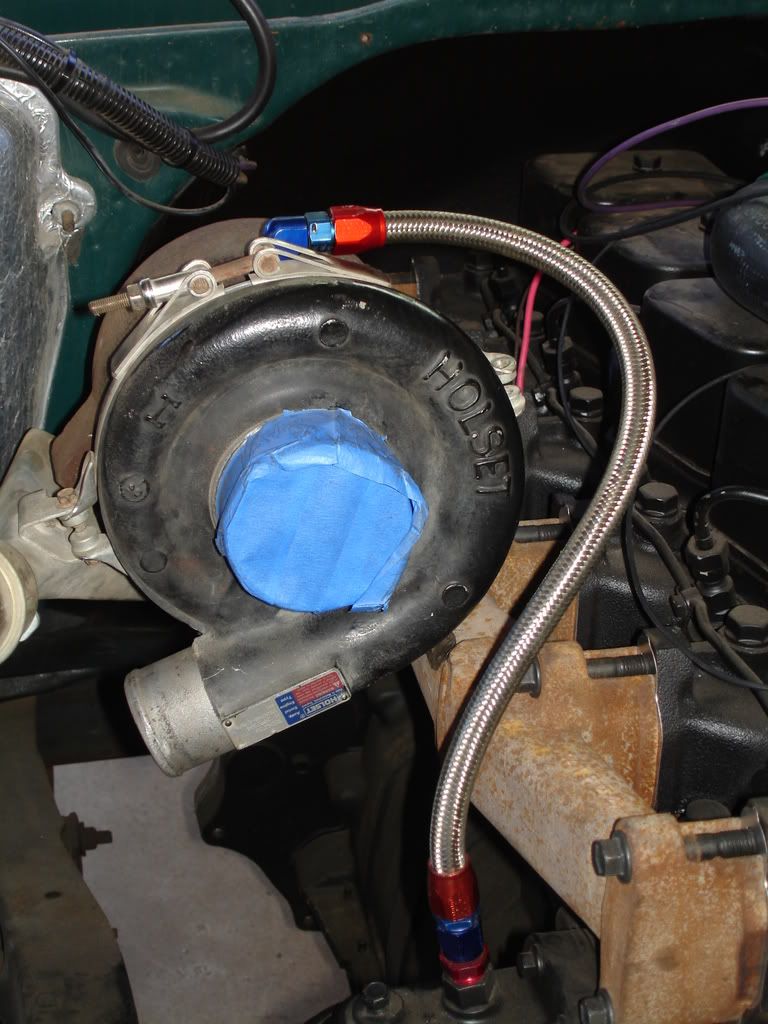 It clears everything very well and will work good. It even adds a little functional bling!! Well, I have oil going to the turbo, but I need to get that oil back to the motor after it is used. The inverted manifold created another issue in the drain pipe. I had modified my original, but it looked like horrid crap when I got done with it. I/we could not find one that would work with my setup. I ended up getting one that was close, but quite a bit too long. I did not want to try modifying it the same way I did the first one (leaning over a fender at arms reach holding two pieces of tubing butted together at a certain phasing, then grabbing the welder to tack it together without moving anything is a bit tough with only two OEM hands). I got to thinking about it and got on the horn to Russ to bounce an idea off of him. He said he could make what I thought up. Basically it is a steel sleeve that I can use to position the pipe where I need it, mark it, remove it from the engine and silver solder it together. It worked way-slick!! The flange that bolts to the turbo is silver soldered from Cummins. This is what it looked like awaiting solder: 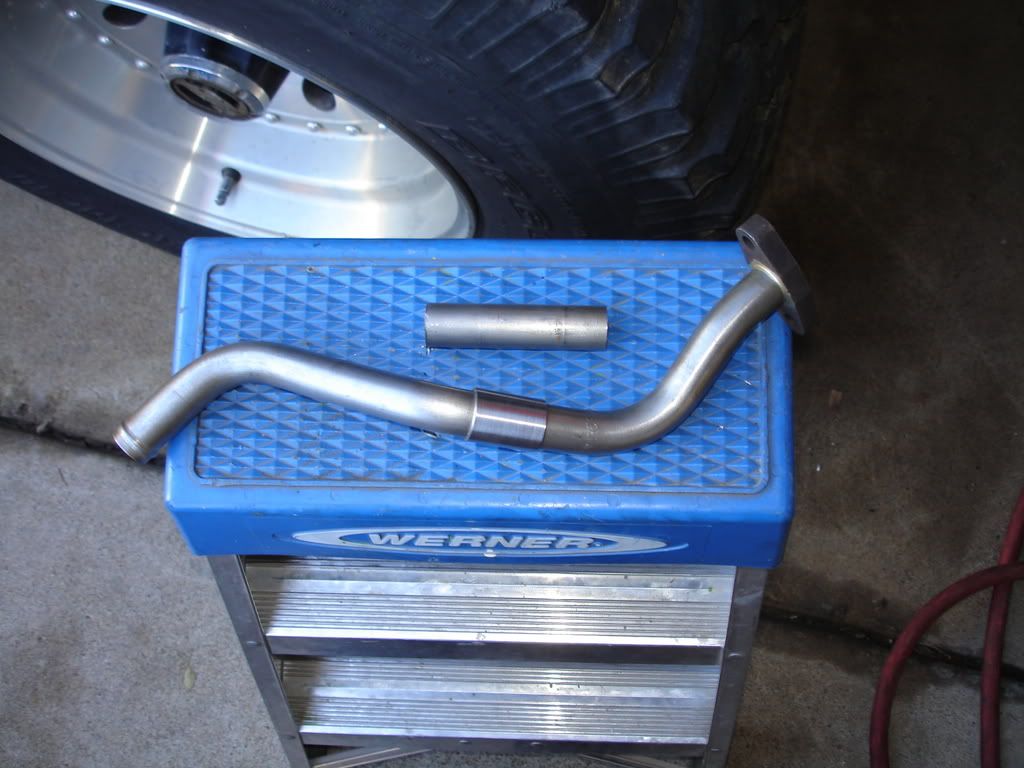 So, now I have an exhaust manifold, a turbo (with oil feed and drain) mounted on the motor. All I have to do on this side is to figure out an air filter and hang the exhaust down pipe on the turbo. I'm getting closer......
__________________
1972 K20 Suburban, 5.9L Cummins, Banks Power Pack, NV4500HD, NP205, H.A.D., D60/14FF ARB Link To Build: HERE. |
|
|
|
|
12-30-2008, 09:04 AM
|
#16 | |
|
high-Tech Red Neck
Join Date: Feb 2008
Location: Livingston, MT/On my boat WA/BC/AK
Posts: 2,294
|
Re: The Story Of A Suburban (Lots Of Pics)
Quote:
I have run big trucks all over that country out there, you haven't lived till you have done the north end of 17 when it is icy, and you weigh 79,000 lbs! It is going to be a pretty cool rig when you get it done. I do like the attention to detail you are going at it with, I have seen way too many folks just slap an engine in a bay, and mickey mouse it to make it run. It is nice to see that you care enough to do it right.
__________________
"He used to be a pretty nice feller, now he's a welder!" |
|
|
|
|
|
01-09-2009, 03:59 PM
|
#18 |
|
I'M TRUCK CRAZY!
Join Date: Oct 2006
Location: Sachse, TEXAS
Posts: 1,737
|
Re: The Story Of A Suburban (Lots Of Pics)
WOW! I only got to look at the pics. you wern't kiding. I'll have to go back and read it. I like
|
|
|
|
|
01-15-2009, 12:04 AM
|
#19 |
|
I had a V-8
Join Date: May 2003
Location: Phoenix AZ
Posts: 1,116
|
Re: The Story Of A Suburban (Lots Of Pics)
Thanks guys!!
I have been getting more done lately, just not had the time to post pics. I tore the brackets and what-not off of the front of the motor and got them painted up and re-installed: 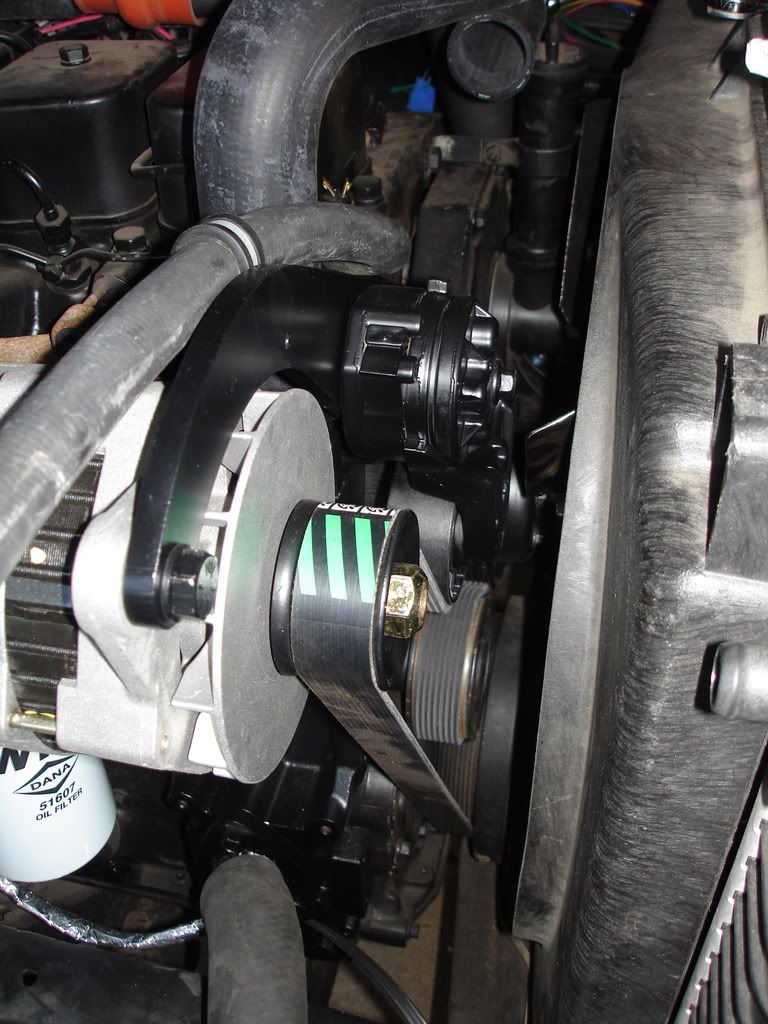 I got my heater supply hose figured out. With the Adel clamp supporting it, it clears everything nicely (it doesn't look like it does in the pic though) 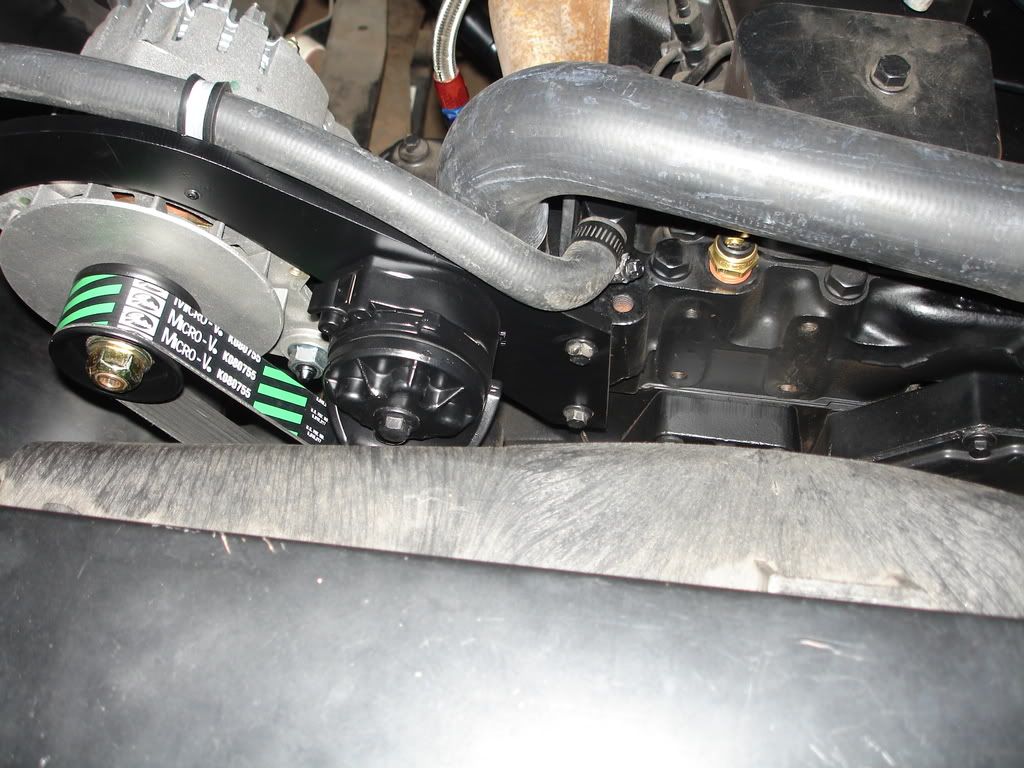 I figured out my lower hose. It fits good, but the pic makes it look like it is sitting on the inner fenderwell. It actually clears by a little bit, but will probably make contact at some point, so I added the anti-abrasion sleeve for good measure. 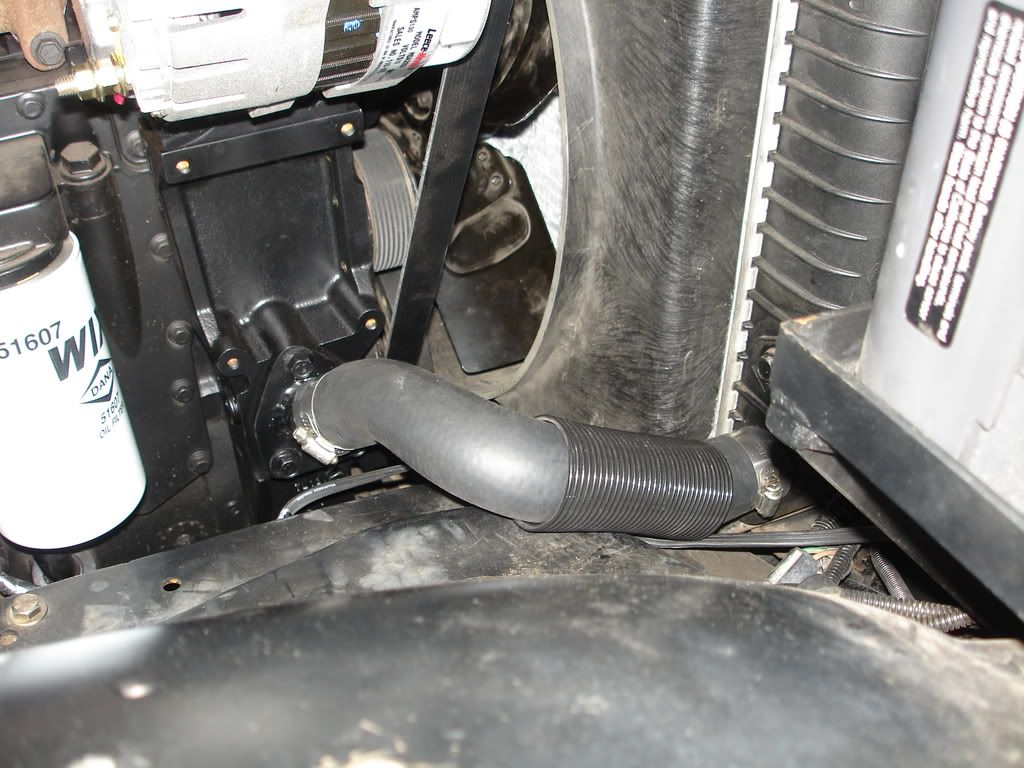 I finished up the harness off of the Horton fan clutch and added an anti-rotation device. Nowhere in the instructions did it say that one was required, but I did not want to rely on the shear strength of a couple 16ga wires to keep it straight, so I made one of my own. I also added a .125" steel rod to the harness to prevent it from being sucked into the fan. 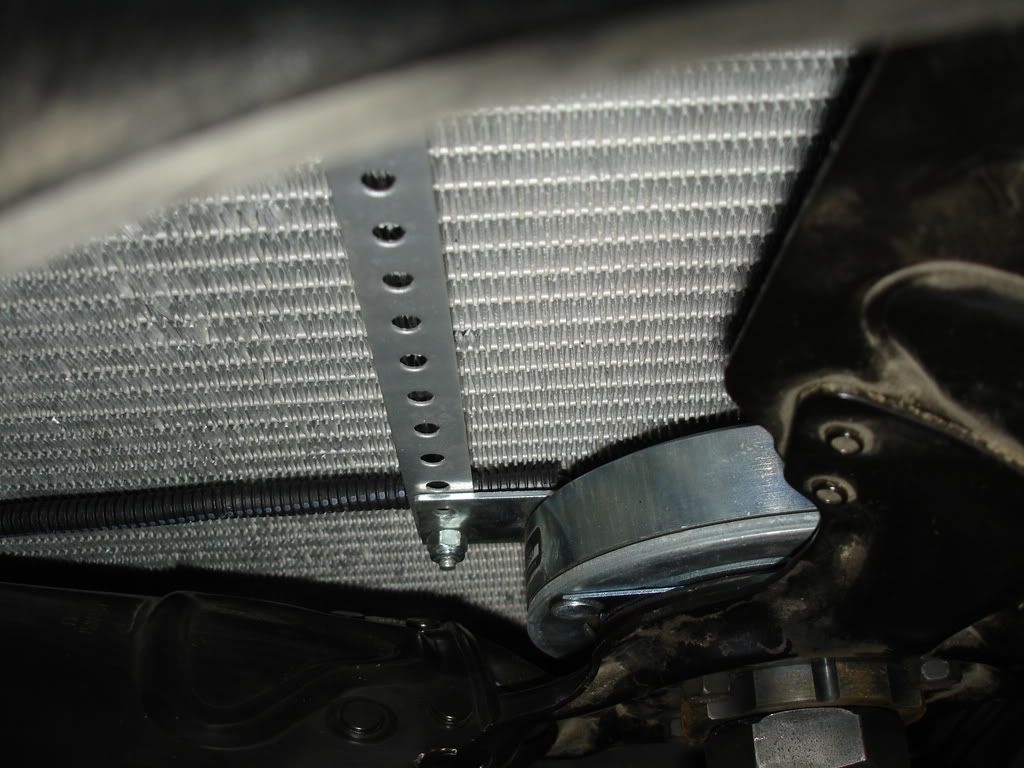 In this next pic you can see the mounting point for the Horton harness on the outside of the fan shroud. The Adel clamp holds the harness nice and tight and with the .125" rod in there it should be good to go. I got the upper hose done also. I had to do it with two hoses for a couple reasons. The combination of the water outlet housing I used pretty much eliminated the use of an off-the-shelf hose and when I modified the intercooler pipe, I got it just a bit too long on the intake end and it interfered with what would be a stock hose from a Dodge, so I had to piece one together. It worked out pretty good as I am able to use two of the same part number hose which is a typical generic 90* hose, so availability will be good when replacement time comes. I used a piece of 1.75" tubing to connect them. I welded a bead around the ends for hose retention and added two support rods that go down to the cylinder head. I did not any of the rod that I thought I had here, so I ended up using two pieces of .625" solid bar stock. It's a bit heavy, but it won't break and at this point, what's a little extra weight??  I also got my battery cables made. This is the only pic I got that is decent enough to post. With everything being black, they just blend in. I used fine stranded 1/0 cable and put an old-school asphalt coated abrasion resistant sleeve over it for good measure. This is the driver's side battery: 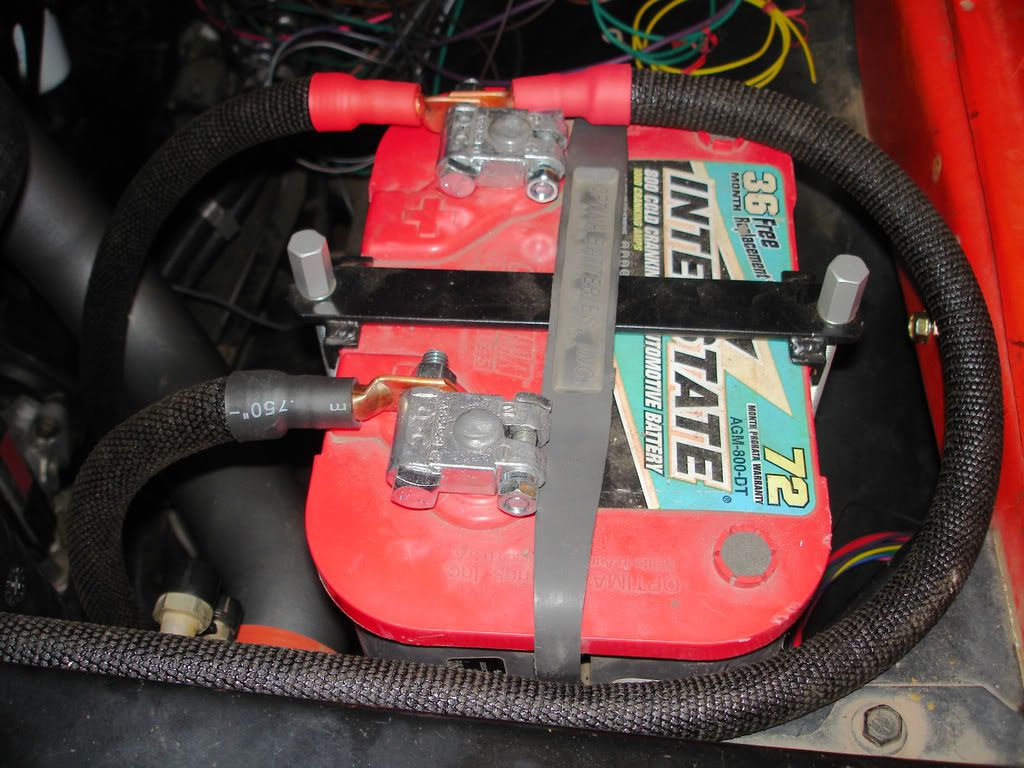 I'm getting closer......
__________________
1972 K20 Suburban, 5.9L Cummins, Banks Power Pack, NV4500HD, NP205, H.A.D., D60/14FF ARB Link To Build: HERE. |
|
|
|
|
01-15-2009, 12:50 AM
|
#20 |
|
high-Tech Red Neck
Join Date: Feb 2008
Location: Livingston, MT/On my boat WA/BC/AK
Posts: 2,294
|
Re: The Story Of A Suburban (Lots Of Pics)
Man its looking good. I might not be too far behind you, if I can get my blazer sold soonish there is a 93 Dodge here that I am looking at getting for the motor, it runs real good, and has been turned up a bit. Probably wont be on the level yours is, but seeing what you have had to do will definitely give me a leg up on it.
I like how you are doing it though, everything looks well thought out, nothing comes off as hackish.
__________________
"He used to be a pretty nice feller, now he's a welder!" |
|
|
|
|
02-01-2009, 03:51 PM
|
#21 |
|
Registered User
Join Date: May 2008
Location: Alta Loma, Ca.
Posts: 930
|
Re: The Story Of A Suburban (Lots Of Pics)
Are you going to keep those front springs? I see they have wear buttons on the ends, but thickness of the material and the fact that with 3 leafs the weight of the engine did not sag it much, means those springs are pretty stiff. (whew, run on sentence) It seems to me that a lot of flex/force would be transferred to the chassis with those springs. Have you seen the conversion were they use Chevy 1/2 ton 52 inch back springs on the front? They move the front mount forward about 2 inches. This would give you a little more clearence for the Dana 60 and allow more spring flex than your lift springs would allow. It should save the chassis. The only reason I bring this up is I had a lift on my 1976 3/4 ton that only had 2 leafs. I swapped them out for another companies multi leaf spring with thinner leaf material and the ride was improved dramatically.
How much lighter is the 4 cylinder Cummins? I have heard they weigh about 800 lbs, which is not too much heavier than a complete big block, correct? I enjoy reading this thread because you have been very creative in making things work. This is a credit to your skills and thought process as a mechanic and fabricator. |
|
|
|
|
02-06-2009, 02:05 AM
|
#22 | ||||
|
I had a V-8
Join Date: May 2003
Location: Phoenix AZ
Posts: 1,116
|
Re: The Story Of A Suburban (Lots Of Pics)
Quote:
Quote:
Quote:
Quote:
__________________
1972 K20 Suburban, 5.9L Cummins, Banks Power Pack, NV4500HD, NP205, H.A.D., D60/14FF ARB Link To Build: HERE. |
||||
|
|
|
|
02-06-2009, 09:36 AM
|
#23 |
|
Registered User
Join Date: Mar 2007
Location: Ben Wheeler,Texas
Posts: 992
|
Re: The Story Of A Suburban (Lots Of Pics)
Love the build, can't wait to see it finished.
__________________
05 2500HD 6.0 excab 69 LWB-Gone but not forgotten! 68 Dodge Charger 383/727 69 Dodge Charger-440/4spd |
|
|
|
|
02-07-2009, 01:45 AM
|
#24 | |
|
I had a V-8
Join Date: May 2003
Location: Phoenix AZ
Posts: 1,116
|
Re: The Story Of A Suburban (Lots Of Pics)
Quote:
So, I have some big items to fit in small spaces. I have a large coolant reservoir ('91 V3500) that needs to find a place to call its own. I tried fitting it on the passenger fenderwell where they normally live. It fit like crap. Not one of the three little feet hanging off of it touch the inner fenderwell in a way that it can be mounted because the feet are used soley for locating it--not supporting the weight of it. The weight, by design, is supported by the tank sitting on the fenderwell. This does not work for me because my fenderwell is the wrong shape. I located a fenderwell to cut up and mount the portion of the top where the tank would sit to my fenderwell. Not ideal, but it should work. Then my air filter and associated plumbing components arrive. Good gawd they are huge. I wanted to use a paper filter, but I ended up going with an AFE Pro-Guard 7 filter. It has the best fine dust particle filtration of any washable filter on the market (almost as good as dry paper). All of the other filters I researched measured their filter performance in LARGE dust particles--not good in dry, dusty AZ. Anyways, back to the story. The filter ironically fits an 02-03 Cummins. It has a 4" inlet nipple and uses a clamp to secure it to whatever it mounts to. That will do just super. Well, the dimensions I read on their site look ALOT smaller than actually looking at the part in person. I got some 4" elbows (2-45* and 1-90*) figuring I could make some combination of them work for me. Those looked alot larger in real-life too. None of this is going to work. There is no way to get the filter into the only space it can fit and plumb it to the turbo. It was suggested by a friend to put the filter on the driver side. I did not like the sound of it, and did not like the mental image that my mind created of it, but desperate times call for blah, blah, blah... I ended up entertaining the thought enough to see what would be required to get it over there. The thought did not last long because I would have to place a 45* elbow directly on top of the intake plenum or intercooler pipe. The problem was that there was not enough hool clearance for the elbow to sit up there. Uuuuugh!! What the hell am I going to do?? Is it too late to go back to a big block?? I found something else to work on (don't remember what) and went on about my business. A few days later I went out for a few minutes and decided to cut up some short sections of 4" pipe to connect the elbows. I cut the pipe, de-burred it and started fubling around with trying to make something usable out of them. I ended up with something that looked like it might work, but the coolant puke tank was not going to work. Uuuuugh. Wait!! What about moving the tank to the drivers side. I took it over to the drivers side, set it 90* clockwise from how it would sit on the passenger fender and almost fell over laughing when I saw that two of the three feet actually fit the fenderwell at the correct angle!! No-way!! But it gets better--no, really!! The third foot needs a flat spot to mount to. I looked down through the hole only to see the only flat spot on the whole fenderwell sitting DIRECTLY UNDER THE FOOT!! No!! This can't be possible!! Oh, but it was!! The only fab work required was to make a spacer about .375" to fill the space between the flat foot and the flat spot on the fenderwell and drill three holes!! There were clearance issues with the hood hinge, but I'll let the pics show that. Here is what I came up with for the air filter and plumbing: (it still needs a support bracket and clamps on it) It actually clears the alternator by a fuzz and will have a fair bit of clearance to the fenderwell when a support bracket is installed. 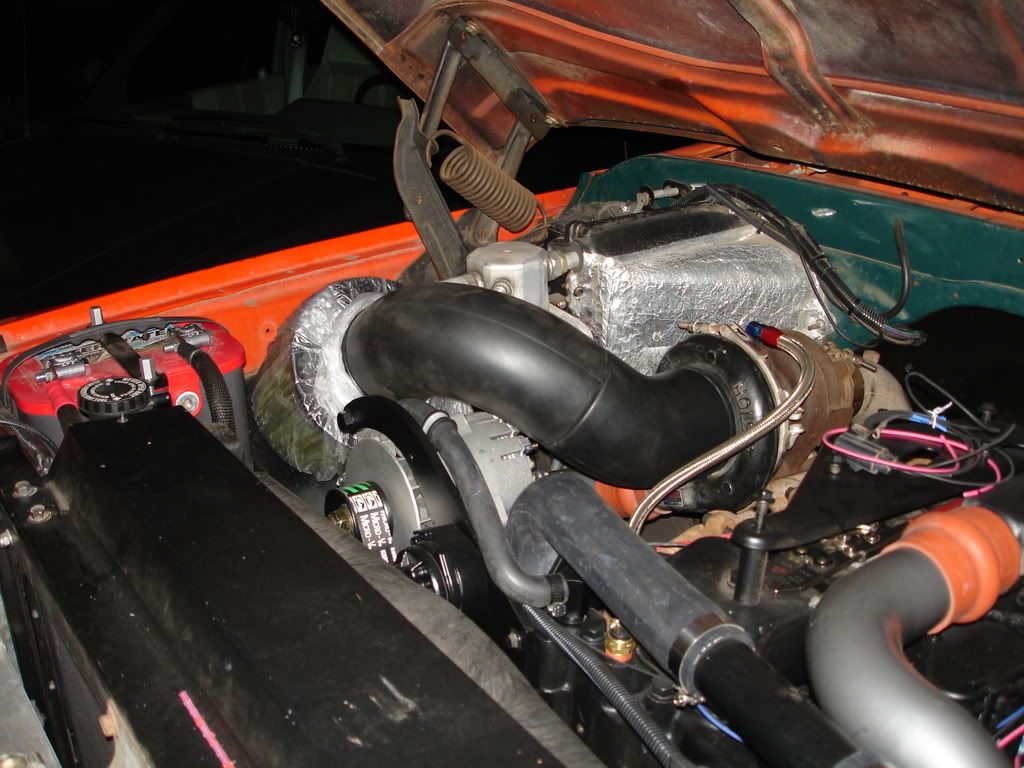 Puke tank mounted to drivers fenderwell: (notice how the hose nipple points in a nice downward angle that matches the shape of the fenderwell also the pic makes the tank look like it is mounted at a goofy angle when it is actually quite level) 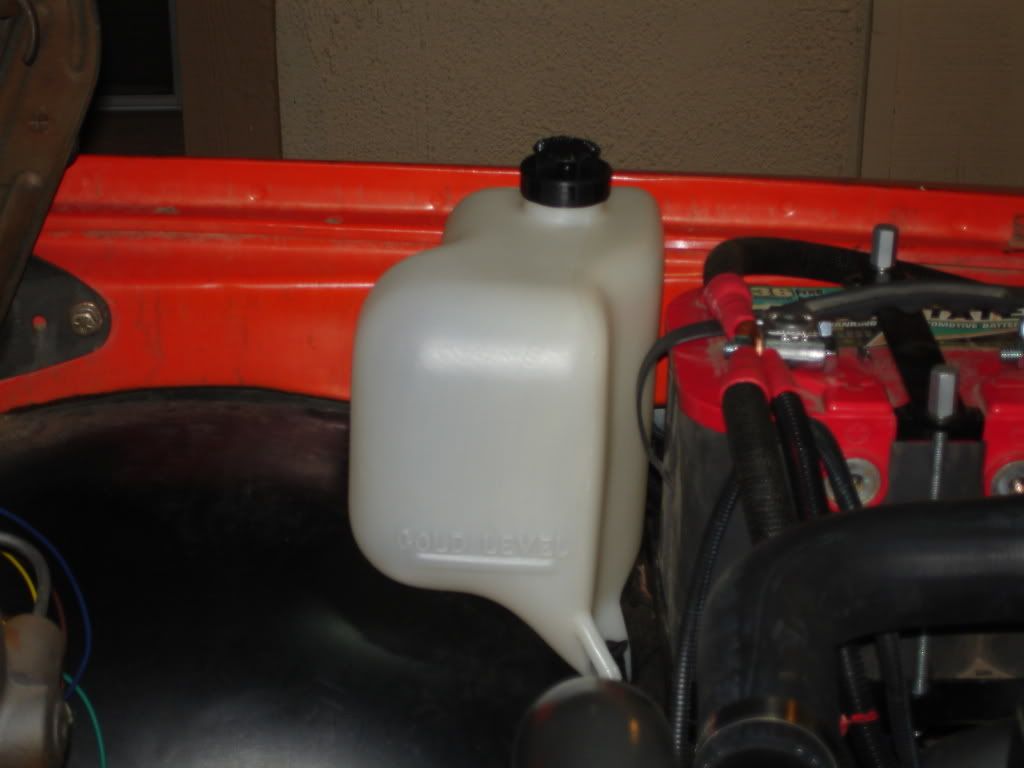 Now, the hood hinges on these trucks are monsterous pieces of iron. The throw of the hinges is measured in feet. A clearance issue is going to result. Look back at the previous pic and notice the back side of the tank kind of zigs then zags. This is a notch in the top of the tank (the notch does not go all the way down to the base of the tank). Believe it or not, the hood hinge uses this notch for clearance!! The pic shows it, but I still do not believe it. 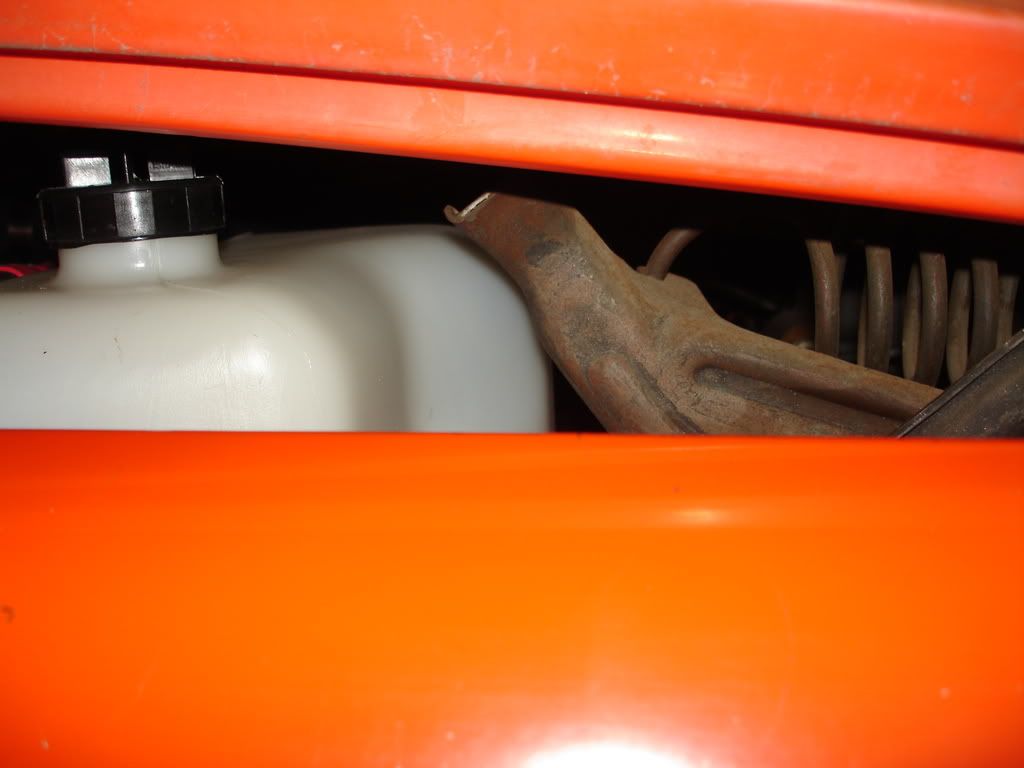 So there you have it. A bunch of big stuff making a big, cavernous engine compartment seem positively tiny. Oh, by the way, I'm getting closer.....
__________________
1972 K20 Suburban, 5.9L Cummins, Banks Power Pack, NV4500HD, NP205, H.A.D., D60/14FF ARB Link To Build: HERE. |
|
|
|
|
|
02-07-2009, 06:03 AM
|
#25 |
|
Registered User
Join Date: Dec 2008
Location: K.C. Missouri
Posts: 1,024
|
Re: The Story Of A Suburban (Lots Of Pics)
The problem was that there was not enough hool clearance for the elbow to sit up there. Uuuuugh!! What the hell am I going to do?? Is it too late to go back to a big block??
I will do you a favor and trade you my big block truck, just to make life easy on you of course !!!!  Very nice work, and can't wait til my,...... I mean your new old truck is whining with that banks on top!!! should run well, I loved my turbo diesels, I made the mistake of buying 502/Allison trans 2001 HD after my last diesel was stolen. |
|
|
|
 |
| Bookmarks |
|
|


 Hybrid Mode
