
|
 08-28-2014, 02:53 PM
|
#1076 |
|
6>8 Plugless........
 Join Date: Sep 2007
Location: Prairie City, Ia
Posts: 17,134
|
Re: The Story Of A Cummins Suburban (Lots Of Pics)
Nice work on the winch and mounting it! I have always been leery of the 4 3/8" bolts that my 8500lb winch is secured with. I was going to try to put bigger bolts in it but was afraid it would mess with the strength of the base of the winch. It's always worked fine, just scares me.

__________________
Ryan 1972 Chevy Longhorn K30 Cheyenne Super, 359 Inline 6 cylinder, Auto Trans, Tilt, Diesel Tach/Vach, Buckets, Rare Rear 4-link and air ride option Build Thread 1972 GMC Sierra Grande Longhorn 4x4 1972 Chevy Cheyenne Super K20 Long Step side tilt, tach, tow hooks, AC, 350 4 speed 1972 C10 Suburban Custom Deluxe 1969 Chevy milk truck 1971 Camaro RS 5.3 BTR STG3 Cam Super T10 1940 Ford 354 Hemi 46RH Ford 9" on air ride huge project Tired of spark plugs? Check this out. |

|

|
|
08-28-2014, 11:03 PM
|
#1077 |
|
Registered User
Join Date: Feb 2009
Location: Southern Oregon
Posts: 1,352
|
Re: The Story Of A Cummins Suburban (Lots Of Pics)
Slick install. Looks like it could have been a factory option.
__________________
1967 C10 Suburban 454/TH400/3.07's An Average Joe and His 'Burb: http://67-72chevytrucks.com/vboard/s...d.php?t=775843 |
|
|
|
|
08-29-2014, 01:14 AM
|
#1078 | ||||
|
I had a V-8
Join Date: May 2003
Location: Phoenix AZ
Posts: 1,116
|
Re: The Story Of A Cummins Suburban (Lots Of Pics)
Quote:
Quote:
Quote:
Quote:
__________________
1972 K20 Suburban, 5.9L Cummins, Banks Power Pack, NV4500HD, NP205, H.A.D., D60/14FF ARB Link To Build: HERE. |
||||
|
|
|
|
08-29-2014, 01:40 AM
|
#1079 |
|
I had a V-8
Join Date: May 2003
Location: Phoenix AZ
Posts: 1,116
|
Re: The Story Of A Cummins Suburban (Lots Of Pics)
So my truck barfed another fuel level sending unit. I found a NOS GM diesel sending unit this time. I noticed in comparing the two, the diesel unit has the old style potentiometer on it as opposed to the newer plastic pos. Hopefully this one lasts a little (whole lot) longer.
 Somewhere along the way I acquired an ARB for the front 60. I had a few things that I wanted to do in the vicinity, so I used that as an excuse to pull the diff and work on it in the shop. By doing this, I was also able to use my case spreader on it which makes the installation of the carrier much easier.  Which left me looking at this in the driveway:  One thing I had to do was replace the frame hangers for the front spring shackles. I found these last year when I put the longer ORD shackles in, but was so tight on time that I put the new bushings in the old shackle mounts. The new urethane bushings were, believe it or not, no worse for wear after many thousands of miles in these raggedy mounts.  I had a stub axle on the passenger side that had a bearing race that was brinneling itself into oblivion. I picked up a Spicer replacement and swapped it out while it was apart. I like the tiger stripes of the heat treating on the new part: 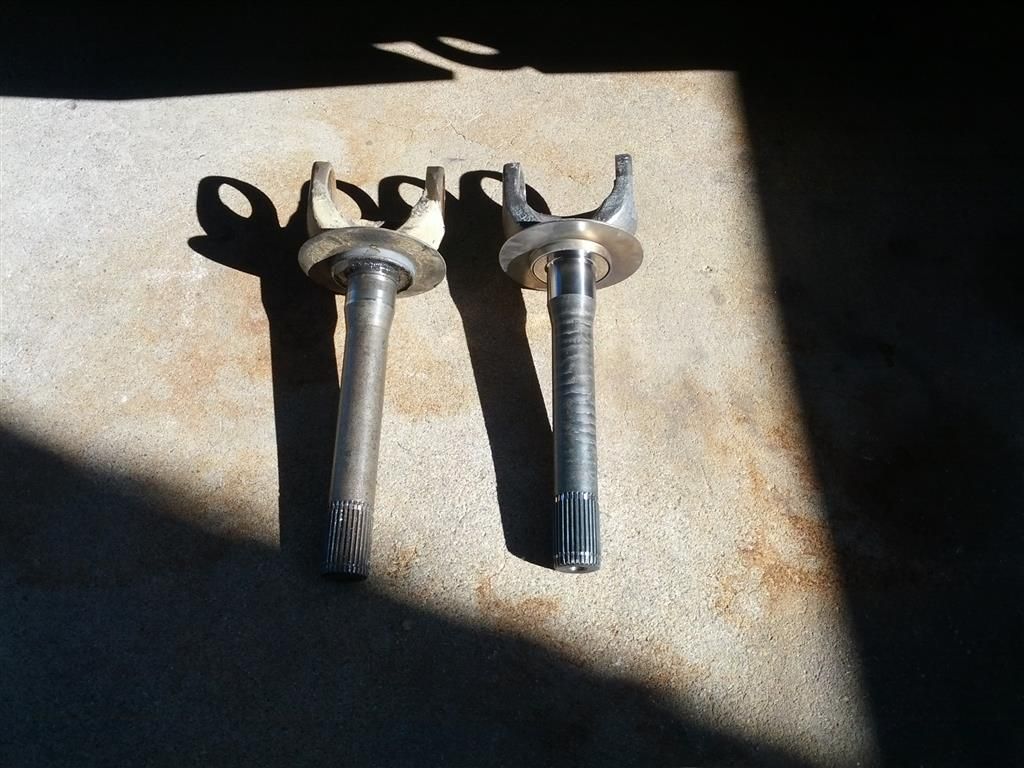 I also swapped in some new components into the Spice locking hubs I am running to try and get some smoother operation out of them. These things are bomb-proof, but boy do they love being high-maintenance.
__________________
1972 K20 Suburban, 5.9L Cummins, Banks Power Pack, NV4500HD, NP205, H.A.D., D60/14FF ARB Link To Build: HERE. |
|
|
|
|
08-29-2014, 11:43 PM
|
#1080 |
|
GEARHEAD
Join Date: Aug 2003
Location: MN
Posts: 6,107
|
Re: The Story Of A Cummins Suburban (Lots Of Pics)
Wear and tear. That just means it got used and used well. Nice job with the winch, but I'm kind of surprised you're sticking with the stock bumper. One small bumper hit from pushing the ends into the grill and fender. Figured that would be on the priority list by now.
Honestly, I'm waiting for you to build a stout bumper so I can copy it. Get busy slacker. 
__________________
If no one knows what you're doing, they can't tell you you're doing it wrong HG's Dream Car Build - Shelby Cobra Kit Build your own adjustable track bar 71  Long Fleet C/10 Long Fleet C/10 72  Jimmy 4x4 (Junkyard Jimmy) Jimmy 4x4 (Junkyard Jimmy)HG's Plow Truck '78  K35 Dually K35 DuallyBigass Farm Truck HG's thread of miscellaneous stuff |
|
|
|
|
08-30-2014, 01:19 AM
|
#1081 | |
|
I had a V-8
Join Date: May 2003
Location: Phoenix AZ
Posts: 1,116
|
Re: The Story Of A Cummins Suburban (Lots Of Pics)
Quote:
__________________
1972 K20 Suburban, 5.9L Cummins, Banks Power Pack, NV4500HD, NP205, H.A.D., D60/14FF ARB Link To Build: HERE. |
|
|
|
|
|
10-10-2014, 01:03 AM
|
#1082 |
|
Registered User
Join Date: Jun 2012
Location: Selkirk Ontario Canada
Posts: 1,141
|
Re: The Story Of A Cummins Suburban (Lots Of Pics)
wow what a read ..i saw that you had posted over on Expedition Portal and it took me a little bit of time to find your build .what great pics from around south western states ..just wondering have you traveled up us 89 north of lake powel into utah where the pink coral rock canyons are..i use to drive that way coming south from SLC all the time
__________________
My 63 GMC Panel Slow Build http://67-72chevytrucks.com/vboard/s...=1#post5457281 63
|
|
|
|
|
10-10-2014, 12:23 PM
|
#1083 |
|
Registered User
Join Date: Oct 2014
Location: Metro Detroit, MI
Posts: 202
|
Re: The Story Of A Cummins Suburban (Lots Of Pics)
Just discovered this thread. Incredible!
Arizona is the only place Ive ever visited that I want to live. |
|
|
|
|
10-14-2014, 02:02 AM
|
#1084 | ||
|
I had a V-8
Join Date: May 2003
Location: Phoenix AZ
Posts: 1,116
|
Re: The Story Of A Cummins Suburban (Lots Of Pics)
Quote:
Quote:
__________________
1972 K20 Suburban, 5.9L Cummins, Banks Power Pack, NV4500HD, NP205, H.A.D., D60/14FF ARB Link To Build: HERE. |
||
|
|
|
|
10-29-2014, 01:29 AM
|
#1085 |
|
I had a V-8
Join Date: May 2003
Location: Phoenix AZ
Posts: 1,116
|
Re: The Story Of A Cummins Suburban (Lots Of Pics)
So one thing that using a vehicle like I do does is illustrate where problems exist. Having operated this thing in pretty much all weather conditions from below sea level to over 13,000' in elevation in weather from hot dry days to white-out blizzard conditions, rain, snow, sleet and hail, problems tend to make themselves known. There are a few, here and there, that will require attention at some point (like a squeak in the windshield wiper transmission assembly--ugh), one problem kept rearing its ugly head and causing more dismay and gnashing of teeth than all of the others combined. Exhaust gas temperature (EGT).
When we would pull a hill in any season other than winter, I have to watch the pyrometer (pyro for short, measures EGT) like a hawk because the EGT would creep up and could swing past the Cummins specified maximum recommended EGT. Not good. Molten aluminum that used to be in the shape of pistons flowing out the exhaust pipe when you are in the middle of absolute nowhere in Montana or Wyoming, or Arizona for that matter, is NOT a good thing. What can be done about it?? There are actually several things that can aid in keeping EGTs down. One is injecting water or methanol into the intake pipe. This cools the incoming mixture and drops EGTs nicely. If methanol is used, a nice bump in horsepower can be achieved as well. It is easy to plumb and kits are readily available. Win-win, right?? Yes and no. Simplicity, etc, yes. My biggest issue with this setup is I have to haul water or methanol. I just built a godforsaken bumper/swingout to get my water out of the truck. Now I will need to devise some sort of reservoir on or in the truck. This takes up valuable real estate inside the cabin. Not ideal. Really don't want to haul more liquid. A bigger intercooler (CAC) would do the trick as well, but I am kind of limited in space available to go bigger with that. One other thing is a different turbo. My motor came with an H1C on it. While not the biggest or best, it is a respectable turbo, especially for what I am doing with the truck. Now, my H1C is not stock as the Banks kit came with a different exhaust housing on it. The stock exhaust housing was something like a 22cm^3 and not wastegated. You could practically drive the truck it was on through the housing and not have to fold in the mirrors. The Banks kit came with a wastegated 14cm^3 housing. The smaller housing helps the turbo spool up quicker and the wastegate prevents over-boosting the intake charge. One drawback to going with a smaller housing is it can create a restriction and that restriction can create a high EGT issue. A balance must be struck between quick spooling and least restrictive. Now, the same thing can happen on the compressor side of the turbo. Too small equals not enough air equals high egt. Bigger is better to a point once again. All of the dimensions and specs of the turbo must be balanced to work well with the motor in the vehicle. I had done some research on turbos once upon a time and came to the conclusion that my turbo was about the same size as an HX35 that was used on later 12V motors. One minor detail I missed was that the early non-intercooled motors (like mine) was that the H1C that those got was referred to as a "BABY" H1C. Now having a pretty good grip on the modern English language, I do not associate anything LARGE with the word BABY. Further research showed my compressor side was quite a bit smaller than the average HX35. Well maybe I just figured out a problem here?? I happen to have an HX35W here..... More research and discussions with people that are smarter than I am on the topic led me to believe this might be a worthwhile conversion. On paper it is a simple swap. Pull the old one off, put the new one on and away we go. Yeah, on paper it is easy.... I traded some work to a buddy and he had my turbo rebuilt for me by a turbo shop in town. I reused my 14cm^3 housing off of my H1C because the HX35 had a 12cm^3 housing on it and the wastegate actuator came off of it at an odd angle that would put it into my evaporator case. Not ideal. My 14cm^3 fits, functions and I already own it so in it goes. The big reason for switching to the HX35 is the compressor side is larger. This is good for airflow, but not so good for clearance. Clearance?? Ugh, clearance.... My setup is weird in that I am running my turbo on a manifold that is upside down. This creates a clearance issue between the the compressor housing and the exhaust manifold. Not good. Too much interference to grind to fit. Ugh. What to do now?? Well, I happen to have an exhaust manifold here off of a 24V motor that has been resurfaced before I stored it. The 24V manifold shares the same physical bolt pattern as the 12V, but instead of rectangular ports, the 24V ports are round as is the general shape of the manifold "tubes" if you will. At an initial glance comparing the 12V manifold to the 24V manifold, the round ports will need a ton of grinding to make work with the rectangular ports in the head, but the ports in the 12V head are smaller than the ports in the 12V manifold. I did a rubbing of the cylinder head port with a piece of tape and found very little material needs to be removed to make the manifold work on a 12V. 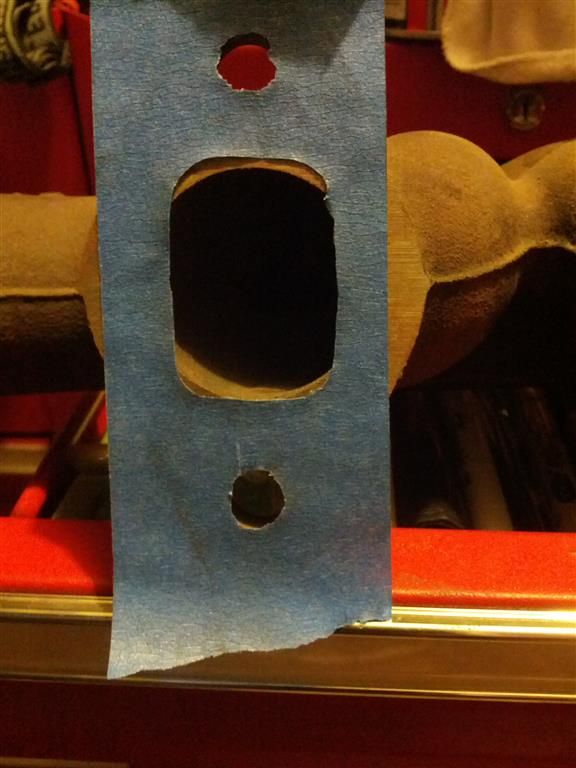 Is this an ideal situation?? No. Will it work?? Yes, and the compressor side of the HX35 clears the manifold. Am I going to do it?? Hell yeah. It's free too!! So with just a few minutes of grinding, I opened up the ports in the manifold to be a fuzz larger than the size of the template. I dug through my stash and found twelve brand new Cummins exhaust manifold bolt spacers so those went in with the manifold. I did have to modify the CAC tube coming off the compressor due to the HX35 using a cast elbow that bolts on the compressor vs the H1C that has a straight dump on the compressor and a 90* bend in the pipe that connects to the compressor. All that and the cast elbow is set up for a larger diameter pipe than what I have. Easy enough. I got an adapter silicone connector for the cast elbow to CAC pipe and cut off the bent end of the pipe. I put it all together and this is what I ended up with: 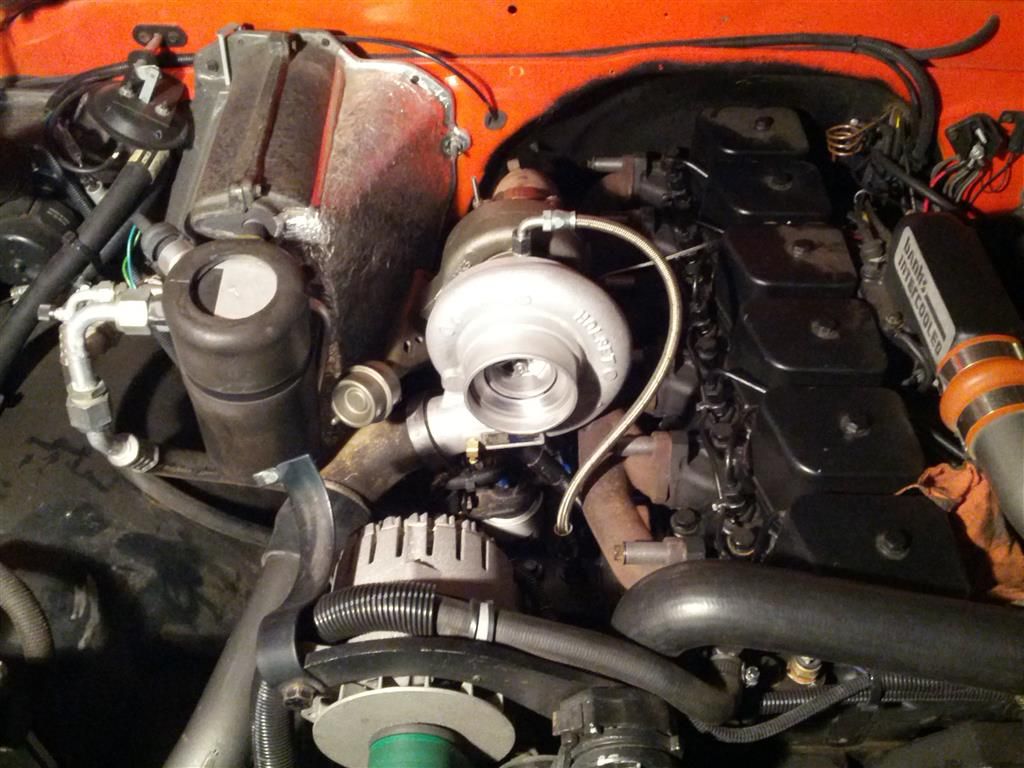 One thing that I did when I built the truck is when I made the air intake setup I used 4" elbows and a 4" to 3.5" bushing to mount to the 3.5" inlet on the H1C instead of the 3.5" pieces. This made hooking up the air intake system very easy. I only had to pull the bushing out of the elbow and hook it up to the new turbo. Picture of it in operation: 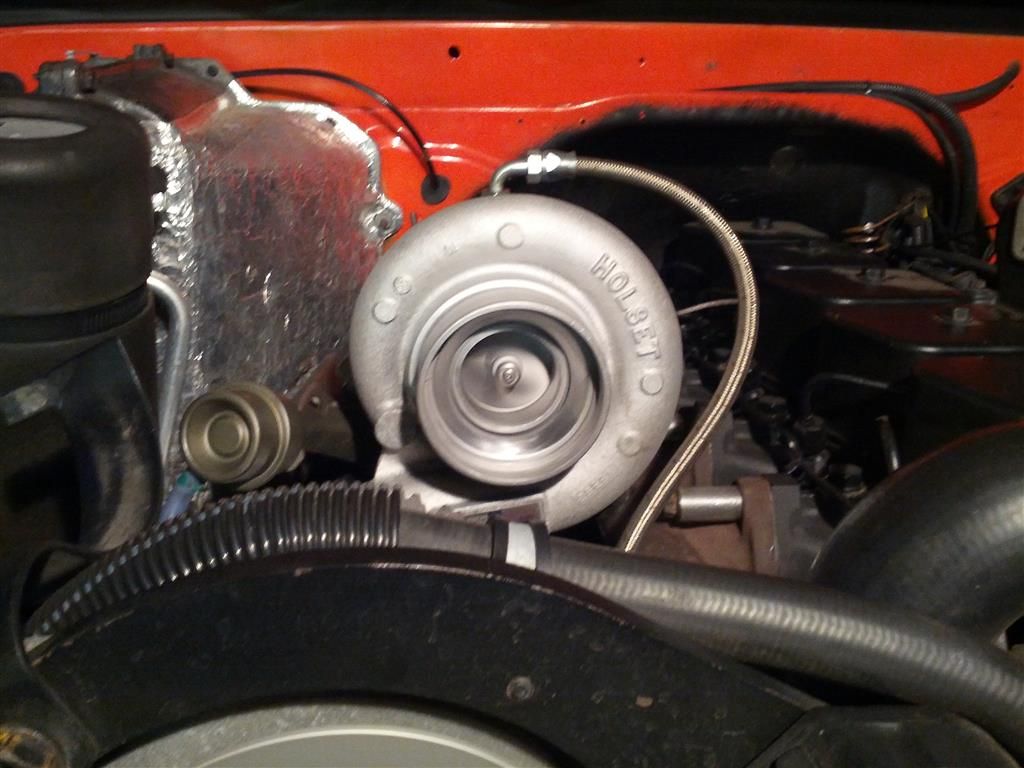 So, after all of this; does it work?? I would have to say that it was worth it. We pulled a bunch of hills this summer in the mild temperatures that make an Arizona summer so wonderful. I pulled a long hill just outside of town at over 70mph on a 115* day. Prior to the new turbo it probably would have been 60ish and watching the pyrometer like a hawk adjusting throttle input to keep max EGT under the Cummins maximum allowed number. On various subsequent trips I have found that I am able to cruise up 7-10% grades much faster than I would have been able to before. I can still pin the pyro at a moments notice if I get stoopid with the throttle, but under normal circumstances it is much improved. I did end up blocking off the wastegate and am running about 25-30psi max boost which helps out dramatically in the power department. This turbo is quite a bit louder than the old one was, even under low boost, but it's not so loud that it is annoying or nerve grating. All in all I'd say this was a very worthwhile swap. I know there is a bunch of added power that is available, but I am having a difficult time convincing myself it is worth the time, effort and money to extract when this thing runs so well in its present configuration.
__________________
1972 K20 Suburban, 5.9L Cummins, Banks Power Pack, NV4500HD, NP205, H.A.D., D60/14FF ARB Link To Build: HERE. |
|
|
|
|
10-29-2014, 03:59 PM
|
#1086 |
|
Registered User
Join Date: Feb 2009
Location: Southern Oregon
Posts: 1,352
|
Re: The Story Of A Cummins Suburban (Lots Of Pics)
Great write up! Im not very diesel savvy but anytime a upgrade can be done for free or with minimal cash outlay is a win in my book. Nice work!
__________________
1967 C10 Suburban 454/TH400/3.07's An Average Joe and His 'Burb: http://67-72chevytrucks.com/vboard/s...d.php?t=775843 |
|
|
|
|
10-29-2014, 07:58 PM
|
#1087 | |
|
Senior Member
Join Date: Apr 2004
Location: sw colorado
Posts: 2,720
|
Re: The Story Of A Cummins Suburban (Lots Of Pics)
Quote:
 hahaha |
|
|
|
|
|
10-30-2014, 09:34 AM
|
#1088 |
|
Registered User
Join Date: Jun 2012
Location: Selkirk Ontario Canada
Posts: 1,141
|
Re: The Story Of A Cummins Suburban (Lots Of Pics)
that worked out well .and you have to like the free side of it
__________________
My 63 GMC Panel Slow Build http://67-72chevytrucks.com/vboard/s...=1#post5457281 63
|
|
|
|
|
10-30-2014, 01:56 PM
|
#1089 |
|
Registered User
Join Date: Oct 2014
Location: Metro Detroit, MI
Posts: 202
|
Re: The Story Of A Cummins Suburban (Lots Of Pics)
Where is your EGT taking its readings from and what are these "cummins recommended" "safe" egt limits? VE or PPump?
If you turn your full throttle fuel up and keep the wastegate it may actually run cooler EGT wise. |
|
|
|
|
10-31-2014, 12:06 AM
|
#1090 | |||||
|
I had a V-8
Join Date: May 2003
Location: Phoenix AZ
Posts: 1,116
|
Re: The Story Of A Cummins Suburban (Lots Of Pics)
Quote:
Quote:
Quote:
Quote:
Quote:
__________________
1972 K20 Suburban, 5.9L Cummins, Banks Power Pack, NV4500HD, NP205, H.A.D., D60/14FF ARB Link To Build: HERE. |
|||||
|
|
|
|
10-31-2014, 02:14 AM
|
#1091 |
|
Registered User
Join Date: Mar 2006
Location: phoenix
Posts: 254
|
Re: The Story Of A Cummins Suburban (Lots Of Pics)
As a frequent passenger in this rig I can say the turbo swap was well worth the effort Nick put into it...
And I am glad he got it out of the way so he could focus on my vehicles... Of course if you notice him with a nervous tic around blue 72 or 70 trucks or burbs, well I know nothing about that 
|
|
|
|
|
10-31-2014, 03:07 PM
|
#1092 |
|
Registered User
Join Date: Oct 2014
Location: Metro Detroit, MI
Posts: 202
|
Re: The Story Of A Cummins Suburban (Lots Of Pics)
But you've added and intercooler and better flowing turbo now so your safe egt is actually a bit higher. If its not blowing black smoke your fine to take it to 1200-1300. The 14cm housing helps too.
Turning the full power screw up will add fuel at higher rpm/wot. Currently the wastegate is not used, if it was allowed to open you will lower backpressure and increase exhaust flow IF theres enough exhaust flow to open it and keep it open in the first place. Dont be afraid of boost either. 35-38 psi is pretty common for factory turbos and factory parts. I run my ppump up to 1400 1500 regularly, but only for short jaunts, not sustained. The newer trucks will hit 1300+ all day long in factory form. |
|
|
|
|
11-03-2014, 10:14 PM
|
#1093 | |
|
I had a V-8
Join Date: May 2003
Location: Phoenix AZ
Posts: 1,116
|
Re: The Story Of A Cummins Suburban (Lots Of Pics)
Quote:
__________________
1972 K20 Suburban, 5.9L Cummins, Banks Power Pack, NV4500HD, NP205, H.A.D., D60/14FF ARB Link To Build: HERE. |
|
|
|
|
|
11-03-2014, 10:16 PM
|
#1094 |
|
I had a V-8
Join Date: May 2003
Location: Phoenix AZ
Posts: 1,116
|
Re: The Story Of A Cummins Suburban (Lots Of Pics)
So as some of you know I have been less than thrilled with the performance and tread life of the E rated BFG All Terrains that I have had on this for a little over 20K miles. I was at the tire shop recently getting a slow leak fixed and noticed how low on tread they were getting and then the guy brought up the purchase info on his computer and I saw how much I paid for them and how recently I paid it. That brought my opinion of the tires to a new low. Now I realize I use the tires a bit harder than the vast majority of BFG AT owners do, but to whack that much tread from the tires in that amount of time was ridiculous. I maintain pressure regularly. It always gets checked before a trip as well as when we air up after a trail. I have leaks fixed as soon as I notice them. I have the tires rebalanced annually or so. So even with all of the trail miles I put on these, they lead a fairly pampered life. If this tread life is indicative of high maintenance, I'm far from impressed. Now mind you they were not worn out, but when no tire guy in his right mind would come to where we travel to fix a tire, I tend to err on the side of caution when it comes to tires. If it was a street queen I would not have been as nervous, but they were getting a bit thin for trail use.
What to do?? What brand to go with?? This guy says Toyos are great and that guy says Toyos are wet crap. That guy says Nittos are great. This guy says Nittos are only good for wheeled garbage cans. Ugh. Who to believe?? I solicited opinions from several people I know, many who use their vehicles is a variety of conditions, from street to trail to industrial. I got a wide range of opinions just like the examples shown earlier. These work for this guy and that guy had no luck with the same tire. Ugh. I started doing my own research with no idea where it was going to lead (other than AWAY from BFG). I had heard some good things about Toyos, so I was checking those out. I was reading reviews of the different aspects of performance of the different tires. The MTs were sounding like a good tire, but I really don't need (or want) a mud tire. The reviews of the ATs were not as good for what I was doing, but still looked like a good tire. The AT IIs were a nice tire as well. One thing I noticed on our trip last year through UT, MT, WY, SD, CO, etc, was how many one ton service trucks had Toyo M55s on them. You'd swear they came from the factory on those trucks up there. I started looking in into those tires. They are a full-on commercial tire suited for pretty brutal conditions like logging, oil/gas fields, mining etc. After reading the reviews on as many sites as I could find info on I was becoming more and more sold on them as I read more reviews on them. The tread pattern falls between a mud lug and an all terrain pattern. It has good tread voids. The reviews tout great performance in pretty much all weather/road conditions including ice which is not normally a strong point of a lug type tread with a lot of negative space. Well, it looks like I found my tires. Now to go buy a set. Yeah, I'll just go buy a set. Not quite that easy. I went to a few tire dealers around town and nobody had ever heard of a Toyo M55. Swell. A couple offered to order them in for some super-stupid high price--plus freight. I contacted a non-tire place that I knew could get Toyo tires and he was finally able to get them at a "reasonable" price. These things ain't cheap boys and girls. Oof. I had to pre-pay and sign a letter stating I would never even think of considering trying to return them. I left my pile-o-money and had them ordered. In my research I found that the tire size, 285/75R16 preferred to be mounted on an 8" wide wheel. I had the BFGs mounted on 7" wheels which are the narrowest size listed for a 285. With the cost of these tires, I really didn't want to potentially shorten their life by putting them on a wheel that was too narrow for maximum life, so researched out a 8" wide 16" steel wheel. I had no luck locating a factory application for an 8" wide 16" wheel so I ordered a set from Wheel Vintiques. After I ordered them I got to thinking and after all these years and various vehicles I've had and modified, this was the first set of new wheels I had ever bought. I have bought many sets of wheels, but never a NEW set until now. Ironically, they look like stock wheels. So I get the new wheels and they are powdercoated black. Ugh, I don't want black wheels on this thing. I call around and get prices on re-powdercoating the wheels. The prices range from really expensive to beyond asinine. I then start researching painting over powdercoat. Come to find out, powdercoat works very well as a primer and with a light scuff takes paint beautifully. Sold!! I applied some white paint like every other steel wheel I have has on them and got the new tires mounted upon them. The first thing I noticed about these tires (beyond that they look pretty cool) is they stunk. Yep, stink, stank, stunk. Nasty. Smelled like some funky avian fecal matter. Took a long time to go away too. Wierd. Other than the stink they seem cool. Here is one next to the BFG it is replacing: (for the same given tire size, load rating. load range, etc, the Toyo M55 weighs 7 pounds more per tire than the BFGs weigh)  All mounted upon the new wheels:  Now I have held off talking about these tires because I wanted to be able to give an accurate opinion of them. They needed to be put through some hell before I could honestly report on them. I will admit I was expecting them to perform well using the reviews as a baseline for judgment, but I have to say they have exceeded most of my expectations by a fair bit (except odor...LOL). I was pretty nervous about the sidewall construction. There are no real shoulder lugs or tread for that matter, just three concentric beads that are very uninspiring. I quickly found there is no reason for concern at all with the sidewalls on these things (or any other part of the tire). These things are as tough as titanium nails. I have aired them down and shown them no mercy whatsoever. My boy and I have put them through the wringer on some pretty sketchy trails and I have yet to permanently mark the sidewalls on these and it took several trips to find a piece of rubber chinked off the main tread of the tire. Absolutely amazing. The sidewalls have had the usual rock marks all over them, but as soon as it rains they look like brand new again. As it sits outside right now, two of the sidewalls are full of cactus needles of some sort. They don't care. At all. I have had them in some different weather conditions. Dry, wet, no snow yet, some light mud. They seem to do good in everything so far. Road manners seem nice as well. Not as quiet as the BFG ATs, but not as weak as them either. Kind of a cross between an AT and a MT for noise. They do seem to do the Toyo drift to the right that I have read about on several of their tires, but nothing that bugs me so much I want to do anything about it. They handle wind and wet very well. I am quite impressed with the tires so far. I have had them on for about eight months now. I don't recall how many miles are on them though. I rotated them one time and they seem to be wearing great. One odd thing is they threw all their weights off at some point. I'm not sure if the original balance place didn't install them correctly or if when they are aired down they push the weights off, but I got them rebalanced and all has been well since.
__________________
1972 K20 Suburban, 5.9L Cummins, Banks Power Pack, NV4500HD, NP205, H.A.D., D60/14FF ARB Link To Build: HERE. |
|
|
|
|
11-04-2014, 11:58 PM
|
#1095 |
|
Registered User
Join Date: Nov 2000
Location: Huntsville Ontario Canada
Posts: 4,052
|
Re: The Story Of A Cummins Suburban (Lots Of Pics)
Great choice on the wheel tire combo !
I have looked at those tires and that's the exact wheel tire combination I am planning on using when I build my longhorn 4x4 cummins chassis for my 67 c20 body. I currently have Toyo open country at2s and I really like them.
__________________
1968 Suburban numbers matching all original truck now equipped with 6.0/4L80 on Accuair http://67-72chevytrucks.com/vboard/s...d.php?t=625017 1967 C/20 6.0/4L80 Roofing Truck 1990 V2500 Suburban "Plow Truck" 2005 TAHOE DD |
|
|
|
|
11-06-2014, 11:40 AM
|
#1096 |
|
Registered User
Join Date: Oct 2014
Location: Kitchener, Ontario, Canada
Posts: 3,254
|
Re: The Story Of A Cummins Suburban (Lots Of Pics)
Great story!! I love when ppl say something can't be done, anything can be done with enough time and skill and maybe some $$. The Burb looks amazing!! Great to hear you drive it all over that's what they are for.
__________________
http://67-72chevytrucks.com/vboard/s...d.php?t=648459 https://67-72chevytrucks.com/vboard/...d.php?t=769441 1951 MG TD 1967 Jeep CJ5 1.9L TDI 33X13.5X15 Mud Grapplers. 1952 GMC 9700 p/u 7.3L diesel on air, dually |
|
|
|
|
11-07-2014, 12:44 AM
|
#1097 |
|
Registered User
Join Date: Feb 2009
Location: Southern Oregon
Posts: 1,352
|
Re: The Story Of A Cummins Suburban (Lots Of Pics)
Toyo makes a great tire. I luv the look of a BFG but Ive never been impressed with how they wear or their sidewalls. New combo looks great on the Burb btw.
__________________
1967 C10 Suburban 454/TH400/3.07's An Average Joe and His 'Burb: http://67-72chevytrucks.com/vboard/s...d.php?t=775843 |
|
|
|
|
11-07-2014, 02:48 AM
|
#1098 | ||||
|
I had a V-8
Join Date: May 2003
Location: Phoenix AZ
Posts: 1,116
|
Re: The Story Of A Cummins Suburban (Lots Of Pics)
Quote:
Quote:
Quote:
Quote:
__________________
1972 K20 Suburban, 5.9L Cummins, Banks Power Pack, NV4500HD, NP205, H.A.D., D60/14FF ARB Link To Build: HERE. |
||||
|
|
|
|
12-22-2014, 11:47 PM
|
#1099 |
|
I had a V-8
Join Date: May 2003
Location: Phoenix AZ
Posts: 1,116
|
Re: The Story Of A Cummins Suburban (Lots Of Pics)
So one of the things that has bothered me since I started driving this conglomeration of wayward parts is the location of the shifter knob in all three axis. There are a few contributors to the situation. One big one is the location of the shift tower where it comes through the floor. This was dictated to me by the placement of the motor itself and the fact that the shifter tower is integral to the transmission and not movable. To give some perspective on the situation, the shifter comes through a hole in the floor located right beside the factory hole for the transfer case shifter. Yes, that far back. Now, when I initially built the truck I bought a brand new shifter tower from GM and installed it. The shifter placement was great--if you were shifting from the back seat. Under the rubber sealing boot that comes on the tower assembly there are some screws that allow disassembly of the tower mechanism. I pulled the steel shifter stub out of the plastic base and heated it up and bent it into a much more agreeable position. This was a great improvement over the initial location, but after many thousands of miles, it has proven to be less than comfortable at times. Another situation exacerbated by the shifter location is the length of the stick itself. It ends up being too long to be comfortable, but too short to be cool. Something needs to be done to improve the physical properties of the shifter. The factory shifter is a combination of a solid stub at the top for a knob to thread onto, followed by a varying diameter tubing down to the bottom where a rubber isolator mates the shifter tube to a threaded insert which threads onto the shifter stub on the transmission. There is no easy way to do much of anything to this shifter except destroy it. Nothing productive will come from that, so another plan will need to be devised.
Now for something seemingly completely unrelated. When I installed the ARB locker in the rear I had done some research and found that the electro-pneumatic solenoid valves that control the flow of actuating air to the lockers were a "fairly" common point of failure. I quote fairly because while they are a quality piece, I did find several posts dealing with bad actuators and many people carry spare valves. I really didn't want to deal with all that crap. Why deal with an electrical switch sending power to a electro-pneumatic valve to send air down a plastic line to the locker when I deal with pneumatic valves in various configurations literally dozens of times in a day?? I'm not trying to win a beauty contest with this thing, so not much to worry about there. Let's go with something robust and simple. Big dumb parts--my favorite kind. I decided to go with a parking brake valve from an air brake setup. Nothing fancy, just a simple on-off valve. I mounted it in the floor right next to the driver seat, right behind my big, dumb auxiliary battery disconnect switch:  It worked great. Out of the way, yet still accessible. Good stuff. That is, until, we were coming down a steep trail (<cough>cowpath/<cough>) and I had to do a multi-point turn to get down this switchback and needed a rear locker to keep from spinning the rear tires. If I went a little forward when I was trying to go backward, VERY bad things were going to happen immediately. So in the heat of the situation, I reach down to engage the rear locker and some stuff had slid forward and blocked access to the switch. Not good. I cleared the stuff out, hit the switch and locked the rear axle. This situation got me to thinking about my setup. I like it. It is functional 95% of the time, but that is the hang up. What to do?? Move the switch?? Go back to the electro-pneumatic setup?? So, back to the shifter situation. I decided the time had come to deal with the uncomfortable setup that I had. I knew I couldn't do anything with the stock stick, so a replacement would have to be sourced. I decided to take care of a couple problems at once with the shifter. I started by pulling the stub out of the base and doing some more strategic bending on it. It seems so simple. Bend it until it is in the right place, but what is the right place?? I thought I had it right when I did it the first time way back when. This proved to be a fairly challenging task requiring a few re-bends to get it "right". I eventually got it where I thought it should be. Now to add a stick to it. I was at the steel yard and picked up a piece of 1" .250 wall DOM tubing. Not having measured the length of anything I grabbed two feet to be safe. I had my buddy Russ bore the end of the tube and machine the threads into it. That worked out perfectly. I now had a two foot long stick in about the right place. 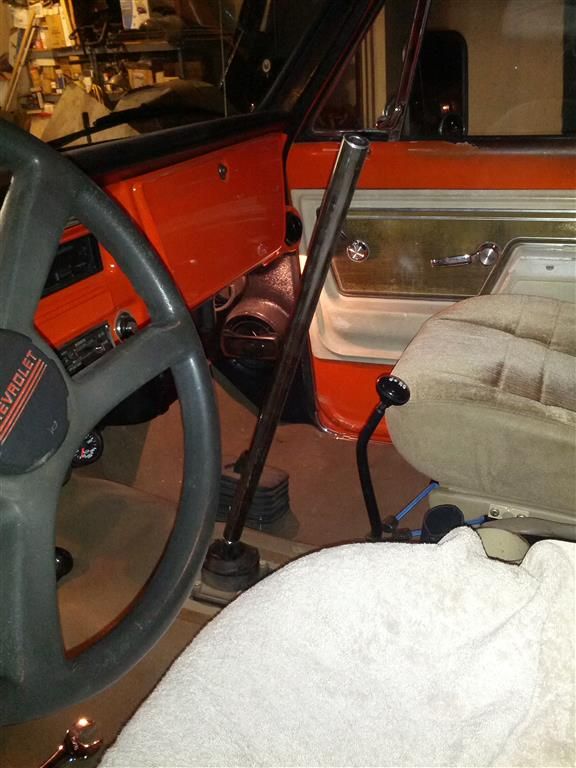 Now, what to do for a knob. I use a shift knob with a pneumatic valve in it hundreds of times a day. I have never had a failure with it. This is my kind of part. So I picked up an Eaton/Fuller A6909 shift knob. It has a pneumatic valve in the knob assembly that I can use for the rear locker. 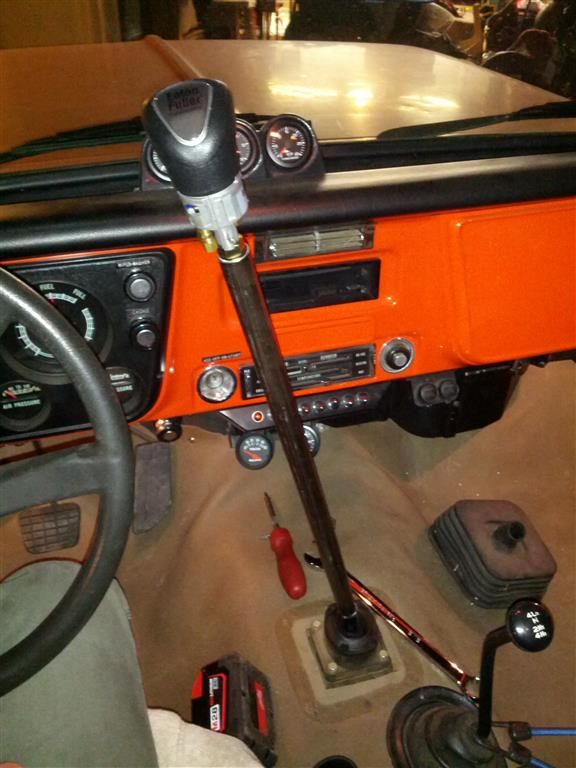 My boy saw this and said I should leave it like that so it can be one of those "cool hotrods". I told him that I'm just not that cool and have to have something slightly more practical. Overall length. Oof. There's another fun task. I made a starting cut and I think I cut an inch off this thing three times and half an inch off of it another three times until I got to what felt "right". 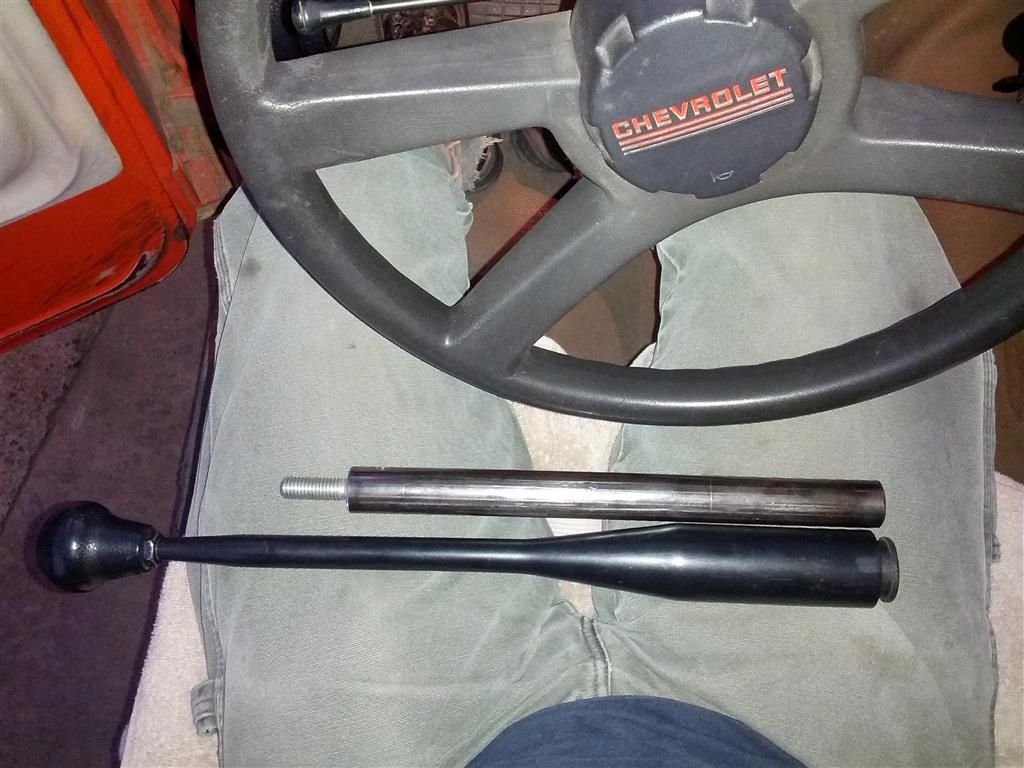 Now that pic is slightly deceiving because the Eaton shift knob is fairly tall making the overall height of the new shifter closer to the length of the old shifter than it looks--still shorter than the original though. Now it is fairly obvious that the outside diameter of the new shifter is a lot smaller than the OD of the old shifter. I want to reuse the stock shift boot, so something will need to be made to deal with this discrepancy. I found a drop from my tie rod that Russ had machined for me. I took that back over to his shop and had him bore it out to fit the new stick and also cut a groove in the bushing to retain the top of the stock boot. This is what I received: 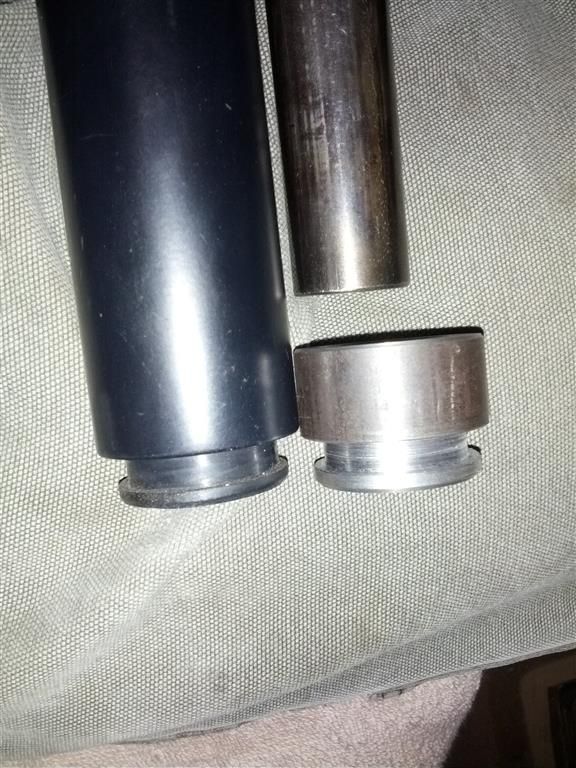 The shift knob mounts with 1/2-13 threads, so I cut the head off of a 1/2-13 bolt and installed it in the tube with a set screw. I retained the shift boot collar in the same fashion. This is what I ended up with: 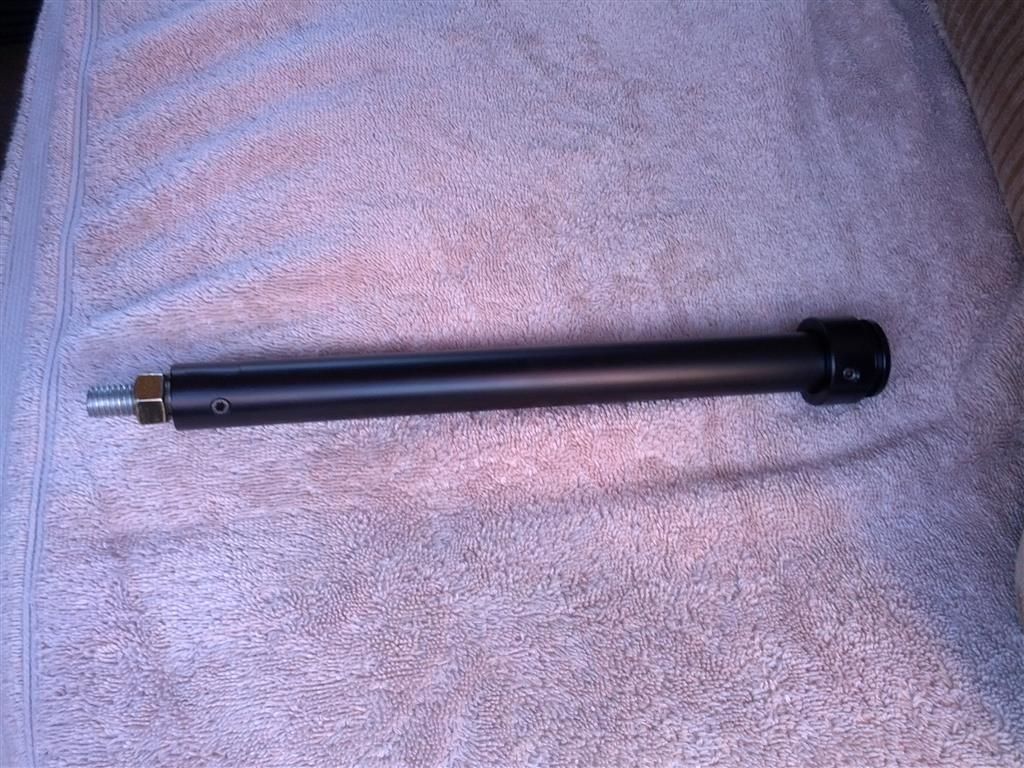 After some plumbing and wiring for a possible future project, this is what I ended up with: 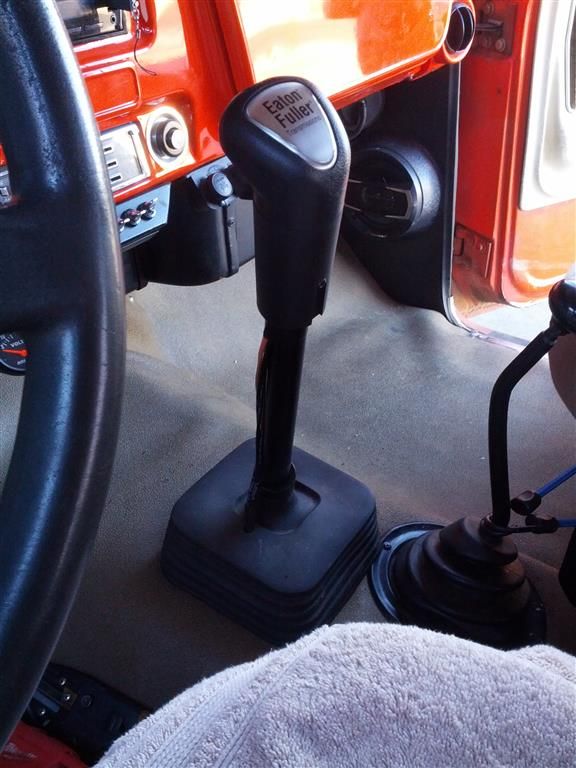 A different angle: 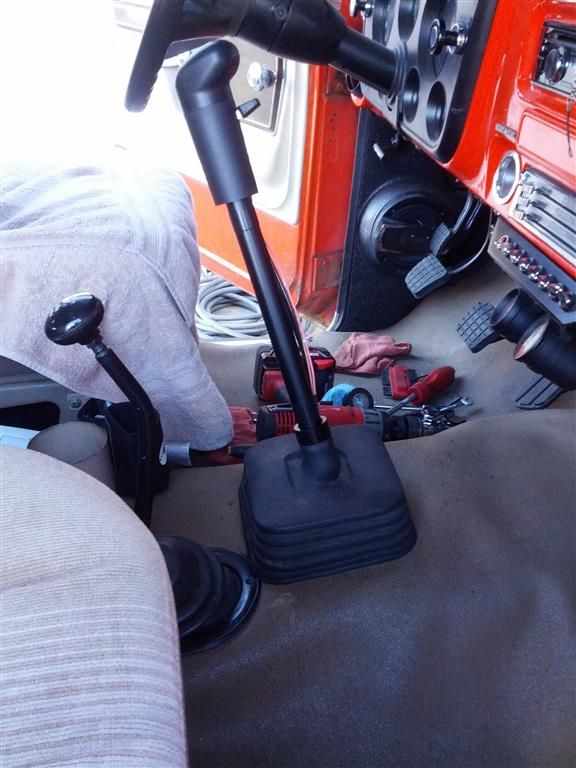 So, a lot of damn work for a shifter and ARB switch. Yep, sure was. Worth it?? Oh hell yes. Very much so. Much more comfortable position on highway and, almost more importantly, off highway. I find myself more likely to flip the rear locker on being that it is easily accessible now. One thing that I anticipated and was not let down with was the amount of noise the stick transmits. Remember the rubber isolator in the original stick mentioned earlier?? That is for noise abatement from the transmission. The stock stick does a nice job of dampening the vibration and not transmitting the noise to the interior. The new stick has no noise dampening properties at all. I thought this would be a big problem, but come to find out, it is really only an issue at certain ground speeds, under certain loads, so unless those criteria are met, no noticeable noise enters the vehicle. Win.
__________________
1972 K20 Suburban, 5.9L Cummins, Banks Power Pack, NV4500HD, NP205, H.A.D., D60/14FF ARB Link To Build: HERE. |
|
|
|
|
12-23-2014, 12:29 AM
|
#1100 |
|
Windy Corner of a Dirty Street
Join Date: Jun 2003
Location: Pueblo West, Colorado
Posts: 2,926
|
Re: The Story Of A Cummins Suburban (Lots Of Pics)
Nice work as usual buddy! Youre right, that shift tower does sit back pretty far. I never noticed that before until you pointed it out. Having an Eaton Fuller shift knob will definitely be a conversation piece. Most idiots will believe it is an Eaton Fuller trans and not know the difference
especially at the Overland Expo
__________________
Current vehicle collection: 1978 Chevrolet K10, 8.1L, NV4500, NP205 1989 Chevrolet Suburban, 8.1L, NV4500, NP241 1993 Chevrolet C1500 Sportside, TBI 7.4L, 4L60E 2001 Chevrolet K2500HD, Ext Cab, SWB, 8.1L, ZF 6 speed 2014 Chevrolet Impala LTZ 3.6L Vortec 8.1L because life is too short to tolerate underpowered vehicles
|
|
|
|
 |
| Bookmarks |
|
|


 Linear Mode

