
|
 12-07-2016, 12:02 PM
|
#51 |
|
Registered User
Join Date: Apr 2015
Location: Fort Washington Pa
Posts: 145
|
Re: 51 chevy build
Stupid VATS! This is where im at now. Sending my pcm out to get the vats system disabled and all of the egr and rear o2s disabled. I was very happy to see good oil pressure. Big step for me! Click on the picture for a 20 second video. It will start but not run. Last edited by Erics51chevy; 12-07-2016 at 12:08 PM. |

|

|
|
12-07-2016, 05:28 PM
|
#52 |
|
Senior Member
 Join Date: Jul 2012
Location: Oblong, Illinois
Posts: 7,017
|
Re: 51 chevy build
You have made good progress. Congrat's on the start and good oil pressure.
|
|
|
|
|
12-08-2016, 11:05 AM
|
#53 |
|
Registered User
Join Date: Apr 2015
Location: Fort Washington Pa
Posts: 145
|
Re: 51 chevy build
Thank you! I sent the pcm out yesterday to get reprogrammed. I will be driving the motor stock for a little while to get it broken in.
Put new ebrake shoes and rotors on the rear. Next is the task of making a driveshaft. I have the 2 peice driveshaft off of the silverado that are about 4 foot long. I need a driveshaft about 5 foot long. So ill cut the ends off of the 2 peice and shrink it to what i need. Not sure about balancing. Heard in the "good ol days" they put a quart of oil in the driveshaft before welding to self balance. I have a gauge to measure run off when spinning to weld the tube straight. |
|
|
|
|
12-08-2016, 12:47 PM
|
#54 |
|
Senior Member
Join Date: Dec 2012
Location: Allen, TX
Posts: 519
|
Re: 51 chevy build
I admire your can-do spirit--you've got a great build going. If I was running a 235 or maybe a stock SBC I might cut and weld my own driveshaft. With that monster motor you're installing, as fast at that shaft will be turning during the inevitable burn-out--I think that's one job I would sublet. I'd hate to rip the output shaft out of the transmission, not to mention a leg.
|
|
|
|
|
12-08-2016, 05:35 PM
|
#55 |
|
Registered User
Join Date: Apr 2015
Location: Fort Washington Pa
Posts: 145
|
Re: 51 chevy build
You could possibly have a point haha. Burnouts are definitally coming. But ill be driving it easy for a little while to break the motor in. Then i could swap the driveshaft for a stronger one.
|
|
|
|
|
12-08-2016, 09:12 PM
|
#56 | |
|
Senior Member
Join Date: Jul 2012
Location: Oblong, Illinois
Posts: 7,017
|
Re: 51 chevy build
Quote:
|
|
|
|
|
|
12-08-2016, 10:13 PM
|
#57 |
|
Senior Member
Join Date: Dec 2012
Location: Allen, TX
Posts: 519
|
Re: 51 chevy build
Holy cow! That took out both ends. I've never seen an axle housing wiped out like that.
|
|
|
|
|
12-08-2016, 10:45 PM
|
#58 | |
|
Senior Member
Join Date: Jul 2012
Location: Oblong, Illinois
Posts: 7,017
|
Re: 51 chevy build
Quote:
|
|
|
|
|
|
12-09-2016, 12:05 AM
|
#59 |
|
Man of Mini-Talents
Join Date: Sep 2009
Location: Oklahoma City, OK
Posts: 4,295
|
Re: 51 chevy build
Dude, what an incredible build! Definitely no cookie cutter going on here.
__________________
Steve Project - Ruth 66 Skylark Project - Lola 60 Biscayne Project - Iron Ox 54 GMC 100 Project - Darth 69 Camaro |
|
|
|
|
12-09-2016, 11:00 AM
|
#60 |
|
Registered User
Join Date: Apr 2015
Location: Fort Washington Pa
Posts: 145
|
Re: 51 chevy build
Thanks zoomin!
Wow, what the heck? Are you sure your friend didnt hit an IED or something? Lol Both axel tubes are welded to the housing so i can sleep a little better at night. |
|
|
|
|
12-12-2016, 07:33 PM
|
#61 |
|
Registered User
Join Date: Apr 2015
Location: Fort Washington Pa
Posts: 145
|
Re: 51 chevy build
I measured the center of the center of the U joints and it came out to be 61 5/8 inches. Anyone know a driveshaft that measures that? Give or take a little bit
|
|
|
|
|
12-14-2016, 12:07 AM
|
#62 |
|
Registered User
Join Date: Apr 2015
Location: Fort Washington Pa
Posts: 145
|
Re: 51 chevy build
Went to the junk yard and they had a full C board box of driveshafts. Only one that fit was a 01 dodge 2500 extended cab truck. About 3 3/4 inches wide
Paid 100 dollars for it. Thought that was overpriced but they had me by the you know whats. 1410 U joints and the 8.8 driveshaft adapter is a 1310 U joint size. Guess i gotta find another adapter or order a 1410x1310 U Joint. [IMG]  [/IMG] [/IMG]
|
|
|
|
|
12-18-2016, 09:29 PM
|
#63 |
|
Registered User
Join Date: Apr 2015
Location: Fort Washington Pa
Posts: 145
|
Re: 51 chevy build
[IMG]
 [/IMG] [/IMG]Difference between a 1310 U joint flange yoke adapter and a 1350. Went to the junk yard in 20 degree weather and stole this off of a f150 driveshaft. Bought it for 3 bucks instead of paying 50 online. I ordered a 1350x 1410 combination U joint and it should be coming in tomorrow. [IMG]  [/IMG] [/IMG]So while waiting i had a little fun painting parts. Starting to clean my messy shop. So much to do. |
|
|
|
|
01-12-2017, 09:12 PM
|
#64 |
|
Registered User
Join Date: Apr 2015
Location: Fort Washington Pa
Posts: 145
|
Re: 51 chevy build
Had a little bit of time here and there. Got my driveshaft in and started on my floor shifter linkage.
Base bracket so far. [IMG]  [/IMG] [/IMG]
|
|
|
|
|
04-11-2017, 10:14 PM
|
#65 |
|
Registered User
Join Date: Apr 2015
Location: Fort Washington Pa
Posts: 145
|
Re: 51 chevy build
[IMG][URL=http://s1193.photobucket.com/user/ericellinger14/media/Mobile%20Uploads/20170310_173134_zpsiumthtvh.jpg.html]
 so i finished the exhaust. i don't know if i like it on the driver side. Had to make some interesting turns to avoid the hood, fender and steering box. I am done the waste gate piping as well but don't have pictures. [IMG]  [/IMG] [/IMG]Bought the sandwich plate and routed all the turbo oil feeds and drains. welded a bung to the oil pan on one side and aluminum pipe on the other because of the tight fitment [IMG][URL=http://s1193.photobucket.com/user/ericellinger14/media/Mobile%20Uploads/20170218_170449_zps0d9usgee.jpg.html] 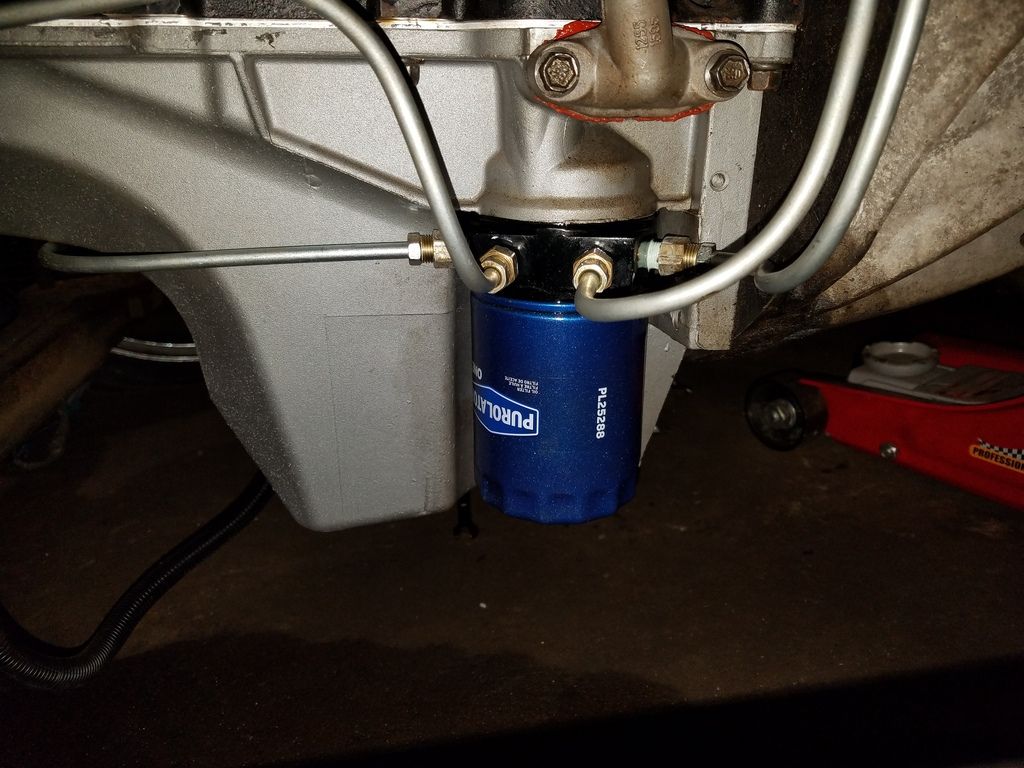 Oil cooler lines not installed yet. I have a lot more pictures i don't have on my phone apparently. I am working on my hood getting all of the dings and dents out. The truck used to be red. It took forever to sand it off. |
|
|
|
|
04-11-2017, 10:36 PM
|
#66 |
|
Post Whore
 Join Date: May 2015
Location: Alabama
Posts: 14,579
|
Re: 51 chevy build
Mankind..that's a mess of turbos on top of that thing..interesting
|
|
|
|
|
04-13-2017, 08:01 AM
|
#67 |
|
Registered User
Join Date: Jun 2016
Location: Knoxville, Illinois
Posts: 331
|
Re: 51 chevy build
This build is pretty sweet so far. Great work.
|
|
|
|
|
04-16-2017, 01:01 PM
|
#68 |
|
Registered User
Join Date: Apr 2015
Location: Fort Washington Pa
Posts: 145
|
Re: 51 chevy build
Updated pictures of my wastegate piping.
[IMG]  [/IMG] [/IMG][IMG]  [/IMG] [/IMG]Got 1 door stripped, cut the bottom on either side off and put a new one on. Doing 1 door at a time so i can remember how all the rubber and felt goes back together. Just got a delivery yesterday of everthing. Unfortunately i cracked the window when i took it out but it was already chipped so doesnt count! [IMG]  [/IMG] [/IMG]Seat i got for free out of a junk yard fits perfectly side to side. [IMG]  [/IMG] [/IMG]Straightened out my bedsides after welding them. Wow they can turn into bacon on such a long peice of metal real fast. [IMG]  [/IMG] [/IMG]
|
|
|
|
|
04-23-2017, 11:52 PM
|
#69 |
|
Registered User
Join Date: Apr 2015
Location: Fort Washington Pa
Posts: 145
|
Re: 51 chevy build
Getting the other door done
Going to order all new glass. Each window has a little chip thats waiting to crack or has already cracked.  [IMG] [IMG] [/IMG] [/IMG]
|
|
|
|
|
04-24-2017, 06:32 AM
|
#70 |
|
Registered User
Join Date: Dec 2011
Location: Mobile, Alabama
Posts: 996
|
Re: 51 chevy build
Great progress!
__________________
My Build - http://67-72chevytrucks.com/vboard/s...d.php?t=515876 |
|
|
|
|
04-25-2017, 10:26 PM
|
#71 |
|
Registered User
Join Date: Apr 2015
Location: Fort Washington Pa
Posts: 145
|
Re: 51 chevy build
Thanks dug.
Just went to summit racing and ordered low voc epoxy primer and hardener. I had to buy the low voc because the regular epoxy primer couldn't be shipped to PA. The low voc is more expensive, who would have guessed? 
|
|
|
|
|
01-08-2018, 06:20 PM
|
#72 |
|
Registered User
Join Date: Apr 2015
Location: Fort Washington Pa
Posts: 145
|
Re: 51 chevy build
So i havent posted in some time obviously, so i have a mess of progress. pic overload on its way.
|
|
|
|
|
01-08-2018, 06:39 PM
|
#73 |
|
Registered User
Join Date: Apr 2015
Location: Fort Washington Pa
Posts: 145
|
Re: 51 chevy build
picked up an Air to fuel ratio gauge which was huge for me. Im not much of a buyer of new things.
 got the bed sides welded up. Used some weld through primer. Then epoxied.   made my own back panel. my cheap butt wasnt paying that much for a piece of rolled metal.  
|
|
|
|
|
01-08-2018, 06:54 PM
|
#74 |
|
Registered User
Join Date: Apr 2015
Location: Fort Washington Pa
Posts: 145
|
Re: 51 chevy build
My idea of the wooden bed. oak flooring. Not done yet.
 Put the primed bed back together and am using Unistrut for the wooden supports. I work as a plumber so get it for free. Including the wood for the bed from a carpenter buddy.   more dash work of course. That thing is like swish cheese. 
|
|
|
|
|
01-08-2018, 08:07 PM
|
#75 |
|
Registered User
Join Date: Apr 2015
Location: Fort Washington Pa
Posts: 145
|
Re: 51 chevy build
Before i get to the doors my father got me a shrinker stretcher for Christmas. i was way too excited for a tool.
 Picked up random latch at a junkyard. Pretty sure i took it out of a mazda truck. I welded a small piece onto the latch hammer for the inside door handle so the latch would open the door sooner and i could use the OEM door handles.  Cut a hole in the door to fit the latch and bent up a plate. countersunk the holes so they could clear the inside door jamb. No special tools to countersink, a hammer and a punch.  Mounted the door latch and closed the door so it was flush with the cab, then used a sharpy to make the center of the latch when it was closed like it hit the striker and made a mark on the inside jamb. drilled the hole and made a piece to bring it out to the appropriate spot.  Dont have a picture for the inside door latch but i cut the piece off of the outside door handle and welded an arm to open from the outside. still working on this to make a tighter fit with less play.  BOOM 
|
|
|
|
 |
| Bookmarks |
|
|


 Linear Mode

