
|
 01-27-2015, 04:06 AM
|
#1876 |
|
Registered User
Join Date: Dec 2012
Location: Rochester, KENT
Posts: 10,480
|
Re: Markeb01 Build Thread
Just love the way your head works Mark.
I get the lights.
__________________
MY BUILD LINK: http://67-72chevytrucks.com/vboard/s...585901]Redneck Express - 1966 C10 Short Fleetside MY USA ROADTRIPS http://forum.retro-rides.org/thread/...2018-humdinger IF YOU CAN'T FIX IT WITH A HAMMER, YOU'VE GOT AN ELECTRICAL PROBLEM MATE. |

|

|
|
01-27-2015, 10:00 AM
|
#1877 |
|
Registered User
Join Date: Apr 2012
Location: Searcy, AR
Posts: 4,203
|
Re: Markeb01 Build Thread
Very nice set-up on the lights...

__________________
DON Proverbs 27:17  US Air Force Retarded errr Retired My '65 Stepper Build:http://67-72chevytrucks.com/vboard/s...d.php?t=533920 My '60 Rusty Patina Build:http://67-72chevytrucks.com/vboard/s...66#post7402266 My '72 http://67-72chevytrucks.com/vboard/s...59#post7204359 SOLD |
|
|
|
|
01-28-2015, 08:56 AM
|
#1878 |
|
Registered User
Join Date: Nov 2014
Location: Omaha
Posts: 558
|
Re: Markeb01 Build Thread
Thats pretty cool bro! Rock on

|
|
|
|
|
02-02-2015, 08:46 PM
|
#1879 |
|
Senior Enthusiast
Join Date: Feb 2007
Location: Spokane Valley, WA
Posts: 8,356
|
Re: Markeb01 Build Thread
Having not yet found nirvana level satisfaction with my steering wheel selection, I’ve recently achieved at least a better level of understanding. I’ve finally found the perfect wheel, at least now I know what I want.
Going back a while, I had a 1950 Oldsmobile wheel (and parking brake) in my 1954 Chevy in the 1970’s: 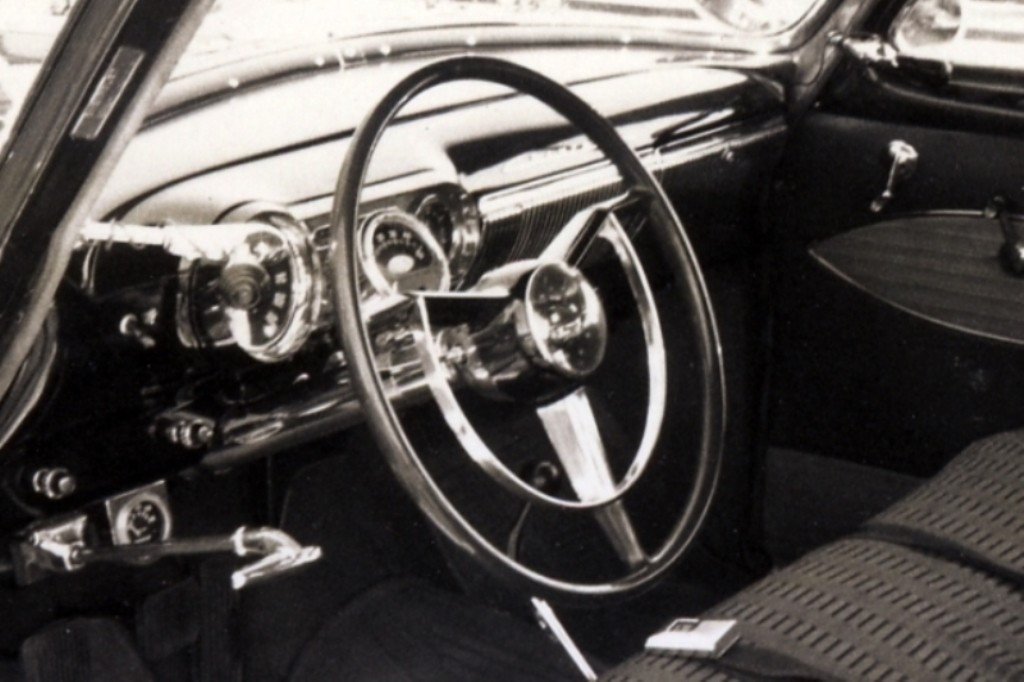 I loved that wheel with the deep blue center and gold “Saturn/Earth” emblem in the center. It came out of a mint condition Olds 98 that just arrived in a local wrecking yard. I also relieved it of the chrome door strikers and lock knobs as well. A few months ago I was perusing a steering wheel restoration site and noticed a similar Olds wheel that had been recast in transparent blue: 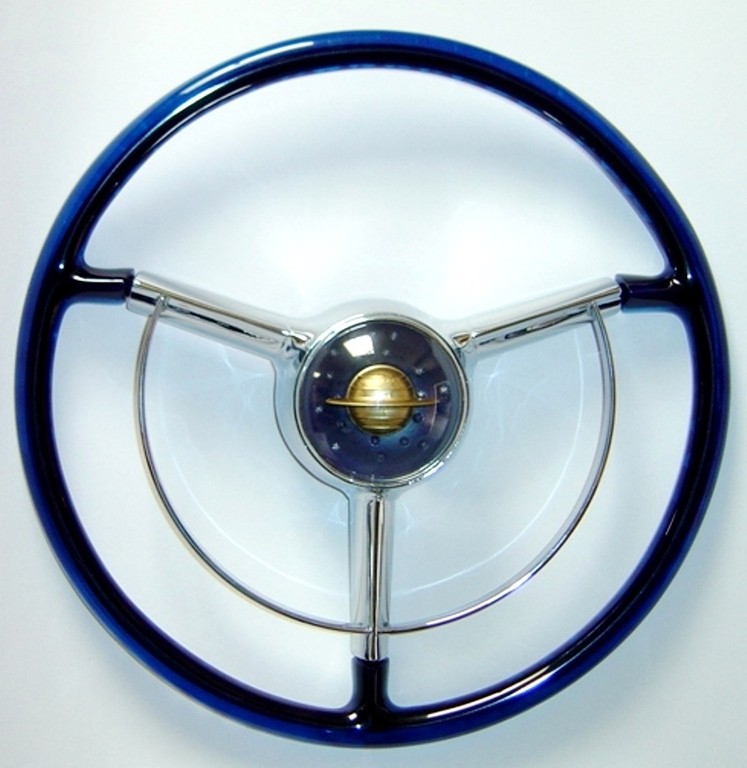 I didn’t notice at the time it had been reduced from 18.5” to 16”, and the horn ring was also moved inboard. A couple of days ago I was watching My Classic Car on YouTube (season 19, episode 4) and saw the transparent wheel in one of the giant roadsters they were featuring. At least I thought it was the same wheel at first: 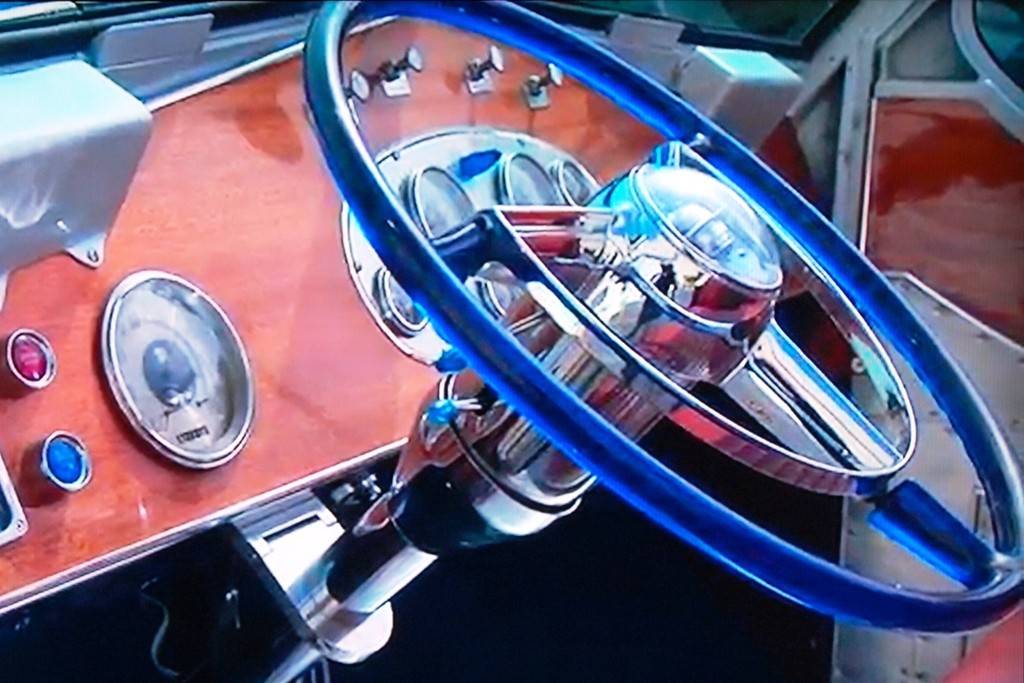 Further inspection showed it to be an original full size version in a lighter color, and with silver trim under the dome. At this point in time I no longer want an Oldsmobile wheel, but I sure like that transparent rim. After I win the lottery I want to marry that rim to a new Mooneyes wheel as I’ve never seen this done. But since these custom wheels cost somewhere from $1,000 - $1,500, I’ll be settling on a standard blue metalflake wheel once I can save up an extra $100 to waste on something else I don’t need! 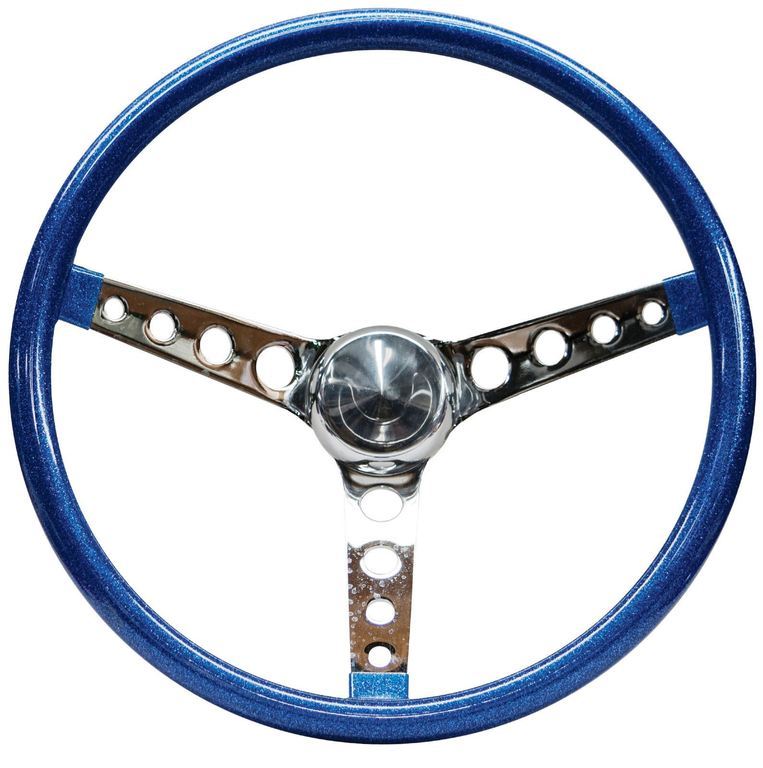 An interesting footnote for some - the Olds 98 emergency brake handle in 1950 was the same exact piece used in the 55-57 T-Birds. It was the first time I ever saw a part that originated on a GM car used in a Ford.
__________________
My Build Thread: http://67-72chevytrucks.com/vboard/s...d.php?t=444502 |
|
|
|
|
02-03-2015, 10:42 AM
|
#1880 |
|
Registered User
Join Date: Apr 2012
Location: Searcy, AR
Posts: 4,203
|
Re: Markeb01 Build Thread
I like the way you think on the wheel
 Interesting bit of knowledge on the e-brake handle...
__________________
DON Proverbs 27:17 US Air Force Retarded errr Retired My '65 Stepper Build:http://67-72chevytrucks.com/vboard/s...d.php?t=533920 My '60 Rusty Patina Build:http://67-72chevytrucks.com/vboard/s...66#post7402266 My '72 http://67-72chevytrucks.com/vboard/s...59#post7204359 SOLD |
|
|
|
|
02-05-2015, 10:29 PM
|
#1881 |
|
Senior Enthusiast
Join Date: Feb 2007
Location: Spokane Valley, WA
Posts: 8,356
|
Re: Markeb01 Build Thread
Kinda bummed on the transparent steering wheel. I contacted the guy that makes them, and he responded that he doesnt do aftermarket wheels at all. So I guess Ill have to find happiness with either the black wheel or a metalflake blue version.
I also managed to squeeze in a few minutes of truck time over the last few days and completed some minor interior refinements. The lone remaining red safety switch cover was replaced with a new black version that reads fast idle. A second shuttle style switch guard was installed next to it for the neutral safety circuit. The wrinkle finish hole covers next to the glove box door were removed for a gloss black repaint, but after soaking in Simple Green overnight they looked so beautiful (turned aluminum) I chucked them in the drill and polished them both to a chrome like finish with Semi-Chrome polish. And finally I pulled the prism tape off the evaporator bezel and restored the original black and gray paint. The tape looked pretty cool in real life, but gave a bland and boring appearance in pictures. 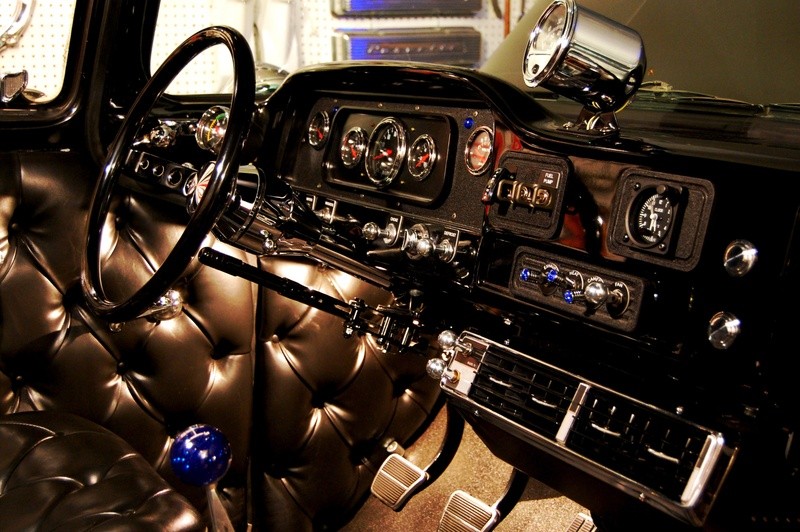 Back to the kitchen cabinets tomorrow. So far Ive stripped all the drawers (13) and only have 36 more doors to go. Yikes!
__________________
My Build Thread: http://67-72chevytrucks.com/vboard/s...d.php?t=444502 |
|
|
|
|
02-05-2015, 10:36 PM
|
#1882 |
|
Registered User
Join Date: Apr 2012
Location: Searcy, AR
Posts: 4,203
|
Re: Markeb01 Build Thread
Bummer on the wheel, but the refinements are Spot-On!!!
__________________
DON Proverbs 27:17 US Air Force Retarded errr Retired My '65 Stepper Build:http://67-72chevytrucks.com/vboard/s...d.php?t=533920 My '60 Rusty Patina Build:http://67-72chevytrucks.com/vboard/s...66#post7402266 My '72 http://67-72chevytrucks.com/vboard/s...59#post7204359 SOLD |
|
|
|
|
02-06-2015, 08:29 AM
|
#1883 |
|
Senior Member
 Join Date: Oct 2009
Location: Fayetteville, Arkansas
Posts: 1,923
|
Re: Markeb01 Build Thread
looking at that interior never gets old. i don't know how you could ever improve on it... but you do.
looks great Mark! |
|
|
|
|
02-08-2015, 11:36 PM
|
#1884 |
|
Senior Enthusiast
Join Date: Feb 2007
Location: Spokane Valley, WA
Posts: 8,356
|
Re: Markeb01 Build Thread
This winter has been so mild, I checked with the weather people this morning and theyre predicting were essentially done here in the eastern part of Washington. There will be some additional snow, but very little thats going to stick. So I decided it was time for the annual mag wheel/tire cleanup. Id like to get them back on the truck tomorrow. I usually leave the snow tires on until the last legal day (April 1st), but there just hasnt been much winter weather at all, and on the bad days I can just leave the truck in the garage. I want to wash it first, so the rally wheels are nice and clean for storage.
In no particular order the drill starts by washing the wheels front and back. Heres one of the front wheels which get pretty dirty on the back side because of the disc brakes: 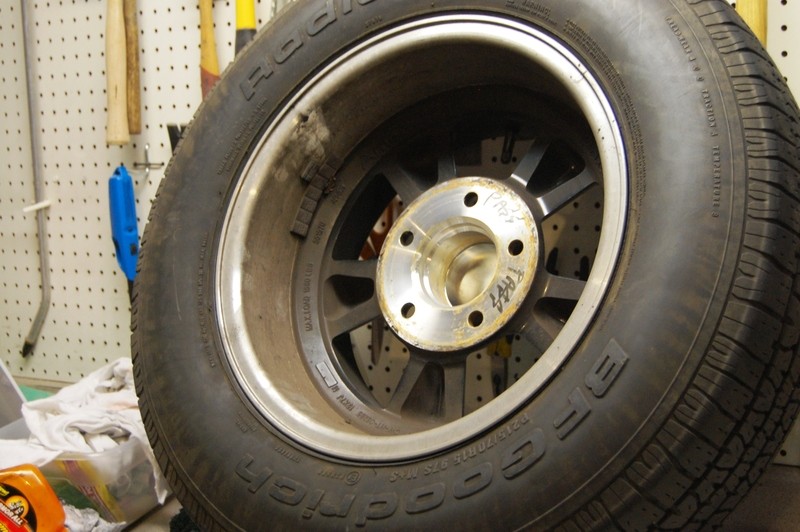 I dig all the rocks out of the tread (mainly on the back tires), including tiny pieces of rock that get stuck in the siping. I then touch up/recolor any of the white letters that start to show through:  I do this with the big fat Sharpie markers. They are basically filled with India Ink, which is the blackest and most permanent substance Ive found for coloring white letters black: 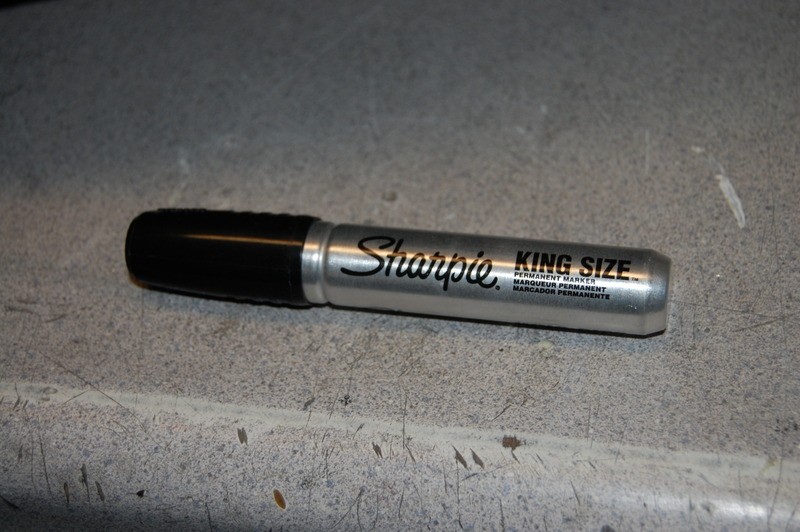 Its a bummer because back in the 50s & 60s there was a product called Tire Black that came in a pint can and covered whitewalls in one coat. It was available in every parts store I ever visited, but its gone from the market now. It colored any tire a deep rich high gloss black and lasted about a month or so. I loved that stuff and used it on all my cars back when. I tried a similar product from a tractor retread outfit, but it didnt work anywhere near as well as the old Tire Black. After everything is cleaned, colored, and the rocks removed, I polish the wheel rims with Semi-Chrome polish. It seems to work very well at making the rims look like new again. After that I swab the tire with ArmorAll Extreme Tire Shine Gel. This tends to seal in the marker dye and extends the color for a year or more. Heres the result of the first finished wheel & tire: 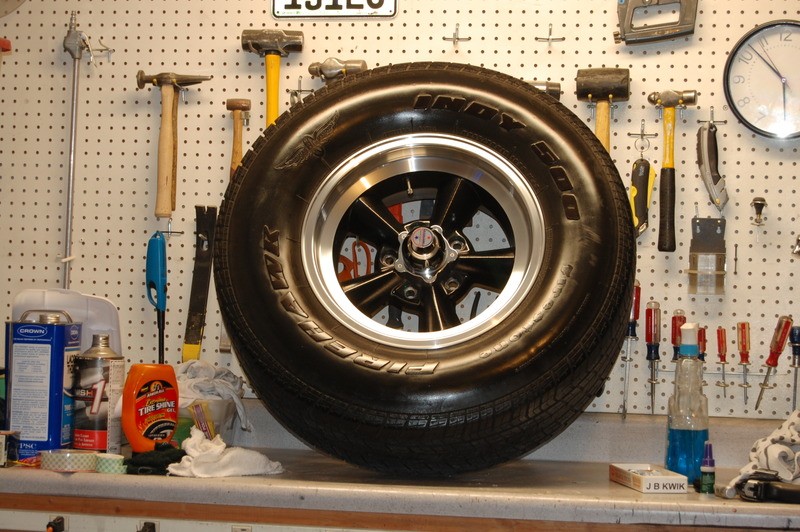 And heres the whole batch ready for reinstallation: 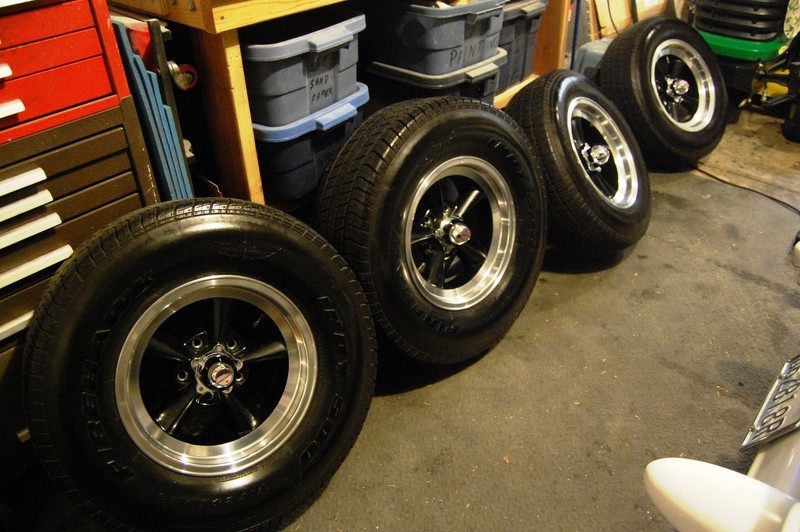 Once installed, I wipe the tires down one last time which removes some of the shine and makes them look more uniform in sheen.
__________________
My Build Thread: http://67-72chevytrucks.com/vboard/s...d.php?t=444502 |
|
|
|
|
02-08-2015, 11:54 PM
|
#1885 |
|
Senior Member
 Join Date: Aug 2013
Location: Windsor, California
Posts: 1,042
|
Re: Markeb01 Build Thread
It's just therapy....turn on some music
|
|
|
|
|
02-09-2015, 12:56 AM
|
#1886 |
|
Registered User
Join Date: Apr 2012
Location: Searcy, AR
Posts: 4,203
|
Re: Markeb01 Build Thread
Love the attention to detail!!!
Great job and thanks for the tp on the sharpie and the Armor all...
__________________
DON Proverbs 27:17 US Air Force Retarded errr Retired My '65 Stepper Build:http://67-72chevytrucks.com/vboard/s...d.php?t=533920 My '60 Rusty Patina Build:http://67-72chevytrucks.com/vboard/s...66#post7402266 My '72 http://67-72chevytrucks.com/vboard/s...59#post7204359 SOLD |
|
|
|
|
02-09-2015, 01:09 AM
|
#1887 |
|
Registered User
Join Date: Dec 2010
Location: Strathmore, Alberta
Posts: 470
|
Re: Markeb01 Build Thread
Mark, do you ever rest???
|
|
|
|
|
02-09-2015, 02:05 AM
|
#1888 |
|
Senior Enthusiast
Join Date: Feb 2007
Location: Spokane Valley, WA
Posts: 8,356
|
Re: Markeb01 Build Thread
Not very often! I was "gifted" with a brain that never turns off, which makes it very difficult to sit and do nothing.
__________________
My Build Thread: http://67-72chevytrucks.com/vboard/s...d.php?t=444502 |
|
|
|
|
02-09-2015, 02:05 PM
|
#1889 |
|
Registered User
Join Date: Apr 2012
Location: Cambridge, Ontario, Canada
Posts: 1,771
|
Re: Markeb01 Build Thread
Nice job Mark, little jealous of the winter you didn't really have
 , we had another 2" of the evil white stuff last night, and it is warmed up to a balmy 11F today , we had another 2" of the evil white stuff last night, and it is warmed up to a balmy 11F todayThey say that the ground hog didn't see his shadow and spring is coming early, but this seems like some kind of propeganda, I believe that the ground hog slept through his alarm and was not in a position to cast a shadow.
__________________
Craigerrr My build thread, CRGRS 66 Winter Build: http://67-72chevytrucks.com/vboard/s...09#post5638709 |
|
|
|
|
02-09-2015, 07:27 PM
|
#1890 |
|
Registered User
Join Date: May 2007
Location: Deale Md
Posts: 4,663
|
Re: Markeb01 Build Thread
You are the master in detail tricks.
__________________
James 63 GMC V6 4speed carryall 65 chevy swb bbw V8 auto 68 K20 327/4 speed, buddy buckets 2002 GMC CC Dually Duramax 64 GMC lwb 3/4 V6 4speed SOLD 66 GMC swb bbw buddy buckets SOLD IG duallyjams The only thing that stays the same is constant change! |
|
|
|
|
02-14-2015, 02:44 PM
|
#1891 |
|
Senior Member
 Join Date: Oct 2013
Location: lousiville Ky
Posts: 2,637
|
Re: Markeb01 Build Thread
Mark,
Have been following your build for a while for two reasons, just plan like everything you are doing , along with how much you share your knowledge. Second we are planning a 1964 C10 short bed, step side project for my wife and I. Your knowledge as a person who drives your regularly is very valuable to us in making the correct decisions for what we want in our new truck. Have been hanging around in the 73 to 87 group as I have built a 86' C10 for one of our grandsons. Have a few questions on your experience with your truck as a driver. Is it ok to ask them here in your build? One example of questions, is type of engine, how do you like your 350 vs other options like the LS engines. The more origional looking engine, with some hot roding additions in more what looks appealing and is more important to us, then the great technology the LS offers. Thanks, Les |
|
|
|
|
02-14-2015, 04:37 PM
|
#1892 |
|
Senior Enthusiast
Join Date: Feb 2007
Location: Spokane Valley, WA
Posts: 8,356
|
Re: Markeb01 Build Thread
Hi Les, asking in the build thread is great, or a pm is fine if you have some private topic to cover.
As for your engine/driving question Ive always been an old school kind of guy. Thats part of why my 350 is fixed up to look like a 327 (oil fill tube in front/no visible PCV setup). Im also retired on a modest income and dont really have the funding to invest in new technology. Ill be the first to admit the LS engines are far better than the old non-roller engine like I have, and fuel injection is a nice improvement over the limitations of a carburetor, but I can fix everything on my engine in the field. Ive never been stranded in over 20+ years of using it as a daily driver. It's been very dependable. Since retirement, I installed a new GM Targetmaster 350 (or whatever they are called now). The only modifications were a Comp Cams HE268 camshaft & kit, and the Pete Jackson noisy gear drive from the old engine I had been running since 1992. With a 4.10 rear axle, it isnt all that user friendly anymore on gas mileage, but I almost never take it on the freeway. Back when I was driving 36 miles a day round trip to work, I ran a stock cam and 3.08 rear axle gears and got as much as 18+ mpg. Ive also added Dougs electric exhaust cutouts behind the rear tires and have them open in every parking lot we encounter, and every car show we attend. They are tons of fun and sound wicked with the cam. Another prime convenience feature of the truck has been the Gaylord hard cover over the bed. It makes for the biggest trunk in the world, and allows us to carry just about anything anywhere. It was really handy back when I was working and traveled more, as we could carry all our food and sleeping supplies for long distance trips. The earliest upgrade after the V8 engine was power steering. It was so miserable with the stock steering, I had to leave it out in the street many times when I just couldn't navigate a parking lot. Let me know if there are other questions I can answer. Regards, Mark.
__________________
My Build Thread: http://67-72chevytrucks.com/vboard/s...d.php?t=444502 |
|
|
|
|
02-15-2015, 01:19 AM
|
#1893 |
|
Senior Member
Join Date: Oct 2013
Location: lousiville Ky
Posts: 2,637
|
Re: Markeb01 Build Thread
Mark,
The old school approach for the engine, is my plan too. Not sure how close to a period 327, the engine will appear. Will be using a World Products block, that I have had for a while. If I can do the old school oil filler tube, that would be great. Do you have a You Tube video of your truck w/ the exhaust open? Would like to hear it. I just did my first one, for the 86' truck, posting the exhaust sound. A couple of questions: 1). Can you make any suggestions on a standard transmission, thinking about a five or six speed. Maybe rated for 450 ft-lbs torque and 400 H.P. Fitting the cab tunnel layout for the shifter will also be an important factor. I do have a hydraulic clutch bell housing from a 1 ton 1965' 292 that can be used (photos of it are below). The rear 4:10 gears sounds good, along with OD in the transmission. 2). How much does you truck weight; Want too consider alternative parts that lighten the truck too. 3). Your build says that you are using a 73 to 87 front suspension, planning on using one also. Do you like it, any suggestions on drivability changes? 4). What rear end are you using, I like the 10 bolt from 73 to 87 trucks. 5). Any good frame modifications needed, like moving the gas tank. Thanks in advance for your help, hope this is not to many questions. Planning is half the fun for me. Also like to take my time to fully understand what the results will be. Les |
|
|
|
|
02-15-2015, 06:13 AM
|
#1894 |
|
Senior Enthusiast
Join Date: Feb 2007
Location: Spokane Valley, WA
Posts: 8,356
|
Re: Markeb01 Build Thread
Hi Les, if youre going to run a 4 barrel carb, Edelbrock offers a couple of intake manifolds with the oil fill provision in front:
7101 has provision for the oil tube. I had my machinist son bore out the hole on mine:  2703 comes with the tube/breather and the manifold already bored out: 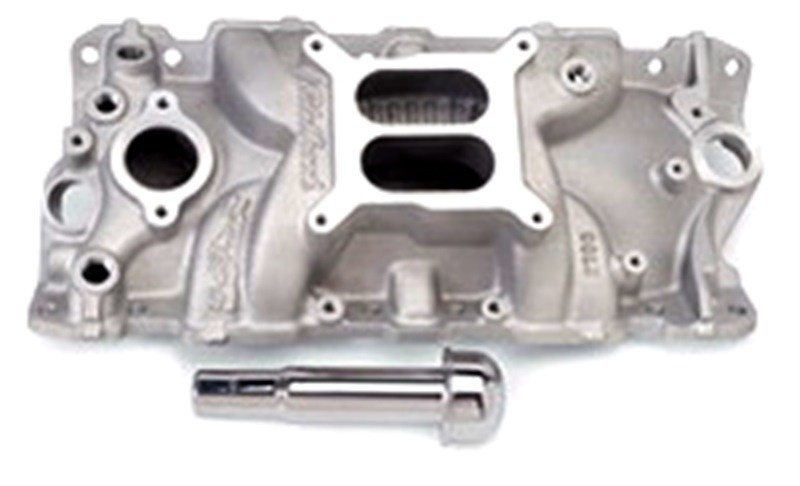 There are others that come with the tube depending on application. Here are a few videos of the exhaust on my truck: Open and closed. Bad video but the audio is good: https://www.youtube.com/watch?v=24M-tvTd3ro This one has the pipes half open. When they are wide open the sound overpowers the cheap dash cam Im using: https://www.youtube.com/watch?v=7z4cObwEIJc This is the newest video, pipes idling from about 8:40 to the end: https://www.youtube.com/watch?v=H0_g_kUzXhc Im running a Richmond Super T10 4 speed, but a 5 speed would be a better bet if it fits in the budget. If I had the money Id be looking at a Tremec offering, probably the TKO good for 600 lbs ft with multiple shifter positions, or the T56 Magnum 6 speed up to 700 lbs of torque. If you have a high hump floor, just about any transmission will fit. If you have a low hump floor, start looking now for a high hump. They show up locally on occasion, or on Ebay, or the parts for sale section of the forum. If you have the low hump floor, youll also need the piece of the firewall forward of the removable pan. If you have a one piece floor (no removable pan) you can still move to the high hump version by laying it on the floor for marking, and then cutting the hole undersize for a mounting flange. The old bellhousing may or may not be the best way to go for a hydraulic clutch. It might be easier to go with a Novak setup which uses the standard driver side setup for the slave cylinder: http://www.novak-adapt.com/catalog/clutch/kit_hcr3.htm Many use a hydraulic throwout bearing, but personally I dont trust them and wanted the hydraulics out of the bellhousing. I dont really remember what my truck weighs, its been a few years since its been on scales. Its a bit lighter in front since removal of the inner fenders, but I carry a ton of stuff in the bed year round. Im running a stock 1975 front end with new springs, shocks, and the factory 1975 sway bar. It would probably handle and corner better with some modernized lowering components, but I dont care for dropped trucks so Im quite happy with it as is. Im running a Dana 44 rear axle, since they are very popular for parts swapping, and it came stock in my truck being a GMC. If I had my choice Id go with some version of a 9 Ford, for the convenience of gear swaps by simply changing the pumpkin. Some version of 5 lug Chevy axle would be cheaper to install. Im pretty sure the 73-87 rear axles are ¾ wider per side. Just something to be aware of as it may require special offset wheels to keep them under the fenders. Im running a rear mounted gas tank and it required no frame modifications. I think the only chassis adjustment youll need will be the rear transmission crossmember. It will probably need to move back to line up with whatever transmission you decide on. I had a custom built 33 gallon tank fabbed up by Rock Valley Tanks. I couldnt afford to buy one again, but it has worked perfectly for over a decade. There are many other solutions to the rear tank, and once the search feature is back on line youll have plenty to pick through. But other than adding support straps, almost none need anything major in the way of frame mods. If Ive left something out, let me know and Ill go at it again. Regards, Mark.
__________________
My Build Thread: http://67-72chevytrucks.com/vboard/s...d.php?t=444502 |
|
|
|
|
02-15-2015, 09:09 AM
|
#1895 |
|
Registered User
Join Date: Nov 2014
Location: Omaha
Posts: 558
|
Re: Markeb01 Build Thread
What did your fuel tank run you again? Do you still have all the schematics for it? I need to look into one for my LS swap
|
|
|
|
|
02-15-2015, 04:25 PM
|
#1896 |
|
Senior Member
Join Date: Oct 2013
Location: lousiville Ky
Posts: 2,637
|
Re: Markeb01 Build Thread
Mark,
Thanks for all the information you provided, it is going to take me some time reviewing all the suggestions. The video links are great too, they provide a much more detailed view of your outstanding work. Definitely enhances my understanding of your trucks character! Nice, Nice, Nice. This is going to greatly help me plan changes to our truck, adding lots fun to our truck. Les Last edited by aotte1; 02-15-2015 at 04:26 PM. Reason: edit |
|
|
|
|
02-15-2015, 04:48 PM
|
#1897 | |
|
Senior Enthusiast
Join Date: Feb 2007
Location: Spokane Valley, WA
Posts: 8,356
|
Re: Markeb01 Build Thread
Quote:
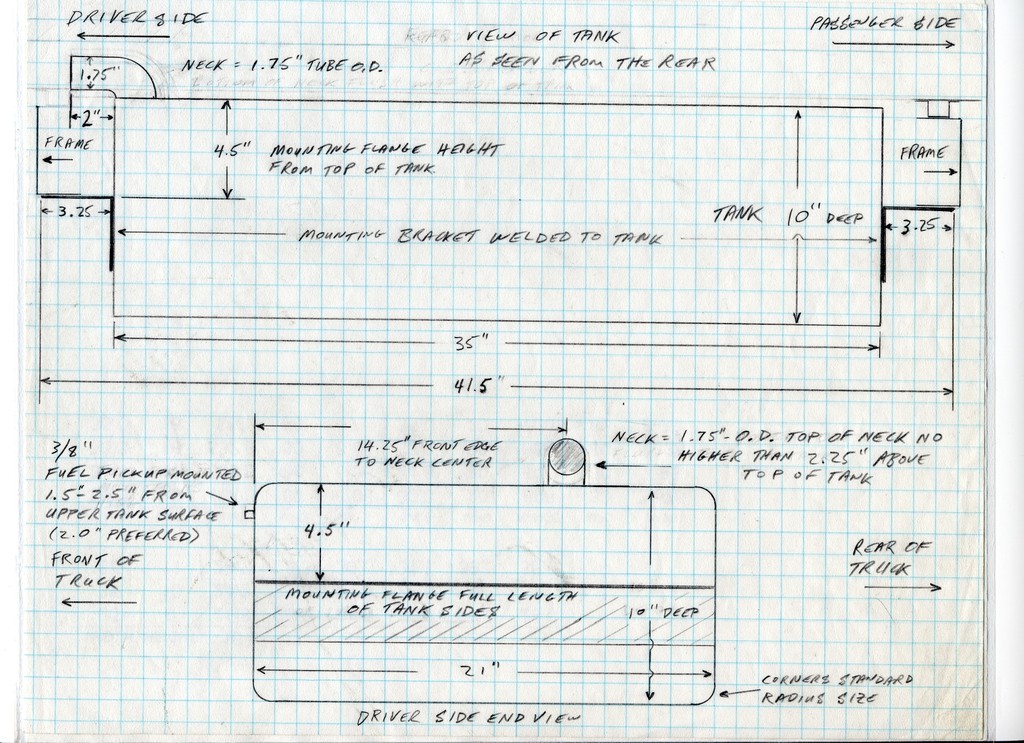 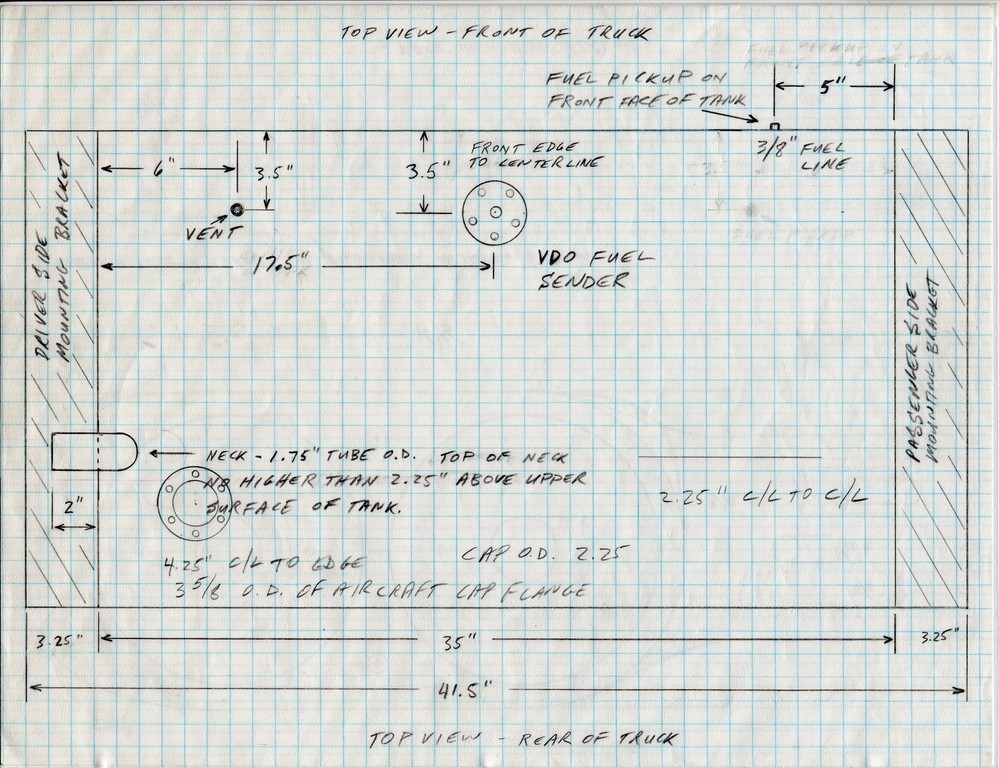 Because I was commuting 360 miles a week plus shopping trips into town (26 miles each way) I wanted as much capacity as possible. So I completely filled the area between the rails which added up to 33 gallons. I could have actually made it bigger as I left about 2 above the tank and below the bed. This tank wouldnt fit in a 63 and up frame as I understand they are narrower in the back, but it shows what can be done. The only modifications Rock Valley suggested were extra heavy end plates and mounting brackets due to the weight of the filled tank. These were agreed to and included. I did make one mistake in my original design, and that was making such a small elbow to connect to the fill pipe. Originally, this connected to a custom fill pipe which hooked up to a 67-72 C10 flange inside the bed, on the driver side bed wall under the upper rear of the back fender. The concept was great, but that elbow was too sharp and caused gas to kick back and shut off the nozzle unless run at dead slow. This took a ridiculous amount of time to fill the tank. The inlet either needed to enter as a straight pipe on the side of the tank, or as a baloney slice along the top. Neither of the repairs were practical as the truck was my daily driver and modifying the inlet would have required taking the tank into town and having it done at a radiator shop. So I modified the tank at home over a weekend by myself. I purchased an Earls aircraft wing filler cap & flange which came with a bolting flange in the shape of a big C that could be slipped inside the tank to secure the mounting flange. It is shown in the overhead drawing. At the time the only source I could find was in Australia! I dropped the tank, filled it with water to eliminate fumes, and cut the hole for the new filler cap. Once it was mounted, I drained the water and dried out the tank over the weekend. By Monday it was back in the truck and ready to go. A lot of owners mount the filler in the center of the floor, but this makes it difficult to fill the tank if the bed is loaded. I decided the left rear corner was much easier to reach at the gas station. Later on I had my son machine up an adapter to close off the area below the bed floor, and repurposed the chunk of aluminum bed floor as a lid to keep crud away from the actual filler cap. Heres what it looks like with the cover in place and out of the way. I have subsequently replaced the knob with a strap that lays flat so a load can be positioned over the top without damage: 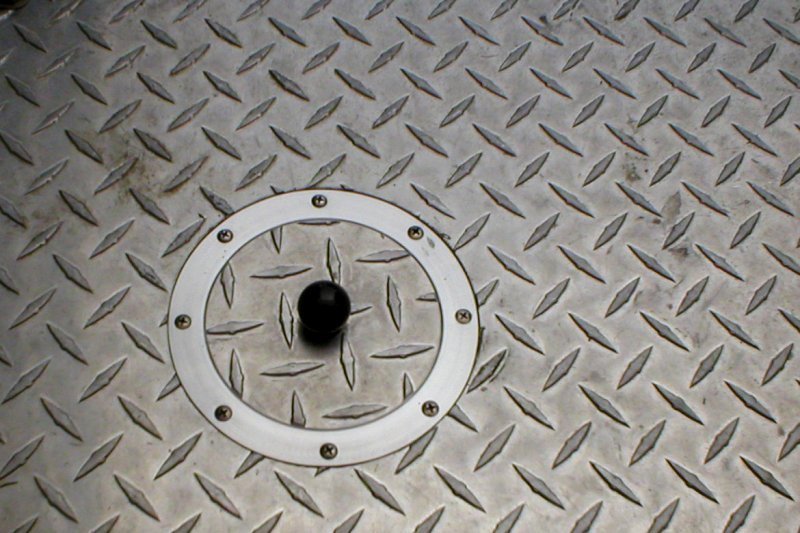 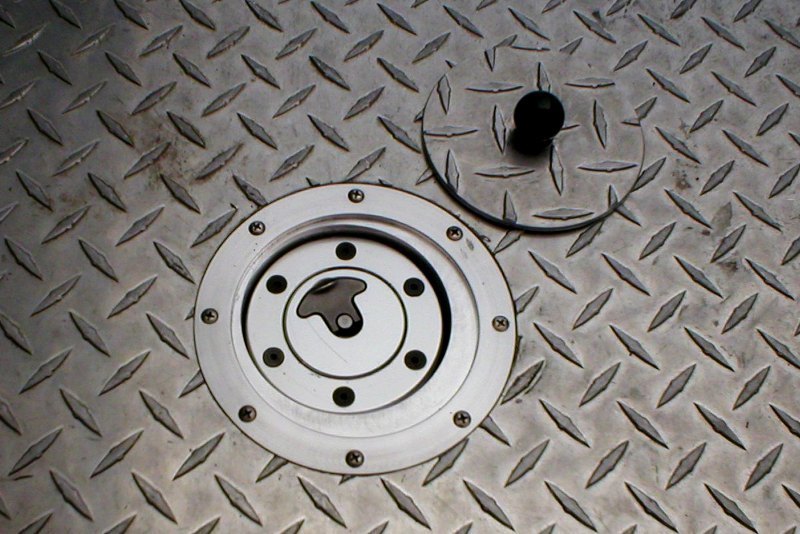 Several nice features of the brand new custom tank is there will never be any rust as it is totally made of stainless steel, is fully baffled inside, and doesnt hang down like many of the suburban tank installations. And the addition of ports for fuel injection lines and a fuel pump are simply a matter of adding them to the drawing. Heres a good example of how much of the tank is visually exposed:  I think thats about it. Any other questions let me know. Regards, Mark.
__________________
My Build Thread: http://67-72chevytrucks.com/vboard/s...d.php?t=444502 |
|
|
|
|
|
02-15-2015, 04:55 PM
|
#1898 | |
|
Senior Enthusiast
Join Date: Feb 2007
Location: Spokane Valley, WA
Posts: 8,356
|
Re: Markeb01 Build Thread
Quote:
"good stuff" can still be a bargain. As set up now, my truck isn't very practical and probably isn't the best model for others to copy. An old design motor with a one piece crankshaft, carb instead of fuel injection, no overdrive, a rough cam, and a 4.10 rear axle. But I'm retired and it is primarily used as a fun car for rod runs and going on dates with my squeeze. It's completely practical for what we need, but if you have to drive it to work or want it for long road trips the newer technology is much more efficient in the long haul. Regards, Mark.
__________________
My Build Thread: http://67-72chevytrucks.com/vboard/s...d.php?t=444502 |
|
|
|
|
|
02-15-2015, 06:12 PM
|
#1899 |
|
Senior Member
Join Date: Oct 2013
Location: lousiville Ky
Posts: 2,637
|
Re: Markeb01 Build Thread
Mark,
The fuel injection suggestion is one I want to investigate too. I also run a lot of carbs on my stuff over the decades, and would love to be able to write fuel mapping for the engine under different conditions. It is so much easier. However, want a system that kind of looks like a carb on a period looking 327. Les |
|
|
|
|
02-17-2015, 01:46 AM
|
#1900 |
|
Senior Enthusiast
Join Date: Feb 2007
Location: Spokane Valley, WA
Posts: 8,356
|
Re: Markeb01 Build Thread
I dreamed up and completed another minor technical improvement tonight. A little over a year ago I added a double “U” piece of tubing to the front center port of my Edelbrock carb, for injecting ether (starting fluid) into the intake manifold under the throttle plates:
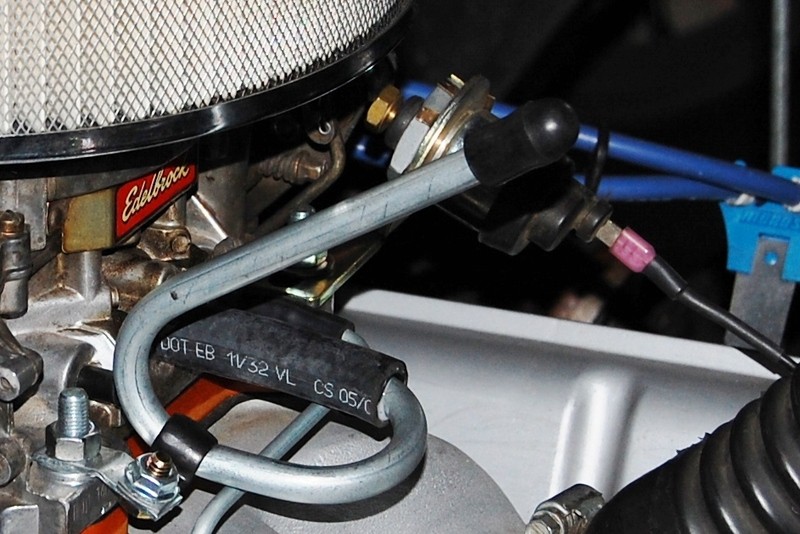 I know a lot of guys spray it directly into the paper air filter element, but I’ve also seen a simple backfire start a major fire when the filter blows up and sets the engine compartment ablaze. To avoid spraying the flammable gas all over the carb, I added a nozzle & tube from a spray can of some other product to make it easier to get all the starting fluid straight down the tube and into the engine: 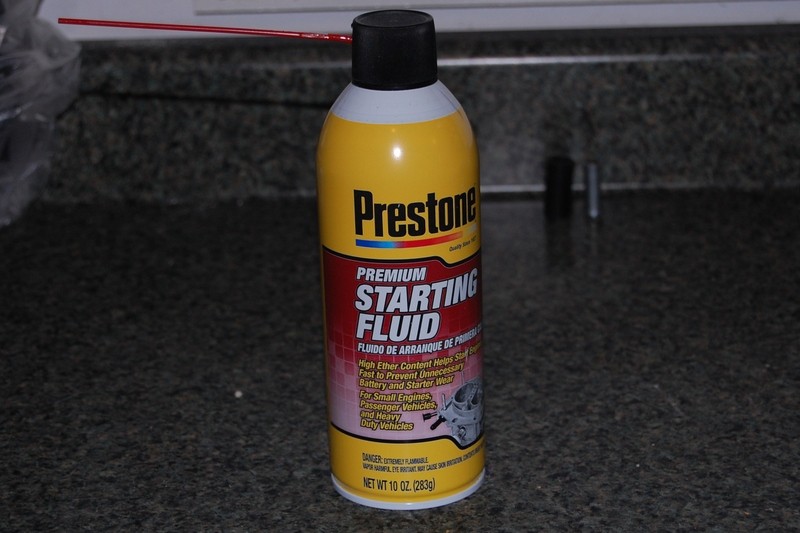 The problem being, every once in a while the tube blows out of the nozzle and lodges in the metal tube on the carb. It gets stuck at the first turn, so it can’t make it into the manifold, but it goes in far enough the top of the plastic tube is exactly even with the top of the metal tube. The only way to retrieve the plastic tube is with tweezers, or by completely removing the tube from the carburetor and blowing it out. Either method takes several minutes and is very annoying when I’m in a hurry to leave. So it took two steps to eliminate the issue. First I glued the plastic tube to the spray nozzle with JB Weld clear epoxy. I kept rotating the nozzle until the epoxy went off, coating about an inch of the red plastic, and all the way around the back of the nozzle: 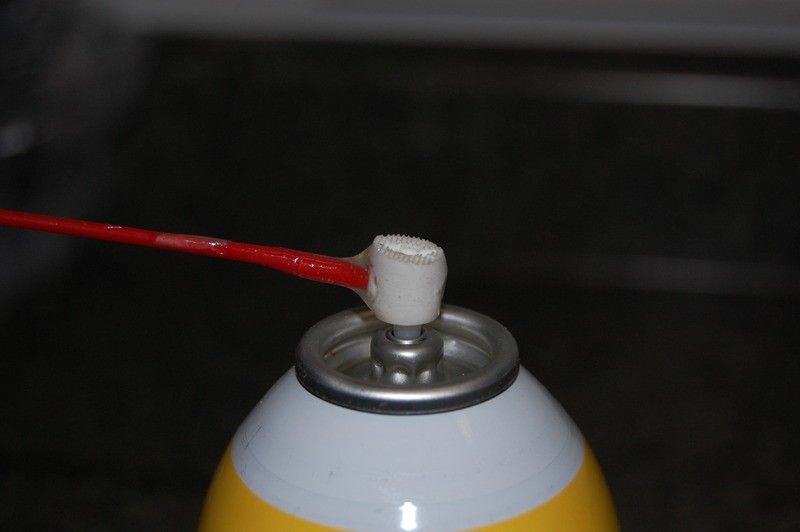 I’ve had no issues since then, but just in case I have to change nozzles someday, I came up with the bright idea to simply shorten the metal tube. So tonight I sliced off an inch and 5/16, and formed another retention bulge on the end. If a nozzle ever blows off again, I can simply reach over and pick it up, as it sticks out the amount I shortened the pipe: 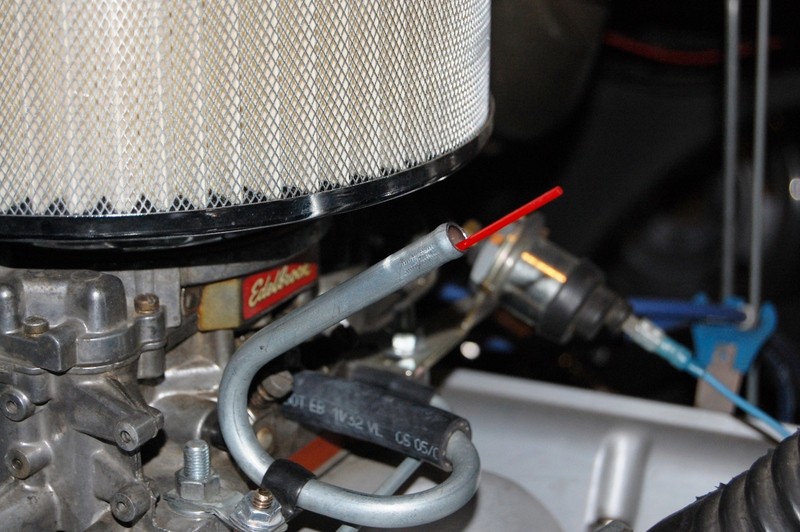 Rather than risking a vacuum leak with prolonged use of the vinyl cap, I replaced it months ago with a piece of fuel hose sealed with a tapered steel plug. One of the things I’ve always been amazed with is my somewhat Mr. Spock abilities on straight lines, assessing level, and measurements. I guessed on how far to cut the steel line, and guessed again on how much to cut off the rubber hose. Nothing was measured or marked, and both came out almost exactly 1 5/16”! 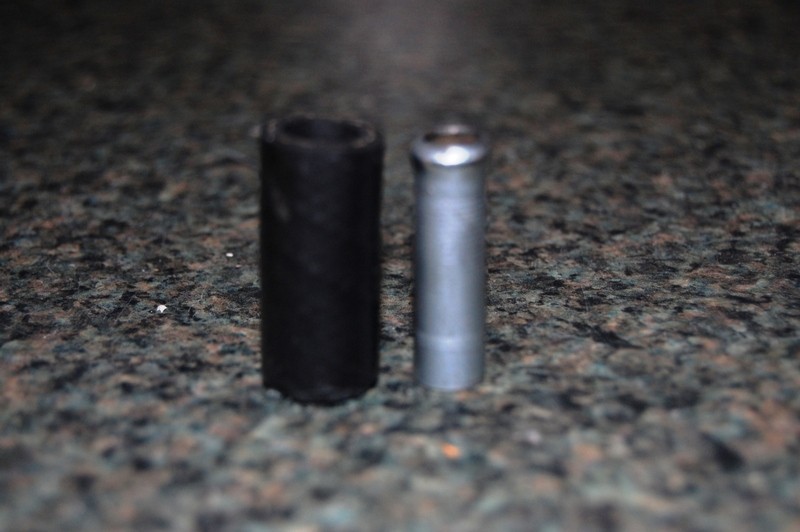 The finished result looks almost exactly the same as before, but will sure be easier and less time consuming in the future if I have any problems with the spay nozzle/tube: 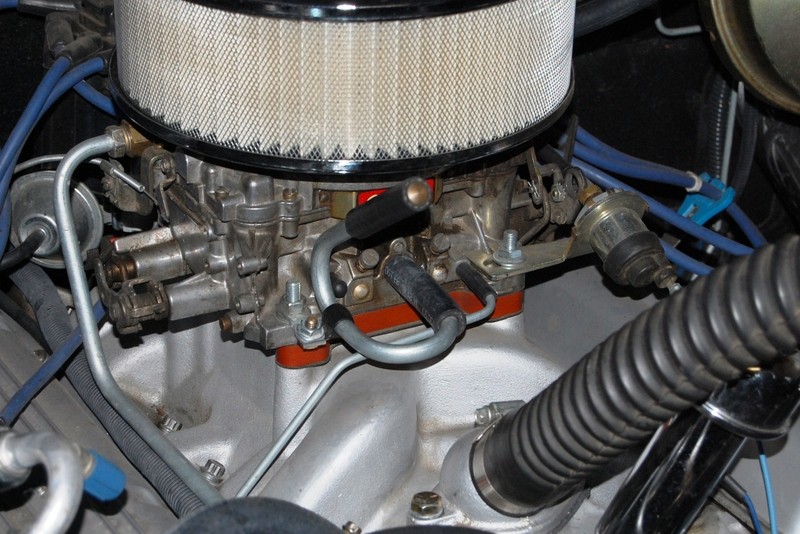
__________________
My Build Thread: http://67-72chevytrucks.com/vboard/s...d.php?t=444502 |
|
|
|
 |
| Bookmarks |
|
|


 Linear Mode

