
|
 07-17-2009, 10:49 AM
|
#101 |
|
Registered User
Join Date: Jul 2009
Location: tulsa
Posts: 89
|
Re: Yet Another s10 swap
This seems like the best thread I have seen over this. I am getting ready to start on my s-10 frame. Can anyone give me an idea of where to cut the frame horns back to? And What gauge steel did you use for your cab mounts? Also, If I used the orginal design cab mounts you made the larger ones would I have to do a transmission tunnel?
|

|

|
|
07-17-2009, 11:35 AM
|
#102 |
|
Registered User
Join Date: Jul 2009
Location: Winston-Salem, NC
Posts: 57
|
Re: Yet Another s10 swap
Great thread, love the s-10 swao. Got a s-10 in the back yard I am holding onto to just for this reason
__________________
During first and only engine rebuild " That O-ring? It's a spare I think, but lets keep it just in case we discover we need it" 1955 Chevy 2nd series, "Mabel" |
|
|
|
|
07-17-2009, 05:58 PM
|
#103 |
|
Registered User
Join Date: Jul 2009
Location: Bakersfield CA
Posts: 113
|
Re: Yet Another s10 swap
Just read through this thread and love it. The most helpful thread I have read so far. You have been a huge help thanks so much for sharing. I actually think by reading this thread I will be able to do this myself and save the grand that AD wants for there kit. I do have a few questions though do you by chance have drawings of the bed mounts that you used, and also with the original mounts that you did do you have to make any floor mods on the cab? Any help would be greatly appreciated.
__________________
_____________________________________________ Thanks, Garrett  My 1950 GMC Build Thread: http://67-72chevytrucks.com/vboard/s...d.php?t=351867 My 1950 GMC Photobucket Account: http://s565.photobucket.com/albums/ss95/1950GMC/ |
|
|
|
|
07-17-2009, 06:37 PM
|
#104 |
|
Registered User
Join Date: Aug 2008
Location: spokane washington
Posts: 26
|
Re: Yet Another s10 swap
tranny ods depends on what heighth you put your cab at.
|
|
|
|
|
07-18-2009, 09:38 PM
|
#105 |
|
Registered User
Join Date: Jul 2009
Location: Bakersfield CA
Posts: 113
|
Re: Yet Another s10 swap
True, so what heigth do I need to go so I dont have to make any floor changes on the cab?
__________________
_____________________________________________ Thanks, Garrett My 1950 GMC Build Thread: http://67-72chevytrucks.com/vboard/s...d.php?t=351867 My 1950 GMC Photobucket Account: http://s565.photobucket.com/albums/ss95/1950GMC/ |
|
|
|
|
07-19-2009, 08:13 AM
|
#106 |
|
Registered User
Join Date: Aug 2008
Location: spokane washington
Posts: 26
|
Re: Yet Another s10 swap
about 4 inches above top of frame.
|
|
|
|
|
07-19-2009, 06:08 PM
|
#107 |
|
Registered User
Join Date: Jul 2009
Location: Bakersfield CA
Posts: 113
|
Re: Yet Another s10 swap
So are there any drawings or pictures out there showing the bed mounts?
__________________
_____________________________________________ Thanks, Garrett My 1950 GMC Build Thread: http://67-72chevytrucks.com/vboard/s...d.php?t=351867 My 1950 GMC Photobucket Account: http://s565.photobucket.com/albums/ss95/1950GMC/ |
|
|
|
|
07-19-2009, 09:01 PM
|
#108 |
|
Registered User
Join Date: Jul 2009
Location: American Fork UT
Posts: 22
|
Re: Yet Another s10 swap
go back one page in this thread, grimss posted some. nevermind.
Last edited by kalvin22; 07-19-2009 at 09:06 PM. Reason: oops those are just cab mounts |
|
|
|
|
07-19-2009, 09:28 PM
|
#109 |
|
Registered User
Join Date: Dec 2007
Location: caldwell, idaho
Posts: 132
|
Re: Yet Another s10 swap
Alrighty fellas,
I originally wanted to show off alittle and maybe help out some fellow garage junkies. What I never intended to do was to provide a definitive how-to. I'm here to help, but this thread was not intended to be a step by step. Having said that, the bed mounts for this type of project rely on too many factors to have specific drawing made. They rely on the height of everything else. If you have specific questions, please ask away. I really want to stay away from giving anymore drawings or measurements. I feel there is plenty of info on my thread to get you through the swap with a little enginuity. Believe me, you guys have more experience and knowledge than I do. Thanks, Jeff BTW - thank you for all the kind words - this has been a ton of fun. Last edited by jeffs51chevy; 07-19-2009 at 09:31 PM. Reason: Didn't want to sound negative - I love this place |
|
|
|
|
07-25-2009, 11:37 AM
|
#110 |
|
Registered User
Join Date: Aug 2008
Location: spokane washington
Posts: 26
|
Re: Yet Another s10 swap
i just used my mounts that were on the frame already and modified to fit. then the back is simply angle or l bracket, but jeff is correct there are many ways and it depends on how you set your cab. unless you are going to haul in your truck it doesnt have to be fort knox just sturdy.
|
|
|
|
|
08-02-2009, 09:33 AM
|
#111 |
|
Registered User
Join Date: Dec 2007
Location: caldwell, idaho
Posts: 132
|
Re: Yet Another s10 swap
Hey guys,
I don't know if others are running into the same problem as me, but mounting the alternator has be problematic. I had to mount it on the passenger side due to power steering issues on the driver's side. Compounding the issue, I only have one accessery hole in the cylinder head to mount too. After messing with it for far too long, this is what I came up with. It's all a little rough, but you get the idea. I've still got the arm to fab, but it might give a guy with this same problem an idea or two. On with the pics: 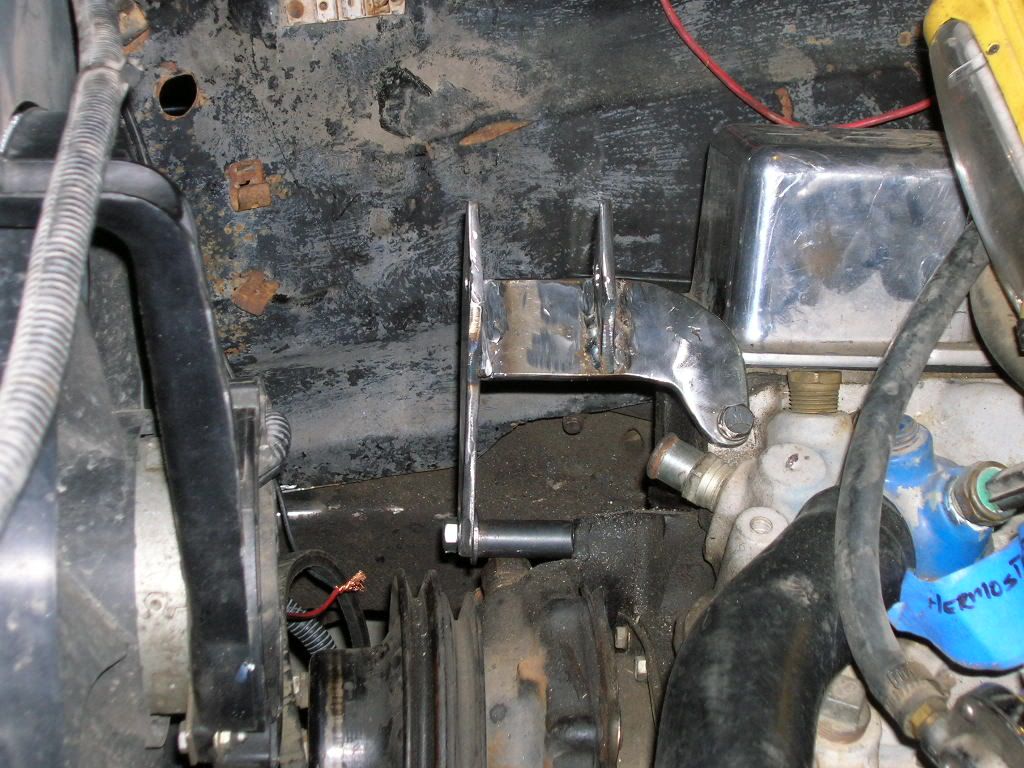 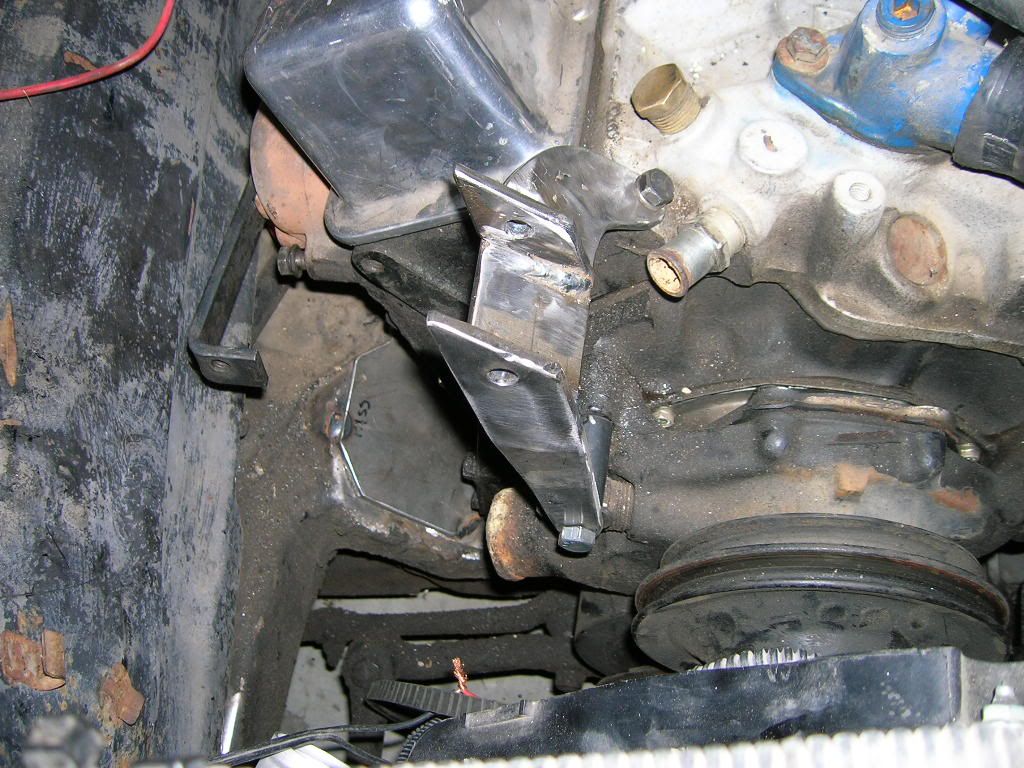
|
|
|
|
|
08-02-2009, 12:58 PM
|
#112 |
|
Registered User
Join Date: Jun 2006
Location: Idaho
Posts: 8,800
|
Re: Yet Another s10 swap
Here is a shot of the set up that was on the 74 chevy donor truck motor. I don't know if it was stock but it line up and works. The top bracket bolts to the passenger side thermostat housing stud.
__________________
1959 Chevy Short Fleetside w/ 74 4WD drive train (current project) OrrieG Build Thread 1964 Chevelle Malibu w/ 355-350TH (daily driver) Helpful AD and TF Manual Site Old Car Manual Project |
|
|
|
|
08-02-2009, 08:19 PM
|
#113 |
|
Registered User
Join Date: Jul 2009
Location: Gilson,Illinois
Posts: 1
|
When you did the cab mounts, you said you used the s-10 bushings, did you also use them on the rear mounts, and if so how did you mount them to the cab. and also thank you for the very useful ideas. I'm still undecided as to weather do an s-10 frame swap or do a front sub-frame swap. hopefully this will help me to deside.
thanks Hanney |
|
|
|
|
08-02-2009, 09:40 PM
|
#114 |
|
Registered User
Join Date: Dec 2007
Location: caldwell, idaho
Posts: 132
|
Re: Yet Another s10 swap
Hanney,
I used the stock s10 bushings both front and rear. If you have a set or see a picture, you'll know how they bolt up. OrrieG, I forgot to include that I have a short water pump. The dept of the short water pump does not allow the alternator to fit infront of the cylinder head and still mate with the pulleys. I guess you could use a thinner Toyota alternator or something, but I used what I had in the garage. Here is the finished for now bracket. 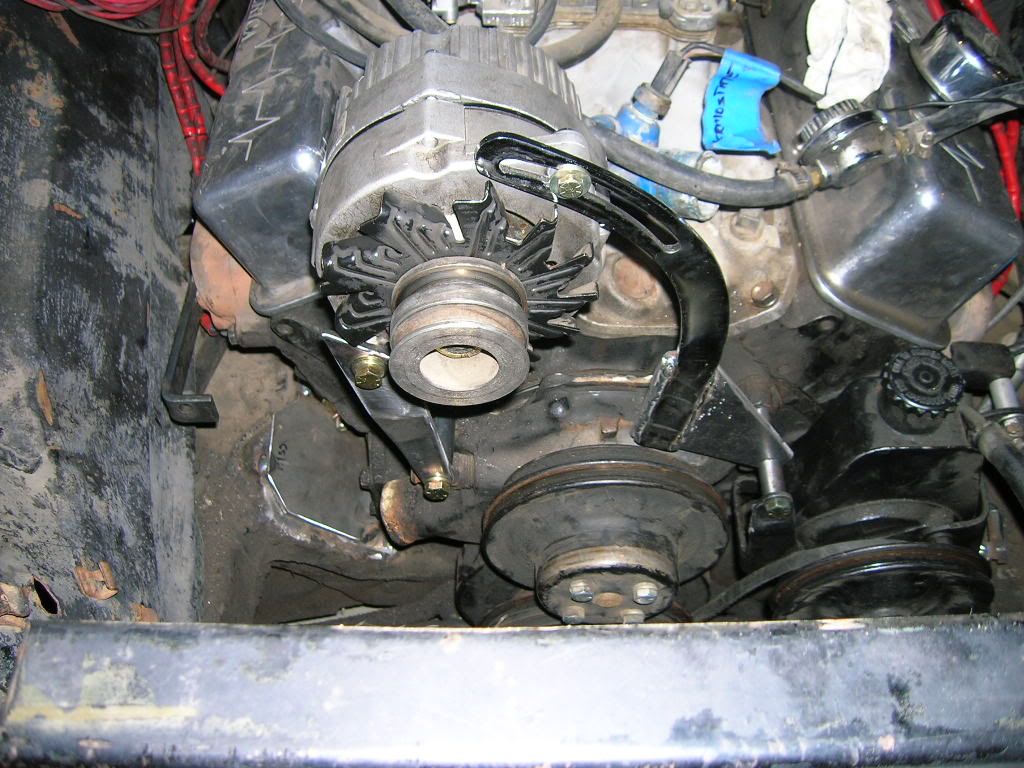 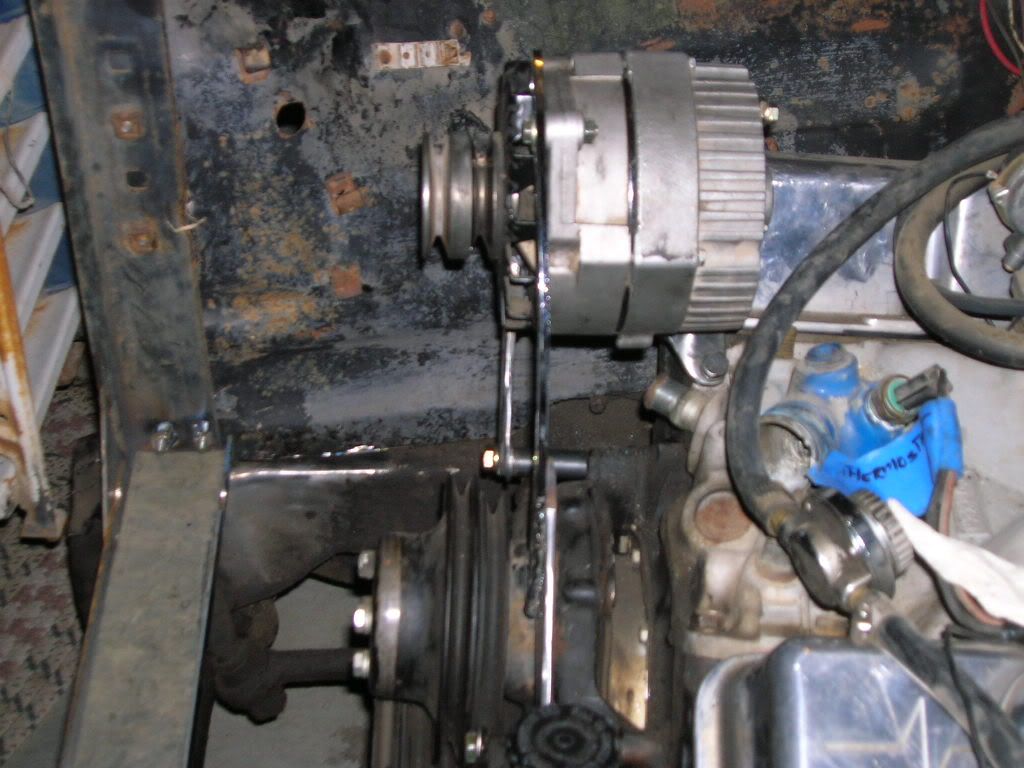 Let me know what you think. |
|
|
|
|
08-02-2009, 11:33 PM
|
#115 |
|
Registered User
Join Date: Jul 2009
Location: American Fork UT
Posts: 22
|
Re: Yet Another s10 swap
looks like it should work. have u tried a belt to see if u can get the proper tension???
|
|
|
|
|
08-21-2009, 10:00 AM
|
#116 |
|
Registered User
Join Date: Aug 2007
Location: pittsburgh pa
Posts: 1,970
|
Re: Yet Another s10 swap
Great thread Jeff... Thanks for all the info.. Very nice fab work!
__________________
68 C10 Shorty TPI,Bagged, and all the good stuff. Classic trucks feature June 06, On the cover of Jegs Christmas Catalog 08 67 C10 Shorty Shop truck project Bagged and Z'd under destruction and getting nowhere fast. 64 C10 Shop Truck/Daily driver, Bagged, Dropmember, SOLD!!!! Gone but not forgotten.. 54 GMC under the knife getting a S10 chassis swap and bagged. See my build thread... 07 GMC Sierra 5/7 drop, 22's and 24's Air ride on my mind.. http://67-72chevytrucks.com/vboard/s...d.php?t=339340 See pics of my trucks in my profile |
|
|
|
|
08-25-2009, 08:39 AM
|
#117 |
|
Registered User
Join Date: Aug 2009
Location: Lake Havasu City, Az
Posts: 134
|
Re: Yet Another s10 swap
Jeff great thread! Your input is just great! I'm getting ready to start a project using 1993 S15 and a 1952 1/2t GMC. Your mounting ideas make sense. What are you using for exhaust manifolds on your build? Did you use the S gas tank and pump and filler? Did not catch what you are using for wiring. Keep posting man I love it.
|
|
|
|
|
08-25-2009, 11:19 AM
|
#118 |
|
Registered User
Join Date: Dec 2007
Location: caldwell, idaho
Posts: 132
|
Re: Yet Another s10 swap
Thanks everyone!!!
I'm using stock log manifolds for now. I want to change that down the road, but for now, it eliminates one more project. Yes, the plan is to use the stock s10 gas tank. We added an electric pump and filter along the inside of the frame. I want to plumb the filler neck out just above the running board splash apron on the drivers side. I'm going for a semi-factory look, much like the earlier 47-48 (I believe) 3/4 and 1 tons. This might change though. As for the wiring, I've pretty much got that whipped. My father and I dropped the v8 in over 12 years ago, and much of the wiring mods were done then. All I had to do this time was hook it all back up and change things for the gauge cluster. Not much help I know. I apologize for the lack of updates. I have had no time or money to devote to the truck. I do appreciate everyones' interest. It keeps me connected and focused at least in mind. Thanks again and take care, Jeff |
|
|
|
|
09-22-2009, 11:54 PM
|
#119 |
|
Registered User
Join Date: Aug 2007
Location: pittsburgh pa
Posts: 1,970
|
Re: Yet Another s10 swap
Hey Jeff,
Thanks again for posting the cab mount drawings.. I started cutting the steel yesterday and welded them up tonight.... I took a slightly different approach and used 4x4 square tube... After loking at your drawings I thought it would be a lot less cutting, bending and welding... It worked great.. The piece cut off the main body of the mount worked for the foot with 1 additional cut.. Sincere thanks for all your info you have posted.. Im ready to start blowing apart my GMC to get it on this frame now...
__________________
68 C10 Shorty TPI,Bagged, and all the good stuff. Classic trucks feature June 06, On the cover of Jegs Christmas Catalog 08 67 C10 Shorty Shop truck project Bagged and Z'd under destruction and getting nowhere fast. 64 C10 Shop Truck/Daily driver, Bagged, Dropmember, SOLD!!!! Gone but not forgotten.. 54 GMC under the knife getting a S10 chassis swap and bagged. See my build thread... 07 GMC Sierra 5/7 drop, 22's and 24's Air ride on my mind.. http://67-72chevytrucks.com/vboard/s...d.php?t=339340 See pics of my trucks in my profile |
|
|
|
|
09-23-2009, 10:40 AM
|
#120 |
|
Registered User
Join Date: Dec 2007
Location: caldwell, idaho
Posts: 132
|
Re: Yet Another s10 swap
c10addict,
Thanks again. One piece of advice I would give is to leave the front clip attached to the cab if at all possible. I did not have the facilities to lift and move the whole front end, but it would have helped tons with alignment issues. Just remove the inner fender wells, trim the radiator core support, and you will find it much easier to get it all lined up. Good Luck, Jeff |
|
|
|
|
09-24-2009, 09:22 AM
|
#121 | |
|
Registered User
Join Date: Aug 2007
Location: pittsburgh pa
Posts: 1,970
|
Re: Yet Another s10 swap
Quote:
 I get carried away with my welds I get carried away with my welds 
__________________
68 C10 Shorty TPI,Bagged, and all the good stuff. Classic trucks feature June 06, On the cover of Jegs Christmas Catalog 08 67 C10 Shorty Shop truck project Bagged and Z'd under destruction and getting nowhere fast. 64 C10 Shop Truck/Daily driver, Bagged, Dropmember, SOLD!!!! Gone but not forgotten.. 54 GMC under the knife getting a S10 chassis swap and bagged. See my build thread... 07 GMC Sierra 5/7 drop, 22's and 24's Air ride on my mind.. http://67-72chevytrucks.com/vboard/s...d.php?t=339340 See pics of my trucks in my profile |
|
|
|
|
|
11-11-2009, 07:51 PM
|
#122 |
|
Registered User
Join Date: Sep 2008
Location: brixey,missouri
Posts: 12
|
Re: Yet Another s10 swap
Hey when are you going to update i want to see some new pictures have you done anything else
|
|
|
|
|
11-14-2009, 12:42 PM
|
#123 |
|
Registered Chevy Owner
Join Date: Aug 2008
Location: Snohomish, wa
Posts: 1,557
|
Re: Yet Another s10 swap
Hey Jeff, check out what I found on another site.
http://www.killbillet.com/showthread.php?t=20487 Seems like you'r helping more that you ever thought.
__________________
Love is fleeting, but Chevy trucks are forever!!!!  1970 Chevy CST C10 long box 350/400  2008 Chevy Silverado short box 4x4 Had; 1951 Chevy short box 307/T5 1988 Chevy shot box 4x4 350/350 1971 Chevy C10 long box 4x4 350/350 1971 Chevy C20 long box 350/350 1971 Chevy C10 long box 350/350 Last edited by nickp51chevy; 11-14-2009 at 12:43 PM. Reason: + |
|
|
|
|
11-14-2009, 10:28 PM
|
#124 | |
|
Registered User
Join Date: Dec 2007
Location: caldwell, idaho
Posts: 132
|
Re: Yet Another s10 swap
Quote:
Jeff |
|
|
|
|
|
11-21-2009, 12:38 AM
|
#125 |
|
AD Addict
Join Date: Oct 2009
Location: Blissfield, MI
Posts: 822
|
Re: Yet Another s10 swap
Jeff,
One suggestion for you or anyone else doing this is to utilize one area that is easy to get to, the battery cover. We did this on Court's truck and I put a Holley fuel regulator there. I ran a Blazer tank to put it in the rear so I didn't have dual exhaust issues and because he's got other body mod plans that will keep it in line. To adjust my fuel pressure, I just pop off the battery box lid on the floor and mounted on the top of the frame rail is the regulator. If I'd have planned it better, I would have put the fuel filter there as well. I'm going to make a rubber matt type box using mud flap type rubber to keep the yuck out. We also put the battery behind the front seat (used an 88 bench seat) and ran the lines through the floor, just wrapped them in fuel line to keep them from rubbing through. Zip ties top and bottom holds them in place. Hard to set the timing from there but everything else has been pretty OK. Nice build and I know what you mean about making this NOT a step by step thing. You've done lots different than I did because the whole thing IS diffferent! I'd do a better job next time...maybe a Dakota and not an S10! |
|
|
|
 |
| Bookmarks |
|
|


 Linear Mode

