
|
Register or Log In To remove these advertisements. |
|
|
|
|||||||
 |
|
|
Thread Tools | Display Modes |
|
|
 04-17-2017, 12:29 PM
|
#1 |
|
Senior Member
 Join Date: Sep 2016
Location: Hershey, PA
Posts: 1,004
|
Finishing a body repair
I promise I used search first...
I found through youtube videos, posts, and research that there doesn't seem to be a definitive guide for newbies on replacing certain patch panel areas. I am working on a kick panel for the passenger side of my 1949 cab and noticed three types of joins. A lap join at the door hinge post, a butt join in the floor and a join of sorts between the lower firewall and the kick panel (maybe called a lap join also?). What I also noticed is part of this kick panel is exposed to the front fender well. What I'm specifically trying to find is the steps to complete such a repair. There are plenty of welding guides and fitment guides, so that's not really what I mean. Here's an example from my research so far, but I could be wrong in my steps. 1. Cut out the cancer 2. Grind, scrape and wire brush all loose rust and debris until you can't get anymore debris to come off. 3. Shape the replacement area 4. Fit the new panel and cut it to the size, shape it needs 4. Spray POR-15 or similar rust-converter/protector inside the open area to stop future surface rust inside between body panels 5. Spray weldable primer on any bare metal to be joined 6. Apply panel sealer to joints 7. Attach clamps to fit the panel tightly 8. Spot weld lap joints, weld butt joints 9. Clean up welds 10. Spray bare metal with epoxy primer 11. Drink and enjoy your work The steps I seem to be missing are the ones to do with how to seal the metal between where spot welds occur and painting the metal inside so there isn't any future rust problems popping up. The butt weld is less of a concern, but even then it seems there should be some kind of sealant for areas exposed to the elements like a floor. Pictures as examples on what I'm dealing with. I haven't applied any sealants because I want to be sure I'm taking the right steps. Rust removed 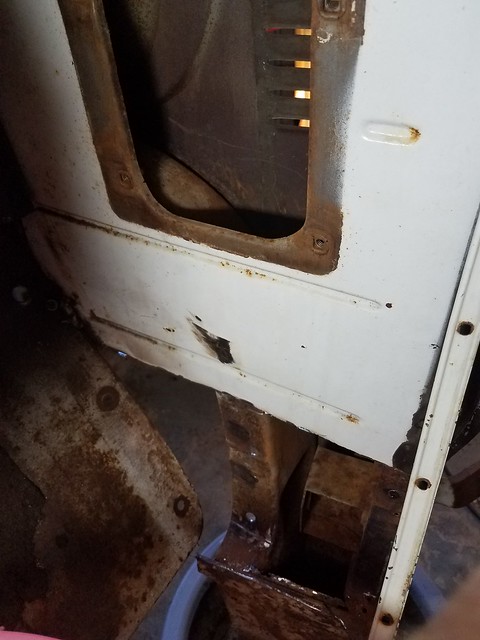 Por-15 painted inside for extra protection 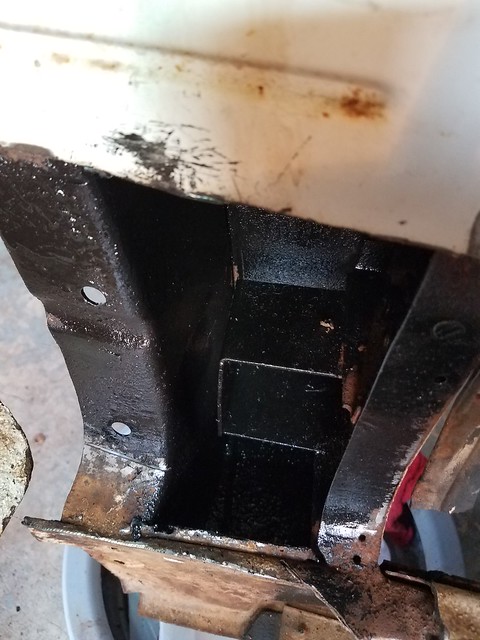 Part fitted but not welded. 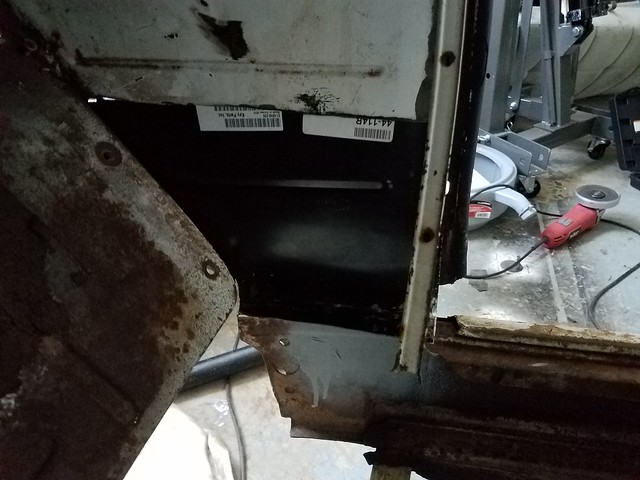
__________________
Current Build Thread 1930 Ford Model A Modern Twist: Ford Model A Rat Rod With a Modern Twist Build Thread Phase 1 "The Swap": 1949 3100 with S10 swap. Beginner build with ambition! Build Thread Phase 2 "The Drop": Beginner Build with Ambition gets Air Ride Last edited by gigamanx; 04-17-2017 at 03:23 PM. |

|

|
|
04-17-2017, 03:09 PM
|
#2 |
|
Registered User
Join Date: Oct 2015
Location: Calgary, Alberta
Posts: 1,252
|
Re: Finishing a body repair
Your steps are about right, except...
Grind, scrape and wire brush all loose rust and debris until you can't get anymore debris to come off by scraping, brushing or grinding. Ignore everything you see or read about any rust convertors or "paint" and only put on 2 part epoxy. All other tinctures will fail and rust will occur. Weld thru primer will help keep rust out from between the mating surfaces you are welding. There is no perfect cure for this area. Once all buttoned up, you can spray a cavity wax into those hard to reach areas. This combined with a 2 part epoxy are as good as you'll get. Good luck. Thanks for posting pictures.
__________________
So when is this "Old enough to know better" supposed to kick in? My 1959 GMC build thread http://67-72chevytrucks.com/vboard/s...d.php?t=686989 |
|
|
|
|
04-17-2017, 03:15 PM
|
#3 |
|
Senior Member
Join Date: Sep 2016
Location: Hershey, PA
Posts: 1,004
|
Re: Finishing a body repair
Grinding was pretty tough in those tight areas and I couldn't fit my hands in to sand. Part of the reason for the paint was after a wire brush, that's about all I could get off. There was a fair bit of junk pulled off the surfaces. I'm hoping the rust converter handles what I couldn't reach better than just leaving it all there.
Is this what I'm looking for and is it applied after welding, or between the seams before welding?   https://www.amazon.com/KBS-Coatings-...=3m+cavity+wax Looks like this may be easier than I thought to apply https://www.youtube.com/watch?v=m2cUlmfW9a8
__________________
Current Build Thread 1930 Ford Model A Modern Twist: Ford Model A Rat Rod With a Modern Twist Build Thread Phase 1 "The Swap": 1949 3100 with S10 swap. Beginner build with ambition! Build Thread Phase 2 "The Drop": Beginner Build with Ambition gets Air Ride Last edited by gigamanx; 04-17-2017 at 03:21 PM. |
|
|
|
|
04-17-2017, 09:49 PM
|
#4 |
|
Registered User
Join Date: Oct 2015
Location: Calgary, Alberta
Posts: 1,252
|
Re: Finishing a body repair
Cavity wax comes when you are all done.
Rust convertor is garbage. You need to do as I described, otherwise you are wasting your time and money. Weld thru primer goes between welded pieces.
__________________
So when is this "Old enough to know better" supposed to kick in? My 1959 GMC build thread http://67-72chevytrucks.com/vboard/s...d.php?t=686989 |
|
|
|
|
04-18-2017, 05:23 AM
|
#5 |
|
Registered User
Join Date: Mar 2012
Location: Lakes Region NH
Posts: 3,152
|
Re: Finishing a body repair
Treating rust really takes a good understanding of what you're fighting. Rust that we're fighting is the result of iron reacting with air in the presence of moisture.
Although people think of rust like a cancer, it really should be thought of as a scab over a wound. Removing all of the rust in an area doesn't heal the metal underneath, but leaves the metal exposed and ready to scab over again. Removing rust to allow welding or to allow a coating to adhere to the base metal makes sense. But if you can remove any moisture from the rust then seal the area and the metal underneath it away from water and air, you will successfully prevent future rust. Rust converter is a good product if used properly. Marketing that says it works miracles is garbage. Rust converter is primarily phosphoric acid which can chemically change rust to a form of iron oxide which is not so porous and is less reactive. The end result is not a sealer in any way, and the conversion process is only a few mils deep so rust converter is not to be used instead of many hours of rust cleanup. It is good for areas where its difficult to get into to assist in cleanup. Most efforts we can make to slow rust involve some method of sealing the metal away from air and water. Epoxy paint is popular because it will harden and cure in a way that can prevent exposure even if it doesn't bond properly. Single stage polyurethane can be effective also. Waxes and oils are generally less effective over long term. No sealer will work if only one side of a piece of steel is protected. Weldable primers apply a coating, primarily zinc, which tends to react with oxygen faster than iron. It is intended to replace factory applied galvanizing when repairing panels. The primer coating will get "used up" over time leaving the iron below exposed. It is made to be used between panels that are spot welded together. It is not made to be welded using an exposed arc as that process burns up the coating. Arc, mig, or tig welding a zinc based weldable primer produces toxic gas. Bad juju. Weldable primer is not a complete solution. It is "better than nothing" and it will work with other products. Galvanizing is the process of electrically applying zinc to steel to provide a sacrificial coating. There are "cold galvanizing" sprays which are used to apply a heavy layer of zinc to steel after a repair. There are also some methods of galvanizing small pieces of steel at home, but it's not really for the hom hobbyist. Like weldable primer, zinc applied in galvanizing is a temporary protection (although it can last for many years) and will eventually get "used up." Also like weldable primer, welding through galvanized steel without removing the zinc creates toxic gas. Unlike iron, the green copper oxides that form in air will create a barrier that prevents additional oxidizing. It is expensive but it can be very effective. Copper can be bonded to steel through electroplating, or it can be included in some coatings as a preventative. Copper was more popular many years ago due to lower cost. OE answers for the areas where steel was butted or overlapped then welded for generally involved treating the area after welding occurred. Often a body would be submerged in liquid then electrically charged to encourage the rust protection to adhere to areas that spraying would be difficult to cover. This is extremely difficult to duplicate for a home hobbyist. These days, many OE pieces are put together with adhesives. Adhesives can act as a sealer, can be applied over some coatings, and do not have the effect of heating, warping, or changing the steel to which they are applied. They are often stronger than the welds they replace. It is sometimes practical to design your repair to use stainless in areas where it is most difficult to treat and to overlap this material with mild steel in places where both sides are easily accessed. Message board knowledge often tells us that steel and stainless can't be welded, but these days there are so many versions of high nickel, lower corrosion steel available that as a blanket statement it is not correct to say they can't be bonded. However, using a mild steel wire or rod with stainless will decrease its ability to resist corrosion. All of these options and answers are also not an answer. Why? Because there is no single best way to prevent rust. Folks in sunny southern CA can get away with a much different strategy than I can here in the humid, acid rain filled northeast. And the methods I have good luck with on a summer only vehicle can be very temporary if used on a car driven through winter snow and salt. And none of it may be effective for someone living in India that has to deal with monsoon rains and humidity that corrodes everything. |
|
|
|
|
04-18-2017, 10:17 AM
|
#6 |
|
Registered User
Join Date: Nov 2010
Location: calgary alberta
Posts: 7,821
|
Re: Finishing a body repair
before cutting out too many panels think about trussing up the body, with the doors on and closed to fit resonable well, then weld in some bracing in a triangulated pattern so the cab can't flex out of shape. then the doors can come off and the panels can be removed/replaced. if there are lots of structure to be replaced sometimes the doors don't fit great after because the structure of the cab flexed when it was stripped down, or it was tweaked at some point in it's life, and then you fight with the doors after the fact for alignment and fitment. better to brace, tack in the new panels, test fit the door, then weld after the door has been fit. don't ask me how i know this.....
there are a couple of different kinds of weld thru primer. some is zinc based and works but spatters way more, some is copper based and costs way more but welds better. I would recomend a sandblast of the rusty areas, if possible, followed by epoxy primer. sandblasted by someone who has blasted autobody before. remember that sandblasting can cause the panels to warp if done wrong.it will also reveal thin areas you may not know about till after. not a bad thing because at least then you know what you have right away, not after a year when the rust comes through the thin spots. the epoxy can be sanded off to expose clean metal before welding in the areas you will be repairing. weld thru primercan be used before welding on the newly exposed metal, then weld and after finished the weld thru can be buffed off the externally showing spots and a new coat of epoxy sprayed on. epoxy sticks way better than weld thru and seals the metal better. weld thru will eventually have rust appear. spray epoxy liberally over the weld areas, seal with a bead of autobody seam sealer, topcoat and hope for the best. |
|
|
|
|
04-18-2017, 10:22 AM
|
#7 |
|
Registered User
Join Date: Nov 2010
Location: calgary alberta
Posts: 7,821
|
Re: Finishing a body repair
don't forget to clean both sides of the metal to be welded. contaminants can be drawn up from the back side into the weld so the weld becomes harder to do due to contaminants and may be porous when done as well. that is another bonus of sandblasting. it takes everything down to bare metal. if you have a good enouigh compressor you could get a small blaster and clan the weld areas yourself, just be carefull not to warp the metal.
|
|
|
|
|
04-18-2017, 10:49 AM
|
#8 |
|
Senior Member
Join Date: Jun 2002
Location: Murray, Kentucky
Posts: 3,361
|
Re: Finishing a body repair
NAPA has a sale on the 3M cavity wax for $16.99 a can so it would be a good time to get some. See page 5 upper left hand corner. I bought some for my rocker panels and windshield frame.
Good luck, Rg https://www.napaecatalog.com/special...217flx&origin=
__________________
Roger '68 Short step - https://67-72chevytrucks.com/vboard/...d.php?t=849675 '69 ('70?) 2wd Blazer '70 GMC Jimmy 2wd |
|
|
|
|
04-19-2017, 07:47 AM
|
#9 |
|
Senior Member
Join Date: Sep 2016
Location: Hershey, PA
Posts: 1,004
|
Re: Finishing a body repair
Thanks for the link raggedjim. I'll order some today. I'm having trouble finding an epoxy primer in a spray can. Is there such a thing? For the small area I have to fix, I don't want to have to get a spray gun, compressor, mix paint, etc. Unless of course that is the only option.
DSRAVEN, I thought about body warping and bracing it, but the area is fairly small and the firewall is in tact along with the running boards and horizontal floor supports. I'm hoping those are enough to keep things from moving on me. It looks as though my original list has too many steps... 1. Cut out rusted through metal 2. Grind, scrape and wire brush all loose rust and debris until you can't get anymore debris to come off. 3. Shape the replacement area 4. Fit the new panel and cut it to the size, shape it needs 5. Spray weldable primer on any bare metal to be welded 6. Attach clamps to fit the panel tightly 7. Spot weld lap joints, weld butt joints 8. Clean up welds 9. Finish the job with epoxy primer 10. Drink and enjoy your work
__________________
Current Build Thread 1930 Ford Model A Modern Twist: Ford Model A Rat Rod With a Modern Twist Build Thread Phase 1 "The Swap": 1949 3100 with S10 swap. Beginner build with ambition! Build Thread Phase 2 "The Drop": Beginner Build with Ambition gets Air Ride |
|
|
|
|
04-19-2017, 08:20 AM
|
#10 |
|
Registered User
Join Date: Oct 2015
Location: Calgary, Alberta
Posts: 1,252
|
Re: Finishing a body repair
Looks like you are on the right track!
 Here is a 2 part epoxy in an aerosol. You can look around your market and should find some. http://www.spraymax.de/index.php?id=351&L=1
__________________
So when is this "Old enough to know better" supposed to kick in? My 1959 GMC build thread http://67-72chevytrucks.com/vboard/s...d.php?t=686989 |
|
|
|
|
04-19-2017, 09:26 AM
|
#11 | |
|
Senior Member
Join Date: Sep 2016
Location: Hershey, PA
Posts: 1,004
|
Re: Finishing a body repair
Quote:

__________________
Current Build Thread 1930 Ford Model A Modern Twist: Ford Model A Rat Rod With a Modern Twist Build Thread Phase 1 "The Swap": 1949 3100 with S10 swap. Beginner build with ambition! Build Thread Phase 2 "The Drop": Beginner Build with Ambition gets Air Ride |
|
|
|
|
|
04-19-2017, 09:39 AM
|
#12 |
|
Registered User
Join Date: Nov 2010
Location: calgary alberta
Posts: 7,821
|
Re: Finishing a body repair
I would suggest that, if you have a compressor and the will power, get ahold of a touch up gun or spray gun and mix your own. the pot life of the mixed product is because it is a 2 part epoxy. like mixing fiberglass or body filler or an epoxy glue. it is a chemical reaction that is somehow slowed down so they can keep it for 4 days. this stuff is usually hard in hours. the mix it yourself routine would possibly be a better end product to apply your filler or paint over. not saying the spray can isn't any good, just saying the home mix is probably better plus you can mix small quantities as required.
I know some will say you need a bunch more stuff to spray at home, filters, water seperators, pressure regulators, masks, etc etc. but if you are rebuilding a truck then it is good to have anyway. you can use it for the other primers as well and it will give you a better rebuild in the end. |
|
|
|
|
04-19-2017, 10:14 AM
|
#13 |
|
Registered User
Join Date: Nov 2010
Location: calgary alberta
Posts: 7,821
|
Re: Finishing a body repair
no matter what you use for spraying, can or you mix, get a good respirator, not just a dust/particulate mask. this stuff is deadly.
|
|
|
|
|
04-20-2017, 12:43 PM
|
#14 |
|
Senior Member
Join Date: Sep 2016
Location: Hershey, PA
Posts: 1,004
|
Re: Finishing a body repair
I am quickly coming to a conclusion that I'll need to buy a compressor for lots of little things like blowing the dust off after sanding something. No idea what size or CFM I would need for air tools and spraying. Lowes doesn't have a good selection and I'm afraid of going "too cheap" on something that really will last a long time in the home garage.
For the small job I have, I think I'll skip the epoxy primer for a simple undercoat of paint between the panels. The whole cab will be blasted at some point in the future and that's when it'll make sense to outfit the paint booth
__________________
Current Build Thread 1930 Ford Model A Modern Twist: Ford Model A Rat Rod With a Modern Twist Build Thread Phase 1 "The Swap": 1949 3100 with S10 swap. Beginner build with ambition! Build Thread Phase 2 "The Drop": Beginner Build with Ambition gets Air Ride |
|
|
|
|
04-20-2017, 02:12 PM
|
#15 |
|
Registered User
Join Date: Nov 2010
Location: calgary alberta
Posts: 7,821
|
Re: Finishing a body repair
there is a tool store in western Canada, KMS TOOLS, that has an online guide to compressors. maybe a good read.
https://www.kmstools.com/assets/cate...uyingGuide.pdf you need to know what tools you may be running and then figure out the cfm (cubic feet per minute) that each one will gobble up while using it and the duty cycle that the compressor will need to keep up that rate. duty cycle is how often the compressor is made to run. some are continuous and some are less. something like an air nailer would need way less air than say a body sander because the nailer just uses a small amount at a time while the sander uses a lot all the time. then factor in the voltage you have available to run it with and the shop space you have available for it to sit in. once you have a compressor you will wonder why you didn't get one earlier. my compressor is a fairly large one and I have never regretted getting it. no more waiting for the compressor to build before I finish something. |
|
|
|
|
05-17-2017, 09:51 AM
|
#16 |
|
Senior Member
Join Date: Sep 2016
Location: Hershey, PA
Posts: 1,004
|
Re: Finishing a body repair
Since I hate unfinished posts when I'm researching, this is to close this one out. I followed the steps and suggestions outlined in the thread. Pretty happy with the outcome, but I did learn a few things:
1. You guys weren't kidding about cleaning the metal. Wherever I had issues with a weld sticking it was because there was a little dirt or rust still left behind. Another tip from my dad was to clean the metal somewhere on the body for the welding clamp. I tried just sticking it to a dirty part and there wasn't enough conductivity to get a clean weld. 2. Weld Thru primer is good for lap joins, but its not the best conductor for welding. I had more luck with bare metal and only used the weld thru where I had to. 3. Don't weld an inside corner haha. It's very hard to grind it flat and clean afterward. This is what I should have done...  4. After its all buttoned up, use a body sealer to fill any left over gaps. I also used body sealer around the edge of inside the cab. It will be covered by carpet eventually, but really seals things nicely to keep water and crap out of the cab. 5. A hammer and dolly are fantastic tools for stress relief and making things fit 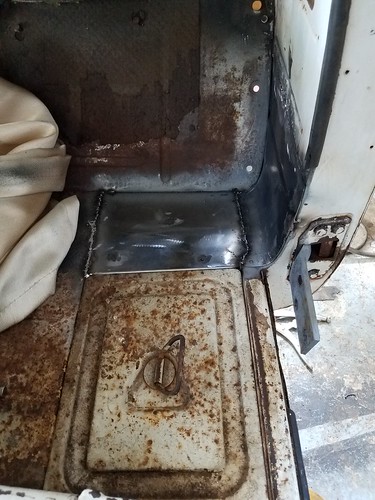 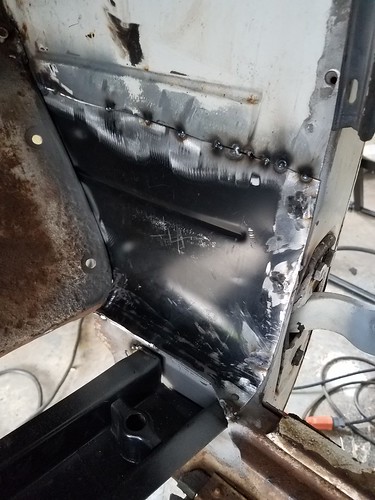
__________________
Current Build Thread 1930 Ford Model A Modern Twist: Ford Model A Rat Rod With a Modern Twist Build Thread Phase 1 "The Swap": 1949 3100 with S10 swap. Beginner build with ambition! Build Thread Phase 2 "The Drop": Beginner Build with Ambition gets Air Ride |
|
|
|
|
05-17-2017, 11:11 AM
|
#17 |
|
Senior Member
Join Date: Jun 2002
Location: Murray, Kentucky
Posts: 3,361
|
Re: Finishing a body repair
Nice work, Rg
__________________
Roger '68 Short step - https://67-72chevytrucks.com/vboard/...d.php?t=849675 '69 ('70?) 2wd Blazer '70 GMC Jimmy 2wd |
|
|
|
|
| Bookmarks |
| Thread Tools | |
| Display Modes | |
|
|


 Hybrid Mode
