
|
Register or Log In To remove these advertisements. |
|
|
|
|||||||
 |
|
|
Thread Tools | Display Modes |
 01-20-2014, 09:15 PM
|
#26 |
|
Registered User
Join Date: Sep 2012
Location: Arizona
Posts: 222
|
Re: My 4/6" ECE lowering install thread - 72 Shorty
That truck is gorgeous the way it sits now…it will only look better closer to the ground.
My best advice is to lower it and then never sign in to this forum again haha…it'll make you want to tinker with perfection. Awesome truck man!
__________________
You remember when drinking too many beers was a bad idea? Me neither. |

|

|
|
01-21-2014, 12:50 AM
|
#27 | |
|
Registered User
Join Date: Aug 2013
Location: Calgary, Alberta
Posts: 674
|
Re: My 4/6" ECE lowering install thread - 72 Shorty
Quote:
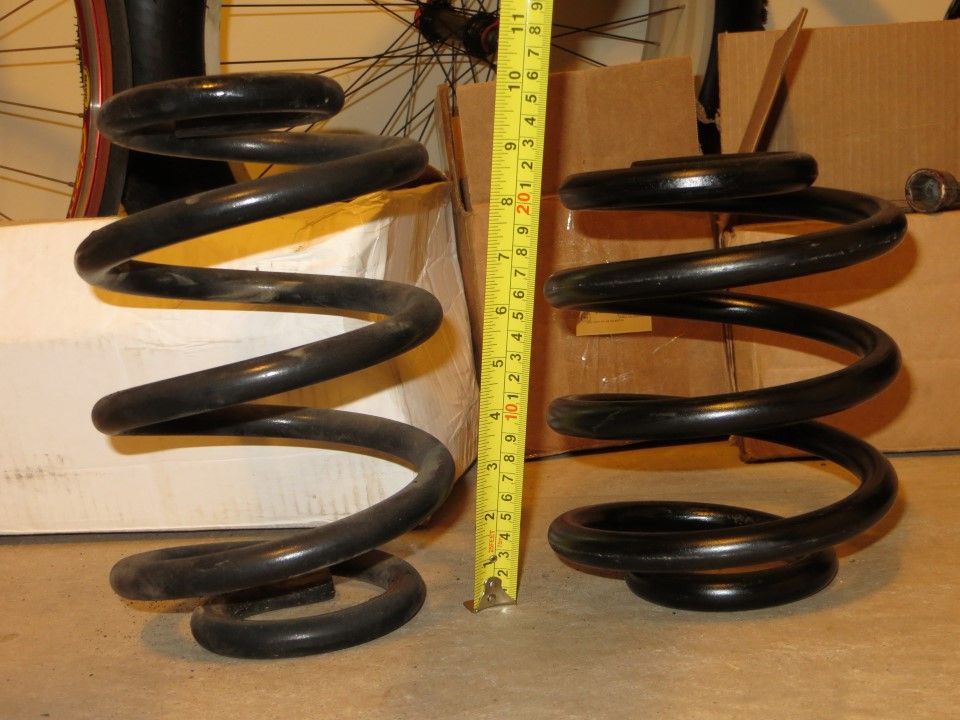 Got some more progress made tonight, after picking up a grinder for the passenger side upper shock mount. It was easier and I got a few sparks in my hair  . Both upper shock mounts are both now off but one of the rivets is stuck in the hole even after some pounding at it. I'll take the grinder back to it tomorrow evening. . Both upper shock mounts are both now off but one of the rivets is stuck in the hole even after some pounding at it. I'll take the grinder back to it tomorrow evening.Wedge cut out of the remaining upper shock mount to allow access for the grinder wheel to the rivet. 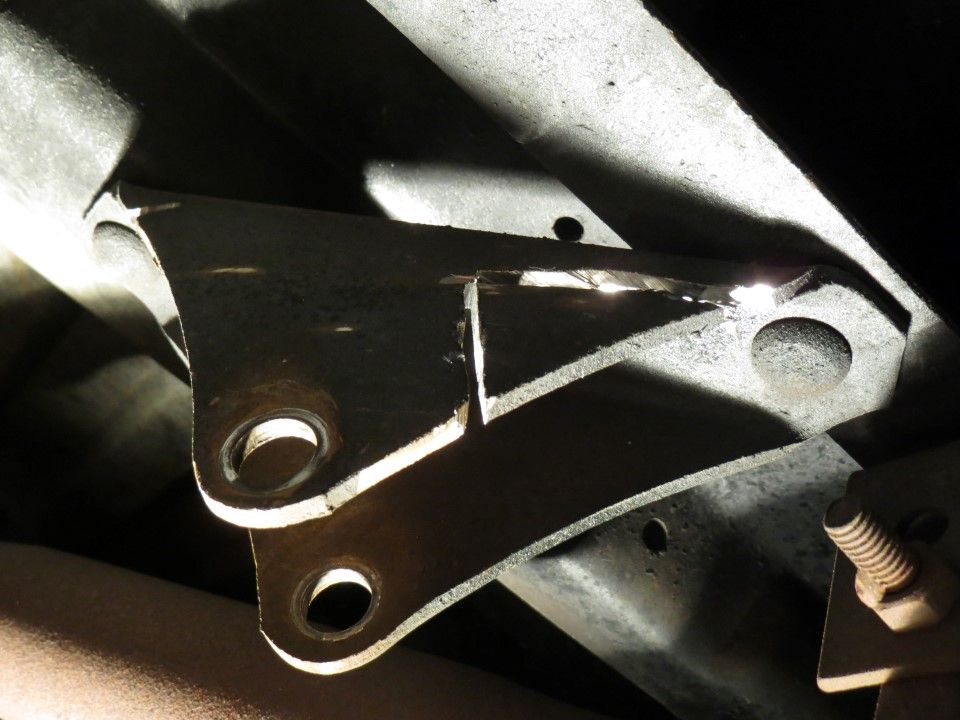 After grinding. It's actually the left rivet in the photo that is stuck in the hole after removing the bracket. Not for long though.  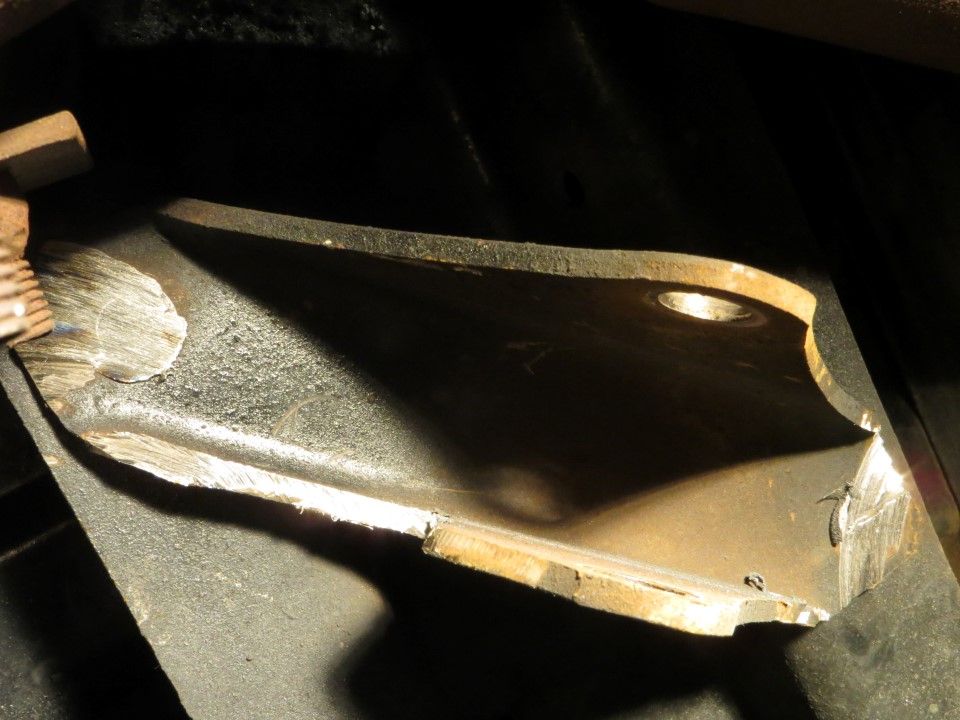 One of two upper shock mounts installed. 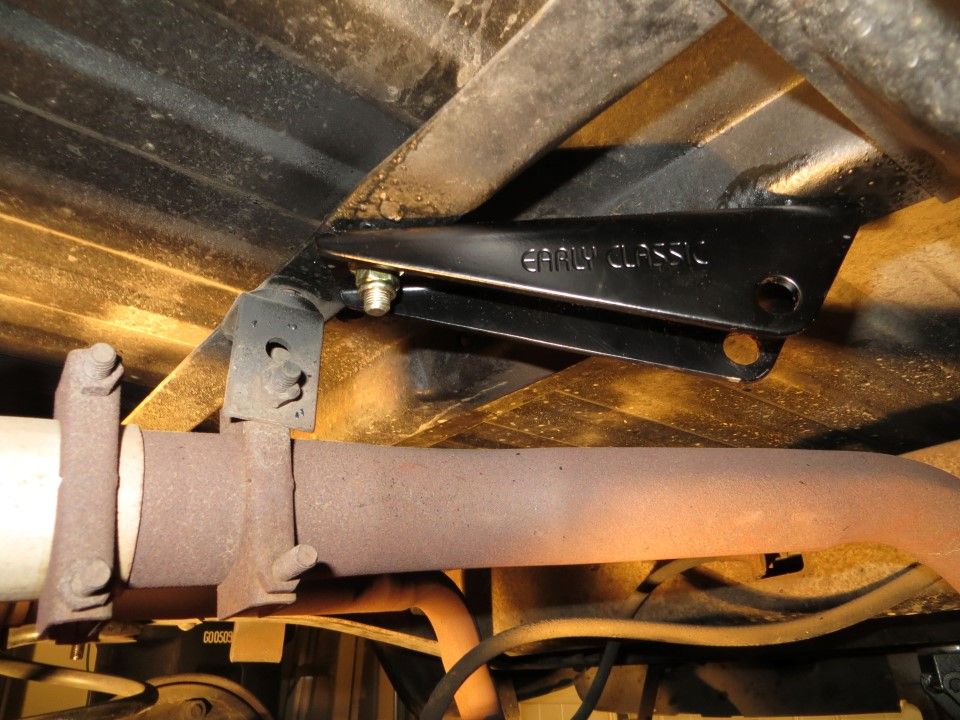 After removing one of the rear springs, I realized ECE didn't provide the torque specs for installing the new springs. I'll get in touch with them. U bolt and lower shock mount removed on the driver side. Thanks for the tip on using the bolt loosening spray in advance. It seems to be helping. 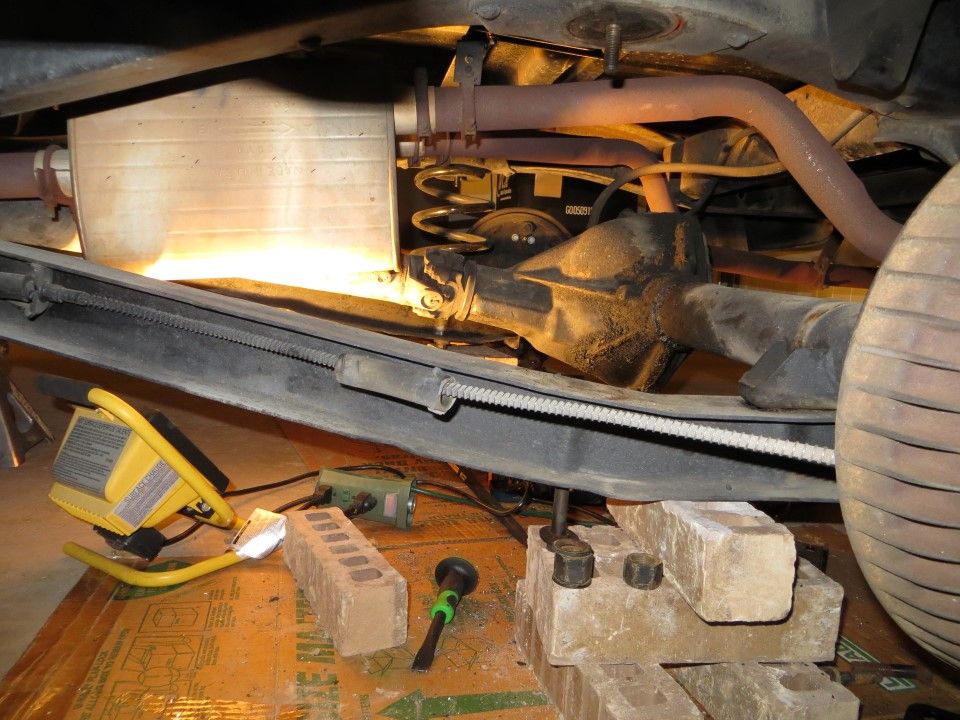 Removed the rear panhard bar too in preparation for the ECE super track bar. 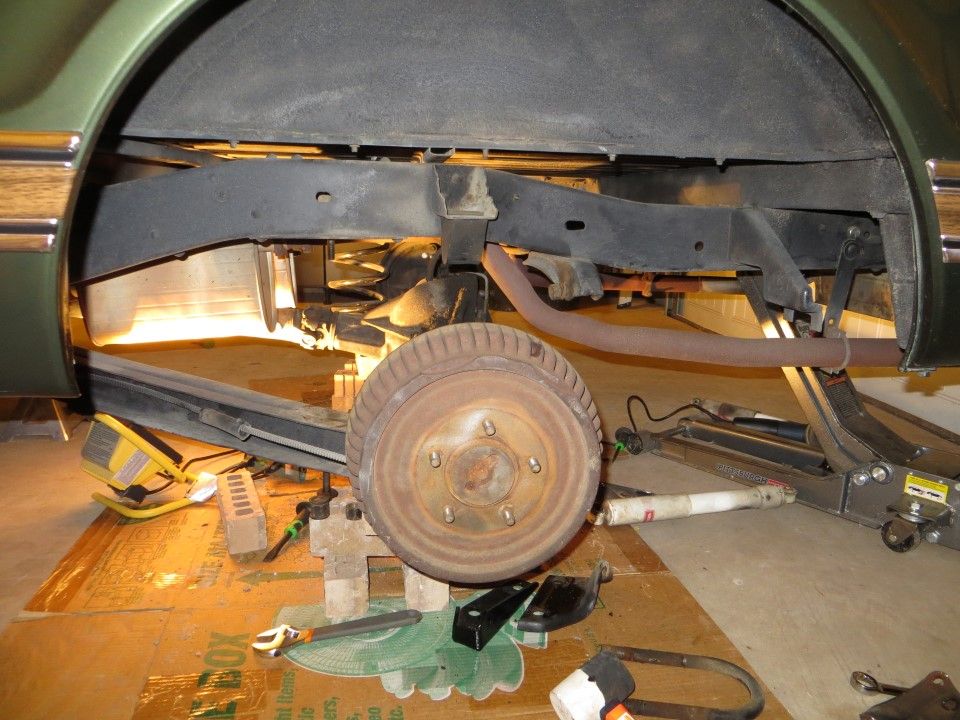 Pan/track bars shown (old short, new long) with new bracket to go on passenger side. 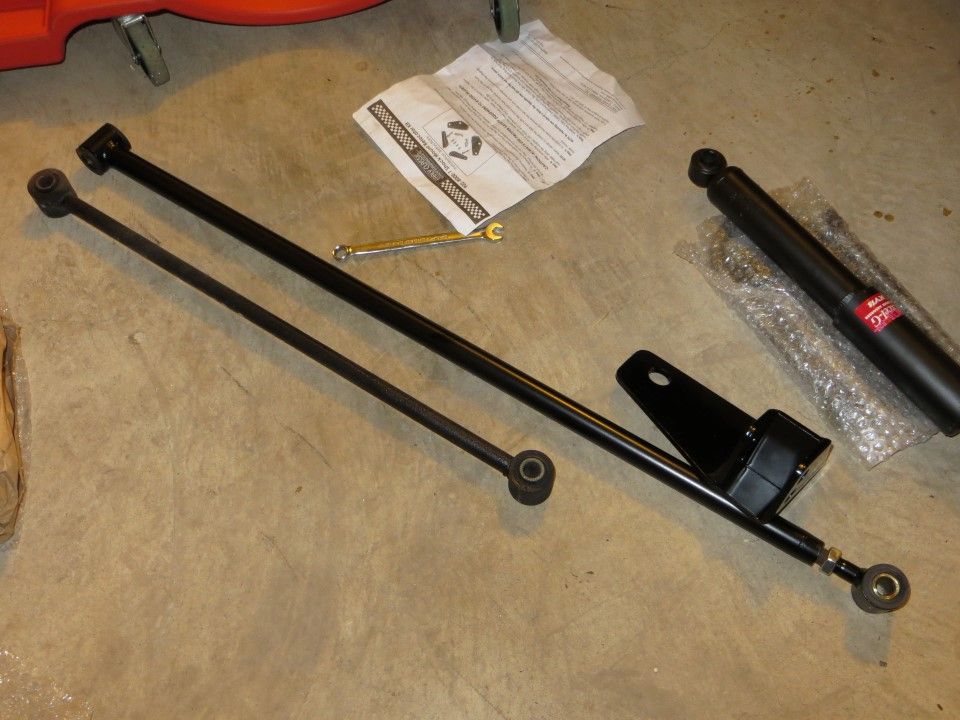 2 tools I need to get: Deep 1-1/16 socket for the rear ubolt nuts. A second 3/4" wrench for the top rear spring bolt head in the frame rail. I got it done without these tools, but they'll make the same on the passenger side easier. Things should move pretty well now that the upper shock mounts are 99% done. 
Last edited by Ekliptix; 01-21-2014 at 12:59 AM. |
|
|
|
|
|
01-21-2014, 02:20 AM
|
#28 |
|
Registered User
Join Date: Jan 2010
Location: Hollidaysburg, PA
Posts: 785
|
Re: My 4/6" ECE lowering install thread - 72 Shorty
Hey thanks for measurement...
__________________
_________________________________ 62 Impala 70 C-10 LWB 71 K-10 SWB 85 C-10 LWB==SOLD 01 2500 HD Members Met......2003Silverado (Dave) |
|
|
|
|
01-21-2014, 02:46 AM
|
#29 |
|
Post Whore
 Join Date: Aug 2013
Location: anamosa iowa
Posts: 46,243
|
Re: My 4/6" ECE lowering install thread - 72 Shorty
Lay some plastic or throw away cardboard under the ft end and soak the nuts and bolts, let them be while you continue to work the rear kit.
__________________
Westcoast got's da most of them. |
|
|
|
|
01-21-2014, 09:26 AM
|
#30 |
|
///Relaxed Atmosphere
Join Date: May 2010
Location: Houston,Tx
Posts: 1,266
|
Re: My 4/6" ECE lowering install thread - 72 Shorty
i have 1/2" blocks for the rear you are welcome to have just come pick them up, i had them on mine replaced them with 1".
__________________
71-Cheyenne Super (E.C.E Static Drop 4.5/7". Intro Rally's 20X8.5 5" B.S 255/35/20 (F) 20X10 5.25 B.S 275/35/20 (R) 87-Silverado Static Drop 5/7" Raceline Explosion 5 22X8.5 (F) 22X10 (R) hector _________________________________ 1971 Chevrolet Cheyenne Super 1987 Chevrolet Silverado 2006 Ford Mustang GT 2012 Toyota 4-Runner 2014 Dodge Ram 1500 Sport Crew Cab |
|
|
|
|
01-21-2014, 09:37 AM
|
#31 | |
|
2WD Jimmy
Join Date: Mar 2005
Location: Davis County, Utah
Posts: 2,563
|
Re: My 4/6" ECE lowering install thread - 72 Shorty
Quote:
 I bet Ekliptix would agree I bet Ekliptix would agree
|
|
|
|
|
|
01-25-2014, 05:07 PM
|
#32 |
|
Registered User
Join Date: Jul 2012
Location: Jonestown, TX
Posts: 469
|
Re: My 4/6" ECE lowering install thread - 72 Shorty
How's the truck coming along? I'm anxious to see the new drop

|
|
|
|
|
01-26-2014, 01:54 PM
|
#33 |
|
Registered User
Join Date: Aug 2013
Location: Calgary, Alberta
Posts: 674
|
Re: My 4/6" ECE lowering install thread - 72 Shorty
I'm getting an hour in here and there. Just about done the rear but I ran into a problem. The instructions don't explain how to use the 2 different stock bolts (which one is for the upper and for the lower mount).
This fellow highlighted the problem but no solution was posted: http://67-72chevytrucks.com/vboard/s...d.php?t=596711 Anyone know how to address the question in the thread at the link above? I found these instructions for a previous gen C10 but if I do the same as in the photo at the following link, the shock is upside down and there are not enough threads for the nut. http://www.customclassictrucks.com/t.../photo_23.html Hector, thanks for offering the lowering blocks. I'll see if I need them once I get this on the ground. Also, anyone know the torque spec on the rear spring nuts? Not in ECE instructions. |
|
|
|
|
01-26-2014, 02:01 PM
|
#34 |
|
67-72 parts collector,
Join Date: Nov 2002
Location: Mid-MO
Posts: 22,682
|
Re: My 4/6" ECE lowering install thread - 72 Shorty
Got pics of the shock bolts?
__________________
Keith Convert to disc brakes. http://67-72chevytrucks.com/vboard/s...d.php?t=444823 |
|
|
|
|
01-26-2014, 02:06 PM
|
#35 |
|
Registered User
Join Date: Aug 2013
Location: Calgary, Alberta
Posts: 674
|
Re: My 4/6" ECE lowering install thread - 72 Shorty
One is normal. The other is like in the first link in my last reply.
|
|
|
|
|
01-26-2014, 05:32 PM
|
#36 |
|
Registered User
Join Date: Aug 2013
Location: Calgary, Alberta
Posts: 674
|
Re: My 4/6" ECE lowering install thread - 72 Shorty
Update: My issue was that I had the front and rear shocks mixed up. They have different size bolt holes, the front and back shocks. I'll post the 'done right' photos later.
|
|
|
|
|
01-27-2014, 04:39 PM
|
#37 |
|
Registered User
Join Date: Apr 2013
Location: Clover,SC
Posts: 142
|
Re: My 4/6" ECE lowering install thread - 72 Shorty
I did the 4/6 also but still went with the 2 inch aluminum block
|
|
|
|
|
01-27-2014, 05:36 PM
|
#38 |
|
Junior Member
Join Date: Mar 2007
Location: Hideaway, TX
Posts: 4,948
|
Re: My 4/6" ECE lowering install thread - 72 Shorty
I would replace those bricks with something else. They could give way any time.
__________________
71 Suburban 350/700R4 Project Trixie 72 CHEVY,Highlander,SWB,396,T400 |
|
|
|
|
01-27-2014, 05:37 PM
|
#39 |
|
Senior Member
 Join Date: Jan 2011
Location: Chattanooga TN
Posts: 6,205
|
Re: My 4/6" ECE lowering install thread - 72 Shorty
Subscribed - awesome truck man!
__________________
Chad 1967 C10 SWB - Project Savannah - 6.0/4L80 *Currently underway* 1968 C10 SWB - TOTY 2018, 50th Anniversary Tribute Project * Sold * Pride and Joy 1986 Silverado Short Fleet - Scarlet *Sold* 1985 Silverado Short Fleet *Sold* 2022 Jeep Gladiator Mojave 2001 Jeep Cherokee XJ 4x4 - Lifted, Built 1992 Jeep Cherokee XJ 4x4 - Lifted 2013 Honda Accord EX-L v6 Coupe 6spd (wife's ride) |
|
|
|
|
01-28-2014, 04:40 PM
|
#40 |
|
Senior Member
Join Date: Nov 2001
Location: Rapid City, SD
Posts: 2,281
|
Re: My 4/6" ECE lowering install thread - 72 Shorty
subscribed
__________________
My Trucks: 1967 Chevrolet Short Wide Box 327 TH350 9" w/3.90 gears paint will be White - Current Project 1967 Chevrolet Custom LWB 283 TH400 3.73 Posi, no-AC, no-PS, no-PB, bench-seat, small-window - mostly orig driver 1967 Chevrolet CST LWB originally a 327 TH400 3.73 Posi AC PS PB, had Buddy Buckets, Small Window - parts truck 1967 Chevrolet CST LWB, 283 MT 3.73 had Buddy Buckets, Panoramic Window - parts truck 2001 Chevrolet 3500 2WD Crew Cab Dually 8.1L Allison White 2002 Chevrolet 1500HD 4x4 Crew Cab 6.0L 4L80E Red |
|
|
|
|
01-28-2014, 05:01 PM
|
#41 | |
|
Registered User
Join Date: Aug 2013
Location: Calgary, Alberta
Posts: 674
|
Re: My 4/6" ECE lowering install thread - 72 Shorty
Quote:
|
|
|
|
|
|
01-28-2014, 05:07 PM
|
#42 | |
|
Junior Member
Join Date: Mar 2007
Location: Hideaway, TX
Posts: 4,948
|
Re: My 4/6" ECE lowering install thread - 72 Shorty
Quote:
__________________
71 Suburban 350/700R4 Project Trixie 72 CHEVY,Highlander,SWB,396,T400 |
|
|
|
|
|
01-30-2014, 01:54 AM
|
#43 |
|
Registered User
Join Date: Jun 2010
Location: Bemidji, MN
Posts: 65
|
Re: My 4/6" ECE lowering install thread - 72 Shorty
An air chisel is also handy prying some of that rusty stuff off. When I lowered mine I had to cut, torch, or grind just about everything in the back. Thank you MN salt. The front end went a lot easier. I found that after grinding the rivets I still had problems. Either the air chisel or I pounded on the remaining rivet with a punch before it popped out.
__________________
2007 Chevy 2500HD all stock 1985 Chevy Blazer- sold 1971 Chevy c10- The Mistress  2014 Ford Interceptor SUV |
|
|
|
|
01-31-2014, 10:25 PM
|
#44 |
|
Registered User
Join Date: Aug 2013
Location: Calgary, Alberta
Posts: 674
|
Re: My 4/6" ECE lowering install thread - 72 Shorty
Ok, so the rear is done except for centering the diff using the adjustable panhard bar after I get the front done.
After jmking9 posted photos of his truck with this kit I asked if he used the stock kit since the stance looked so good. http://67-72chevytrucks.com/vboard/s...d.php?t=613874 He told me he replaced the front 1.5" drop springs with 2" drop springs ECE makes, I contacted ECE and they agreed to swap the ones in my kit (1.5" drop) for 2" if I paid the shipping. Good enough. So, it'll be about 10 days or so until I get the 2" front springs in the mail. Here are some notes about the rest of the rear install. Rear passenger side done. Will adjust the panhard bar (threaded bar) to center the suspension under the truck. It looks like I'll have to remove the adjustable end of the panhard bar from it's current mount point, adjust it then bolt the end back in. Fyi, the lower position hole it's in is for 6" drops. The upper one is for 5" drops, according to the instructions. The round headed bolt in this photo connecting the stock to the lower mount was a pain to hold in place while I torqued the other side. With a crescent wrench I happened to have opened wide open, I was just able to hold the rounded bolt head in place. 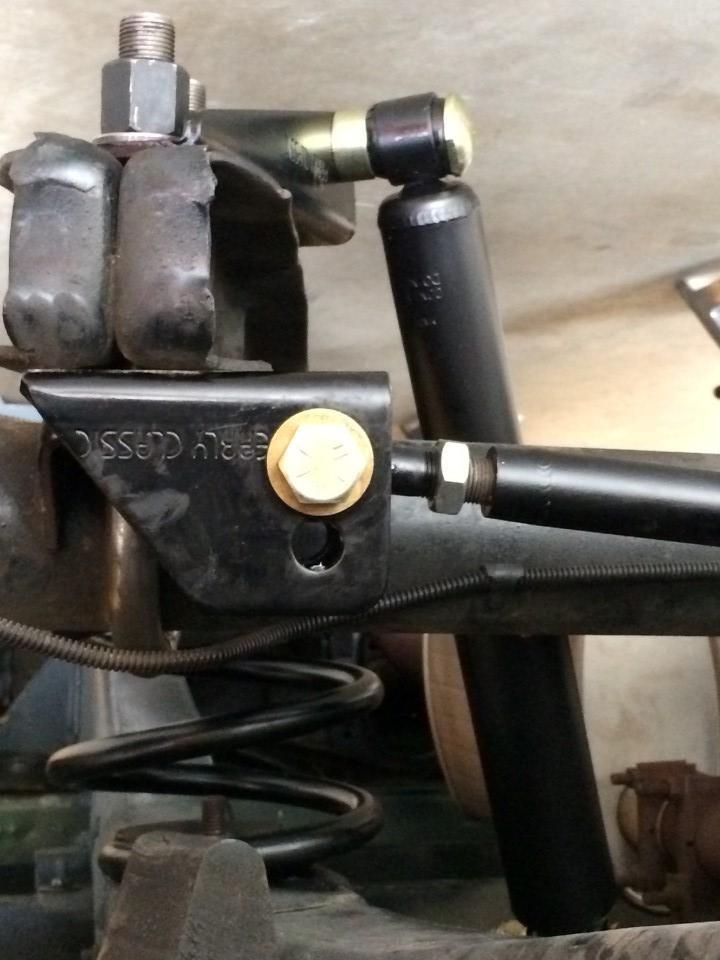 I'm a little concerned about the angle on the rear lower shocks with the bracket. I'll see how it looks once I make sure the suspension is centered then contact ECE after if it still looks this skewed. 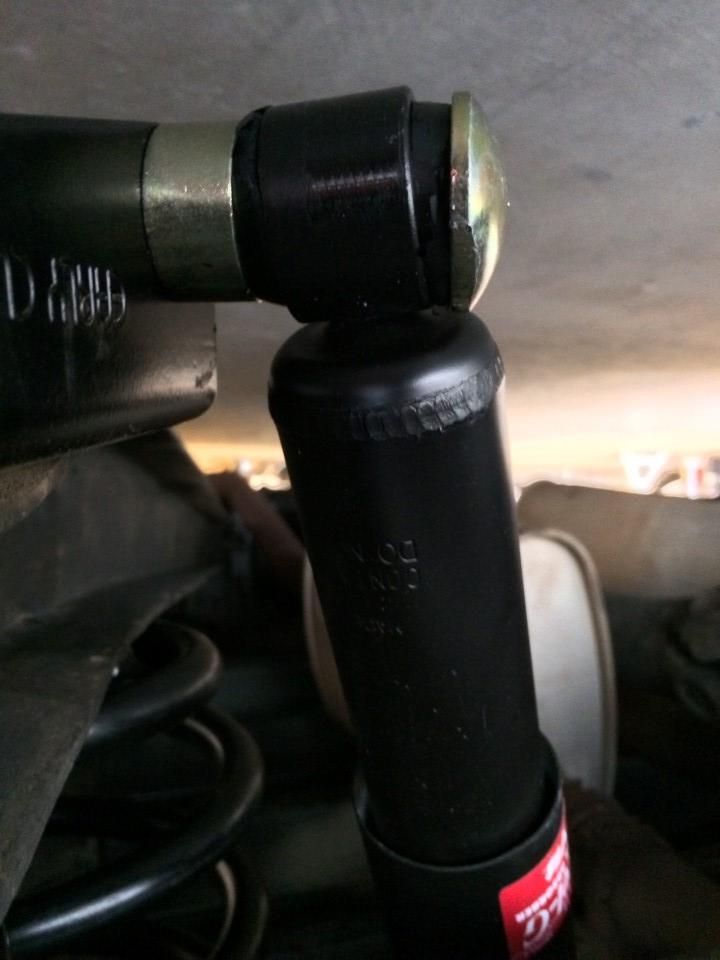 One comment is that the lower bolts could be a little longer. I believe I torqued this up a little more after the photo, but still...Also there were no details in the instructions on where to place the metal spacer in the photo, inside or outside the shock. It would have been helpful, but I searched and found some photos on google. 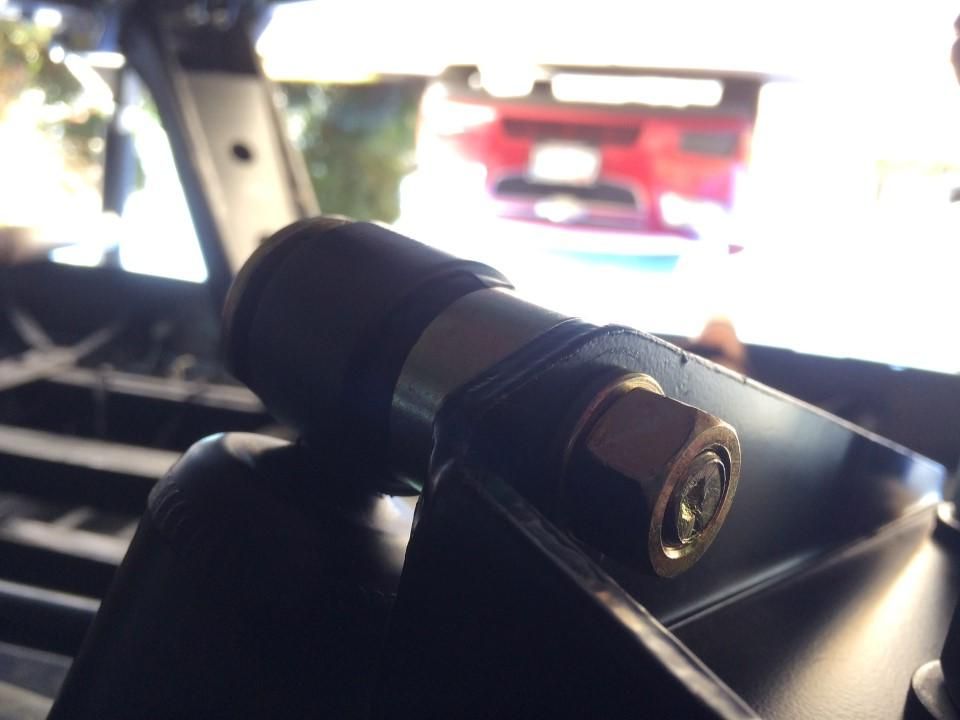 The original mounting point for the stock panhard bar is just to the passenger side of the rear diff. After you remove the original panhard bar, you're left with a thick bolt sticking out towards the rear of the truck that interferes with installing the aftermarker panhard bar. Looking at how this bolt went through the diff frame, I didn't want to try to unthread it as I was worried it was supporting the diff housing somehow so I just sawed it off. Since then, I contacted ECE and they say I can remove it without issue (need to hammer it out). I would have appreciated this info in the instructions but I forgive them a little for agreeing to exchange the front coils for lower ones. 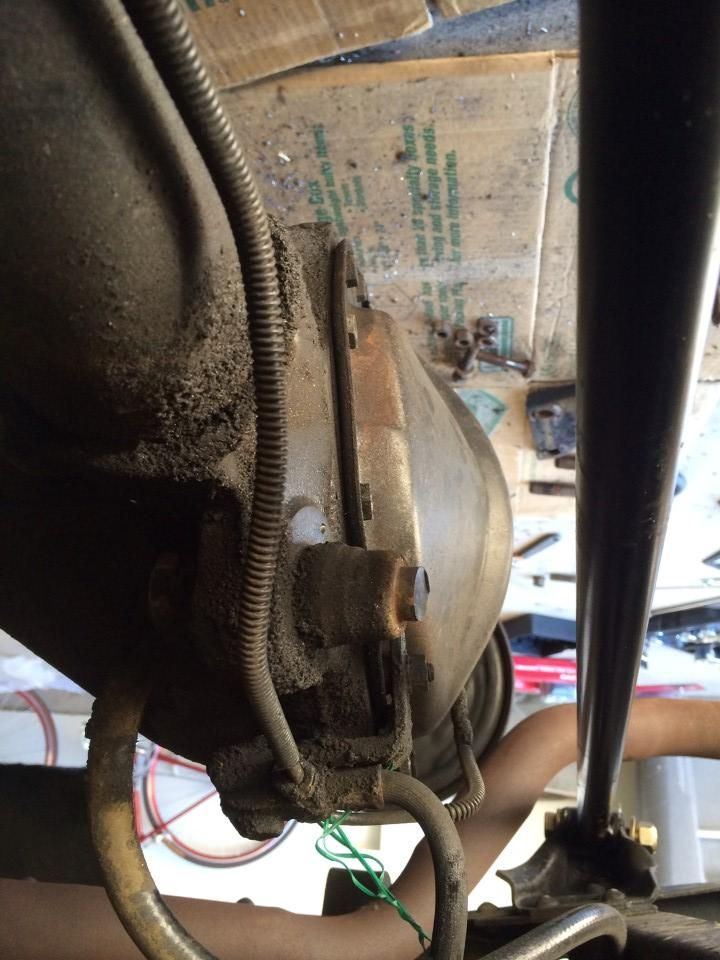 Driver side. 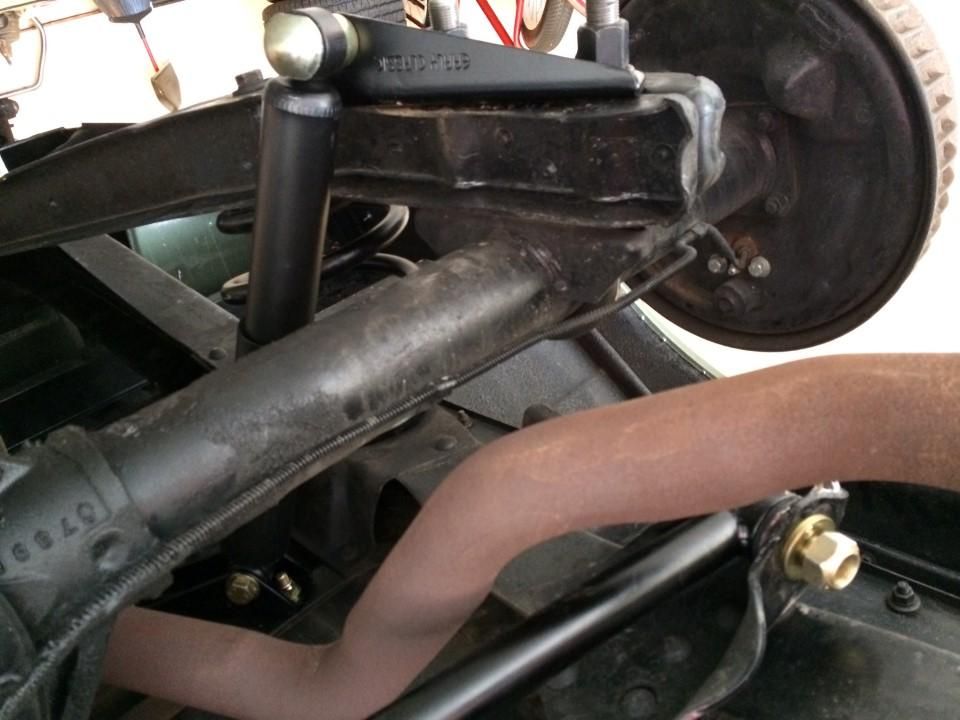 Full view 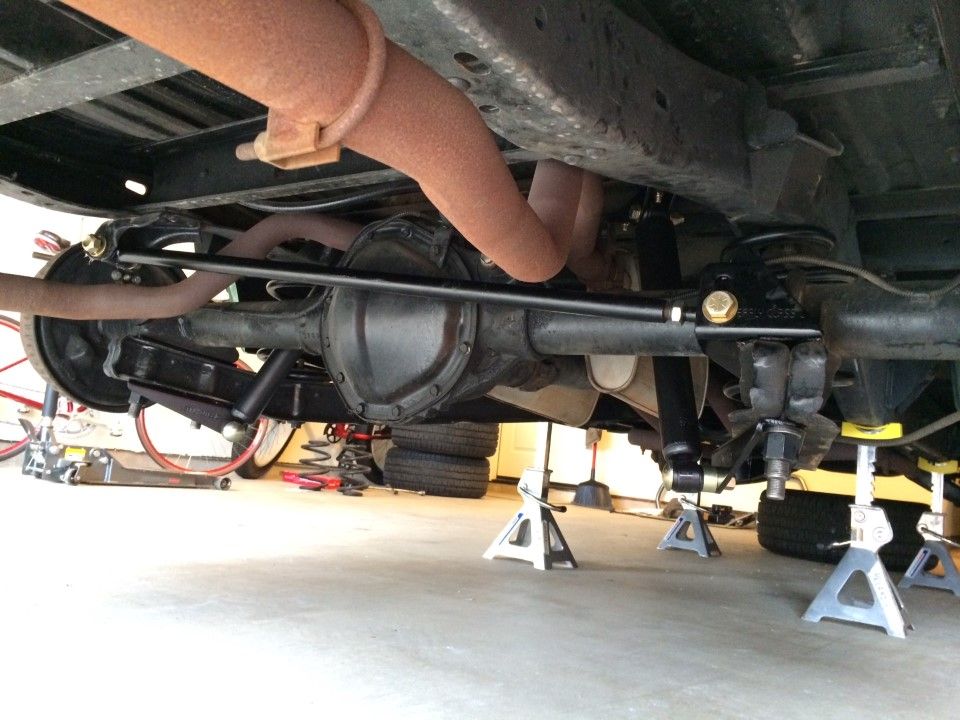 Passenger side bolted up. Another gripe about the mediocre instructions is ECE didn't say how much to torque the rear coils to the frame. Contacting them, it's 70ft-lbs if you're wondering. You can see the small black spacer included to go under the axel cup. This is included to match the new passenger side panhard bracket that adds the same space. Free extra 1/8" lowering! 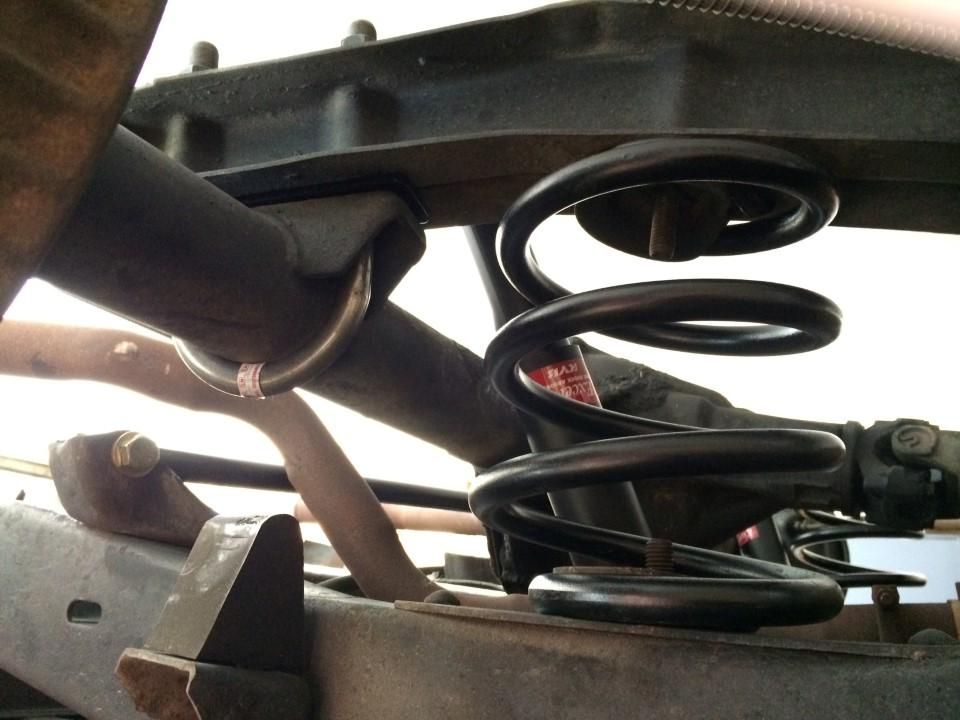 New rear panhard bar installed but awaiting tightening until front is done. Grease included in kit. There's a slight angle on this bar so if you install the non adjustable head of the bar the wrong way, the other end on the passenger side won't line up with the mount on the passenger side. The instructions mentioned this. I installed it wrong on the first go then flipped it. Btw, it may take some pounding with a rubber sledge to get the panhard head into the driver side bracket. 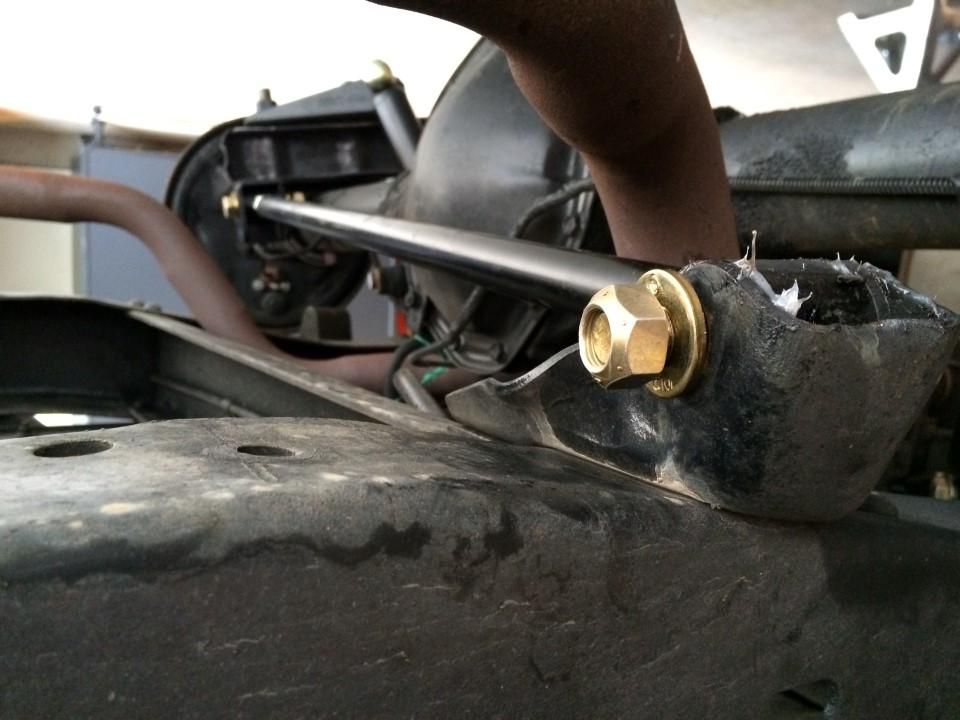 Back on the ground, I checked out how much space there was from the bump stops and axel. Driver side. 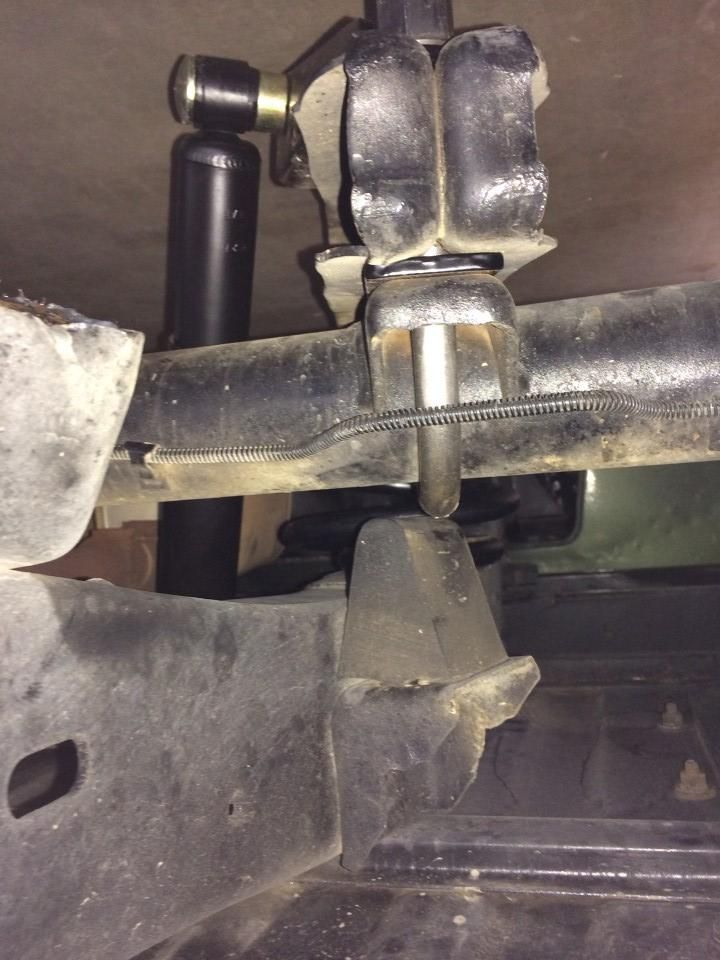 Passenger side (more space). 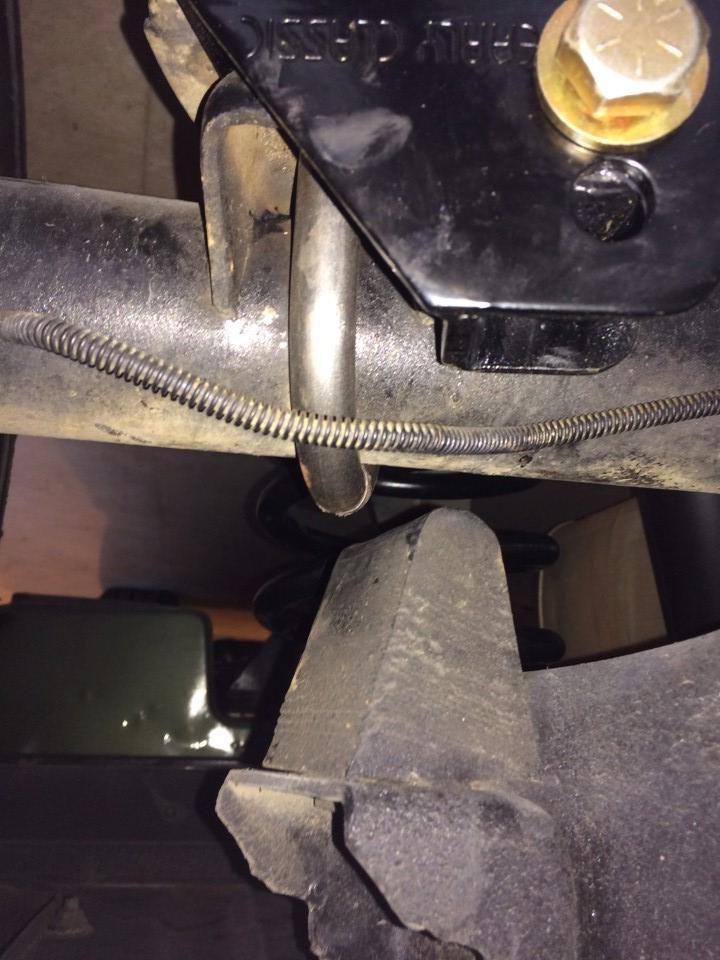 Truck photos (just rear is done so far). 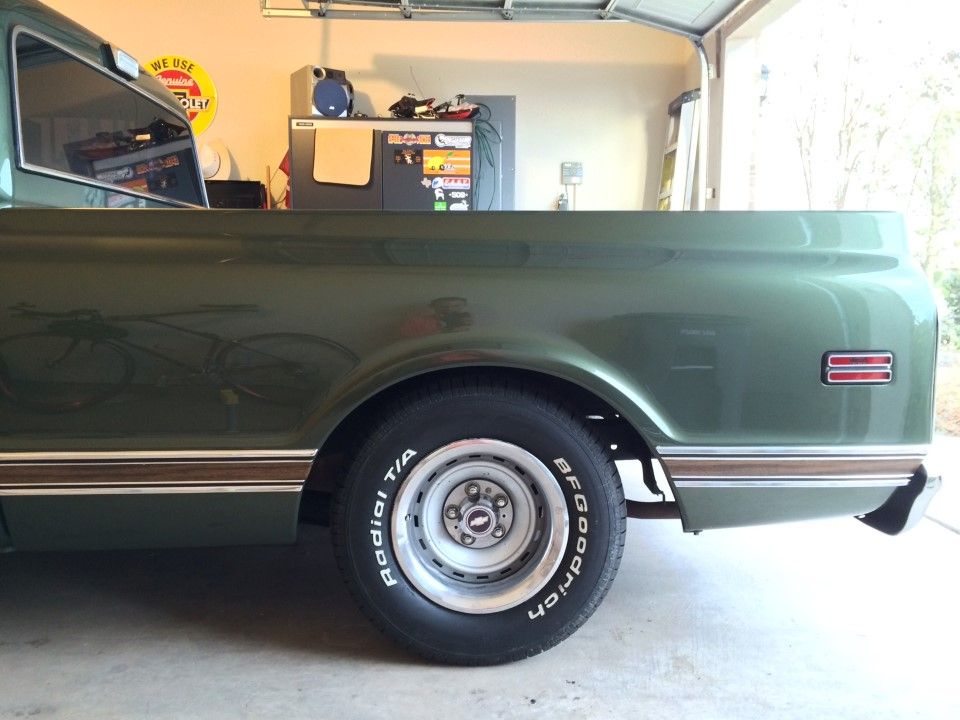 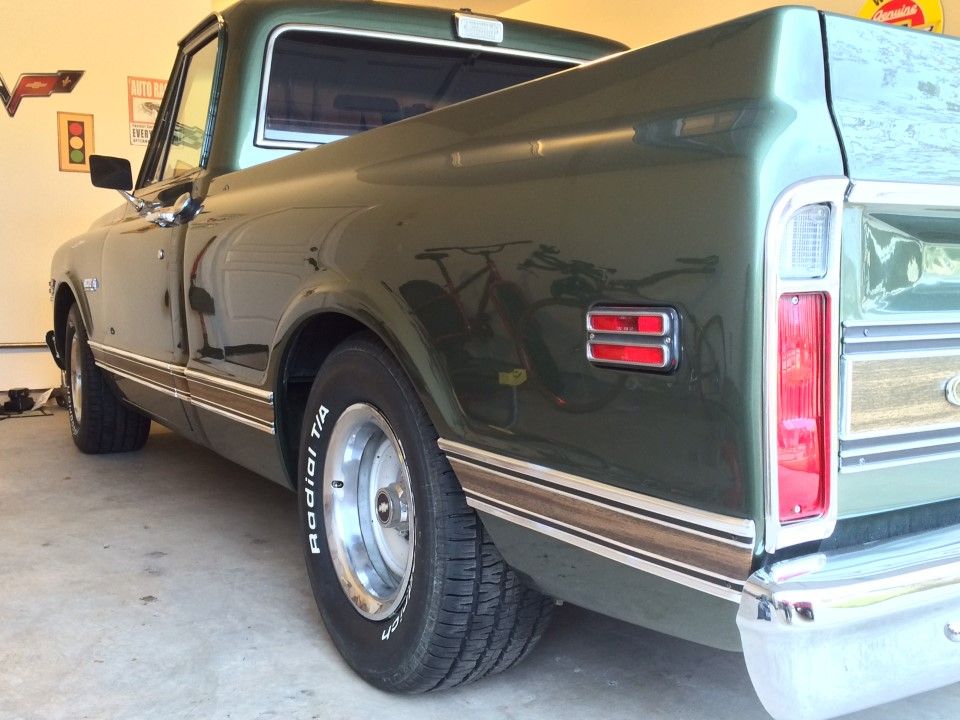 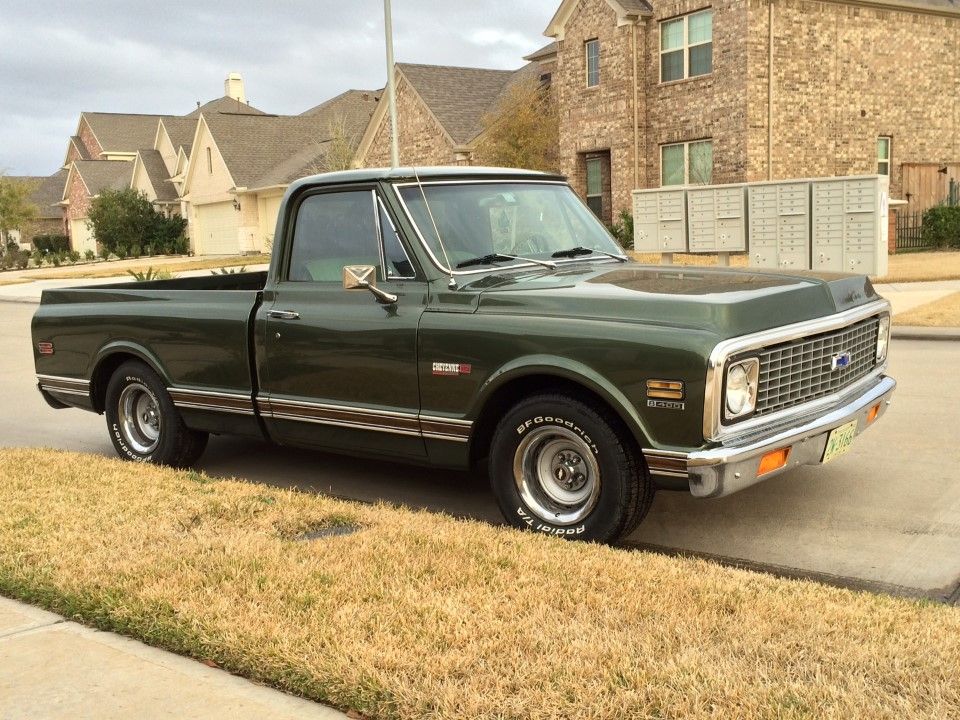 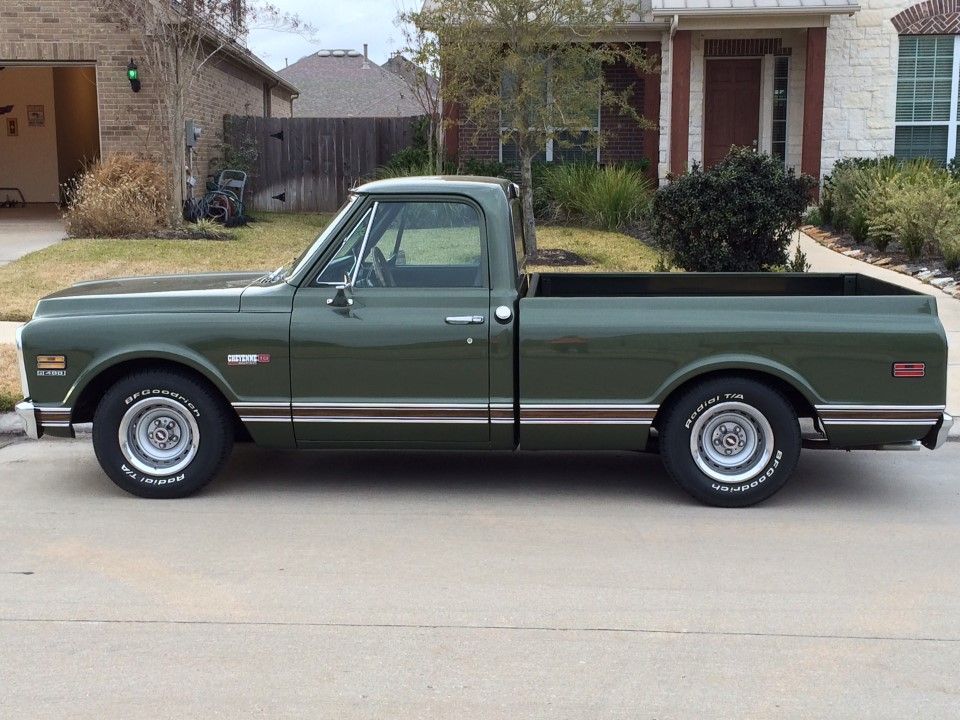 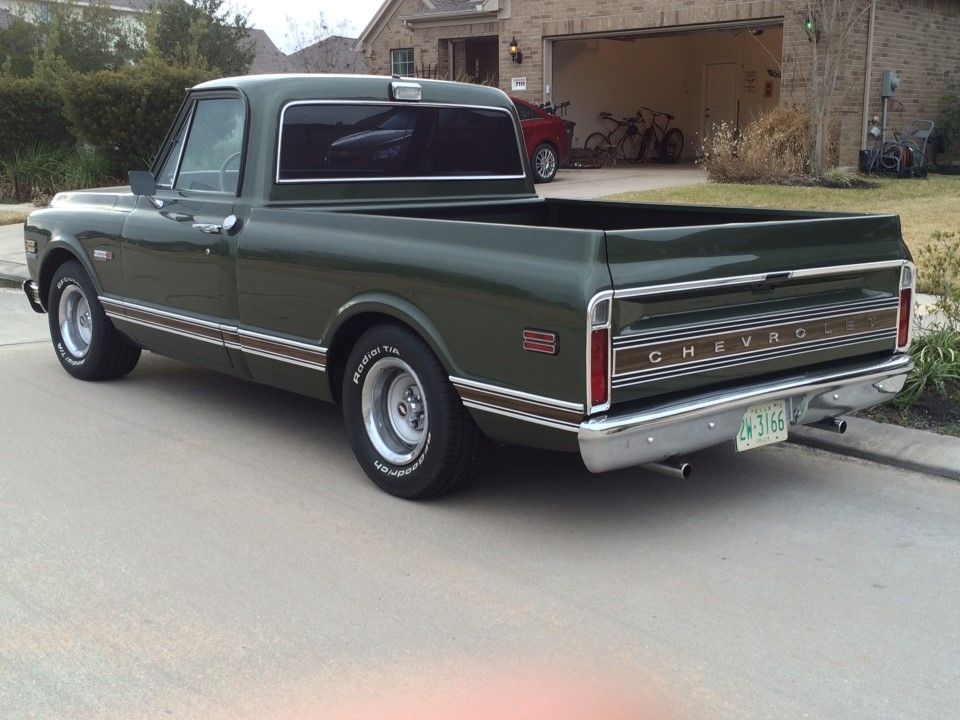 It has a ways to go before it's the lowest ride in the house. 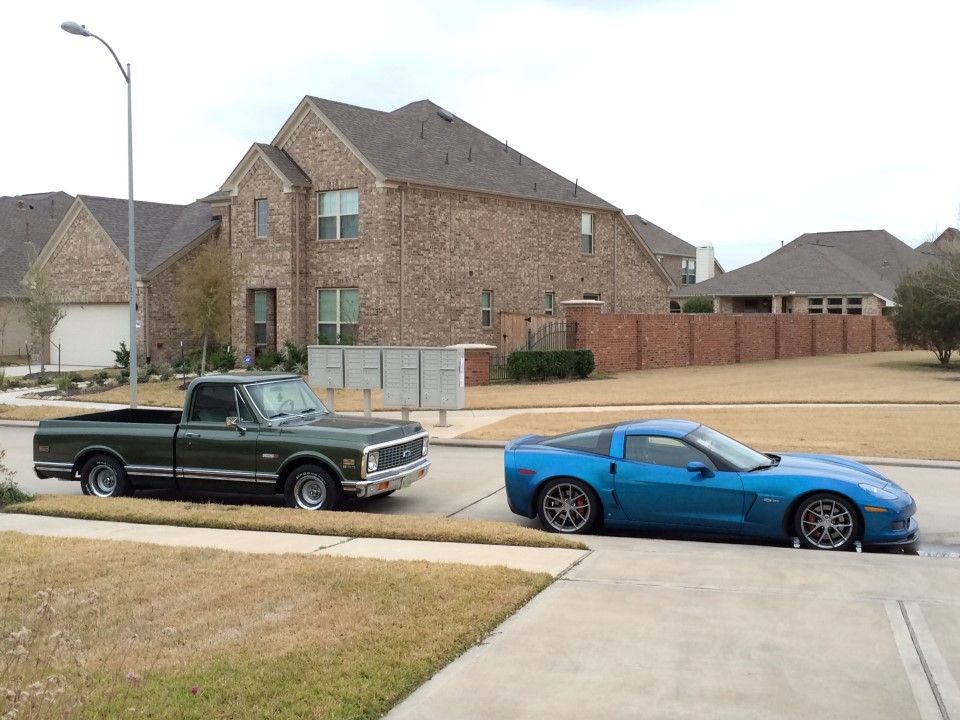 So, is it low enough in the rear? I'll comment after I see it with the font lowered. If the stance is like jmking9's, I'll be happy. For measurements, the rear is 2-3/4" lower then before. Oddly, the rear passenger side is still slightly higher (3/8") then the driver side, just like before the install. Tire pressure, old truck-syndrome, ? I'll have more to report when I get my 2" front springs back from ECE in ~10 days. Last edited by Ekliptix; 01-31-2014 at 10:31 PM. |
|
|
|
|
01-31-2014, 10:29 PM
|
#45 |
|
Registered User
Join Date: Oct 2012
Location: Arlington Washington
Posts: 1,808
|
Re: My 4/6" ECE lowering install thread - 72 Shorty
Looks to me you will have a bit of a rake with a front 2" drop spring. A small drop block will even it out if you have any issues
|
|
|
|
|
01-31-2014, 10:38 PM
|
#46 |
|
Registered User
Join Date: Aug 2013
Location: Calgary, Alberta
Posts: 674
|
Re: My 4/6" ECE lowering install thread - 72 Shorty
I'm not opposed to a small rake. jmking9, with this kit, mentioned he installed a c notch because the axle was hitting the frame but he also said he has crappy roads. I have not hear of others with this issue from what I read. The rear spacer is a good option though.
|
|
|
|
|
01-31-2014, 11:09 PM
|
#47 | |
|
RAT1968 '68 Cab/'71 Parts
Join Date: Feb 2002
Location: Coarsegold, CA
Posts: 2,375
|
Re: My 4/6" ECE lowering install thread - 72 Shorty
Quote:
But I thought I'd chime in here with pre-paint (with stats) and post-paint stance shots of RAT since she uses the ECE kit with 2.5" drop spindles and 2" drop springs in front, and 6" drop coils in the back. FWIW, I have about 1-3/8" before the stock sized bump-stops hit the axle. Even though I'm not hitting...haven't yet, anyway, I inquired of the boyz at ECE re: the wisdom of a c-notch install. They know me and my driving/truck-use habits and said no need. If I *did hit*, next step would be to trim the stops down. They weren't saying a c-notch was a bad idea...Just that they didn't think *I* needed one. The second shot is rough-grained photography, but it's the only clear shot of the stance I have on a truly level surface. Other than the exact same suspension kit (I forgot whether or not you're using their front anti-sway bar), we're probably still "apples and oranges", here. You are running 15" wheels, right? Mine are 20's. Might be the same overall diameter with tires, but likely not.
__________________
M17 Coarsegold, CA RAT's shiny now. But always a rat. |
|
|
|
|
|
01-31-2014, 11:19 PM
|
#48 |
|
RAT1968 '68 Cab/'71 Parts
Join Date: Feb 2002
Location: Coarsegold, CA
Posts: 2,375
|
Re: My 4/6" ECE lowering install thread - 72 Shorty
Here's another semi-close comparison.
__________________
M17 Coarsegold, CA RAT's shiny now. But always a rat. |
|
|
|
|
02-01-2014, 12:05 AM
|
#49 |
|
Registered User
Join Date: Sep 2006
Location: Riverton KS
Posts: 832
|
Re: My 4/6" ECE lowering install thread - 72 Shorty
I just went out and measured mine. I'm sitting right at 28" in the rear. So if you started out at 31" and went down 2.75", your at 28.25". So, once yours settles, it should be the same. BTW mine sits about .25" lower on the passenger side, so go figure. As far as the notch goes, I'd drive it a bit and see what you think. Its going to look great.
__________________
1970 SWB Build |
|
|
|
|
02-01-2014, 08:56 AM
|
#50 |
|
Registered User
Join Date: Oct 2012
Location: Green Valley Arizona
Posts: 1,351
|
Re: My 4/6" ECE lowering install thread - 72 Shorty
Once you put in the 2" lower springs I think it will look perfect.
 BWT...nice pair of Chevy's 
__________________
1970 C10 Short Stepper with 71/72 front clip. |
|
|
|
|
| Bookmarks |
| Thread Tools | |
| Display Modes | |
|
|


 Linear Mode

