
|
 04-24-2018, 11:08 AM
|
#51 |
|
Senior Member
 Join Date: Sep 2017
Location: Bryan, Texas
Posts: 2,265
|
Re: Wife's 48
Big, you are right!
I just need a lot more experience. Luckily (or unluckily) I have two of these trucks to work on, so I'm going to get "some" experience. I don't think I've built up enough heat in the corner to cause any deformity, although I have one more rear corner to do, so knock on wood. Then I start on doors, fenders, bed sides, etc. That is when I'm worried about fit and deformity. So I'm stressing a little right now. I keep putting off anything that scares me until I can't stand it and then I do it. Like the dash. Getting the old one out of the cab without damaging the cab was very stressful. It's now out without damaging the cab, now welding the "better" one back in will be a new test of what I've learned. It's a good thing I'm enjoying the learning, because it's coming at me like a freight train. |

|

|
|
04-24-2018, 11:54 AM
|
#52 |
|
Registered User
Join Date: May 2014
Location: ID
Posts: 663
|
Re: Wife's 48
Excellent, keep at it!
If you already know this, sorry, maybe someone else will find it useful. Quit looking at it from the point of view "building up heat". Go back to my 4 simple rules. Heat = shrink, hammer on dolly = stretch, hammer off dolly = shrink. Pick your method. If you break it down to these simple rules, it is easier to manage sheet metal. Heat Affected Zone (HAZ), the end result (when cooled) is shrinkage. It is going to happen, and you're gonna have to fix it. Those are areas that need to be stretched when you're done welding. If you're gonna weld, heat happens. Sometimes you can plan to cut/weld to place the HAZ near a structural feature. Guess what? It still shrinks. The adjacent structural piece holds it in place so you can't see the shrinkage, and you may not have to fix it. That's why making a weld seam across the center of a door or fender turns into ocean waves. There is no structure to hold it in place. When I "build up heat", I get a blowout. Otherwise, weld on... The other problem to "building up heat" is when you are welding and the surrounding metal is hot, it is expanded. If you weld in that "built up heat" condition, you can inadvertently lock in the "expanded" area causing lots of heart ache. That is the reason for skipping around to keep from "building up heat". So you are welding on metal that is NOT currently heated and expanded. draven's technique works great, and this is the "why". If you learn to torch or TIG weld, you can actually see the expansion of the metal as you weld. Anyway, ponder on this and move on. Finish welding up those seams. "All Metal" is not the be-all end-all to filling. Remember science class? Two dissimilar metals makes a battery. Steel and "all metal" can create galvanic corrosion, causing future failure. Your best solution is keep chasing pinholes with the welder until they are all gone. Lightly blast welded areas, and paint with epoxy primer. Then use a high quality filler over epoxy. The repair will be waterproof. |
|
|
|
|
04-24-2018, 12:35 PM
|
#53 |
|
Senior Member
Join Date: Sep 2017
Location: Bryan, Texas
Posts: 2,265
|
Re: Wife's 48
BIG, that was a very thought out response. Thank you!
It makes sense when you put it that way. I've read MPC's posts on Garage Journal on how to weld sheet metal, but doing is different than reading. Now I'm trying to do it and this really helps. |
|
|
|
|
04-24-2018, 01:21 PM
|
#54 |
|
Registered User
Join Date: May 2014
Location: ID
Posts: 663
|
Re: Wife's 48
Robert is the master! Keep following his stuff. I'm nowhere near as good as that guy! I can screw up metal (that should be the 5th rule) just like anyone else. Persistence 'til I get it right.
|
|
|
|
|
04-24-2018, 01:46 PM
|
#55 |
|
Registered User
Join Date: Nov 2010
Location: calgary alberta
Posts: 7,823
|
Re: Wife's 48
waaaay better explanation. its what mt brain was sayin. somehow it got mixed up before the keyboard got it.
like said, best to epoxy before the bondo. bondo is porous so it can hold moisture and cause corrosion or simply fall off when it de-bonds itself. epoxy seals the surface after metal working, then bondo, then epoxy, then high build primer. thats how I do it anyway. never used all metal except in the corners of the roof to A pillar where the old solder filler was used. got rid of the solder, sanded as much off as I could after melting it away, then all metal because I wasn't positive the regular filler would be there in 10 yrs if any lead was left under it. |
|
|
|
|
04-26-2018, 10:25 AM
|
#56 |
|
Registered User
Join Date: May 2014
Location: ID
Posts: 663
|
Re: Wife's 48
One thing I left out about "building up heat". The goal is to keep the HAZ as small as possible. Building up heat = larger HAZ. Smaller HAZ = less area to planish.
And rule #5. It's only metal. If you screw it up, revert back to rules 1-4. |
|
|
|
|
04-26-2018, 10:32 AM
|
#57 | |
|
Registered User
Join Date: May 2014
Location: ID
Posts: 663
|
Re: Wife's 48
Quote:
http://www.evercoat.com/product-deta...art/100870/us/ I haven't tried it. It's a polyester filler. They say it is stronger, and more crack resistant. Expensive though, I bought a quart to give it a try. Just make sure to weld shut any pinholes. Epoxy, then filler. |
|
|
|
|
|
04-26-2018, 01:37 PM
|
#58 |
|
Senior Member
Join Date: Sep 2017
Location: Bryan, Texas
Posts: 2,265
|
Re: Wife's 48
BIG, thanks for that. I hope others see it. I agree. I replaced less than the patch panel would cover, just in case I messed up I could cut it back out, get another panel and start over.
So I got a kick out of the "it's only metal" line. My 85 year old dad has said that so many times I can't count them. He wouldn't teach me to weld, but I got (had) to do the grinding and fitting, so I got to hear it over and over. I'll try the filler you talked about, and epoxy then filler. Got it. Thanks. |
|
|
|
|
05-12-2018, 09:24 AM
|
#59 |
|
Senior Member
Join Date: Sep 2017
Location: Bryan, Texas
Posts: 2,265
|
Re: Wife's 48
I checked the 3 corners for misses and got them welded up yesterday.
I had some blow outs on the "old" sheet metal. It seems that at the edge it would occasionally blow out. When it did, if I put a weld dot just off the edge, when I went back to the edge it seemed to hold. Is this the way you would do it? I will post pics later this weekend, right now I need to get back on the 4th corner. |
|
|
|
|
05-12-2018, 01:36 PM
|
#60 |
|
Senior Member
Join Date: Sep 2017
Location: Bryan, Texas
Posts: 2,265
|
Re: Wife's 48
Thanks to some helpful criticism and some even more helpful "how to", all 4 corners are welded up solid.
The first picture is of the first corner I did. There were some "holes" in my weld. So I touched it up. 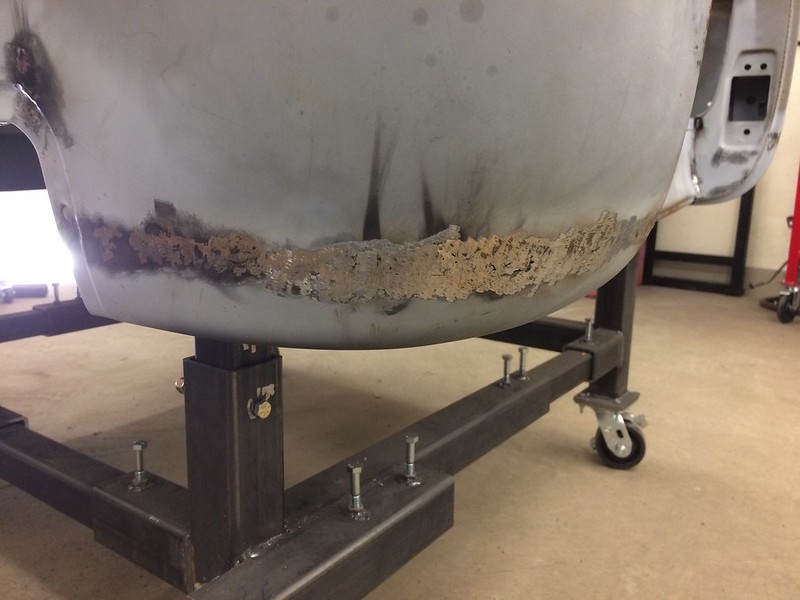 IMG_1923 by Robert Moorman, on Flickr IMG_1923 by Robert Moorman, on FlickrI know there looks to be a pinhole, but that is the first pass under the second pass. I have not worked it with the flap disc yet. Then on to the 4th corner. 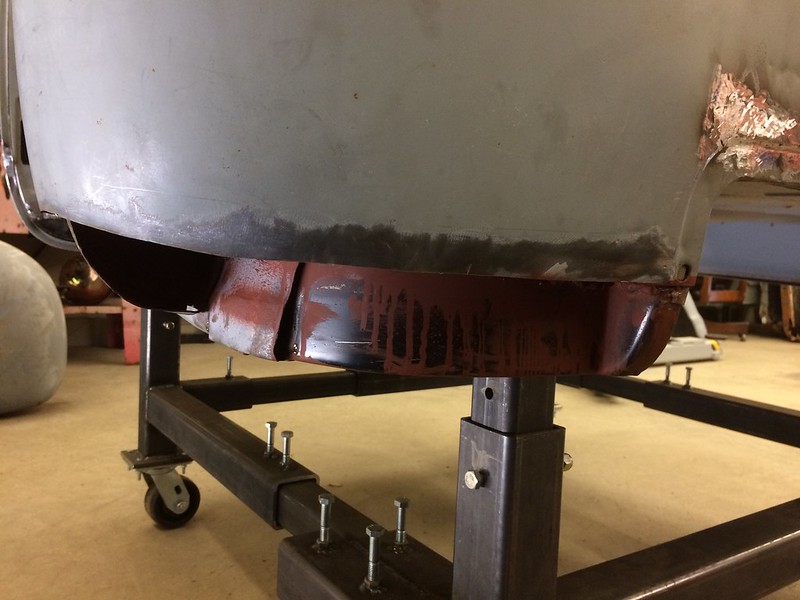 IMG_1925 by Robert Moorman, on Flickr IMG_1925 by Robert Moorman, on FlickrThe inner support, with the primer runs on it was still primed except where the welds are. The primer was up inside everything. Then welded in place.  IMG_1926 by Robert Moorman, on Flickr IMG_1926 by Robert Moorman, on FlickrI had some blow outs, still trying to figure those out, and I had to re-weld and re-grind 3 times in some places to make sure there were no pinholes. I think it's solid. It looks correct and it will take only a skim coat of filler to make it ready to paint. Now on to other parts. I got the mounting plate for the side vent welded in, but still trying to figure out how to mount the vent on the plate. There is not much room in there. |
|
|
|
|
05-12-2018, 03:10 PM
|
#61 |
|
Post Whore
 Join Date: May 2015
Location: Alabama
Posts: 14,579
|
Re: Wife's 48
turned out nice...your blowouts could be from the old metal being thinner than your new patch or thinner from rust deterioration of the original metal....
__________________
Mongo...aka Greg RIP Dad RIP Jesse 1981 C30 LQ9 NV4500..http://67-72chevytrucks.com/vboard/s...d.php?t=753598 Mongos AD- LS3 TR6060...http://67-72chevytrucks.com/vboard/s...34#post8522334 Columbus..the 1957 IH 4x4...http://67-72chevytrucks.com/vboard/s...63#post8082563 2023 Chevy Z71..daily driver |
|
|
|
|
05-12-2018, 06:44 PM
|
#62 |
|
Senior Member
Join Date: Sep 2017
Location: Bryan, Texas
Posts: 2,265
|
Re: Wife's 48
Thanks Mongo.
I think you were right about some additional rusty areas where the metal was thinner was what caused my blow outs. I was wondering how to weld it up or does it just need to be cut out further? I found if I put a small bead in a semicircle around the "hole" that blew out that I could then tack weld to the small beads and fill in the hole. I don't know if that is right, but it seemed to work. But I'll bet that I'll hear the correct solution would be to cut out another piece and weld in to better steel. I must say that after almost 3 hours of fitting, I just wasn't up for more fitting. The fitting is the most aggravating part so far. |
|
|
|
|
05-12-2018, 07:47 PM
|
#63 |
|
Post Whore
Join Date: May 2015
Location: Alabama
Posts: 14,579
|
Re: Wife's 48
if you have access to the backside a piece of copper will help absorb some of the heat...put the copper where youre welding
__________________
Mongo...aka Greg RIP Dad RIP Jesse 1981 C30 LQ9 NV4500..http://67-72chevytrucks.com/vboard/s...d.php?t=753598 Mongos AD- LS3 TR6060...http://67-72chevytrucks.com/vboard/s...34#post8522334 Columbus..the 1957 IH 4x4...http://67-72chevytrucks.com/vboard/s...63#post8082563 2023 Chevy Z71..daily driver |
|
|
|
|
05-12-2018, 10:38 PM
|
#64 | |
|
Senior Member
 Join Date: May 2007
Location: Doodah Kansas
Posts: 7,746
|
Re: Wife's 48
cardboard freight (harbor freight) sells those copper welding heat sinks.
Quote:
if I try to hit the edge of metal first it blows right through, it seems like tacking to the tack keeps the energy on the thicker weld. here is what I am talking about with both the gap and the tacks  IMG_6700 by Joe Doh, on Flickr IMG_6700 by Joe Doh, on Flickrthat metal was thin and old, if I had tried a lap weld it would have blown through both sides. also notice how I rotated around the part to keep heat from building up in one area. I would quench with a damp rag once in a while, and if the metal was moving a bit I used a sledge on the back side like a dolly and a flat head hammer on the front side to "ring" the tack and take some of the stress out of it. you look like you are doing fine! it will mud up and disappear as long as you dont leave any pinholes. if you are going for a metal finish you have a lot of dolly work in store haha!
__________________
the mass of men live lives of quiet desperation if there is a problem, I can have it. new project WAYNE http://67-72chevytrucks.com/vboard/s...d.php?t=844393 |
|
|
|
|
|
05-12-2018, 10:49 PM
|
#65 |
|
Senior Member
Join Date: Sep 2017
Location: Bryan, Texas
Posts: 2,265
|
Re: Wife's 48
OK, this is a question I'd like some help with.
I used vise grips and clamped the rear drivers side patch to the existing, albeit rusted out panel. Once I thought it was in place I used a cutting wheel on a grinder to cut the new panel and at the same time cut through the old panel. I've read this is the way to make the new patch fit as closely as possible. Is there a better way? Also, how do you cut a patch to fit something like that fender? One of my problems seems to be getting the patch to fit close enough to weld. |
|
|
|
|
05-12-2018, 11:07 PM
|
#66 |
|
Post Whore
Join Date: May 2015
Location: Alabama
Posts: 14,579
|
Re: Wife's 48
ive seen people use the cut thru both pieces method but ive never done it...I put my patch over the area and mark around it with a sharpie...and then cut inside the line on the rusted side....then I sneak up on it fitting...if I was gonna cut thru both pieces I think id tack weld it together to keep it from moving and use the thinnest cutting disc I could find...ive got some .030 discs
on this cab corner I had to build the whole thing as they don't make patch's for it...with no access to the backside I had to put a backer strip in it where the seam is so I left a little gap so my weld would bond to all 3 pieces...thought it turned out decent considering im not much of a body man
__________________
Mongo...aka Greg RIP Dad RIP Jesse 1981 C30 LQ9 NV4500..http://67-72chevytrucks.com/vboard/s...d.php?t=753598 Mongos AD- LS3 TR6060...http://67-72chevytrucks.com/vboard/s...34#post8522334 Columbus..the 1957 IH 4x4...http://67-72chevytrucks.com/vboard/s...63#post8082563 2023 Chevy Z71..daily driver Last edited by mongocanfly; 05-12-2018 at 11:12 PM. |
|
|
|
|
05-13-2018, 02:25 AM
|
#67 |
|
Registered User
Join Date: Nov 2010
Location: calgary alberta
Posts: 7,823
|
Re: Wife's 48
a few tips that work for me. right or wrong, dunno. not a pro by any means. take with a grain of salt I guess.
first, the metal needs to be clean on both the front and back sides of the weld before you start or you will draw contaminants into the weld second, always use the mig wire cutters on the wire before you strike a new weld. the sharp tip on the wire will chisel the surface and start a clean weld right away so less time "waiting" for the bead to "clean up" and start welding nice. by that time you may have burned through. third, do short bursts/tacks on suspect thin areas. stick a small "ball" of metal on the edge with a tack. that makes the edge "thicker" and it will absorb a bit more heat from future attempts to close the gap. use a hammer and dolly (hammer on dolly) right away to help flatten the ball after and this will bring the 2 sides closer together as well as assist with the shrinking issue when welding sheet metal. a weld "ball" on each side of the weld can be connected with another tack after the area has cooled off. again, hammer and dolly (on dolly). allow stuff to cool between welds. fourth, move around the patch to ensure shrinkage/distortion isn't creeping in on you so your patch doesn't fit nicely anymore. I usually have success with tacking 4 sides, then put tacks 1/2 way between those points and so on all the way around the patch. you can use compressed air to help cool the entire area right down again before welding more. use the air after the hammer on dolly part is done. hold the blow gun further away from the surface than your brain tells you to because that will help cool the entire area instead of just the weld area.the weld area wants to shrink when it cools so weld, hammer on dolly while it's hot to stretch it, let it cool to the same temp as the rest of the panel/project, adjust with hammer and dolly as required to get the shape needed and keep gaps etc, go again with more tacks fifth, check the thickness of the metal around the patch compared to the normal metal thickness of the surrounding metal. if it's a bunch thinner then you may need to go bigger with the patch to get out further where the metal is thicker sixth, if using a slightly thicker patch material than original steel in the area of the patch, possibly because the patch panel doesn't come quite as big as you thought, start the tack on the new steel and wobble it over to the old steel quickly then stop before the heat causes burn through the metal seventh, a copper or brass backer with somewhat of the same shape as the weld area will help by absorbing heat plus weld doesn't stick to it. it also helps keep the puddle from falling through the weld area, which makes a burn hole, which then makes the gap between the parts bigger, which takes more welding to close, which means more heat to the area and/or more time to finish the weld, which usually means more flap disc time, which means more heat build up, which means more distortion, which....you get it. you can use a flattened out piece of copper pipe. I have a few of different sizes and shapes from different diameters of pipe and have found them handy for this. a small handle can easily be put on them to stop heat transfer to your welding glove. a well placed magnet or vice grip can also be handy to keep them in place. magnets will cause disruption of the pig weld though. eighth, have you played with wire speed and voltage settings (I assume you are mig welding) to see if a lower voltage or more/less wire speed would help? ninth, sometimes what has worked for me is to start a tack, with a bit more wire speed, but make it short, time wise, and leave the wire in the weld puddle. let it cool off for a sec and do a second tack right away. there is no waiting for the weld bead to strike and cleanup because the wire is already embedded in the metal. this will allow you to get a bigger "ball" of weld metal on the edge of a thin metal patch. this also works when you have good fitting well spaced parts and don't have to worry about burn through so much, you just want to lay down a longer bead without heating up the area and then possibly burning through. you can do a short burst, leave the wire in the bead, wait for the glow to fade through the welding helmet screen, then do another short burst and pull off. hammer on dolly, allow to cool, do another spot somewhere else on the patch. tenth, when you have an area with some of those weld "balls" built up on the edges you can connect them with a short burst in a circular pattern and watch them fill in the middle themselves. a copper backer helps here. then hammer on dolly right away, cool, metal finish, check for pinholes with a bright light on the back side in a dim area, epoxy prime, fill as required, etc. you can also check for pinholes using solvent or brake clean sprayed on the back side of the patch. it usually finds it's way through the small spaces especially if "helped" with some compressed air (use a solvent that doesn't evaporate as quickly or use lots). if you get a wet spot on the front side then you have a pinhole. a helper is a good thing to have for this job. remember the solvent is flammable so be careful with it when welding/grinding etc. it's a good idea to have a fire extinguisher around closeby anyways, whenever welding/grinding etc that's it, I'm outta fingers, you got 10. lol |
|
|
|
|
05-13-2018, 02:41 AM
|
#68 |
|
Registered User
Join Date: Nov 2010
Location: calgary alberta
Posts: 7,823
|
Re: Wife's 48
nice work and planning there mono.
ok, one more tip. if you have cleco fasteners, like mono has in his post, you can use them as panel clamps through the seams of the 2 parts if you can get some access to the back side. this works well on curved parts, like mono's post shows. make a 1/2 a hole, that would be the same size as the normal cleco hole would be, on each part, at matching areas on the seam,, then match up the parts and put a cleco through the (now complete when the two 1/2's are together) hole and use a small "washer" on the back side for the cleco to grip into. basically you are lining up the two 1/2 holes, one in the patch panel and one in the original panel, to make a complete hole when the 2 parts come together. the cleco fits in the hole and holds itself in by using the washer on the back side to grip into. when the cleco's are removed the little washer can usually be fished out with a magnet. ok, thats 11 so you owe me a finger (not the middle one, haha) |
|
|
|
|
05-13-2018, 02:42 AM
|
#69 |
|
Registered User
Join Date: Nov 2010
Location: calgary alberta
Posts: 7,823
|
Re: Wife's 48
the cleco trick works good if you want the 2 parts tight together. forgot to mention that.
|
|
|
|
|
05-13-2018, 09:40 AM
|
#70 |
|
Senior Member
Join Date: May 2007
Location: Doodah Kansas
Posts: 7,746
|
Re: Wife's 48
I got a set of butt weld clamps at cardboard frieght to do my bed shortening, they worked perfectly and were 6 bucks!
__________________
the mass of men live lives of quiet desperation if there is a problem, I can have it. new project WAYNE http://67-72chevytrucks.com/vboard/s...d.php?t=844393 |
|
|
|
|
05-13-2018, 09:51 AM
|
#71 |
|
Senior Member
Join Date: Sep 2017
Location: Bryan, Texas
Posts: 2,265
|
Re: Wife's 48
Thanks guys! As I am going along, I'm trying to incorporate what you all do to help me figure out what works for me.
I think I'm getting better with the MIG, and when I had blowouts I worked through them as described. When cutting out an "oval" patch like the fender, what did you use to cut it out? I've been using a grinder with a cutting wheel and that is pretty good for straight lines, but how do you do curves? Before I start on the fenders, which I'd like to get as smooth as possible, I may need to learn a new way to cut out for my patches. I am butt welding the patches. I would like to start learning more about hammer on/off dolly, and will on the next patches. I'd like to get as much metal finish as possible. These first few patches are going to have filler, it will be a thin coat, but you won't be able to see the back side. On the fenders I have to do better. |
|
|
|
|
05-13-2018, 10:54 AM
|
#72 | |
|
Senior Member
Join Date: May 2007
Location: Doodah Kansas
Posts: 7,746
|
Re: Wife's 48
Quote:
here is the rust hole from that fender. needed a BIIIIG patch.  IMG_3177 by Joe Doh, on Flickr IMG_3177 by Joe Doh, on Flickrluvckily the spare bed had a chunk of fender on it I cut the hole and laid the patch over it then used spray paint from the bottom to transfer the exact cutout size!  IMG_6697 by Joe Doh, on Flickr IMG_6697 by Joe Doh, on Flickr
__________________
the mass of men live lives of quiet desperation if there is a problem, I can have it. new project WAYNE http://67-72chevytrucks.com/vboard/s...d.php?t=844393 |
|
|
|
|
|
05-13-2018, 12:40 PM
|
#73 |
|
Registered User
Join Date: May 2014
Location: ID
Posts: 663
|
Re: Wife's 48
I use a scribe and snips. Zero clearance, no gap. I rarely use clecos and never use butt clamps. Magnets to hold in place while tack welding. Weld, grind, hammer, repeat. When the metal starts to get out of shape, stop welding. Correct it, and get it back into shape.
|
|
|
|
|
05-13-2018, 04:07 PM
|
#74 |
|
Post Whore
Join Date: May 2015
Location: Alabama
Posts: 14,579
|
Re: Wife's 48
you'll find that not ever situation is the same....I've used magnets, panel clamps, clecos, slight flange, and just whatever gets the job done.....not saying I'm right but it works....you can't always use the exact same process. ....
__________________
Mongo...aka Greg RIP Dad RIP Jesse 1981 C30 LQ9 NV4500..http://67-72chevytrucks.com/vboard/s...d.php?t=753598 Mongos AD- LS3 TR6060...http://67-72chevytrucks.com/vboard/s...34#post8522334 Columbus..the 1957 IH 4x4...http://67-72chevytrucks.com/vboard/s...63#post8082563 2023 Chevy Z71..daily driver |
|
|
|
|
05-13-2018, 06:37 PM
|
#75 |
|
Senior Member
Join Date: Sep 2017
Location: Bryan, Texas
Posts: 2,265
|
Re: Wife's 48
Guys, thank you all. Very informative! I will try and improve with your suggestions. Thanks!
|
|
|
|
 |
| Bookmarks |
|
|


 Linear Mode

