
|
Register or Log In To remove these advertisements. |
|
|
|
|||||||
 |
|
|
Thread Tools | Display Modes |
 01-21-2017, 09:04 PM
|
#1 |
|
Registered User
Join Date: Dec 2008
Location: Las Vegas, NV
Posts: 810
|
need some advice before I mess up my NOS fender
I don't know how or when it happened but my drivers side NOS fender got double dented on/near the body line, probably in the move, any tips on how to get that perfect again with no bondo
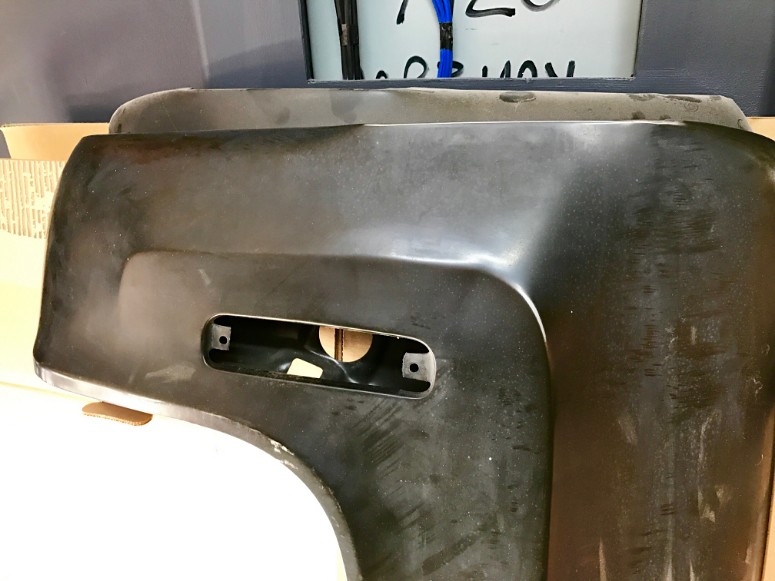 Untitled by devin lalande, on Flickr Untitled by devin lalande, on Flickrtoday I tried a couple of processes I figured couldn't hurt to at least try.........so I copied some You Tube vids using a heat gun followed by freezing compressed air and then some hot glue on the end of a wooden dowel to try and persuade the metal back in place.......eeeh, was a fun experiment I guess.....metal is probably too thick for these processes to be a slam dunk I think.....and it's not like I'm an expert or anything 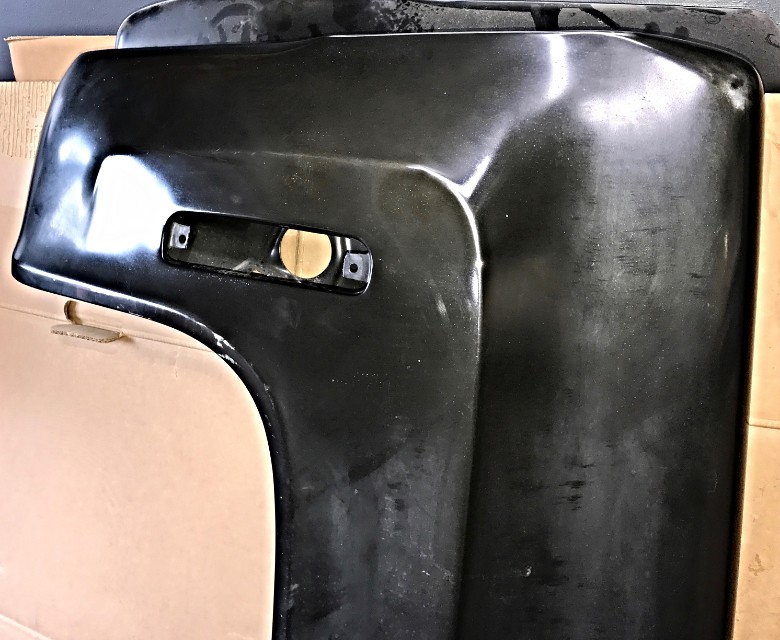 Untitled by devin lalande, on Flickr Untitled by devin lalande, on Flickrso I need some help here before I mess this panel up. What should my next plan of attack be?
__________________
1983 Chevy C10 250/3spd (current project truck) 1976 Chevy C10 350/350 Heavy Half (future project truck) |

|

|
|
01-21-2017, 11:42 PM
|
#2 |
|
Registered User
Join Date: Dec 2000
Location: Boise, Idaho
Posts: 6,001
|
Re: need some advice before I mess up my NOS fender
There is no way you can get a few tips and do this. It's extremely easy when it comes to metal finishing, that repair is a piece of cake. But that's after some experience. Just going right into it, it takes more than a few tips.
But if you want to start right now on this one, here you go, a "Basics of Basics" on Metal Finishing. http://www.hotrodders.com/forum/basi...ts-163013.html Brian
__________________
1948 Chevy pickup Chopped, Sectioned, 1953 Corvette 235 powered. Once was even 401 Buick mid engined with the carburetor right between the seats! Bought with paper route money in 1973 when I was 15. "Fan of most anything that moves human beings" |
|
|
|
|
01-22-2017, 12:30 AM
|
#3 | |
|
Registered User
Join Date: Dec 2008
Location: Las Vegas, NV
Posts: 810
|
Re: need some advice before I mess up my NOS fender
Quote:
With this truck of mine I'll have plenty opportunities to practice......looking forward to learning all I can!
__________________
1983 Chevy C10 250/3spd (current project truck) 1976 Chevy C10 350/350 Heavy Half (future project truck) |
|
|
|
|
|
01-22-2017, 12:43 AM
|
#4 | |
|
Registered User
Join Date: Feb 2016
Location: Hebron
Posts: 1,123
|
Re: need some advice before I mess up my NOS fender
Quote:
__________________
 RUBBER DOWN AND HIT THE ROAD!!! RUBBER DOWN AND HIT THE ROAD!!!1940 Ford Dlx Coupe 1969 Mach1 |
|
|
|
|
|
01-22-2017, 01:11 AM
|
#5 | |
|
Registered User
Join Date: Dec 2008
Location: Las Vegas, NV
Posts: 810
|
Re: need some advice before I mess up my NOS fender
Quote:
__________________
1983 Chevy C10 250/3spd (current project truck) 1976 Chevy C10 350/350 Heavy Half (future project truck) |
|
|
|
|
|
01-22-2017, 01:18 AM
|
#6 |
|
Registered User
Join Date: Oct 2015
Location: Calgary, Alberta
Posts: 1,252
|
Re: need some advice before I mess up my NOS fender
Bondo isn't a sin if it's less than 3/16" thick.
Keep trying the metal work as that's the best way after all.
__________________
So when is this "Old enough to know better" supposed to kick in? My 1959 GMC build thread http://67-72chevytrucks.com/vboard/s...d.php?t=686989 |
|
|
|
|
01-22-2017, 01:21 AM
|
#7 | |
|
Registered User
Join Date: Dec 2000
Location: Boise, Idaho
Posts: 6,001
|
Re: need some advice before I mess up my NOS fender
Quote:
Basics of Basics Molding repair / metal finishing By Brian Martin When straightening stainless moldings you are "metal finishing" just as you would metal finishing a ding on a fender. The following method would only be used on small damage of course, but depending on the time spent, you could use the same theory on a larger dent. If you do this on a fender, you don't need filler of any kind. The art of metal finishing is not easy. But if you are doing it on these moldings, you are on the way to doing it on your dented fender or door. The most important thing you want to remember is that when you file (a VEXON file for auto body work is the best tool) on something like this, it is more for spotting high and low spots than "cutting" those high spots. You run the file over the area then look closely to see what the file hit. If there are areas where the file hit hard, these are likely high spots that need to be tapped down a little before you proceed. You don't want to keep filing (or sanding) if you are hitting some spots hard and others aren't even being hit. If there are spots that aren't being hit, those need to be brought up. When there are large high and low spots a small hammer or rounded ended chisel can be used to rough it into shape. All the while, checking with the file, THAT is the tool to see where you are at. I was taught to use a sharp tool like an awl to push up these low spots. It works well because the pressure is so localized. You want to push up from the back with an awl, and DO NOT MOVE where the awl is making contact. As you push up, the pressure is so localized you can usually see on the other side where you are pushing. If you are right on the money, go ahead and bring it up as much as you want. If you are off a little, you can move the awls tip over to where you think you need to be and apply pressure there, again, watching closely on the out side. If you don't move where the awl's point is making contact, you can easily move it a little to where you need to be, remember we are likely talking about moving it an eighth inch or less, sometimes a thirty second of an inch. If you move the awl after pushing an area up, you may not be able to find that exact spot again. The point is (if you'll pardon the pun) to hold pressure on the awl where you pushed up as you look at the outside to see if you hit the right spot. If you do need to remove the awl to file, take a good look at the back and make a mental note of exactly where you pushed. That way you can go right back to the spot if you need to after seeing what the file is telling you. If you dont move it, you can easily slide it over that eighth inch or less to the exact spot you need to bring up. What I do is hold the molding in my hand with my index finger and thumb. In the middle of my hand is the awl. I squeeze the molding pushing the awl up into it. My hand is upside down so the molding is facing up towards me. That way I can easily push up the low spot while I look at it from the other side. The trick is, DO NOT file much, and just run it over the surface until you can see the high and low spots. After you have worked the area to near perfection, you can file a little more to knock down highs to make it perfectly flat for sanding and polishing. But if you rush this identifying of high and low spots and think you can file the damage away, you will end up with too thin of metal and blow the whole thing. When I was learning, I even went thru the metal a time or two. It is easy to do if you ask the file to do too much. The file should be looked at as a straight edge, more than a cutting tool. This process can be long and tedious, you must take your time or you will do more damage than good. If you push up a little too much, just tape it down and try again. We are talking moving the metal a few thousands of an inch or so. Dont move the metal so much as to make a visible dent. Most of the time you will barely be able to see where you moved it (thus the importance of not moving the awl) only the file will tell you if you did or not. Now, once you get the area flat, you have filed it and the file says it is FLAT, you need to sand the file marks out. This is a trick I thank one of my mentors for. I have shown this to many bodymen and they will always be amazed at how good it works. You need a DA, a good old DA that you can lock the head to a grinder mode. Not an orbital sander, but a true Dual action sander. My favorite is the National Detroit DAQ. This tool is the best version on the market in my opinion. It has the most torque using he least amount of air. Ok, you have listen to a story. I mentioned I have shown this trick to many bodymen, well the last time I did, it cost me. I had a nearly brand new DAQ (my last one lasted 25 years!) that I used to demo this procedure on a door skin a co-worker was doing. I was helping him with a problem door and when we came to the point of metal finishing the skin he went to grab his air grinder with 80 grit, NO, NO, NO, wrong tool! I went to my box and grabbed my DAQ with some 120 and quickly knocked the thing down flat and beautiful. There was a few guys there by this time and all were amazed at how well this worked. Well, one of them liked it so much they thought they would trade their worn out DAQ for my brand new one. Yep, a few days later I went to use my DAQ and found that in my box was not my new one, but an older abused DAQ!!! To this day I have not found my nice new DAQ, I suspect it is in one of my buddies garages at his home. Ok, here is the trick, you use the DA pad as a 6 block. If you put the DA on grinder mode with some 600 or 800 on it you can hold it flat as you run it over the surface, favoring the left to right direction. The disc is turning clockwise, so you want to run the disc over the area hitting ONLY the top half of the disc on the metal, against the rotation of the disc. This top area is flat right? It is one half of a perfectly flat circle, so it is in effect a block. On this stainless you would use the 600 or finer to block it. On sheet metal you could start with 120 or 180, and prime over that. If it was going to be chromed like a bumper that is thick metal, you could still use the 120 or 180 and then move on up to 600 and leave it, the chrome shop will take care of the rest. Heck, I dont think they use anything finer than that anyway. I have used this method on stainless steel moldings, steel being chromed, thick steel like bumpers being chromed, sheet metal parts like fenders or doors being primed and painted, it WORKS. The neat thing is, when I was taught this trick back in the seventies, the finest paper you had was 600. Now, with paper all the way up to 3000, you can REALLY do some trick stuff. I had a set of aluminum wheels to sell on eBay. They had some curb rash on the bead. I used this method with 120, 180, 320, 600, 1200, 1500, 2000 and then polished it to a fine luster. It really works well, give it a try.
__________________
1948 Chevy pickup Chopped, Sectioned, 1953 Corvette 235 powered. Once was even 401 Buick mid engined with the carburetor right between the seats! Bought with paper route money in 1973 when I was 15. "Fan of most anything that moves human beings" |
|
|
|
|
|
01-22-2017, 02:26 AM
|
#8 |
|
Registered User
Join Date: Dec 2008
Location: Las Vegas, NV
Posts: 810
|
Re: need some advice before I mess up my NOS fender
thank you sir!
__________________
1983 Chevy C10 250/3spd (current project truck) 1976 Chevy C10 350/350 Heavy Half (future project truck) |
|
|
|
|
01-22-2017, 04:55 PM
|
#9 |
|
Registered User
Join Date: Dec 2008
Location: Las Vegas, NV
Posts: 810
|
Re: need some advice before I mess up my NOS fender
ok here's where I'm at with the repair, you can see the low spots; this metal is tough around the body seam!
Any follow-on pointers or just more of the same....... 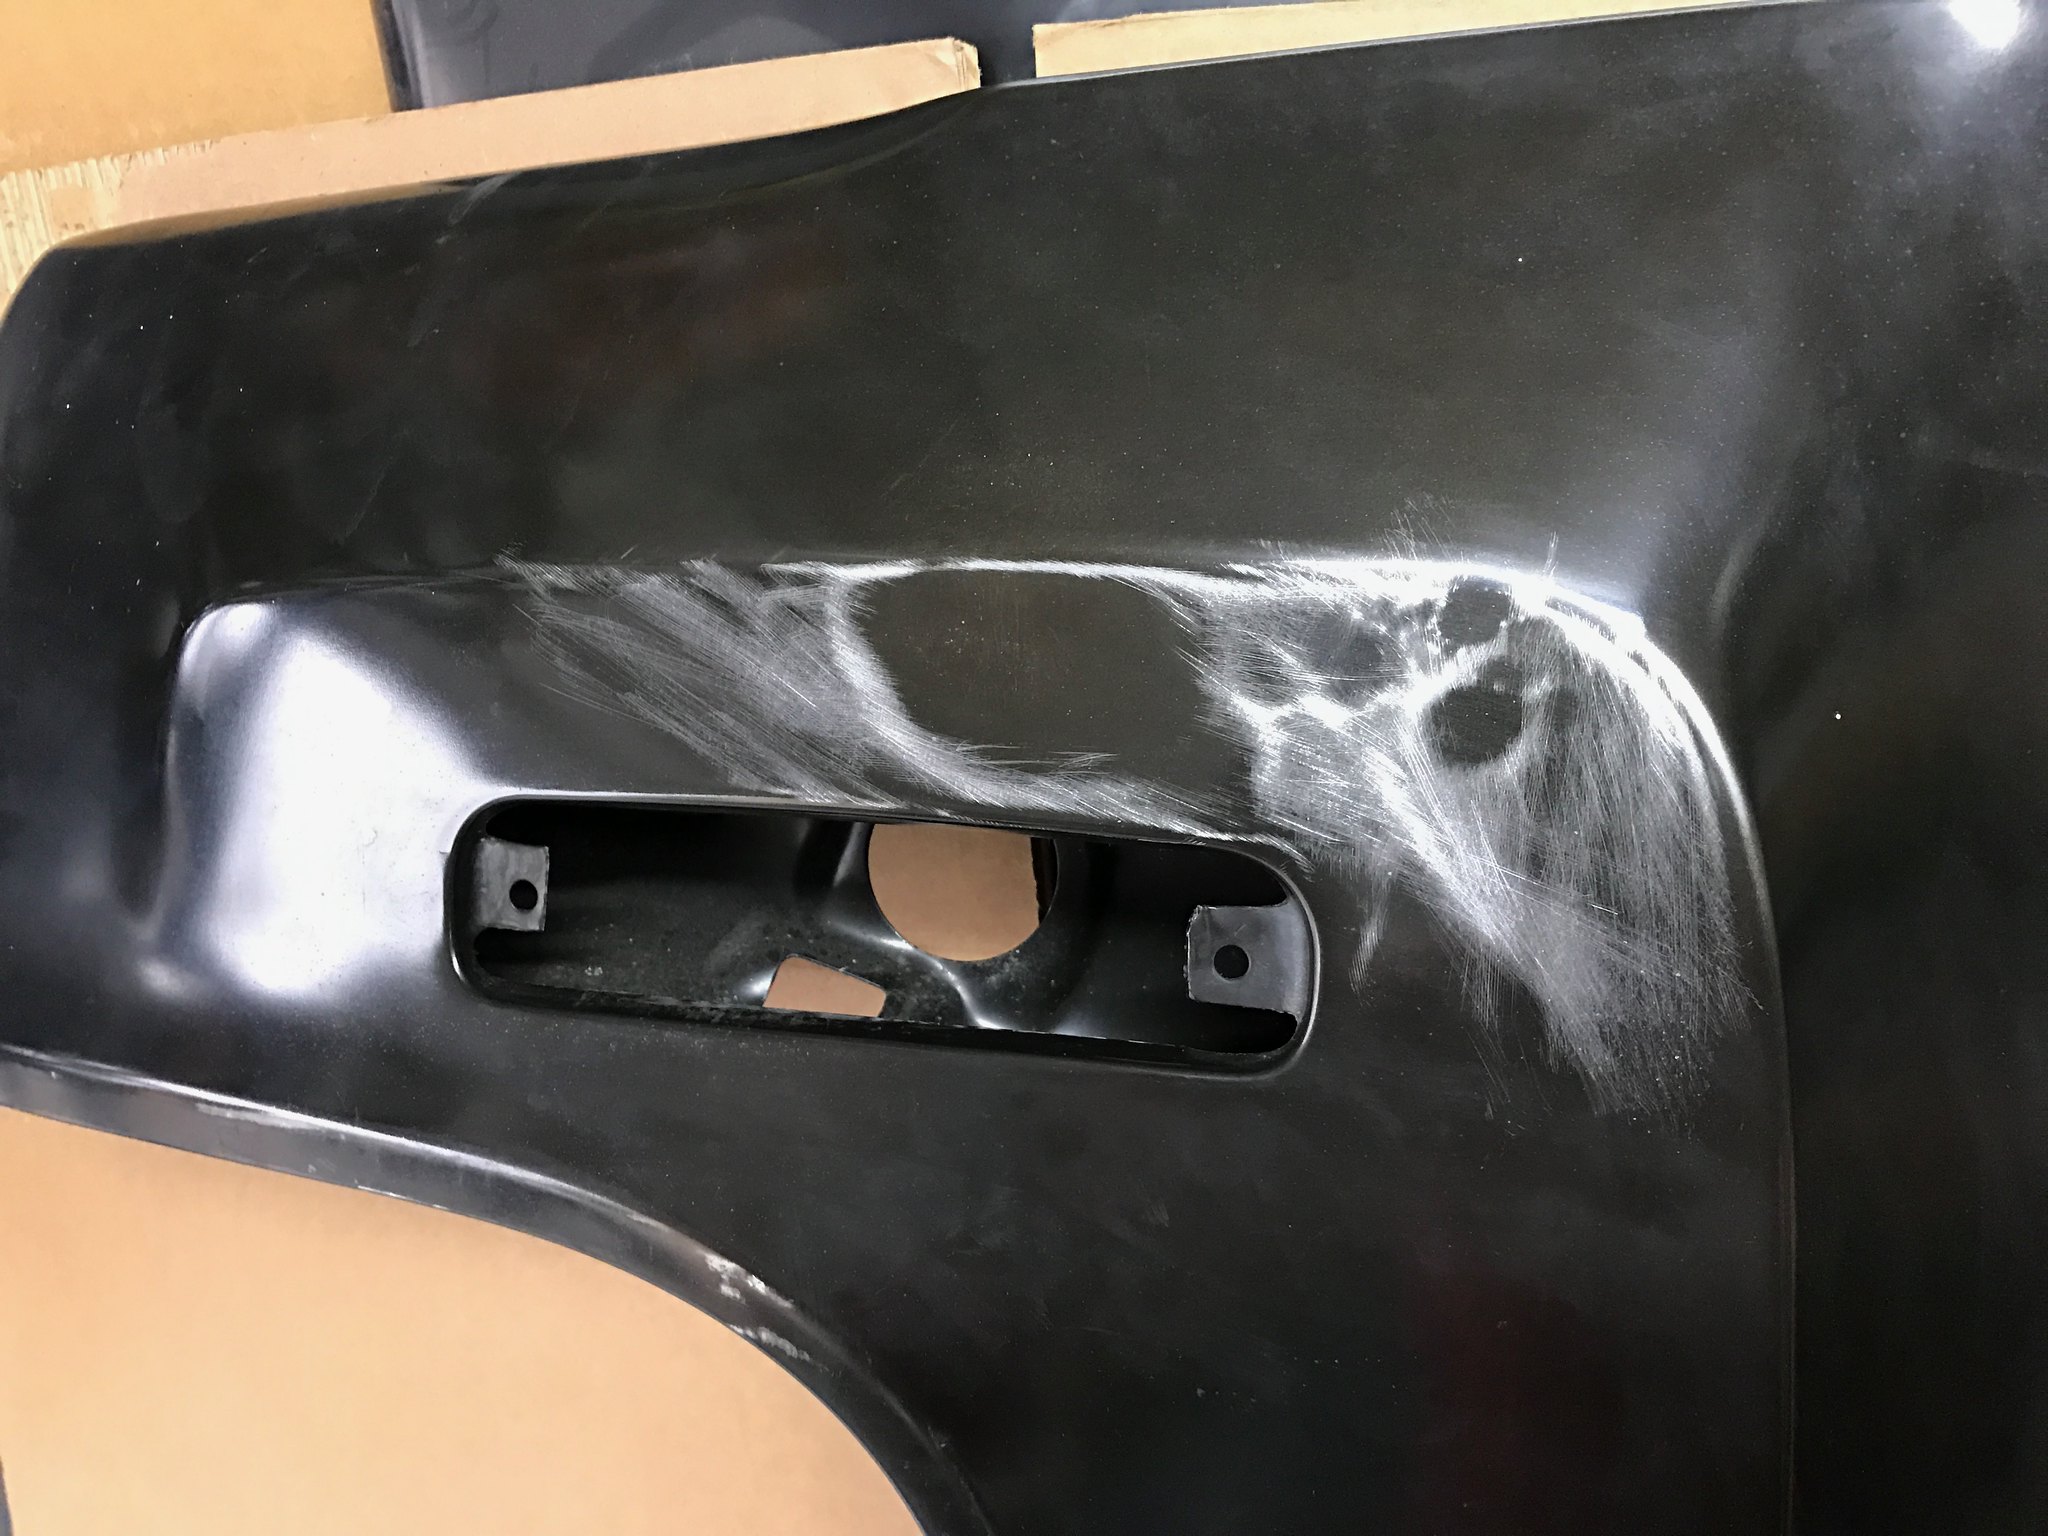 Untitled by devin lalande, on Flickr Untitled by devin lalande, on Flickr
__________________
1983 Chevy C10 250/3spd (current project truck) 1976 Chevy C10 350/350 Heavy Half (future project truck) |
|
|
|
|
01-22-2017, 06:55 PM
|
#10 |
|
Registered User
Join Date: Nov 2016
Location: Erie, Pa
Posts: 87
|
Re: need some advice before I mess up my NOS fender
If you can get it a touch high a shrinking disc may help. A sharpie marker paint job and light sanding will help with high and low spot identification. Less aggressive than a file.
|
|
|
|
|
01-22-2017, 08:40 PM
|
#11 |
|
Registered User
Join Date: Dec 2000
Location: Boise, Idaho
Posts: 6,001
|
Re: need some advice before I mess up my NOS fender
There will be no need for a shrinking disc there as the metal isn't stretched (at least not enough) and unless you push it up way to high there is going to be no need to shrink.
This is all very easy, take it just as you are, move those low spots up and keep up the good work. Take it slow and don't remove metal with your checks, all you need is to run sandpaper on a block over it is all you need to see the highs and lows. Brian
__________________
1948 Chevy pickup Chopped, Sectioned, 1953 Corvette 235 powered. Once was even 401 Buick mid engined with the carburetor right between the seats! Bought with paper route money in 1973 when I was 15. "Fan of most anything that moves human beings" |
|
|
|
|
01-23-2017, 08:56 AM
|
#12 | ||
|
Registered User
Join Date: Dec 2008
Location: Las Vegas, NV
Posts: 810
|
Re: need some advice before I mess up my NOS fender
Quote:
Quote:
__________________
1983 Chevy C10 250/3spd (current project truck) 1976 Chevy C10 350/350 Heavy Half (future project truck) |
||
|
|
|
|
01-23-2017, 12:31 PM
|
#13 |
|
Registered User
Join Date: Dec 2000
Location: Boise, Idaho
Posts: 6,001
|
Re: need some advice before I mess up my NOS fender
This is a good place to learn the tricks. But as Footstomper said, a little filler isn't a sin! It's not like there won't be an ouce of filler on the truck. There will be some here and there or all over it, it's not a big deal. If don't properly, it's just another way to repair something, with filler, without filler, buy a new part, it's all good.
God knows my truck will be covered in filler! And I can't wait for the day it's that close to being done! Brian 
__________________
1948 Chevy pickup Chopped, Sectioned, 1953 Corvette 235 powered. Once was even 401 Buick mid engined with the carburetor right between the seats! Bought with paper route money in 1973 when I was 15. "Fan of most anything that moves human beings" |
|
|
|
|
01-24-2017, 07:40 PM
|
#14 |
|
Lost amongst the CORN
Join Date: Nov 2002
Location: Northern Iowa
Posts: 1,072
|
Re: need some advice before I mess up my NOS fender
If you look at the first photo you can see an eyebrow right above each dent on the other side of the body line. If you apply upward pressure to the low spot, start close to the body line and very lightly tap that eyebrow with a body hammer.
That eyebrow is basically locking the dent in place. As the eyebrow goes down the low spot will come up and once the brow is gone any remaining low areas will move with relative ease. This is something I did a few years back, same process. http://www.chevelles.com/forums/12-b...ly-method.html
__________________
Currently working on How To Videos and custom metal 70 Chevelle gettin Sliced and Diced Anything But STOCK 70 Chevelle SS455 not a typo its a BUICK BABY 49 and 72 Chevy Trucks restored to original...close to it Drommer Stor....Norwegian for Dream Big http://s969.photobucket.com/albums/a...lle/?start=all https://www.flickr.com/photos/47922830@N03/ Pictures of my work and projects |
|
|
|
|
01-25-2017, 06:26 PM
|
#15 |
|
Registered User
Join Date: May 2013
Location: Centerville,Ma.
Posts: 1,223
|
Re: need some advice before I mess up my NOS fender
I have been doing body work for 45 years, filler in small amounts is your friend not an evil. I would rather have a straight panel with a skim of filler than a wavy panel with non.
|
|
|
|
|
| Bookmarks |
|
|


 Linear Mode

