
|
Register or Log In To remove these advertisements. |
|
|
|
|||||||
 |
|
|
Thread Tools | Display Modes |
 12-09-2018, 02:07 PM
|
#1 |
|
Registered User
Join Date: Aug 2013
Location: Calgary, Alberta
Posts: 674
|
Light Painting Photography Instructions - C10
Hi! I'm going to share a photo technique for your C10 that uses simple tools and can create photos you can't believe you actually took. I'm happy with how well these turned out, myself. If you decide to try this, post your results. If it's not working for you, no problem, I'm happy to suggest some adjustments to make.
Video showing the steps, with trial and error: https://youtu.be/dJHV4IMHXuA Setup  Results  Equipment needed:
 Concept: Cameras collect light. That's their job. When you take a photo in the daylight, the light from the sun bounces off the subject and into the camera lens. That's how the photo shows up later (digital or film). In the pitch dark, a photo will be black because there is no light for the camera to see and create the picture. So, in the dark you can provide the light via a flashlight! This offers you the control to dictate what the camera sees. Wherever you shine the light during the photo, that lit-area will appear in the photo. Why am I not visible in the photos? Because I never let the light touch me. As far as what the camera sees, I'm dark, so it does't register me as in the photo. Only what the light touches. Camera Setting: Your camera will need a manual mode. Why? Because this type of photography is all about controlling 2 major settings, and trial and error. It took 40+ attempts to get the final photos I liked, below. This means making large or small adjustments to the following settings: Aperture & shutter speed. Aperture: This is a ring within the lens that can open or close to let more or less light in. A photo will be brighter if the aperture is open, and darker if the aperture is closed. The term to describe the aperture setting is F-stop, and it describe in the units of F4, F8, F11, F18, etc. There's a big range of aperture values for each lens. The odd thing to remember is F4 is more open (more light) then F18. Check out the illustration below. 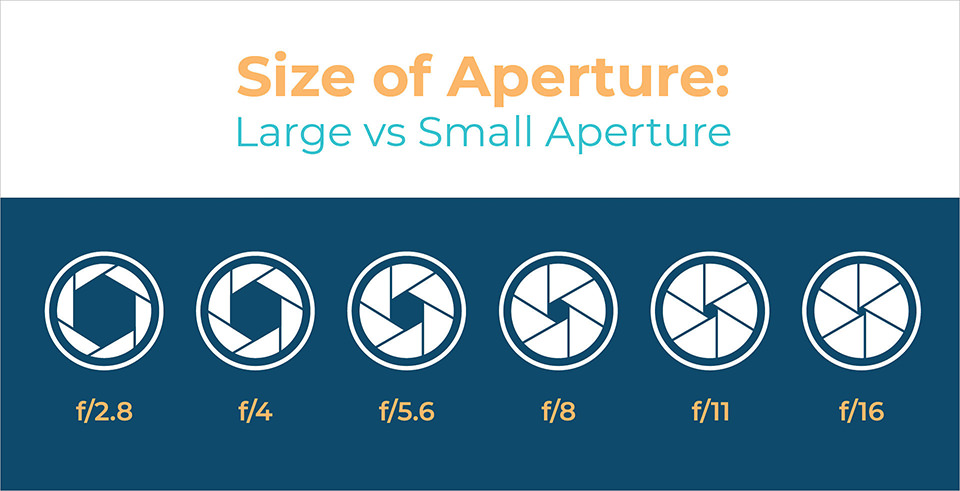 Shutter Speed: Shutter speed means how long the camera is letting light in, during the photo. Typical photography uses fractions of a second to capture a still image (1/500th of a second). When there is a lot of light available (sunshine) a very short (brief) shutter speed (1/500th of sec) is required to allow the light to build up and create the image. When there is less light available (indoors), more time is required for the available light to build up in the camera to create the photo (1/5th of a second). Shutter speed or "exposure time" can be thought about like leaving a piece of tan leather out in the sun. The longer you leave it there, the more bleached it's going to become. This 'brightness' of the leather in the sun is related to a) how long the sun hits the leather, and b) how intense the sun is. The same is true for the brightness of the photo building up. In the case of light painting photography, I typically use a 30 second exposure. That's right 30 entire seconds of light entering the camera. This is why I put it on Manual mode, so I can set the shutter speed to 30 seconds. My aperture is typically F9 or F16, depending on the power of my flashlight. It'll take trial and error to figure out what aperture you'll need for the photo to be bright enough vs too bright. Why do I want 30 seconds of shutter speed? Mainly to give myself time. Time to grab my flashlight, run over to the truck, and have time to 'paint' light on the truck for a 30 second period. This brings the tripod into the picture. Have you tried taking a photo inside, with poor light and no flash? If you're holding the cameara, guess what? You're moving. In auto mode, the camera senses it's dark, so to compensate it a) opens the aperture up, and b) tries to apply a long shutter speed to collect the little light that's available (1/5th of a sec sometimes). During this 1/5th of a second, you are MOVING, even a little. This causes a blurry photo. This is why in auto mode, the flash will typically try to add light to the scene to the goal of getting a brief shutter speed to avoid a blurry photo. The tripod fixes this 'movement' problem that creates blurryness. During the 30 second exposure, the camera is totally still. And since the truck is totally still, there is no blurryness. Other tips:
 Results:      Good luck!
__________________
1972 Cheyenne Super SWB PS, PB, Tach, A/C, Tilt. Drivetrain: Built 402BB, TCI Streetfighter 700R4, 2,500 stall, Eaton posi, 3.73. Suspension/Chassis: ECE 4.5/6.5 drop, CPP nitrogen shocks, CPP front and rear sway bar, CPP cross members. Exhaust: 3" exhaust with x-pipe, Spintech 3000 mufflers, Hooker ceramic coated headers. Best 1/4 mile time: TBD. Last edited by Ekliptix; 12-09-2018 at 02:18 PM. |

|

|
|
12-09-2018, 02:24 PM
|
#2 |
|
Registered User
Join Date: Apr 2008
Location: Md
Posts: 2,451
|
Re: Light Painting Photography Instructions - C10
FANTASTIC photos. ....I think you forgot to mention 1st, you need to polish your truck till your fingers bleed......Awesome results...Thanks for sharing.
__________________
http://67-72chevytrucks.com/vboard/s...d.php?t=635605 |
|
|
|
|
12-09-2018, 03:05 PM
|
#3 |
|
Senior Member
 Join Date: Apr 2016
Location: Cypress, TX
Posts: 3,562
|
Re: Light Painting Photography Instructions - C10
This is a downright fun post you've made here. Good work. You're right, I would not believe it if I took those, I'm sure mine would not turn out that great. Of course my truck looks best in the dark, especially if you're not poking around with a flashlight! :-)
I have done something like this with a film camera in the dark with shutter open and then walked around lighting up various items with a portable photo flash unit. But yours is better with a flashlight because the fill does not have the sharp and deep shadows that a flash gives, your lighting is more uniform and natural. I like your flashlight on a stick idea. Very nice work and nice truck. |
|
|
|
|
12-09-2018, 06:57 PM
|
#4 |
|
Special Order
  Join Date: Nov 2004
Location: Mt Airy, MD
Posts: 85,863
|
Re: Light Painting Photography Instructions - C10
Reminds me of brochure photography
__________________
"BUILDING A BETTER WAY TO SERVE THE USA"......67/72......"The New Breed" GMC '67 C1500 Wideside Super Custom SWB: 327/M22/3.42 posi.........."The '67" (project) GMC '72 K2500 Wideside Sierra Custom Camper: 350/TH350/4.10 Power-Lok..."The '72" (rolling) Tim "Don't call me a redneck. I'm a rough cut country gentleman" R.I.P. ~ East Side Low Life ~ El Jay ~ 72BLUZ ~ Fasteddie69 ~ Ron586 ~ 67ChevyRedneck ~ Grumpy Old Man ~ |
|
|
|
|
12-10-2018, 01:01 PM
|
#5 |
|
At the body shop.
Join Date: Aug 2009
Location: Land of fruits and nuts.
Posts: 5,130
|
Re: Light Painting Photography Instructions - C10
Chasing clouds.
Been messing with a 10 stop ND 30 seconds in daylight
__________________
" That didnt make it any newer " " Dont antique the equipment " |
|
|
|
|
12-10-2018, 04:48 PM
|
#6 |
|
Registered User
Join Date: Nov 2017
Location: Wasaga Beach Ontario Canada
Posts: 197
|
Back in 1966 I had a 63 Chevrolet Impala and was going to get it painted. I loved the new colour that Chrysler came out with that year called Red Maple. I said to the body guy and showed him a picture of the colour, I want this colour. He said he can get it close but not exactly the same unless I want to drive around with lights hanging all over the car. The picture was taken inside with all the the lights at certain angles to bring out the best look. I painted the car that colour and was happy with the way it turned out as it changed colour from day to night and even under the street lights there was a different glow. Since then lighting has meant something to me when looking at different paint jobs so far as to have test sheets done so I can view them under different lights and very important out in the daylight not inside an office or body shop. Be fussy it's fun and drives the body guys crazy. Have a good one eh!
|
|
|
|
|
12-10-2018, 06:01 PM
|
#7 |
|
Registered User
Join Date: Oct 2016
Location: Dallas Texas
Posts: 2,869
|
Re: Light Painting Photography Instructions - C10
.
Impressive results! Did you have multiple light points on the full truck pics? I could only discern a single one, like you stuck the stick in the ground somewhere off the passenger rear quarter aimed at the scene. Those are nice with the snow/shadow effect. Looking good. -klb
__________________
67 C10 fleet fuel injected '70 402, 700r4, 3.73 posi 07 335 sport turbo 6sp 94 Trans Am GT LT1 6sp posi -- sold after 22yrs 99 540 sport V8 6sp -- sold 73 240z L24 4sp -- given to friend 68 C10 step 350/350 3.73 open -- sold |
|
|
|
|
12-10-2018, 06:09 PM
|
#8 |
|
Registered User
Join Date: Aug 2013
Location: Calgary, Alberta
Posts: 674
|
Re: Light Painting Photography Instructions - C10
If you check out the video, at the 10:45 mark you'll see the way I applied light in 2 steps:
1) Move the flash light from the front grill around the side of the truck, along the lower trim. I'd call this multiple-points, since I'm walking and moving the light. 2) run over to another location and shine a more powerful light at the truck, and the background. This is also multiple points, since I'm standing in one place, but moving where the light is shining on the truck during the photo. Does this answer your question? |
|
|
|
|
12-11-2018, 12:32 AM
|
#9 |
|
Registered User
Join Date: Oct 2016
Location: Dallas Texas
Posts: 2,869
|
Re: Light Painting Photography Instructions - C10
Yes thanks..
-klb
__________________
67 C10 fleet fuel injected '70 402, 700r4, 3.73 posi 07 335 sport turbo 6sp 94 Trans Am GT LT1 6sp posi -- sold after 22yrs 99 540 sport V8 6sp -- sold 73 240z L24 4sp -- given to friend 68 C10 step 350/350 3.73 open -- sold |
|
|
|
|
12-12-2018, 02:07 AM
|
#10 |
|
Registered User
Join Date: Apr 2014
Location: Azle,Texas
Posts: 2,248
|
Re: Light Painting Photography Instructions - C10
Learned a bunch from this thread, Thanks!
|
|
|
|
|
12-12-2018, 03:09 PM
|
#11 |
|
Registered User
Join Date: Oct 2009
Location: Tampa Bay
Posts: 1,549
|
Re: Light Painting Photography Instructions - C10
Ekliptik, thank you so much for turning me on to light painting 3 years ago. Every year when my brother comes to visit we spend a evening light painting. Here is a photo of my truck that we did the first year. You have seen it before but for everyone else here it is.
165 photos were taken and out of those I stitched about 50 together in photoshop to create the finished photo. Here is the first photo showing only the interior lit up. I used a LED light stick on the floor of the cab pointing up. The aperture is F5.6 and shutter speed 1 sec. For this photo I was laying down in the bed and my brother operated the camera. I used a 110V stage light and bounced the light off a orange 5 Gal Home Depot bucket to get the orange reflected light. The aperture is F5.6 and shutter speed 1 sec. In this photo the stage light was pointed the other way with the same aperture and speed settings. In this photo you can see me and the trail from the LED light stick. Of course the unwanted parts are taken out in photoshop when all the layers are stitched together. The aperture was 5.6 and shutter speed 10 secs. For each photo I would paint a different part of the truck or the background/foreground ect.. This type of photography really makes for a fun evening and really interesting photos. The lights I used were a 110V stage light, a 48 inch shop light, holding them by hand with a long extension cord, and a light stick which was battery powered. Thanks Ekliptik, Great thread and Youtube video.
__________________
CHEVY/GMC VIN DECODERS |
|
|
|
|
12-17-2018, 09:56 PM
|
#12 |
|
Registered User
Join Date: Jul 2014
Location: Chico, California
Posts: 940
|
Re: Light Painting Photography Instructions - C10
Thanks so much for the photography lesson. This is the nicest night photo I have ever taken of my truck. It took just a few minutes and a half dozen tries. And I took it with my Samsung S7 cell phone!
With a little more effort, I'm sure I could do better. |
|
|
|
|
12-18-2018, 12:13 AM
|
#13 |
|
Registered User
 Join Date: Jul 2006
Location: Ozark, MO
Posts: 4,887
|
Re: Light Painting Photography Instructions - C10
Wow, I need a nicer camera asap!
__________________
'20 Silverado Trail Boss ~ '17 Tahoe ~ '79 K15 Sierra Grande ~ '76 Blazer 2wd ~ '71 Cheyenne swb ~ '55 Pontiac Safari ~'50 3100 bagged ~ '80 Wife ~ Late model kids
|
|
|
|
|
12-18-2018, 01:41 AM
|
#14 |
|
At the body shop.
Join Date: Aug 2009
Location: Land of fruits and nuts.
Posts: 5,130
|
Re: Light Painting Photography Instructions - C10
You ever mess with nuetral density filters?
10 stop filter 30 seconds in mid day sun
__________________
" That didnt make it any newer " " Dont antique the equipment " |
|
|
|
|
12-18-2018, 04:33 PM
|
#15 | ||
|
Registered User
Join Date: Aug 2013
Location: Calgary, Alberta
Posts: 674
|
Re: Light Painting Photography Instructions - C10
Quote:
Quote:
__________________
1972 Cheyenne Super SWB PS, PB, Tach, A/C, Tilt. Drivetrain: Built 402BB, TCI Streetfighter 700R4, 2,500 stall, Eaton posi, 3.73. Suspension/Chassis: ECE 4.5/6.5 drop, CPP nitrogen shocks, CPP front and rear sway bar, CPP cross members. Exhaust: 3" exhaust with x-pipe, Spintech 3000 mufflers, Hooker ceramic coated headers. Best 1/4 mile time: TBD. |
||
|
|
|
|
01-30-2019, 02:29 PM
|
#16 |
|
Registered User
Join Date: Sep 2016
Location: Tulsa, OK
Posts: 410
|
Re: Light Painting Photography Instructions - C10
Just watched your video. That is very cool!! I admire photography and quality stuff, but have no idea how to do it. Haha! I might have to try this out sometime, if I can figure out how to adjust my camera to do that. LOL
Very cool photos!! |
|
|
|
|
07-29-2020, 01:31 PM
|
#17 |
|
Registered User
Join Date: Aug 2013
Location: Calgary, Alberta
Posts: 674
|
Re: Light Painting Photography Instructions - C10
Little update. My friend came over in his lambo last night. We parked it in the same spot the C10 photos were taken, above. Now it's summer, so no snow this time. He setup his camera beside mine, and I taught him all the steps. He did most of the actual light-painting.
 
__________________
1972 Cheyenne Super SWB PS, PB, Tach, A/C, Tilt. Drivetrain: Built 402BB, TCI Streetfighter 700R4, 2,500 stall, Eaton posi, 3.73. Suspension/Chassis: ECE 4.5/6.5 drop, CPP nitrogen shocks, CPP front and rear sway bar, CPP cross members. Exhaust: 3" exhaust with x-pipe, Spintech 3000 mufflers, Hooker ceramic coated headers. Best 1/4 mile time: TBD. |
|
|
|
|
07-29-2020, 07:35 PM
|
#18 |
|
Registered User
Join Date: Oct 2016
Location: Dallas Texas
Posts: 2,869
|
Re: Light Painting Photography Instructions - C10
.
Great shot. Was your friend wearing sandals with white socks? LOL! Looks like he stood in one spot too long there in that first shot. -klb
__________________
67 C10 fleet fuel injected '70 402, 700r4, 3.73 posi 07 335 sport turbo 6sp 94 Trans Am GT LT1 6sp posi -- sold after 22yrs 99 540 sport V8 6sp -- sold 73 240z L24 4sp -- given to friend 68 C10 step 350/350 3.73 open -- sold |
|
|
|
|
07-29-2020, 07:47 PM
|
#19 |
|
Registered User
Join Date: Aug 2013
Location: Calgary, Alberta
Posts: 674
|
Re: Light Painting Photography Instructions - C10
haha, I didn't see that before. Those are his white+black sneakers. Good eye.
|
|
|
|
|
07-29-2020, 07:49 PM
|
#20 |
|
Senior Member
Join Date: Apr 2016
Location: Cypress, TX
Posts: 3,562
|
Re: Light Painting Photography Instructions - C10
I kind of like that extra foot.
|
|
|
|
|
07-29-2020, 08:05 PM
|
#21 |
|
Registered User
Join Date: Aug 2013
Location: Calgary, Alberta
Posts: 674
|
Re: Light Painting Photography Instructions - C10
Btw, the camera I used was a whopping $500. The light was $10.
The 2 recent photos above took about 50 attempts of trial and error. The photos are not edited! They're straight off the camera.
__________________
1972 Cheyenne Super SWB PS, PB, Tach, A/C, Tilt. Drivetrain: Built 402BB, TCI Streetfighter 700R4, 2,500 stall, Eaton posi, 3.73. Suspension/Chassis: ECE 4.5/6.5 drop, CPP nitrogen shocks, CPP front and rear sway bar, CPP cross members. Exhaust: 3" exhaust with x-pipe, Spintech 3000 mufflers, Hooker ceramic coated headers. Best 1/4 mile time: TBD. |
|
|
|
|
08-30-2020, 09:43 PM
|
#22 |
|
Registered User
Join Date: Oct 2016
Location: Dallas Texas
Posts: 2,869
|
Re: Light Painting Photography Instructions - C10
.
A local speed shop posted this image on their FB page. With the bit of knowledge I've gained on this thread, it's looking to me like this is a pretty good effort. My guess is that the image hasn't been edited otherwise the EXIT sign would have been deleted. Wonder how many takes it took... -klb
__________________
67 C10 fleet fuel injected '70 402, 700r4, 3.73 posi 07 335 sport turbo 6sp 94 Trans Am GT LT1 6sp posi -- sold after 22yrs 99 540 sport V8 6sp -- sold 73 240z L24 4sp -- given to friend 68 C10 step 350/350 3.73 open -- sold |
|
|
|
|
08-31-2020, 01:34 AM
|
#23 |
|
At the body shop.
Join Date: Aug 2009
Location: Land of fruits and nuts.
Posts: 5,130
|
Re: Light Painting Photography Instructions - C10
Light paint
Long exposure 1 frame Gone plaid...
__________________
" That didnt make it any newer " " Dont antique the equipment " |
|
|
|
|
08-31-2020, 03:44 PM
|
#24 |
|
Registered User
Join Date: Dec 2012
Location: Vancouver, Washington
Posts: 1,644
|
Re: Light Painting Photography Instructions - C10
I'll have to try this.. I have all the gear to do it. My friends use the same techniques in the field with nature landscapes
__________________
1968 Chevrolet C/10 LWB - 327, TH350 - 4/5 Drop |
|
|
|
|
08-31-2020, 10:30 PM
|
#25 |
|
Senior Member
Join Date: Feb 2001
Location: New Madison, Ohio
Posts: 21,339
|
Re: Light Painting Photography Instructions - C10
Awesome ...
__________________
A husband can be right...or...A husband can be happy.  67-72 Chevy and GMC Trucks...The Classic Truck for the Classic Folk.  1970 CST Two tone green, 402BB, 400 Automatic, Tach, Buckets, AC, AM-FM, Tilt, GM CB, GM 8 Tract, LWB, etc   JOHN 17:3...The better side of "LIFE" Remember: Everyday is a good day...Some are just gooder! |
|
|
|
|
| Bookmarks |
|
|


 Linear Mode

