
|
Register or Log In To remove these advertisements. |
|
|
|
|||||||
 |
|
|
Thread Tools | Display Modes |
 07-28-2012, 10:04 AM
|
#1 |
|
Registered User
Join Date: Sep 2011
Location: Louisville, KY
Posts: 756
|
'69 Build....name pending
'69 w/ sbc 400, 700r4.
       More to come. |

|

|
|
07-28-2012, 10:45 AM
|
#2 |
|
Hotrodchevy
Join Date: Sep 2010
Location: Hot Springs NC
Posts: 275
|
Re: '69 Build....name pending
nice truck
__________________
2017 1500 CREW CAB GMC 1997 C1500 Chevy 1971 CHEVY CHEVELLE SS 402BB : 1971 CHEVY C10 Stepside Project 71 cluncker http://67-72chevytrucks.com/vboard/s...ferrerid=89816 My Build Second Chance Suburban (SCS)http://67-72chevytrucks.com/vboard/s...d.php?t=424650 |
|
|
|
|
07-28-2012, 11:09 AM
|
#3 |
|
Registered User
Join Date: Jul 2011
Location: Farmville, Va
Posts: 3,027
|
Re: '69 Build....name pending
nice place to start a quality rebuild.
|
|
|
|
|
07-28-2012, 11:28 AM
|
#4 |
|
Registered User
Join Date: Sep 2011
Location: Louisville, KY
Posts: 756
|
Re: '69 Build....name pending
Thanks! More pictures coming later this weekend. A friend and I replaced the windshield already, new wiper blades on the way. Just purchased disk brakes front/rear as well. The all the weatherstripping and interior will be addressed but all I'm doing with the exterior is CLR and buff.
Once I get the oxidized paint cleaned up this weekend I'll get some more progress pics up. |
|
|
|
|
05-17-2014, 11:10 AM
|
#5 |
|
Registered User
Join Date: Sep 2011
Location: Louisville, KY
Posts: 756
|
Re: '69 Build....name pending
Well, life just gets in the way of plans sometimes! Getting some space in the garage cleaned up and going to pull the '69 in and start dis-assembly of the suspension. Need to get it down to a friends place next week for a pressure wash underneath first.
I'll give you my wish list and I'd love input as this is my first time digging in this deep. Drop will be static on this truck. 4.5/6. I'm planning on PB UCA/LCA's up front moved 1" forward. Not sure if I should go stock width or narrowed 1". I will also be going with PB rear trailing arms, not sure on 1" or 3" drop. I already have a CPP 4 wheel disk brake set up and I don't know if I need their drop spindles or any drop spindle will work. I would also love some input on which springs to go with. I'm still torn on wheels as well. I'm sticking with 6 lug and I may stick with the rally's for now but may also go with a 15 x 8 steelie and caps. Hoping to start ordering some parts in the next few weeks! |
|
|
|
|
05-17-2014, 05:21 PM
|
#6 |
|
Registered User
Join Date: Oct 2012
Location: Arlington Washington
Posts: 1,808
|
Re: '69 Build....name pending
Gonna be a cool truck. Personally with that mild of a drop I'd rebuild your stock control arms and trailing arms saving you a lot.
|
|
|
|
|
05-17-2014, 05:36 PM
|
#7 | |
|
Registered User
Join Date: Sep 2011
Location: Louisville, KY
Posts: 756
|
Re: '69 Build....name pending
Quote:
I guess the question is how much $$ my time is worth. |
|
|
|
|
|
05-17-2014, 05:41 PM
|
#8 |
|
Registered User
Join Date: Jul 2010
Location: los angeles,ca
Posts: 3,617
|
Re: '69 Build....name pending
Cool truck! I like your plans for it too. What is that on the inner fenderwell?
|
|
|
|
|
05-17-2014, 07:50 PM
|
#9 | |
|
Registered User
Join Date: Sep 2011
Location: Louisville, KY
Posts: 756
|
Re: '69 Build....name pending
Quote:
|
|
|
|
|
|
05-17-2014, 09:10 PM
|
#10 |
|
Registered User
Join Date: Mar 2006
Location: Pittsburgh
Posts: 1,694
|
Re: '69 Build....name pending
Looks like your starting with a nice truck Dan. I wanted the 1" forward control arms to center the front wheel.
I'd ask Nate about what drop to utilize on his rear T/A's for 15" wheels. If your running stock T/A's with 15" wheels a 1 1/2" block is only recommended so that you don't have scrub line issues if you get a flat.
__________________
Nate 1967 short fleet Project Blue Goose 'If it don't bounce back... heeheehee you go hungry!" Blues Brothers |
|
|
|
|
12-13-2014, 12:36 AM
|
#11 |
|
Registered User
Join Date: Sep 2011
Location: Louisville, KY
Posts: 756
|
Re: '69 Build....name pending
Time to bring this thread back. Taking it to a friend's shop tomorrow for power washing of the under carriage so it can go in the vacant bay in the garage. Looks like 5/7 static drop it is.
I think I'll stick with the current wheels for now but if I can find some steelies that will work with disk brakes I may go that route. The only other 6 lug wheel I think I'd consider is the Mobsteel wheels but I'm just not sure yet. I'll try to get some pics as I go. Parts aren't even ordered yet as I had to get the space cleared first. |
|
|
|
|
12-13-2014, 11:51 AM
|
#12 |
|
68 C 10
 Join Date: Aug 2010
Location: Advance ,Mo
Posts: 554
|
Re: '69 Build....name pending
On the PB arms I would just run the 1inch forward. I think the 1 inch narrowed is mainly for the drop members. I ordered a set of 1inch forward and they shipped 1 inch forward 1 inch narrowed When you put these on a static drop and add a CCP modular dropped spindle it narrows the tract width to much and tie rods become a big issue , I cut my tie rods to the shortest length possibly and they where still to long causing the wheels to toe out. After consulting with Nate we figured out I had the wrong arms and he shipped me a new set that are just 1 inch forward.
As far as the trailing arms I went with the 3 inch drop with Nates trailing arms there should be any scrub issues because of the way he has it designed. Now if you where just using blocks that's a different story. This is a pic before I started cutting the rods Down. End result wasn't much better. But with new arms the line up perfect.
__________________
Kevin "Life is Hard But its Harder when your Stupid" John Wayne 68 C10 70 C20 http://67-72chevytrucks.com/vboard/s....php?t=602326# |
|
|
|
|
12-13-2014, 05:20 PM
|
#13 |
|
Registered User
Join Date: Sep 2011
Location: Louisville, KY
Posts: 756
|
Re: '69 Build....name pending
Good info Kevin, thanks.
|
|
|
|
|
12-13-2014, 11:29 PM
|
#14 |
|
Registered User
Join Date: Sep 2011
Location: Louisville, KY
Posts: 756
|
Re: '69 Build....name pending
Pressure washed the front end, engine bay and much of the frame today. I have no clue what was done to this truck in the past and I'm stumped as to what the bright green on the steering and suspension components is.
Also, the frame rails under the hood were black before cleaning and when finished they were the same green as the rest of the truck or peeled down to bare metal. The paint job done on this truck was sketchy at best. There is also evidence of orange paint but the SPID says olive green and the VIN # on the frame matches. I think the front clip was swapped at some point because there are a few AC components hanging around and but you can see from the interior pics, there is no AC. Hood is pulled and I'm hoping that tomorrow I have time to get the front clip off.(in pieces as I don't have help to lift tomorrow.)    
|
|
|
|
|
12-21-2014, 12:36 PM
|
#15 |
|
Registered User
Join Date: Sep 2011
Location: Louisville, KY
Posts: 756
|
Re: '69 Build....name pending
After tearing into this some more, I just can't justify the cost of PB UCA/LCA and TA's. I really don't think I need it for what I want to do.
What I'm trying to figure out now is if I stick with the 15" wheels what's the best way to get 5/7? I've got the front fine w/ 2" mod DS and 3" springs but what's best for the rear if I need to steer clear of a 2" block? My other option would be to ditch the 15" wheels and go with Mobsteel 20". Not going with the PB parts would free up the cash for wheels/tires. I'm open to suggestions here, I only want to do this once. |
|
|
|
|
01-10-2015, 03:14 PM
|
#16 |
|
Registered User
Join Date: Sep 2011
Location: Louisville, KY
Posts: 756
|
Re: '69 Build....name pending
I have the inner fenders pulled and plan to get them and the battery tray blasted, primed and painted flat black soon. There is no rust but the PO had a bad battery in there for a while I'm guessing and the tray is in rough shape. The passenger inner fender got some collateral damage as well. In the process of getting my parts ordered and I'm going to get it on the jackstands soon and start to disassemble the front end.
 
|
|
|
|
|
01-10-2015, 08:36 PM
|
#17 |
|
Registered User
Join Date: Sep 2011
Location: Louisville, KY
Posts: 756
|
Re: '69 Build....name pending
Here's a before of the inner fenders.
 
|
|
|
|
|
01-11-2015, 03:22 PM
|
#18 |
|
Registered User
Join Date: Sep 2011
Location: Louisville, KY
Posts: 756
|
Re: '69 Build....name pending
I got to the interior for a few minutes this morning. I started with removal of the sill plates and weatherstripping. I knew that they had been leaking a bit but there is evidence of a bit of water that has made it's way to the rockers. Mostly surface rust but I'm going to have to address it while I'm at it.
As an aside, does anyone have a good technique for removing the adhesive from the previous weatherstripping. I think it came loose at some point and the PO gobbed some glue in there to hold them.   The seat is comfortable but the sun got to it over the years. I picked up an Overstock.com $13.00 saddleblanket seat cover that will work for now. I also got the passenger side release reconnected as that side wouldn't move when you tried to move the seat forward or backward.  I'm not sure if I will keep this carpet or not but I do have some dynamat that I plan to put down and I also have some dark olive seatbelts that will be going in including a middle belt. At some point if the truck gets painted I'd like to paint the interior and since I've got it torn down now it makes the most sense but I don't know if I want the extra step or not for what I'm doing with this truck.   Last, could someone help me find a way to edit the first post? I can't find any way to edit it and I want to change the title, no name is pending. Just '69 build. Thanks. Also, I just realized I lost the links to the previous pics due to some photobucket housecleaning. I will edit those as well if I can get an edit button on the original few posts of the thread. |
|
|
|
|
01-13-2015, 08:26 PM
|
#19 |
|
Registered User
Join Date: Sep 2011
Location: Louisville, KY
Posts: 756
|
Re: '69 Build....name pending
I'm getting parts ordered but I have a question regarding drop spindles. Is there any reason I should go with the CPP modular 2" vs the 2.5" that come with the ECE kit? I just want to make sure what I order is compatible with the 15" wheels I have.
|
|
|
|
|
01-22-2015, 08:53 PM
|
#20 |
|
Registered User
Join Date: Sep 2011
Location: Louisville, KY
Posts: 756
|
Re: '69 Build....name pending
I haven't done a thing all week but today I put my credit card to work and ordered the ECE 4.5/6 drop. It should ship tomorrow or Monday. I hope to make some progress next weekend.
|
|
|
|
|
02-28-2015, 04:58 PM
|
#21 |
|
Registered User
Join Date: Sep 2011
Location: Louisville, KY
Posts: 756
|
Re: '69 Build....name pending
It's been a while, life gets in the way of things sometimes and we've been on the go over the past few weekends.
My autobody friend is going to help me with the minor rust repair and that's it. I was going to pain the interior so it was done and then possibly go after the exterior down the road but I just don't want to put that kind of money into this truck right now. After the rust repair I will put down the dynomat, new carpet and call it a day for the interior. I'm finally getting the brakes off. I'll get after the rear soon. Once everything is removed I'll clean up the front end, prime and paint. I need to get ball joints ordered and I will probably go with new inner/outer for the tie rod ends as well. I can see how much easier this job would be if the truck already had disks. Removing those drum brakes took a little time. 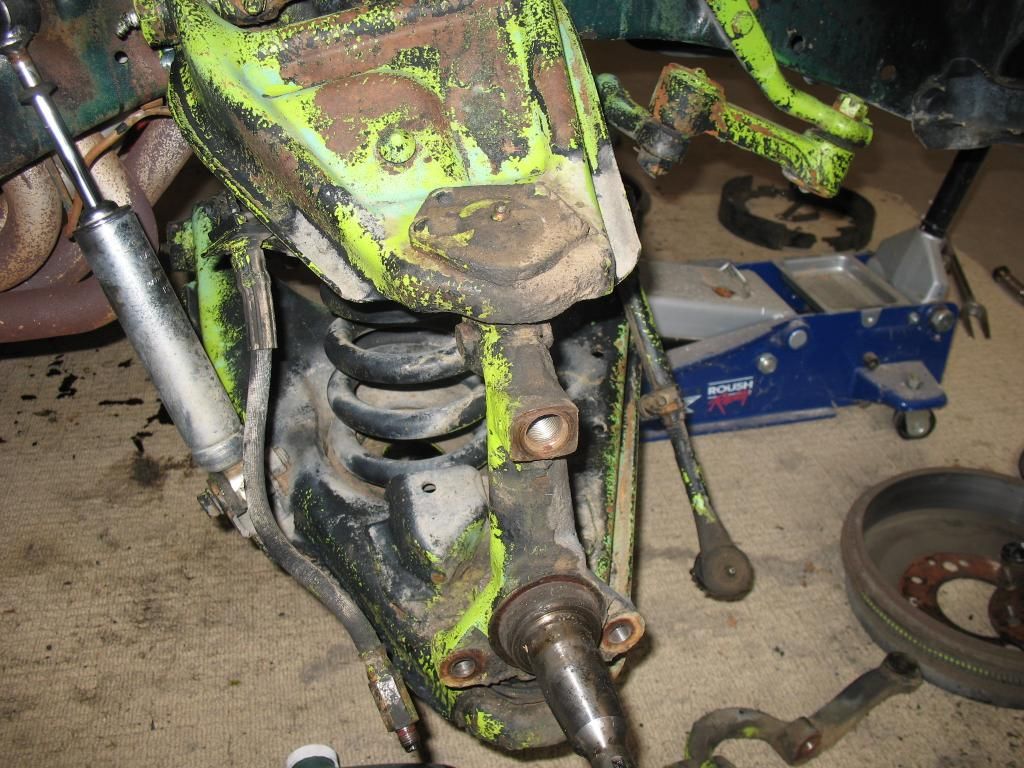 [/URL] [/URL]
|
|
|
|
|
02-28-2015, 06:18 PM
|
#22 |
|
Registered User
Join Date: Apr 2001
Location: DALLAS,TX
Posts: 21,911
|
Re: '69 Build....name pending
Since you're replacing the spindles & swapping in discs, I would have just knocked the upper/lower BJ's loose & yanked the drum + spindle as an assembly.
__________________
67SWB-B.B.RetroRod 64SWB-Recycle 89CCDually-Driver/Tow Truck 99CCSWB Driver All Fleetsides @rattlecankustoms in IG Building a small, high rpm engine with the perfect bore, stroke and rod ratio is very impressive. It's like a highly skilled Morrocan sword fighter with a Damascus Steel Scimitar..... Cubic inches is like Indiana Jones with a cheap pistol. |

|
|
|
02-28-2015, 06:46 PM
|
#23 |
|
Registered User
Join Date: Sep 2011
Location: Louisville, KY
Posts: 756
|
Re: '69 Build....name pending
After doing it the way I did it, I think I agree with you! I'm not sure if I could have done it that way or not though given my shadetree tool selection. I'm not sure how to go about the ball joint removal to be honest, I think these are the originals and riveted in.
I just ordered a cheap-o harbor freight angle grinder today. That should help with the upper rear shock brackets as well. |
|
|
|
|
02-28-2015, 09:02 PM
|
#24 |
|
Registered User
Join Date: Apr 2001
Location: DALLAS,TX
Posts: 21,911
|
Original upper BJ's are riveted. The rivets need to be drilled or cut & knocked off to remove them. The lower BJ's press out.
To get the BJ's separated from the spindle, remove the cotter pins & back off on the castle nuts securing the upper/lower BJ's. Back them off until the threads are about flush w/the top of the nut. Then give the top/bottom of the spindle some good whacks w/a hammer. This method uses the compressed springs energy to help separate the two pieces. Once the spindle unseats off the BJ's, put a jack under the lower a-arm, compress the spring slightly, unthread the castle nuts the rest of the way, & then slowly drop the jack/a-arm down (slowly releasing the compressed springs stored energy).
__________________
67SWB-B.B.RetroRod 64SWB-Recycle 89CCDually-Driver/Tow Truck 99CCSWB Driver All Fleetsides @rattlecankustoms in IG Building a small, high rpm engine with the perfect bore, stroke and rod ratio is very impressive. It's like a highly skilled Morrocan sword fighter with a Damascus Steel Scimitar..... Cubic inches is like Indiana Jones with a cheap pistol. |
|
|
|
|
02-28-2015, 11:16 PM
|
#25 |
|
Registered User
Join Date: Sep 2011
Location: Louisville, KY
Posts: 756
|
Re: '69 Build....name pending
Thanks for the advice. I've got the upper BJ removed from the spindle and the lower CA is hanging now. Problem is, I need to get another socket for the lower castle nut before I can try to get that one out.
I will try to use your method for the lower. Thanks again! |
|
|
|
|
| Bookmarks |
|
|


 Linear Mode

