
|
Register or Log In To remove these advertisements. |
|
|
|
|||||||
 |
|
|
Thread Tools | Display Modes |
 01-15-2014, 11:03 PM
|
#1 |
|
Registered User
Join Date: Nov 2013
Location: Green Bay, WI
Posts: 435
|
Bored.... and figured for once I'd give back vs. being the normal leeching sponge asking questions.
Hope this serves some of the novice guys well.(as simple as this is to alot of us) (This will also not necessarily benefit ANYONE running aftermarket hi-po torque converters, built tranny's etc.... this is simply just mating 5.3L Gen III to a 4L60e in stock form.... some variances in bolt torqueing specs may be specific to your application but should serve most of us doing simple 350/TH350, 350/TH400, 5.3/4L60e etc. REFERENCE INFORMATION: **GM Bellhousing Dowel Pins: (X-Long-1.50, .625 Dia) Moroso PN# 37932 **Torque Converter Pre-Fill: MINIMUM 1 qt. (2 if new Tq Converter) Dex III + -----(Note: I used Dex VI... any Dex III and higher is backwards compatible) **Bellhousing to Engine torque spec: 32-35 lb-ft **Torque converter to flexplate torque spec: 46 lb-ft This is how I did this by myself... friends = easier...but prepare to lose beer. -------------------------------------------------- First things first...... torque converter... PRACTICE IF YOUR NEW! Putting the torque converter onto the input shaft is something you should practice while the torque converter is dry. Slowly and axially aligned to the input shaft slide the torque converter on until you feel a slight stop... and this point you will need to rotate the converter around until you feel another 'sliding point of engagement. Your almost there... continue to rotate again at the 2nd stop until you feel the torque converter AGAIN slide back along the input shaft. These 3 clicks are crucial not only in feeding the torque converter fluid via input shaft internal pumps but also with flywheel alignment. Okay... party time now. The torque converter needs to be pre-filled in order to prevent heat build up at initial start up before the pump in the transmission distributes fluid. Get at least a quart of Dex III + in there beforehand. It takes a bit... rock it around, do a dance.... it takes a bit, but it will take the fluid. Ensure you have clean surfaces on the all shafts and skim coat with transmission fluid.  Check the input shaft... again I applied a light skim coat on the orange o-ring and rear of the inputshaft behind the pump inlet.  When you have the torque converter filled.... quickly place it onto the input shaft and ensure that you hear the 3-clicks or levels of engagement. You might leak a little bit... but hopefully you have it a go once around beforehand to familiarize yourself. Your 'Dimension 'A' should be around 1-1/64" for a 4L60e... 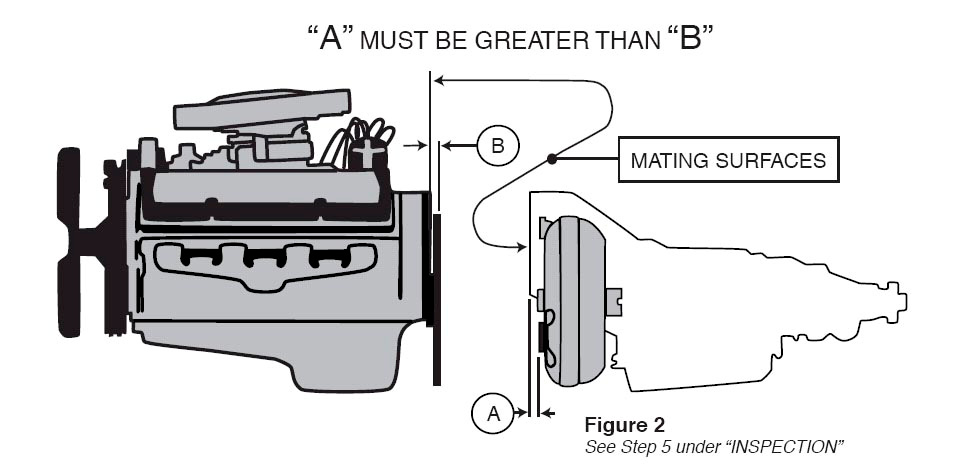 On the back of your engine... you should have 2 dowel pins.. if not.. now is the time. I used Moroso PN# 37932...and their available at O'Reilly's for $15-20. (or online if your patient) This is how I align engine and transmissions together.... cherry picker on front with load leveler going side to side.... floor jack on the rear to adjust pitch of transmission. Be safe while doing this... I have a holes in my floor jack that bolt into the tailhousing mounting point. My engine is secured safely... your should be too.   Slowly and carefully align the transmission onto the dowels and that to the back of the motor... DO NOT FORCE THIS BY USING THE BELLHOUSING BOLTS... rubber mallets on the sides at most.... it'll go. I used a skim coat of anti sieze on my dowels also.  Hand tighten bolts into engine on back.  Go on the side of your engine where the starter and shield used to be. MAKE SURE YOU CAN STILL SPIN THE TORQUE CONVERTER BY HAND FREELY and that it has a bit of end play axially. (3/16" ish)  If you look in the hole.. you can see the fllexplate surface is 3/16" + away from the mounting surface on the torque converter.  Now that everything moves and spins freely... lets torque the bell down. I use an anti-sieze on mine... 32-35 lb-ft. I start at the top center....then the bottom right... top left...bottom left etc... just like changing a rim on a car.  Check them all off once more...32-35 lb-ft... I usually hash mark mine off with a paint marker when I do this the 2nd time around. (Also a good visual way to check down the line... does the hash mark on the bell match the bolt head)  Now... back to the converter and flexplate. On the starter side.. turn the engine over with a socket on the crank to where the hole in the flywheel shows and then spin the torque converter to find the matching mouting surface threaded hole.(Having your spark plugs out makes this easy to do) I use thread locker 242 on these....  Hand tight each one first....  Get all 3 in before we start to torque. I rotated and snug up the bolts again only 'wrench loosely tight'... and then began my torque sequence. You will have to have a friend keep a wrench on the crank pull in front or... like I did... use a driver with a breaker bar in order to keep the engine crank from spinning when your torqueing down the flexplate/converter bolts. Torque to 46 lb-ft... again I hash mark mine  Repeat 2 more times... and viola... its beer time!  Your all mated up..... me 2.  
__________________
1966 C10 SWB Fleet 5.3L LM7 Vortec / 4L60e Swap 1966 C10 w/ 5.3L/4L60e Build Thread 2012 GMC Sierra 5.3L 4x4 CCSB Last edited by 66LSx; 01-15-2014 at 11:17 PM. |

|

|
|
01-16-2014, 08:40 AM
|
#2 |
|
Registered User
Join Date: Sep 2012
Location: Leander, TX
Posts: 969
|
Re: How to Mate GM Auto Transmission to Engine
Great write up. I always wondered how the torque converter bolts were accessed. I didn't know there was a cover by the starter. Thanks for taking the time to do this. A little bit more complicated than a normal SBC mating to a th350.
Bret
__________________
64' Build Thread http://67-72chevytrucks.com/vboard/s...d.php?t=586955 |
|
|
|
|
01-17-2014, 12:30 AM
|
#3 | |
|
Registered User
Join Date: Nov 2013
Location: Green Bay, WI
Posts: 435
|
Re: How to Mate GM Auto Transmission to Engine
Quote:
__________________
1966 C10 SWB Fleet 5.3L LM7 Vortec / 4L60e Swap 1966 C10 w/ 5.3L/4L60e Build Thread 2012 GMC Sierra 5.3L 4x4 CCSB |
|
|
|
|
|
10-23-2015, 09:38 AM
|
#4 |
|
But Found Her 25yrs Later!
 Join Date: Oct 2010
Location: Oregon City, Oregon
Posts: 10,468
|
Re: How to Mate GM Auto Transmission to Engine
Thanks
__________________
I lost my 65 - Found it 25 years later: http://67-72chevytrucks.com/vboard/s...d.php?t=426650 66 C20 Service Truck: http://67-72chevytrucks.com/vboard/s...d.php?t=428035 |
|
|
|
|
09-05-2018, 01:05 AM
|
#5 |
|
Registered User
Join Date: Mar 2018
Location: Idaho
Posts: 73
|
Re: How to Mate GM Auto Transmission to Engine
Glad I found this thread! Im currently attempting this. 2001 4l60e to 2006 5.3l L33. Having issues.
Is it normal to have 1-2 bolts not line up? Block doesnt have bolt hole for one to right of top 12 oclock hole. Pass side bottom bolt by oil pan doesnt line up. Engine Block mating to flexplate is 7/8 inch clearance. Distance between torque converter snout and trans mating surface is 3/8 to 1/2 inch max, but distance from tq converter bolt holes to trans mating surface is 1-1/2 inches. The tq converter slipped onto the input shaft with the 3 clunks/engagements and does not go any further. Are these distances normal/acceptable tolerances? Internet has all kinds of answers. Any help greatly appreciated!
__________________
 - long term project '68 C10 true shortbed! Resto-mod. LS swap. Build thread: http://67-72chevytrucks.com/vboard/s...d.php?t=769919 "I've still kept this project truck when anyone else would've given up and sold it as is. Giving up is easy, staying the course is part of life's journey" - long term project '68 C10 true shortbed! Resto-mod. LS swap. Build thread: http://67-72chevytrucks.com/vboard/s...d.php?t=769919 "I've still kept this project truck when anyone else would've given up and sold it as is. Giving up is easy, staying the course is part of life's journey"___________________________________________ '68 C10 true shortbed, LS swap restomod. '03 Z71 daily, '63 AMC Rambler V8 survivor |
|
|
|
|
09-05-2018, 11:11 PM
|
#6 | |
|
60-66 Nut
 Join Date: Mar 2007
Location: Coeur d'Alene, Idaho
Posts: 23,246
|
Re: How to Mate GM Auto Transmission to Engine
Is your 2001 4L60E trans from behind a Gen I small block?
Quote:
__________________
Power Steering Box Adapter Plates For Sale HERE Power Brake Booster Adapter Brackets For Sale '63-'66 HERE and '67-'72 HERE and '60-'62 HERE and "60-'62 with clutch HERE Rear Disc Brake Brackets For Sale. Impala SS calipers HERE Camaro Calipers HERE D52 Calipers HERE 6 Lug HERE Hydroboost Mounting Plates HERE |
|
|
|
|
|
09-06-2018, 11:20 AM
|
#7 | |
|
Registered User
Join Date: Mar 2018
Location: Idaho
Posts: 73
|
Re: How to Mate GM Auto Transmission to Engine
Quote:
No spacers etc. and the bellhousing has the top 12 o'clock bolt hole which I believe means that it's a V8 housing. Seems that 2000-newer bellhousings should bolt up to any LS..? I'm hoping I haven't got it all lined up right, maybe tq converter snout has been pressing against flexplate instead of seated in the crank hole..? I dunno, I'll try again soon.
__________________
- long term project '68 C10 true shortbed! Resto-mod. LS swap. Build thread: http://67-72chevytrucks.com/vboard/s...d.php?t=769919 "I've still kept this project truck when anyone else would've given up and sold it as is. Giving up is easy, staying the course is part of life's journey"___________________________________________ '68 C10 true shortbed, LS swap restomod. '03 Z71 daily, '63 AMC Rambler V8 survivor Last edited by UniqueOdyssey68; 09-06-2018 at 12:37 PM. |
|
|
|
|
|
09-16-2018, 03:09 PM
|
#8 |
|
Registered User
Join Date: Jul 2018
Location: Houston, TX
Posts: 16
|
Re: How to Mate GM Auto Transmission to Engine
Let me add to this...
1. Put a little bit of grease on the pilot of the torque converter where it seats in the back of the crank. 2. PLEASE look at your flywheel carefully. On *MOST* GM's that use 3 bolts to secure the torque converter to the flywheel (most 99+ 4L60E applications) ONE, yes just ONE of those 3 holes in your flywheel is SMALLER/THINNER than the other two. There is a reason for this. That is your ALIGNMENT hole. It MUST BE the first bolt that you install. Before you install the trans, look at your flywheel and identify the smaller hole. Then, using the appropriate tool roll the flywheel around until that bolt hole is by the starter location so that it can be put in first. If that bolt goes in 1st, then the others will naturally line up correctly with their respective holes. 3. Torque converter to flywheel spacing is LIFE OR DEATH. You are not just looking that you have enough clearance-you must also make sure that you do not have too much clearance. If the gap between the torque converter and flywheel is too big, when you bolt the two together you are actually pulling the converter hub, or neck, out of the pump reducing the amount of engagement between the inner pump gear and the converter. If you look at the video I have posted below, the flywheel flexes towards the front of the engine, away from the transmission, under a load due to internal thrust from the torque converter. If converter spacing is too great, and you have too little pump engagement, it may work under normal light loads, but under hard, aggressive, high load situations, the converter may move far enough forward due to flywheel flexing to allow the tangs, or tabs, on the inner pump gear to be broken. There is a reason that torque converter manufacturers such as Circle D provide flat, faced, clearance adjustment shims (washers) with their torque converters. It's so that you can get that clearance set up correctly. Too large a free gap between T/C & flywheel can be just as damaging as too little. Either too much, or too little, clearance will both result in the same problem-broken/damaged pump and related damage to the T/C neck, or hub. Also.. it would be very beneficial to people attempting their own transmission installation to understand just how critical cleaning the transmission cooling lines, and cooler itself (the entire system). If you are not using some type of solvent to clean out the entire trans cooling system then you should not be installing transmissions at all. I know.. I've heard it all before.. You've been doing it *your way* for years and have not had any problems doing it that way. That may be true, but one day, you will skip cleaning that cooler, or not do it properly, or not get it really clean, or not verify how many gallons per minute free flow you have, and it's going to destroy the transmission you are putting in. You will most likely blame the builder (if it was not you), or blame the wrecking yard that sold it to you-but in reality the fault lies squarely on you, or your installer. Here's the video; https://www.youtube.com/watch?v=YEfqKoilLkI In the video-watch the relationship between the flywheel and the engine. You will see the flywheel flex forward. Also, watch the converter neck where it enters the trans, you will see it withdraw, or pull out of, the transmission when the flywheel flexes forward. |
|
|
|
|
09-17-2018, 12:48 PM
|
#9 |
|
Registered User
Join Date: Mar 2018
Location: Idaho
Posts: 73
|
Re: How to Mate GM Auto Transmission to Engine
Great info, thank you! Spent a lot of time researching. Finally was able to get it all lined up and bolted together correctly.
Also found this video - mentions some of the same concerns and has good steps for measuring to ensure endplay is within acceptable tolerance. https://www.youtube.com/watch?v=lrqANOa_k3w
__________________
- long term project '68 C10 true shortbed! Resto-mod. LS swap. Build thread: http://67-72chevytrucks.com/vboard/s...d.php?t=769919 "I've still kept this project truck when anyone else would've given up and sold it as is. Giving up is easy, staying the course is part of life's journey"___________________________________________ '68 C10 true shortbed, LS swap restomod. '03 Z71 daily, '63 AMC Rambler V8 survivor |
|
|
|
|
09-17-2018, 01:44 PM
|
#10 |
|
Registered User
Join Date: Feb 2011
Location: Parkville, MD
Posts: 1,024
|
Re: How to Mate GM Auto Transmission to Engine
When installing a transmission, I always put some 3"-4" long studs in the bolt holes to help me line up the trans. Grind down the end of the stud to make it easy to get the trans on, and cut a slot so I can screw it in with a flat head. After the trans in is place, replace the studs with bolts. Once they all have bolts, start tightening them down. This isn't too big of a deal with an automatic, but it really helps with a manual transmission where you need to get the input shaft through the clutch and into the pilot bearing.
__________________
1970 C20 Custom Camper - 350, TH350 1997 GMC Suburban 1994 Acura Integra GSR 1987 Dodge Daytona Shelby Z |
|
|
|
|
| Bookmarks |
| Tags |
| transmission mount |
|
|


 Linear Mode

