
|
 01-24-2019, 11:28 PM
|
#1 |
|
Registered User
Join Date: Jun 2015
Location: Thousand Oaks, CA
Posts: 16
|
My 59 GMC Build
After searching for a couple months (after moving back to SoCal), I finally found a truck. I picked it up in Bakersfield, CA two days ago. It was quite the hassle getting there (UHaul screwed up big time), but in the end, it was worth it. She is a 59 GMC, but the front clip has been swapped from a 55/56 Chevy.
https://photos.app.goo.gl/axzrjF7PBi1Zti4aA She also has what I think is a 2nd Gen Camaro subframe on the front https://photos.app.goo.gl/hPJivGxXBXJDXNd87 and a 'built' 350 and TH350. https://photos.app.goo.gl/rBpGNNHWLkR3bLDj7 Once I get the engine to fire, I will decide if it is going to stay or go. I would really rather have an LS, but since this sbc is already here, I am going to see how it runs. The wiring harness is new, but only about 20% installed (if that, I actually wish it hadn't been started because now I have to try to figure out what has been done). https://photos.app.goo.gl/AxWdYBp2SQ8nKWeE7 A lot of work has been started, but most of it wasn't finished. It has a tilt column, but again, not done very well. Now I get to figure out the wiring for that, since they chopped the harness. https://photos.app.goo.gl/ki3gBYn3MfmUnC7R6 The goal is to get it up and running in a month or two, and use it for my daily driver while I work on my 'real' project, my 68 Camaro. Needless to say, I have my work cut out, but I think it's possible. It won't be a show truck, that's for sure, but I think it will be fun. Parts have already started showing up, the joys of being in SoCal. Not 100% sure the pictures will work, I haven't tried embedding from Google before, and my Flickr account needs to be upgraded. I will fix them if they don't work. And I have tons more. Wish me luck guys 
|

|

|
|
01-25-2019, 01:24 AM
|
#2 |
|
Senior Member
 Join Date: Aug 2010
Location: Shasta Lake, CA.
Posts: 1,619
|
Re: My 59 GMC Build
Welcome to the fun !
Sounds like a fun project ( untangling other peoples work ) and making it your own. BTW you can post your pictures here without links that over time can disappear because of second party changes. Just be sure they are not large files. Good luck with the build and have fun with it.
__________________
Glen & Jane's Rides 57 GMC NAPCO Long Bed V8 4 speed Bought 2008 7 other cars & trucks , 5 trailers '56 Chevy Long Bed I6, 4 speed Bought 1990 Sold 8.22.2020 56 GMC Suburban Pickup V8, 4 speed Hydramatic Bought 1996 Sold 10.11.2020 My Other Tinkerings http://67-72chevytrucks.com/vboard/s...75#post8967275 |
|
|
|
|
02-07-2019, 04:00 AM
|
#3 |
|
Registered User
Join Date: Jun 2015
Location: Thousand Oaks, CA
Posts: 16
|
Re: My 59 GMC Build
I guess I can't edit the original post, but here are the original pictures I linked to...
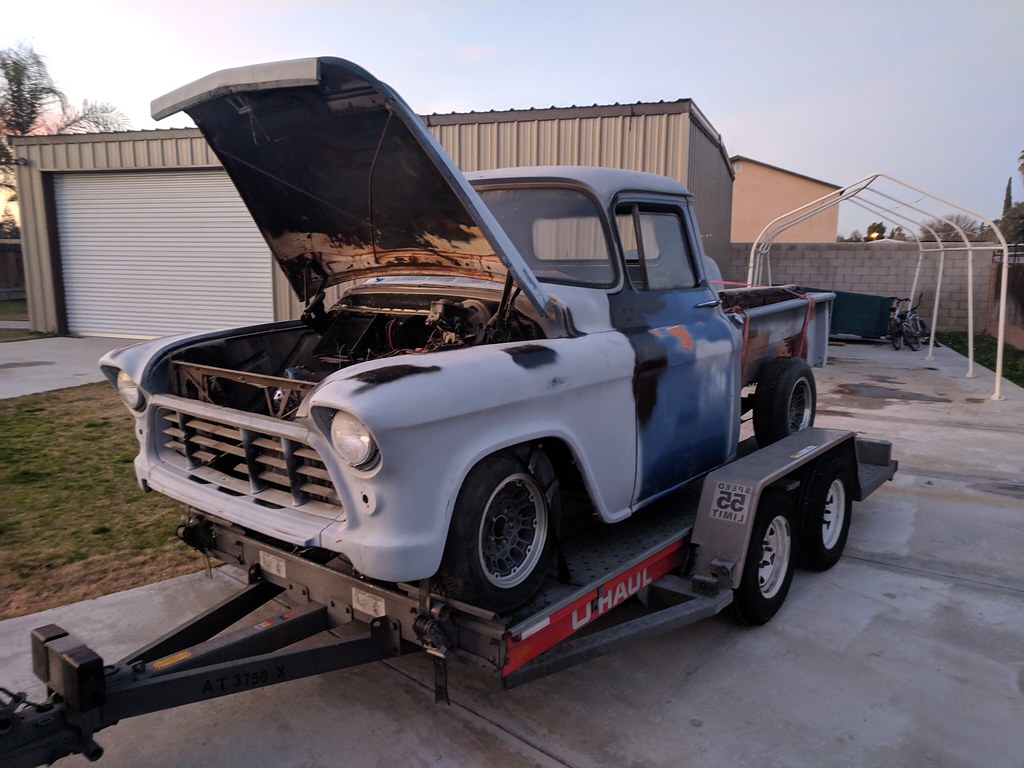 Loaded Up by Shawn Wallbridge, on Flickr Loaded Up by Shawn Wallbridge, on FlickrThe grafted front clip. 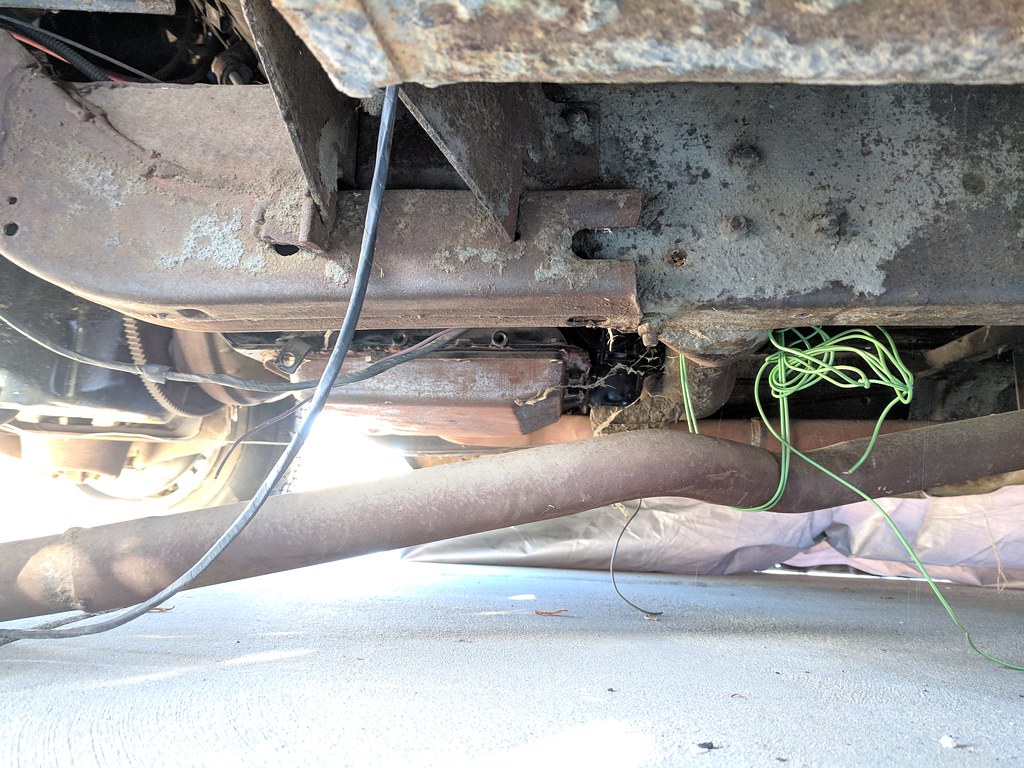 IMG_20190124_083151 by Shawn Wallbridge, on Flickr IMG_20190124_083151 by Shawn Wallbridge, on FlickrThe engine compartment. 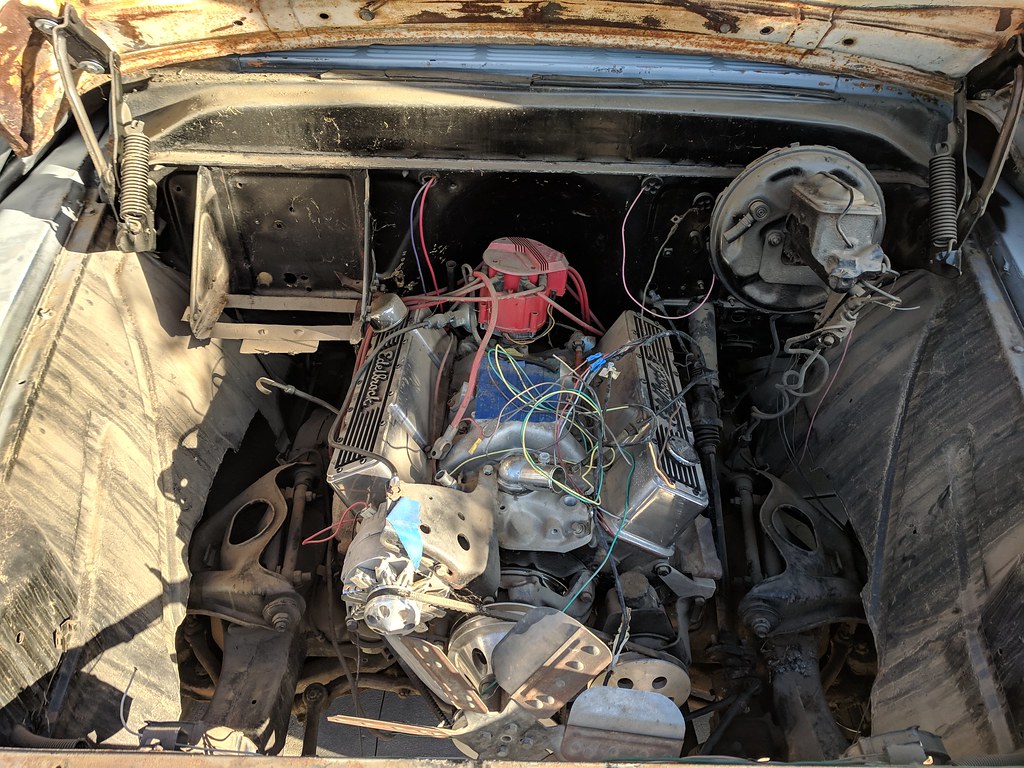 Engine Bay by Shawn Wallbridge, on Flickr Engine Bay by Shawn Wallbridge, on FlickrAnd the column/wiring harness. 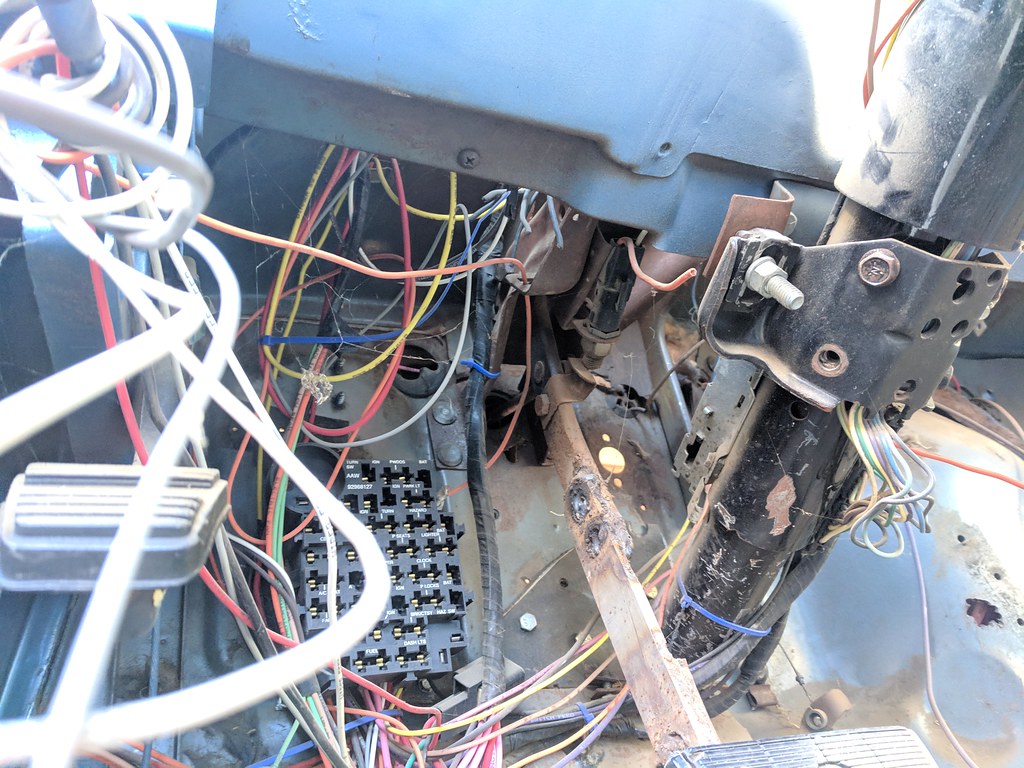 Under the dash by Shawn Wallbridge, on Flickr Under the dash by Shawn Wallbridge, on FlickrHere is my flickr album for the build, I wlll post all the pictures there, with some embedded here. As for progress, I haven't made much. We have had a TON of rain in SoCal, and I have been told our kitchen remodel need to be finished before I can start on the truck Thankfully I should be finished the kitchen this week, then I can get started.  Kitchen by Shawn Wallbridge, on Flickr Kitchen by Shawn Wallbridge, on FlickrI found a decent carb on Craigslist, a Holley Avenger 670, which should be plenty. 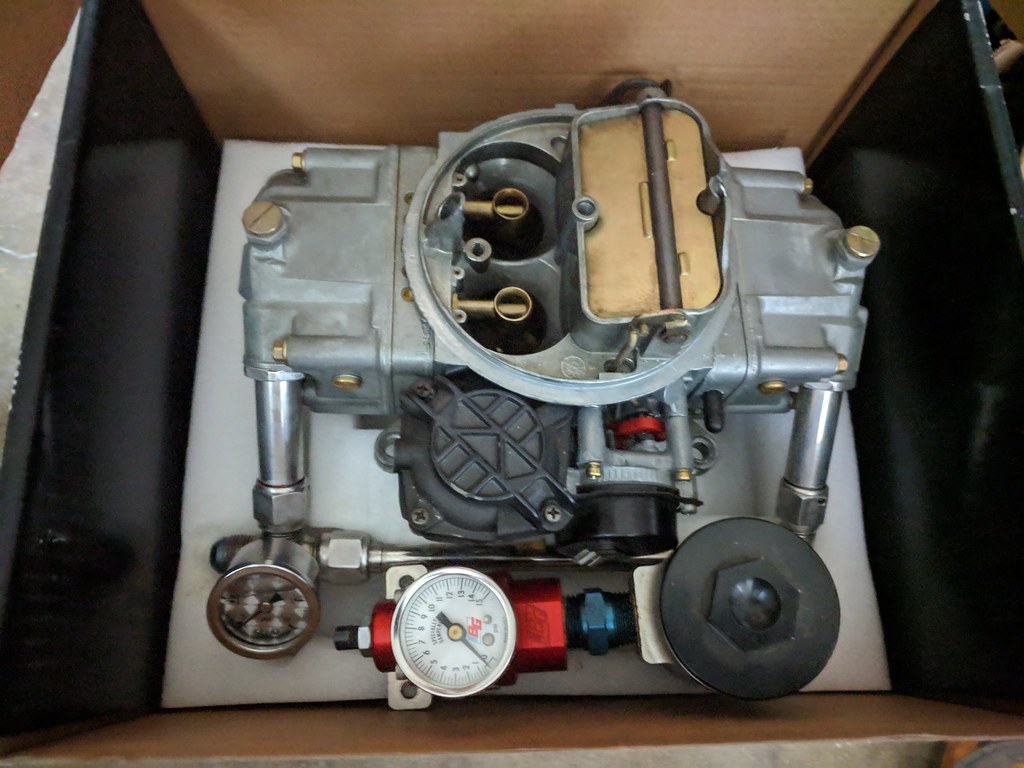 IMG_20190123_220356 by Shawn Wallbridge, on Flickr IMG_20190123_220356 by Shawn Wallbridge, on FlickrAnd I have the complete exhaust system. I went with cheap Chinese headers (which are actually really nice) off eBay, a Speedway 2.5" Dual build it yourself kit, and a pair of BlackWidow Venom 250 mufflers. They sound pretty good on youtube. I have ordered some NiCopp brake line and fittings, as I noticed they bolted the T fitting for the brake lines on the diff to the body, and I would rather be safe than sorry, especially with LA traffic. Hopefully that gets here early next week. I put my scope in the valve cover vent, and I think the heads are 441's, which aren't horrible, so we will see. If the weather isn't too bad this weekend I hope to start poking around and see what I have. The truck came with a bunch of new parts, which is nice, but I still have a decent list of other stuff I need. One thing I wanted to do, given that the taillights are so small is put an LED strip at the bottom of the rear window. I looked at a few options that were designed for that specific use and they were $20-40. Which is kind of crazy. So I bought a 5 meter roll of 12v red LED strip for $6.22 on eBay. I think that's about it for now, more updates after I actually get a chance to start working on the truck. |
|
|
|
|
02-11-2019, 09:28 PM
|
#4 |
|
Registered User
Join Date: Jun 2015
Location: Thousand Oaks, CA
Posts: 16
|
Re: My 59 GMC Build
I managed to finish up the kitchen remodel this weekend, so hopefully that means I get more Truck time
 I did manage to spend a couple hours on her this weekend. I swept out the cab, removed the gas tank (to check out the corners), got her up in the air and took a look underneath. It's definitely a 2nd Gen FBody front clip, I checked the part numbers on the rotors and calipers. I might end up getting the C5 spindle/brake kit from CPP, we will see. The bushings all need to be replaced, so I might get their poly rebuild kit as well. We will see. 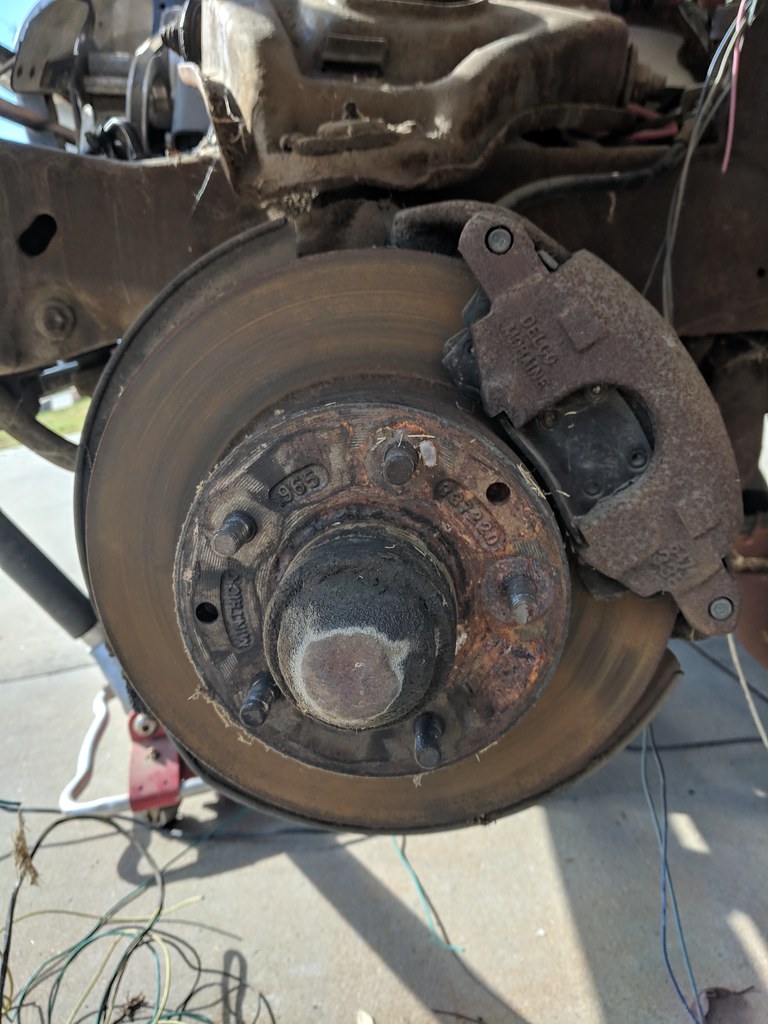 IMG_20190209_142714_1 by Shawn Wallbridge, on Flickr IMG_20190209_142714_1 by Shawn Wallbridge, on FlickrI had read that the core support mounts can be a pain with the camaro front clip. Hopefully this won't be a problem. 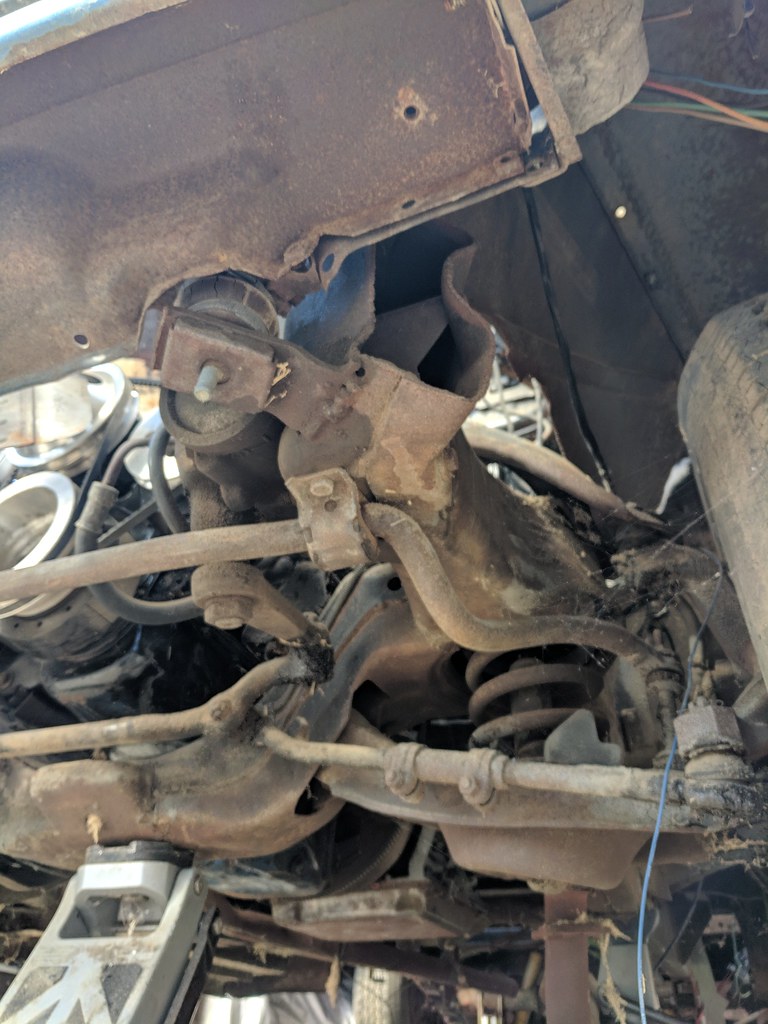 IMG_20190209_142445 by Shawn Wallbridge, on Flickr IMG_20190209_142445 by Shawn Wallbridge, on FlickrI pulled a valve cover and as I expected, it has seen better days. They claimed it was a 350, but it might actually be a 305, at least the heads are off a 305. I should have checked the block, but I didn't look up the casting numbers until later.  IMG_20190209_134341 by Shawn Wallbridge, on Flickr IMG_20190209_134341 by Shawn Wallbridge, on FlickrI also found the usual backyard hack bodywork...  IMG_20190209_141637 by Shawn Wallbridge, on Flickr IMG_20190209_141637 by Shawn Wallbridge, on Flickrand  IMG_20190209_140520 by Shawn Wallbridge, on Flickr IMG_20190209_140520 by Shawn Wallbridge, on Flickrand I think the inside panel is suppose to meet the outside panel here.  IMG_20190209_152438 by Shawn Wallbridge, on Flickr IMG_20190209_152438 by Shawn Wallbridge, on FlickrBut it was cool to see the various colours it has been over it's lifetime... 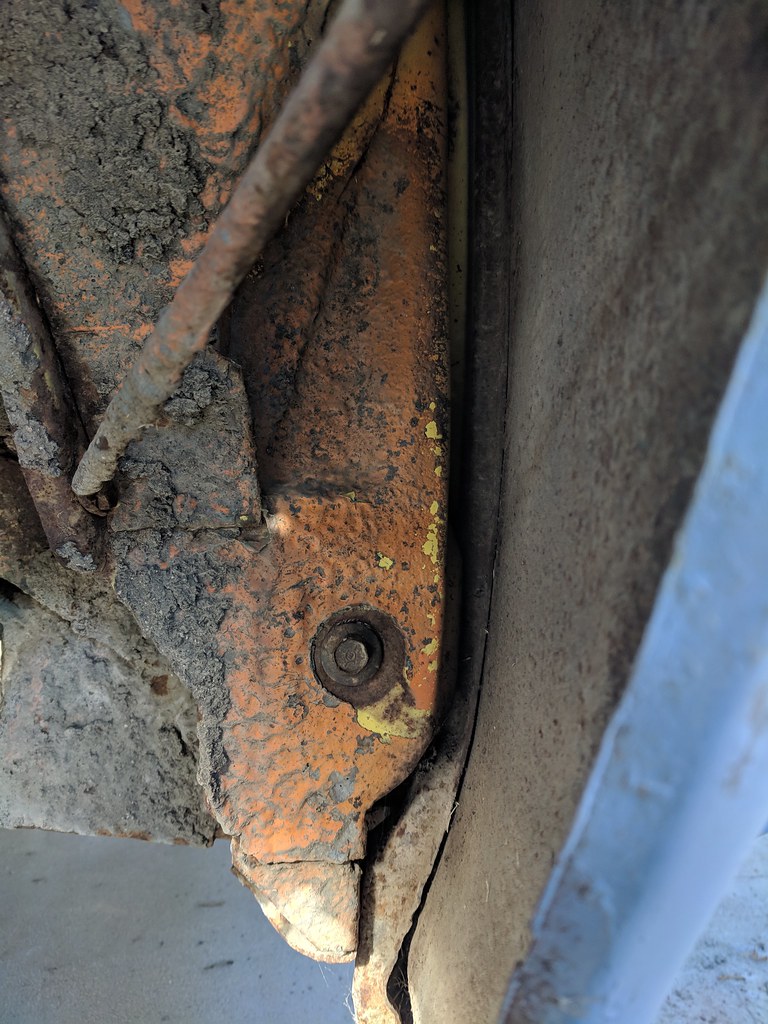 IMG_20190209_143211 by Shawn Wallbridge, on Flickr IMG_20190209_143211 by Shawn Wallbridge, on FlickrI pulled the entire harness back, as it wasn't run very well, and they didn't use grommets at all. The existing hole they were using was right at the inner fender, which was very tight and just not good imho. 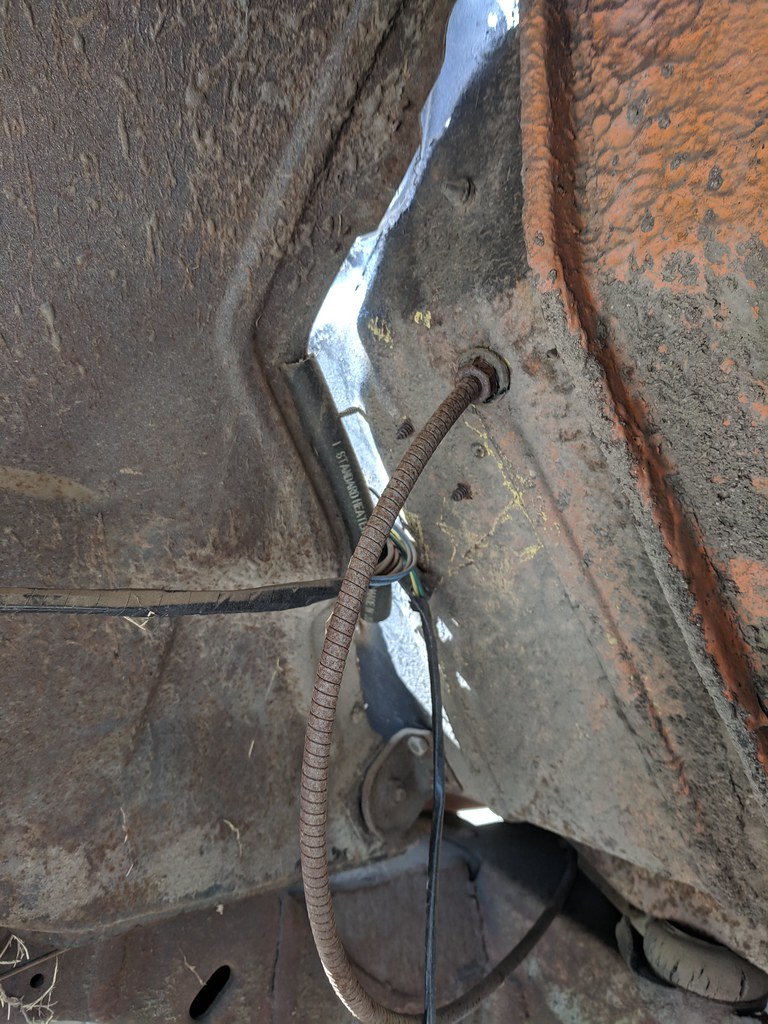 IMG_20190209_143133 by Shawn Wallbridge, on Flickr IMG_20190209_143133 by Shawn Wallbridge, on FlickrOn a positive note, the column that they installed is actually going to work out. I was expecting to order an Ididit or CPP column, but this one will be fine. I also opened up the shiny new bits that showed up... Black Widow Venom 250's 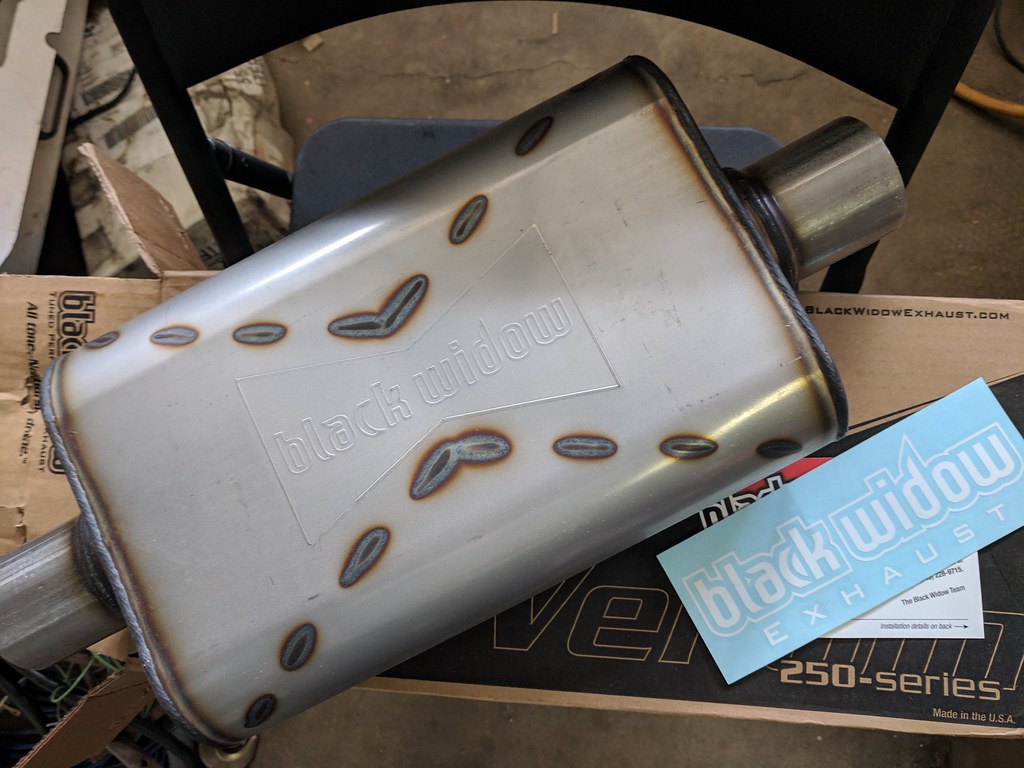 IMG_20190209_125802 by Shawn Wallbridge, on Flickr IMG_20190209_125802 by Shawn Wallbridge, on Flickrand some no-name headers off eBay  IMG_20190209_125534 by Shawn Wallbridge, on Flickr IMG_20190209_125534 by Shawn Wallbridge, on Flickr
|
|
|
|
|
02-13-2019, 04:34 AM
|
#5 |
|
Registered User
Join Date: Jun 2015
Location: Thousand Oaks, CA
Posts: 16
|
Re: My 59 GMC Build
Not much of an update, just the stuff the nice man in the Brown truck dropped off.
First up, I found an 'open-box' fuel pump on Amazon for 50% off, so I picked that up. 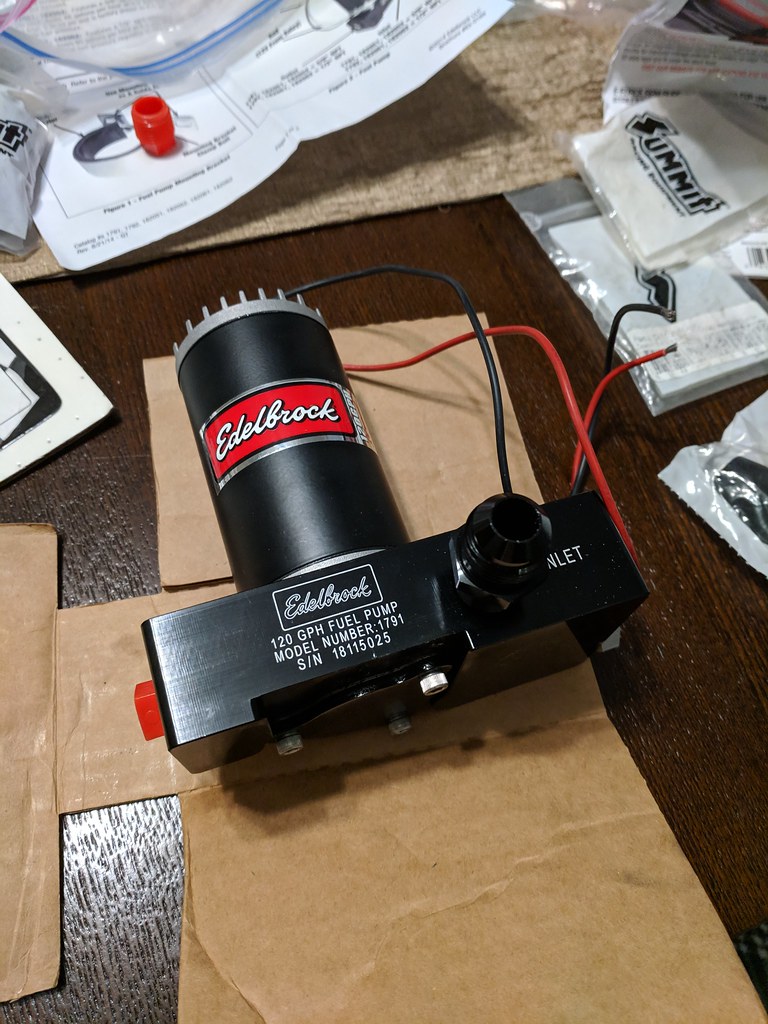 IMG_20190212_233143 IMG_20190212_233143 by Shawn Wallbridge, on Flickr I love the classic detail on the top, which of course you will _never_ see. 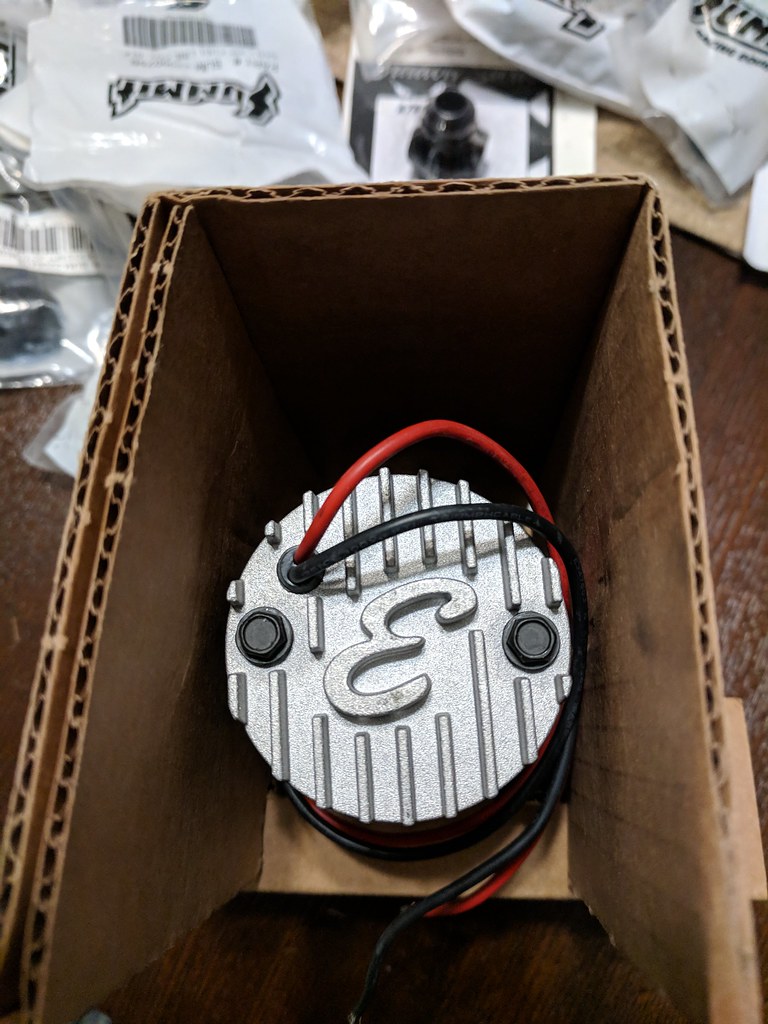 IMG_20190212_233418 IMG_20190212_233418 by Shawn Wallbridge, on Flickr Thankfully, I have a 50ft roll of aluminum fuel line, and I already had all the fittings I needed in my stash.. 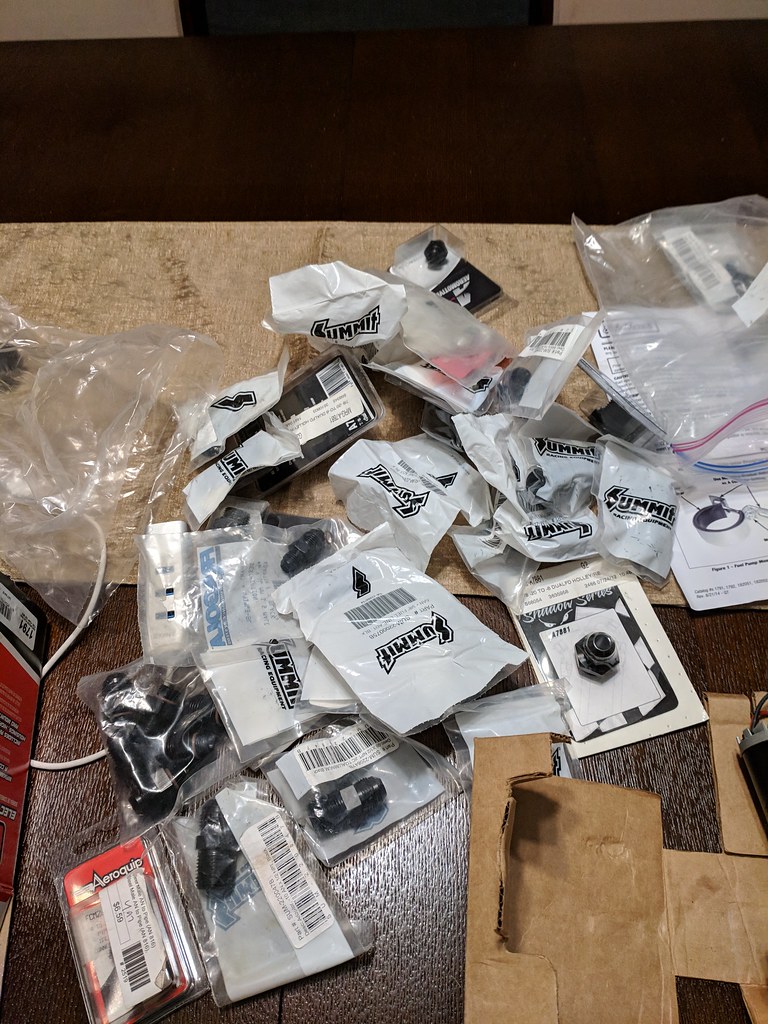 IMG_20190212_233227 IMG_20190212_233227 by Shawn Wallbridge, on Flickr So, other then figuring out if I am going to remove the existing pickup tube and braze in a larger one or pick up a new sending unit, I pretty much have the fuel system sorted. I also got a 50ft roll of 1/4" NiCopp line, Stainless -4AN tube nuts and sleeves, and the -4AN Tee fitting I need (for the rear axle). 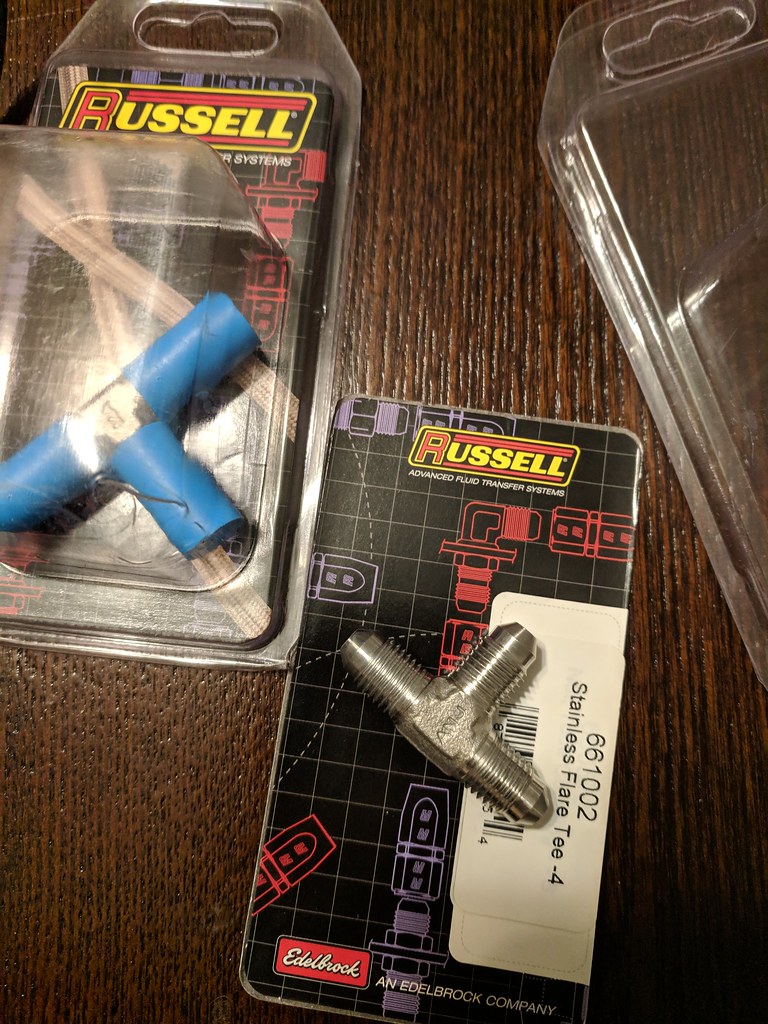 IMG_20190212_233319 IMG_20190212_233319 by Shawn Wallbridge, on Flickr I really love the look of AN fittings for brakes, and I really suck at making bubble flares (I would blame my crappy double flare tool, but it's probably just me). And lastly, I got the LED strip I am going to use for a third brake light in the bottom of the back window. I had looked on eBay for some, and they wanted $30-40 for a 2ft strip that was sold as a brake light. I found a 15ft strip for $6.55 shipped. 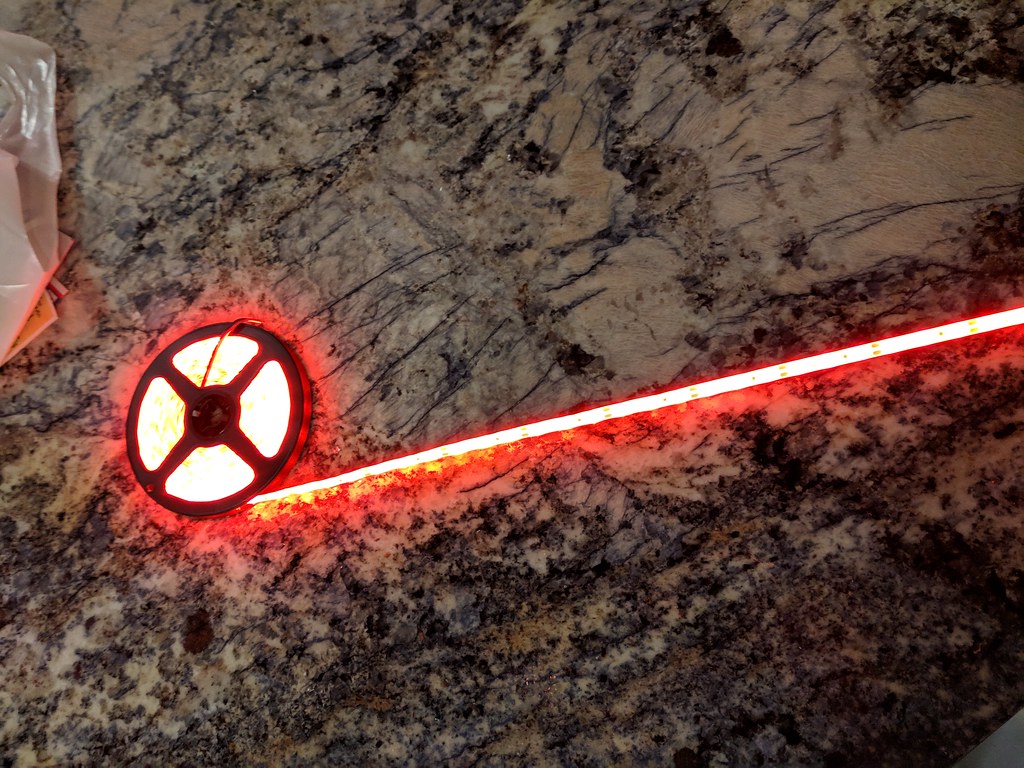 IMG_20190212_234650 IMG_20190212_234650 by Shawn Wallbridge, on Flickr I think it will be plenty bright enough. 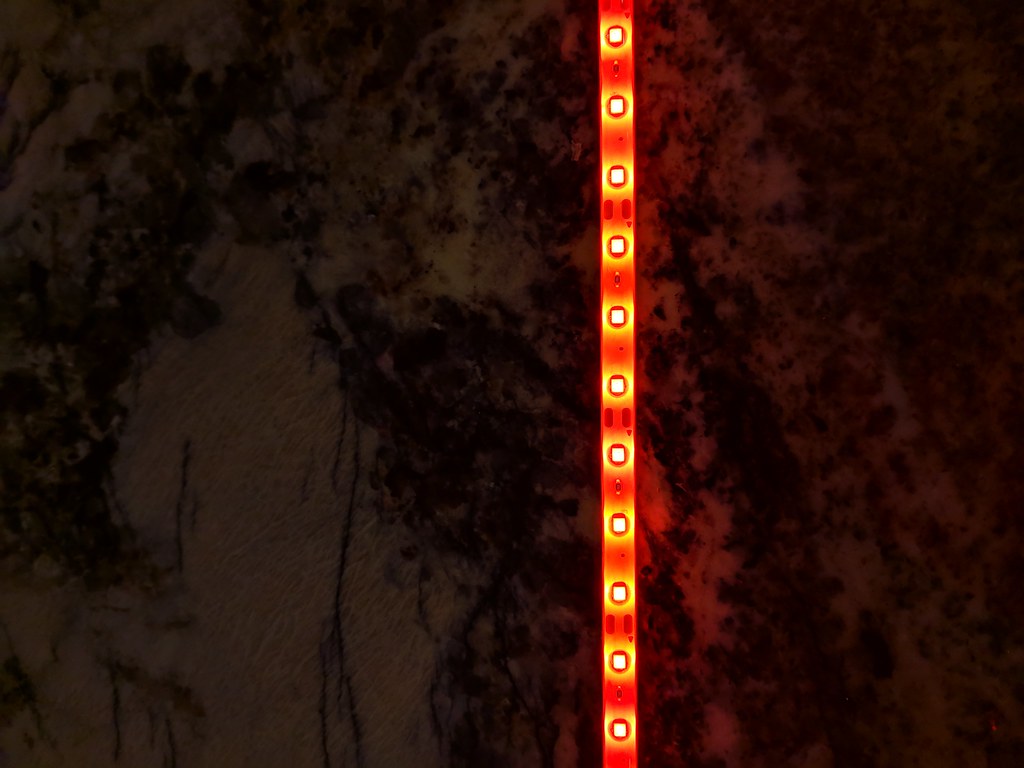 IMG_20190212_234656 IMG_20190212_234656 by Shawn Wallbridge, on Flickr I have enough for the truck, my Camaro and probably 3-4 other vehicles. If anyone wants some, send me a PM. I am _still_ tempted to go with an LS. I saw the latest Sloppy youtube video where they are aiming to go 8's for $8k, and he said they are going with a 4.8, which I had never thought of. I called around hoping they would be cheaper, and the prices out here are still insane. One guy quoted me $2500 for a 4.8.  Screenshot_20190213-001410.png Screenshot_20190213-001410.png by Shawn Wallbridge, on Flickr If anyone has a line on reasonably priced LS motors in LA, let me know. |
|
|
|
|
02-13-2019, 05:51 AM
|
#6 |
|
Registered User
Join Date: Jul 2015
Location: Doune, perthshire, Scotland
Posts: 206
|
Re: My 59 GMC Build
Good start, be nice to watch it progress
__________________
My taking way longer than expected 58 build |
|
|
|
|
03-09-2019, 02:48 AM
|
#7 |
|
Registered User
Join Date: Jun 2015
Location: Thousand Oaks, CA
Posts: 16
|
Re: My 59 GMC Build
So I haven't updated in a while, and I totally failed at my goal of getting it on the road in a month, but that's mostly due to unexpected expenses (and work got more than a little crazy).
I did get some progress made. I installed the cheap eBay headers. They fit fine, the drivers side will self clearance a little, but overall not bad for $100. 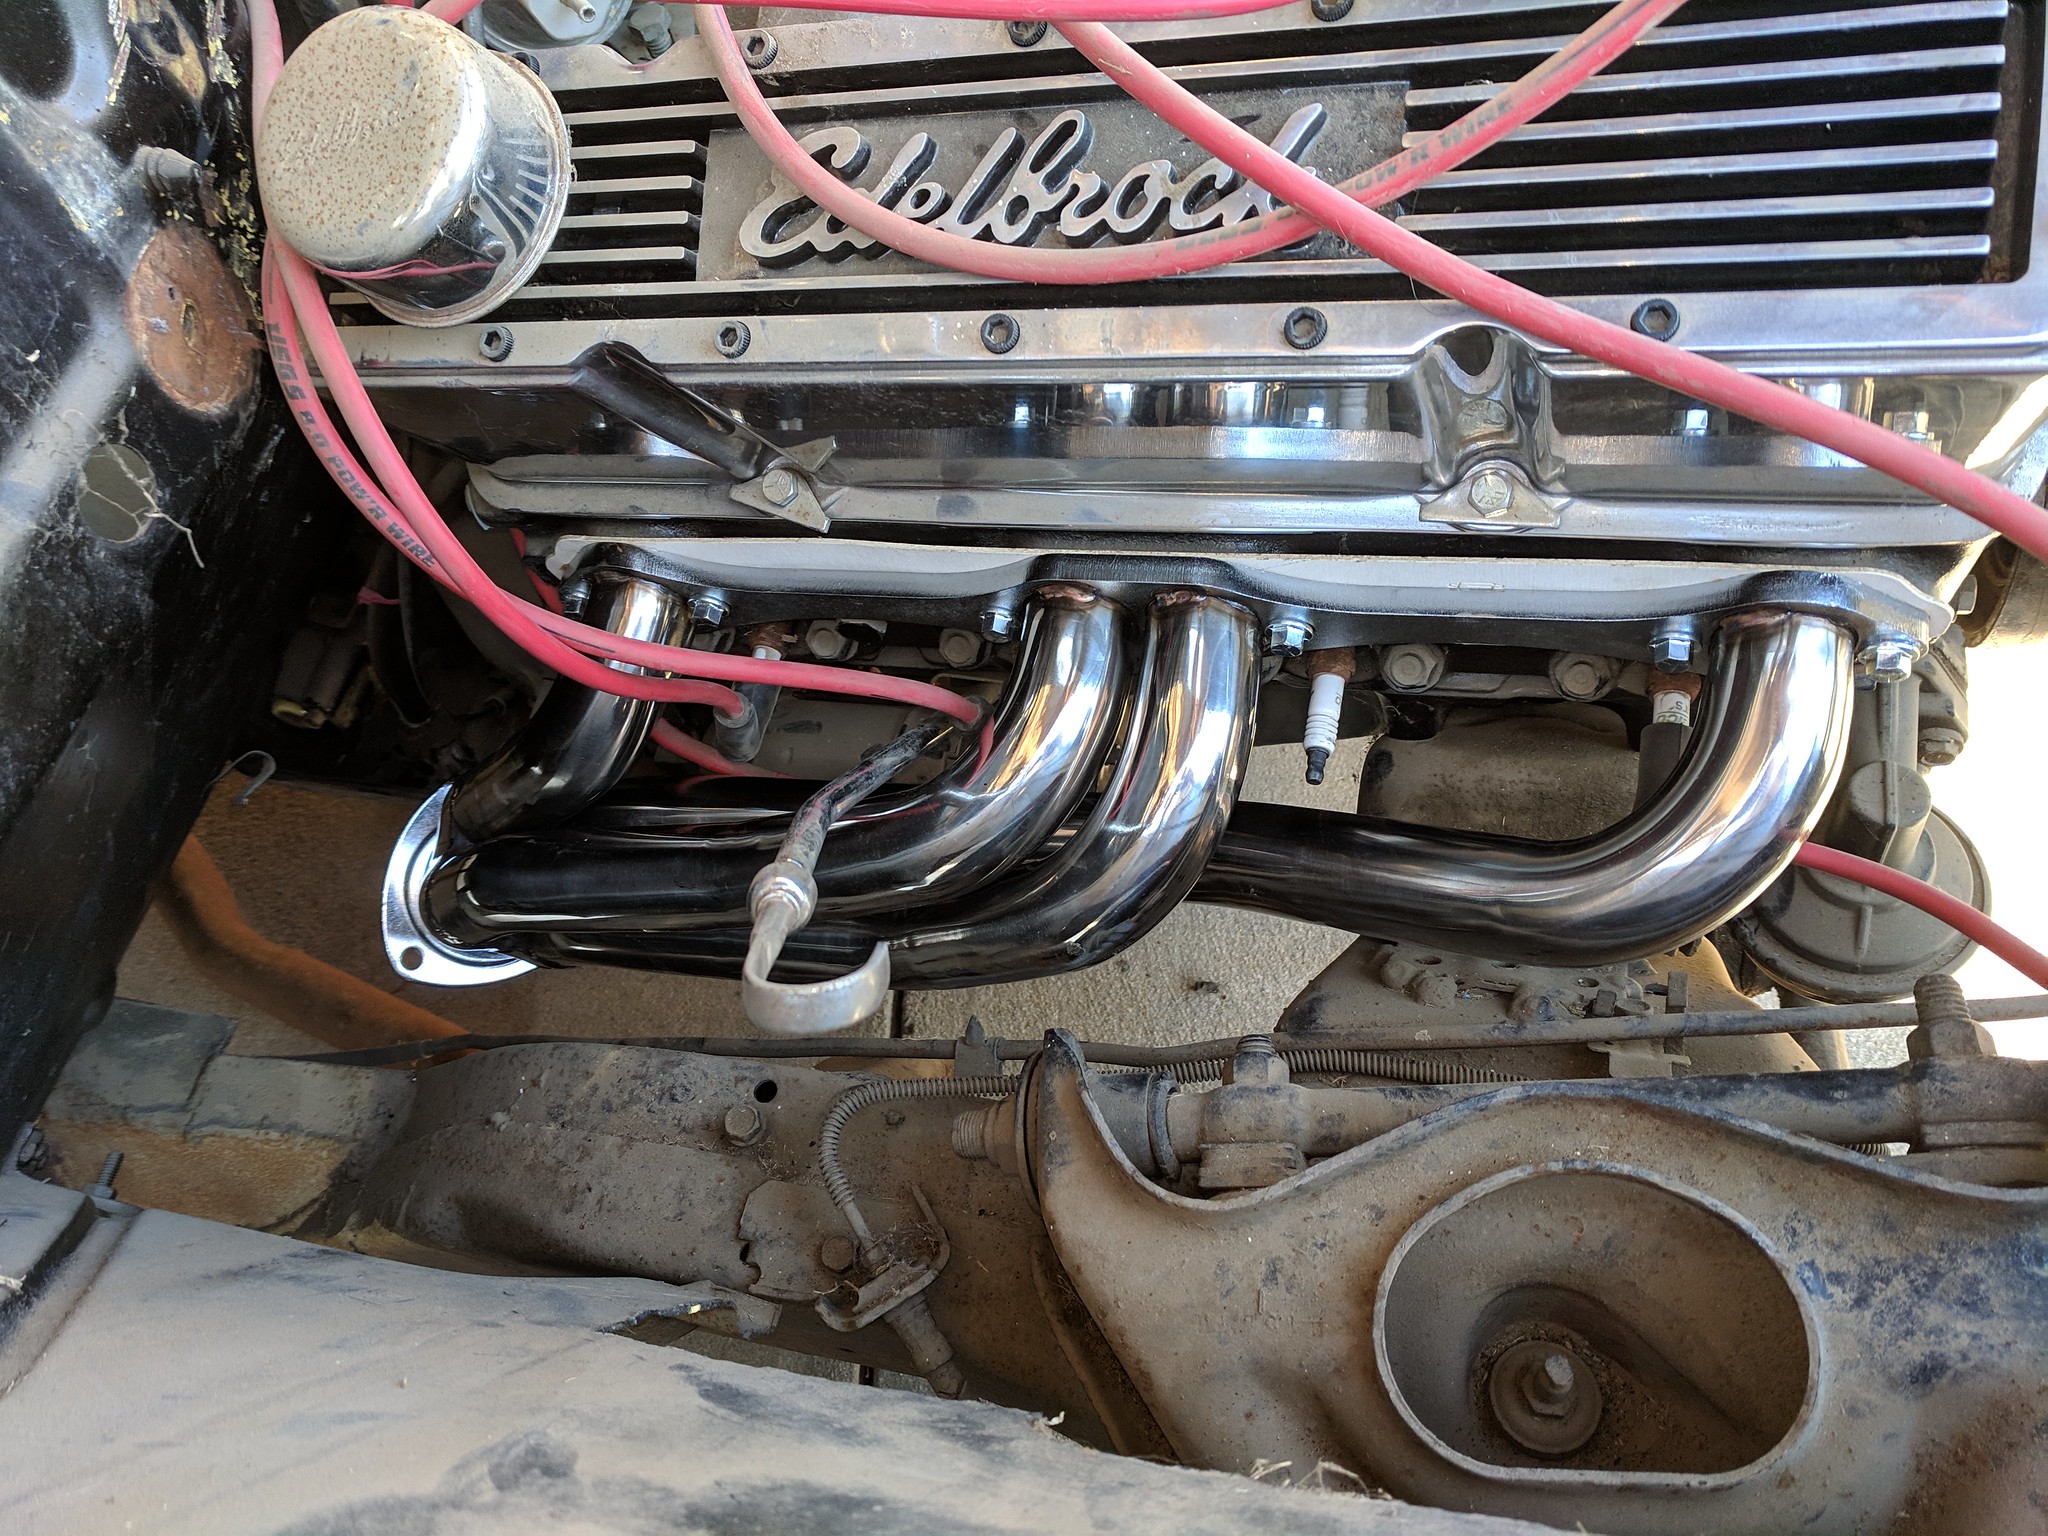 IMG_20190216_163606 IMG_20190216_163606 by Shawn Wallbridge, on Flickr 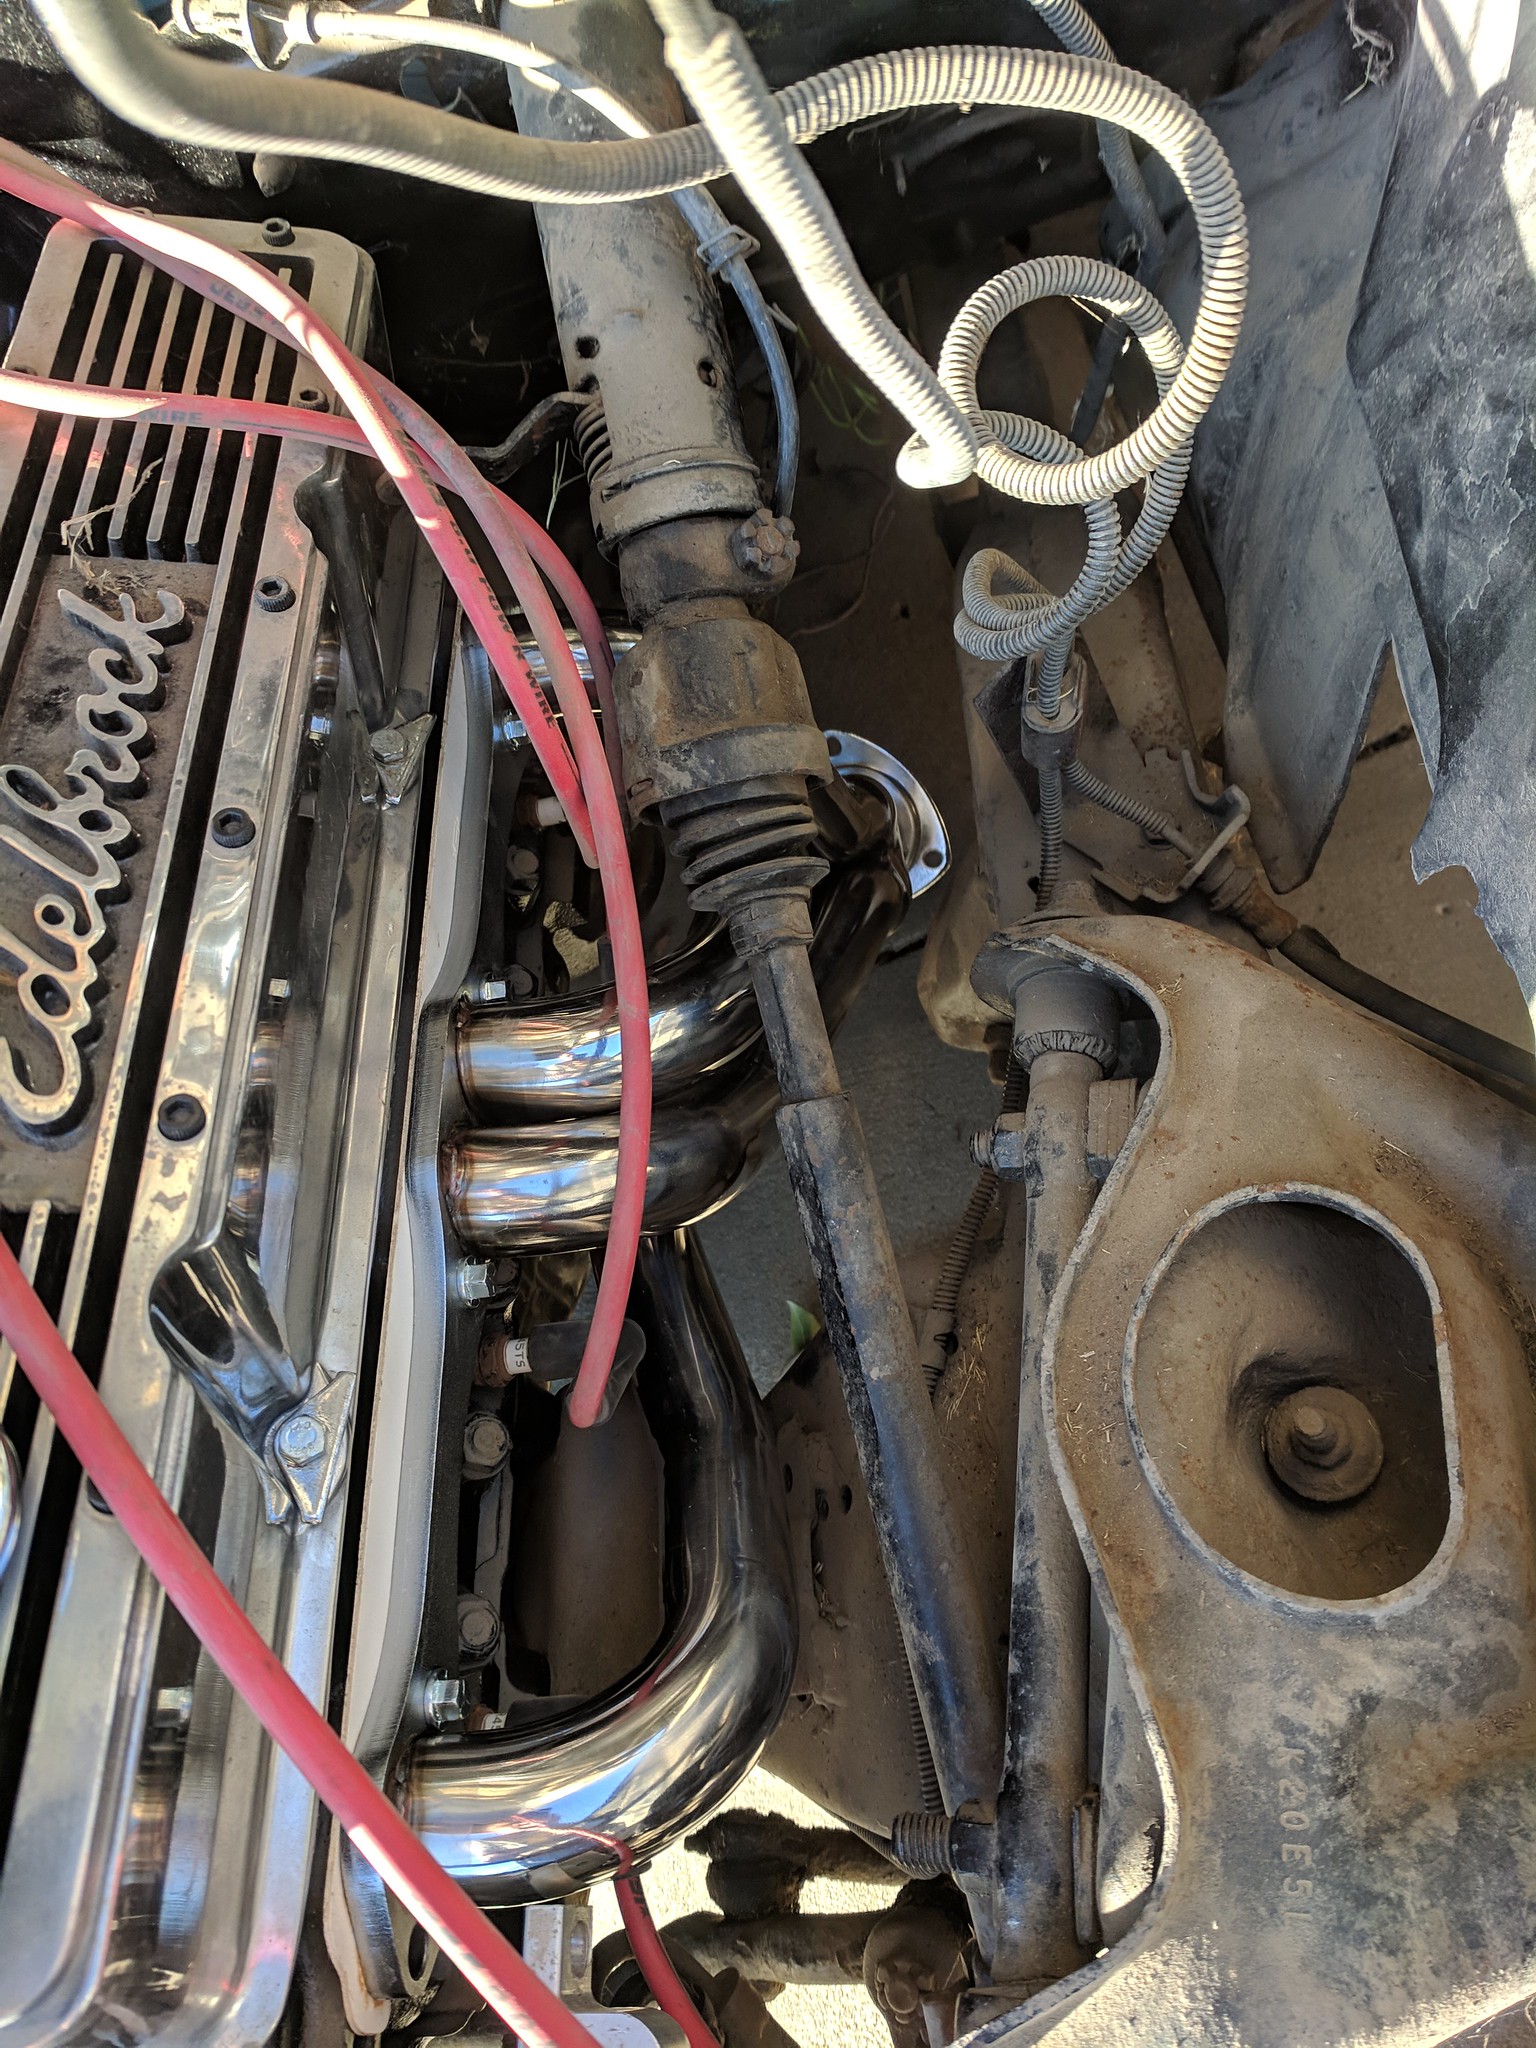 IMG_20190216_163617 IMG_20190216_163617 by Shawn Wallbridge, on Flickr I mounted the carb, and picked up an air cleaner on eBay. 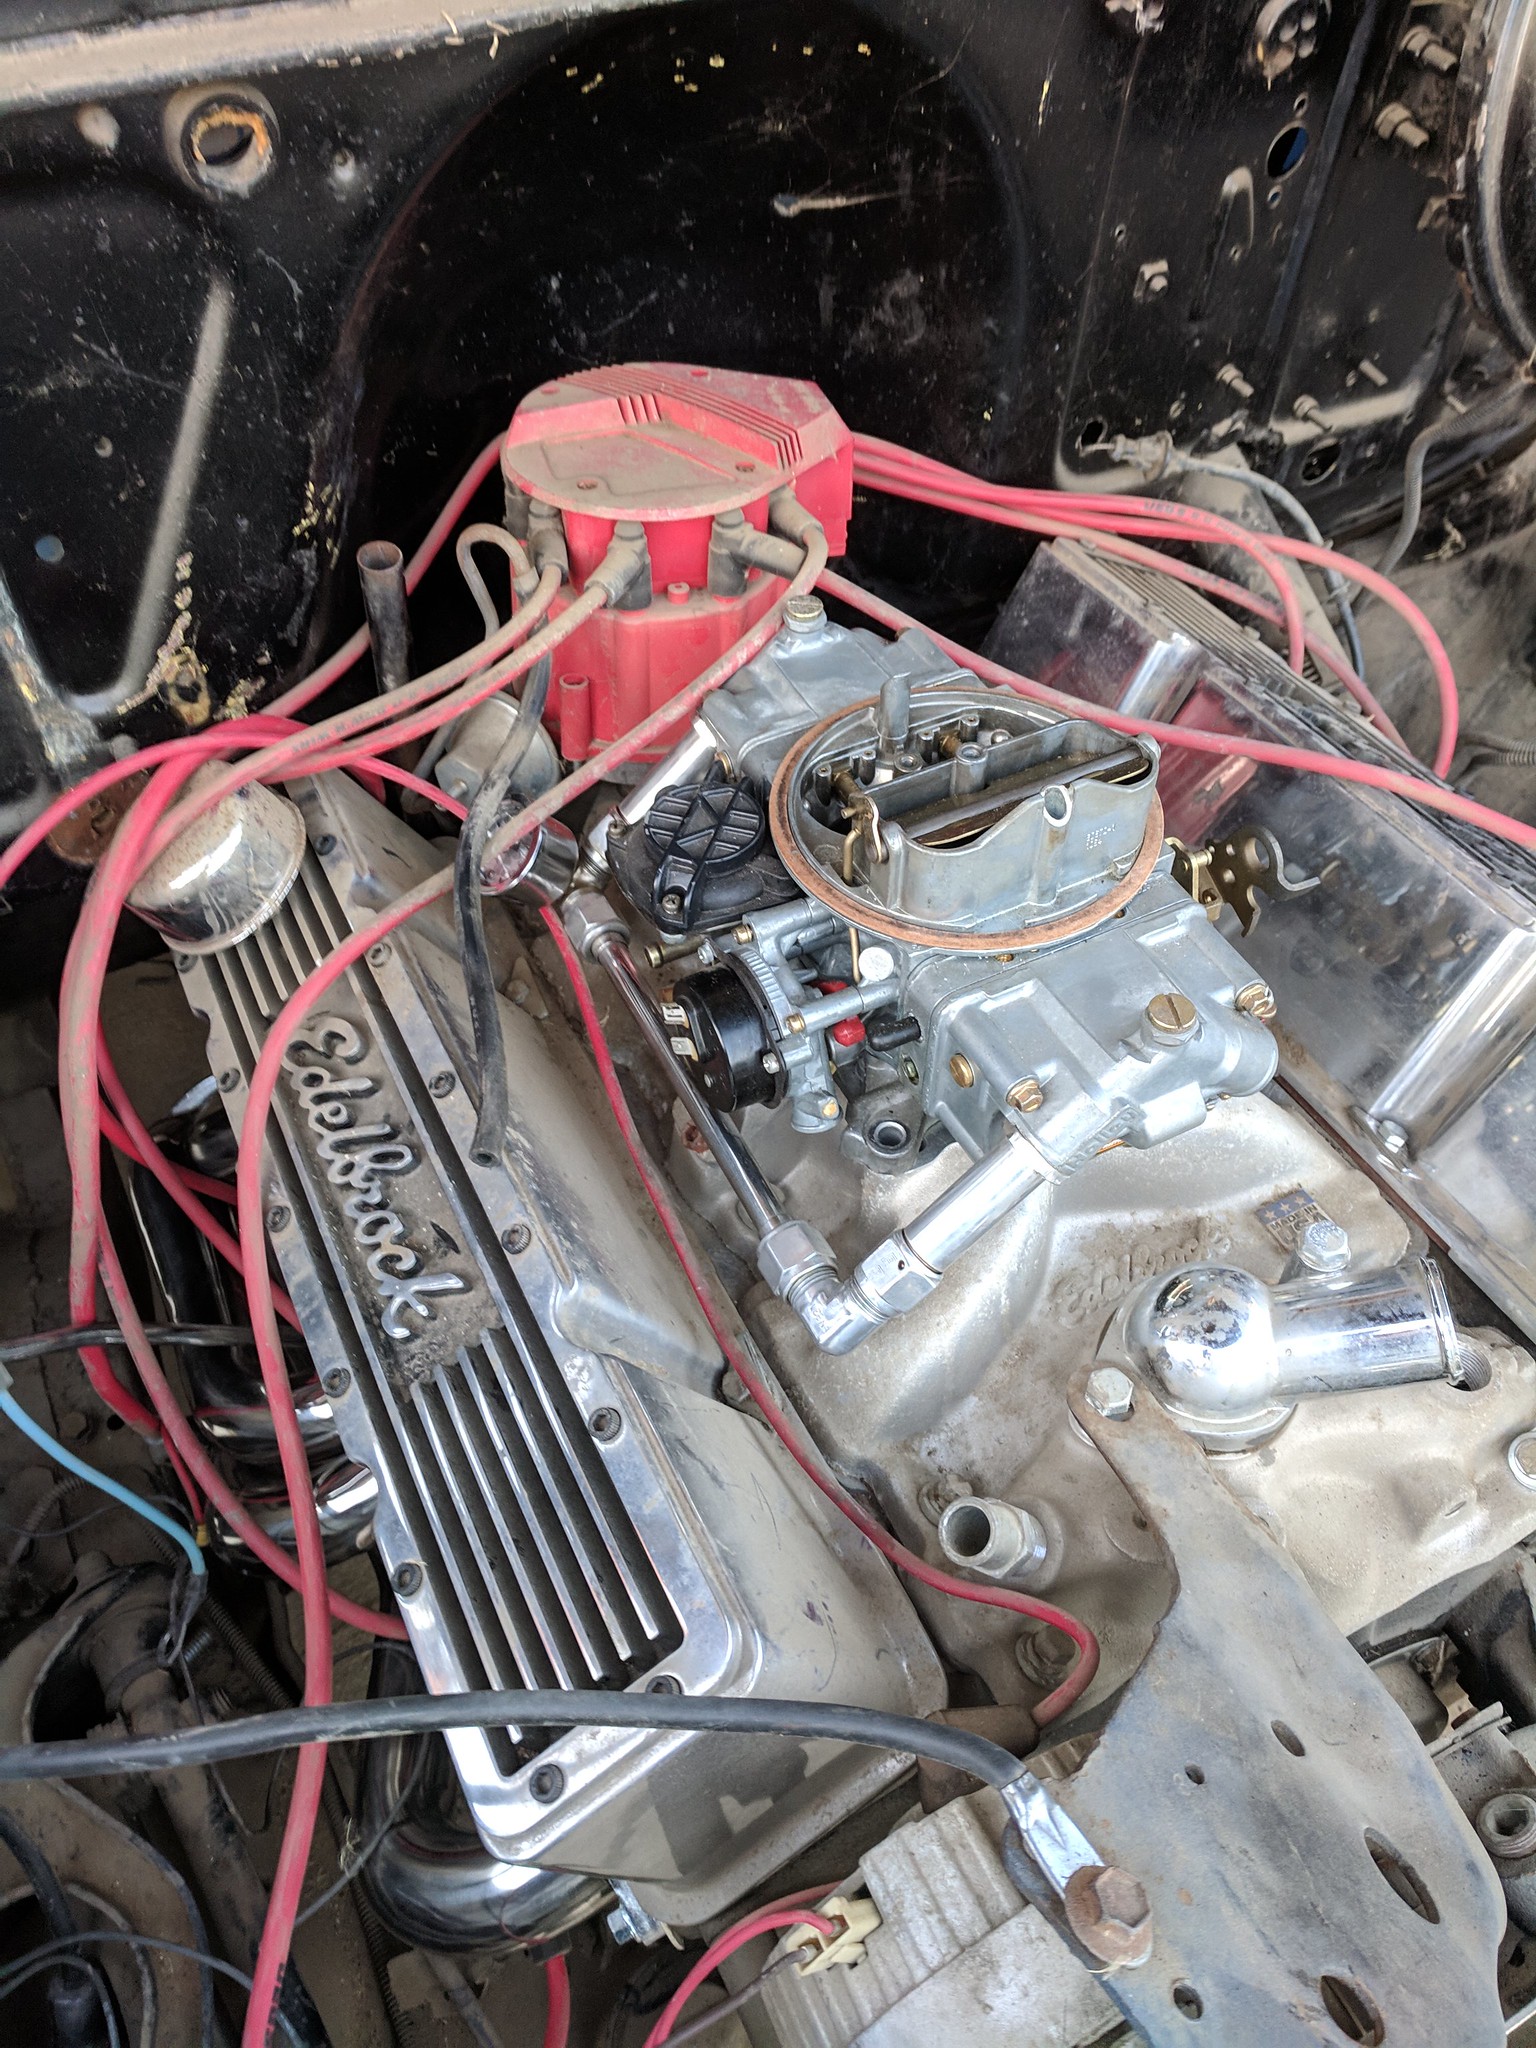 IMG_20190216_172110 IMG_20190216_172110 by Shawn Wallbridge, on Flickr 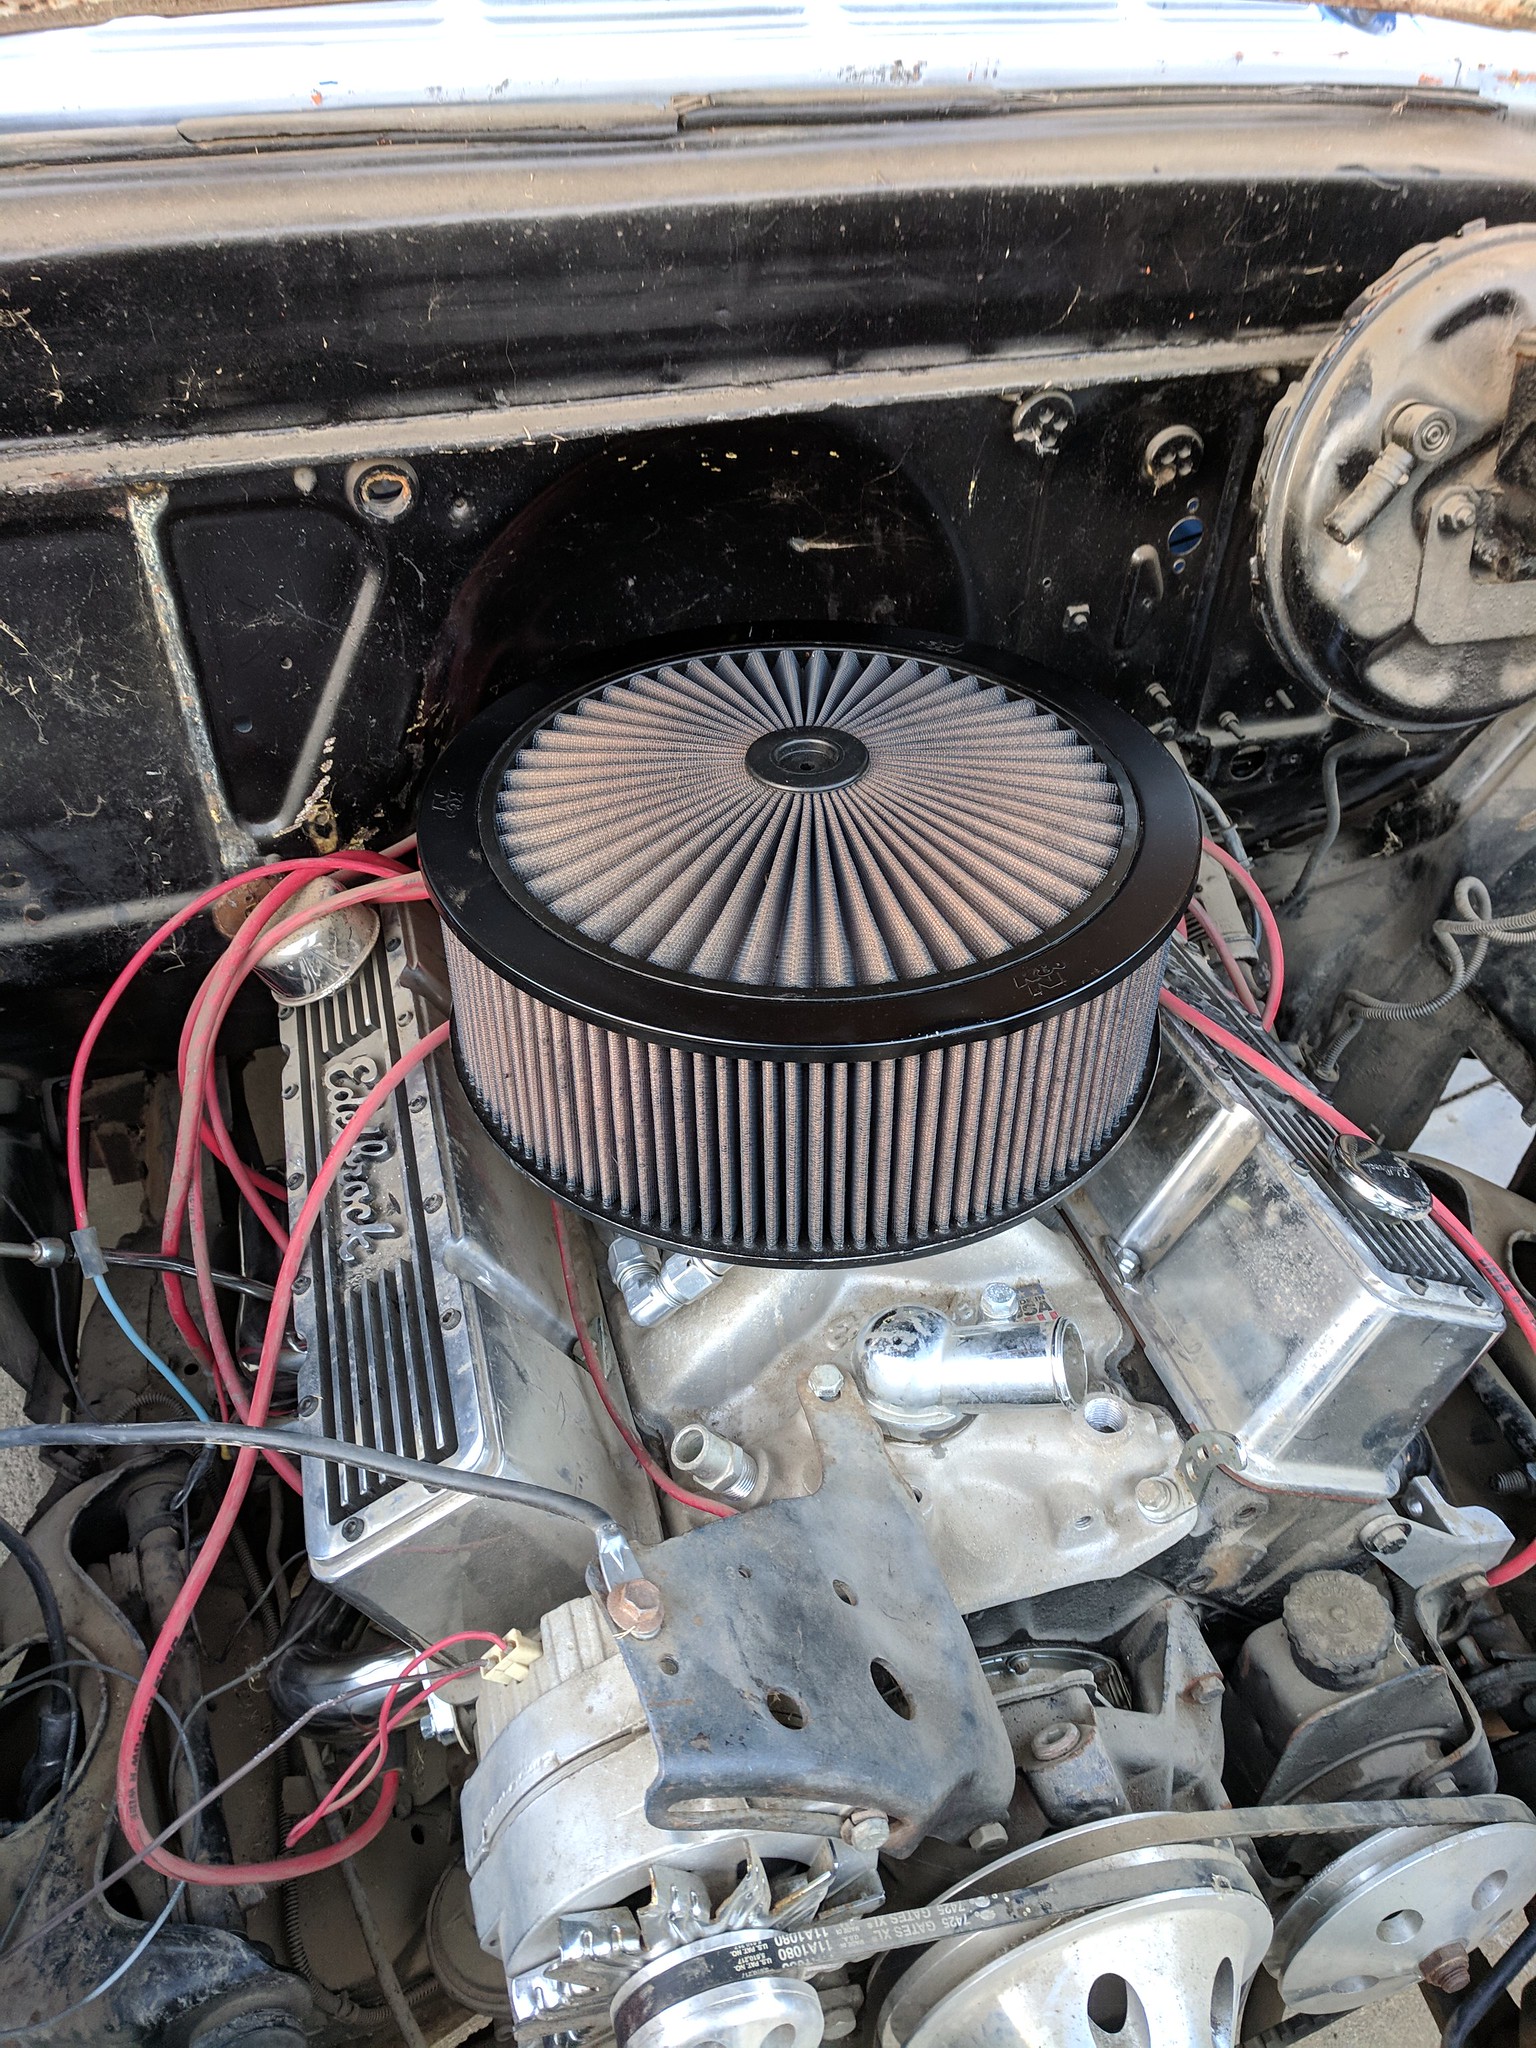 IMG_20190216_172133 IMG_20190216_172133 by Shawn Wallbridge, on Flickr I pulled the entire harness out of the car, and started going through it and doing it the way I want it done. I picked up a bulkhead connector which will make it a lot cleaner, and allow me to trim a lot of the wires back. I also made a cardboard template for my new dash, mocked up the guages, and cut and fitted the piece of aluminum I will be using for the dash... 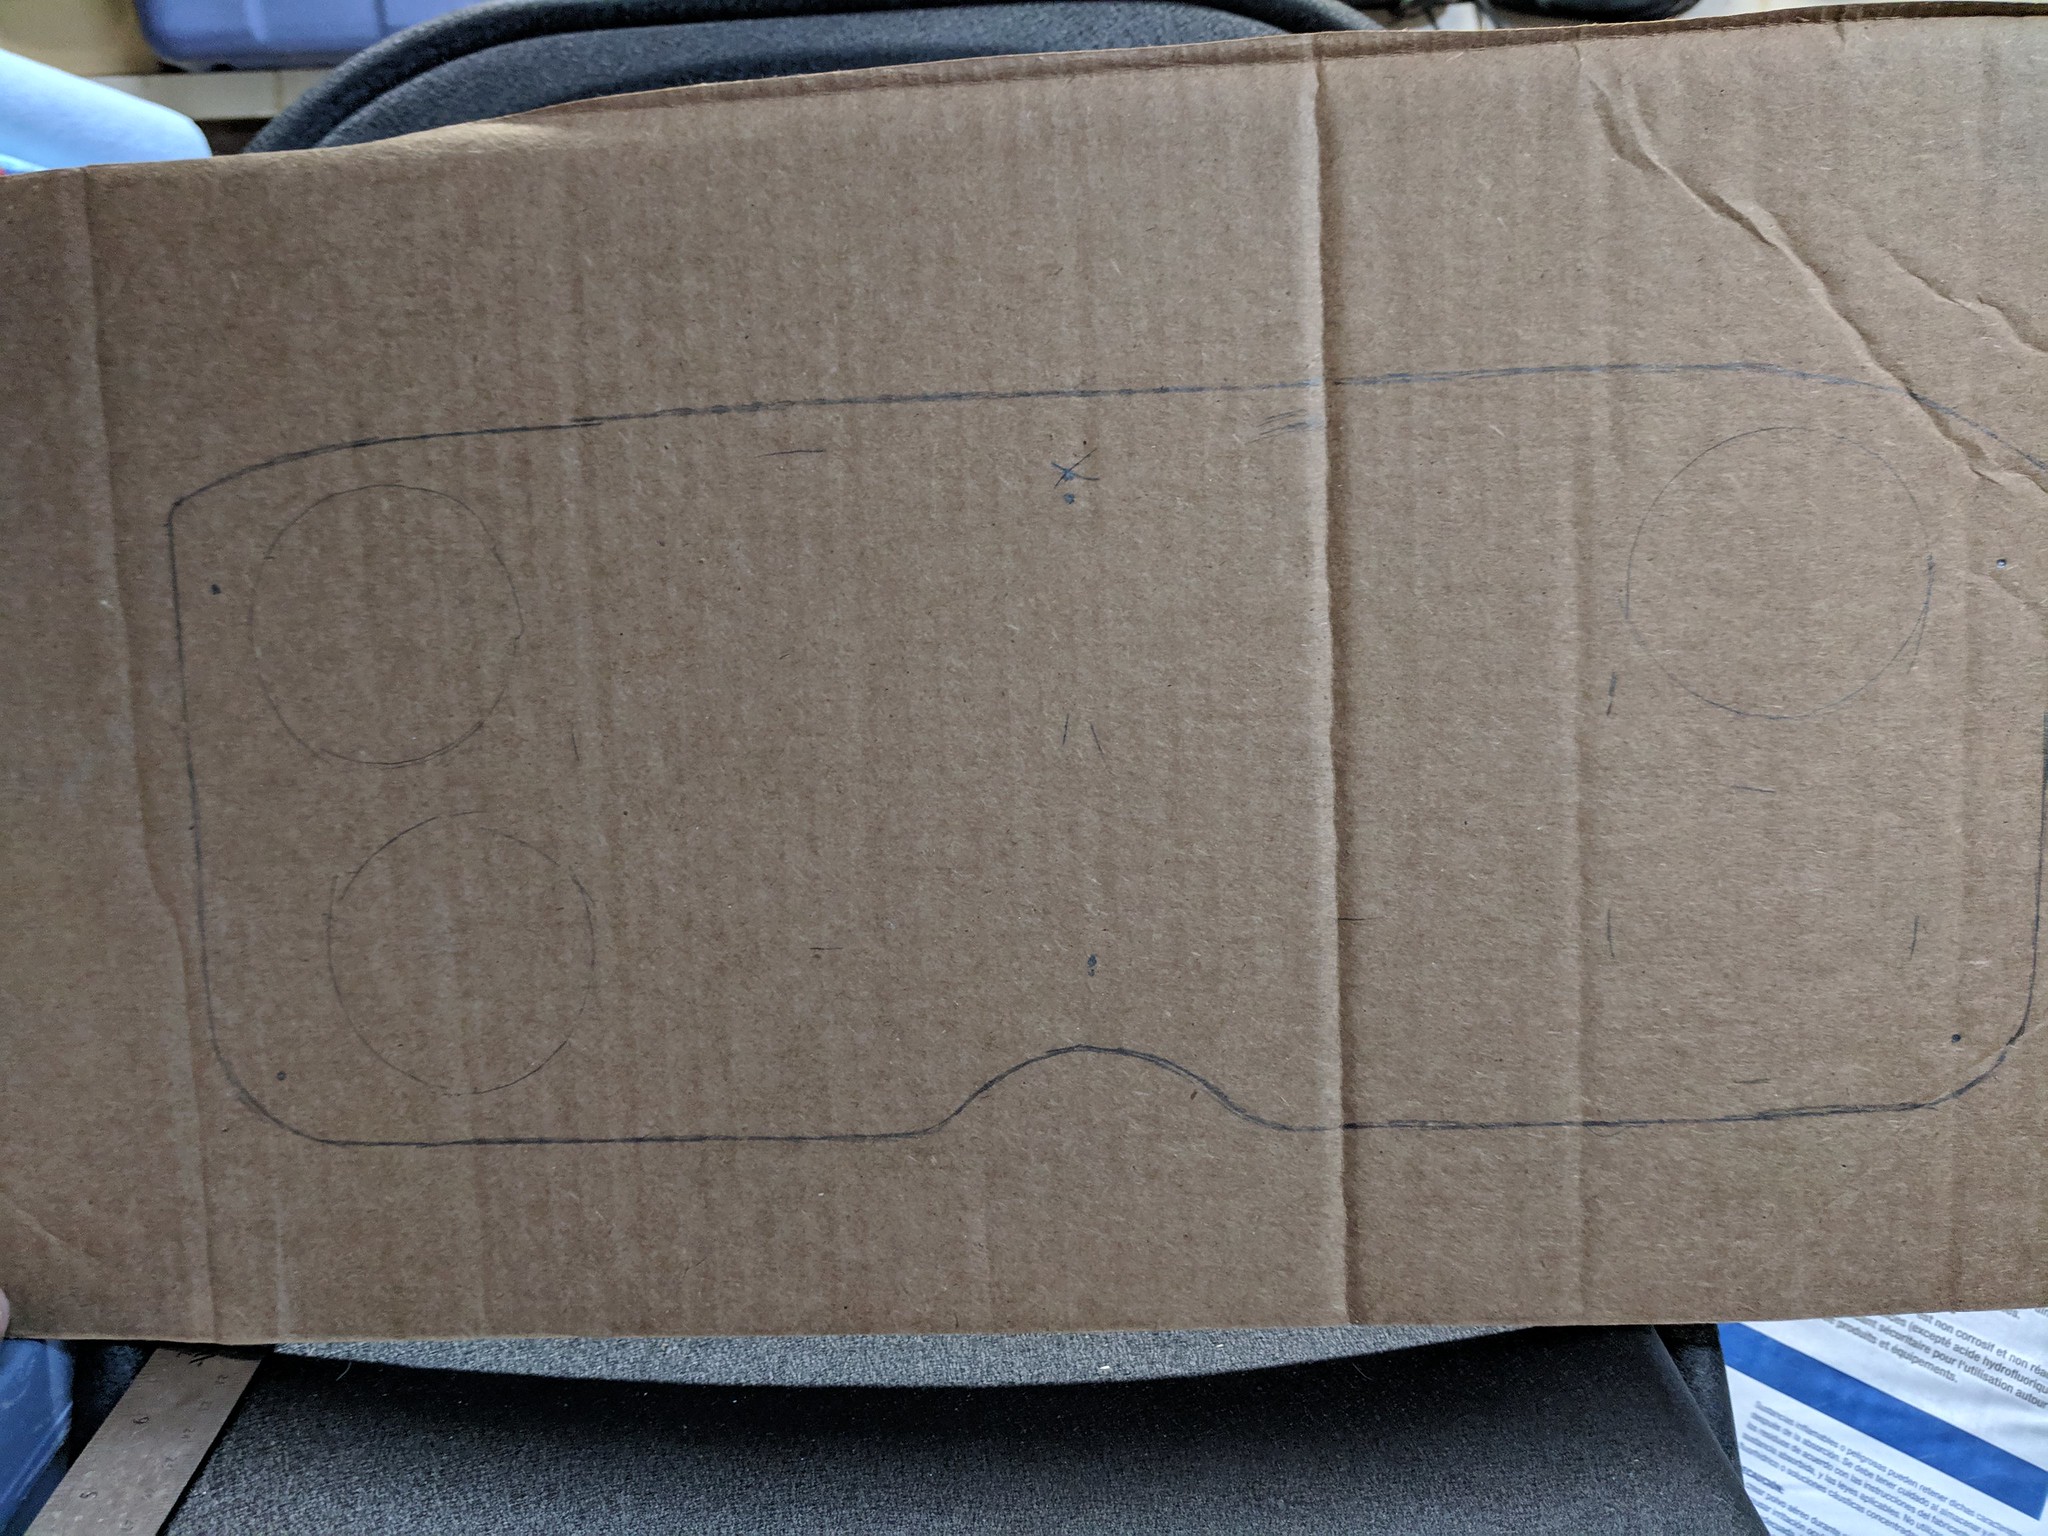 IMG_20190302_220315 IMG_20190302_220315 by Shawn Wallbridge, on Flickr 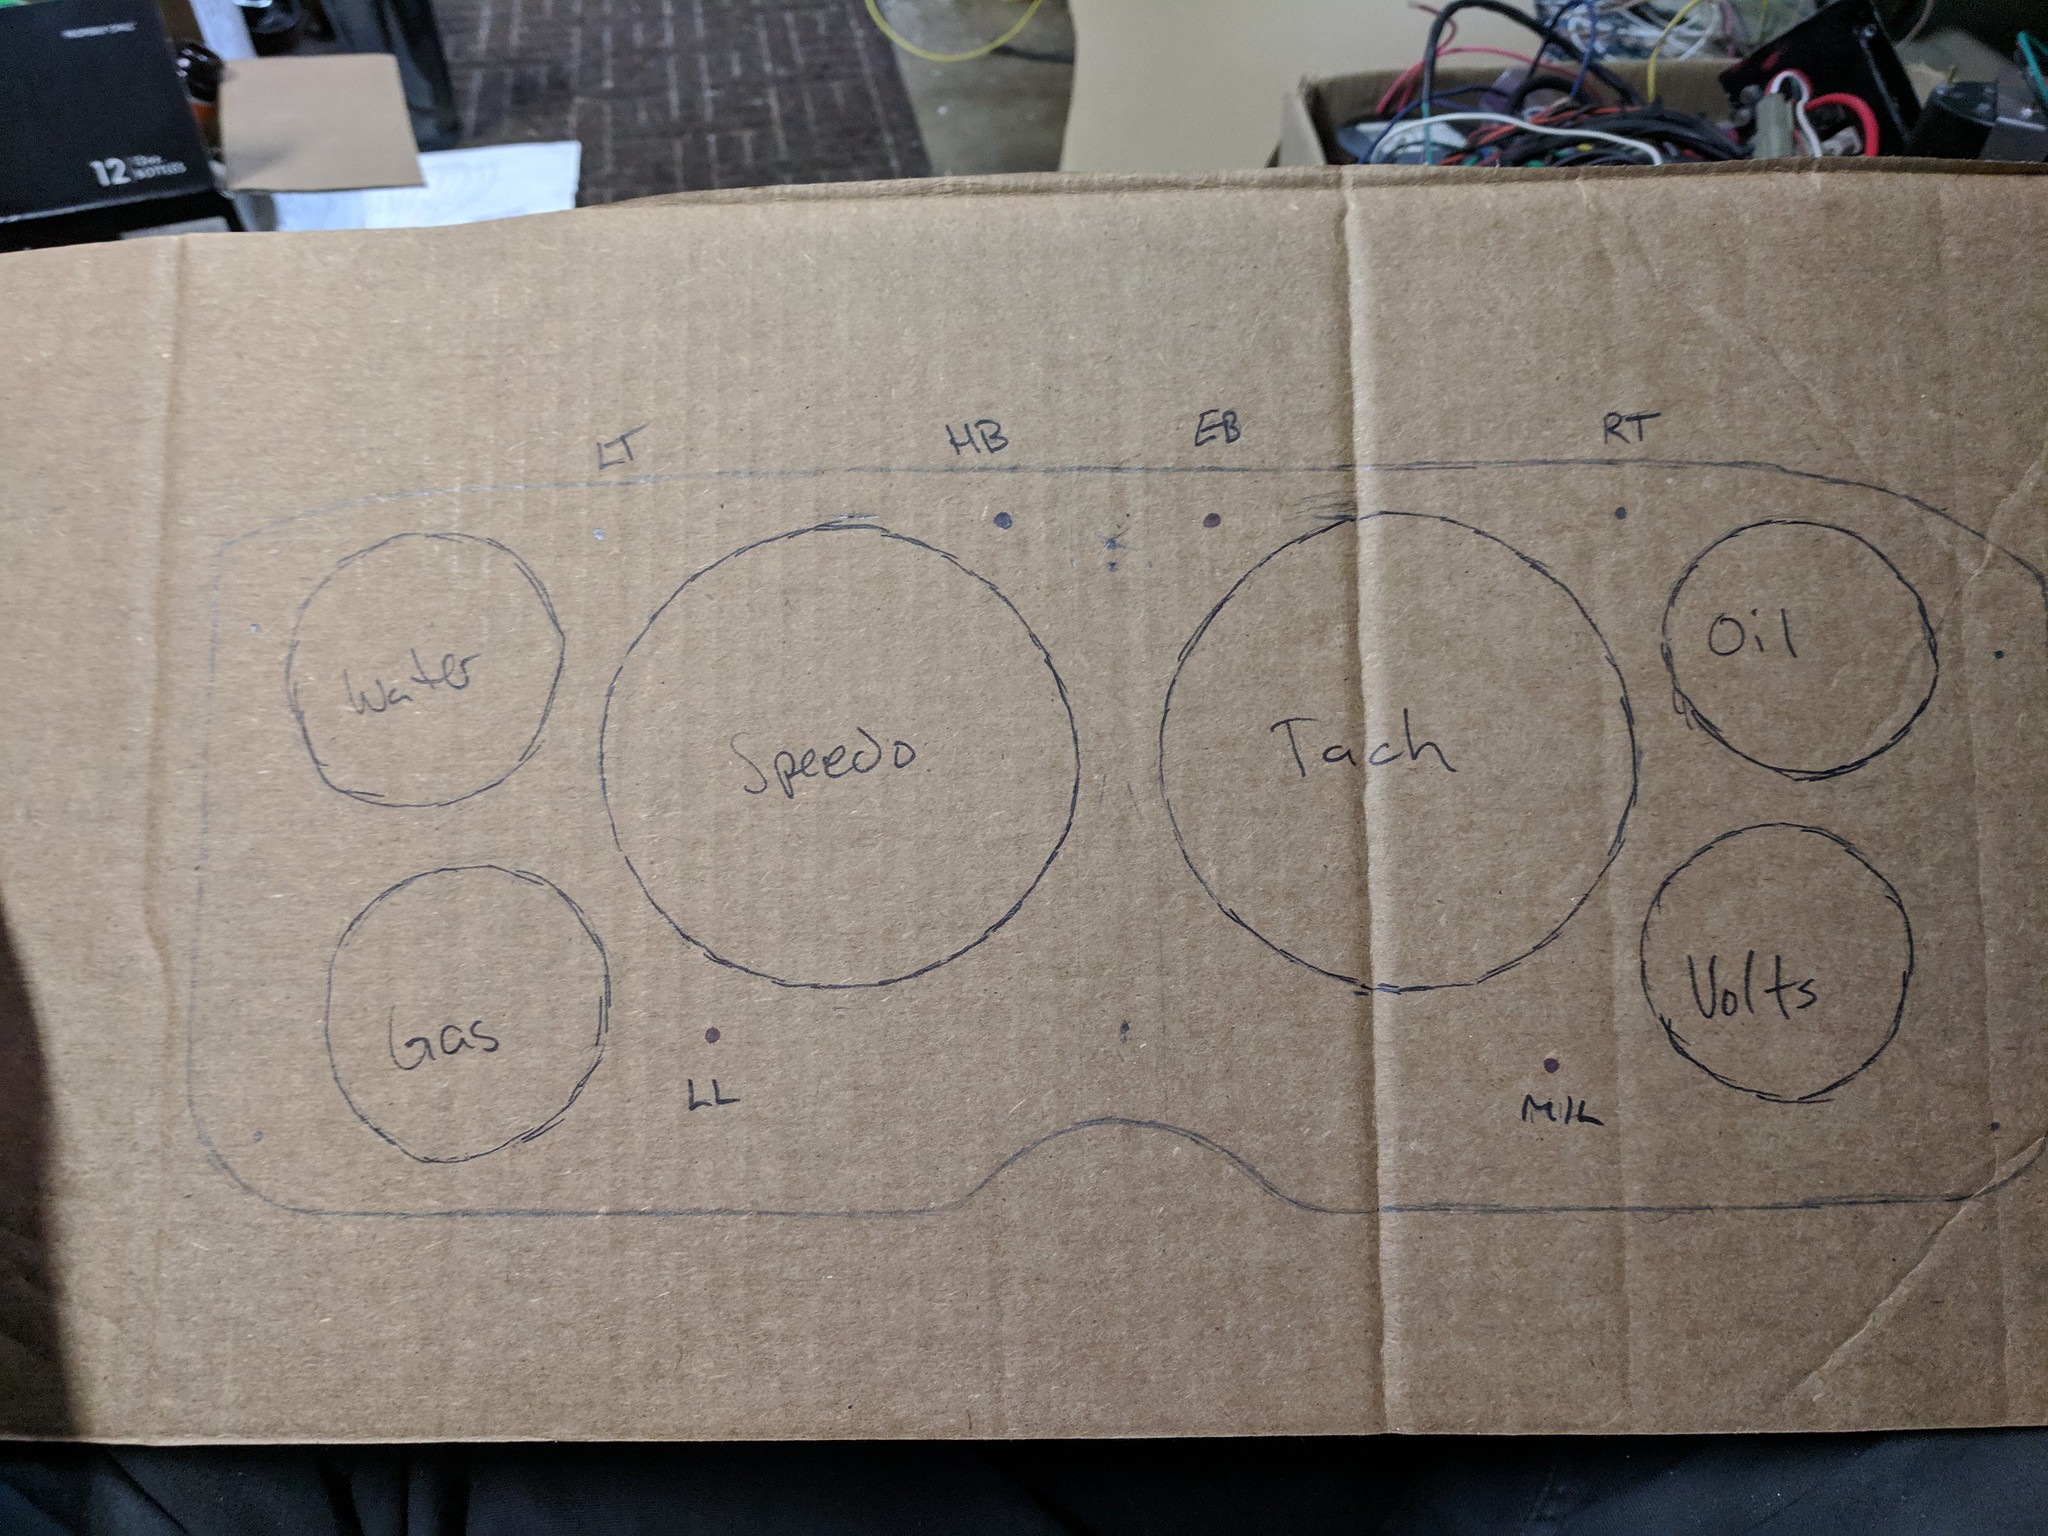 IMG_20190302_223249 IMG_20190302_223249 by Shawn Wallbridge, on Flickr 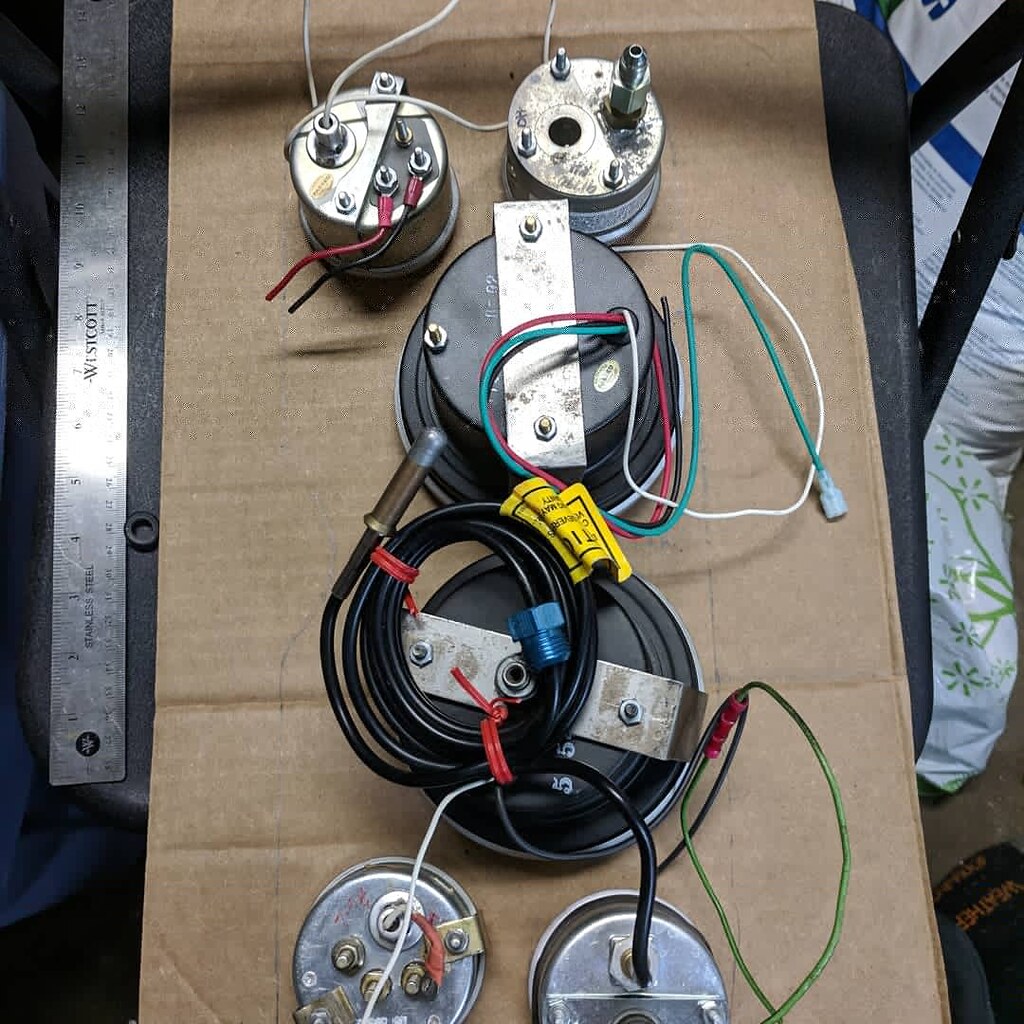 IMG_20190302_220530_276 IMG_20190302_220530_276 by Shawn Wallbridge, on Flickr  IMG_20190303_130203_292 IMG_20190303_130203_292 by Shawn Wallbridge, on Flickr  IMG_20190303_131140 IMG_20190303_131140by Shawn Wallbridge, on Flickr Yes that is a network rack shelf, it was going to get tossed at work, and it should be plenty strong enough.  IMG_20190303_151458 IMG_20190303_151458 by Shawn Wallbridge, on Flickr Then I started to create a sub-harness with two metri-pack 8pin connectors for all the wiring. It won't really make it much easier to remove (since I am running mechanical guages, I will have the oil pressure line, water temp, and speedometer cable), but it will be cleaner and a lot easier to wire on the bench than up under the dash.  IMG_20190302_190956 IMG_20190302_190956 by Shawn Wallbridge, on Flickr I also pulled all the brake lines. They had mounted the hard line T fitting that normally attaches to the rear axle, to the frame. So, imho, they needed to be replaced. I am using AN fitting adapters and AN fittings for everything, but I have only done the rear axle lines. Man I love the NiCopp lines. So much easier than stainless, though it kind of made my full set of Rigid tubing benders obsolete 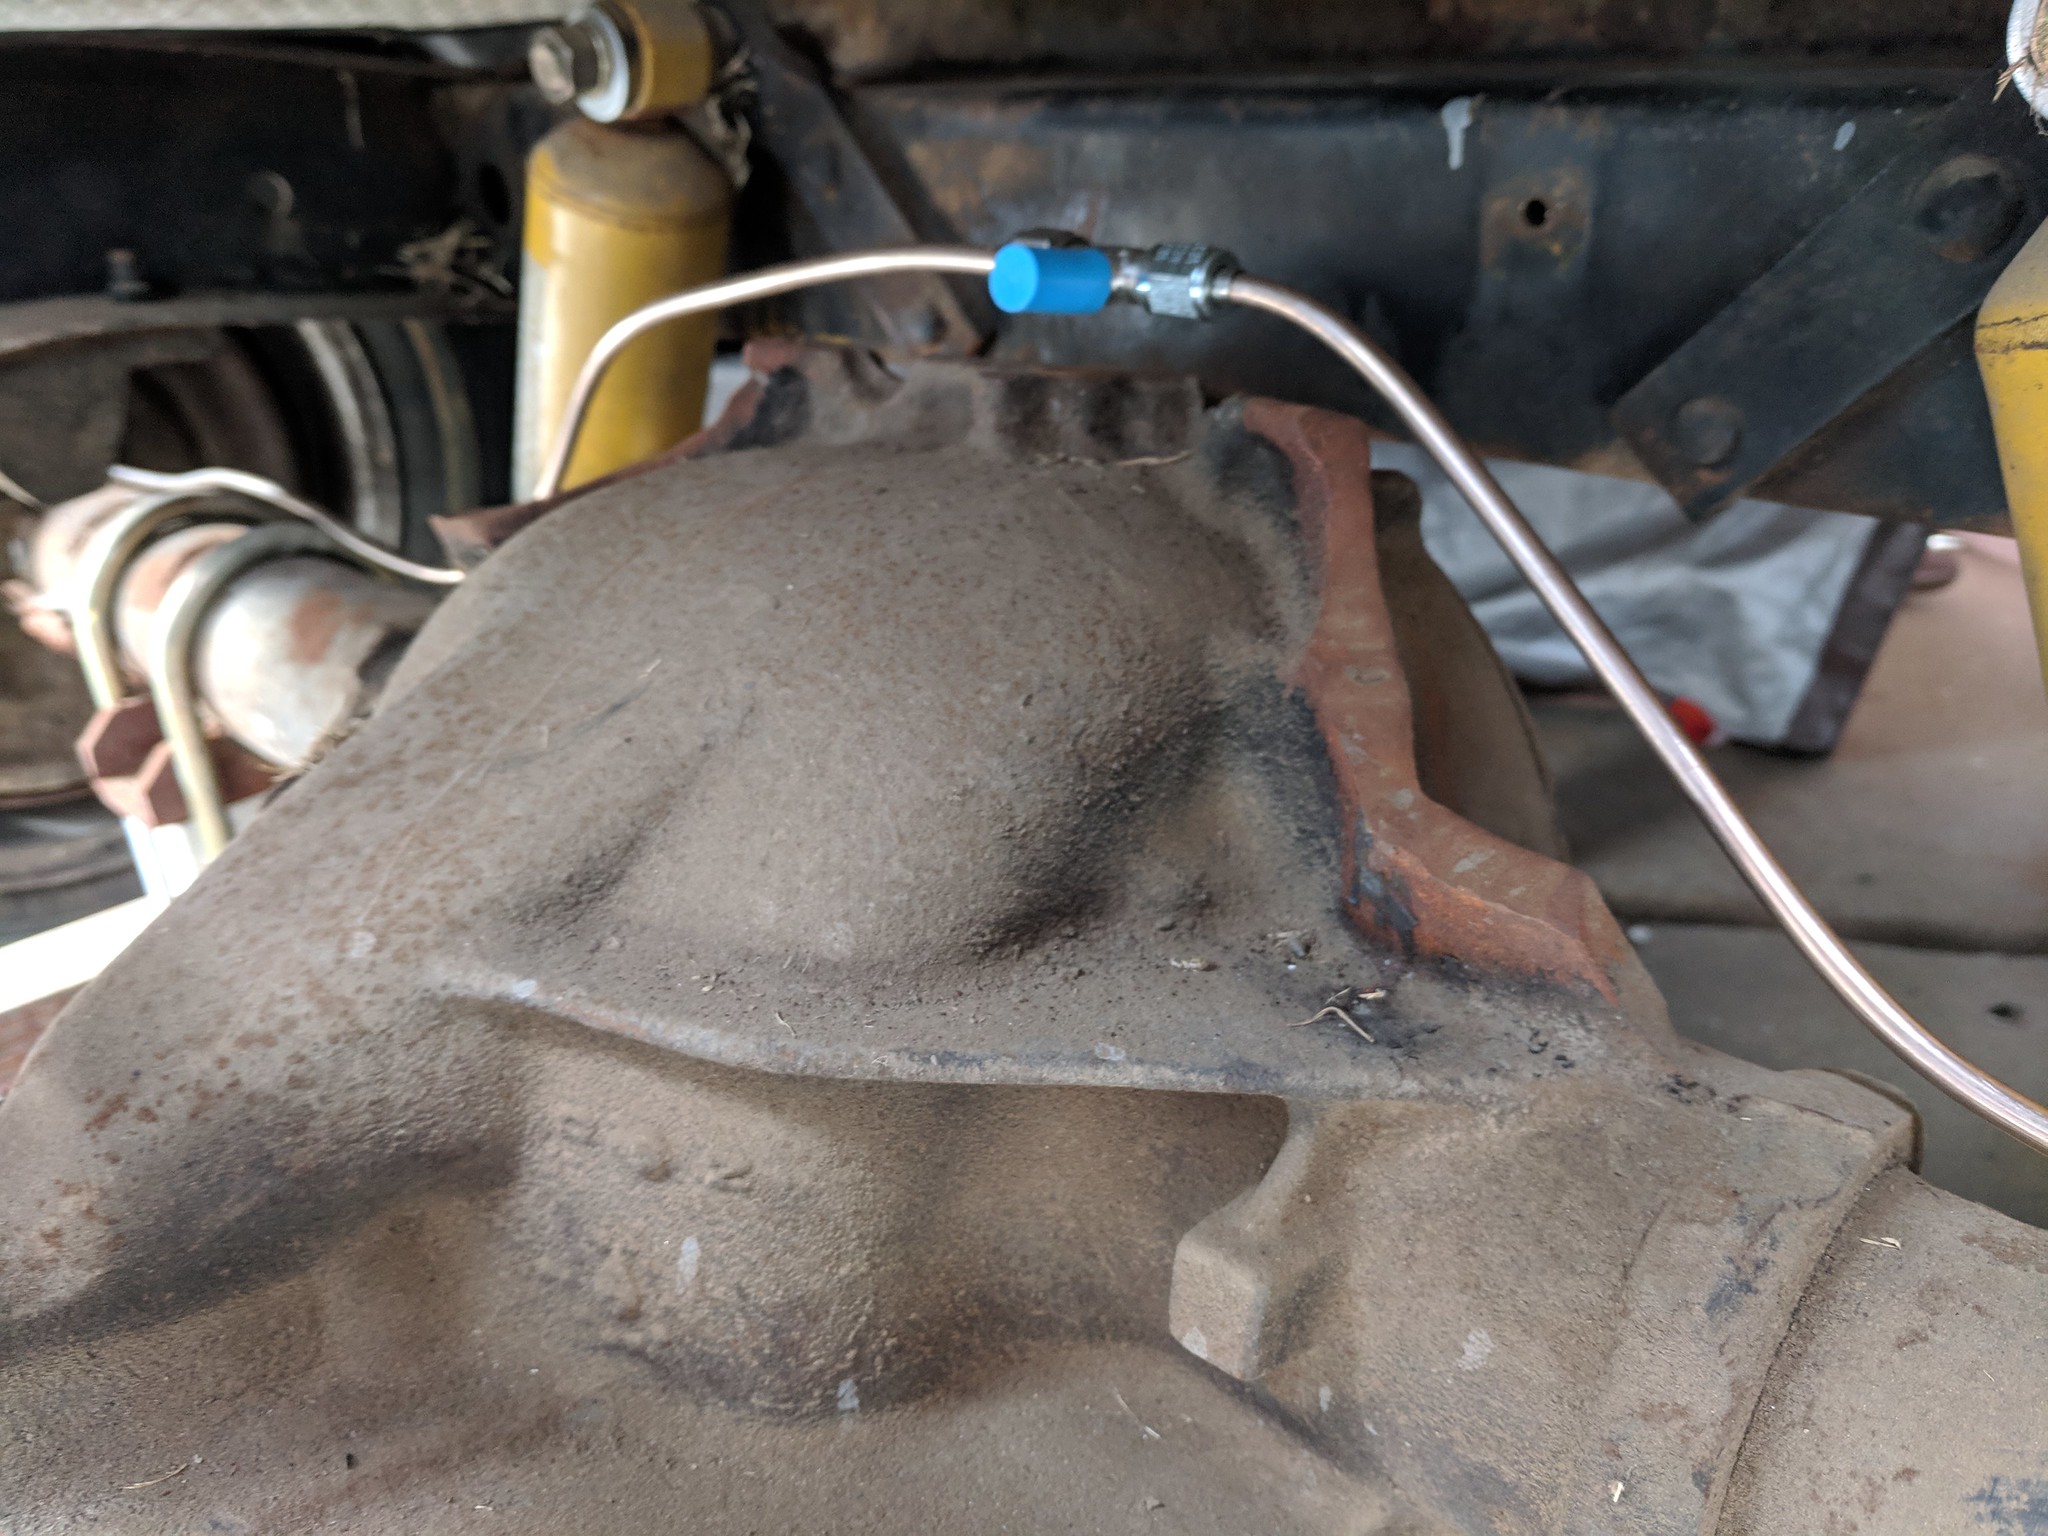 IMG_20190303_155605 IMG_20190303_155605 by Shawn Wallbridge, on Flickr This isn't final, I still need to secure it to the axle. 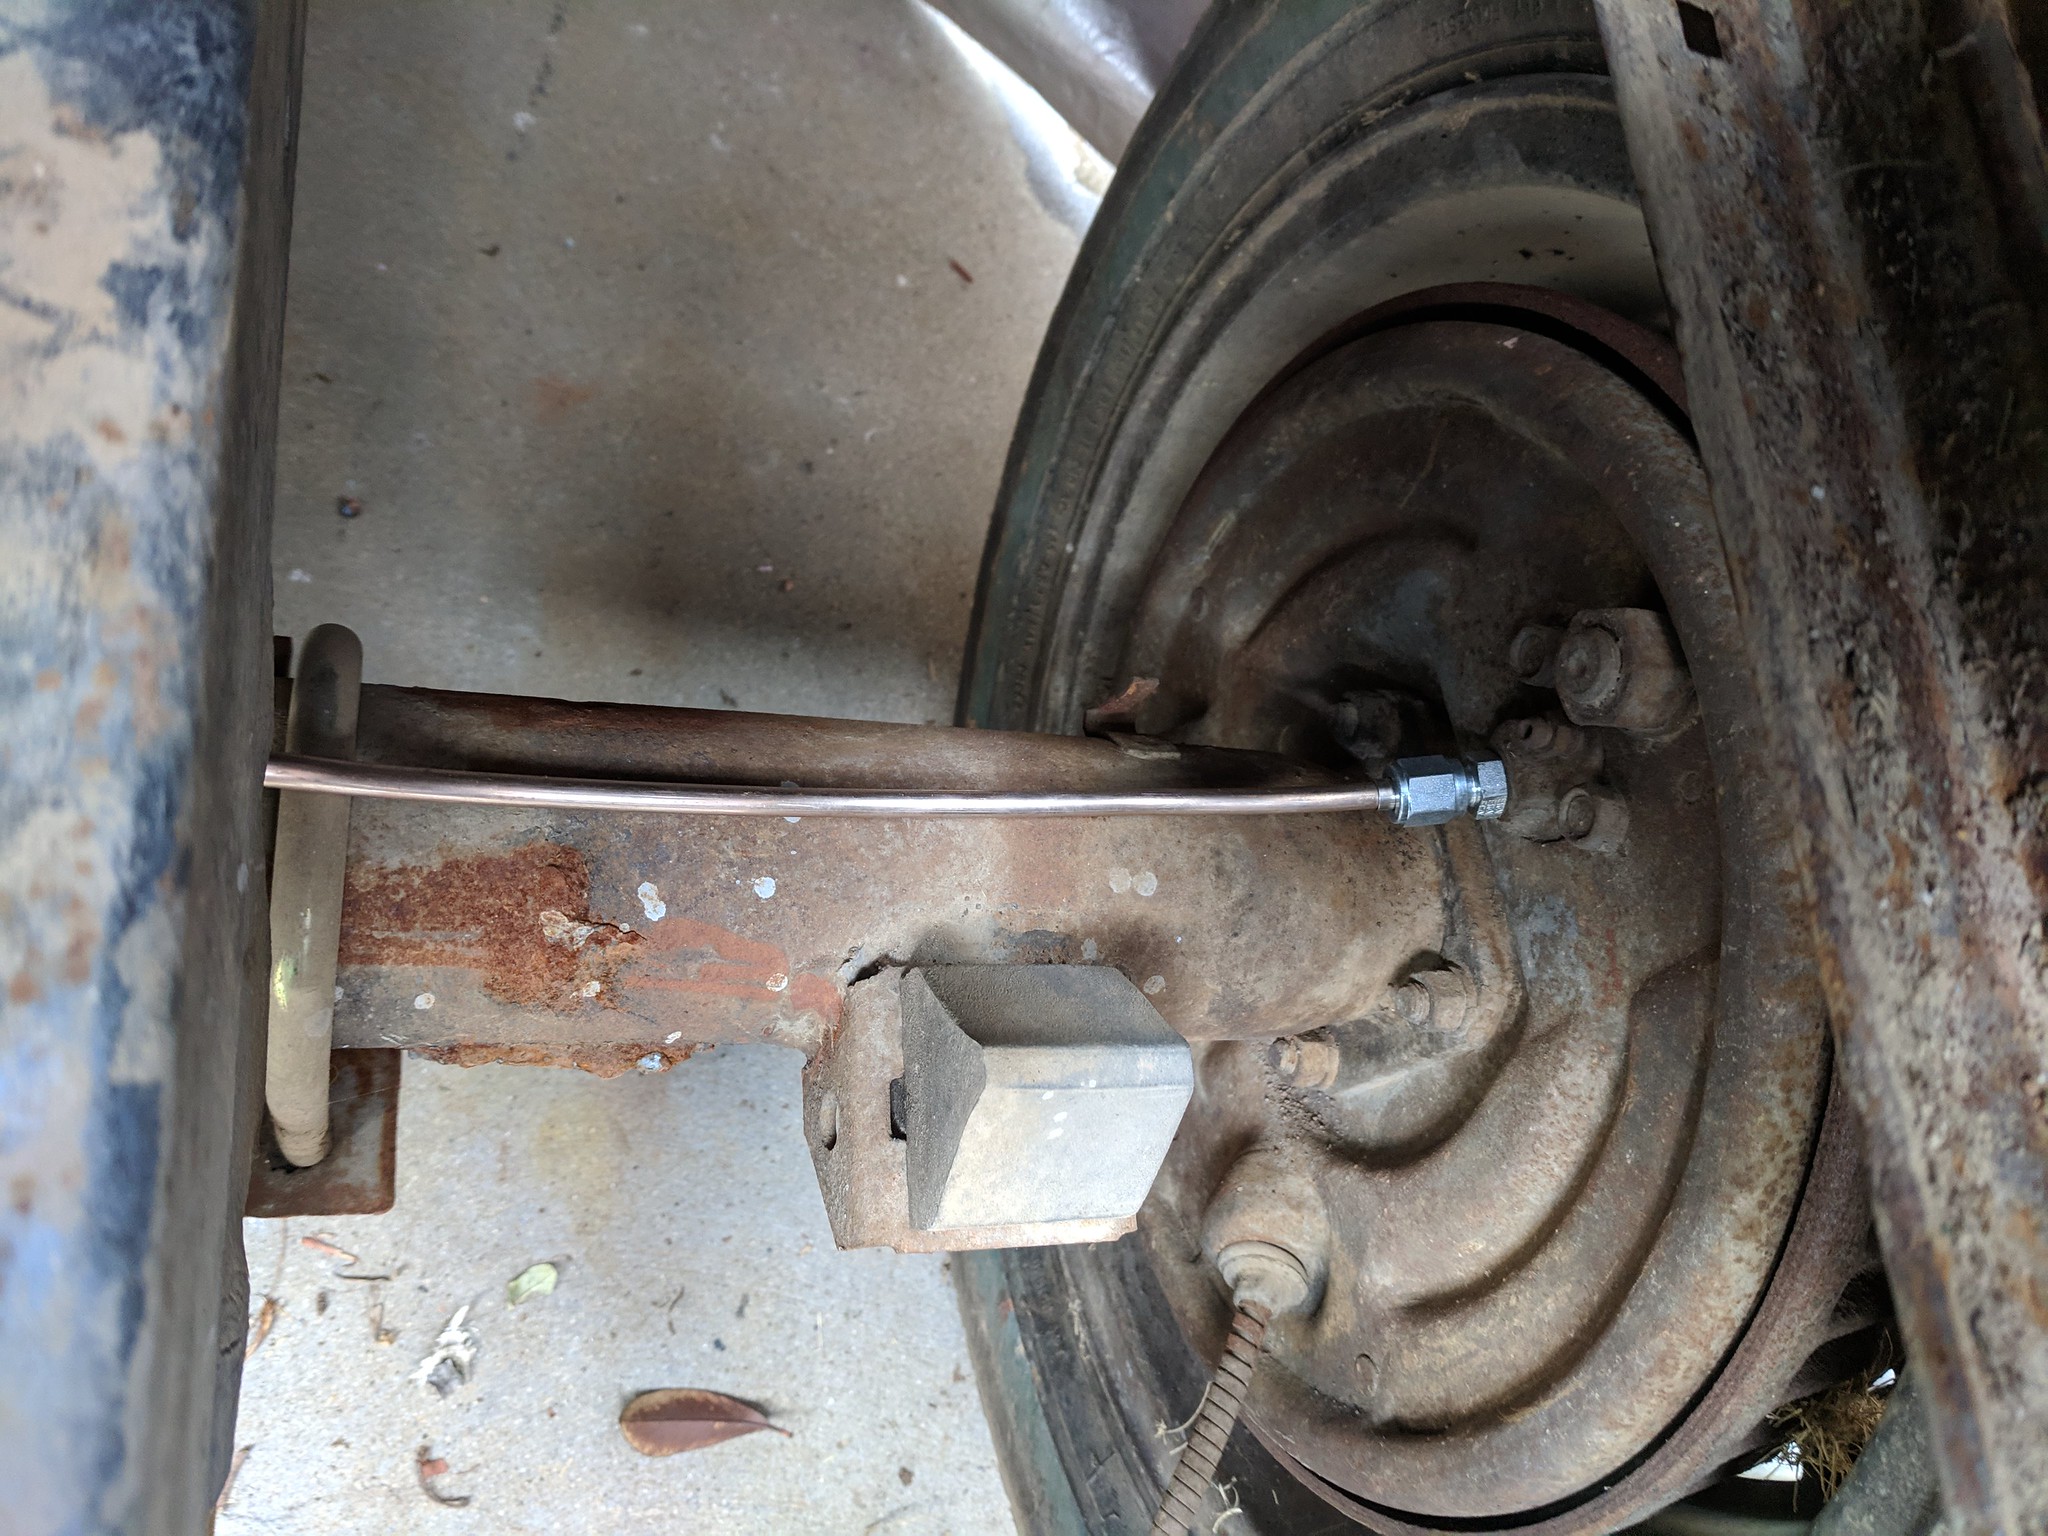 IMG_20190303_155600 IMG_20190303_155600 by Shawn Wallbridge, on Flickr The Kevlar flexible brake lines came in, so I can secure the hard line and install the flex so I can get started on the front to rear. Though I realized I don't have a spare residual valve for my rear drums, so I ordered that. Thankfully I have plenty of AN fittings. One interesting thing, is I can't find anything on the engine that is in the truck. It appears to be stamped ULB, but I can't find that stamping referenced anywhere on the internet. 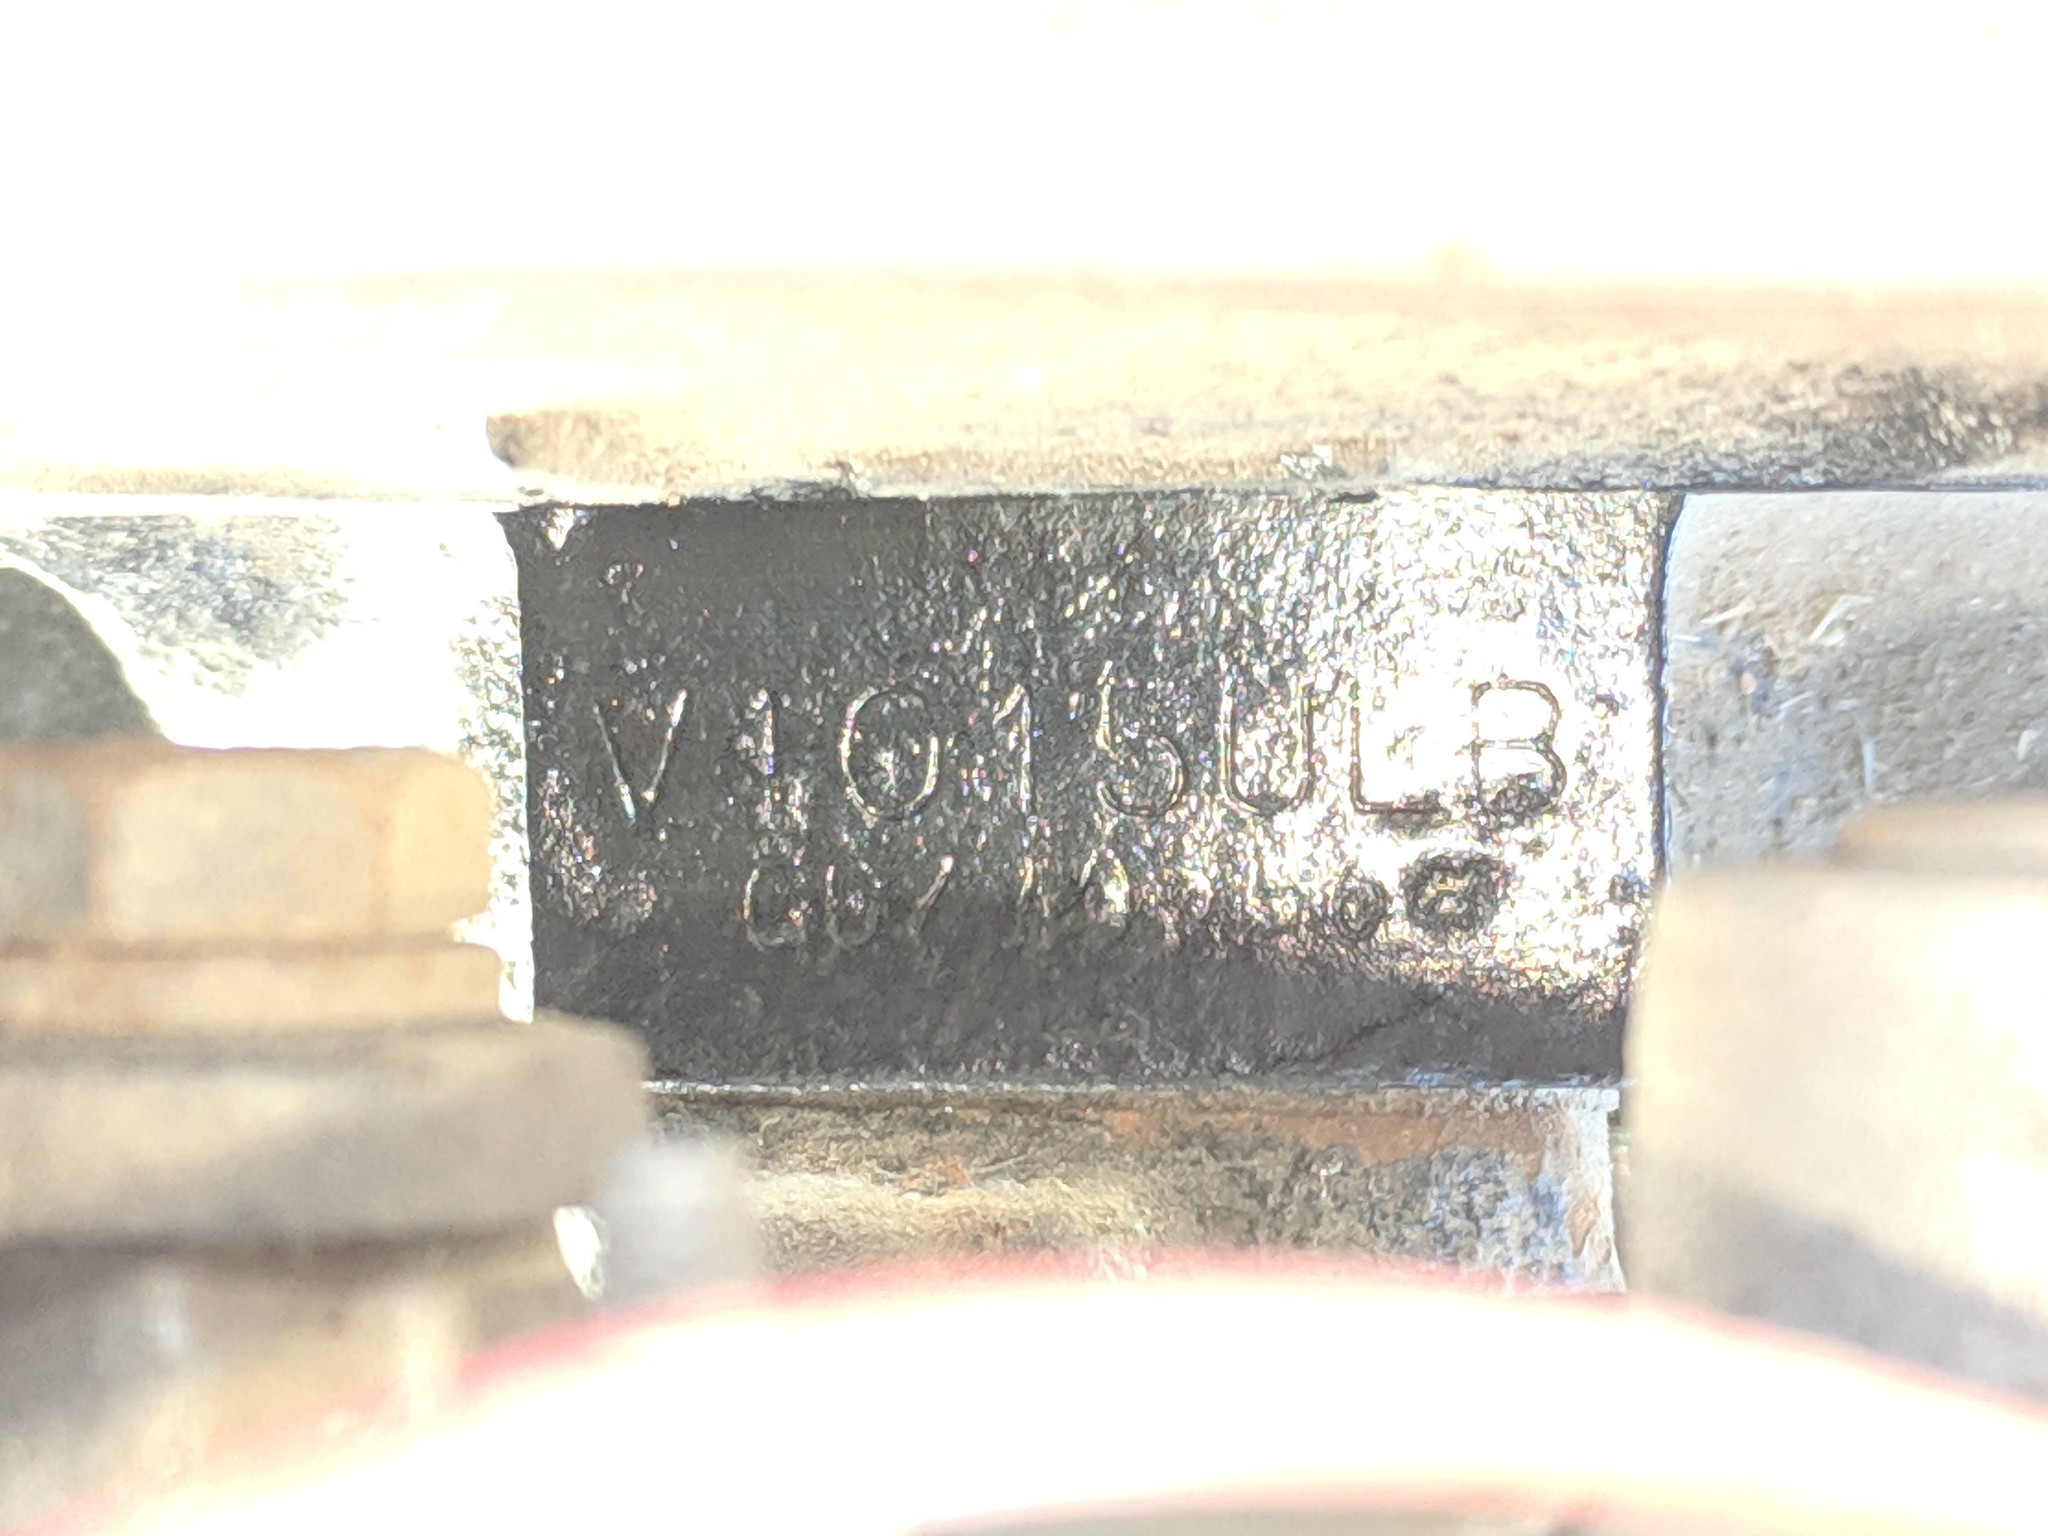 IMG_20190216_154647 IMG_20190216_154647 by Shawn Wallbridge, on Flickr One issue I ran into, it appears that someone along the way used regular NPT fittings on the transmission, instead of the NSPT, so I will need to use the same, I just hope it doesn't leak.  IMG_20190223_121308 IMG_20190223_121308 by Shawn Wallbridge, on Flickr One cool thing, I saw this guy on the freeway the other day. He was on the 101 south, between the 23 and Kanan Rd one morning on my drive in, not sure if he is on here, but Hi 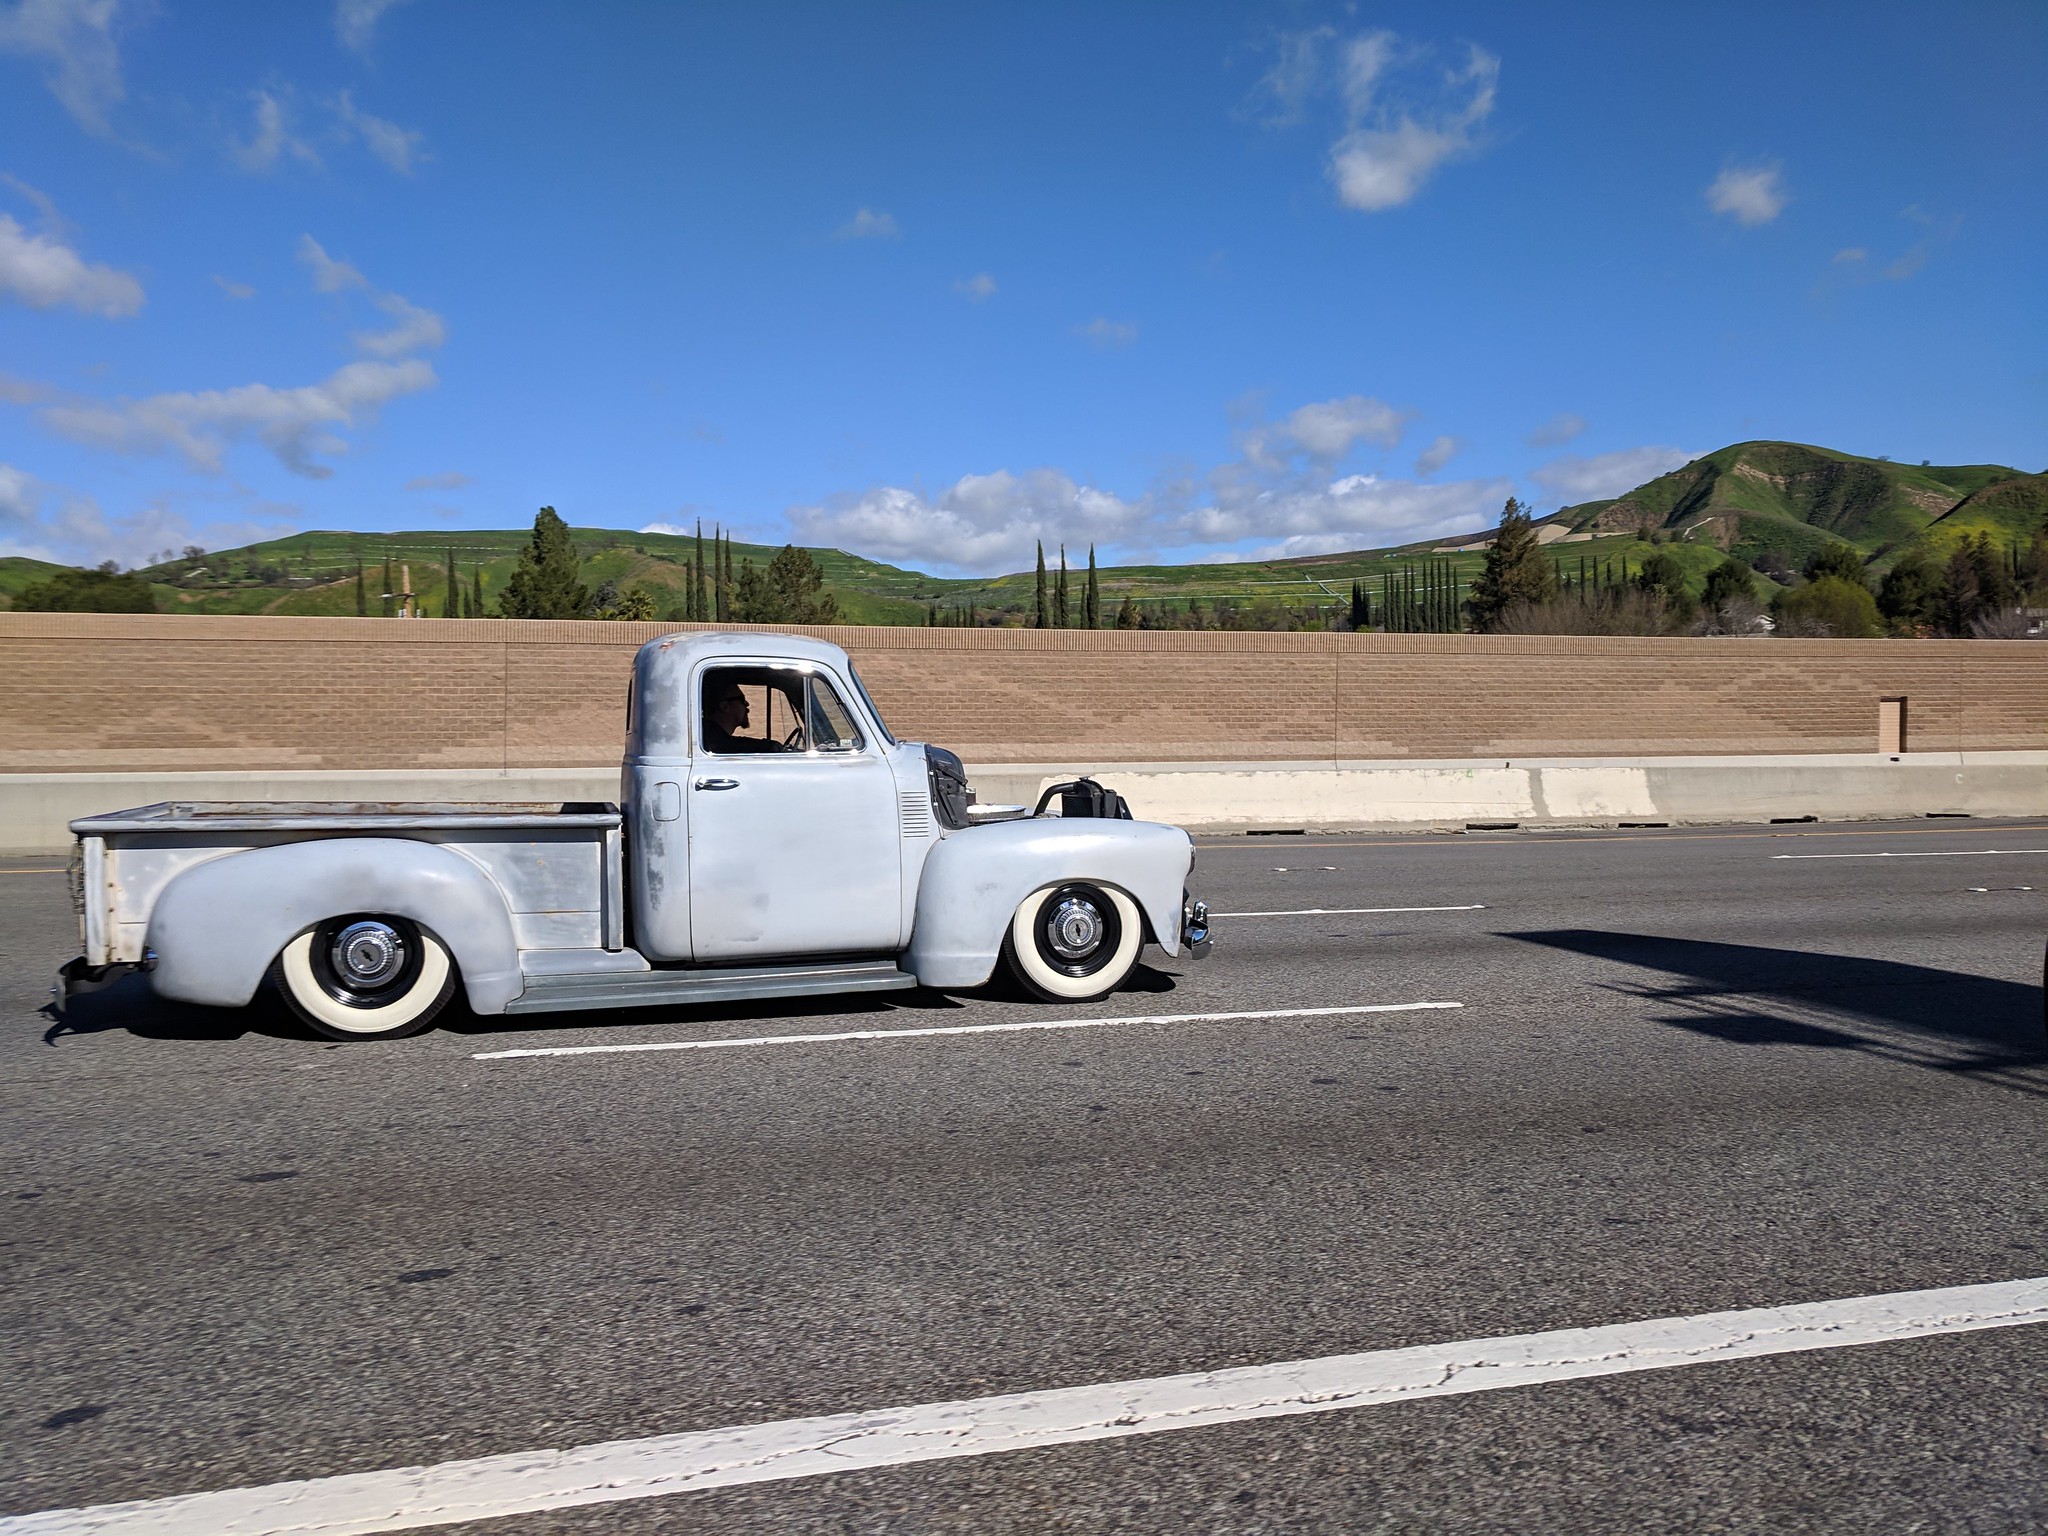 IMG_20190304_094330_1 IMG_20190304_094330_1 by Shawn Wallbridge, on Flickr Thankfully I won't get much done this weekend, even though it is a beautiful weekend, because I will be at The Race of Gentlemen in Santa Barbara tomorrow. Today was tech and a bit of a car show, and from what they had today, I can't wait to see the racing tomorrow. This was my favourite car.. 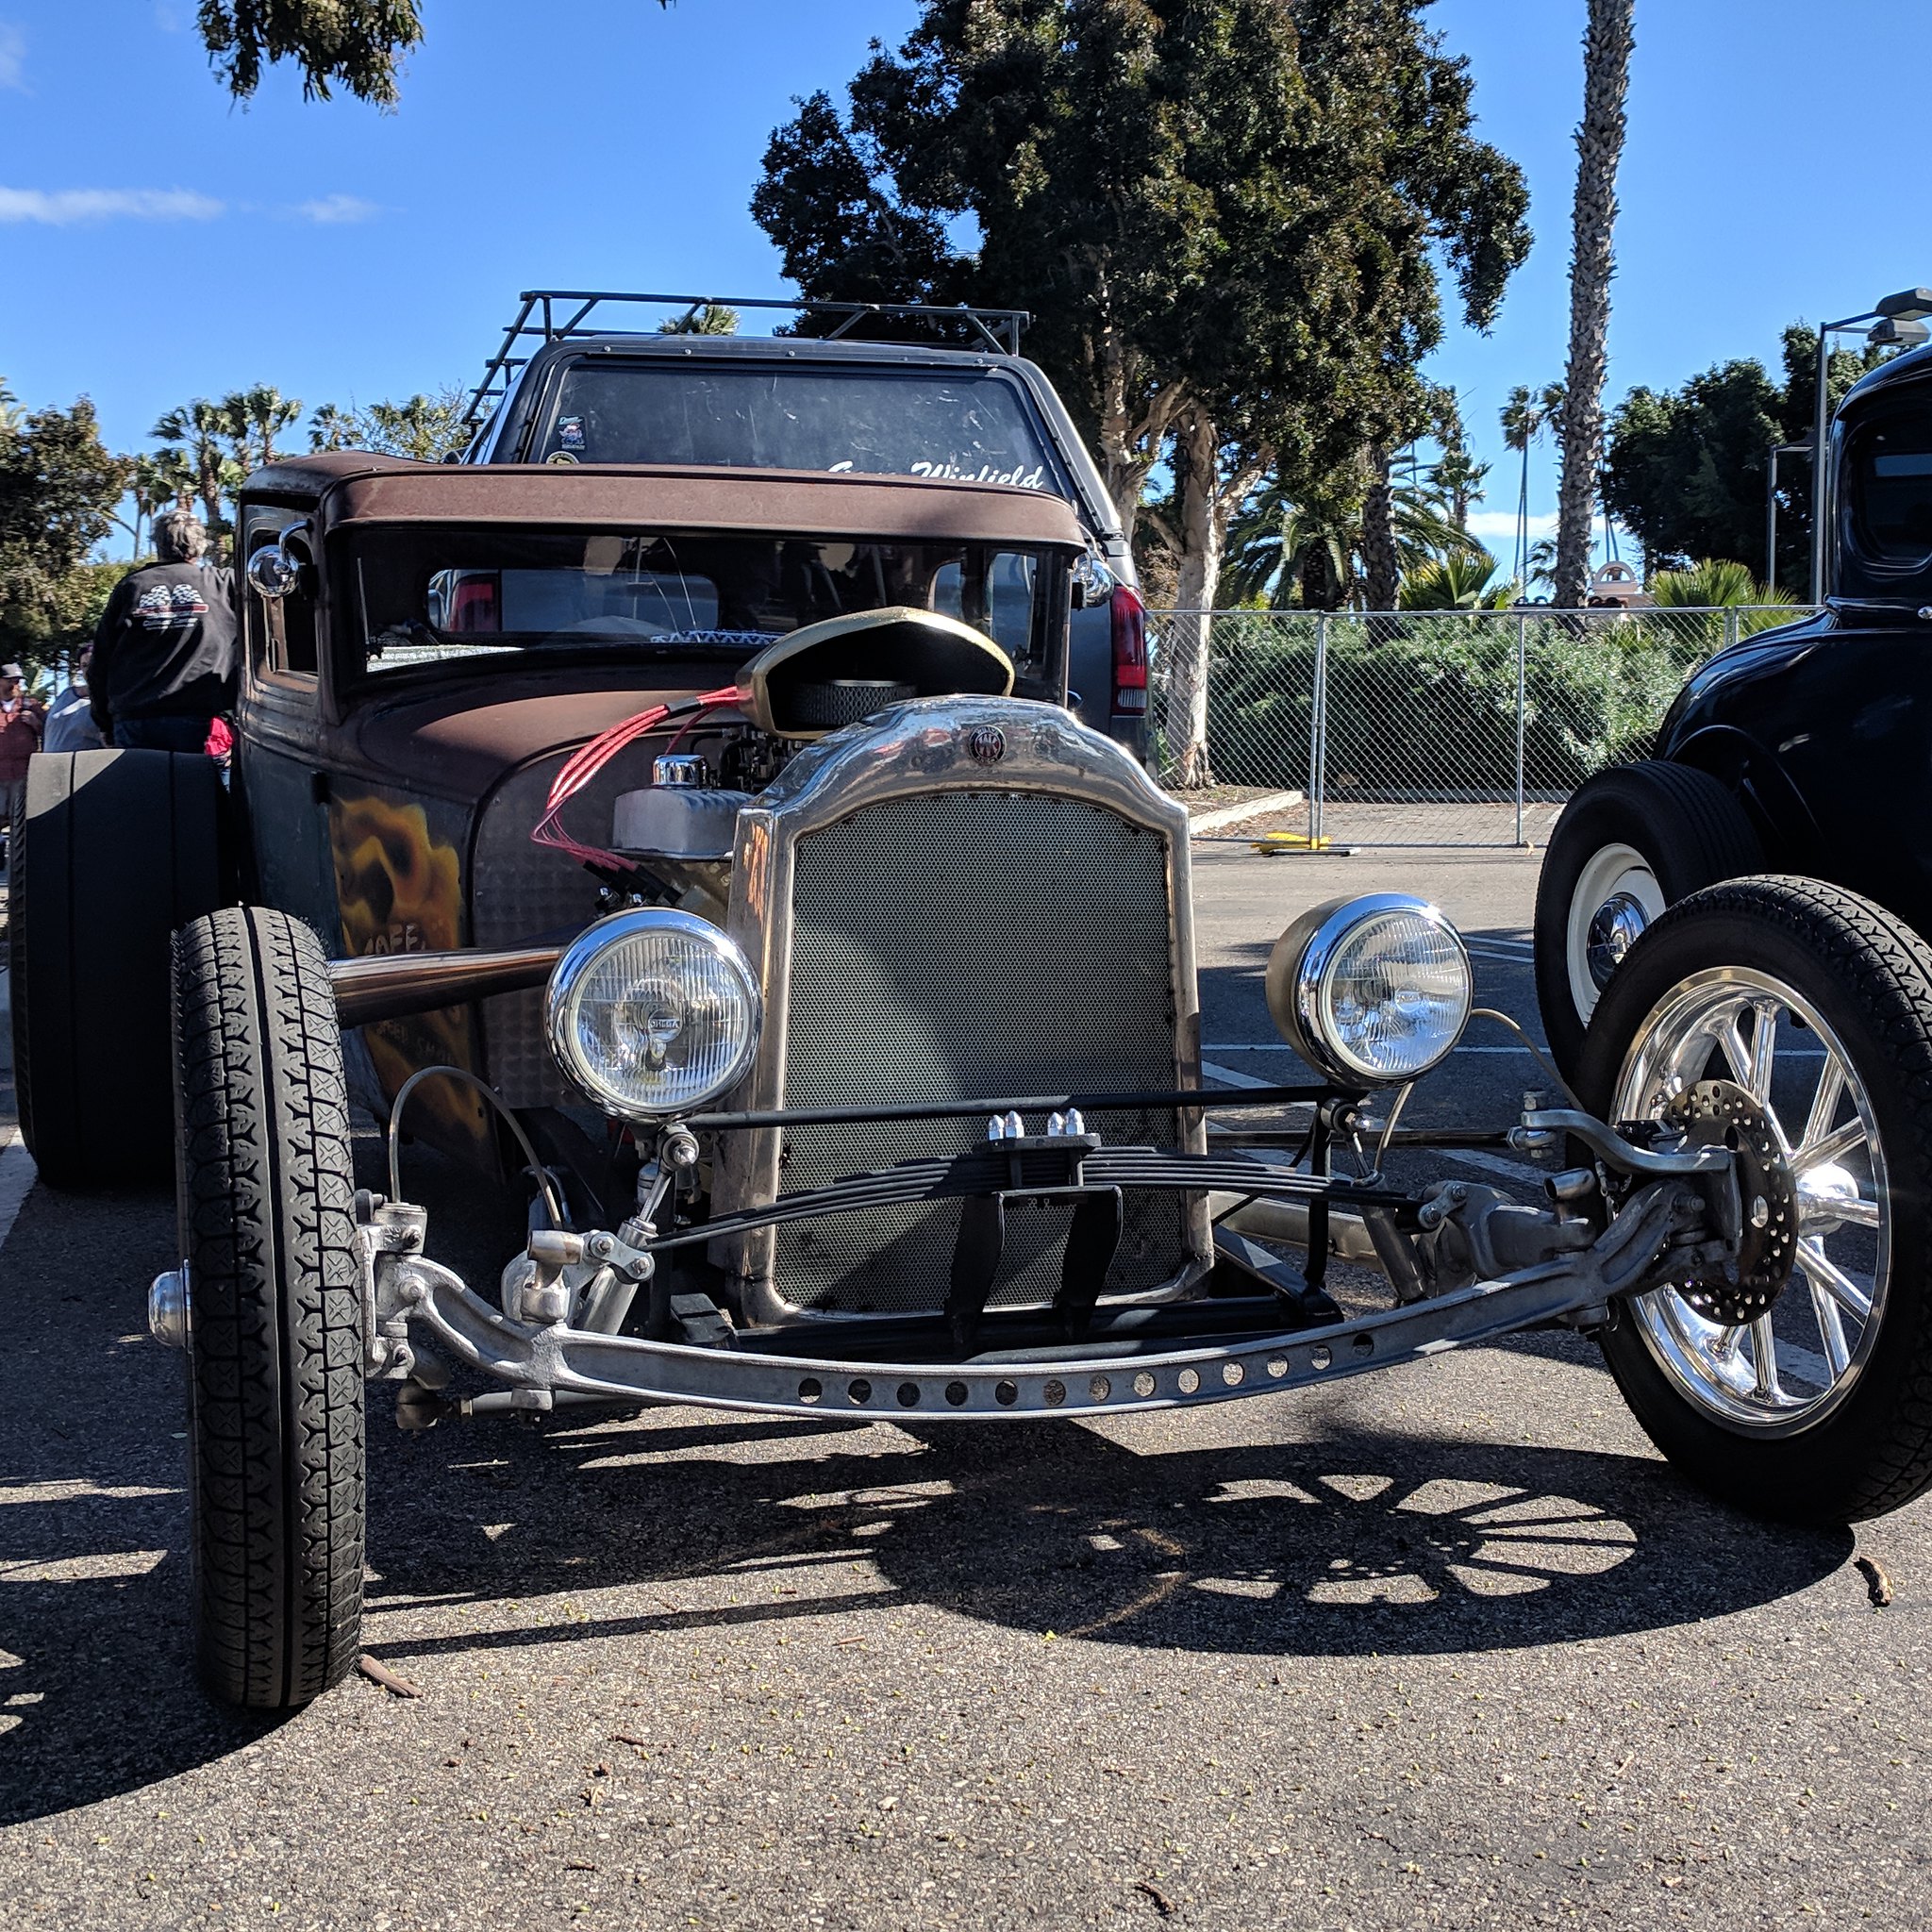 IMG_20190308_145452_789 IMG_20190308_145452_789 by Shawn Wallbridge, on Flickr |
|
|
|
|
05-04-2019, 02:08 AM
|
#8 |
|
Registered User
Join Date: Jun 2015
Location: Thousand Oaks, CA
Posts: 16
|
Re: My 59 GMC Build
Wow, it's been a while since I updated, but I got a lot done, so here goes.
In trying to update the truck to be more modern and reliable, I went with a proper bulkhead fitting for the electrical harness. I thought 22 pins would be plenty, but it was just barely enough (I actually had to move the power connections to their own bulkhead fitting).  IMG_20190406_130735 by Shawn Wallbridge, on Flickr The dash side, while I was terminating the pins.  IMG_20190413_145133 by Shawn Wallbridge, on Flickr The entire interior harness is run, trying to keep everything fairly well organized. Not quite done in this picture... 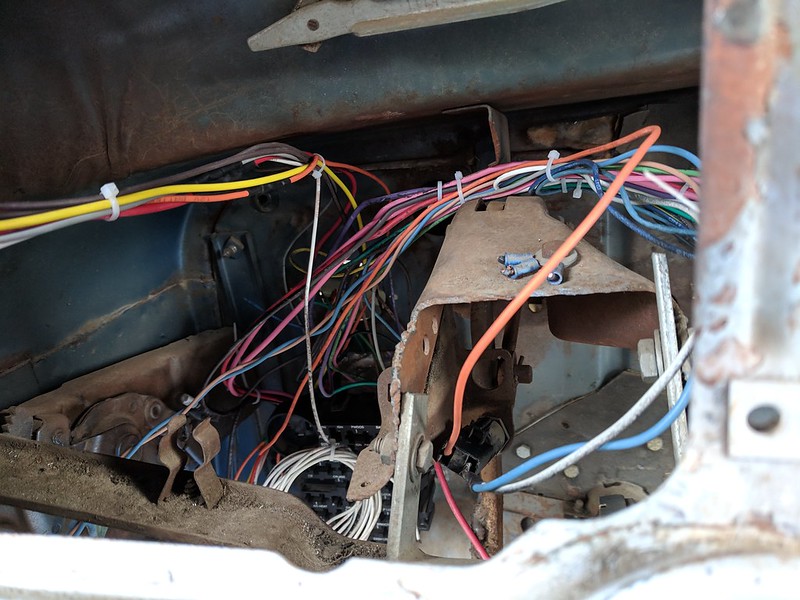 IMG_20190407_175158_1 by Shawn Wallbridge, on Flickr I finished the dash, though it hasn't been mounted yet. The tape is gone too 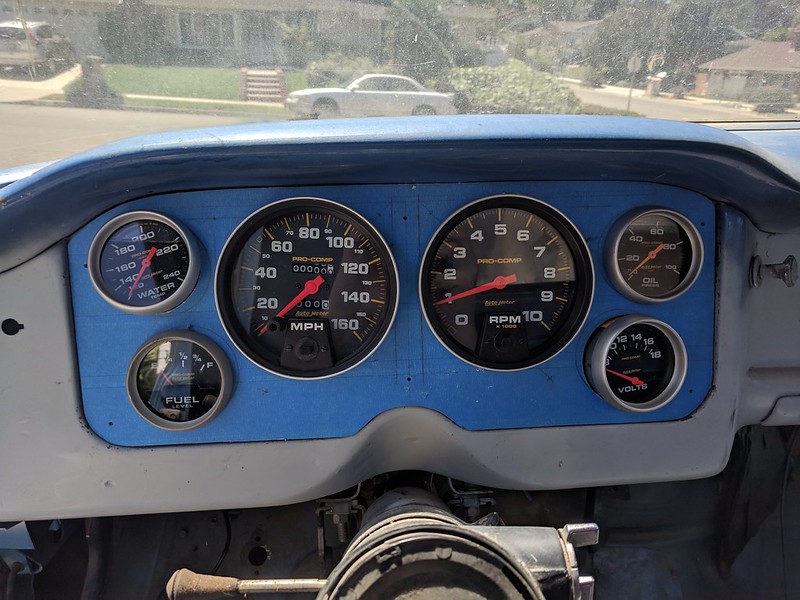 IMG_20190406_122525 by Shawn Wallbridge, on Flickr The front harness is pretty much run, but I haven't done the termination as I had to modify the headlight buckets to ensure I could get the connectors through.  IMG_20190413_163750 by Shawn Wallbridge, on Flickr I had an old Mallory CD ignition box from my old C20, but I had to modify the HEI distributor to remove the ignition module, I probably should have made the harness myself, but it was $6 and came with everything to install it. 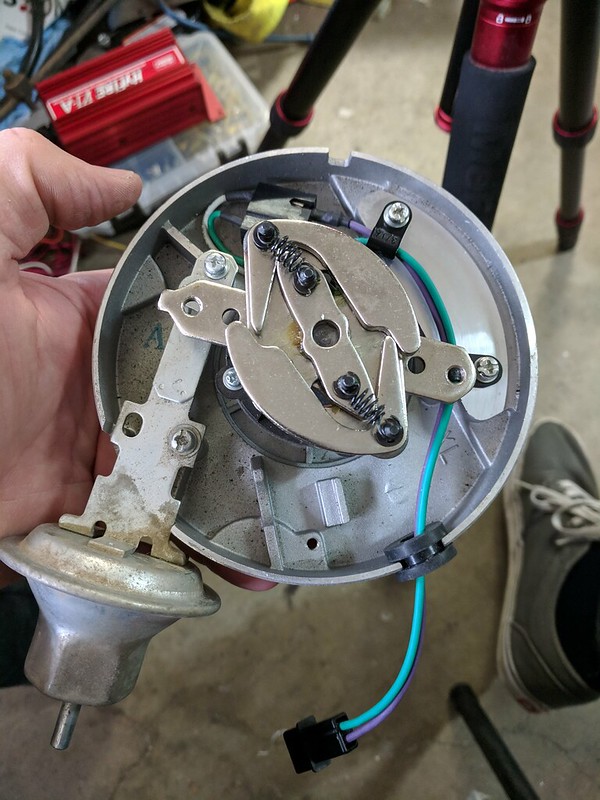 IMG_20190420_111945 by Shawn Wallbridge, on Flickr Going with the reliability theme, I also moved to a Ford started solenoid, to reduce the chances of having a hot-start issue. 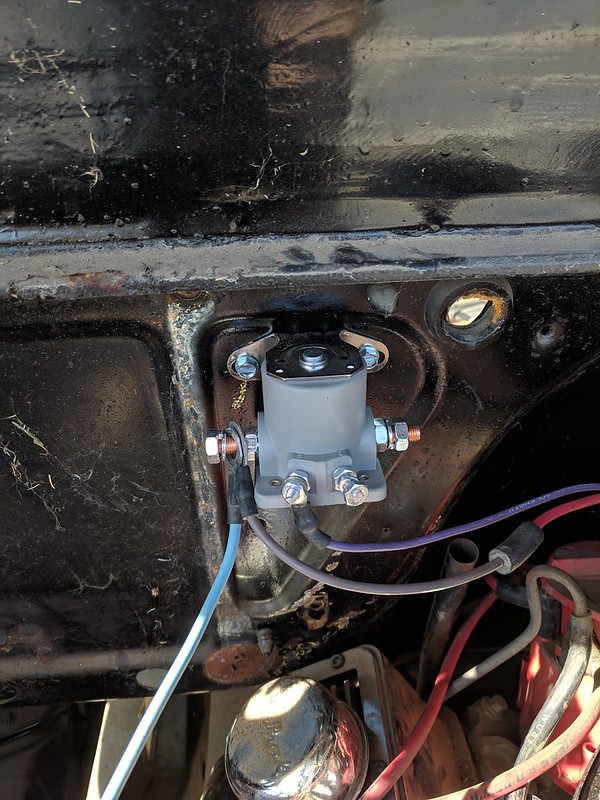 IMG_20190413_164917 by Shawn Wallbridge, on Flickr I also wanted to get rid of this nasty mess... 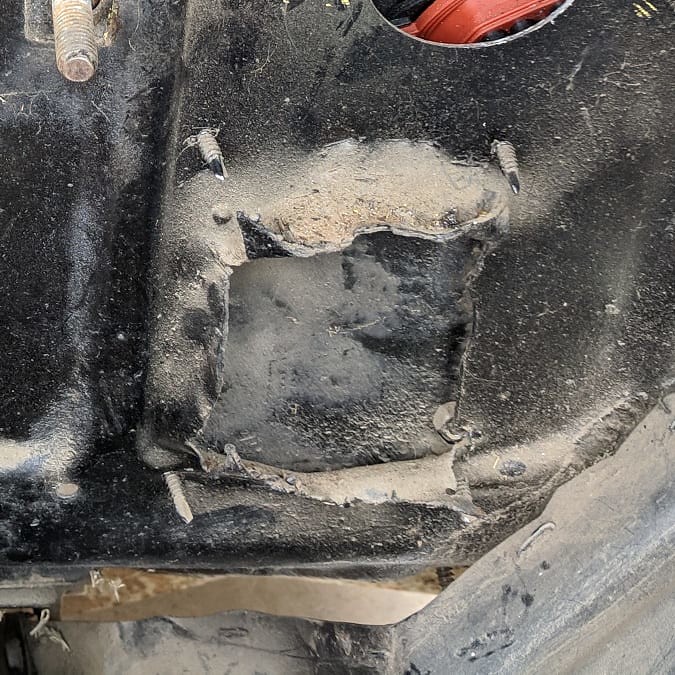 IMG_20190421_115619_279 by Shawn Wallbridge, on Flickr So I cut it out (badly)...  IMG_20190420_164524 by Shawn Wallbridge, on Flickr And welded in a new piece (badly)...  IMG_20190420_174109 IMG_20190420_174109 by Shawn Wallbridge, on Flickr It definitely isn't the best job, but this is just a daily, not a show truck. It was my first welds in almost 3yrs.  IMG_20190421_124857 by Shawn Wallbridge, on Flickr I will be putting some seam sealer on the inside to make sure I don't have any leaks. Since I had the sander out, I decided to give the fender a quick once over, then of course I wanted to see what the paint is going to look like, and I love it!  IMG_20190421_130209 by Shawn Wallbridge, on Flickr Not too bad for a spray can. I do hate the power antenna hole though, I don't really want to spend the time removing it now, so I have to live with it. I also wrapped up the brakes, all new hard and soft lines, new prop valve and of course, line lock Here is the rear...  IMG_20190427_151644_613 by Shawn Wallbridge, on Flickr It's 1/4" NiCop line, Earl's -4AN fittings and Afco Kelvar flex brake lines. Here is the factory master, Wilwood prop valve and generic Amazon line lock.  IMG_20190427_151644_583 by Shawn Wallbridge, on Flickr Here is the front, again same fittings and hoses. 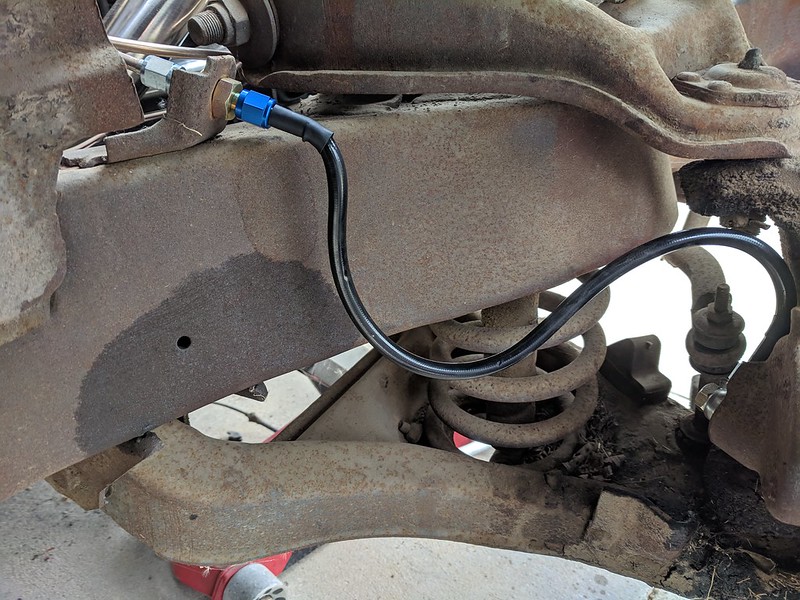 IMG_20190427_122121 by Shawn Wallbridge, on Flickr Then I wanted to move on to the fuel system. But, if you remember, I had a nasty mess behind the tank. They had very badly replaced the cab corners, and hadn't bothered to paint the inside, so I had a lot of surface rust in the corners, but it also had a lot of rust behind the tank, and looking at it closer, they had a decent amount of actual holes all along the back of the cab, but they didn't bother fixing it... 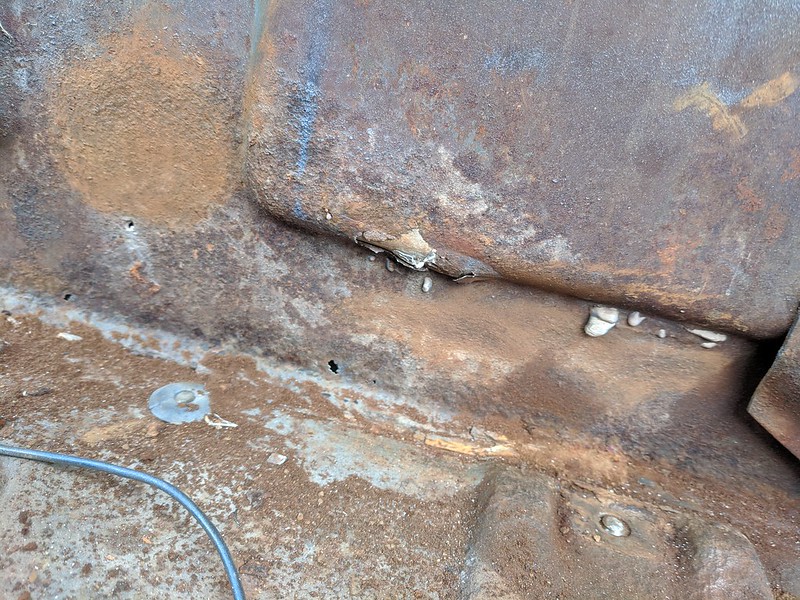 IMG_20190427_161417 by Shawn Wallbridge, on Flickr They just threw some bondo over it and it even looks like some foil tape. So, I cleaned it up as best as I could for now, and put down some POR15 I had for my Camaro.  IMG_20190428_150011 by Shawn Wallbridge, on Flickr I forgot to take a before and after, so I have a half way through and after...  IMG_20190428_172812 by Shawn Wallbridge, on Flickr  IMG_20190428_172821 by Shawn Wallbridge, on Flickr Now that the back half is dry, I can do the front, then after that dries will be the steps and doors. Of course, one of the awesome parts of working on old vehicles in California, is evicting the tenants.  IMG_20190428_164715_701 by Shawn Wallbridge, on Flickr I also cut out the headlight buckets last weekend, after letting them sit in some EvapoRust. The stuff is awesome, if you have the time, it's great to get rid of rust with almost no effort. And it didn't damage the plastic adjusters on the buckets. I also painted the back of those in POR15, and will do the inside first thing tomorrow. The goal for this weekend is getting the new battery tray mounted. I was going to mount it to the frame, like the 48-53's, but the Camaro clip comes too far back. So I am going to use the Jegs mount I bought, since it's a bit more solid, and looks a lot better (it's also smaller, so hopefully it clears the valve covers). I also want to get the fuel lines run tomorrow, even though I need to wait for a bulkhead fitting before I can wrap it up completely. The other thing I am waiting on is the Clutch-head sockets. I looked at all the local stores for them, but couldn't find them. The online restoration stores wanted a ridiculous amount for them, so Amazon to the rescue, but alas they didn't have Prime shipping, so I don't have them yet. I need those for a bunch of stuff, including checking out the inside of the gas tank. And I need to modify the sending unit for a bigger hose, not sure how that is going to go. I looked for aftermarket tanks, but all I could find was bed mounted (not an option, as I want to be able to the truck as a real truck, and not have to worry about putting stuff in the bed and blocking the filler), so I either need to modify the existing tank, modify a new stock tank, make my own tank (welding skills probably aren't quite there yet, and no tig), or have someone build me a tank. Thankfully I know a guy... He did some work on the Nova I used to have. I also want to get the engine primed before I put the distributor back in, so I need to install the fuel pump block off plate, make sure the oil pressure gauge is hooked up, and put some actual oil in it. I really hope it doesn't have any big leaks. As much as I would love to go LS, that would very easily add another month before it sees the road, and I really really want to get it on the road. Oh, and I got a good deal on a blem'ed Champion 3 core aluminum rad. I haven't installed it yet, but soon, when I get closer to starting it. But before I am 'allowed' to start it, I need to get the exhaust on it, which is most likely a weekend in itself, so maybe next weekend. Oh, and not sure if I posted this yet, but I had a piece of bondo that had come off... 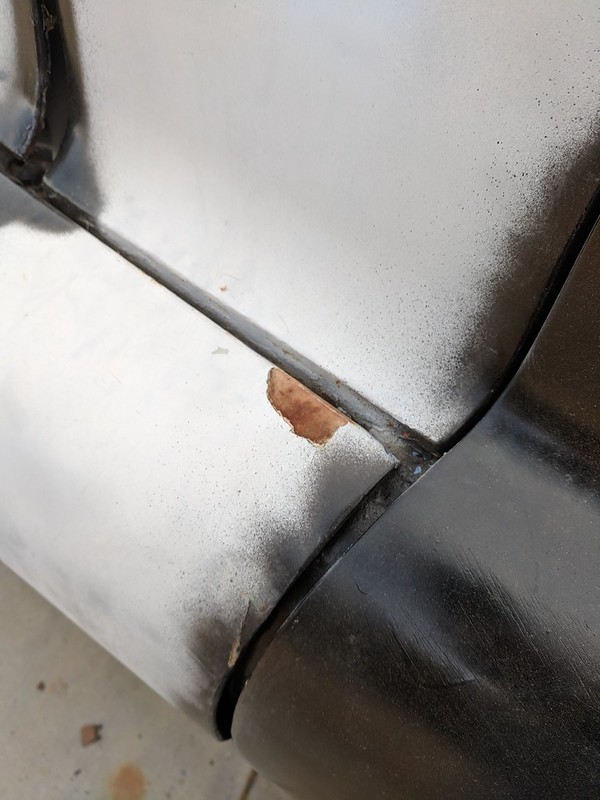 IMG_20190407_175741 IMG_20190407_175741 by Shawn Wallbridge, on Flickr So I decided to hit it with a grinder to at least prime the metal and prevent any further rust...  IMG_20190413_123418 by Shawn Wallbridge, on Flickr And big surprise, it's not pretty  I will probably hit the entire fender with my Eastwood SCT (another great tool, btw, it's as good as they say it is) I will probably hit the entire fender with my Eastwood SCT (another great tool, btw, it's as good as they say it is)In reality the entire truck has a lot of bondo, so I am torn. I can just hit the areas that I won't be able to get to later, knowing they will look nasty underneath and spray the rest the way it is. Or, I can strip everything now and have a fairly scarred and beat up, but bondo-free truck. I certainly don't have the time to properly fix everything now. I would like to strip it all now, but in reality I have to get it on the road, so I will probably meet part way in the middle. Same deal with the frame, though I am more likely to leave it as is, since I expect that at some point I will want to fix or at least reinforce where they have hacked. I think that's about it, hopefully these pictures aren't as massive (and unreadable) as the last post. I sure wish I could edit the posts. |
|
|
|
|
05-05-2019, 01:08 AM
|
#9 |
|
Senior Member
 Join Date: May 2007
Location: Doodah Kansas
Posts: 7,747
|
Re: My 59 GMC Build
looks like a really good start, count me in!
__________________
the mass of men live lives of quiet desperation if there is a problem, I can have it. new project WAYNE http://67-72chevytrucks.com/vboard/s...d.php?t=844393 |
|
|
|
|
05-05-2019, 02:20 PM
|
#10 |
|
Registered User
Join Date: Jun 2015
Location: Thousand Oaks, CA
Posts: 16
|
Re: My 59 GMC Build
Well, yesterday wasn't the best day, it started well, but went downhill pretty fast.
I started by painting the inside of the headlight buckets with POR15, then since I had it out, I did the inside of the lower valance under the grill. 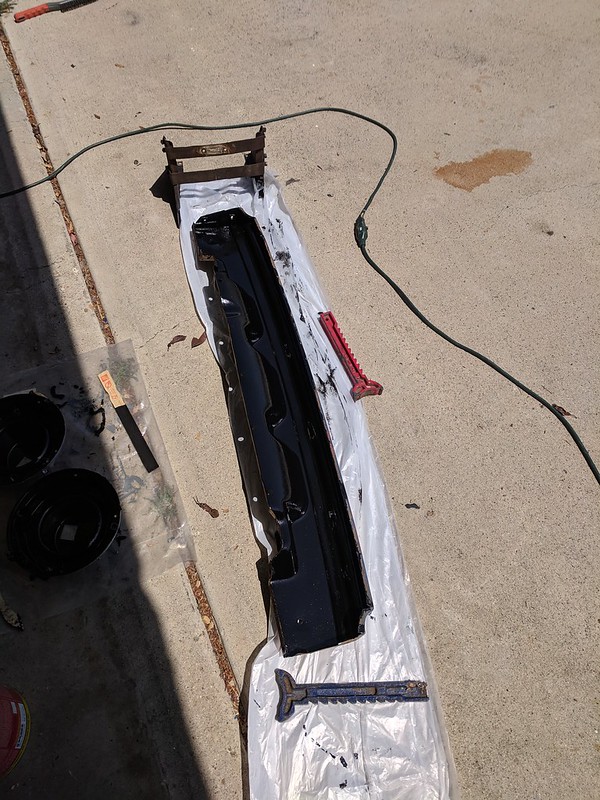 IMG_20190504_142323 by Shawn Wallbridge, on Flickr They turned out great, I love POR15. As you can see in the picture, I started to look into my options for the battery tray. Unfortunately, the Jeg's tray that I bought isn't going to work on the firewall, so I need to figure out what I can do with the one I have. It has been hacked up already, so I may look at buying a new one, and modifying it. Or I might just make my own, who knows. Since I had the wire wheel out to get the rust off the valance, I decided to clean up the paint and rust on the upper valance, it's primed now. But I don't have a picture. But then I decided to just get the rust that was forming in the passengers side door opening. Which escalated very very quickly. I was just cleaning up where the rear cab wall panel meets the door opening, but when I got to the bottom, where the panel starts to wrap below, I started to see just how bad of a job they had done on the replacement. So, I decided it had to be done....  IMG_20190504_191447_817 by Shawn Wallbridge, on Flickr And it gets worse... 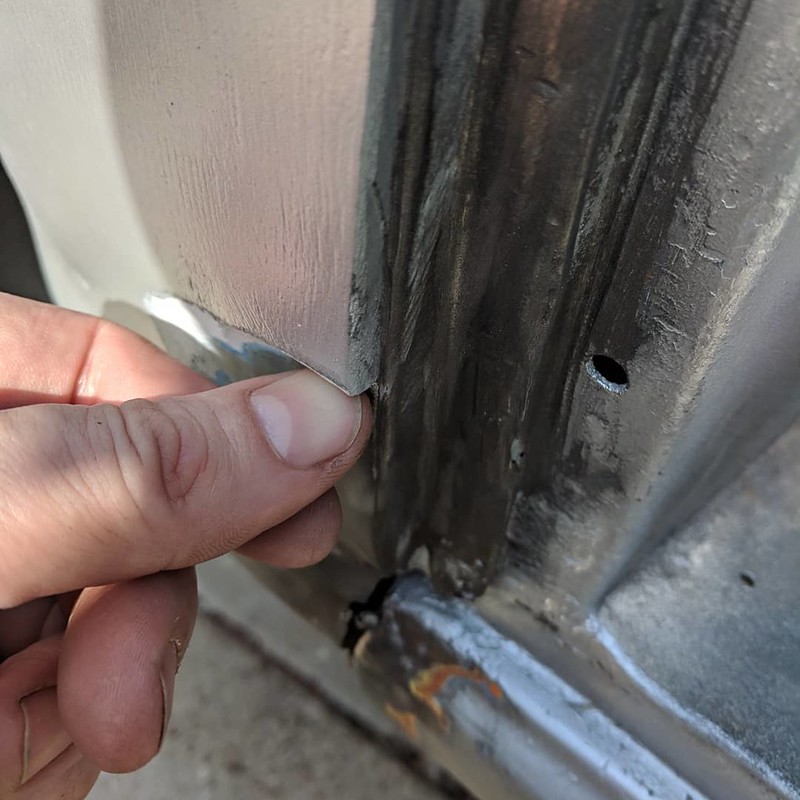 IMG_20190504_191447_818 by Shawn Wallbridge, on Flickr A whole lot worse... 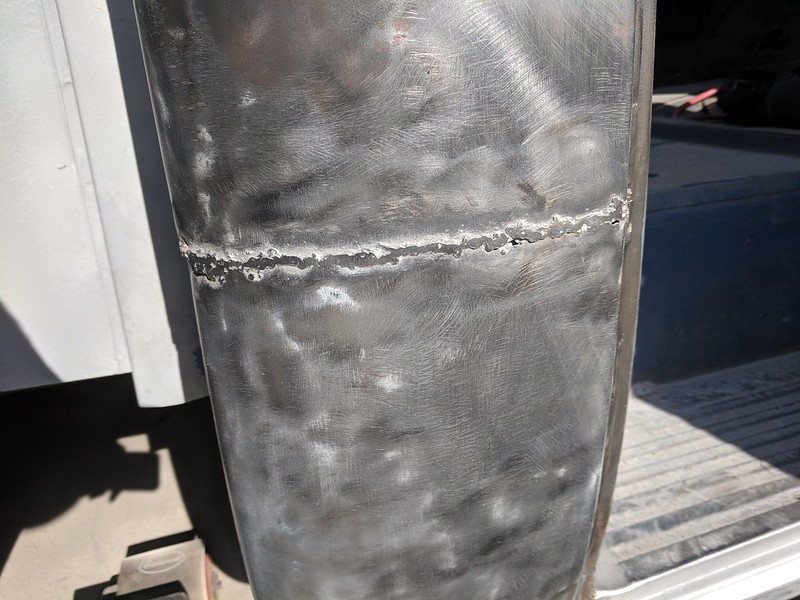 IMG_20190504_165028 by Shawn Wallbridge, on Flickr  IMG_20190504_165320 by Shawn Wallbridge, on Flickr  IMG_20190504_165304 by Shawn Wallbridge, on Flickr  IMG_20190504_165246 by Shawn Wallbridge, on Flickr So, that sucks, but what can you do, the joys of old trucks, you never know what's under the makeup. I am not going to fix it right now, at this point, the whole back of the cab needs to be replaced, so I will just weld up the holes, and spray it. I am not going to try to hide it. I did get the fuel pump installed, and started working on the plumbing.  IMG_20190504_191748_119 by Shawn Wallbridge, on Flickr That pump is pretty nice, but it's annoying they have the inlet coming in the front, rather than the side. I am going to head back out and fire up the grinder and see how big of a cloud of body filler dust I can create
|
|
|
|
|
05-06-2019, 01:15 AM
|
#11 |
|
Registered User
Join Date: Jun 2015
Location: Thousand Oaks, CA
Posts: 16
|
Re: My 59 GMC Build
So, another day, another pile of bondo dust. After yesterday's surprise, I didn't have high expectations for the other side, and I wasn't disappointed.
This side started good, the weld was pretty much the same as the other side, minus the holes. But as I got closer to the bottom, things got way worse than yesterday. The bottom of the door opening had over an inch of body filler, the sheetmetal had almost been folded back, and they had just built up the body line with bondo. Here it is before I started...  IMG_20190505_123849 by Shawn Wallbridge, on Flickr And once I started to strip away the bodyfiller in one spot...  IMG_20190505_124828 by Shawn Wallbridge, on Flickr  IMG_20190505_124802 by Shawn Wallbridge, on Flickr And about half an hour later, after I stripped it off.  IMG_20190505_132332 by Shawn Wallbridge, on Flickr  IMG_20190505_132335 by Shawn Wallbridge, on Flickr 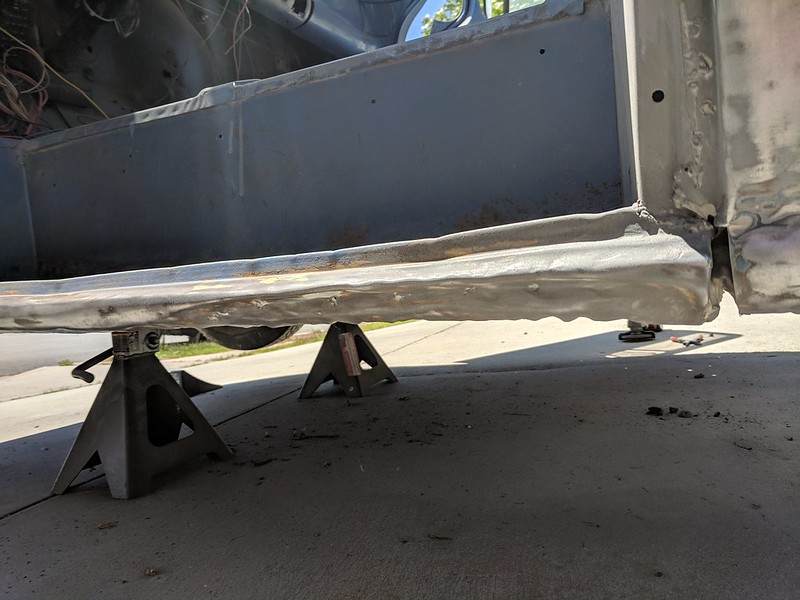 IMG_20190505_132341 by Shawn Wallbridge, on Flickr A nice close up of the 1/2" gap between the panels that they had just filled with bondo. While I was at it, I decided to see what was behind the filler I could see on the bed side. More quality work...  IMG_20190505_144208 by Shawn Wallbridge, on Flickr And I hit the passenger side upper back panel, where I could tell it had some filler..  IMG_20190505_142512 by Shawn Wallbridge, on Flickr Now that is all covered in some primer, I will probably wait to spray the color until I get it actually running. I did make some progress on that part, I ran the hard lines for the fuel up to the pressure regulator (I had it, might as well use it). Hopefully I don't end up moving it after I get the battery situation sorted out. I had an idea when I was making dinner tonight, but I still need to measure it out. The issue with the Jegs bracket is the mounting holes are too far apart, since the bolts go on the outside. I might be able to cut this one up, and make it work. We will see. While I was under there, I noticed that the POR15 that I let run down in the corners covered most of the metal, but I will probably try to get the rest. I also saw what was left of the rusted parts they didn't cut out.  IMG_20190505_152642 by Shawn Wallbridge, on Flickr And I saw this when I was cleaning up for the night. Kind of neat.  IMG_20190505_172557 by Shawn Wallbridge, on Flickr Oh, and one lesson learned, don't leave your phone laying around while your welding. I had a small piece of slag land on my screen, and it cracked all the way across  Hopefully the parts that I am waiting on arrive this week, and maybe I can get a couple hours in the garage one night to finish some wiring I still need to finish. |
|
|
|
|
05-12-2019, 12:26 AM
|
#12 |
|
Registered User
Join Date: Jun 2015
Location: Thousand Oaks, CA
Posts: 16
|
Re: My 59 GMC Build
I didn't get a whole lot done today, but something is better than nothing.
I finished the wiring for the lights in the front. 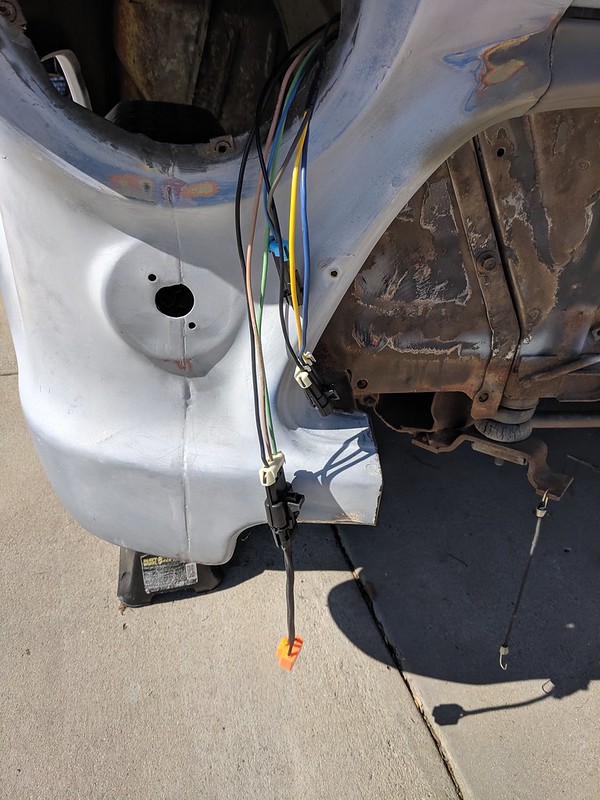 IMG_20190511_160158 by Shawn Wallbridge, on Flickr I used MetriPack connectors for everything, which may be a but excessive, but again reliability. Most of the wiring has braid over it for abrasion resistance. 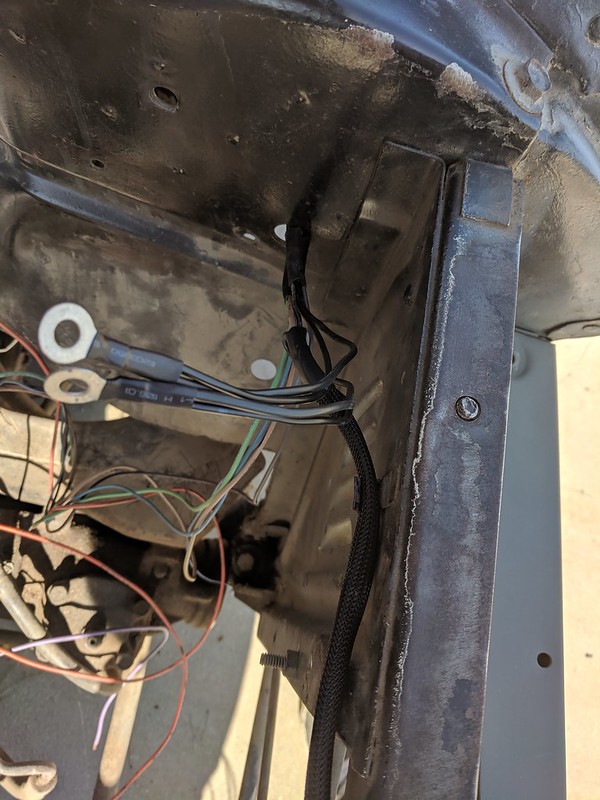 IMG_20190511_161005 by Shawn Wallbridge, on Flickr Once I got that done, I wanted to get the rest of the wiring for the front done, but I needed to figure out where I am putting the battery and solenoid. Which meant cutting and grinding. I had bought a frame mount battery tray from Jegs, but I don't have the room to mount it on the frame, where it would have gone on 48-53's because of the Camaro front clip. So, I decided to hack it up to work on the firewall. This is the mount...  IMG_20190511_165400 by Shawn Wallbridge, on Flickr I figured I could cut off the mounting tabs on the outside, and flip them around and use them on the inside. This is what I had planned on doing...  IMG_20190511_172255 by Shawn Wallbridge, on Flickr But it was no where near long enough to fit both of the factory mounts, so I ended up welding on the top (and actually ended up with a pretty good weld).  IMG_20190511_192427 by Shawn Wallbridge, on Flickr So, now it's mounted like this...  IMG_20190511_193920 by Shawn Wallbridge, on Flickr Which is plenty strong enough, but I am going to drill holes for a second set of bolts at the bottom, which will stop it from flexing/bouncing. The other thing I need to figure out is the hold down. The one that came from Jegs is too wide, and the hinge hits it when it I close the hood. But that should be pretty simple to figure out. Now that that is done, I can re-mount the solenoid and finish the wiring for the front. Hopefully I can get that and a bunch more done tomorrow before getting cleaned up for mothers day dinner. My goal now is to get the exhaust done next weekend, and hopefully fire it up Memorial Day weekend. |
|
|
|
|
05-19-2019, 02:24 PM
|
#13 |
|
Registered User
Join Date: Jun 2015
Location: Thousand Oaks, CA
Posts: 16
|
Re: My 59 GMC Build
Now that I have the battery mount sorted, I finished up the wiring in the front yesterday, along with the fuel pump and the rear taillight main harness.
I mocked up the new taillights I have so I can figure out the wiring, but at first it seemed like the brackets were not correct, but after looking at the pictures, I think they are right.  IMG_20190518_160814 by Shawn Wallbridge, on Flickr It seemed weird that they aren't level. But once you get the lights on it, it actually looks fine.  IMG_20190518_161028 by Shawn Wallbridge, on Flickr They are LED, so hopefully they are nice and bright. I am super surprised how the wiring connects to the lights.  IMG_20190518_161226 by Shawn Wallbridge, on Flickr I might remove those connectors and figure out something else, it seems like it would be super easy to pull out by accident. I did have a helper yesterday, though he wasn't much help, just sat there and watched  IMG_20190518_160236 by Shawn Wallbridge, on Flickr I finished up the wiring on the dash the other day, so it's ready to be installed. 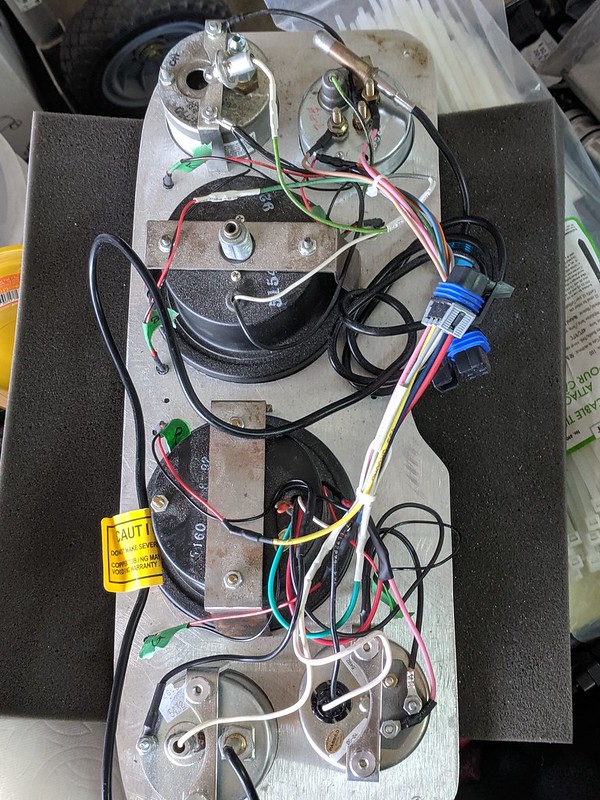 IMG_20190518_160337 by Shawn Wallbridge, on Flickr |
|
|
|
|
05-21-2019, 10:04 PM
|
#14 |
|
Registered User
Join Date: Jun 2015
Location: Thousand Oaks, CA
Posts: 16
|
Re: My 59 GMC Build
I never got around to posting these, but yet more ****ty work...
 IMG_20190519_172924_011 by Shawn Wallbridge, on Flickr 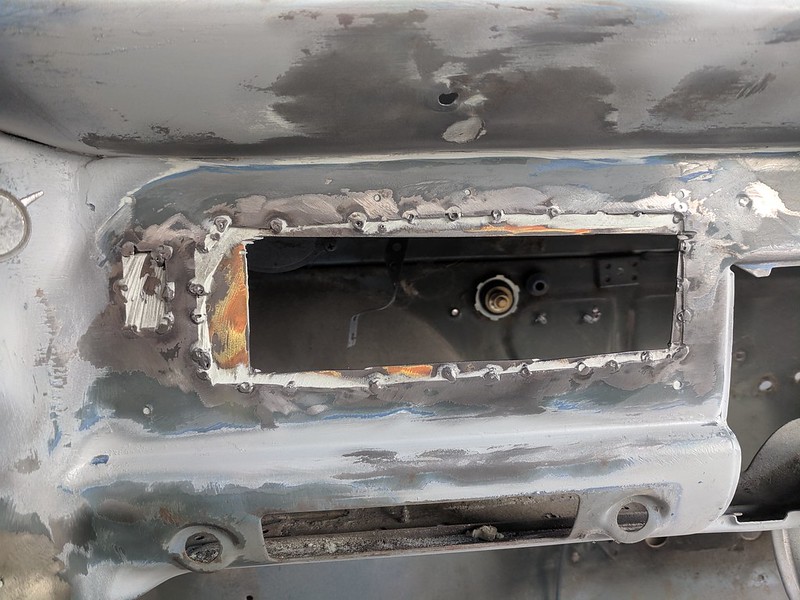 IMG_20190519_172524 by Shawn Wallbridge, on Flickr  IMG_20190519_172519 by Shawn Wallbridge, on Flickr  IMG_20190519_172514 by Shawn Wallbridge, on Flickr All I wanted to do was mount some switches
|
|
|
|
|
07-18-2019, 03:39 AM
|
#15 |
|
Registered User
Join Date: Jun 2015
Location: Thousand Oaks, CA
Posts: 16
|
Re: My 59 GMC Build
So it has been quite a while since I updated, but I have been making some progress.
Other than a few odds and ends, like the rear taillight harness ( I don't want to wire it until the bumper is on and the bed is mounted.) all of the electrical is done. I painted and installed the (hacked together) battery tray. 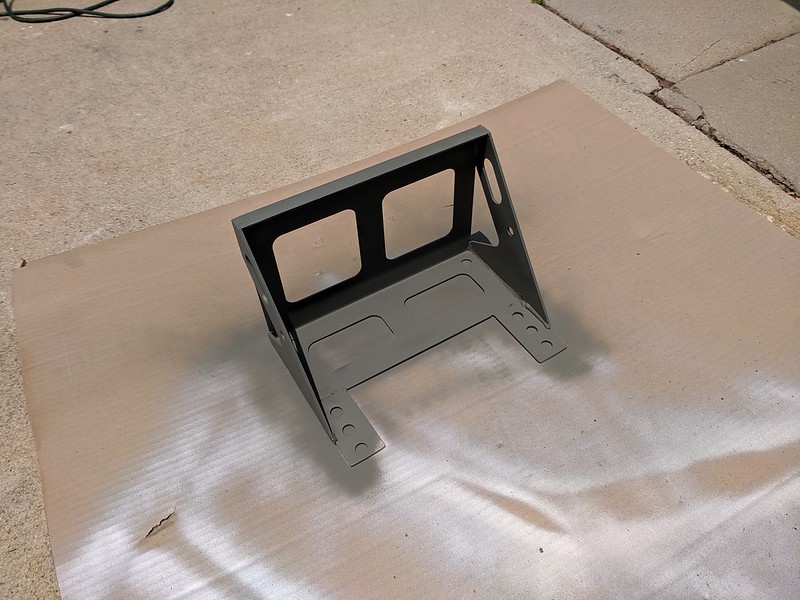 IMG_20190707_133535 by Shawn Wallbridge, on Flickr And I had one of these on my Bike back in the day, but it is a module that flashes your brake lights a few times when you hit the brakes. 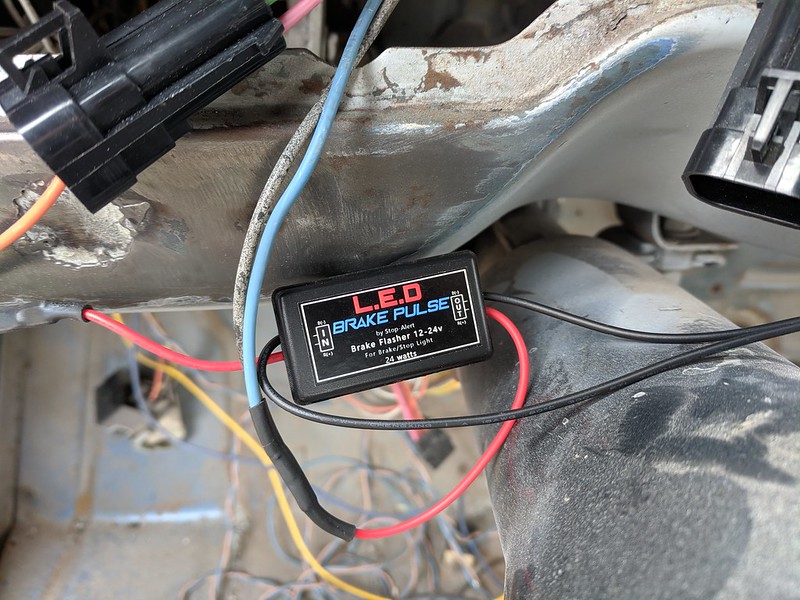 IMG_20190601_115656 by Shawn Wallbridge, on Flickr I pulled the gastank sender and found some bits inside, the sock had fallen off, aaand a a bit of tree.  IMG_20190601_121453 by Shawn Wallbridge, on Flickr Thankfully the tank looks pretty good. I just need to figure out the fitting, so I can get an adapter for the AN lines I installed. I installed my radiator, which was a blem from Champion, so I saved a bit but it still looks pretty good, and I had no issues installing it. Buuut, the Lincoln Mark VII fan I was planning on using.....won't fit.  IMG_20190601_123800 by Shawn Wallbridge, on Flickr So it looks like I will need to pick up a 16" SPAL or something. I also did some reading on the trans cooler fittings. I found that 1) I really wish I hadn't tossed the brass ones, as it might have been better to just get adapters for those fittings. 2) It's pretty common for someone a TH350's live to use the wrong type of fitting. And alas, mine is one. So, I put the _right_ fittings in as best as I can, and hopefully it doesn't leak, which would probably mean pulling the trans and installing a heli-coil. I am really crossing my fingers, but I have a feeling it will leak...  IMG_20190601_133443 by Shawn Wallbridge, on Flickr Oh and speaking about fingers, I either suck at making AN hoses, or I have some really ****ty hose, because I cannot seem to be able to actually get a fitting on. I have plenty of holes in all my fingers trying to get them on. And yes I have tried the electrical tape/zip tie tricks, none of them have worked. So I still need to make the trans cooler lines And I started on the exhaust. I have it most of the way done, but I don't want to finish it until I get the rear bumper. It's done until just past the rear axle. I was kind of silly and picked up a cheap electric cutout on eBay, so that will be fun Of course, the Black Widow mufflers are suppose to sound pretty good on their own.  IMG_20190601_152021 by Shawn Wallbridge, on Flickr I am also planning on running an Air - Fuel guage, so I cut out and installed the bungs for the O2 sensors in each bank.  IMG_20190601_161432 by Shawn Wallbridge, on Flickr I think they were from Speedway, and really not that bad, so even if you don't plan on running O2's, and you are doing a fresh exhaust, I would still put them in and use the block off ports. This is the first quarter mocked up. I wanted the system to be easy to remove, if needed, so I used a few V-bands. Though I bought cheap ones on eBay, and it isn't worth it. The step the pipe goes in isn't very deep, so it's harder to fit before you weld. 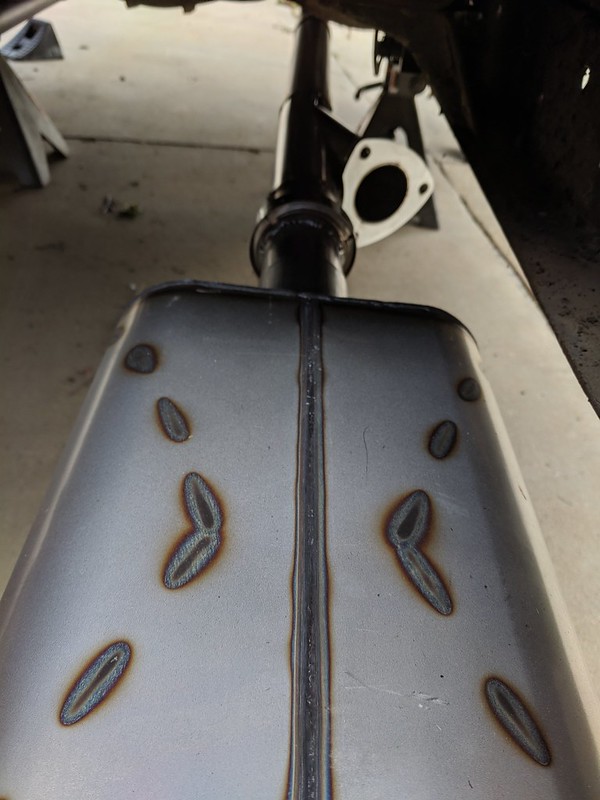 IMG_20190602_175715 by Shawn Wallbridge, on Flickr When I was cutting the exhaust I came up with the idea of marking where the pipe _should_ be, so it's easier to make sure I am cutting square. I am sure I heard this tip somewhere, but I don't remember where. So, sorry 'bout that.  IMG_20190602_152358 by Shawn Wallbridge, on Flickr And this is the mostly finished product. 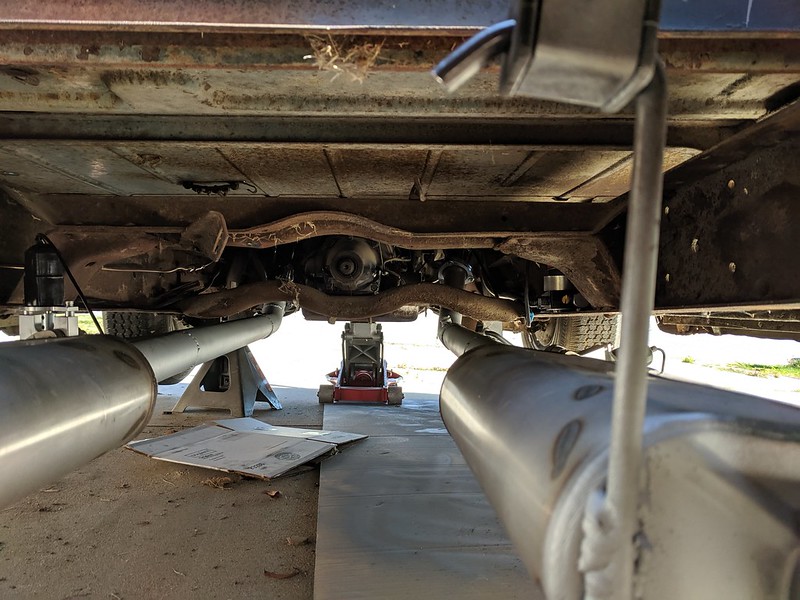 IMG_20190706_160645 by Shawn Wallbridge, on Flickr It's 2.5" mild steel, so I hit it with VHT high-heat silver. Hopefully it lasts. Then I found out some disappointing news, which is totally my fault for not thinking of, but I checked the casting code on the back of the block. And I have a 305, not a 350. I absolutely spaced on that code until a few weeks ago. I had tried to find the code on the front, but weirdly enough, it isn' listed anywhere. This is the casting number on the back...  IMG_20190623_160614 by Shawn Wallbridge, on Flickr Looks like a 86/87 305 with 140hp Then I started to strip the headlight covers I picked up on eBay, so I can re-paint them Gloss Black. 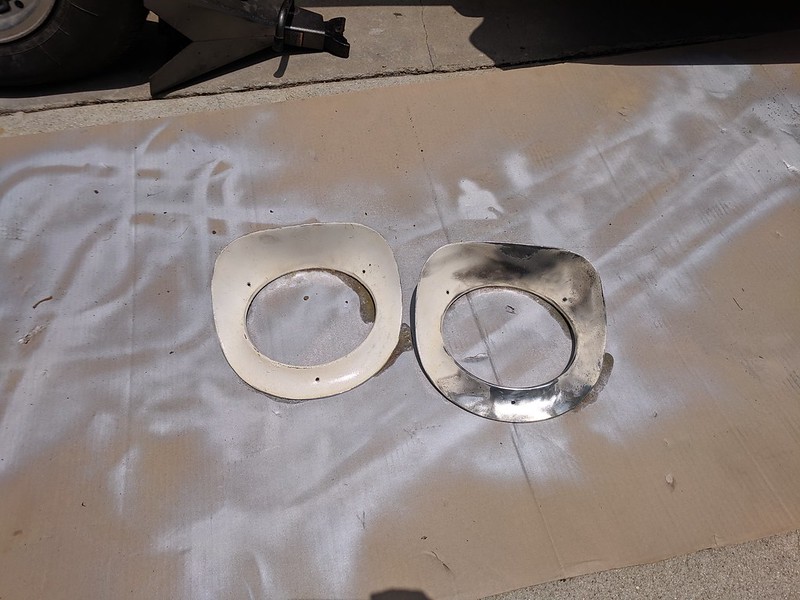 IMG_20190707_133539 by Shawn Wallbridge, on Flickr But before installing the headlights, I wanted to strip and re-paint the front fenders, which I already suspected were in bad shape. Aaaaand, things escalated....  IMG_20190707_142913 by Shawn Wallbridge, on Flickr BTW, the Eastwood SCT is amazing, I can't recommend it enough, but the wheels I had were pretty course, so they did leave some scratches in the metal. The back half of this is the colour I was going to paint it...  IMG_20190707_154951 by Shawn Wallbridge, on Flickr And, like I said, things escalated. 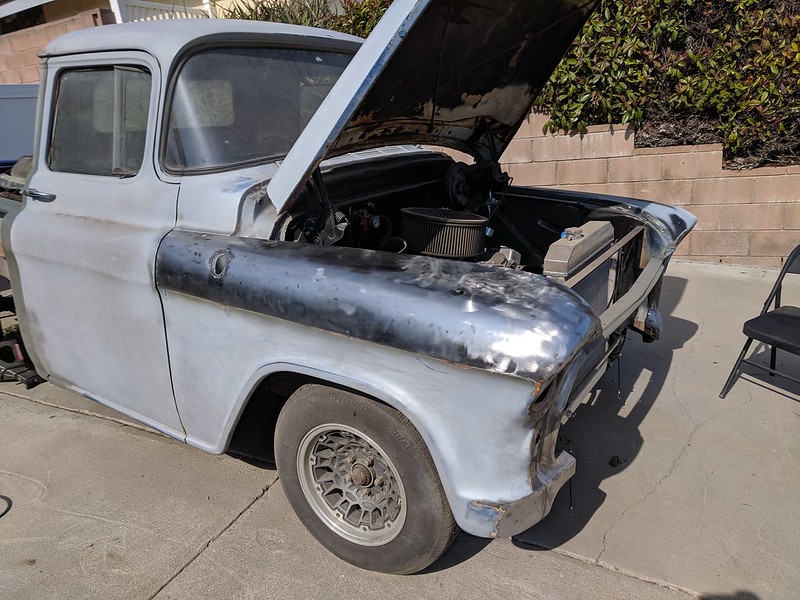 IMG_20190707_163255 by Shawn Wallbridge, on Flickr I found more crappy work, this had tape behind it to make sure the bondo didn't push through...  IMG_20190707_163300 by Shawn Wallbridge, on Flickr And at least they didn't destroy a good panel doing this hack job of a frenched antenna, as it still has plenty of rust holes.  IMG_20190707_163304 by Shawn Wallbridge, on Flickr  IMG_20190707_163316 by Shawn Wallbridge, on Flickr And here I switched over to using a wire wheel, as the Eastwood had been going sold for at least an hour and was getting pretty warm. 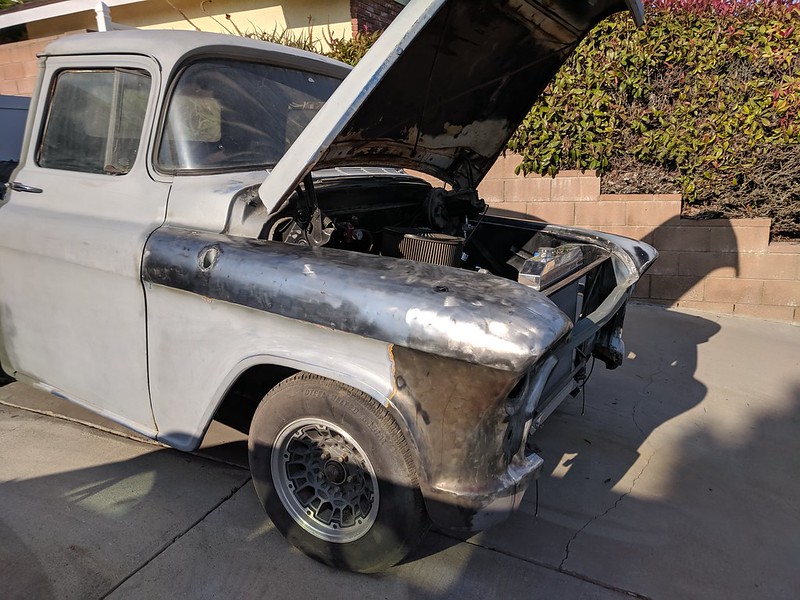 IMG_20190707_180438 by Shawn Wallbridge, on Flickr But this also kind of sold me on an idea... I am leaving her naked. Well, three coats of semi-gloss Rustoleum clear cote, but bare underneath. 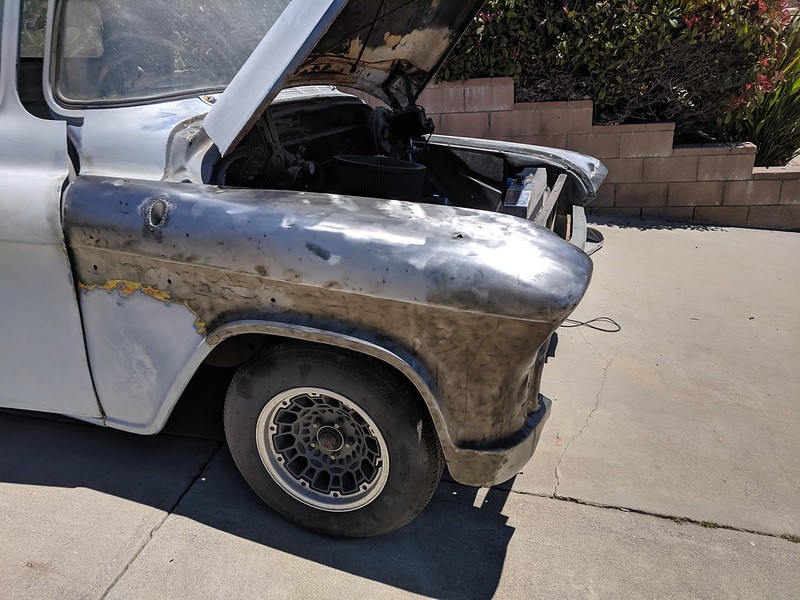 IMG_20190714_124733 by Shawn Wallbridge, on Flickr I may have to nickname her, Scar. Especially after I started to strip the drivers side fender...  IMG_20190707_180458 by Shawn Wallbridge, on Flickr She is almost going to look like a steel drum.  For reference I have no idea why it would have this brazed seam...  IMG_20190714_124754 by Shawn Wallbridge, on Flickr But it looks kind of cool. And after I installed the headlights, and marker lights. 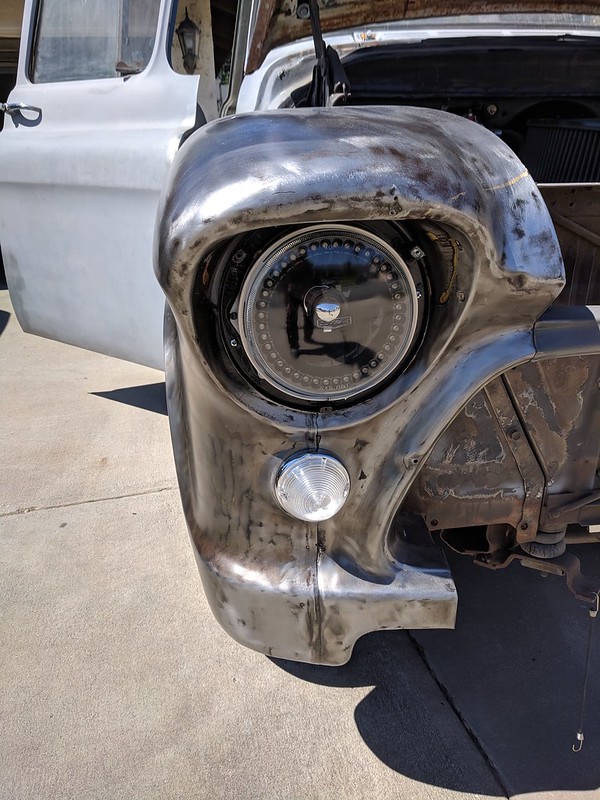 IMG_20190714_152828 by Shawn Wallbridge, on Flickr The paint hadn't tried on the trim pieces, but they should look pretty good, they are going to be a gloss black, along with the grill. This was the etching primer, I forgot to take a picture of the gloss black.  IMG_20190714_152818 by Shawn Wallbridge, on Flickr So next on the list is finish the fuel system, finally finish making the trans cooler lines, and prime the engine. Then, I can start it and see if/how it runs. But first, I have to finish installing the new doors, and make a couple sliding barn doors for our house. |
|
|
|
 |
| Bookmarks |
|
|


 Linear Mode

