
|
Register or Log In To remove these advertisements. |
|
|
|
|||||||
 |
|
|
Thread Tools | Display Modes |
|
|
 02-23-2005, 03:36 AM
|
#1 |
|
Registered User
Join Date: Feb 2005
Posts: 39
|
1984 Chevy C-10 With A 305 Motor - Vacuum Hoses and PCV Questions
I purchased an 84 Custom Deluxe with a 305. I don't know anything about its history; however, the motor is running good. I does have a few problems though that I would like to take care of. For now I would like to take the problems one at a time. I will post other problems later.
It seems that a lot of the smaller rubber hoses are all capped off. Also the charcoal canister on the lower right hand side in the engine compartment has all the empty spots where rubber tubes should be connected. Basically I just want to get all these hoses connected back to where they are supposed to go. There is one hose behind the carb. There are two or three hoses in front/under the carb. Also the air cleaner has a place where a hose should be connected, and also the damper that opens/closes which allows or blocks fresh air into the air cleaner does not close... I was reading that this is supposed to close when the engine starts in cold weather to help warm the engine up. The engine runs really rough when first starting... but once it is warmed up it will idle and run forever... Engine get horrible gas milage... 5 -7 miles per gallon.... calculations were not based off using the gas guage... I filled the tank, recorded how many gallons I purchased, and noted the milage... drove interstate at 65 miles per hour for 30 miles and then turned around and drove back, topped off the tank and noted how many gallons purchased, and then did the math. I would love to get all the rubber hoses connected to their proper places... Haynes and Chiltons do not help me... very confusing. Last edited by gconn77; 03-06-2005 at 02:20 AM. Reason: Spell Words Correctly in Title |

|

|
|
02-23-2005, 09:13 AM
|
#2 |
|
Mudslides 'r my specialty
Join Date: Dec 2003
Location: STL
Posts: 1,106
|
Good luck.
The best thing would be to find a similar truck nearby and just copy the way the lines are run. I have an 85 with a 305 with only one vacuum line capped off, and I can't figure out where it goes at all...
__________________
Always on the lookout for old cars and parts...(20s, 30s, 40s, 50s, 60s, etc.) http://www.cardomain.com/memberpage/500339 |
|
|
|
|
02-23-2005, 10:14 AM
|
#3 |
|
North Coast, baby!
Join Date: Jun 2004
Location: Toledo, OH
Posts: 437
|
I'm sure someone on this board has a pic of an 84 vacuum route. You can look at my 79 pic to get started. It should at least let you see how to hook up the canister. The air cleaner will have one vacuum hose going to the temp sensor and one from the temp sensor to the air diverter. Also a large hose coming from the pass. side valve cover up to the housing, plus a heat stove pipe up to the bottom of the air diverter door. Hope this helps. Welcome aboard.
__________________
Brad 79 Scottsdale C20  350/350 3.73's Still running full CA smog gear! 
Last edited by TrainD5115; 02-23-2005 at 10:17 AM. |
|
|
|
|
02-23-2005, 06:09 PM
|
#4 |
|
Registered User
Join Date: Feb 2005
Posts: 39
|
Added Photos and More Information Regarding The Problem
I create a webpage that has all the photos and information about my problem. I did not want to load up the photos here and bog the message board down. However, I will post small thumbnail pics here. If you could please take a moment to click over to my page that has the full size photos.
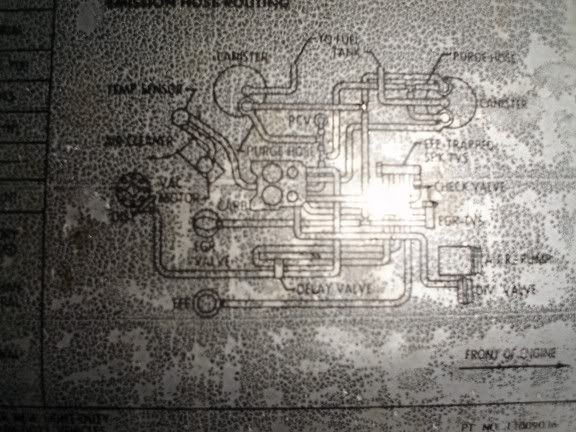
The page I created is located at 84 Chevy C/10 Custom Deluxe. PHOTO #6  This is a photo of the Charcoal Canister. Please click the photo or CLICK HERE to view the full size photo. The very bottom has the PCV. There is a bigger connection on the bottom of the post and a smaller connection above this. *The PCV is located on the right hand side valve cover. It is in good condition. It is connected directly to the carb. (See photo #9). Also looking at photo #10, there is some kind of splitter at the PCV. One rubber tube should come from the carb to the PCV, and then the rubber tube appears that is should then go from the PCV to the canister. PHOTO #8  This is a photo of the Air Cleaner. Please click the photo or CLICK HERE to view the full size photo. In the air cleaner, located on the inside of the air filter, is the Thermatic air cleaner sensor. From what I read (Haynes), this sensor controls the damper in the snorker of the air cleaner. The problem is the damper is always open. I can reach in there and move the damper closed with my thumb, but the minute I let go, it returns to the open position. Cold weather and cold start engine, same problem. I belive that the Thermatic air cleaner sensor is bad. Additionally, there is a capped rubber hose that is mounted to the bottom of the air cleaner. I would like to know where this is supposed to be connected to. Lastly, there is a metal piece (I believe is the thermostat for the engine collant). There are three post that look like rubber tubes could be connected to them. Testing though resulted in no suction or liquid coming from these three posts. PHOTO #9  This is a photo of the Carb. Please click the photo or CLICK HERE to view the full size photo. After removing the air cleaner, you can easily see four capped off rubber lines. I would really like to know where these all need to go. Removing the caps from any of these lines has no effect on the motor except for the bigger rubber hose with the larger bolt stuck in it acting as a cap. When I remove the cap on this rubber line, a huge amount of air is sucked into the tube and the moter very quickly stalls. PHOTO #10  This is a photo of the VECI Label. Please click the photo or CLICK HERE to view the full size photo. This is an actual image of my Vehicle Emissions Control Information (VECI) Label. Hopefully with this added information and photos you guys can help me get all of these hoses re-connected back to where they belong. I appreciate everyone's help as well as interest in this problem. Regards, Garry |
|
|
|
|
02-23-2005, 06:47 PM
|
#5 |
|
Mudslides 'r my specialty
Join Date: Dec 2003
Location: STL
Posts: 1,106
|
I have the same sticker on my radiator support, but it is all gibberish.
The acronyms don't match up to what they should be...stupid GM.
__________________
Always on the lookout for old cars and parts...(20s, 30s, 40s, 50s, 60s, etc.) http://www.cardomain.com/memberpage/500339 |
|
|
|
|
02-23-2005, 06:55 PM
|
#6 |
|
Registered User
Join Date: Feb 2005
Posts: 39
|
Is there anyway you can take some photos of your engine and carb area so that I can compare to my engine... You said all your hoses are connected minus one... can you tell me where all of yours are going and hopefully illustrate with photos?
|
|
|
|
|
02-23-2005, 07:01 PM
|
#7 |
|
Mudslides 'r my specialty
Join Date: Dec 2003
Location: STL
Posts: 1,106
|
It would be easier to email them to you if you want them soon. PM me your email address, I already have some pics taken.
__________________
Always on the lookout for old cars and parts...(20s, 30s, 40s, 50s, 60s, etc.) http://www.cardomain.com/memberpage/500339 |
|
|
|
|
02-23-2005, 07:04 PM
|
#8 |
|
Registered User
Join Date: Feb 2005
Posts: 39
|
Ok... PM sent!
|
|
|
|
|
02-24-2005, 03:55 PM
|
#9 |
|
Registered User
Join Date: Dec 2002
Location: Houston
Posts: 300
|
Hey Dano, been to the Autozone site 1000 times, never got into that section. A lot of good info there.
Garry, first off, welcome to the board. Have to agree with John on deciding what you NEED in your area. If you are somewhere that does emission testing for inspection, you're in for some serious work, it's all gotta go back like it is on that sticker, and that motor isn't set up to accept all those parts. My guess is that the engine has been replaced with an older one. Your intake manifold not only doesn't have a place for an EGR, but also doesn't have a place for the second four port thermal vacuum switch (one of the devices on your schematic) which would be a threaded hole in the intake near the water inlet. Your exhaust manifolds don't have the tubes for the A.I.R. system, there's no A.I.R. pump, no deceleration valve. A lot of what's associated with the canister vacuum lines is not even on your motor. Even with the right motor in there, it's a BIG job to resore all that, GM doesn't make some of that stuff anymore. It can be done, but it turns into months of research and parts chasing and junkyard digging. Just did all that, we have emissions tests here. Looking at that diagram under your hood, all those ports on the carb that are designated with letters like FJBLTH are shown roughly where they actually are on the carb. The carb even has those letters embossed and/or stamped into the metal, but some you can't see unless you have the carb in your hands. With any luck, you live where all they do is basic inspection, in which case all you need to worry about is the basic vacuum stuff needed to make it run right, like vacuum advance, the PCV portion of it. If that's the case, you will have a bunch of plugged and capped vacuum ports. Guess you're looking at either restoring it to match that sticker, in which case you have a roadmap to work off of but an engine that won't support the parts and systems without changing the intake and exhaust manifolds (which incidentally may not pass emissions test anyway once finished if it's an old high milage engine), or forgetting all that and doing your own custom as needed vacuum routing if you can pass inspection without emissions test. My sticker is an XDJ which is almost identical to yours, mine just has one more port on the canister with one more small hose to the air cleaner. Other than that, it's the same. Pics of mine would be helpful if you have to bring it back to emission standards, but if you don't have to go that route, then they would be useless. Best of luck.
__________________
Paul 1984 Chevy C-10 *LWB/305* |
|
|
|
|
02-24-2005, 07:07 PM
|
#10 |
|
Professional Grade
Join Date: May 2003
Location: Fort McMurray, Alberta
Posts: 7,915
|
If you look, it seems that your oil pressure light doubles as the choke light. There is the oil pressure symbol on one side, and what looks like a butterfly valve on the other. Maybe plug that wire in, start the truck up, and let it run for a few minutes, see if it turns off?
__________________
1995 Chevrolet 2 Door Tahoe (6.6L LBZ Duramax / ZF6 / NP241 with 1 ton solid axle swap) |
|
|
|
|
02-24-2005, 08:19 PM
|
#11 |
|
Project 2 Resume
Join Date: May 2004
Location: Jim Thorpe, PA
Posts: 884
|
I'm 100% positive about the terminal, to the choke. Do you have a voltmeter or a test light? With the truck running check that light blue terminal lead and check it again while off. You don't want voltage there in any other ignition key position (ONLY running). If it's getting voltage while running, then the oil pressure switch MAYBE correct. I'm not sure if your truck's choke runs off a pressure switch to the rear of the intake or a pressure switch by the oil filter housing.
Like Russell said, is correct. I'm not sure how that tie wrap will effect things regarding the dash light or not. It's obviously holding the linkage open. I'm trying to go by memory because my present truck I converted from hot air to electric choke. Which is most recent to me.
__________________
John 1984 C30 Chevy Crew Cab Dually 1998 Jeep Cherokee 4x4 2004 Chevy Trailblazer 4x4 (wife's) 1970 Mustang FB fully tubed (getting 521 BBF & powerglide) 1978 Nova 2dr (going BBCaddy & S.P. th400) 1984 Monte SS (circle track car) Last edited by badone07; 02-24-2005 at 08:21 PM. |
|
|
|
|
02-25-2005, 12:10 AM
|
#12 |
|
Registered User
Join Date: Feb 2005
Posts: 39
|
Revised Hose Routing Diagram
Ok... I have revised the hose routing diagram based off the information I have received on my problem. I have revised the diagram so that I can show you guys what I will be doing. Please review the diagram and give me the thumbs up... or tell me what I have done wrong. After you guys approve the diagram, I will then perform the work on the motor. I look forward to your comments.
Here is the OLD HOSE ROUTING DIAGRAM:  Here is the NEW REVISED HOSE ROUTING DIAGRAM:  I am hoping that I got it all right... if so, then I will be going to the store to purchase new vacuum hose, clamps, and caps. Hopefully this will be the first start towards cleaning the motor up a little. Regards, Garry |
|
|
|
|
02-25-2005, 01:03 PM
|
#13 |
|
Project 2 Resume
Join Date: May 2004
Location: Jim Thorpe, PA
Posts: 884
|
Garry, you just don't have most of the components in your hose routing diagram. Unless you can hunt down all the components, it's a waste of time. Randomly, partially deleting components on the diagram won't mean a thing without them actually being there. Since you don't have any emissions, that's as clean as it will get with the vacuum lines. It's just a matter hooking up what you have to function propery and capping the rest of the unused vacuum sources. You also don't have to waste any caps on the air cleaner housing if you're not going to supply vacuum to it, like your diagram. You do not need hose clamps for vacuum lines. It's really not that complicated at all. Good luck with it.
__________________
John 1984 C30 Chevy Crew Cab Dually 1998 Jeep Cherokee 4x4 2004 Chevy Trailblazer 4x4 (wife's) 1970 Mustang FB fully tubed (getting 521 BBF & powerglide) 1978 Nova 2dr (going BBCaddy & S.P. th400) 1984 Monte SS (circle track car) |
|
|
|
|
02-27-2005, 01:07 AM
|
#14 |
|
Registered User
Join Date: Feb 2005
Posts: 39
|
Vacuum Hoses and PCV Valve Project COMPLETE!
Project complete!!! Here are two photos below. Motor is running much better. In fact it starts right up even when cold. I will test it one more time tomorrow morning after it sits all night. Anyway, thank you everyone for helping me. Tomorrow morning I am going to work on the electric choke. If I have any questions regarding the electric choke, I will probably start a new thread. This one is getting too big and I want to keep the content specific to the subject of Vacuum Hoses and PCV questions. Thanks again guys... excellent first impression of the website and members!
Best Regards, Garry  
Last edited by gconn77; 02-27-2005 at 01:08 AM. Reason: Adding Title |
|
|
|
|
| Bookmarks |
| Thread Tools | |
| Display Modes | |
|
|


 Hybrid Mode
