
 |
|
|
#1 |
|
Registered User
Join Date: Nov 2013
Location: nanaimo, bc
Posts: 19
|
'51 Hodge Podge
Hi all,
this story started July 1, 2015. Well, it actually started sometime in 1951 but I don't have the details or the desire to do the research. Suffice it to say, this truck was not a weekend special but someone smeared a lot of lipstick on to make it appear that way. I've wanted a 47-54 Chevy since I saw an immaculate chopped, mint green pro-street build on the pages of Classic Truck magazine in 1995. I like to think my tastes have refined since then but the truth is they've probably slid a long way towards the other end of the spectrum. I took a shot at several AD's over the past few years and slowly came to the realization that you have to be lightning quick to pick up a reasonably priced example on Vancouver Island. Anyway, a lot of other projects came and went, mostly of the two wheel variety, until I happened to see an ad for a running '51 just an hour South. Right, cancel plans, grab my AD cash stash and hit the road. Tell the missus? No time, she'll figure it out when she gets home. As luck would have it, everyone else was out celebrating our nations birthday and must have been too inebriated to drive because I was the first one to show. A quick inspection didn't reveal anything out of the ordinary for these trucks so I traded cash for a 30 yr. old title (it wasn't printed but hand written on some form I've never seen before) and went to load it on the trailer. Just then the owner suggests he drive it on, no brakes see. No problem, the truck is borrowed and the trailer's a rental, have at it. The highlights of the build are a Supra IFS with coil-overs, 4.8 backed by an S-10 NV3500, truck arm rear suspension and an Explorer 8.8 with disc brakes. The rest is less important but I'll try to touch on it in future posts. |
|
|

|
|
|
#2 |
|
Registered User
 Join Date: Aug 2012
Location: West Side of the valley, CA
Posts: 878
|
Re: '51 Hodge Podge
Hodge Podge sounds fitting. Supra IFS? Interesting...looking forward to it.
|
|
|

|
|
|
#3 |
|
Registered User
Join Date: Nov 2013
Location: nanaimo, bc
Posts: 19
|
Re: '51 Hodge Podge
As soon as I got it home, I gave a more thorough going over and started to find the sins of owners passed. It had two bondo face lifts and someone had riveted tin over the missing kick panels. The outer cowl was made entirely of mud and the front of the cab had sunk 2 inches over the frame. The only thing holding it up were the running boards.
[IMG] 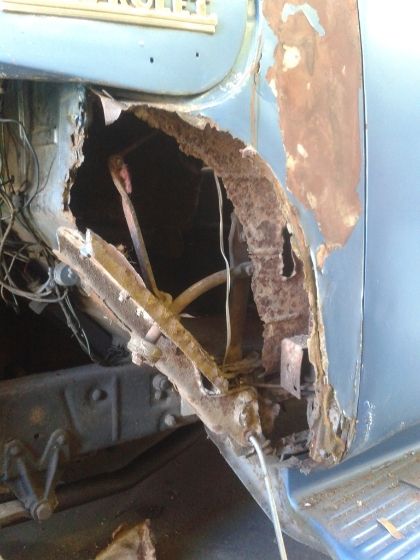 [/IMG] [/IMG]I dug in and made up new panels for all those that were rusted out. I don't have any pics of those, I figure you all know pretty well what is involved in replacing the structure of these cabs, unfortunately I had to learn that as well. After several weeks of rust repair and grinding on body filler, I'd had enough and rolled it into the back yard and forgot about it. |
|
|

|
|
|
#4 |
|
Registered User
Join Date: Nov 2013
Location: nanaimo, bc
Posts: 19
|
Re: '51 Hodge Podge
Before I knew it, another Canada day was celebrated and I hadn't touched it. I thought enough was enough, time to drag it back in the garage or I'll be right back where I started.
Initially, I planned on using a Jag IFS but I couldn't find one anywhere. My backup plan was an 86-92 Supra IFS as they are a self contained unit other than the strut tops, they have big discs and rack and pinion steering. I've always been into early Japanese vehicles and have wanted to try the Supra clip in something for a few years. There are quite a few of them in various states of disrepair around here so it was easy to find something usable and pocket friendly. [IMG] 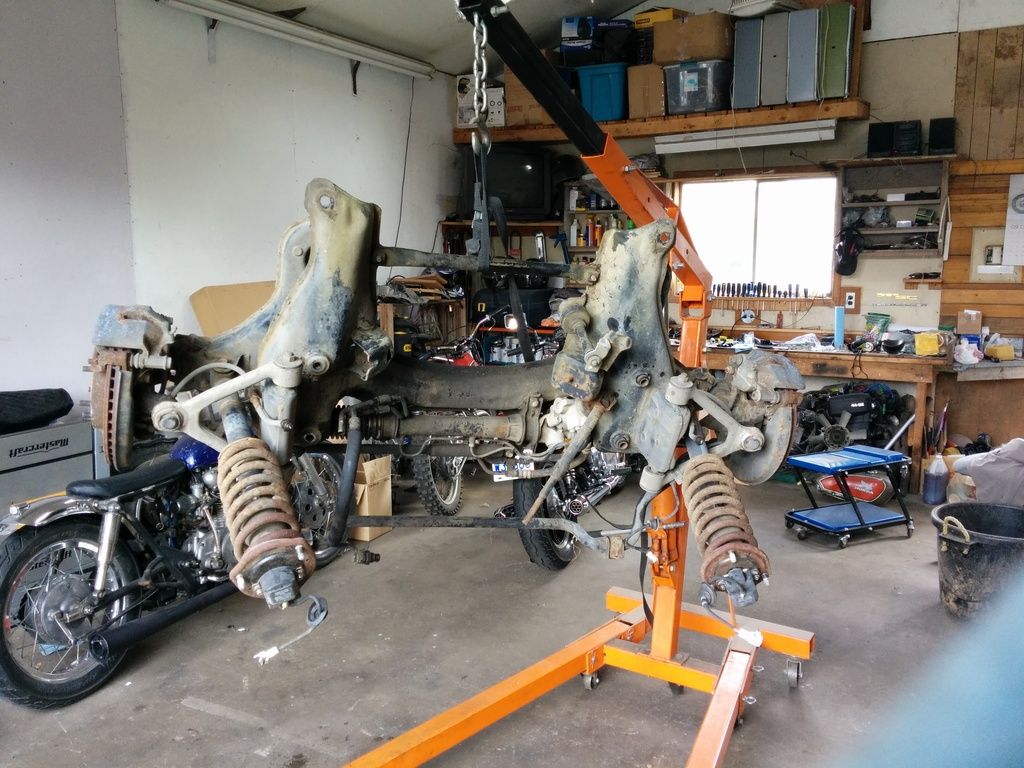 [/IMG] [/IMG]I stripped the front of the truck frame and offered it up 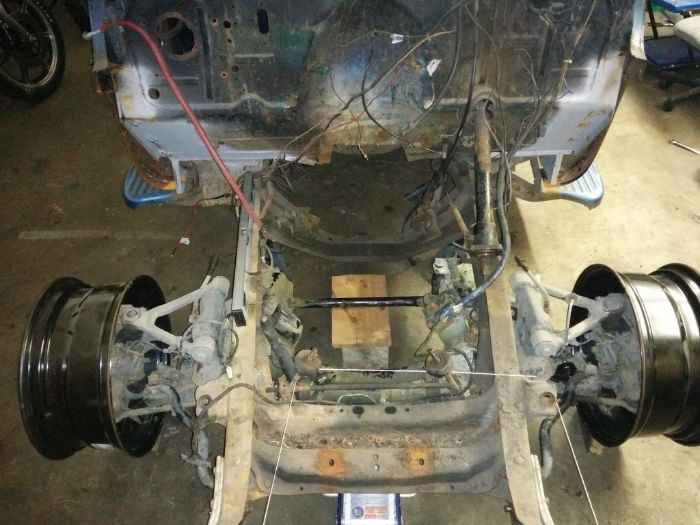 The mounting points are 1/2" too wide and the frame would need some massaging around the steering shaft but otherwise, I couldn't see any reason not to use it. I wanted to keep it as a bolt in affair so I welded some 5/8" inner diameter tube to the frame. The sleeves for the rear mounting points need to be sectioned into the frame but the front sleeves can be welded directly to the outside as they are another 1/2" inch wider. [IMG] 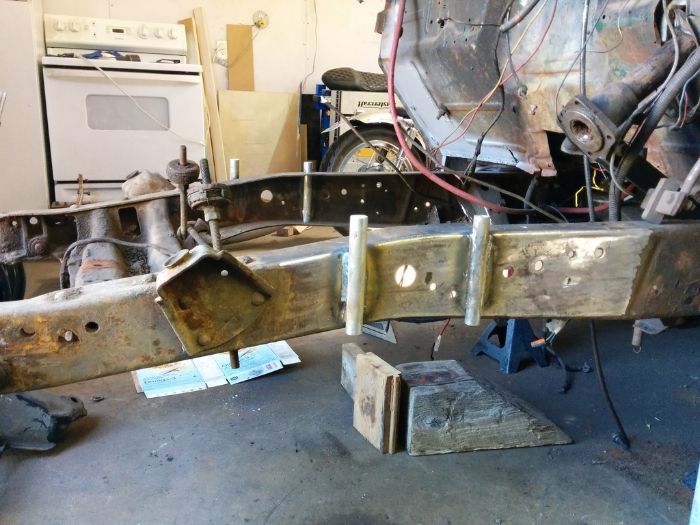 [/IMG] [/IMG]I boxed the sleeves with lengths of 1x3 .120 wall tube on the outside of the frame and notched the frame up to the bottom of the 1x3. This isn't necessary but my ride height would have been about 7" with the lower control arms horizontal. With the notch, my ride height should be around 5 1/2" at the bottom of the running boards. I then boxed the inside of the frame with 3/8" plate, leaving a 1" relief for the steering shaft. At about this time, I found a killer deal on some new QA1 coil-overs with two pairs of springs, 350 and 450lb/inch. Judging by the tables on the QA1 website, the 450's should be about right for one of these trucks so I lucked out on that purchase. Now I had to mount them. I got a local fab shop to bend some 1 3/4" DOM for the hoops, then I made some stand-offs? towers? to mount the hoops off the side of the frame. I did this to be able to triangulate off the top of the frame and allow clearance for the inner fender. I figure I ought to mention that I'm not an engineer and I'm making it up as I go. I feel that it's plenty sturdy but if anyone else wants to try this do so at your own peril.... |
|
|

|
|
|
#5 |
|
Registered User
Join Date: Nov 2013
Location: nanaimo, bc
Posts: 19
|
Re: '51 Hodge Podge
With the coil-overs mounted as they are, she will get low. Max height is around 9" at the running board and the Supra cross-member sits about the same, maybe a touch higher. The lower control arms sit horizontal at about 5" but the tie rods point up about 2 degrees. I'll have to wait and see how this translates in regards to bump steer.
|
|
|

|
|
|
#6 |
|
Registered User
Join Date: Mar 2009
Location: Derby Kansas
Posts: 564
|
Re: '51 Hodge Podge
Looks interesting. I'll follow along!
__________________
av8tr33337 AKA Bartman  Email av8tr33337@yahoo.com Email av8tr33337@yahoo.comBartman's Ad-S10 Chassis Swap http://67-72chevytrucks.com/vboard/s...d.php?t=415418 My First Youtube Video http://www.youtube.com/watch?v=B6hSt...eature=channel More Pics of the 51 Project http://s668.photobucket.com/albums/v...hassis%20Swap/ 1951 3100 Pickup |
|
|

|
|
|
#7 |
|
Registered User
Join Date: Jan 2016
Location: Alberta Canada
Posts: 103
|
Re: '51 Hodge Podge
This is cool. Looks like a good start, I love seeing new and unusual ways to build these things. That's what hot rodding is all about.
__________________
My work in progress http://67-72chevytrucks.com/vboard/s...d.php?t=720672 |
|
|

|
|
|
#8 |
|
Registered User
Join Date: Nov 2013
Location: nanaimo, bc
Posts: 19
|
Re: '51 Hodge Podge
Thanks for following along fellas, hopefully it`s worthwhile.
My goal is to have it driveable for the end of February under $4000 CAD. Right now I'm around $2800 with the price of the truck but still need a wiring harness, fuel system and all the nickel and dime stuff that adds up. I had a carb'd small block 350 all mocked up and ready to build mounts when I happened to see an ad for a 4.8 with harness and ecm out of a 2002 Silverado. I figured it was fate so I checked it out. Supposedly had 150 000 km but it had already been pulled from the vehicle so I couldn`t verify anything other than the visuals. For $450, I was willing to give it a shot. [IMG] 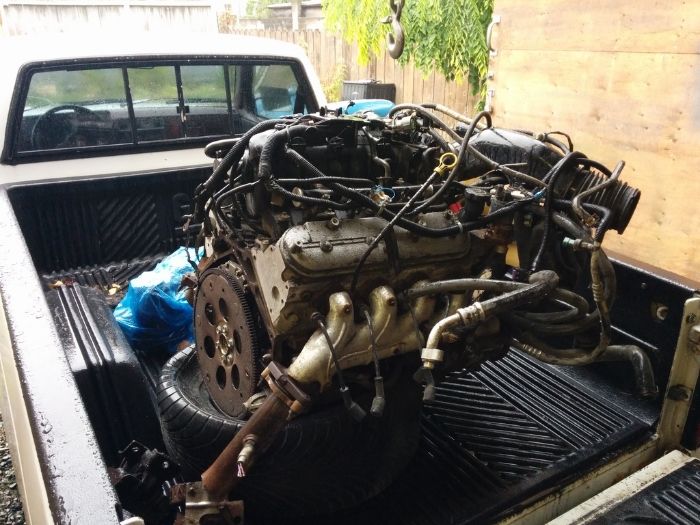 [/IMG] [/IMG]I ordered some of the pancake style engine mounts and extended the original Supra engine platforms to mount the LS. [IMG] 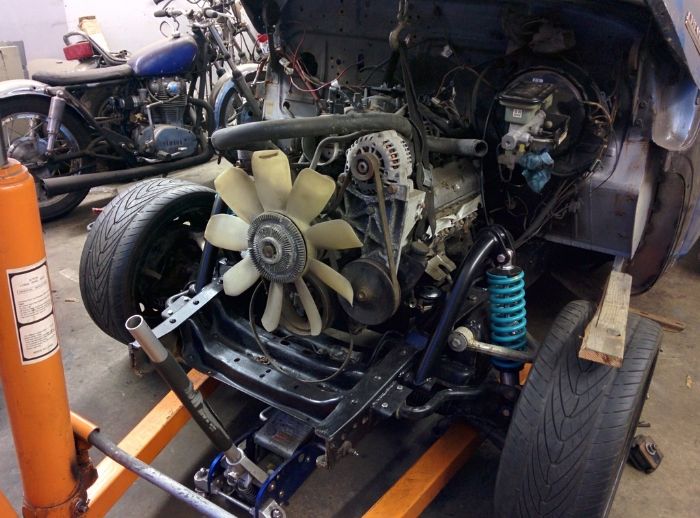 [/IMG] [/IMG]I had to mount it about an inch higher than I wanted due to the truck oil pan. I thought about getting a different one but I`m using an nv3500 5spd from an S-10 and they have a rediculous slave mount housing that only hangs an inch higher than the bottom of the oil pan so I figure it isn't worth the cost of the pan. As it sits, the pan is about 3/4" below the Supra cross member so I'll make a skid plate of some sort. I also made a tranny mount that extends from the stock AD trans cross-member. At least I assume it's the stock one. |
|
|

|
|
|
#9 |
|
Registered User
Join Date: Nov 2013
Location: nanaimo, bc
Posts: 19
|
Re: '51 Hodge Podge
|
|
|

|
|
|
#10 |
|
Senior Member
 Join Date: May 2007
Location: Doodah Kansas
Posts: 7,747
|
Re: '51 Hodge Podge
looks cool!
__________________
the mass of men live lives of quiet desperation if there is a problem, I can have it. new project WAYNE http://67-72chevytrucks.com/vboard/s...d.php?t=844393 |
|
|

|
|
|
#11 |
|
Registered User
Join Date: Nov 2013
Location: nanaimo, bc
Posts: 19
|
Re: '51 Hodge Podge
Thanks, I had a look through your thread and I enjoy the symbiosis of your builds. I imagine it's more cost effective that way, not to mention time saved hunting down parts. One day I'd like to try doing a swap with a Crown Vic chassis, keeping all the systems, and a TF body. It would take some planning tho, the missus gets annoyed with just one vehicle blown apart around the yard. Something about having to park on the street...
|
|
|

|
|
|
#12 |
|
Registered User
Join Date: Nov 2013
Location: nanaimo, bc
Posts: 19
|
Re: '51 Hodge Podge
Ok, what's next. I put the stock truck exhaust manifolds on and there was definitely a spatial conflict between them and the frame rails.
[IMG] 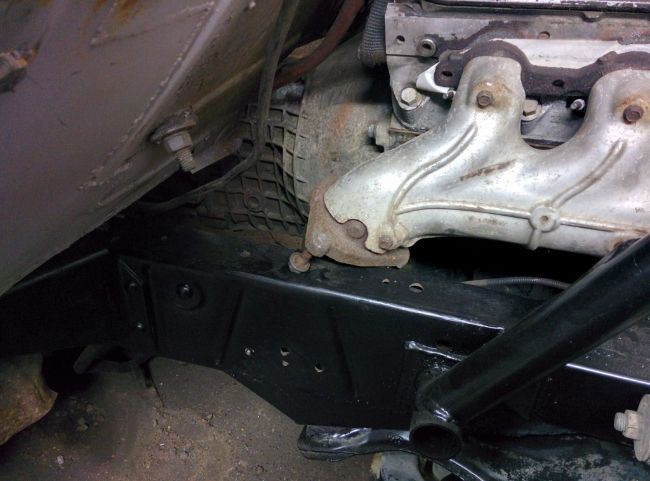 [/IMG] [/IMG]The drivers side is worse but nothing a little surgery couldn't cure. I also had to make a relief for the steering shaft, it protrudes about a 1/4" into the exhaust path. The drivers side will still flow better than the stock stock passenger side tho so I'm content with the way it turned out. I have no idea whether they'll hold up after a few heat cycles but they are currently crack free. I'll get some pics with them mounted as soon as the engine is back in. |
|
|

|
|
|
#13 |
|
Registered User
Join Date: Nov 2013
Location: nanaimo, bc
Posts: 19
|
Re: '51 Hodge Podge
I finally got around to doing some work on the firewall, a chore I was loathing since the beginning. Filled 83 holes, moved the steering column hole over an inch and welded on a backing plate for the brake booster.
I also test fit the cross member and trailing arms from a '71 c-10 and bolted up an 8.8 rear end from an Explorer. I'm not too sure what path I'll head down for the rear suspension. I'm leaning towards a basic shrader valve air bag set up. I like the idea of having adjustable spring rate as well as the ability to haul stuff on occasion. [IMG] 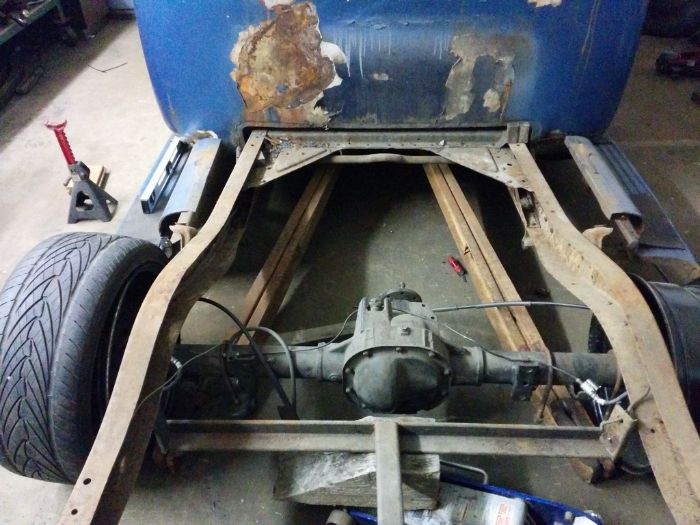 [/IMG] [/IMG]
|
|
|

|
|
|
#14 |
|
Registered User
Join Date: Nov 2013
Location: nanaimo, bc
Posts: 19
|
Re: '51 Hodge Podge
I've been slacking this week and haven't done a whole lot on the truck. I find that if my momentum slows on a build, I start working on something else so I decided to put the bed on to check the fit. I bought some 18x7.5" steel wheels a few months back from a Ford Escape, they have a fairly high positive offset that worked perfect on the front, not so much on the back. The bedsides fouled by about 3" each side so I had a go at flipping the barrels on the wheels.
[IMG] 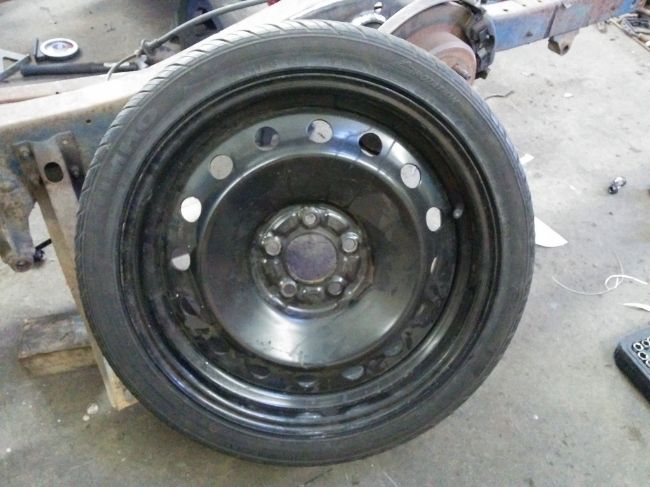 [/IMG] [/IMG][IMG] 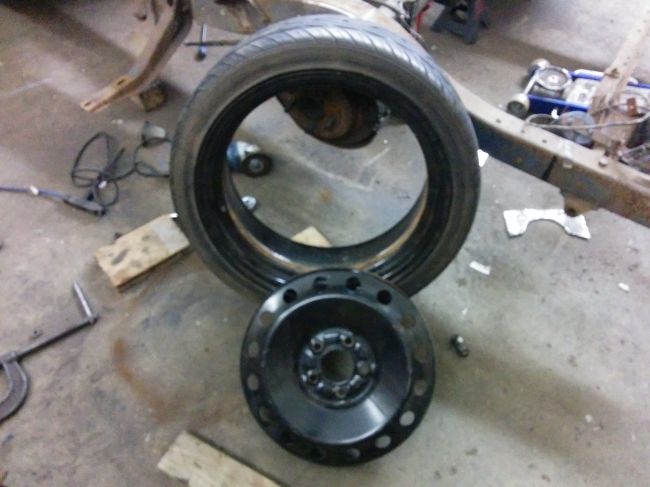 [/IMG] [/IMG][IMG] 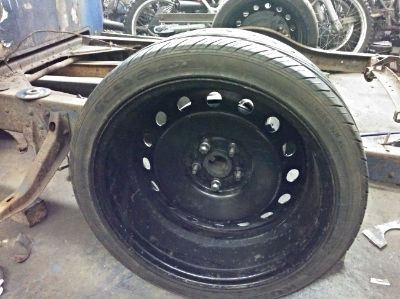 [/IMG] [/IMG]I should have about 1/2" of clearance to the fender if I measured right ( sometimes a crapshoot tho). I'll put the bed on tomorrow and see what's up. |
|
|

|
|
|
#15 |
|
Registered User
Join Date: Sep 2013
Location: Westminster, SC
Posts: 933
|
Re: '51 Hodge Podge
I have done the welding of the exhaust on the LS based engines. They are made of cast steel not iron, I have had no issues of cracking later.
__________________
My '47 C.O.E build |
|
|

|
|
|
#16 | |
|
Senior Member
 Join Date: May 2007
Location: Doodah Kansas
Posts: 7,747
|
Re: '51 Hodge Podge
Quote:
I like how you flipped the barrels, I was thinking of 18" camaro steels with reverse offset for the next one
__________________
the mass of men live lives of quiet desperation if there is a problem, I can have it. new project WAYNE http://67-72chevytrucks.com/vboard/s...d.php?t=844393 |
|
|
|

|
|
|
#17 | |
|
Registered User
Join Date: Feb 2013
Location: Fallbrook California
Posts: 245
|
Re: '51 Hodge Podge
Quote:
|
|
|
|

|
|
|
#18 |
|
Registered User
Join Date: Nov 2013
Location: nanaimo, bc
Posts: 19
|
Re: '51 Hodge Podge
That's good to hear. I did some quick research on it and it seems that the general consensus is if they don't crack when cooling than they should be fine. It's definitely a more pocket friendly option.
|
|
|

|
|
|
#19 |
|
Registered User
Join Date: Nov 2013
Location: nanaimo, bc
Posts: 19
|
Re: '51 Hodge Podge
That sounds like the perfect setup Joedoe. Our next house will definitely have an expansive yard, I'd love to have somewhere to park a trailer.
The 18" Camaro steelies would be a nice choice, I've only seen one set for sale and fella wanted $800 for them. I'm assuming they are more reasonable around your parts. |
|
|

|
|
|
#20 |
|
Registered User
Join Date: Nov 2013
Location: nanaimo, bc
Posts: 19
|
Re: '51 Hodge Podge
|
|
|

|
|
|
#21 |
|
Registered User
Join Date: Nov 2013
Location: nanaimo, bc
Posts: 19
|
Re: '51 Hodge Podge
I managed to put the box on yesterday to check the wheel offset and the wheelbase, quite the ordeal by yourself.
[IMG] 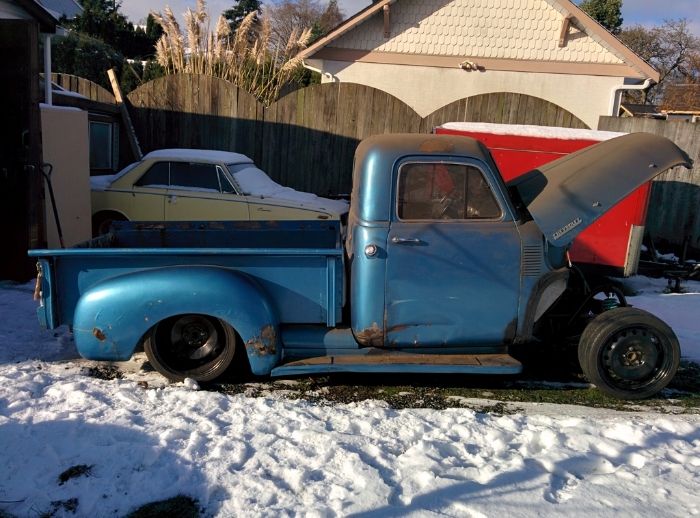 [/IMG] [/IMG]I'm happy with the way the wheels sit in the fenders so I trued up the centers and welded them in. Wound up with 5.5" of backspacing on the 7.5" rims. It gives me about 3/4" clearance on each side. Hopefully it will be enough with Heim joints on the panhard bar. [IMG] 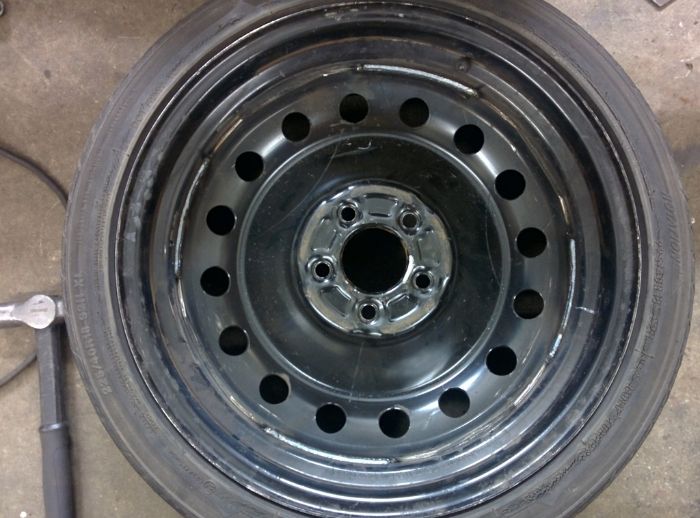 [/IMG] [/IMG]I also decided to put in a small notch in the frame. I used some 4" pipe and then I got ridiculous with the reinforcements. A 5/16" plate in the center of the frame over the notch, another on the outside of the frame and then boxed the inside as well. There is a thread on here where someone ran all the numbers and said that with the outside plate and the boxing plate, the frame would be as strong as original so I added one more to the equation just in case. I plan to use it as a truck on occasion. [IMG] 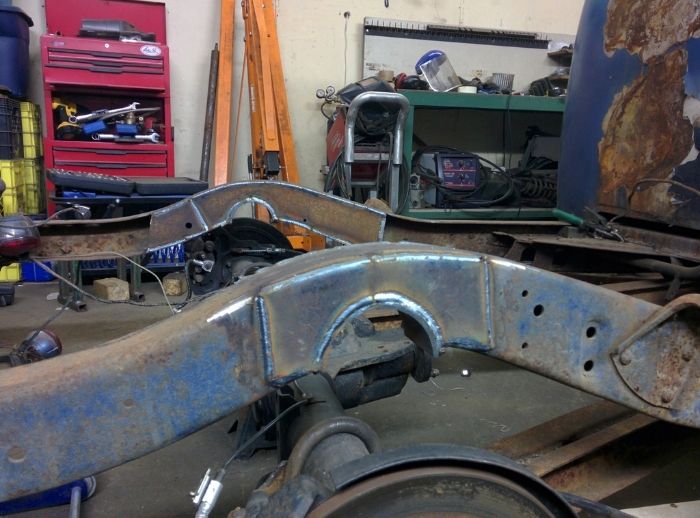 [/IMG] [/IMG]
|
|
|

|
|
|
#22 |
|
Senior Member
 Join Date: May 2007
Location: Doodah Kansas
Posts: 7,747
|
Re: '51 Hodge Podge
looks great!
__________________
the mass of men live lives of quiet desperation if there is a problem, I can have it. new project WAYNE http://67-72chevytrucks.com/vboard/s...d.php?t=844393 |
|
|

|
|
|
#23 |
|
Registered User
Join Date: Jul 2014
Location: Clear and Still Idaho
Posts: 509
|
Re: '51 Hodge Podge
Hodge
Ricer IFS? Welding wheel hubs? Just pushing your leg. The shock towers are good thinking, extra plate on the rear cut out. Overkill is under rated. Have you checked run-out on hub welding? Fun build lots of ideas. Keep on keepin on NC 
__________________
Been there, wrecked that 
|
|
|

|
|
|
#24 |
|
Registered User
Join Date: Feb 2013
Location: Fallbrook California
Posts: 245
|
Re: '51 Hodge Podge
Quote:
|
|
|

|
 |
| Bookmarks |
|
|