
|
 01-25-2016, 06:03 PM
|
#126 |
|
Senior Member
 Join Date: Mar 2013
Location: Ann Arbor, MI
Posts: 1,021
|
Re: Sarge's rattle-can rebuild
Nice work on the console. I've always just stuck civvy consoles in my M1009's and while they work, I like keeping the military look like you have so I may try this on my next one. A couple questions:
What is the ammo can designation? I like the size you chose. Do you have it centered between the seats or offset to the driver? |

|

|
|
01-25-2016, 06:26 PM
|
#127 | |
|
I know the pieces fit
Join Date: Nov 2007
Location: MONTGOMERY, AL
Posts: 5,523
|
Re: Sarge's rattle-can rebuild
Quote:
|
|
|
|
|
|
01-25-2016, 06:49 PM
|
#128 | |
|
I know the pieces fit
Join Date: Nov 2007
Location: MONTGOMERY, AL
Posts: 5,523
|
Re: Sarge's rattle-can rebuild
Quote:
|
|
|
|
|
|
02-20-2016, 03:41 PM
|
#129 |
|
I know the pieces fit
Join Date: Nov 2007
Location: MONTGOMERY, AL
Posts: 5,523
|
Re: Sarge's rattle-can rebuild
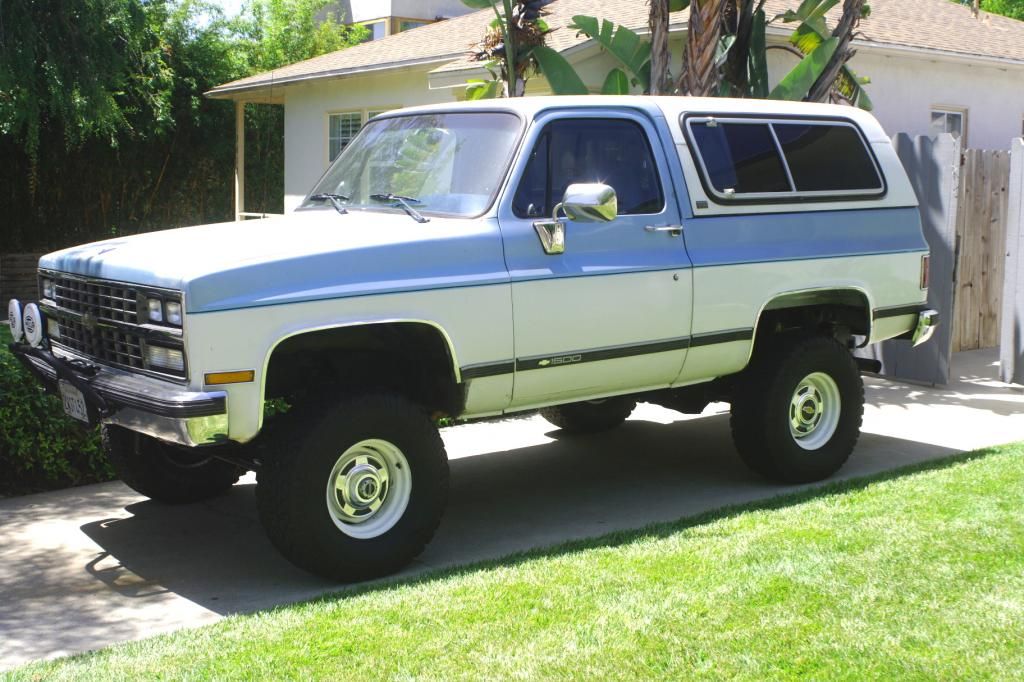
I finally finished this console and got it in the truck. When I left off I'd made the mounting brackets but I ended up having to fit them to the floor. The front legs had to be curved to fit the tranny hump, the rear legs got a relief cut so the mounting tabs could be rotated back to fit the floor flat. Then the reliefs needed filler pieces welded in. Then I got it where I wanted it in the truck and drilled the floor. At that point I could paint it and put it all together.
|
|
|
|
|
02-20-2016, 03:49 PM
|
#130 |
|
I know the pieces fit
Join Date: Nov 2007
Location: MONTGOMERY, AL
Posts: 5,523
|
Re: Sarge's rattle-can rebuild
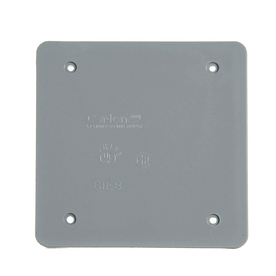
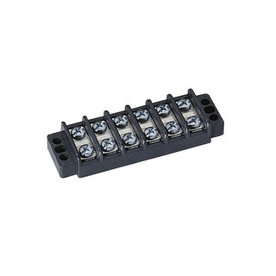
I'm sure this is all overkill but I didn't like the idea of a 14 gauge wire run from under the hood into a metal can, even though it'll be fused. So I cut a wood "floor" for the bottom of the console then put the junction box in like 48cj2a suggested. The box is pictured open but it does have the lid on it now and then the shelf added above it that is now the bottom of the usable storage space. The ammo can is 14" deep, I put 3" legs on the shelf to cut the functional space down to a more reasonable 11".
|
|
|
|
|
02-20-2016, 03:54 PM
|
#131 |
|
I know the pieces fit
Join Date: Nov 2007
Location: MONTGOMERY, AL
Posts: 5,523
|
Re: Sarge's rattle-can rebuild
I spent way too much time on the console, but it's done and turned out nice. The only thing I'm not 100% happy with is the arm rest pad, I had that done and honestly I think I could have done better. I made the base and have my own material, so the guy only charged me $15 to cover it. I won't be out much if I take it to someone and get it redone. But for now it'll do. I did add a stainless steel bow eye to the front of the box so it can be locked.
|
|
|
|
|
02-20-2016, 06:39 PM
|
#132 | |
|
Senior Member
Join Date: Apr 2009
Location: Lawrence KS
Posts: 821
|
Re: Sarge's rattle-can rebuild
Quote:
__________________
1981 Chevy C30 440 Holmes 42K one owner miles |
|
|
|
|
|
02-20-2016, 07:10 PM
|
#133 |
|
Registered User
Join Date: Dec 2009
Location: Fairbanks, AK
Posts: 1,830
|
Re: Sarge's rattle-can rebuild
Looks great nice work. Plenty of power now.
__________________
-Marcus 1991 V3500 L29 454 4L80E NP205 D60/14 Bolt 4.56's 1984 K30 292 TH400 NP205 D60/14 Bolt 4.56's flat bed 7'6" Meyer Plow 2022 Silverado 3500 L8T Project Daily Driver Project Heavy Hauler Project Plow Truck |
|
|
|
|
02-21-2016, 06:07 PM
|
#134 |
|
I know the pieces fit
Join Date: Nov 2007
Location: MONTGOMERY, AL
Posts: 5,523
|
Re: Sarge's rattle-can rebuild
Thanks guys I appreciate it. We used the truck today to take the dirt bikes riding, it was nice having the armrest on the trip. The boys were disappointed the chargers aren't plugged up yet but we'll get to it.
|
|
|
|
|
02-24-2016, 03:42 PM
|
#135 |
|
I know the pieces fit
Join Date: Nov 2007
Location: MONTGOMERY, AL
Posts: 5,523
|
Re: Sarge's rattle-can rebuild
Damn!t! Not good. Oh well. Hard to tell what happened in the picture because the paint is flat, but a limb fell on the cab and dented it up some including some metal damage into the windshield seal area plus busted the glass. I don't care nearly as much about the dent as not being able to get a new windshield and seal and just replacing them - the metal will have to be addressed first.
I am tempted to buy a stud welder and puller from Eastwood and trying my hand at fixing it. But I'd planned on getting it clear coated this spring anyway, so I'm going to take it to that guy tomorrow and see how much he wants to repair this too. No matter which one of us does it, the original paint will only be removed where a stud needs to be welded on. I can touch it up with rattle can primer and OD green. The truck will still be cleared satin/flat - that part I'm trusting him to figure out. |
|
|
|
|
02-24-2016, 04:08 PM
|
#136 |
|
Registered User
Join Date: Feb 2010
Location: Central, IL
Posts: 599
|
Re: Sarge's rattle-can rebuild
That sucks, but parts should not be hard to find!
GM Weatherstrip # is 471009 Perfect time to get a windshield with an antenna for a stereo too if you don't already have one. As for the paint hit it good with a pressure washer to knock off the nasty stuff build up from the elements, then use a scrub brush and some CLR before you clear it. It will look like new! by the way - Nice work on the Console Wiring!
__________________
03 Suburban Z71 Z71 98 GMC Yukon SLT 4x4 Yukon 86 M1009 CUCV Project Milverado 48 Willys CJ2A 48CJ2A |
|
|
|
|
02-24-2016, 05:08 PM
|
#137 |
|
I know the pieces fit
Join Date: Nov 2007
Location: MONTGOMERY, AL
Posts: 5,523
|
Re: Sarge's rattle-can rebuild
Thanks for the part number, I didn't think they'd still have those available. It won't be hard to work on with the windshield out. The dash pad is still out, so whoever does the work can sit on the metal dash to work the metal back. The windshield was already cracked and I need one with the antenna anyway, so this isn't as big a deal as it would be on a different truck. But it's still going to be time and money. The Eastwood stud kit is $270. I can't discount his expertise, but if I do it myself I'll still have the tools. We'll see what he says and go from there.
|
|
|
|
|
02-24-2016, 06:17 PM
|
#138 |
|
Registered User
Join Date: Dec 2010
Location: murray ky
Posts: 351
|
Re: Sarge's rattle-can rebuild
Man that does stink but it looks like you're trying to make lemonade so good luck with it.
|
|
|
|
|
02-24-2016, 10:21 PM
|
#139 |
|
I know the pieces fit
Join Date: Nov 2007
Location: MONTGOMERY, AL
Posts: 5,523
|
Re: Sarge's rattle-can rebuild
Thanks. It sucks, but it does give me an excuse to buy a stud welder kit. I kinda want to try to fix it myself but we'll see.
|
|
|
|
|
02-24-2016, 11:13 PM
|
#140 |
|
laying low
Join Date: Mar 2001
Location: Searcy, Ark. USA
Posts: 12,955
|
Re: Sarge's rattle-can rebuild
I hate that it happened but it's an excuse to pickup another power tool. It ain't all bad.

__________________
Boog 69 Chevy stepside, 358/T350, 4.11 posi, 4.5/4 drop, rallys, poboy driver primer is finer 91 Chevy sportside, Tahoe, Yukon & GMC Crewcab All GM..'nuff said. I stand for the flag and kneel at the cross |
|
|
|
|
02-24-2016, 11:26 PM
|
#141 |
|
I know the pieces fit
Join Date: Nov 2007
Location: MONTGOMERY, AL
Posts: 5,523
|
Re: Sarge's rattle-can rebuild
Funny thing is, on Trucks! TV last Sunday, one of the new guys was showing the basics of pulling dents with studs and a slide hammer and I was watching and thinking how much I'd like to own one and try that.
I guess that's the route I'm going. I'm not budgeted for this but maybe I can make it work. I'm dang sure not going to make an insurance claim. Alright then. Let's give it a whirl. |
|
|
|
|
03-06-2016, 09:01 PM
|
#142 |
|
I know the pieces fit
Join Date: Nov 2007
Location: MONTGOMERY, AL
Posts: 5,523
|
Re: Sarge's rattle-can rebuild
Anyone else perpetually riding the Time & Money Pendulum? This was one of those weekends where I had plenty of one and none of the other, you can probably guess which. That's OK, there's always something to catch up on. I'd shelved a few projects while it was so dang cold, one of them was my drivers side window regulator. When I did all the work to the vent windows and doors, the drivers side door window had a tight spot in it when you rolled it up, but only with the door panel on. Weird, right? I ended up bending the new regulator before I figured it out. Well, Boog figured it for me, he suggested I check the inner door shell. It was bowed in a bare smidge, but it was enough to bind up with all new seals on everything, including the door panels. I'd rolled the window up and left it there for the winter. I was able to bend the inner shell back with my hands, it wasn't easy but it didn't have to move much. I'd already ordered a new regulator, so I got that installed. I didn't take a picture of this earlier, but I'd bought a roll of plastic sheeting at Home Depot and used it to line inside the doors. And I didn't take a picture, but I also replaced the foam strip at the lower inside of the door panel. Drivers side works well now.
|
|
|
|
|
03-06-2016, 09:24 PM
|
#143 |
|
I know the pieces fit
Join Date: Nov 2007
Location: MONTGOMERY, AL
Posts: 5,523
|
Re: Sarge's rattle-can rebuild
I'd bought a bull bar from Irish1941, here's a pic of it on his truck:
 But it wouldn't work on my truck due to the lift shackles. I had to change up the legs to make it fit my truck. The first pic shows the main hoop mounted after 2" have been sectioned out of each side, in the second pic I've mounted the two other legs to the front of the bumper instead of the top so I can tack them to the main hoop. Irish1941 had changed it from two lights to three before I bought it, last pic I've positioned two tabs to tack on. |
|
|
|
|
03-06-2016, 09:31 PM
|
#144 |
|
I know the pieces fit
Join Date: Nov 2007
Location: MONTGOMERY, AL
Posts: 5,523
|
Re: Sarge's rattle-can rebuild
Next pic, it's all welded up and ready for paint, and the last pic it's on the truck. Notice that windshield hasn't fixed itself.
|
|
|
|
|
03-07-2016, 01:04 AM
|
#145 |
|
Registered User
Join Date: Dec 2009
Location: Fairbanks, AK
Posts: 1,830
|
Re: Sarge's rattle-can rebuild
Looking good. I did something similar sealing my doors on the crew cab. Weather looks nice.
__________________
-Marcus 1991 V3500 L29 454 4L80E NP205 D60/14 Bolt 4.56's 1984 K30 292 TH400 NP205 D60/14 Bolt 4.56's flat bed 7'6" Meyer Plow 2022 Silverado 3500 L8T Project Daily Driver Project Heavy Hauler Project Plow Truck |
|
|
|
|
03-08-2016, 12:35 PM
|
#146 |
|
I know the pieces fit
Join Date: Nov 2007
Location: MONTGOMERY, AL
Posts: 5,523
|
Re: Sarge's rattle-can rebuild
Thanks man. These doors are notorious for wearing and shutting poorly but they shut and sound like new with just a little attention in the right spots.
|
|
|
|
|
04-12-2016, 10:10 PM
|
#147 |
|
I know the pieces fit
Join Date: Nov 2007
Location: MONTGOMERY, AL
Posts: 5,523
|
Re: Sarge's rattle-can rebuild
Alright then, back to the windshield damage. I did not take enough pics to properly document what damage happened. The limb that fell had a curve in it, so it left two dents. One over the passenger side, but back from the windshield. That was probably the heavy end of the limb. It went deep enough to dent the inner cab shell, and when it popped that inner dent, it hit the vanity mirror on the visor and shattered it. I pushed up on the inner dent in the cab, it popped back into position. The second dent on top of the cab curved from the top and across the windshield gasket and made the mess I consider more serious - leaky windshields not allowed, especially when we have to buy a new one.
So, on to the pics. The first one is the damage as I found it, front view. You can see how the cab crown is mashed in on the passenger side. The second pic is terrible, but it's where I'd marked the perimeter of both dents with a yellow crayon. With flat paint, you can't see the edges of the dent even in person so I'm doing my Helen Keller bit, feeling with one hand and tracing with the other to outline my work area. Unfortunately, when I took the pic I was holding the camera up and couldn't see too good, so half the second dent is cut out of the pic. More pics to come though. |
|
|
|
|
04-12-2016, 10:31 PM
|
#148 |
|
I know the pieces fit
Join Date: Nov 2007
Location: MONTGOMERY, AL
Posts: 5,523
|
Re: Sarge's rattle-can rebuild
I did get a stud welder but not from Eastwood. Harbor Freight had one that had forty-something reviews and a 4.5 star rating on sale for $109 with the slide hammer. Good enough for me. I'm no body guy, no shape/no how, but I don't mind trying. Plus we've all watched a million builds over the years on TV and elsewhere - that doesn't equate into experience or make me an expert. But we've seen this done many times and I've got a truck here that doesn't need a perfect repair, it just needs to be repaired. Anyway, that's how I talked myself into this foolishment. On to the pics.
In the next few pics you can see where I've used an angle die grinder and roloc disk to remove the paint where I think I need a stud, welding studs, using the slide hammer, and removing studs. In the last pic, that's of my work space. I've got a blanket on the dash/cowl to sit on with the windshield out, so it's not awkward work. |
|
|
|
|
04-12-2016, 10:47 PM
|
#149 |
|
I know the pieces fit
Join Date: Nov 2007
Location: MONTGOMERY, AL
Posts: 5,523
|
Re: Sarge's rattle-can rebuild
And you keep at it until all of the concave dents are gone. The crown is back up there where it needs to be and the lip at the windshield is straight again. Bad pic, but it's straight. I did create some high spots that I need to tap back down. Last pic? Don't get carried away with the slide hammer if you have meat hooks for hands - it will take a bite.
Rain showed up so I pulled a tarp over it. But I got a 1 lb Bondo kit at the local Zone, so I am going to try giving it a skim coat and blocking it before paint repair. Also, I found two rust holes under the windshield gasket. I'm a total newb at welding but it's fun so I'm going to try repairing those myself as well. |
|
|
|
|
04-13-2016, 06:46 AM
|
#150 |
|
Registered User
Join Date: Feb 2010
Location: Central, IL
Posts: 599
|
Re: Sarge's rattle-can rebuild
Pictures don't do it justice but nice work and you got to dabble in something new too!
__________________
03 Suburban Z71 Z71 98 GMC Yukon SLT 4x4 Yukon 86 M1009 CUCV Project Milverado 48 Willys CJ2A 48CJ2A |
|
|
|
 |
| Bookmarks |
|
|


 Linear Mode

